Network Topology
Overview
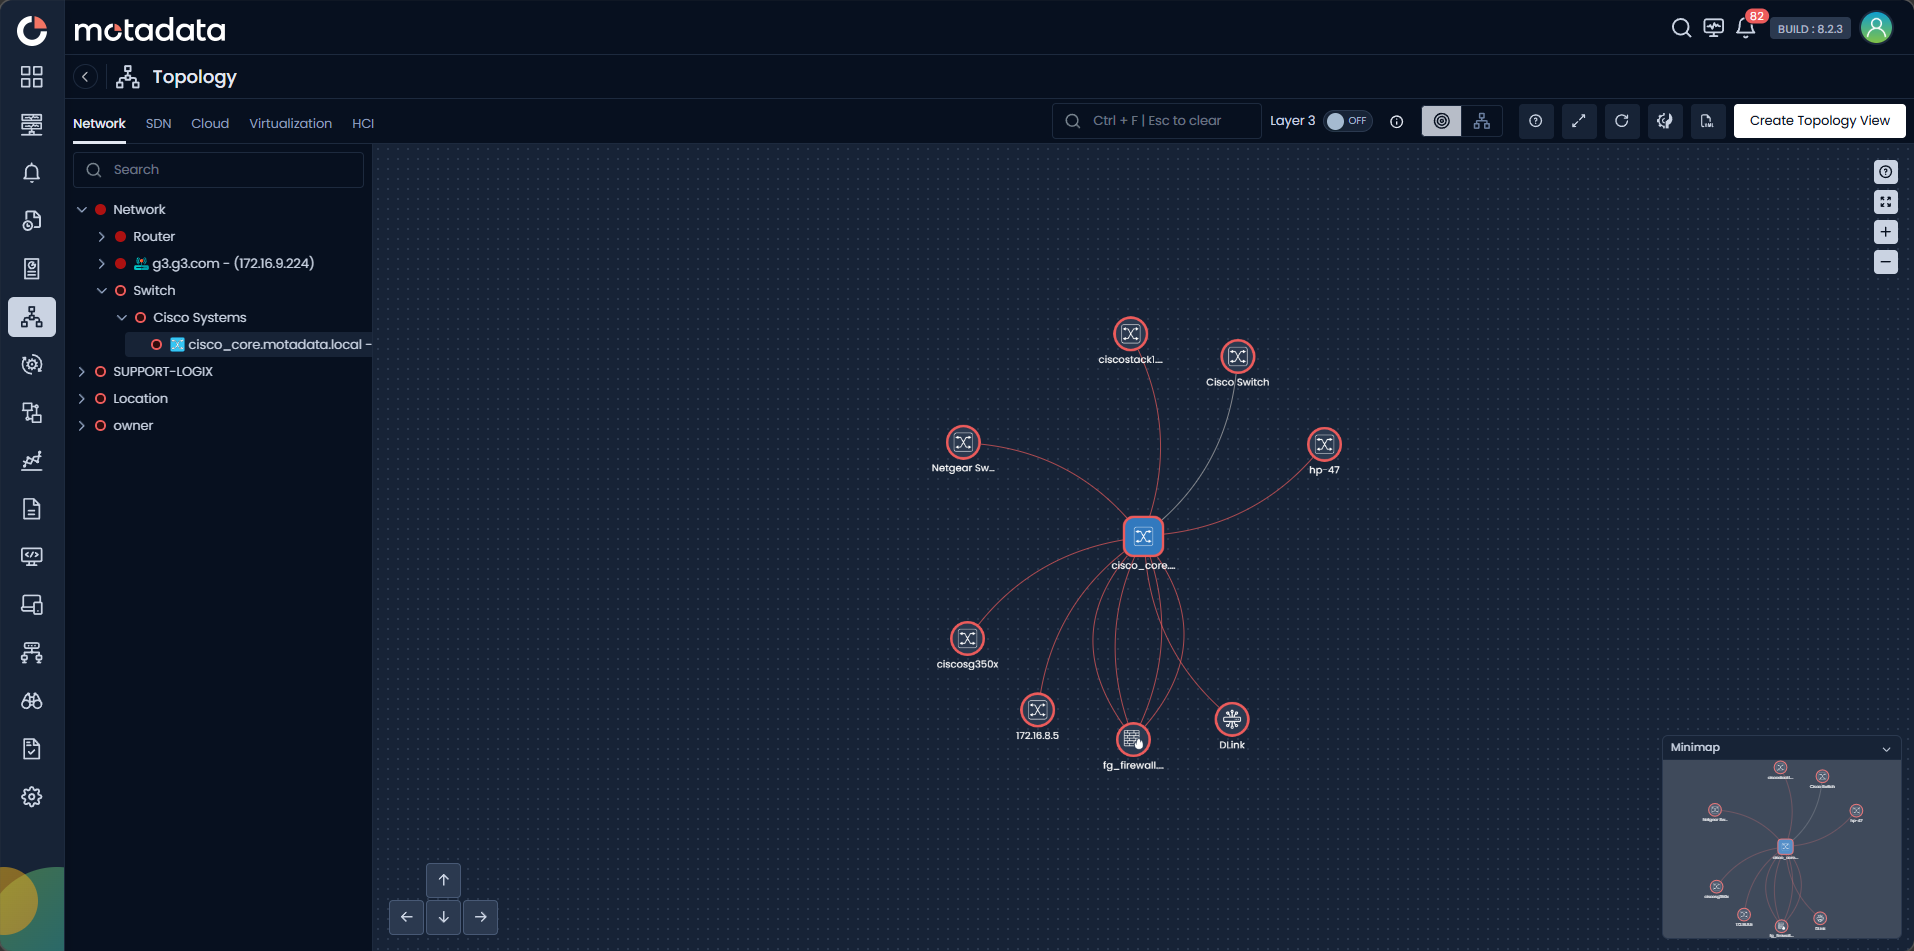
The network topology page in Motadata ObserveOps (formerly known as AIOps) provides a comprehensive visual representation of your network infrastructure, enabling you to understand the interconnections and interdependencies between network devices. By displaying the relationships between switches, routers, firewalls, and other network components, the topology map helps you identify issues and quickly resolve them.
Pre-requisites for a Network Device to be Detected in a Topology Map
The device should be discovered and configured as a monitor in the system.
All the devices need to be configured to be able to communicate with either an L2 (CDP, LLDP, SPM) or an L3 (OSPF, BGP, ISIS) protocol.
Protocols Supported for Topology Creation
The protocols supported for creating a topology map of a network device are:
Layer 2 protocols
- Cisco Discovery protocol
- Link Layer Discovery protocol
- Switch Port Mapping protocol
Layer 3 protocols
- Open Shortest Path First protocol
- Border Gateway protocol
- Intermediate System to Intermediate System protocol
Creating Network Topology in Motadata ObserveOps
The creation of a topology map for network devices in Motadata ObserveOps starts with the execution of a Topology Scan scheduler. This process begins from a seed point device, which is provided by the user in the scheduler. Once the scheduler starts executing the topology creation job in the background, Motadata ObserveOps uses the appropriate neighbor discovery protocols on the starting point device to find the peer nodes, identify the interface connection between the two devices and build the Topology map.
The creation of a Topology Map for network devices starts with the execution of a Topology Scan scheduler. The Topology creation starts from one node and moves on to find the peer nodes and the process goes on till the map is created.
Let us see in detail how this process works.
User creates a topology scan scheduler and specifies the entry point or the seed device around which they want to create the topology.
The Topology creation job is executed in the back end as per the schedule. ObserveOps uses the appropriate neighbor discovery protocol on the seed device to find the peer(s) connected to it.
The interface connection between the seed device and the peer device is identified and this relation is then stored in a file known as ‘Dependency Map’ in the back end. These relations could be seen at the UI level at Settings > ObserveOps > Parent Child Dependency Mapper
ObserveOps then uses the neighbor discovery protocols recursively to create the topology map
The navigation panel is created based on the seed device selected for creating the Topology. i.e., the seed devices are present on the navigation panel to view the Topology created for that device.
Now, let us see how to schedule a topology scan in the next section.
Navigation
Go to Menu, Select Settings ![]() . After that, Go to Monitor Settings
. After that, Go to Monitor Settings ![]() . Select Topology Scanner. The page to configure the topology scan scheduler is now displayed.
. Select Topology Scanner. The page to configure the topology scan scheduler is now displayed.

Select ![]() to start creating a scheduler for network topology. A pop-up asking for scheduler details is displayed.
to start creating a scheduler for network topology. A pop-up asking for scheduler details is displayed.

Topology Scan Scheduler
Enter the details in the pop-up to create the scheduler as follows:
| Field | Description |
|---|---|
| Entry point | Select the entry point around which you want to build the topology. The topology scan runs with this point as a starting point, querying this device, subsequently drawing the links from this device to other connected devices, and showing the connectivity of all the devices on your infrastructure. |
| Scheduler Type | Select the frequency (Once, Daily, Weekly, and Monthly) at which you want the Topology scan to run. |
| Start Date | Select the date on which the topology scan should start. |
| Hours | Select the time at which the topology scan should start. |
| Days | Select the days on which the topology scan should run. This parameter is available only when you select the Scheduler Type as Weekly. |
| Months | Select the months in which the topology scan should run. This parameter is available only when you select the Scheduler Type as Monthly. |
| Dates | Select the dates on which the topology scan should run. This parameter is available only when you select the Scheduler Type as Monthly. |
| Link Layer | Select the layer (L2 or L3 or both) at which you want the topology map to be built. |
| Protocol | The Protocol will be auto-selected based on the Link Layer you have selected in the previous option. You can change the selected protocols once you have specified the Link Layer. |
| Notify Teams | Enter the email addresses, username, handle, or user profile that should receive a notification when the topology scan starts. |
Select the Create Scheduler button to create the scheduler with the values entered.
Select the Reset button to erase all the current field values, if required.
Once the topology scan runs on the scheduled time and is executed successfully, the topology map will be created and available to view on the topology screen.
You can also run a scheduler instantaneously from the Topology Scanner screen by clicking on ![]() for the scheduler you want to run.
for the scheduler you want to run.
Create Topology View
From the Network Topology screen, you can also create a topology view for the slected topology map. The Create Topology View option displays in the top right screen only for the seed topology displayed in the left side panel.
Clicking the Create Topology View button, you can filter the monitors for the selected topology and configure the topology view. This helps you organize the topologies into the required groups.

| Field | Descripiton |
|---|---|
| Topology Name | Provide the topology name you want to display in the list. |
| Topology View Group | Name the group to organize this topology view under a defined standalone or key-value label for better classification and access. |
| Include/ Exclude | Select whetear you want to include or exclude the monitor filter and its associated values to be selected from the next option. |
| Monitor Filter | Select filter from the list. i.e., Tag, Group, IP and IP Range. Selecting any option, it allows you to select the associated value(s) from the respective opitons. i.e., Select Tags, Select Groups, Enter one or more IPs and Enter one or more IP Ranges. |
| Security | Select security type either Public or Private. If you select the security to Private you can Share it With associated Users or User Profiles, selecting from the respective drop-downs. |
Then, click the Create Topology View and proceed further. The added topology view gets listed in the left side panel under the gorup name you provided.
Creating a network topology map helps you visualize complex networks in a comprehensive manner and better understand the hierarchy of your infrastructure components. It enables you to view the complete IT infrastructure, monitor the status of network components, and identify network elements causing any issue. In addition, topology maps are dynamic and updated when actual components in your infrastructure change, making it easier to find and resolve issues in your infrastructure.