Installing the Discovery Agent
Discovery agents are lightweight programs that scan your IT infrastructure to provide comprehensive visibility into your hardware, software, and system configurations.
This guide covers the installation of the standalone Discovery Agent on Windows, Linux, and macOS systems. This agent's primary function is to collect and transmit asset information to the ServiceOps portal, which is essential for effective asset, patch, and package management.
Starting from Agent version 8.7.4, the Discovery and RDP Agents have been unified into a single agent. The separate Discovery Agent and RDP Agent guides are applicable only up to version 8.7.3. For agent installation instructions, refer to the Discovery Agent page.
Prerequisites
Before installing discovery agents, ensure your system meets the following requirements:
System Requirements
Windows Systems
- Operating System: Windows 8 and above versions
- Architecture: 32-bit and 64-bit supported
- Dependencies:
- .NET version 4 and above
- Microsoft Visual C++ Redistributable for Visual Studio 2015, 2017, 2019, and 2022
Linux Systems
Supported Distributions:
Ubuntu RedHat Zorin CentOS Mint OpenSuse SUSE Debian Solaris Oracle Rocky OS Fedora Almas OS
- Permissions: Root access required
- Dependencies: sudo must be installed
macOS Systems
- Operating System: macOS 10.15 and above
- Permissions: Root access required
Required Information
You'll need the following information from your ServiceOps portal:
- ServiceOps Server URL: Your ServiceOps portal URL
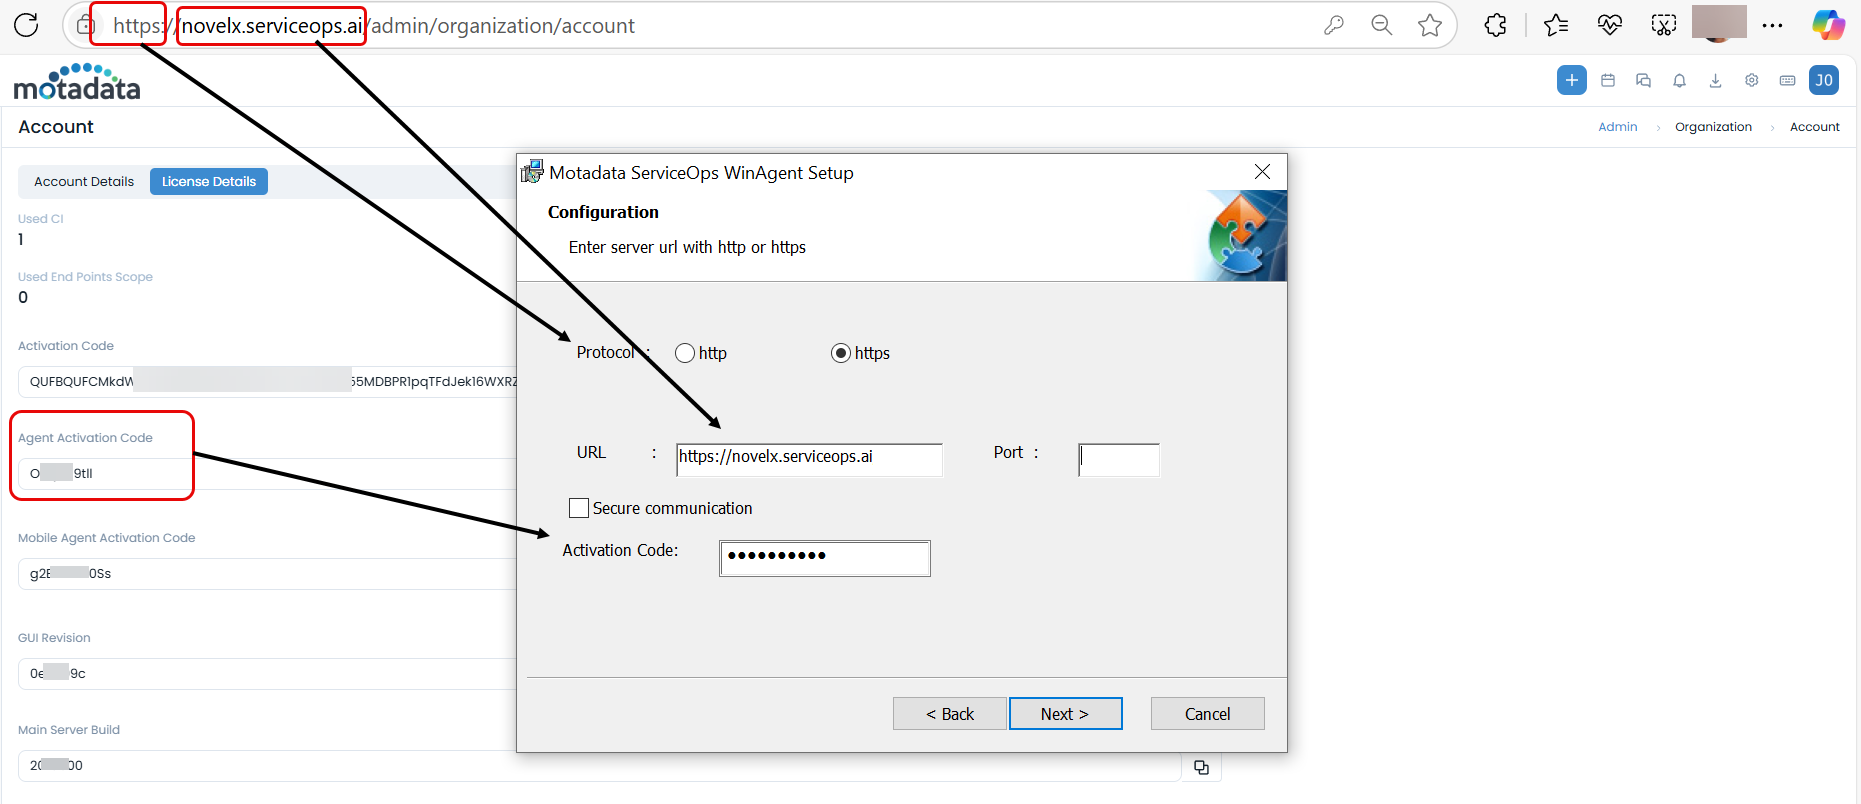
- Activation Code: Available in Admin > Organization > Account > License Details
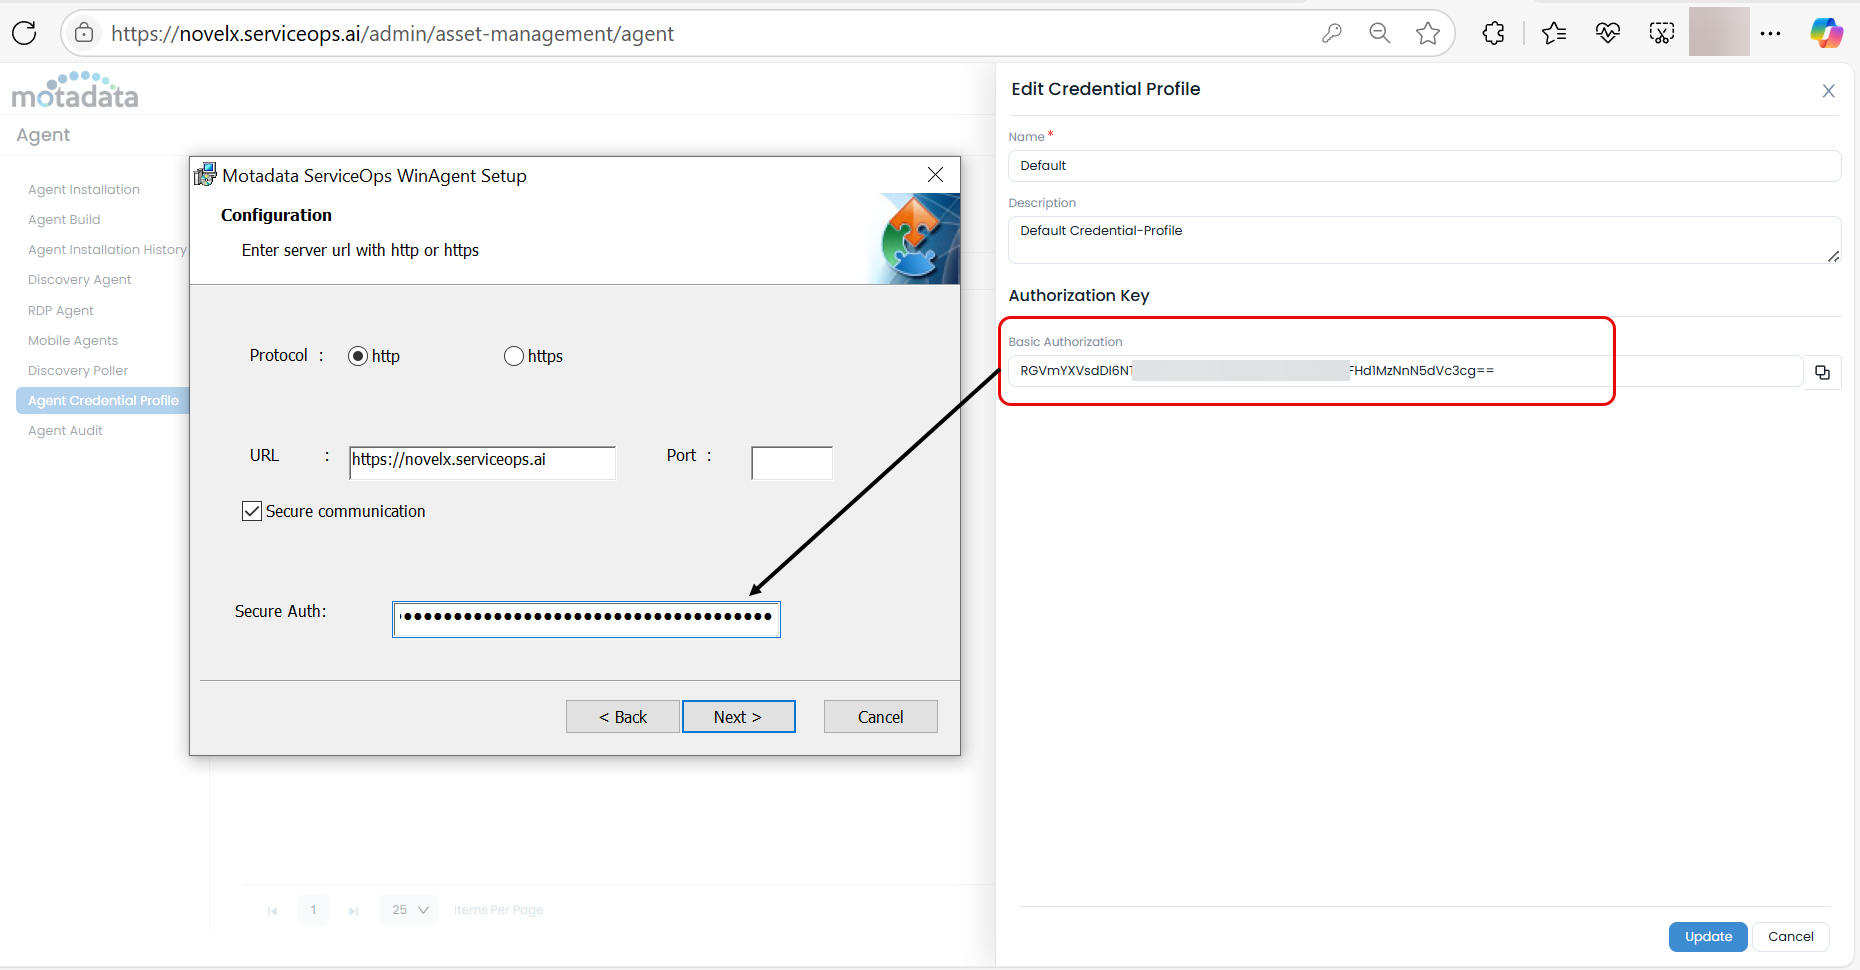
- Secure Auth Code: Available in Agent Credential Profile settings
- Protocol: HTTP or HTTPS (depending on your configuration)
- Agent-based discovery is supported for Windows 7 and Windows Server 2008 endpoints
- Windows discovery and RDP agent auto-upgrade is supported from v8.4.504 onwards
- Linux and Mac agent auto-upgrade is supported from v8.4.3 onwards
- The Auto-Upgrade feature does not support Combined Agents (Discovery + RDP). To auto-upgrade the Discovery and RDP agents, upload them separately
- The communication will stop if the Agent Credential Profile is deleted or archived from the portal
Installation Methods
ServiceOps provides multiple options for installing discovery agents. Choose the method that best suits your environment:
- Windows
- Linux
- macOS
Windows Discovery Agent Installation
Prerequisites
Before you begin, please ensure:
- File sharing should be allowed.
- UAC (User Access Control) should be allowed in the Registry Editor from the path: Computer\HKEY_LOCAL_MACHINE\SOFTWARE\Microsoft\Windows\CurrentVersion\Policies\System\LocalAccountTokenFilterPolicy.
- Add a folder (C:\Users\Public) in the Exclusions section under Virus and Threat Protection Settings.
- Exclude RemComSvc.exe file from any Anti-Virus settings.
- If Firewall is on, allow the below Inbound Rules:
- Windows Management Instrumentation (DCOM-In) (Private, Public)
- Windows Management Instrumentation (DCOM-In) (Domain)
- Windows Management Instrumentation (WMI-In) (Private, Public)
- Windows Management Instrumentation (WMI-In) (Domain)
- Remote Service Management (NP-In) (Private, Public)
- Remote Service Management (NP-In) (Domain)
- Bypass the pattern-executor.exe file in the Antivirus application
- Allow the download and execution of .exe files from the Firewall and Antivirus rules.
If the agent does not get installed after fulfilling the above prerequisites, reboot the machine, and try again to install the agent.
Step 1: Download the Agent
- Navigate to the Download Links section in your ServiceOps documentation
- Download the latest Windows discovery agent (
.msi) file - Choose the appropriate version (32-bit or 64-bit) for your system
Step 2: Run the Installation
- Run the
.msifile with administrator rights - The User Access Control popup will appear - click Yes to continue
- Follow the installation wizard

Step 3: Configure Connection Settings
- Click Next to proceed with the installation
- Enter the following details:
- URL: Your ServiceOps server URL
- Port: Leave blank for default ports, or enter specific port (443 for HTTPS)
- Protocol: Select HTTP or HTTPS based on your configuration

Step 4: Enter Authentication
Choose one of the following authentication methods:
For Upgrade Scenarios
- Secure Communication: Enter the Secure Auth key from Agent Credential Profile
- Activation Code: Enter the activation code from License Details
For New Installations
- Secure Communication: Enter the Secure Auth key from Agent Credential Profile.
- Activation code feature will not work for new installations.
Step 5: Complete Installation
- Click Install to begin the installation process
- Wait for the installation to complete
- Click Finish when the wizard completes

Step 6: Verify Installation
- Check that the agent appears in Programs and Features
- Verify the agent service is running
- Confirm the agent appears in your ServiceOps portal


Ports 8730 and 8731 are used for communication between the Agent service and notification utility.
Linux Discovery Agent Installation
Step 1: Download the Agent
- Navigate to the Download Links section in your ServiceOps documentation
- Download the latest Linux discovery agent file
- Choose the appropriate version (32-bit or 64-bit) for your system
Step 2: Navigate to Download Directory
- Open terminal on your Linux machine
- Navigate to the directory where you downloaded the file:
cd /path/to/download/directory

Step 3: Set File Permissions
- Check and set execute permissions for the agent file:
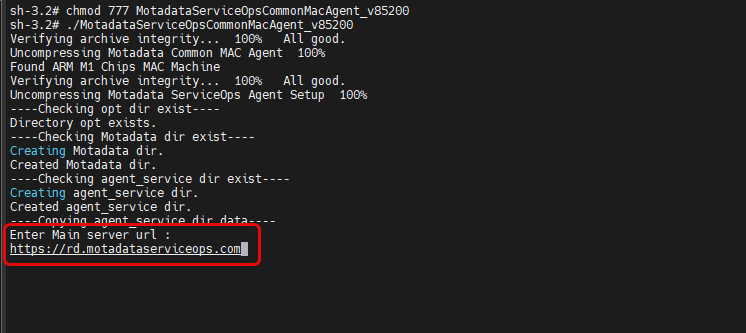
chmod 777 MotadataServiceOpsCommonAgent

Step 4: Run the Installation
- Execute the agent file:
./MotadataServiceOpsCommonAgent

Step 5: Configure Connection
- Enter the ServiceOps server URL when prompted.

- Enter the secure code or activation code when prompted. You can get the activation code from the Motadata ServiceOps portal in Admin > Account (under Organization) and Secure Code from the Admin > Discovery and Agents > Agents > Agent Credential Profile tab.
Here, enter either the Activation Code or Secure Auth code based on the type of installation, i.e. upgrade or fresh/new installation.
In case of Upgrade Scenario,
If you are upgrading the ServiceOps application from v8.5.0 to 8.5.1, you can use either of the the below two options to establish communication with the Agent. They are:
Secure Communication: Enter the "Secure Auth" key generated from the Admin > Discovery and Agents > Agents > Agent Credential Profile tab, if enabled. Once enabled, you cannot use the activation code.

Activation Code: Enter the activation code to continue using the less secure method. You can get the activation code from the Motadata ServiceOps portal in Admin > Organization > Account > License Details tab.

In case of New Installation Scenario:
When the application is installed for the first time, select the "Secure Communication" option and enter the Secure Auth key generated from the Admin > Discovery and Agents > Agents > Agent Credential Profile tab. Here, the activation code feature will not work.
noteThe communication will stop if the Agent Credential Profile is deleted or archived from the portal. In such a situation, you can either restore the credential profile or create a new one and then use it for agent installation.

- A successful Installation prompt would be seen as below:

Step 6: Verify Installation
- Check the agent service status:
sudo systemctl status motadata_serviceops.service

macOS Discovery Agent Installation
Step 1: Download the Agent
- Navigate to the Download Links section in your ServiceOps documentation
- Download the latest macOS discovery agent file
Step 2: Set File Permissions
- Open terminal and navigate to the download directory
- Set execute permissions:
sudo chmod 777 MotadataServiceOpsCommonMacAgent

Step 3: Run the Installation
- Execute the agent file with sudo:
sudo ./MotadataServiceOpsCommonMacAgent

Step 4: Configure Connection
- Enter the ServiceOps server URL when prompted
- Enter the secure code or activation code when prompted

Step 5: Verify Installation
- Check that the installation completed successfully
- Verify the agent appears in your ServiceOps portal

Post-Installation Verification
Check Agent Status
- Windows: Check Services app for the agent service
- Linux: Use
systemctl status motadata_serviceops.service - macOS: Check LaunchDaemons for the agent service
Verify Portal Registration
- Log into your ServiceOps portal
- Navigate to Discovery > Agents
- Verify your agent appears in the list
- Check that the agent status shows as "Online"
Test Discovery
- After installation, allow time for the agent to complete its initial discovery cycle (typically runs every 60 minutes, or can be manually triggered from the ServiceOps portal if available).
- Check that assets are being discovered
- Verify asset information in the Hardware Assets section
Troubleshooting Common Issues
Installation Issues
- Problem: Permission denied during installation
- Solution: Ensure you're running with appropriate permissions (admin/root)
Connection Issues
- Problem: Agent cannot connect to ServiceOps server
- Solution: Verify URL, port, and network connectivity
Authentication Issues
- Problem: Invalid activation code or secure auth key
- Solution: Double-check the codes from your ServiceOps portal
Service Issues
Problem: Agent service not starting
Solution:
- Check the agent logs at the installation path for your OS:
- Windows:
C:\Program Files (x86)\Motadata\winagent_service - Linux:
/opt/Motadata/ - macOS:
/opt/Motadata/
- Windows:
- Verify the agent configurations (server URL, port, protocol, and authentication credentials) and confirm all required dependencies are present.
- If the issue is not resolved, check the system logs for your OS:
- Windows: Open Event Viewer and look for errors under Windows Logs > Application
- Linux: Run
journalctl -u motadata_serviceops.serviceto view service logs - macOS: Open Console.app or run
log showto inspect system-level errors
- Check the agent logs at the installation path for your OS:
Firewall Issues
- Problem: Communication blocked
- Solution: Configure firewall rules to allow bidirectional communication for required ports (8730, 8731, 8090).
Uninstallation
Windows Agent
- Use Programs and Features to uninstall
- Or use the command line:
msiexec /x [agent-msi-file] /quiet - Once the agent is uninstalled, delete the agent directory (WinAgent) from the path
C:\ProgramData\Motadata.
Linux Agent
sudo systemctl stop motadata_serviceops.service
sudo systemctl disable motadata_serviceops.service
sudo rm -rf /etc/systemd/system/motadata_serviceops.service
sudo rm -rf /opt/Motadata/
macOS Agent
Open Terminal and follow the below mentioned commands:
Stop Agent Service:
sudo launchctl unload /Library/LaunchDaemons/com.motadataserviceops.agent.plist
Remove Agent Service:
sudo rm /Library/LaunchDaemons/com.motadataserviceops.agent.plist
Delete Agent dir:
sudo rm -rf /opt/Motadata

Configuration Best Practices
Follow these best practices to ensure optimal performance, security, and reliability of your discovery agents.
- Network Configuration
- Security Considerations
- Performance Optimization
- Ensure agents can communicate with the ServiceOps server
- Configure appropriate firewall rules
- Use HTTPS for secure communication when possible
- Keep activation codes and secure auth keys confidential
- Regularly update agents to match your ServiceOps version
- Monitor agent logs for security issues
- Deploy agents during low-usage periods
- Monitor system resources during discovery operations
- Configure appropriate discovery schedules
Next Steps
After successfully installing the Agent for Discovery, follow the steps below to configure the agent:
- Configure Discovery Settings: Set up network ranges and scan schedules
- Monitor Discovery: Verify that assets are being discovered correctly
- Set Up Alerts: Configure notifications for discovery events
- Deploy Additional Agents: Install agents on remaining target machines
Related Topics
- Windows Poller Installation: For Windows-based Poller installation
- Linux Poller Installation: For Linux-based Poller installation
- RDP Agent Installation: For remote desktop access agents
- System Requirements: For detailed system requirements