Agent Bulk Installation via Utility
The Remote Agent Installer utility provides a powerful solution for deploying ServiceOps agents across multiple machines simultaneously, supporting Windows, Linux, and macOS environments with flexible IP range configuration and LDAP integration.
The Remote Agent Installer utility allows you to install and uninstall agents from multiple machines that fall within a configured IP range. This tool is particularly useful for network administrators who need to deploy agents across large environments without individual machine access. Once installed, you can discover the agents and perform required operations on them.
Prerequisites
Before using the Remote Agent Installer utility, ensure your environment meets the following requirements:
System Requirements
- Host Machine: Windows 8 and above versions
- Target Machines:
- Windows 8 and above (32-bit and 64-bit)
- Linux (32-bit and 64-bit)
- macOS (Intel and M1 processors)
- Dependencies:
- .NET version 3.1 and above
- Microsoft Visual C++ 2015 and above (Windows targets)
Network Requirements
- Remote Access: Target machines must be accessible from the host machine
- Network Connectivity: All machines should be in the same network
- File Sharing: Must be allowed on the network
- Administrative Access: Local administrator rights on target machines
Pre-Deployment Prerequisites
For remote agent bulk installation using the utility, fulfill the following prerequisites:
File Structure Setup
- Exes Folder: Create an
exesfolder in the utility directory (if not present) - File Accessibility: The exes folder must be accessible to all machines within the network
- File Naming: Files in the exes folder must be named according to the format specified in
MSI_FileName_Example.txt - Agent Files: Required agent files should be stored in the exes folder
Security Configuration
- Antivirus Exclusions:
- Exclude
RemComSvc.exefrom any Anti-Virus settings - Add
C:\Users\Publicto Virus and Threat Protection exclusions - Bypass
pattern-executor.exefile in the Antivirus application
- Exclude
- Firewall Rules: Allow the following Inbound Rules:
- Windows Management Instrumentation (DCOM-In) (Private, Public)
- Windows Management Instrumentation (DCOM-In) (Domain)
- Windows Management Instrumentation (WMI-In) (Private, Public)
- Windows Management Instrumentation (WMI-In) (Domain)
- Remote Service Management (NP-In) (Private, Public)
- Remote Service Management (NP-In) (Domain)
- File Execution: Allow download and execution of .exe files from Firewall and Antivirus rules
Registry Configuration (Workgroup Machines)
If the target machine is in a Workgroup and not in an AD server, update the Registry setting:
- Open the Registry Editor
- Navigate to:
Computer\HKEY_LOCAL_MACHINE\SOFTWARE\Microsoft\Windows\CurrentVersion\Policies\System - Add a new DWORD (32-bit value)
- Name it as
LocalAccountTokenFilterPolicy - Set the value as
1
If the agent does not get installed after fulfilling the above prerequisites, reboot the machine and try again to install the agent.
Understanding the Remote Agent Installer
What is the Remote Agent Installer?
The Remote Agent Installer is a utility provided by Motadata ServiceOps that enables bulk deployment of agents across multiple machines. It supports installation and uninstallation of agents on Windows, Linux, and macOS systems.
Key Features
- IP Range Support: Install agents across a range of IP addresses
- Multi-Platform Support: Windows, Linux, and macOS agent deployment
- LDAP Integration: Use LDAP for Windows machine discovery
- CSV Import: Import machine details from CSV files
- Real-time Status: Monitor installation progress in real-time
- Bulk Operations: Install or uninstall agents in bulk
Error Codes and Troubleshooting
If agent installation fails, the utility will display error codes with the following meanings:
Return Codes
- (-1): Incorrect parameters of target machine
- (-2): Malformed credentials of target machine
- (-3): Invalid target name
- (-4): Bad credentials of target machine
- (-5): Could not connect to target machine
- (-6): Error copying executable file in target machine
- (-7): Error copying service in target machine
- (-8): Error executing service in target machine
- (-9): Error connecting to remote service of target machine
Installation Process
Step 1: Download the Utility
- Download the RemoteAgentInstaller.zip file on a computer with Internet connection
- Extract the ZIP file to a local directory
- Run the
RemoteAgentInstaller.exefile with administrator rights
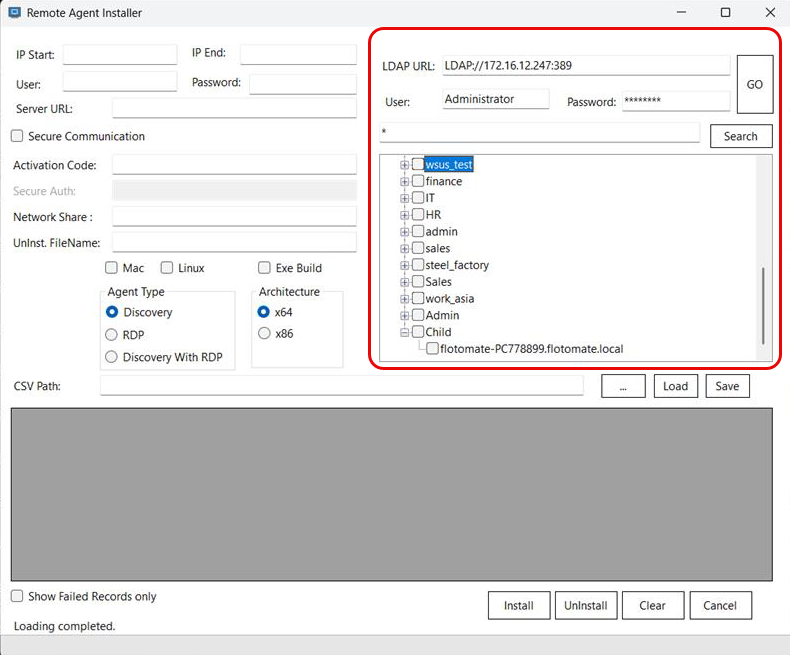
Step 2: Configure Installation Parameters
The Remote Agent Installer interface will appear. Configure the following parameters:

IP Range Configuration
- IP Start: Enter the IP Address from which the agent installation will begin
- If only IP Start is specified, the agent will be installed only on this single machine
- IP End: Enter the IP Address till which the agent installation will end
- If both IP Start and End are provided, the agent will be installed on all machines within the specified IP range
The machines should be in the same network for IP range deployment to work correctly.
Authentication Configuration
- User and Password: Enter the user credentials of the target machines
- Server URL: Enter the URL (IP Address/Domain) of the ServiceOps server
Communication Configuration
- Secure Communication: Enable if secure code is used for communication
- Once enabled, enter the Secure Auth code
- This code is available from the ServiceOps portal under Agent Credential Profile
- Activation Code: Agent activation code from ServiceOps > Admin Settings > Organization > Account > License Details
File Configuration
- Network Share: Enter the network path from which the agent file can be accessed for installation
- Uninst. FileName: Enter the name of the file for uninstallation
- For Mac, use the file name as
motadata_uninstall_rdpwrapper_agent.sh
- For Mac, use the file name as
Platform and Agent Configuration
- Mac: Select for Mac agent installation/uninstallation
- When selected, "Exe Build" and "Discovery with RDP" options will be disabled
- Linux: Select for Linux agent installation/uninstallation
- When selected, "Exe Build" and "Discovery with RDP" options will be disabled
- Exe Build: Enable to support installation/uninstallation of build with exe extension from the exes folder
- Agent Type: Select the type of agent to install
- Architecture: Select the architecture of the target machines
LDAP Configuration (Windows Only)
If you have LDAP details and want to use it:
- LDAP URL: Enter the URL of the LDAP server beginning with
LDAP://followed by IP Address and Port Number- Example:
LDAP://111.111.0.11:920
- Example:
- User: Enter the username of the LDAP user
- Password: Enter the password of the LDAP user
CSV Import Option
You can also upload a CSV file to import agent details:
- Click Browse (3 dots) to select a CSV file. You can also download the sample file, fill in the required data, and upload it.
- Click Load to import the file
- Click Save to confirm the import
- Once loaded, the machine details appear in the grid showing:
- Machine Name
- User
- Status (updates as installation progresses)
Step 3: Execute Installation
- Once all details are filled, click Install
- The installation process will begin
- Monitor the installation status from the Status bar (Green bar)
- Use Clear to clear the details if needed
- Use Cancel to cancel the installation process
Step 4: Verify Installation
After installation, verify that agents appear in:
- Hardware Assets List page in ServiceOps
- Discovery Agent tab of Admin > Asset Management > Asset Discovery
Uninstallation Process
To uninstall agents in bulk:
- Configure the same parameters as for installation
- Click UnInstall instead of Install
- The uninstallation process will begin
- Monitor the status bar for progress
Advanced Configuration Options
Platform-Specific Considerations
Windows Deployment
- Supports both 32-bit and 64-bit architectures
- Requires .NET Framework 4 and above
- Supports LDAP integration for machine discovery
Linux Deployment
- Supports both 32-bit and 64-bit architectures
- Requires proper file permissions on target machines
- Uses shell scripts for installation/uninstallation
macOS Deployment
- Supports Intel and M1 processors
- At any given time, you can install or uninstall only one Mac RDP agent (either MacIntel or MacM1)
- Uses shell scripts for installation/uninstallation
Network Configuration
File Sharing Requirements
- Ensure the exes folder is accessible from all target machines
- Verify network share permissions
- Test file accessibility before bulk deployment
Security Considerations
- Configure proper firewall rules for remote access
- Set up antivirus exclusions for agent files
- Ensure administrative access to target machines
Best Practices
Planning and Preparation
- Test Deployment: Test the utility on a small subset of machines first
- Network Assessment: Verify network connectivity and bandwidth
- Document Configuration: Keep records of all configuration parameters
- Backup Strategy: Ensure you have backups before upgrading existing agents
Security Best Practices
- Credential Management: Use secure methods to store and transmit credentials
- Network Security: Ensure secure communication channels
- Access Control: Limit access to the utility to authorized administrators
- Audit Logging: Enable logging for deployment activities
Performance Optimization
- Staggered Deployment: Deploy to different IP ranges at different times
- Bandwidth Management: Schedule deployments during off-peak hours
- Resource Monitoring: Monitor system resources during deployment
- Error Handling: Have a rollback strategy for failed deployments
Monitoring and Troubleshooting
Real-time Monitoring
- Status Bar: Monitor installation progress through the green status bar
- Grid View: Track individual machine status in the grid
- Error Codes: Use the provided error codes for troubleshooting
Common Issues and Solutions
Connection Issues
- Error (-5): Check network connectivity and firewall settings
- Error (-4): Verify user credentials and permissions
- Error (-3): Ensure target machine names are correct
File Access Issues
- Error (-6): Verify file sharing and network access
- Error (-7): Check service file permissions and antivirus exclusions
- Error (-8): Ensure administrative rights on target machines
Service Issues
- Error (-9): Check remote service connectivity and firewall rules
- Service Not Starting: Verify service dependencies and permissions
Troubleshooting Commands
# Check network connectivity
ping <target_ip>

# Test file access
net use \\<target_ip>\<share_name>

# Check service status
sc query <service_name>

# Verify administrative access
psexec \\<target_ip> cmd
Next Steps
After successfully configuring the Remote Agent Installer utility:
- Test Deployment: Deploy to a small test group to verify configuration
- Monitor Performance: Track deployment success rates and system impact
- Document Procedures: Create runbooks for future deployments
- Plan Rollout: Schedule full deployment across your organization
- Set Up Monitoring: Configure alerts for deployment status and agent health
Related Topics
- Installing Discovery Agent: For individual discovery agent installation
- Installing RDP Agent: For individual RDP agent installation
- Agent Bulk Installation/Uninstallation via GPO: For GPO-based bulk deployment