Installing the Integration Connector Agent
Integration Connector agents act as secure bridges between ServiceOps and third-party applications like Active Directory, enabling seamless integration without requiring direct connectivity.
The Integration Connector is a dedicated application that executes ServiceOps actions on on-premise or cloud platforms, providing secure integration capabilities for LDAP authentication, Active Directory operations, and workflow automation. This guide provides step-by-step instructions for installing Integration Connector agents on supported platforms.
Prerequisites
Before installing Integration Connector agents, ensure your system meets the following requirements:
System Requirements
Windows Systems
- Operating System: Windows 8 and above versions
- Architecture: 32-bit and 64-bit supported
- Dependencies:
- .NET version 3.5 and above
- Microsoft Visual C++ 2015 and above
Linux Systems
- Supported Distributions: Ubuntu, RedHat, and other Linux distributions
- Permissions: Root access required
- Dependencies: sudo must be installed
Required Information
You'll need the following information from your ServiceOps portal:
- ServiceOps Server URL: Your ServiceOps portal URL
- Basic Authorization Token: Available in Integration Connector Credential Profile
- Protocol: HTTP or HTTPS (depending on your configuration)
- Port: 80 for HTTP, 443 for HTTPS
Pre-Installation Requirements
- Java Environment: Java should not be pre-installed (fresh system without existing Java applications)
- Network Connectivity: Active Internet connectivity to the Main Server for on-premise applications
- SSL Certificate: Valid SSL certificate required for secure communication
- Credential Profile: Create or use existing Integration Connector Credential Profile
- The Integration Connector is supported from version 8.6.1 onward
- Compatible with both Windows and Linux systems
- Supports deployment on On-Premise and SaaS platforms
- If the Integration Connector is used to connect with on-premise applications, it must have active Internet connectivity to the Main Server
Key Features and Capabilities
Integration Functionalities
- LDAP User Authentication: For login authentication
- LDAP-based User Import: Bulk user import from Active Directory
- Active Directory Operations: Create, enable, disable, and update AD users with Workflow
- Active Directory Self-service: Perform self-service operations in SaaS portal
Deployment Options
- On-Premise Deployment: For internal network integration
- SaaS Deployment: For cloud-based integration
- Web-based UI: Remote management and troubleshooting capabilities
Installation Methods
ServiceOps provides multiple options for installing Integration Connector agents. Choose the method that best suits your environment:
- Windows
- Linux
Windows Integration Connector Installation
Step 1: Download the Agent
- Navigate to the Download Links section in your ServiceOps documentation
- Download the latest Windows Integration Connector (
.msi) file - Choose the appropriate version for your system
Step 2: Run the Installation
- Run the
.msifile with administrator rights - The User Access Control popup will appear - click Yes to continue
- Follow the installation wizard
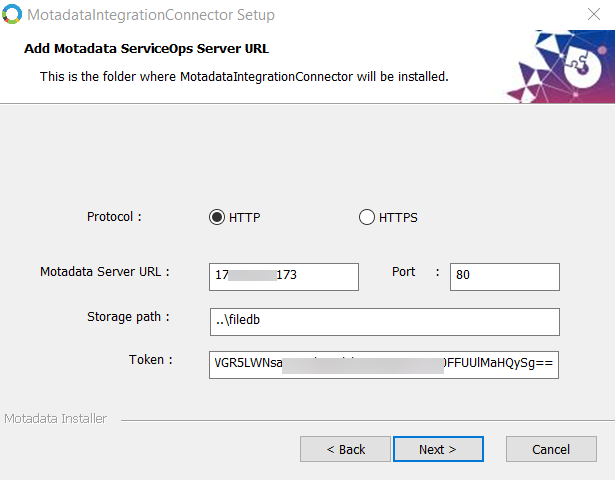
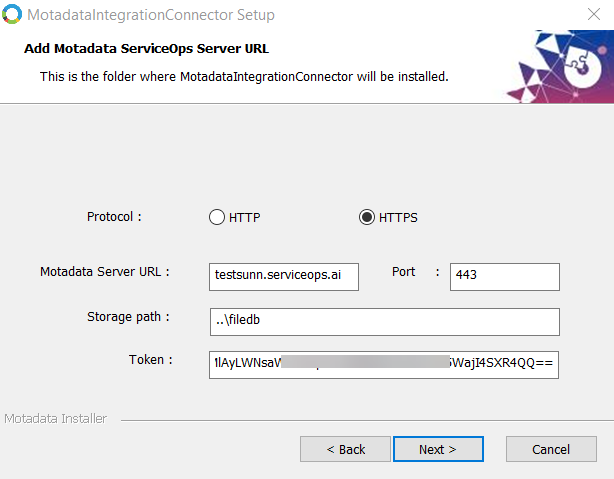
Step 3: Configure Connection Settings
- Click Next to proceed with the installation
- Enter the following details:
- Protocol: Select HTTP or HTTPS
- Motadata Server URL: Enter the ServiceOps URL
- For HTTP: Enter the IP Address
- For HTTPS: Enter the domain URL
- Port: Specify the port number (80 for HTTP, 443 for HTTPS)
- Storage Path: Displays the default path, which can be modified if needed
- Token: Enter the Basic Authorization token from Integration Connector Credential Profile
For HTTP
For HTTPS
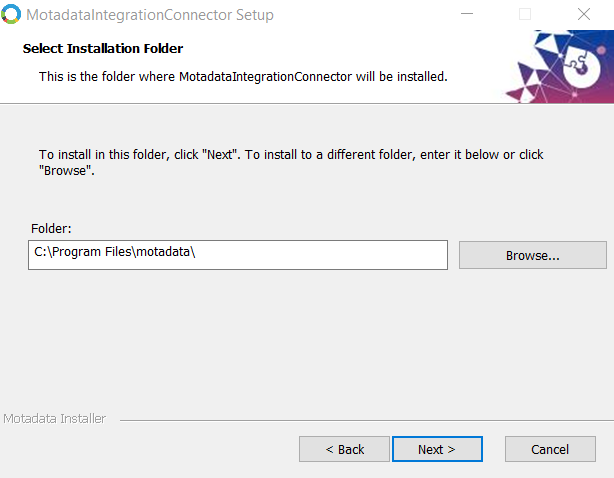
Step 4: Select Installation Folder
- Browse and select the folder where you want to install the Integration Connector
- Click Next to continue
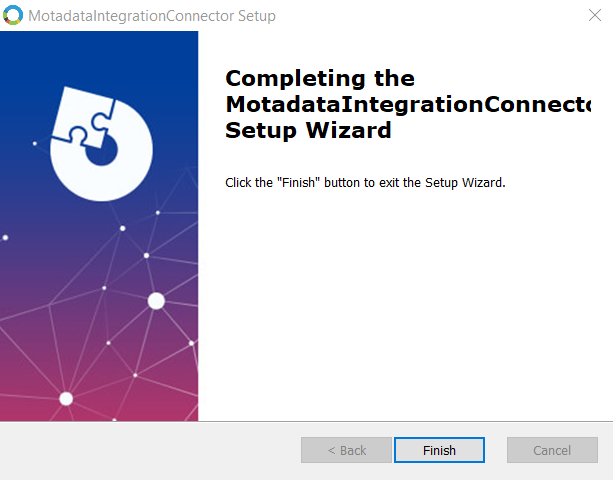
Step 5: Complete Installation
- Click Install to begin the installation process
- Wait for the installation to complete
- Click Finish when the wizard completes

Step 6: Verify Installation
- Check that the Integration Connector appears in Programs and Features
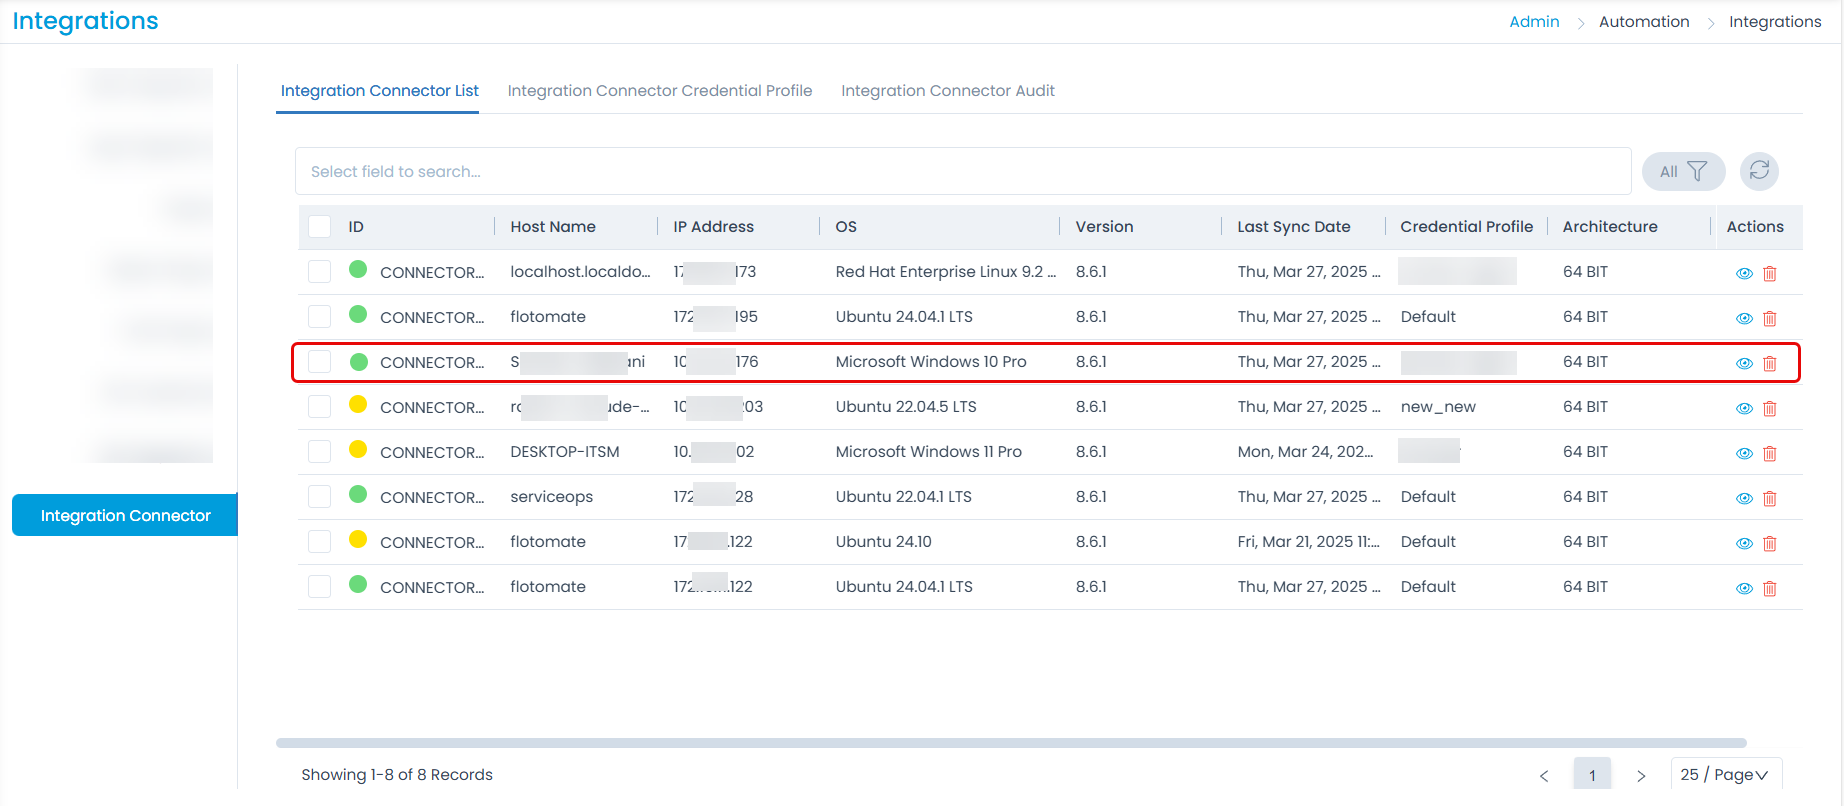
- Verify the connector appears in the Integration Connector List in your ServiceOps portal
Linux Integration Connector Installation
The installation steps for Linux Integration Connector are the same for both on-premise and SaaS deployments. The only differences are in the configuration values you enter during the setup process.
Step 1: Download the Agent
- Navigate to the Download Links section in your ServiceOps documentation
- Download the latest Linux Integration Connector file
- Choose the appropriate version for your system
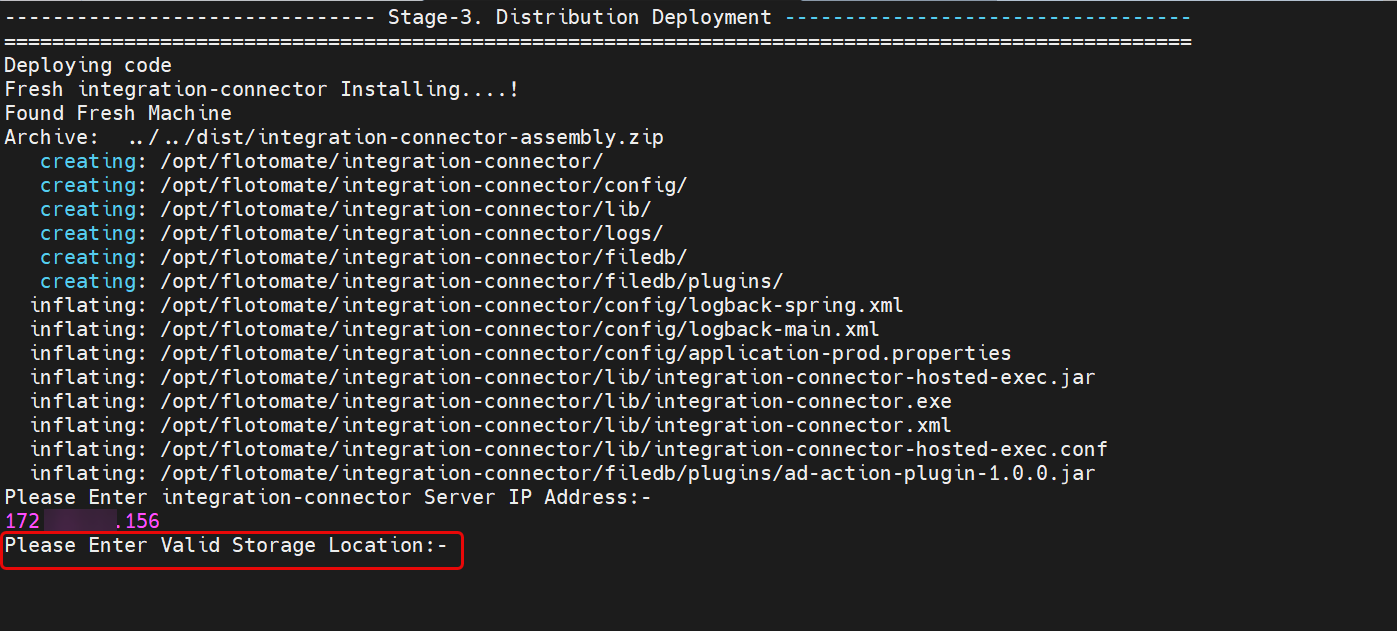
Step 2: Navigate to Download Directory
- Open terminal and navigate to the directory where you downloaded the file
 2. Check file permissions and set execute permissions if needed:
chmod 777 Integration-connector_v8x

Step 3: Run the Installation
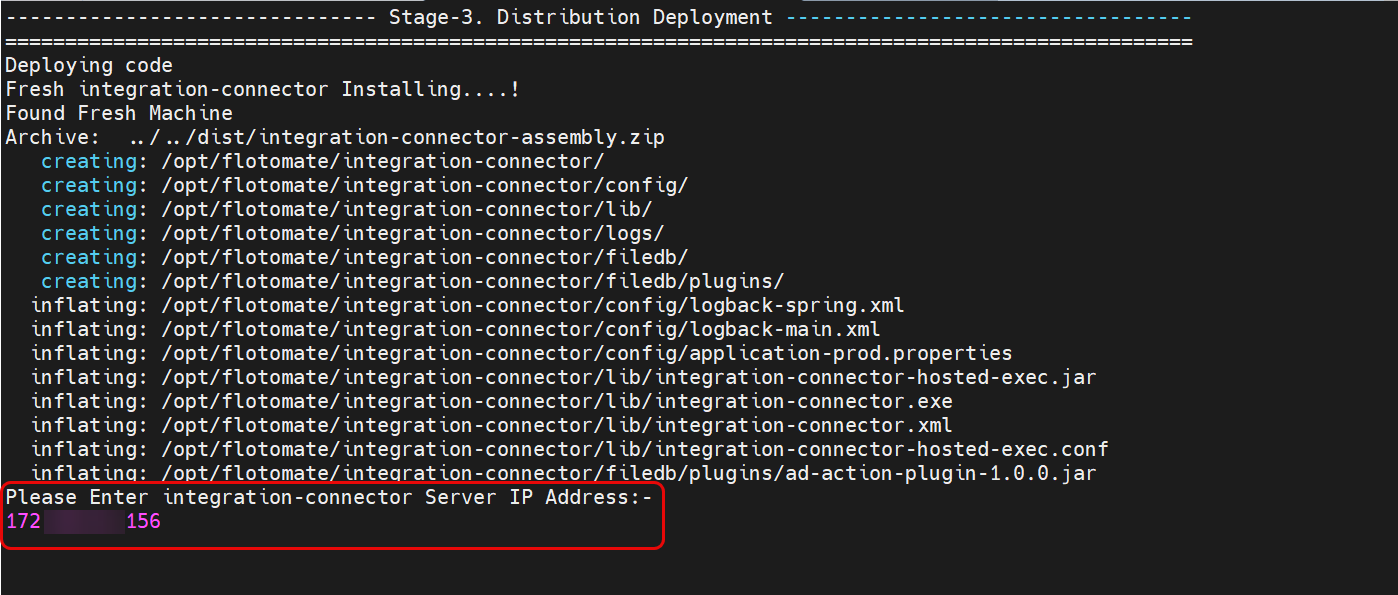
- Execute the Integration Connector file:
./Integration-connector_v8x

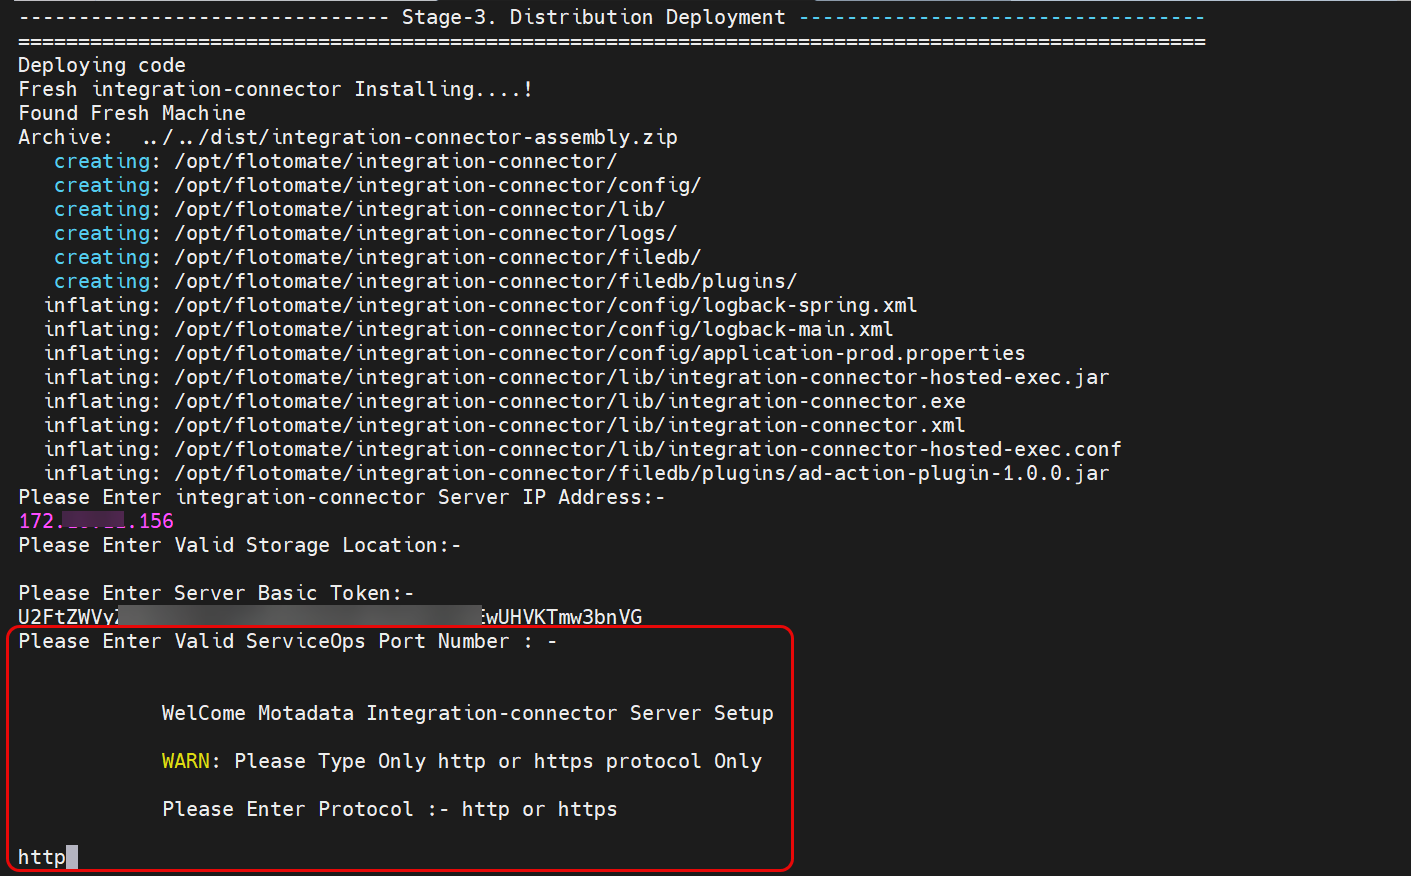
Step 4: Configure Connection
The configuration prompts are the same for both deployment types. Use the appropriate values based on your deployment:
For On-Premise Deployment:
- Server IP address: Enter your ServiceOps server IP address
- Storage location: Optional - press Enter to use default
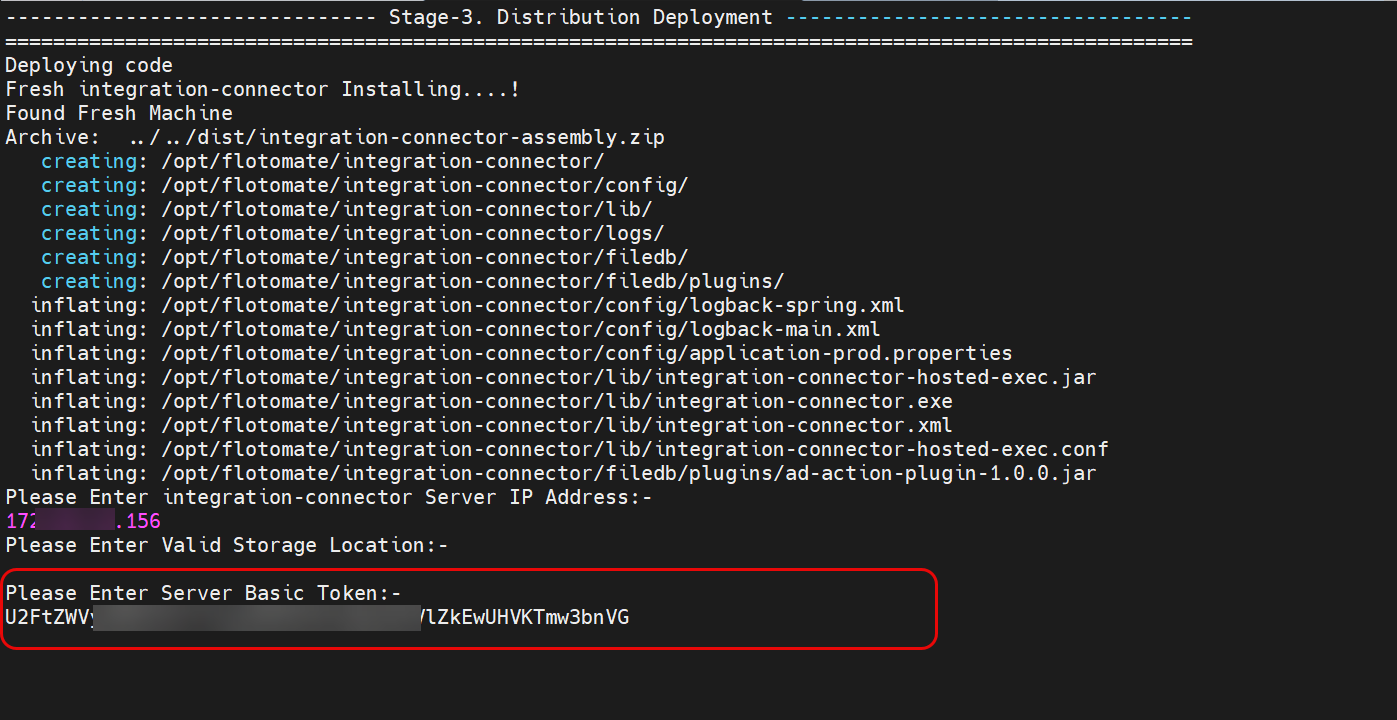
- Basic Authorization token: Enter the token from Integration Connector Credential Profile
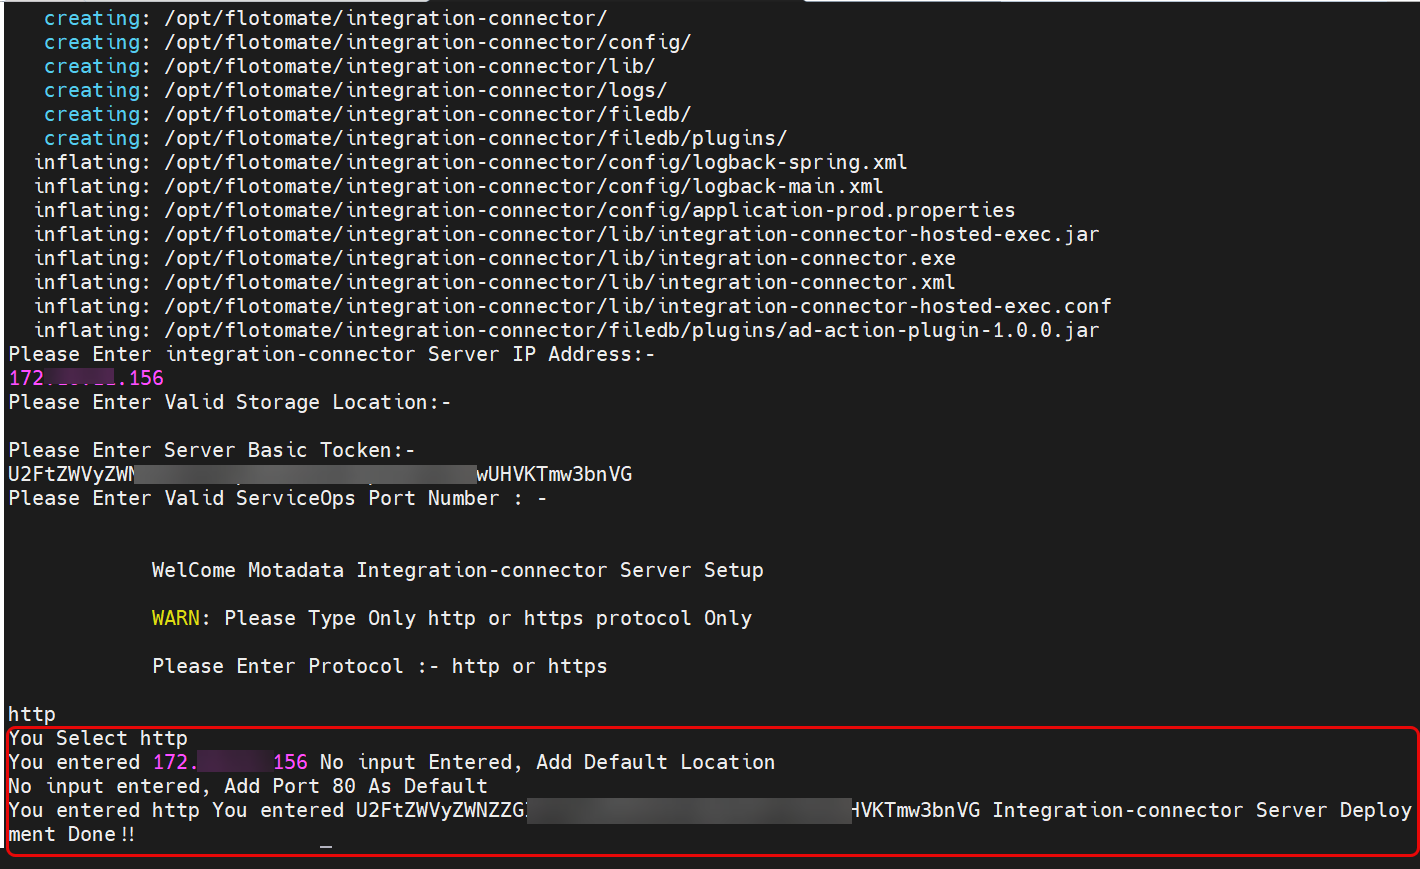
- Port number and protocol: Leave blank for default or enter port 80 and HTTP
For SaaS Deployment:
- Server IP address: Enter your ServiceOps domain (e.g.,
testsunn.serviceops.ai) - Storage location: Optional - press Enter to use default
- Basic Authorization token: Enter the token from Integration Connector Credential Profile
- Port number and protocol: Enter port 443 and HTTPS
Step 5: Verify Installation
- Check the installation summary and confirmation message
- Verify the connector appears in the Integration Connector List in your ServiceOps portal
Additional Configuration
Adding SSL Certificate to Java Keystore
This guide explains how to import an LDAP SSL certificate into the Java Keystore (cacerts) used by the ServiceOps application on Windows. This is required to ensure secure communication between ServiceOps and your LDAP server.
Prerequisites:
- Certificate File: You must have the LDAP SSL certificate file (e.g.,
.ceror.crt). - Admin Privileges: Access to Command Prompt as an Administrator.
- Default Keystore Password:
changeit
Configuration Details:
| Item | Path |
|---|---|
| Target Directory | C:\Program Files\motadata\serviceops\package\java\lib\security\ |
| Keytool Utility | C:\Program Files\motadata\serviceops\package\java\bin\keytool.exe |
Step-by-Step Instructions:
1. Backup the Keystore: Before importing new certificates, always create a backup of your current keystore file.
- Open Command Prompt.
- Navigate to the security directory:
cd "C:\Program Files\motadata\serviceops\package\java\lib\security" - Run the following command to create a backup:
copy cacerts cacerts_backup
2. Import the Certificate:
Open Command Prompt as an Administrator.
Navigate to the directory:
cd "C:\Program Files\motadata\serviceops\package\java\lib\security"Execute the import command:
"C:\Program Files\motadata\serviceops\package\java\bin\keytool.exe" -import -alias motadata -keystore "C:\Program Files\motadata\serviceops\package\java\lib\security\cacerts" -file "(LDAP Cert File Path)"infoReplace
<LDAP Cert File Path>in the command below with the full path to your.ceror.crtfile.When prompted for the password, type:
changeitWhen asked Trust this certificate?, type
yesand press Enter.
3. Verify the Import: To confirm the certificate was added correctly, run the following command:
keytool -list -keystore cacerts | findstr motadata
4. Restart Services: For ServiceOps to recognize the new certificate, you must restart the relevant services.
- Open Windows Services.
- Locate the Integration Connector service.
- Right-click and select Restart.
Expected Result: After completing these steps, the LDAP SSL connection should establish successfully within the application without security handshake errors.
If you encounter an "Access Denied" error, ensure your Command Prompt was opened using the Run as Administrator option.
Post-Installation Verification
Check Agent Status
- Windows: Check Services app for the Integration Connector service
- Linux: Use
systemctl status integration-connector.service - Portal Registration: Verify the connector appears in the Integration Connector List
Verify Integration Functionality
- Test LDAP Connection: Verify LDAP authentication works correctly
- Test AD Operations: Verify Active Directory operations function properly
- Check Logs: Monitor Integration Connector logs for any issues
Portal Verification
- Log into your ServiceOps portal
- Navigate to Admin > Automation > Integrations > Integration Connector
- Verify your connector appears in the Integration Connector List tab
- Check that the connector status shows as "Online"
Troubleshooting Common Issues
Installation Issues
- Problem: Permission denied during installation
- Solution: Ensure you're running with appropriate permissions (admin/root)
Connection Issues
- Problem: Integration Connector cannot connect to ServiceOps server
- Solution: Verify URL, port, and network connectivity
Authentication Issues
- Problem: Invalid Basic Authorization token
- Solution: Double-check the token from Integration Connector Credential Profile
Java Issues
- Problem: Java conflicts during installation
- Solution: Ensure no Java is pre-installed on the system
Network Issues
- Problem: Connectivity issues with on-premise applications
- Solution: Verify Internet connectivity to the Main Server using ping command
Uninstallation
Windows Uninstallation
- Use Programs and Features to uninstall
- Or use the command line:
msiexec /x [integration-connector-msi-file] /quiet
Linux Uninstallation
# Stop the Integration Connector service
systemctl stop integration-connector.service
# Navigate to the flotomate folder
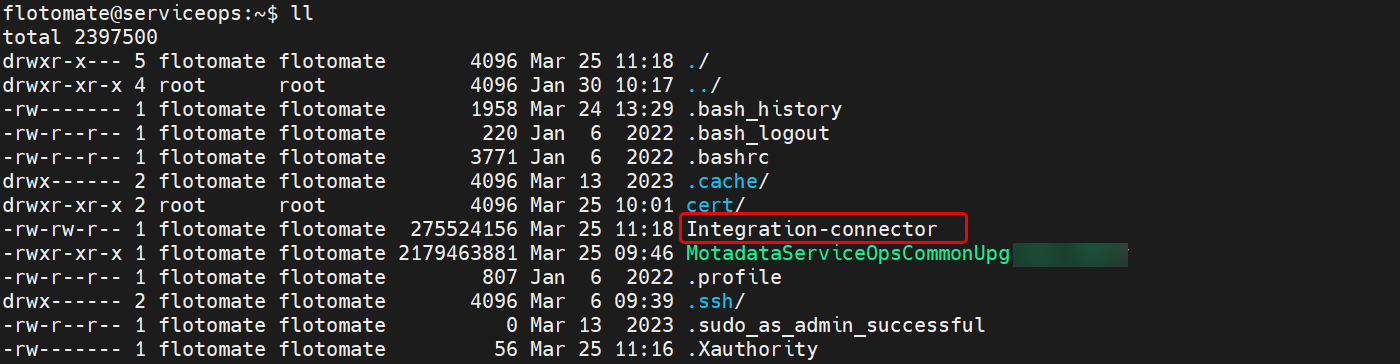
cd /opt/flotomate/
# Remove the Integration Connector folder
rm -rf integration-connector
# Navigate to the system folder
cd /etc/systemd/system/
# Remove the Integration Connector service
rm -rf integration-connector.service
# Verify uninstallation
cd /opt/flotomate/
# Check that the integration-connector folder is not found
Configuration Best Practices
Network Configuration
- Ensure Integration Connector can communicate with the ServiceOps server
- Configure appropriate firewall rules for integration communication
- Use HTTPS for secure communication when possible
Security Considerations
- Keep Basic Authorization tokens confidential
- Regularly update Integration Connector to match your ServiceOps version
- Monitor Integration Connector logs for security issues
- Use strong authentication methods
Performance Optimization
- Deploy Integration Connector during low-usage periods
- Monitor system resources during integration operations
- Configure appropriate connection timeouts
Integration Connector Management
Credential Profile Management
- Create Credential Profiles: Set up custom credentials for different integration scenarios
- Manage Tokens: Generate and manage Basic Authorization tokens
- Audit Activities: Track all connector-related activities
Log Management
- Request Logs: Request connector logs from the portal
- View Logs: Access real-time log information
- Download Logs: Download logs as ZIP files for analysis
Connector Operations
- Search and Filter: Find specific connectors using search and filter options
- Bulk Operations: Archive or delete multiple connectors
- Status Monitoring: Monitor connector health and status
Next Steps
After successfully installing the Integration Connector:
- Configure Credential Profiles: Set up authentication credentials
- Test Integrations: Verify LDAP and Active Directory connections
- Set Up Workflows: Configure workflow-based integrations
- Monitor Performance: Track integration performance and logs
- Deploy Additional Connectors: Install connectors on other systems as needed
Related Topics
- System Requirements: Review the detailed system requirements for all components.