Installation Guide for High Availability (HA) Deployment
This guide empowers IT Administrators to build a resilient, uninterrupted ServiceOps environment by eliminating single points of failure, ensuring business continuity during outages.
High Availability (HA) refers to systems that are durable and designed to operate continuously without failure for an extended period. The primary goal of HA is to ensure an agreed-upon level of operational performance and uptime, guaranteeing service and data recovery during an unplanned disruption.
This guide provides detailed instructions for setting up a High Availability environment for ServiceOps.
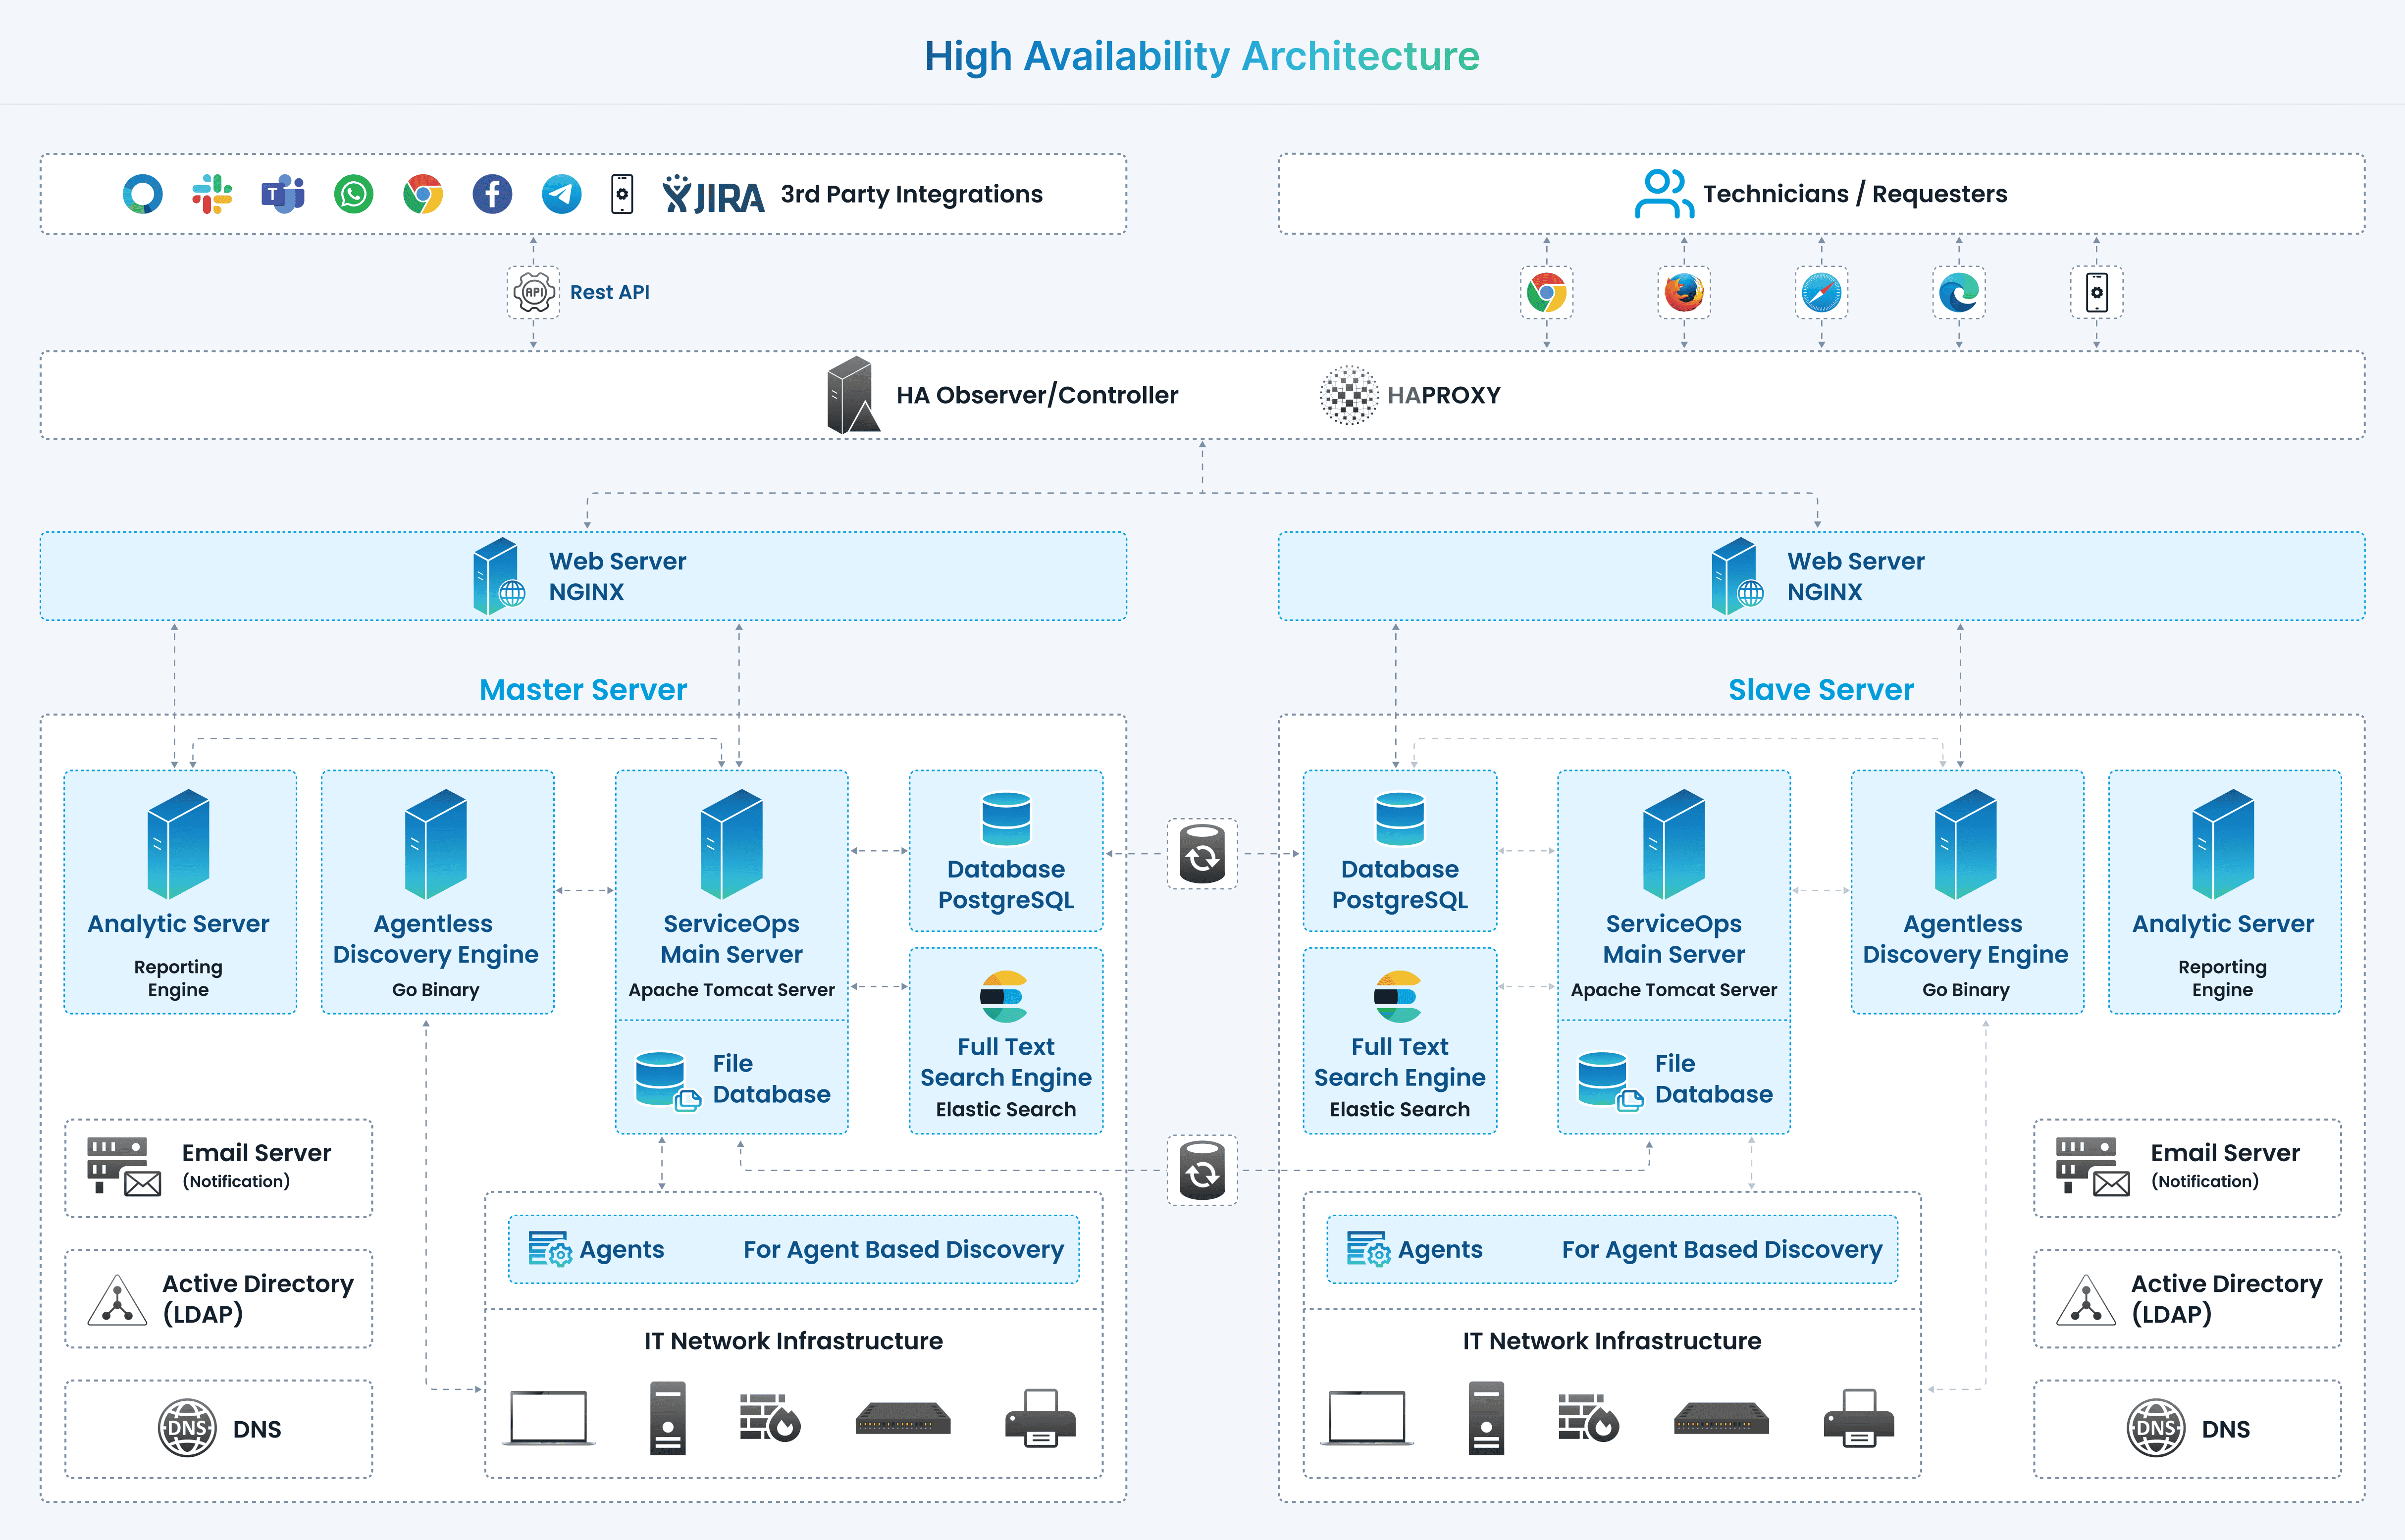
Standalone Deployment - HA Architecture Overview
In a ServiceOps High Availability setup, three main components work together:
- Master Server: The primary ServiceOps server accessed by users.
- Slave Server: A secondary, idle server that continuously replicates data from the Master's database.
- HA-Proxy Server: A load balancer that redirects traffic to the Slave server if the Master server becomes unavailable.
During a downtime event, the Slave server is promoted to become the new Master, using its synchronized database to provide uninterrupted service.
Single Data Center Architecture
Prerequisites
Before proceeding with the HA setup, ensure you have met System Requirements and Pre-Installation Checklist.
HA Configuration Steps
Follow these steps to configure the High Availability environment.
Step 1: Install Master and Slave Servers
Install ServiceOps on two separate servers. One will act as the Master and the other as the Slave.
- For Hardware Requirements please refer Hardware Requirements
Copy release build installer (service_desk_master_CI) to target machine.
Open terminal and navigate to the directory where the build is.
Make Sure you have the permission to execute the file. If there’s no permission then you can change it using the following command:
sudo chmod 777 service_desk_master_CIRun Installer by using the following command:
sudo ./service_desk_master_CIEnter the password when prompted. The password will be the same as the system admin password.
Enter the file where the key needs to be saved. Here, just press enter and it will auto-add the key path.
After adding the ssh key, it will prompt to enter the username for the server ssh
For detailed installation instructions, refer to the Standalone Installation Guide
Ensure both servers have the same ServiceOps version and are fully functional before proceeding.
Step 2: Set Up the HA Observer Server
The HA Observer monitors the health of the Master and Slave servers and manages the failover process.
- Do not use
sudowhen running the HA Observer installer package. - Ensure both Master and Slave machines are ready before starting this step.
- Use the same username and password for SSH on both Master and Slave machines.
- Please use common password on SSH Master and Slave machine.
- Download the HA Observer installer from the Download Links page.
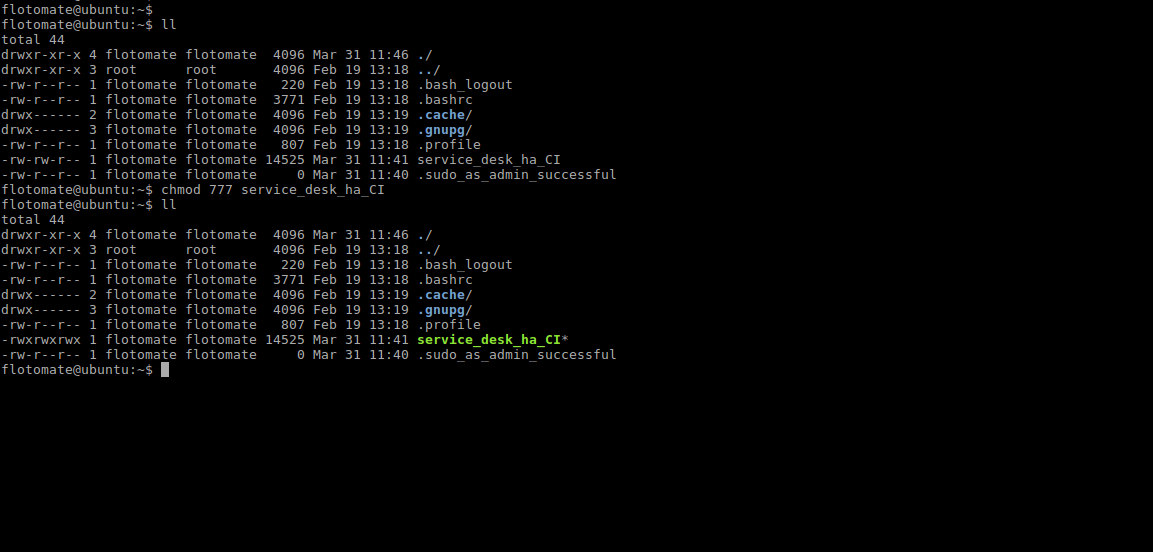
- Assign execute permissions to the installer file:
chmod 777 service_desk_ha_CI
- Run the HA Observer installer:
./service_desk_ha_CI

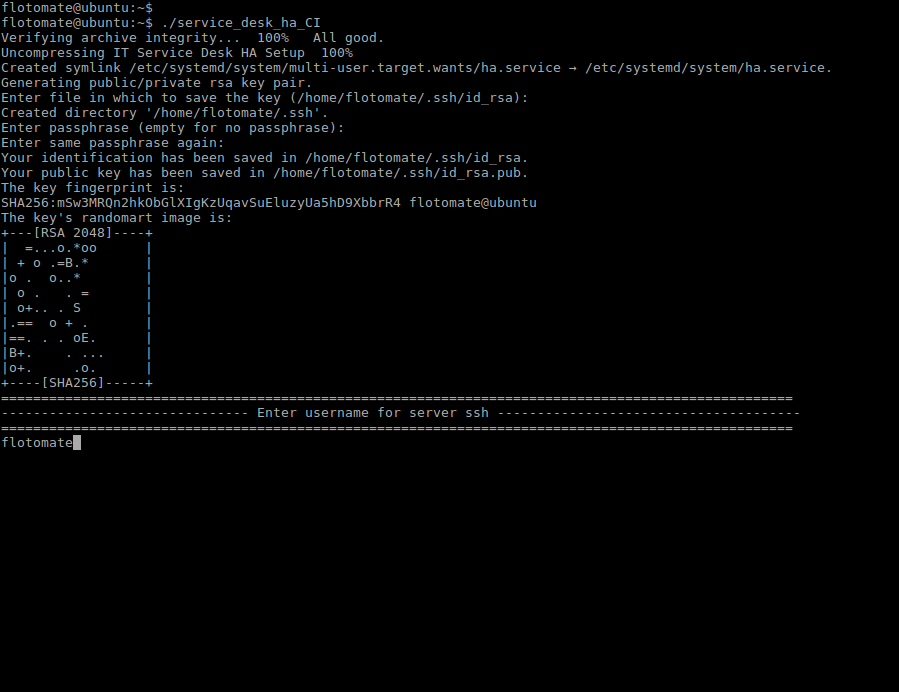
- It will prompt for generation of the public key. Press Enter for generating the Key.
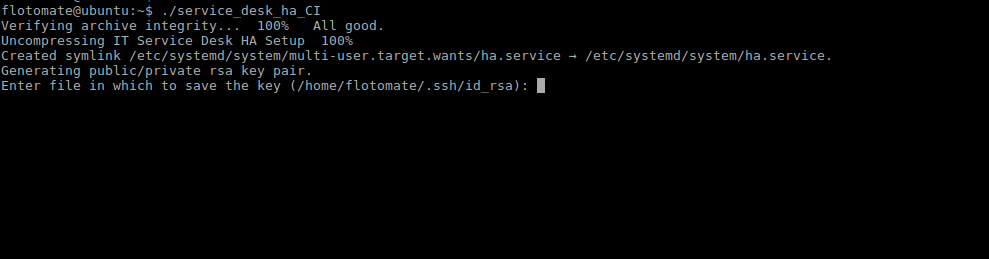
- After generating public key, it will prompt to enter the Passphrase twice. Press Enter for both the prompts.
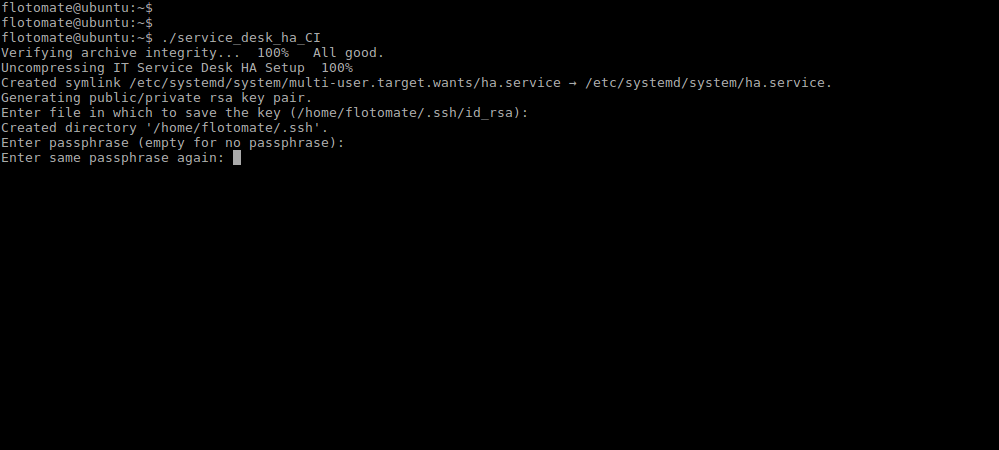
- It will prompt to “Enter username for server ssh”. This Username will be Common for both the machines i.e Master and Slave.
Here flotomate is entered just for example. User needs to enter the respective Machine's Username.
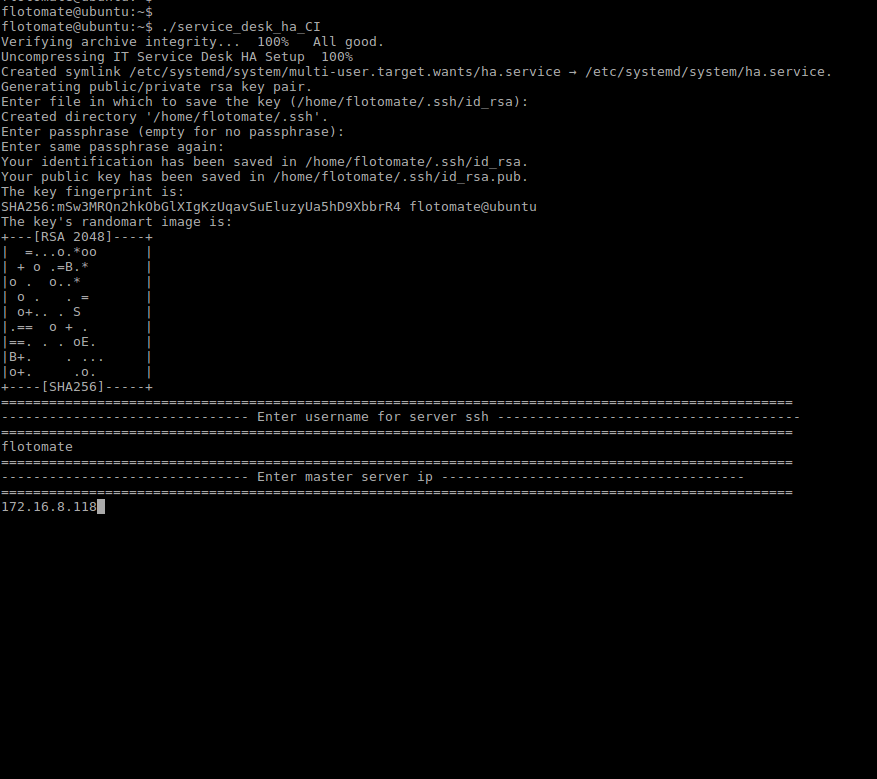
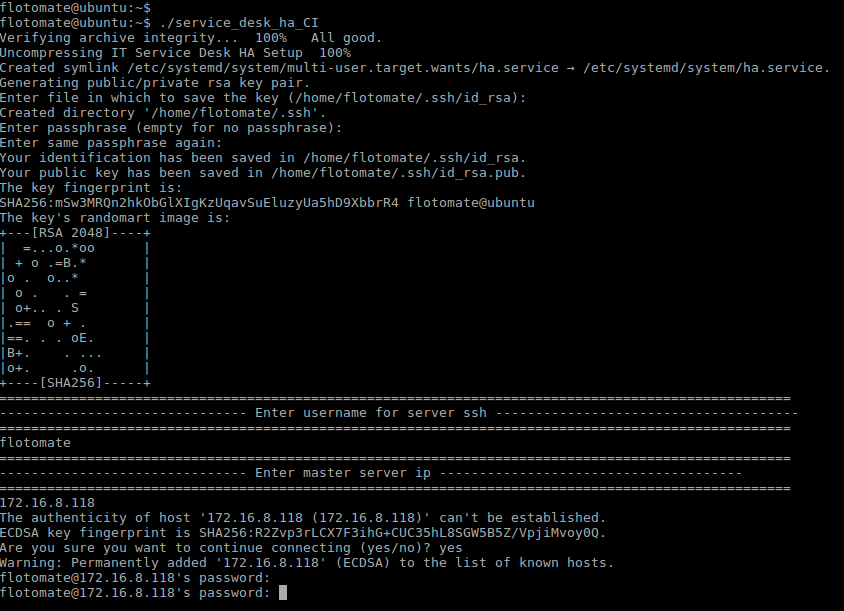
- Enter the IP address and password for the Master server when prompted.
Here entered IP is just for example. User needs to enter respective Master’s IP.
- After entering the IP Address, it will prompt for Password twice. Here, the password will be respective machines password.
- Enter the IP address and password for the Slave server when prompted.
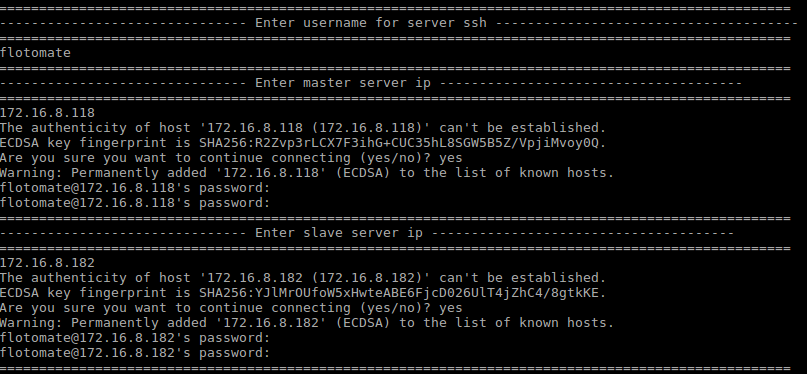
- Enter the
sudopassword when prompted. This password will be the same as the common password entered in Step 8.
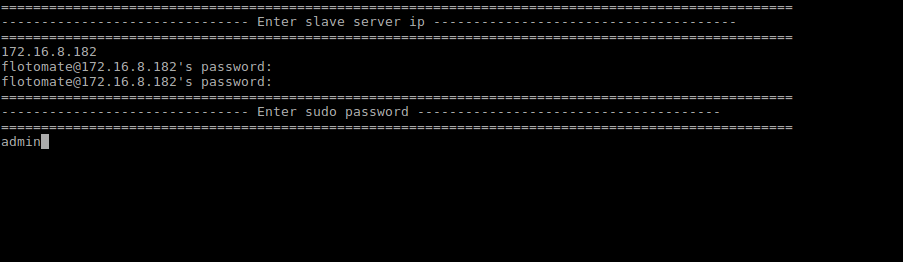
- After entering the sudo password, it will automatically start configuration of Slave and will show message as “Enter slave config started”.

- After finishing the above step it will show message "HA Installed SuccessFully". It will then automatically start the mechanism of file sync showing the message "File Sync Setup Started".

- After the File Sync Setup started, it will prompt for "Entering Key" for generating public/private rsa key pair. Press Enter in response.
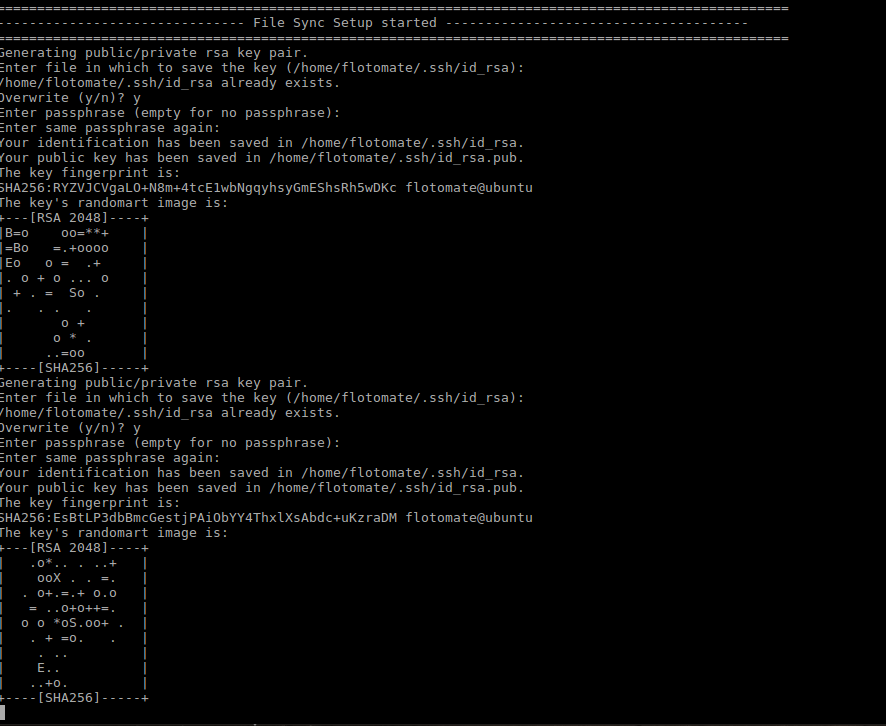
- After entering the Key, File Sync Installation Setup finishes. With this HA Observer Installation also finishes.

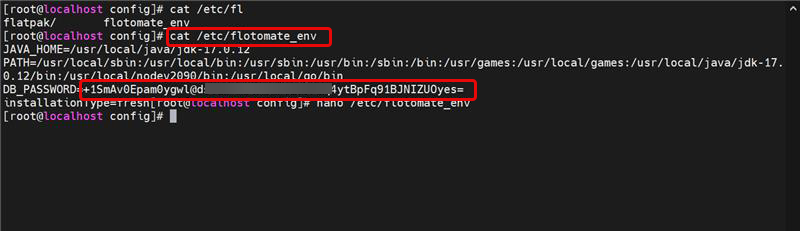
- Finally, ensure the Slave server's database password matches the Master's. You may need to manually update the password in the following configuration files on the Slave server:
/opt/flotomate/main-server/config/application-saas.properties
/opt/flotomate/cm-analytics/config/application-saas.properties
/etc/flotomate_env
/opt/flotomate/cm-analytics/lib/analytics-hosted-exec.conf
/opt/flotomate/main-server/lib/boot-hosted-exec.conf
The core High Availability setup is now complete. At this stage, the Master and Slave servers are configured for data replication.
The following section on configuring an HA-Proxy server is optional but recommended for automatic client redirection during a failover.
For advanced HA-Proxy configurations, especially in a DMZ, refer to the How to Configure HA Proxy in DMZ guide.
Optional: Configure HA-Proxy for Automatic Failover
While the core High Availability setup ensures data replication between the Master and Slave servers, it does not automatically redirect user traffic if the Master server fails. To achieve seamless, automatic failover, you can deploy an HA-Proxy server.
The HA-Proxy acts as a reverse proxy and load balancer, sitting in front of your Master and Slave servers. It monitors the health of the primary server and, in the event of an outage, automatically reroutes all incoming traffic to the standby Slave server. This ensures that users experience minimal disruption and service continuity is maintained without any manual intervention.
This section guides you through the installation and configuration of an HA-Proxy server for your ServiceOps environment.
- The HA-Proxy requires a separate server with a dedicated IP address.
- Internet connectivity is required to install the HA-Proxy package.
HA-Proxy Installation
- Log in to the HA-Proxy server as a root user.
- Install the HA-Proxy package:
sudo apt-get update
sudo apt-get install haproxy -y

Open the HA-Proxy configuration file for editing:
sudo nano /etc/haproxy/haproxy.cfgAdd the following configuration to the end of the file. Replace the placeholder IP addresses with the actual IPs of your HA-Proxy, Master, and Slave servers.
defaults
    log global
    mode tcp
    option httplog
    option dontlognull
    timeout connect 5000
    timeout client 50000
    timeout server 50000
    errorfile 400 /etc/haproxy/errors/400.http
    errorfile 403 /etc/haproxy/errors/403.http
    errorfile 408 /etc/haproxy/errors/408.http
    errorfile 500 /etc/haproxy/errors/500.http
    errorfile 502 /etc/haproxy/errors/502.http
    errorfile 503 /etc/haproxy/errors/503.http
    errorfile 504 /etc/haproxy/errors/504.http

frontend http_front
    # Replace with your HA-Proxy IP address
    bind 172.16.8.100:80
    stats uri /haproxy?stats
    default_backend http_back

backend http_back
    balance roundrobin
    mode tcp
    option tcp-check
    # Replace with your Master Server IP
    server master 172.16.8.241:80 check port 80
    # Replace with your Slave Server IP
    server slave 172.16.8.240:80 check port 80
Restart the HA-Proxy service to apply the changes:
sudo systemctl restart haproxy

In the event of a failover, the Slave server may take approximately 5-8 minutes to become fully active.
HA-Proxy SSL Configuration
This section provides instructions for configuring SSL certificates for HAProxy.
Prepare Certificate Files
Create a combined PEM file from your certificate and private key:
cat example.crt example.key >> example.pem
Copy the PEM file to the HAProxy server:
cp example.pem /etc/ssl/
Set proper permissions:
sudo chmod 600 /etc/ssl/example.pem
sudo chown root:root /etc/ssl/example.pem
Configure HAProxy
Open the HAProxy configuration file:
vi /etc/haproxy/haproxy.cfg
# or
nano /etc/haproxy/haproxy.cfg
Update the frontend configuration to enable SSL:
Standard HTTP configuration (port 80):
frontend http_front
    bind *:80
    default_backend http_back
SSL configuration (port 443):
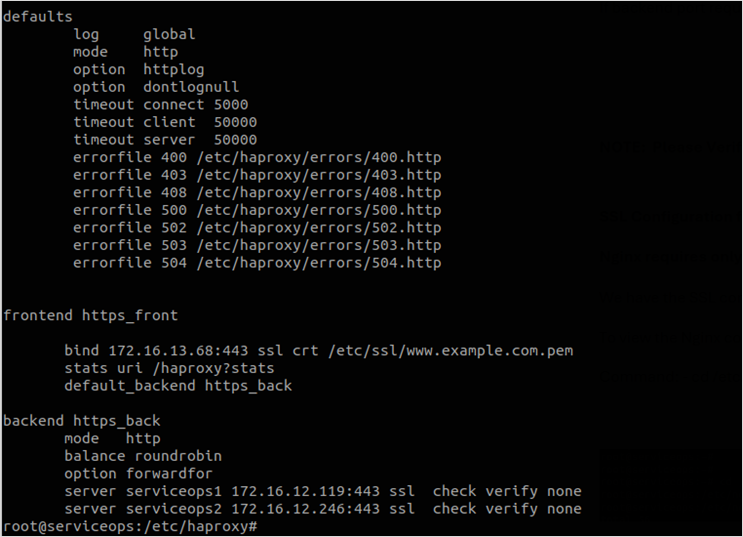
frontend https_front
    bind *:443 ssl crt /etc/ssl/example.pem
    default_backend http_back
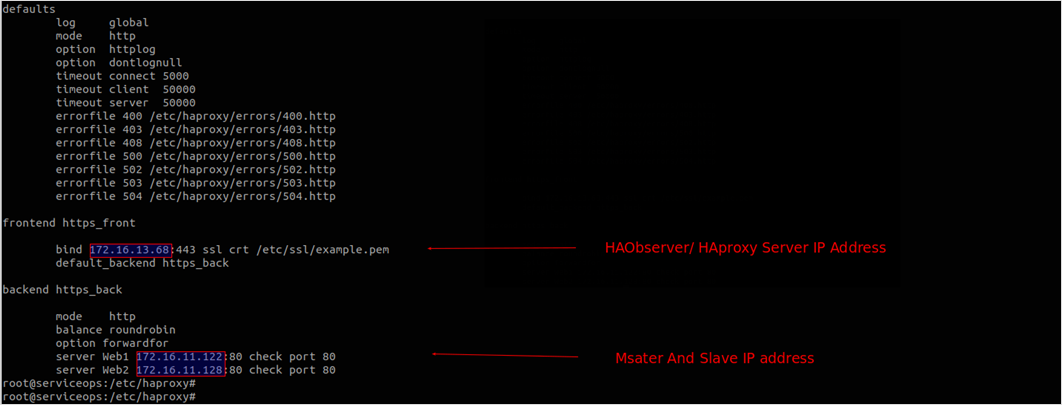
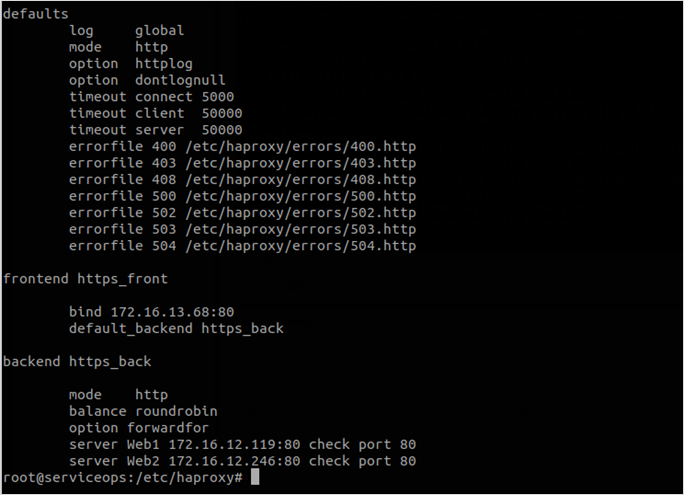
- Complete frontend configuration example:
frontend https_front
    bind 172.16.13.68:443 ssl crt /etc/ssl/example.pem
    mode http
    option forwardfor
    default_backend http_back
Configure Backend for HTTPS
If your backend servers also use HTTPS, update the backend configuration:
backend http_back
    mode http
    balance roundrobin
    server master 172.16.13.69:443 check ssl verify none
    server slave 172.16.13.70:443 check ssl verify none
Verify and Test Configuration
Test HAProxy configuration syntax:
haproxy -c -f /etc/haproxy/haproxy.cfg-2941fe92bed387b472a9368ccf449aed.png)
Restart HAProxy service:
systemctl restart haproxyVerify service status:
systemctl status haproxyTest SSL connectivity:
openssl s_client -connect your-domain.com:443 -servername your-domain.com
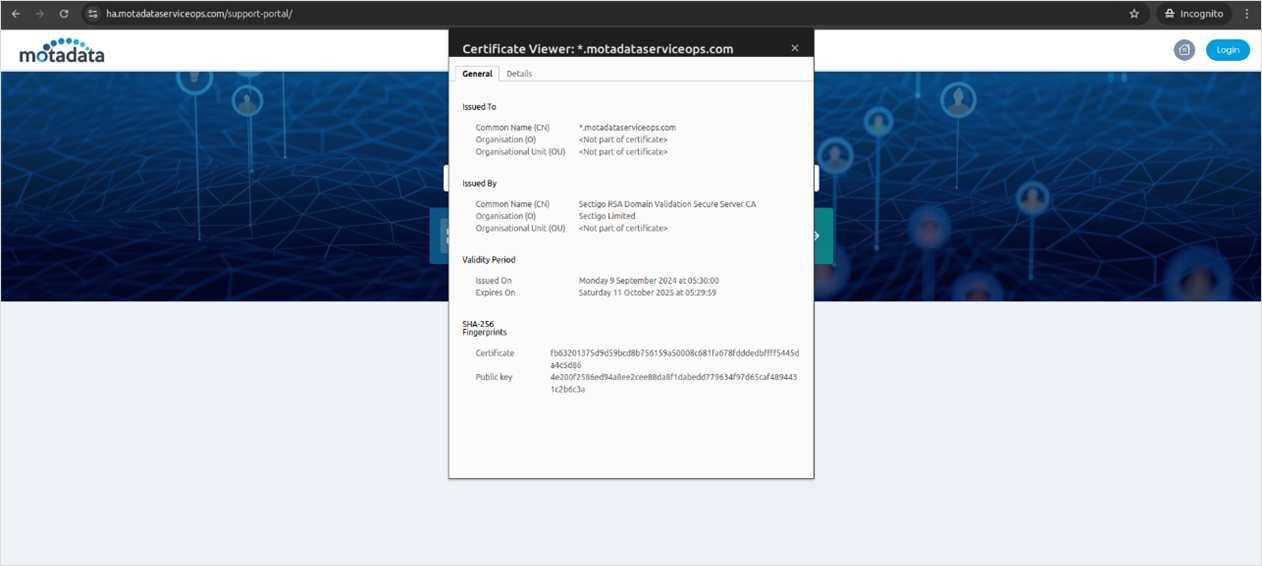
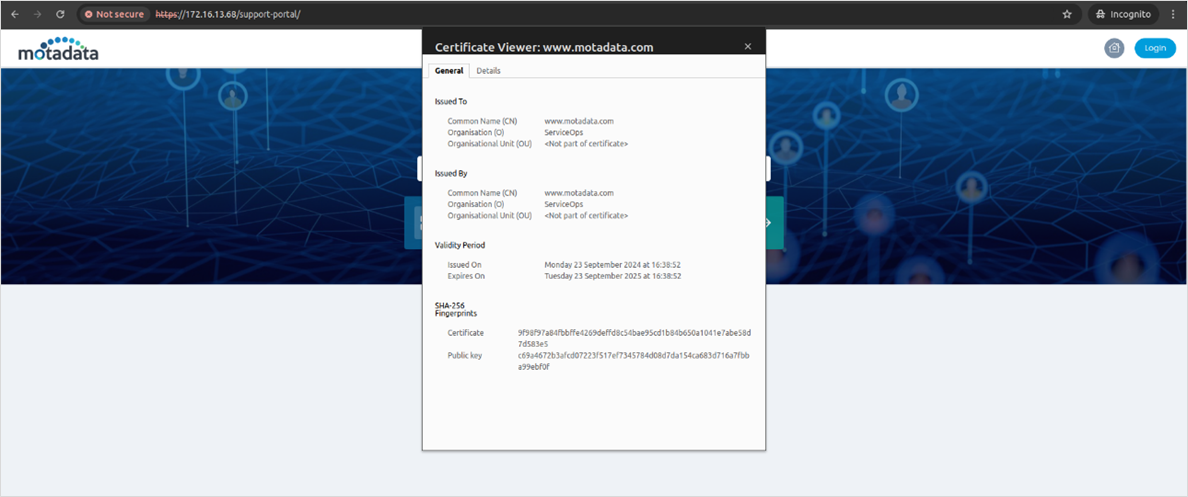
Verify SSL Certificate
- Access your application through HTTPS in a web browser
- Check certificate details by clicking the lock icon
- Verify certificate validity and domain match
Restart HA Proxy Server Service
Next, after updating the port, restart the HA Proxy server service before validating the haproxy.cfg file.
Verify the port number is open from the OS Firewall and Network side.
Patroni-Based HA Configuration
For environments using Patroni and ETCD-based HA installer packages, refer to the dedicated guide: Patroni-Based HA Configuration This covers the following sections:
- 3-machine standalone layout (Application and Database co-located on each node)
- 4-machine Standalone HA Deployment with DC-DR (Application and Database co-located on each node)
- 5-machine Distributed HA Deployment (Application and Database on separate dedicated machines)
- 6-machine Standalone HA Deployment with DC-DR Master-Slave
Configuring Air Gap in HA Environment
This section outlines how to configure the Airgap utility in an HA environment. This setup maintains high availability within the isolated network while using the external Airgap utility machine to securely fetch and transfer update metadata and patch binaries.
Prerequisites
Before beginning the installation, ensure the following requirements are met:
- Internal Network: Three dedicated servers (Master, Slave, and HA Proxy) with static IPs and interconnectivity.
- External Network: One Air Gap Utility Machine with stable internet access to reach vendor URLs and the Motadata Central Patch Repository.
- Storage: A secure portable storage medium (e.g., encrypted USB or secure transfer host) for manual data movement.
Configuration Steps
1. Install the HA Cluster (Internal)
Set up the core ServiceOps architecture within your isolated network first.
- HA Proxy Setup: Install and configure the HA Proxy/Controller. This will act as the single entry point (192.168.x.x) for all users.
- Master & Slave Installation: Install ServiceOps on both the Master and Slave servers.
- Establish Sync: Configure DB Sync and File DB Sync between the Master and Slave to ensure the standby server remains identical to the active one. See, for detailed CLI commands and configuration file edits.
2. Set Up the Air Gap Utility Machine (External)
The Utility Machine acts as the bridge for patch management.
- Network Configuration: Ensure this machine is not part of the internal ServiceOps domain. It only requires an internet connection.
- Utility Initialization: Install the Air Gap Utility tool provided by Motadata.
- Fetch Metadata & Patches:
- Run the utility to download the latest Patch Catalog from vendor websites.
- Connect to the Motadata Central Patch Repository to download required patch binaries.
3. Manual Data Transfer
Because the environment is air-gapped, data must be moved manually to the internal network.
- Export Data: Copy the downloaded binaries and metadata from the Utility Machine to your secure transfer medium.
- Import to Master: Connect the medium to the Active Master Server and move the files to the designated ServiceOps patch directory.
4. Finalizing Synchronization
Once the data is on the Master Server, the HA architecture handles the rest:
- Importing: The Master Server automatically imports the new metadata and binaries into the application.
- Internal Replication: ServiceOps triggers a File DB Sync, automatically pushing the newly imported patches from the Master to the Slave server.
- Verification: Log in via the HA Proxy IP and navigate to Patch Management > Health Check to ensure both nodes recognize the new updates.
Always perform a manual backup of the Master Server database before importing new patch catalogs in an HA environment.
Next Steps
After completing the HA deployment, you may need to set up additional components depending on your requirements. Below are links to guides for other server components that you can deploy.
- Deployment Models: To understand different deployment options.
- Agent Deployment: To install agents on managed endpoints for monitoring, asset management, and remote control.
- Distributed File Server Installation: For storing and managing attachments and other file-based assets.
- Plugin Server Installation: To extend ServiceOps functionality with custom or third-party integrations.
- DMZ Server Installation: For secure communication with agents and services in a demilitarized zone.
- Poller Installation: To discover assets behind a firewall.