Disaster Recovery Operations Guide
This guide enables System Administrators to rapidly restore operations from a secondary site, ensuring business continuity and resilience in the event of a primary data center failure.
This document provides the essential operational procedures for managing a ServiceOps Disaster Recovery (DR) environment, including manual failover and failback. It is intended for administrators responsible for maintaining the system's availability.
For instructions on setting up the initial DC-DR replication, please refer to the Installation Guide for Disaster Recovery (DR) Deployment.
In this guide, you will find procedures for:
- Performing a Manual Failover to the DR Site
- Executing a Planned Failback to the Primary DC
- Restoring a DR Site from Scheduled Backups
Prerequisites
Before you can initiate a manual switchover, the following conditions must be met:
- Confirmed DC Outage: The primary Data Center (DC) must be confirmed as unreachable and not recoverable within the acceptable timeframe (as per your organization's business continuity plan).
- Administrative Access: You must have
rootor equivalent administrative credentials for all servers at the Disaster Recovery (DR) site. - Healthy DR Environment: The DR site servers (application, database) must be running and healthy. A basic health check (e.g., checking CPU, memory, disk space) is recommended.
- Stakeholder Communication: Key stakeholders and incident response teams must be aware of the outage and the decision to failover to the DR site.
- DR Plan Accessibility: The Disaster Recovery plan (this document) and any related credentials must be accessible from a location independent of the primary data center.
- Network Paths to DR Site: All necessary network routes, firewall rules, and VPNs to the DR site have been pre-configured and tested.
Pre-Switchover Checklist
Use this checklist to ensure all preparatory steps are completed immediately before you begin the technical switchover process:
| Status | Action | Notes |
|---|---|---|
| ■ | Obtain Authorization: Confirm you have received the necessary management approval to proceed with the failover. | A DR failover is a significant business decision. |
| ■ | Initiate Incident Log: Start a formal incident ticket or log to document every action, decision, and timestamp during the failover process. | Essential for post-mortem analysis and auditing. |
| ■ | Review DR Resource Allocation: Confirm that the DR servers have sufficient CPU, RAM, and storage resources allocated to handle the full production load. | Prevents performance issues after switchover. |
| ■ | Verify Replication Status: If possible, check the status and last sync time of the database and file storage replication. | This helps to estimate the Recovery Point Objective (RPO) or potential data loss. |
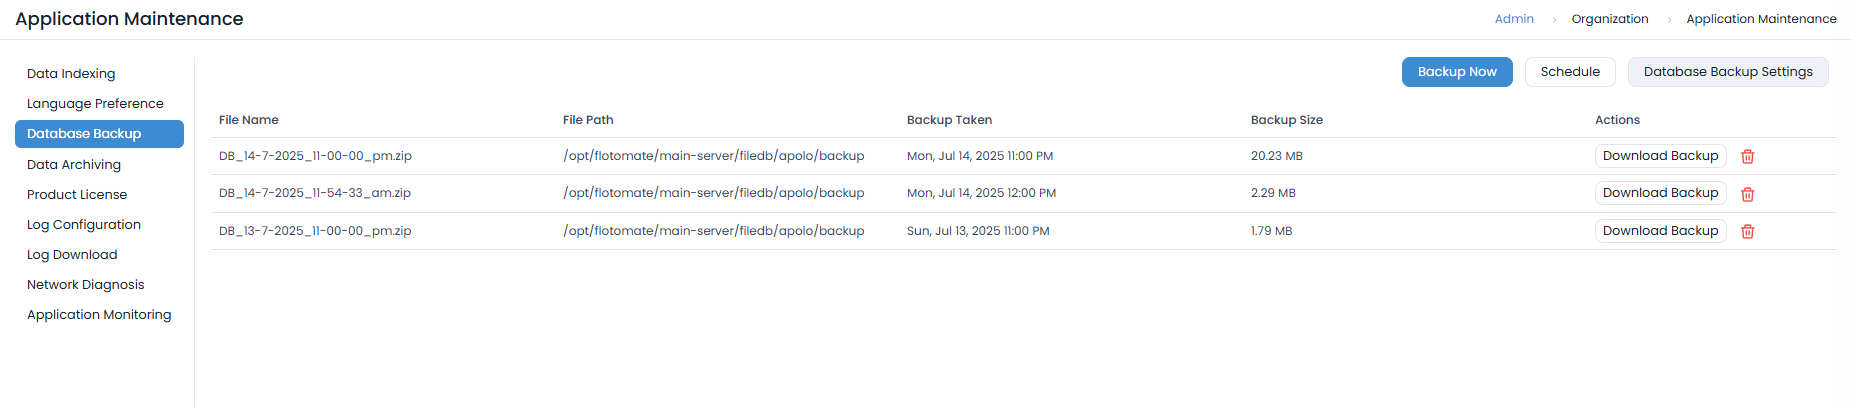
| ■ | Check Last Successful Backup: Verify the status and timestamp of the latest successful database backup from the ServiceOps portal under Admin > Organization > Application Maintenance > Database Backup. | This provides a fallback recovery point if replication is compromised. |

| ■ | Notify End-Users: Inform end-users and technicians that the system is currently unavailable and a failover is in progress, providing an estimated time to recovery. | |
| ■ | Prepare DNS Changes: Have the required DNS changes ready to be applied. The Time To Live (TTL) for the relevant DNS records should be low to facilitate a quick switch. | |
| ■ | Disable DC Site Access: Ensure that if the primary DC comes back online unexpectedly, it is isolated from the network to prevent a "split-brain" scenario. | This can be done via firewall rules or by shutting down network interfaces. |
Manual Switchover (Failover)
When the primary DC site becomes unavailable, perform the following manual steps on the DR site to resume operations.
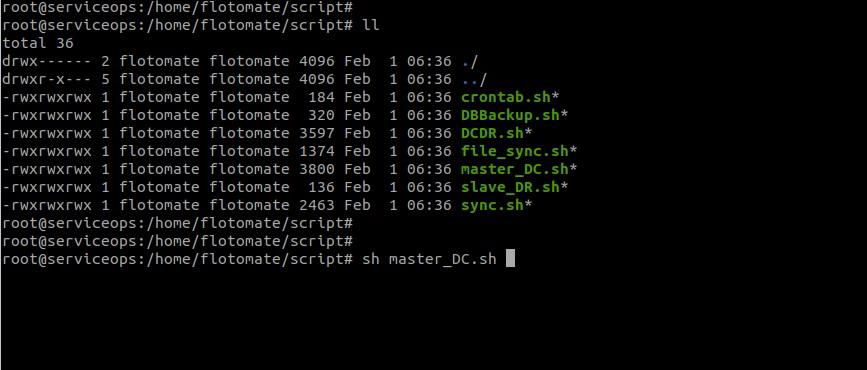
Step 1: Promote DR Database
Log in to the DR server as the
rootuser.Navigate to the
/optdirectory and execute themaster_DC.shscript to promote the slave database to a master.sh master_DC.sh
Verify that the PostgreSQL service is running correctly:
systemctl status postgresql
Step 2: Update Replication Configuration for Failback
To prepare for eventual failback to the original DC, you must re-establish a replication link. In this new configuration, the DR site acts as the master.
- Switch to your application user (e.g.,
flotomate). - Edit the
file_sync.shscript at/home/{user}/script/file_sync.sh. - Update the
current_slavevariable to point to the original DC's IP address.

Execute
crontab.shto apply the new cronjob.sh crontab.sh

Step 3: Start Application Services
Start all necessary ServiceOps services on the DR server:
systemctl start ft-main-server
systemctl start ft-analytics-server
systemctl start ft-plugins-server
Once services are running, update your DNS records to point all user traffic to the DR site's IP address.
Log in to the application to perform a sanity check and confirm that operations are normal.
Switchback to Original DC (Failback)
Once the original DC site is recovered and fully stable, you can perform a planned switchback to move operations back to your primary data center. Unlike an emergency failover, a failback is a controlled process that should be performed during a scheduled maintenance window to minimize disruption.
Prerequisites for Switchback
- Stable Primary DC: The original DC environment must be fully restored, tested, and confirmed to be stable and ready to handle the full production load.
- Complete Data Replication: All data written to the DR site during the outage must be fully replicated back to the primary DC's database and file stores.
- Scheduled Maintenance Window: A formal maintenance window must be scheduled and communicated to all stakeholders and end-users.
Pre-Switchback Checklist
| Status | Action | Notes |
|---|---|---|
| ■ | Announce Maintenance: Communicate the date and time of the planned switchback to all users. | |
| ■ | Verify DC Health: Perform a final health check of the primary DC servers (CPU, memory, disk). You can check the status from the Admin > Organization > Application Maintenance > Application Monitoring tab. | |
| ■ | Perform Final Sync: Run a final, manual data and file replication from the DR site to the DC to ensure data is 100% current. | This minimizes the Recovery Point Objective (RPO) for the switchback itself. |
| ■ | Prepare DNS Changes: Have the DNS changes ready to point traffic back to the original DC IP address. |
Switchback Procedure
Step 1: Stop Services on DR Site
To prevent any new data from being written during the transition, stop the application services on the DR server at the beginning of the maintenance window.
systemctl stop ft-main-server
systemctl stop ft-analytics-server
systemctl stop ft-plugins-server
Step 2: Promote Original DC Database
- Log in to the original DC server as the
rootuser. - Navigate to the
/optdirectory and execute themaster_DC.shscript to promote its database back to the master role.sh master_DC.sh - Verify that the PostgreSQL service is running correctly:
systemctl status postgresql
Step 3: Start Services on Original DC
Start all necessary ServiceOps services on the original DC server.
systemctl start ft-main-server
systemctl start ft-analytics-server
systemctl start ft-plugins-server
Step 4: Update DNS and Verify
- Update your DNS records to point all user traffic back to the original DC site's IP address.
- Once DNS has propagated, perform a thorough verification using the checklist below.
Post-Switchback Verification
Use this checklist to validate that the primary DC is fully operational after the switchback.
| Category | Status | Action | Notes |
|---|---|---|---|
| Service Availability | ■ | Confirm Service Status: Verify all ft-* services are active on the primary DC. Alternatively, you can check the status from the DCDR tab of Admin > Organization > Application Maintenance > Application Monitoring tab as shown in the below image. | |
| ■ | Application Login Test: Log in to the web console from the primary DC URL. |

| Data Integrity | ■ | Check for Recent Data: Verify that data created on the DR site during the outage is present. You can do this by verifying the replication status | |
| Communication | ■ | Announce System Restore: Formally announce that the switchback is complete and the system is operating normally from the primary data center. |
At this point, your environment is back to its original state. You must re-establish the replication link from the DC to the DR site by following the initial setup guide again to ensure you are protected for a future event.
Scheduled Database Backups
While continuous replication is the primary method for minimizing data loss, maintaining scheduled backups provides a crucial secondary recovery option. This is particularly useful if the replication link is broken for an extended period or if you need to restore the system to a specific point-in-time before a data corruption event.
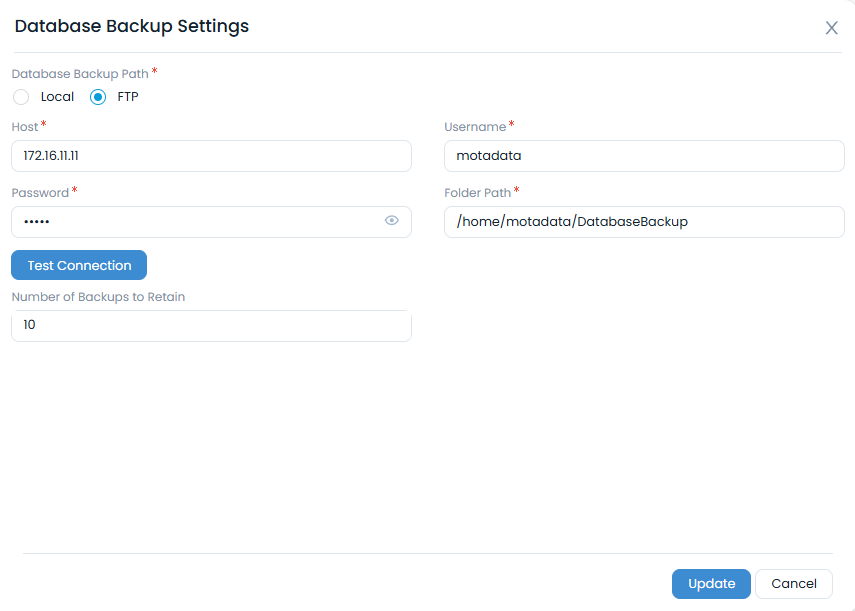
For an additional layer of data protection, ServiceOps supports automated, scheduled database backups to a remote FTP location.
Configure Backups
- In the ServiceOps UI, navigate to Admin > Organization > Application Maintenance > Database Backup.
- Configure FTP Settings: Enter the host, credentials, and path for your FTP server. Test the connection and save.
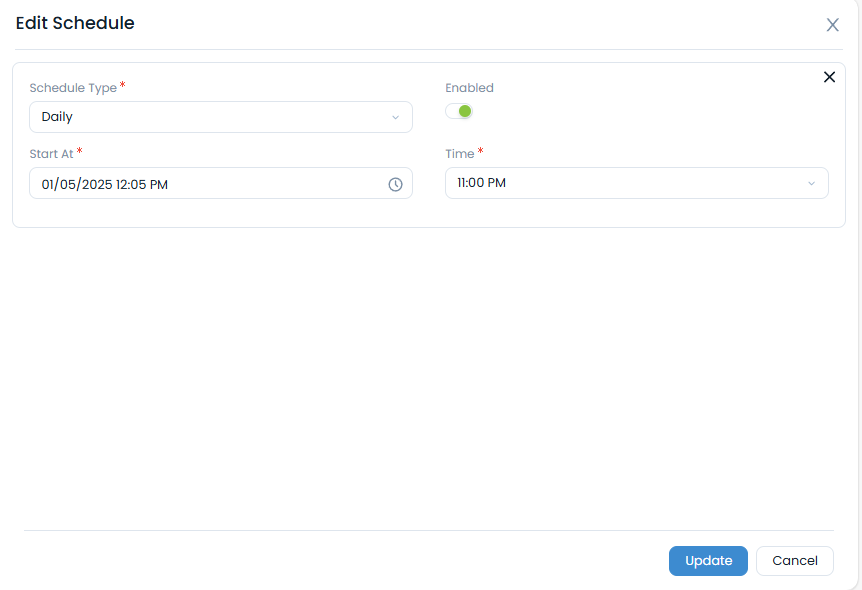
- Schedule Backups: Set a daily schedule for the backup to run automatically.
- Test: Use the Backup Now button to test the process and verify that a backup file is created in the specified location.
Restore from Backup
To restore a database from a backup file on a DR server:
Transfer the latest backup file to the
/tmpdirectory on the DR server and unzip it.mv DB_DATE_BACKUP.zip /tmp/
cd /tmp
unzip DB_DATE_BACKUP.zipFor example:
mv DB_10-6-2021_11-00-00_pm.zip /tmp
cd /tmp
unzip DB_10-6-2021_11-00-00_pm.zip
Stop the main application services.
systemctl stop ft-main-server
systemctl stop ft-analytics-server
Log in to the PostgreSQL console (using root), drop the existing database, and create a new, empty one.
Command:
su postgresCommand:
psqlDROP DATABASE flotoitsmdb;
CREATE DATABASE flotoitsmdb;Once created, verify whether the database is created using the below command:
\lQuit from the database using the below command:
\q
- Use the
pg_restorecommand to restore the dump file into the newly created database.# Example
pg_restore -U postgres -d flotoitsmdb < DB_10-6-2021_11-00-00_pm - Start the application services.