Agent Bulk Installation/Uninstallation via GPO
Group Policy Objects (GPOs) provide an efficient way to deploy ServiceOps agents across multiple Windows machines simultaneously, saving time and ensuring consistent deployment across your Active Directory environment.
Group Policy Objects are a powerful Windows feature that allows network administrators to control the environment of Active Directory users and computers. Using GPOs, you can deploy software packages to multiple users and computers simultaneously, making it an ideal solution for bulk agent deployment in enterprise environments.
Prerequisites
Before implementing GPO-based agent deployment, ensure your environment meets the following requirements:
System Requirements
- Domain Controller: Active Directory domain controller with Group Policy Management
- Target Machines: Windows 8 and above versions
- Architecture: 32-bit and 64-bit supported
- Dependencies:
- .NET version 4 and above
- Microsoft Visual C++ 2015 and above
Administrative Requirements
- Domain Administrator Rights: Required to create and apply Group Policy Objects
- Local Administrator Rights: Required on target machines for software installation
- Network Access: Target machines must be able to access the shared package location
Pre-Deployment Prerequisites
For remote agent bulk installation using GPO, fulfill the following prerequisites:
File Sharing and Permissions
- File Sharing: Must be allowed on the network
- UAC Settings: User Access Control should be allowed in Registry Editor
- Path:
Computer\HKEY_LOCAL_MACHINE\SOFTWARE\Microsoft\Windows\CurrentVersion\Policies\System\LocalAccountTokenFilterPolicy
- Path:
Security Configuration
- Antivirus Exclusions:
- Add
C:\Users\Publicto Virus and Threat Protection exclusions - Exclude
RemComSvc.exefrom any Anti-Virus settings - Bypass
pattern-executor.exefile in the Antivirus application
- Add
- Firewall Rules: Allow the following Inbound Rules:
- Windows Management Instrumentation (DCOM-In) (Private, Public)
- Windows Management Instrumentation (DCOM-In) (Domain)
- Windows Management Instrumentation (WMI-In) (Private, Public)
- Windows Management Instrumentation (WMI-In) (Domain)
- Remote Service Management (NP-In) (Private, Public)
- Remote Service Management (NP-In) (Domain)
- File Execution: Allow download and execution of .exe files from Firewall and Antivirus rules
If the agent does not get installed after fulfilling the above prerequisites, reboot the machine and try again to install the agent.
Understanding Group Policy Objects
What is Group Policy?
Group Policy contains configurations that help network administrators control the environment of Active Directory users and computers.
What is a Group Policy Object?
Group Policy Objects (GPOs) are a group of policy settings based on which certain actions can be enforced on all users and computers in the Active Directory Domain. Using GPOs, you can deploy software packages for multiple users, thus saving time and money.
Microsoft provides a simple way to deploy software and also a quick solution to uninstall it when needed.
GPO Configuration Process
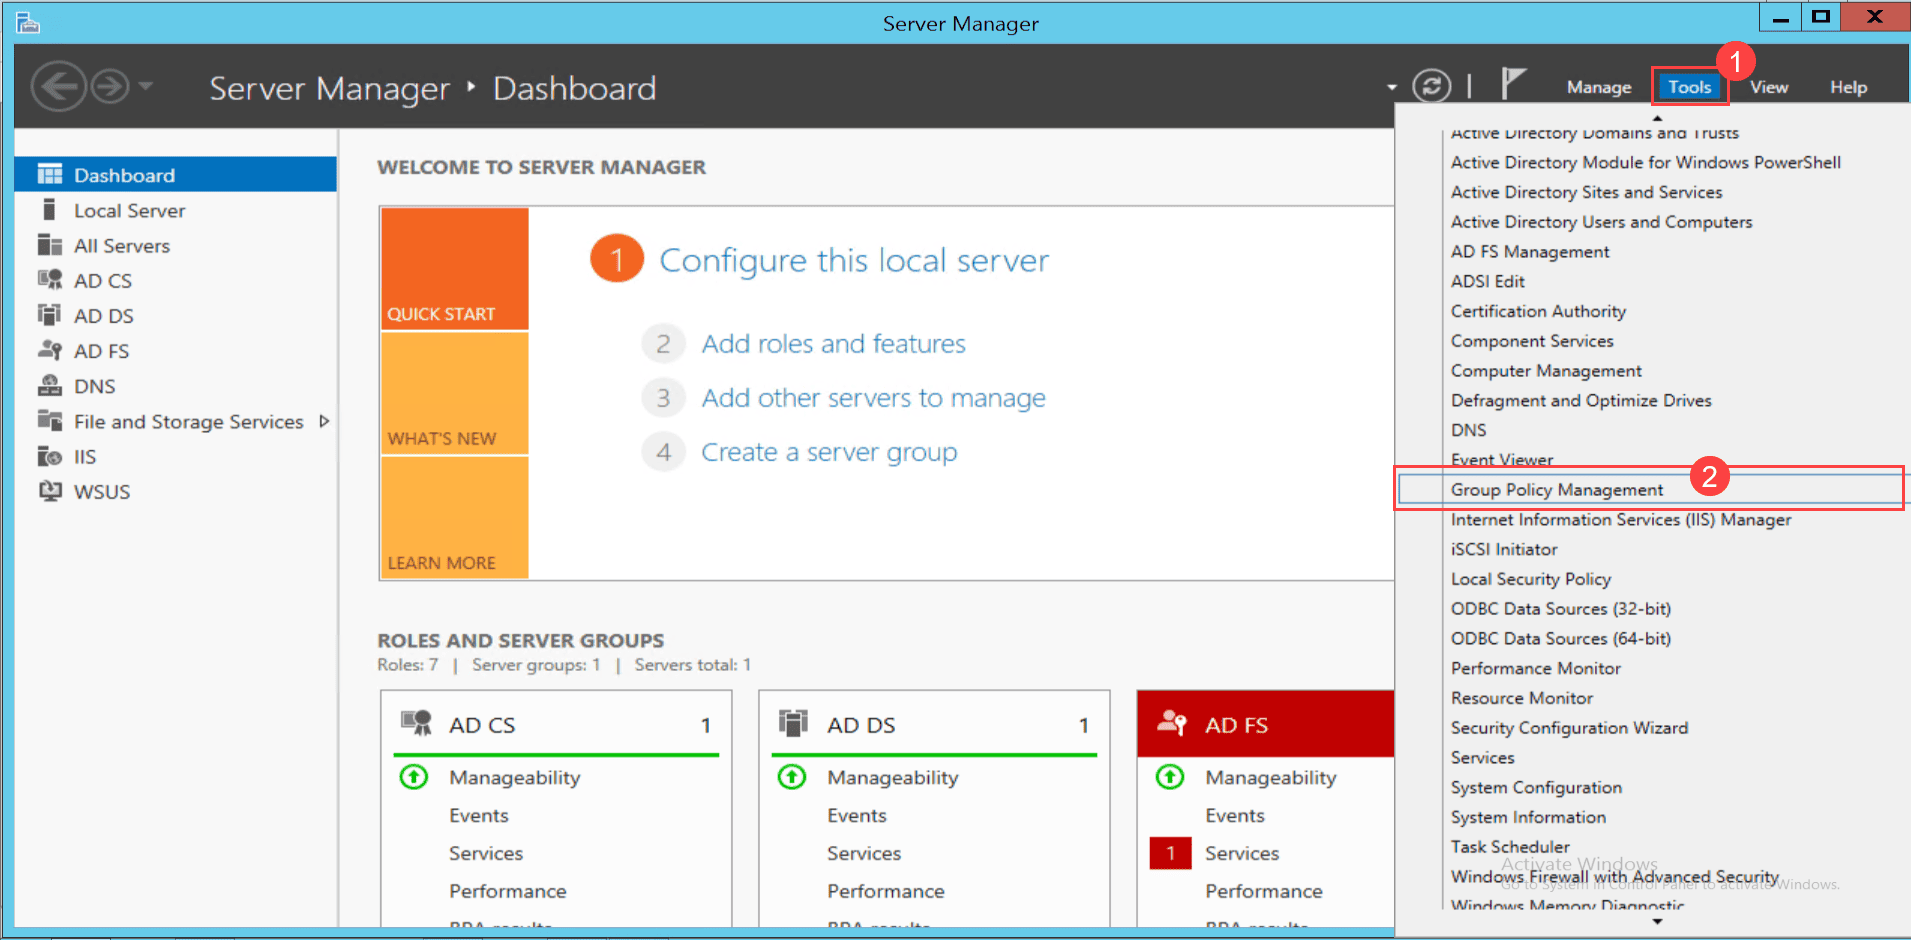
Step 1: Access Group Policy Management
- Open the Server Manager from the menu
- Navigate to Tools > Group Policy Management
Step 2: Create a New GPO
- Expand the Domains tree
- Select the desired domain
- Right-click and select Create a GPO in this domain and Link it here

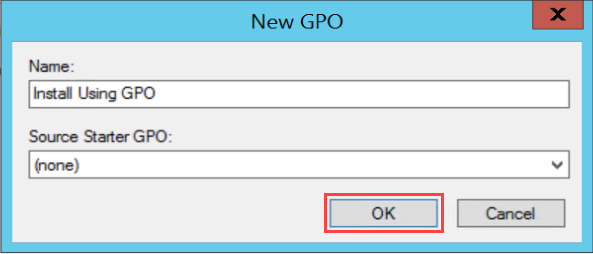
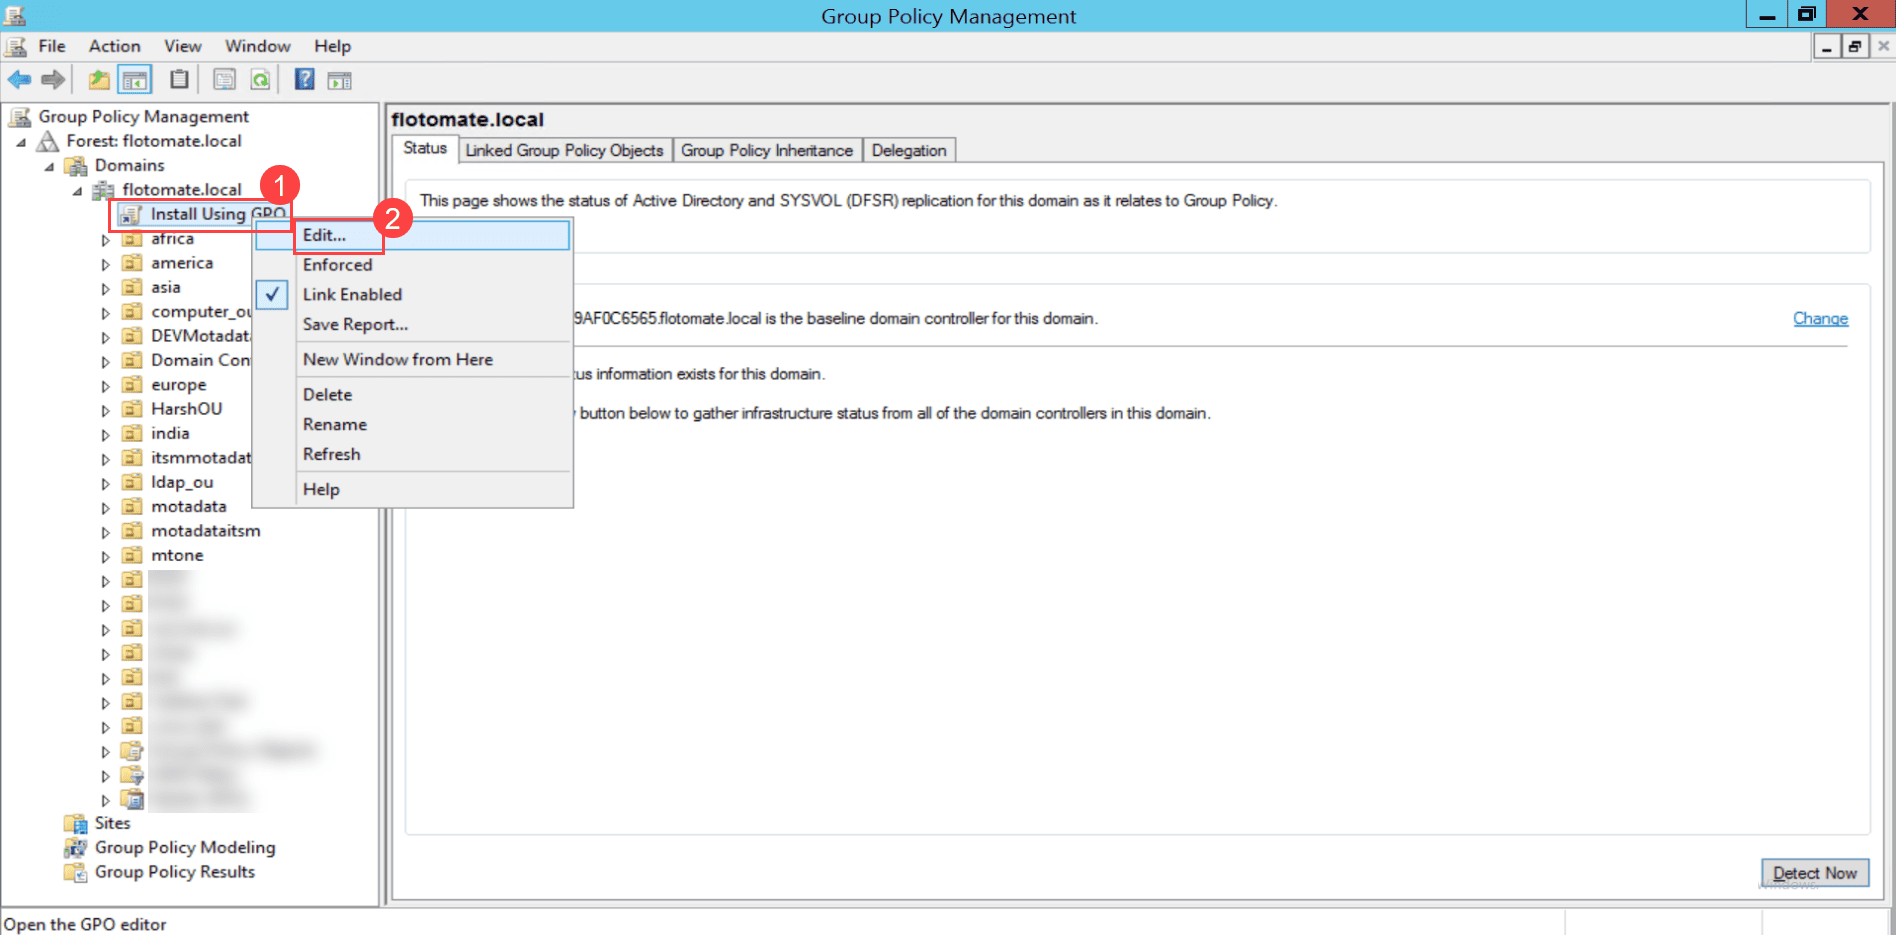
Step 3: Configure GPO Policy
- Create a new GPO policy by entering the name and clicking OK
- Right-click the created policy and select Edit
Step 4: Add Software Package
- In the Group Policy Management Editor, navigate to: Computer Configuration > Policies > Software Settings > Software Installation
- In the right pane, right-click and select New > Package
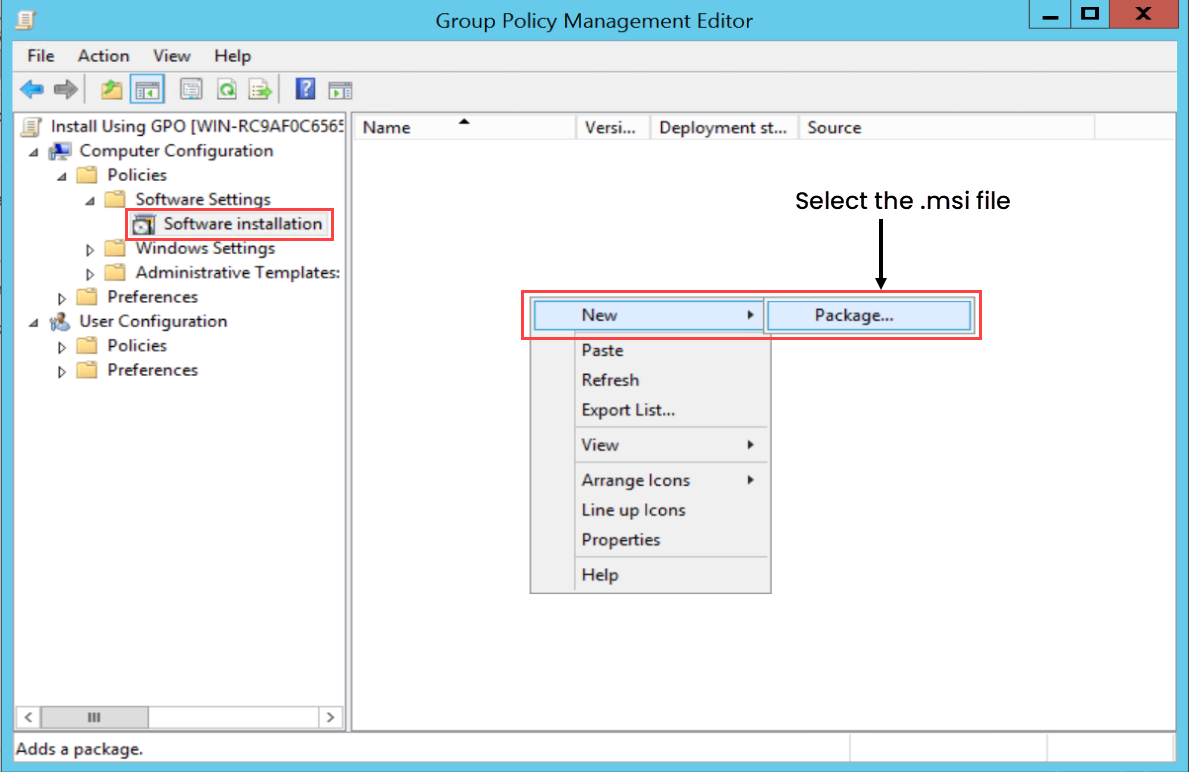
- Select the pre-defined agent setup file and click Open
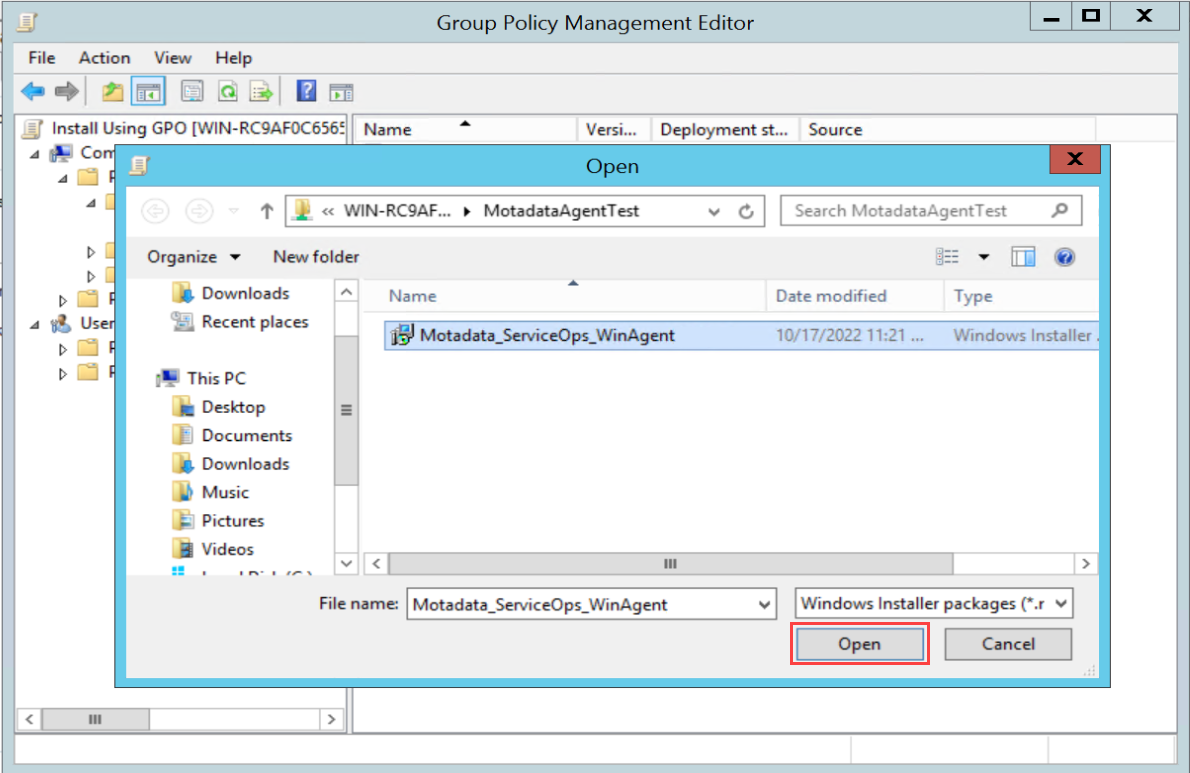
- To get the pre-defined agent setup file, contact the Motadata Support or Implementation team
- This file must be publicly accessible from the target machine
- When performing an upgrade, ensure that the old MSI file is not deleted or removed before installing the new one
- The new MSI file must be publicly accessible for the upgrade to proceed successfully
Step 5: Configure Package Properties
- Navigate to Computer Configuration > Policies > Software Settings > Software Installation
- Right-click and select Properties
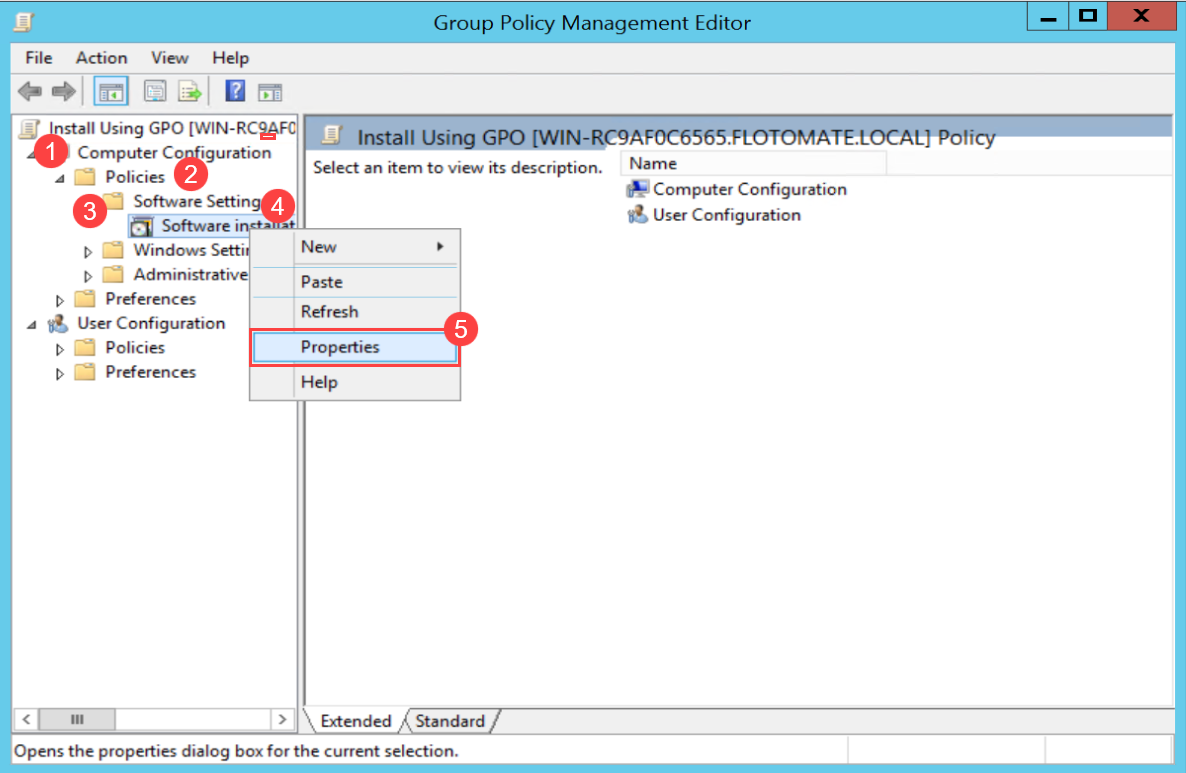
- In the Software Installation Properties window:
- Select the General tab
- Browse and select the default package location
- Select the options: Assign and Basic
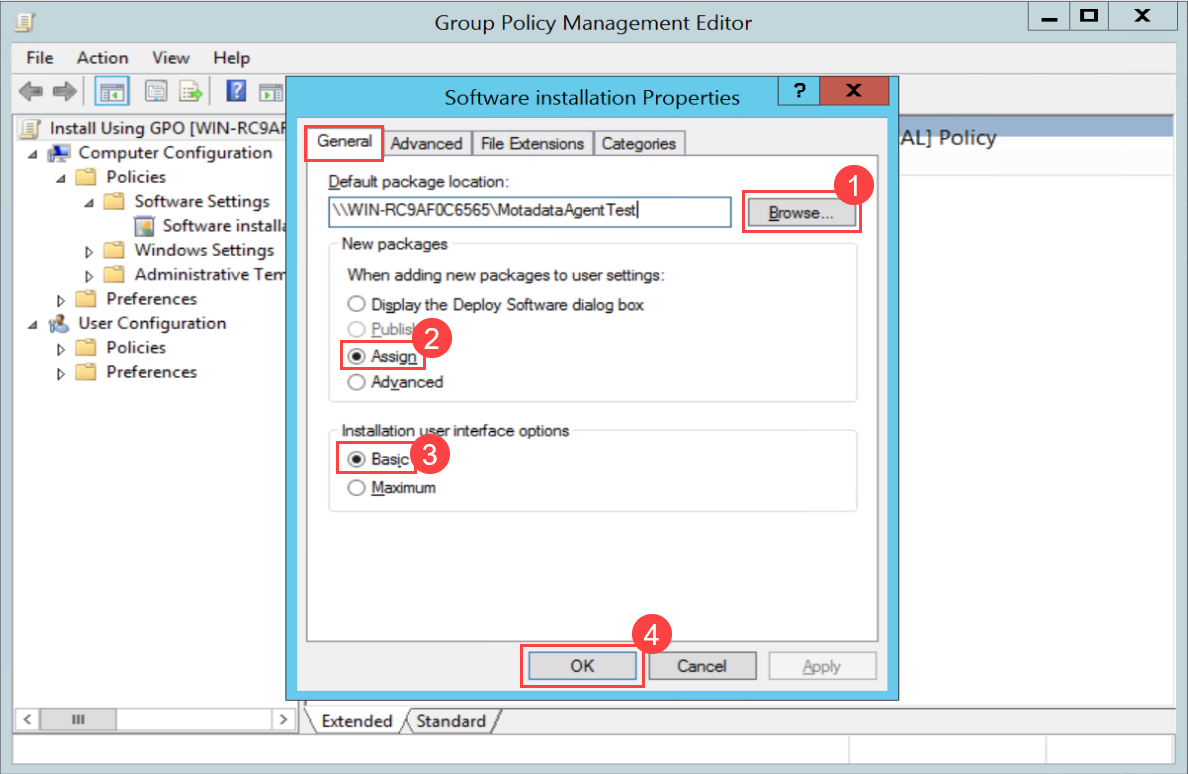
The shared folder path given in the Default Package Location must be publicly accessible from the target machines.
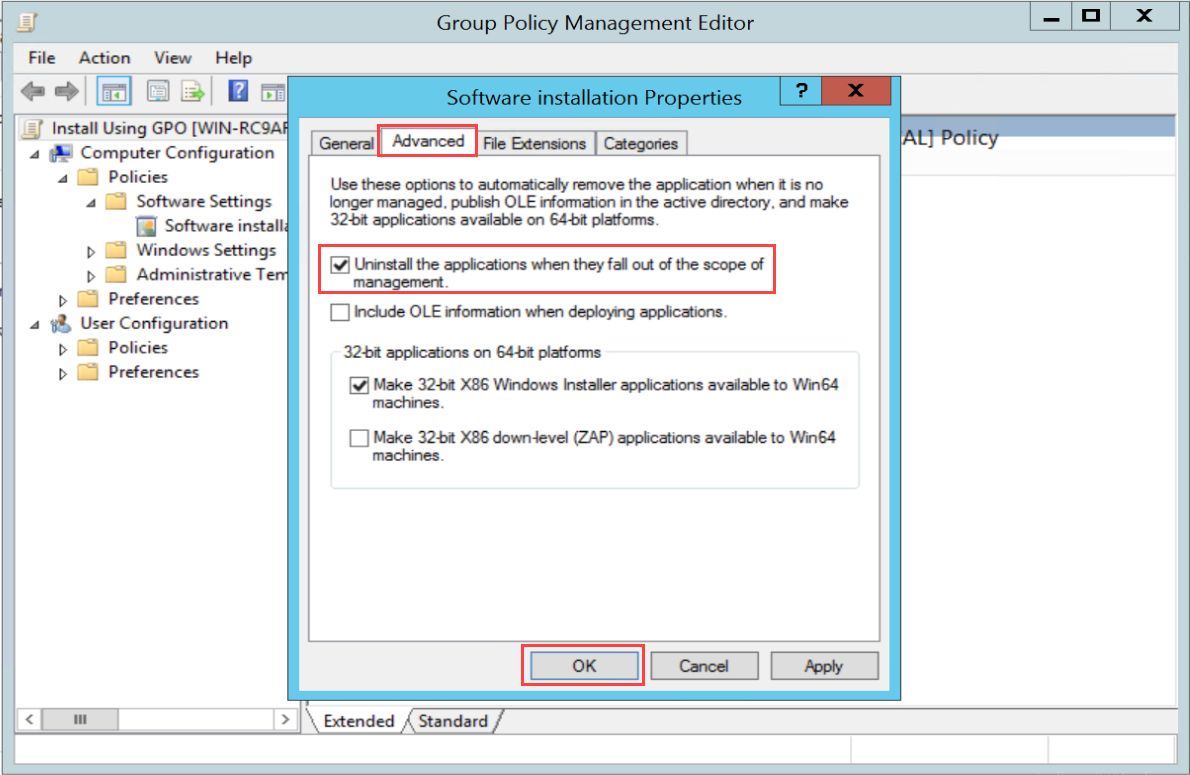
Step 6: Configure Advanced Settings
- Select the Advanced tab
- Enable the option Uninstall the applications when they fall out of the scope of management
- Click OK
Step 7: Set Agent Properties
- Right-click on the agent and select Properties
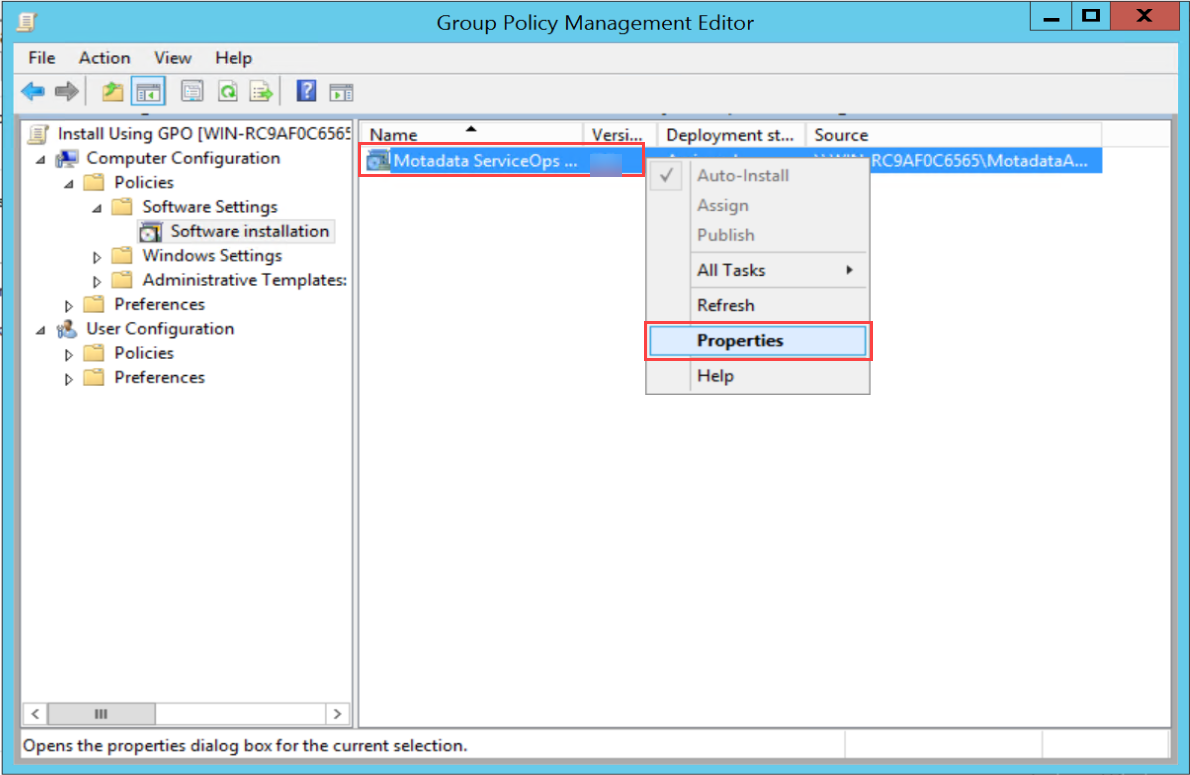
- In the Properties window, select the Deployment tab
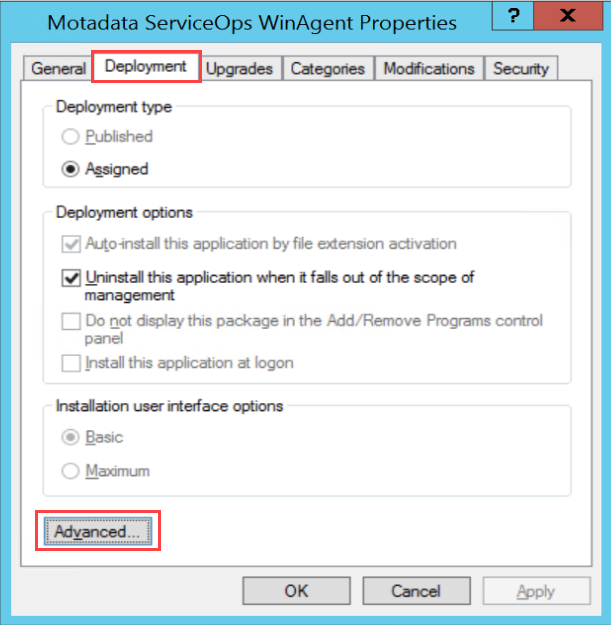
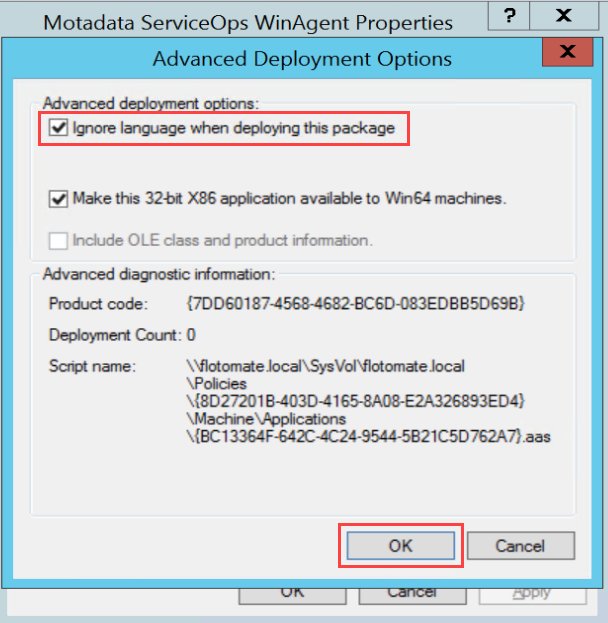
- Click Advanced and enable the option Ignore language when deploying this package
- Click OK
Deployment and Execution
Manual Policy Update
Once the GPO policy is created, you can force the policy to apply immediately by running the following command on target machines:
gpupdate /force
Automatic Policy Application
The Software Installation process begins when a system restarts, or you can start it manually using the gpupdate /force command.
Verification
In ServiceOps, the agents installed using this policy will appear on:
- Hardware Assets List page
- Discovery Agent tab of Admin > Asset Management > Asset Discovery
Troubleshooting GPO Deployment
Common Installation Failures
If agent installation fails, modify the following GPO settings:
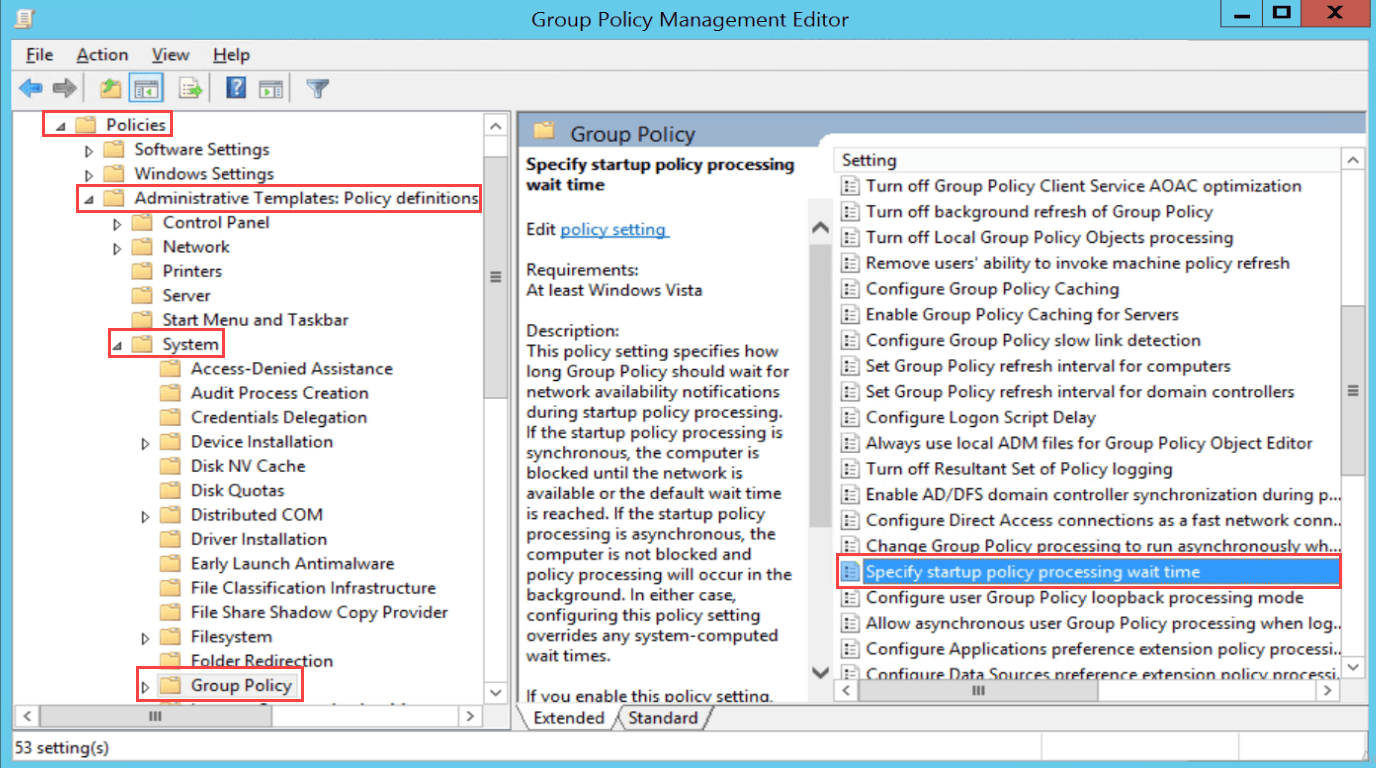
Startup Policy Processing Wait Time
- Navigate to Computer Configuration > Policies > Administrative Templates > System > Group Policy
- Enable the option Specify startup policy processing wait time
- Set the Amount of time to wait (in seconds) as 600
- This is the approximate average time taken to install the agent on the target machine
- You can increase it if the target machine is slower or due to network latency
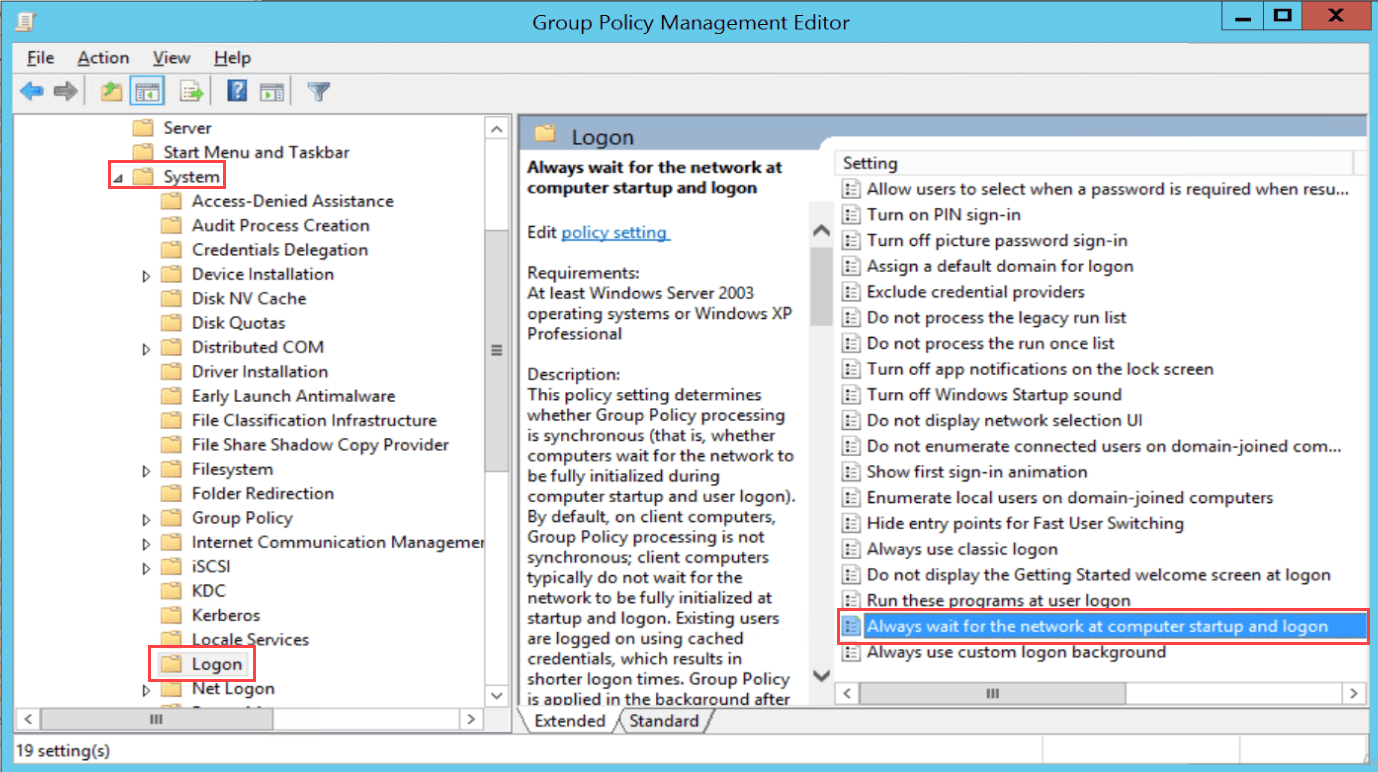
Network Wait Time
- Navigate to Computer Configuration > Policies > Administrative Templates > System > Logon
- Enable the parameter Always wait for the network at computer startup and logon
Additional Troubleshooting Steps
- Check Network Connectivity: Ensure target machines can access the shared package location
- Verify Permissions: Confirm domain and local administrator rights
- Check Event Logs: Review Windows Event Logs for installation errors
- Test Package Accessibility: Verify the MSI file is accessible from target machines
Agent Uninstallation Using GPO
Step 1: Access Software Installation
- Navigate to Computer Configuration > Policies > Software Settings > Software Installation folder
- Select the agent (Motadata ServiceOps)
- Right-click and select All Tasks > Remove

Step 2: Configure Uninstallation
- In the Remove Software dialog that appears
- Select the option Immediately uninstall the software from users and computers
- Click OK
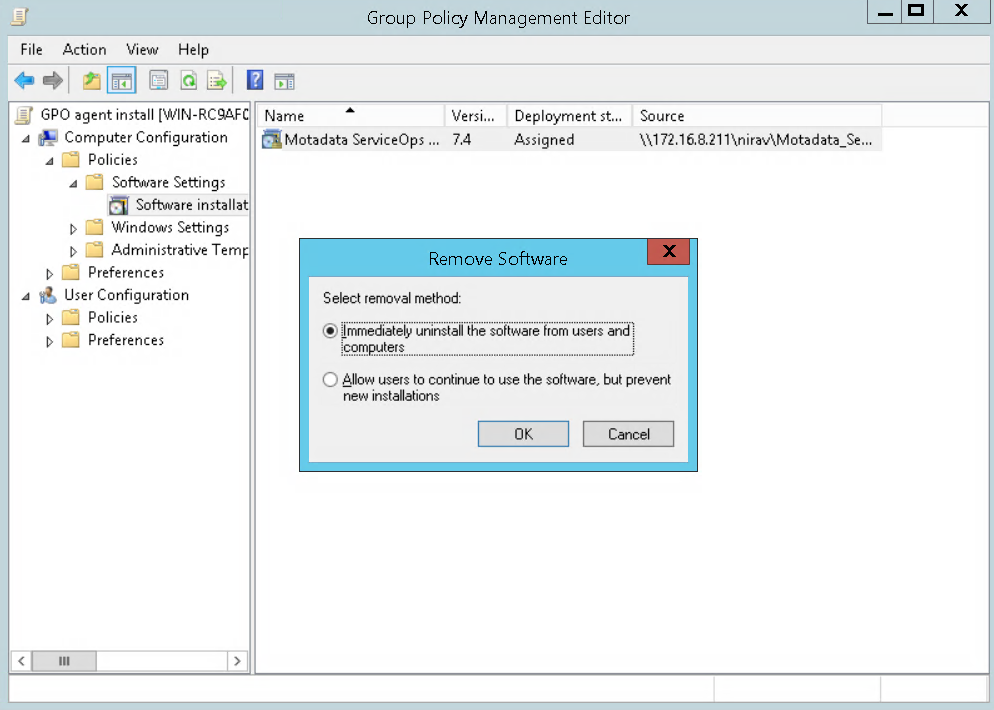
The uninstallation will take place after the next system reboot.
Best Practices
Planning and Preparation
- Test in Pilot Group: Deploy to a small test group before full deployment
- Document Configuration: Keep detailed records of GPO settings and package locations
- Backup Existing Agents: Ensure you have backups before upgrading existing agents
- Network Assessment: Verify network connectivity and bandwidth for large deployments
Security Considerations
- Package Security: Ensure MSI files are stored in secure, accessible locations
- Access Control: Limit access to GPO management to authorized administrators
- Audit Logging: Enable audit logging for GPO changes and deployments
- Antivirus Integration: Work with your security team to configure proper exclusions
Performance Optimization
- Staggered Deployment: Deploy to different OUs at different times to avoid network congestion
- Bandwidth Management: Schedule deployments during off-peak hours
- Monitoring: Monitor system resources during deployment
- Rollback Plan: Have a rollback strategy in case of deployment issues
Monitoring and Verification
Deployment Monitoring
- GPO Status: Check GPO application status using
gpresultcommand - Software Inventory: Verify agent installation in Programs and Features
- Service Status: Check that agent services are running
- Portal Verification: Confirm agents appear in ServiceOps portal
Troubleshooting Commands
# Check GPO application status
gpresult /r

# Force GPO update
gpupdate /force

# Check GPO application details
gpresult /h report.html

# Check software installation status
wmic product get name,version
Next Steps
After successfully configuring GPO-based agent deployment:
- Test Deployment: Deploy to a pilot group to verify configuration
- Monitor Performance: Track deployment success rates and system impact
- Document Procedures: Create runbooks for future deployments
- Plan Rollout: Schedule full deployment across your organization
- Set Up Monitoring: Configure alerts for deployment status and agent health
Related Topics
- Installing Discovery Agent: For individual discovery agent installation
- Installing RDP Agent: For individual RDP agent installation
- Agent Bulk Installation via Utility: For utility-based bulk deployment