Installing the Combined Discovery + RDP Agent
Streamline endpoint management on Windows by deploying a single agent for both comprehensive asset discovery and secure remote desktop access.
The combined Discovery + RDP agent is the most efficient solution for Windows environments, integrating the functionalities of both the Discovery and RDP agents into a single installation. This approach simplifies deployment and provides a unified tool for asset visibility and remote troubleshooting.
Starting from Agent version 8.7.4, the Discovery and RDP Agents have been unified into a single agent. The separate Discovery Agent and RDP Agent guides are applicable only up to version 8.7.3. For agent installation instructions, refer to the Discovery Agent page.
Benefits of a Combined Installation
Streamlined Deployment
- Single Installation: Install both discovery and RDP functionality with one file
- Reduced Complexity: Eliminate the need for separate agent installations
- Consistent Configuration: Ensure both services use the same connection settings
Operational Efficiency
- Unified Management: Manage both discovery and RDP capabilities from one agent
- Simplified Updates: Update both functionalities together
- Reduced Resource Usage: Single agent process for both services
Use Cases
- IT Support Teams: Need both asset discovery and remote access capabilities
- System Administrators: Want comprehensive asset management with remote troubleshooting
- Help Desk Operations: Require both asset visibility and remote support tools
Prerequisites
Before proceeding with the installation, ensure that your environment meets the following requirements.
System Requirements
- OS: Windows 8 and above (32-bit & 64-bit)
- Dependencies: .NET Framework 4+, Microsoft Visual C++ Redistributable for Visual Studio 2015, 2017, 2019, and 2022
Required Information
You will need the following details from your ServiceOps portal during installation:
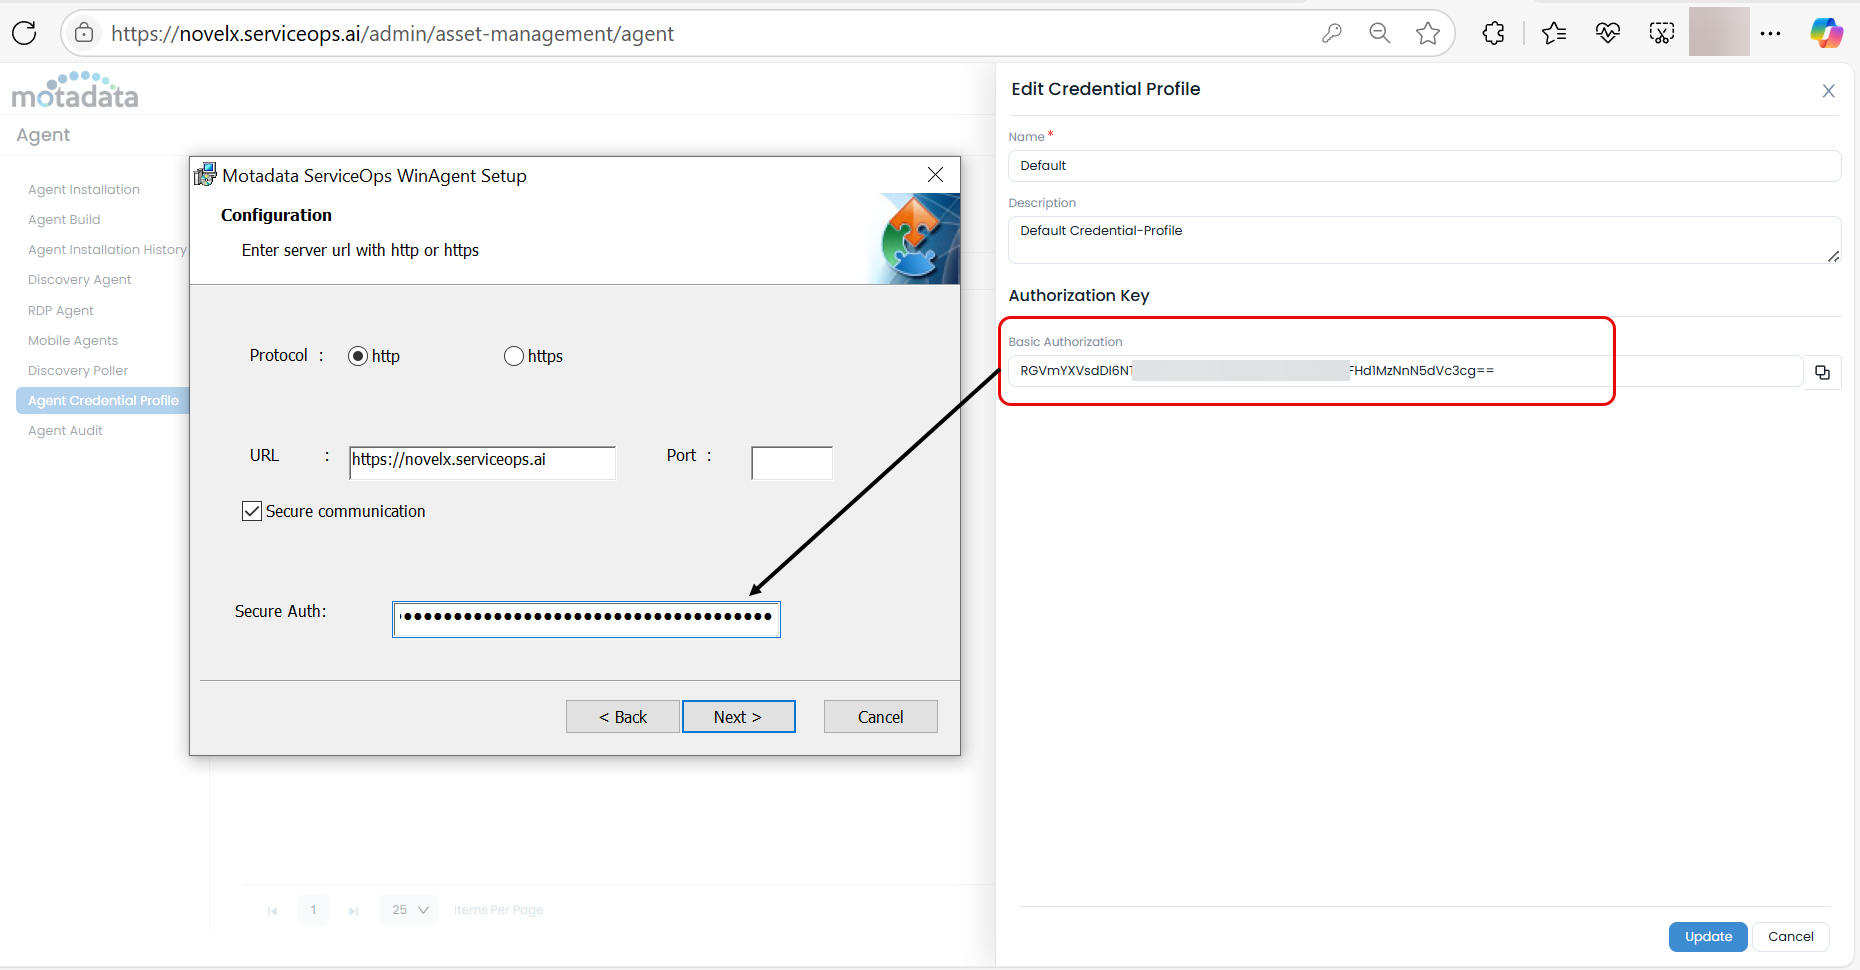
- ServiceOps Server URL: The web address of your ServiceOps instance.
- Secure Auth Code: Found in Admin > Discovery and Agents > Agents > Agent Credential Profile. This is the required method for new installations.
- Activation Code: (For upgrade scenarios only) Found in Admin > Organization > Account > License Details.
- Protocol: HTTP or HTTPS, depending on your server configuration.
Pre-Installation Checklist
- RDP Server Ready: The RDP Server (MeshCentral) must be installed and configured within ServiceOps.
- Asset Discovery: For RDP functionality to work, the target asset must already be discovered in ServiceOps (either through agent-based or agentless methods).
- Network Accessibility: The ServiceOps server domain must be publicly accessible, or a host entry (located at
C:\Windows\System32\drivers\etc) must be added on the target machine if it's in a private network. - Firewall Configuration: Ensure firewall rules are in place to allow outbound communication for both discovery (Ports 8730, 8731) from the agent to the ServiceOps server, and bidirectional communication for RDP (Ports 80, 443, 8443) to and from the ServiceOps server.
- Antivirus Exclusions: To prevent interference, exclude the
MotadataRemote.exe(located atC:\Program Files (x86)\Motadata\Motadata RDP WinServer\rdpapp\MotadataRemote.exeby default) from your antivirus scans. - Add Folders: Add the rdpapp and Remote folders at the below location if they do not exist:
*   `C:\Program Files (x86)\Motadata\Motadata RDP WinServer\rdpapp`
*   `C:\ProgramData\Remote`
- The Auto-Upgrade feature does not support the combined agent. To automate upgrades, the Discovery and RDP agents must be deployed and managed separately.
- Communication will fail if the Agent Credential Profile used for installation is deleted or archived.
Combined Agent Installation on Windows
The installation process for the combined agent is identical to the standalone Windows agent installation, with the key difference being the installer file you use.
Step 1: Download the Combined Agent
- Navigate to the Download Links section in your ServiceOps documentation.
- Download the latest Windows Combined Discovery + RDP agent (
.msi) file (e.g.,Motadata_ServiceOps_WinAgent_With_RDP_V8.x.x_x64.msi). - Ensure you select the correct architecture (32-bit or 64-bit) for the target system.
Step 2: Run the Installation Wizard
Right-click the downloaded
.msifile and select Run as administrator.When the User Access Control (UAC) prompt appears, click Yes.
The installation wizard will launch. Click Next to begin.

Step 3: Configure Connection Settings
In the server configuration screen, enter the following:
- URL: Your ServiceOps server URL.
- Port: Leave this blank to use default ports (80/443) or enter a specific port if required.
- Protocol: Select HTTPS (recommended) or HTTP.
Click Next.

Step 4: Provide Authentication Details
Select the Secure Communication option.
Enter the Secure Auth key obtained from the Agent Credential Profile in ServiceOps.
Click Next.
For new installations, the Activation Code method is not supported.
Step 5: Complete the Installation
Click Install to start the installation process.
Once the installation is complete, click Finish to exit the wizard.

Post-Installation Verification
After installation, it is crucial to verify that both Discovery and RDP components are functioning correctly.
1. Verify Service and Program Installation
- Check that the agent appears in Control Panel > Programs and Features.
- Open the Services application (services.msc) and confirm that both the Discovery and RDP agent services are running.
2. Verify Portal Registration
- Log in to your ServiceOps portal.
- Navigate to Discovery > Agents. Confirm the new device appears in the list with an "Online" status.
- Navigate to Admin > Asset Management > RDP Configuration > RDP Agents. Confirm the new device also appears in this list.
Verify Discovery Functionality
- Asset Discovery: After installation, allow time for the agent to complete its initial discovery cycle (typically runs every 60 minutes, or can be manually triggered from the ServiceOps portal if available).
- Asset Registration: Check that assets are being discovered and appear in the Hardware Assets list.
- Asset Information: Verify that detailed asset information is being collected.
Verify RDP Functionality
- Wait for Registration: Allow 5-7 minutes after installation for the RDP agent to fully register with the RDP server before attempting a connection.
- Establish Connection: Try to establish an RDP connection from the ServiceOps portal.
- Verify Session: Ensure the RDP session connects successfully without errors.
- Test Features: Verify RDP features like screen recording and session management.
Configuration Requirements
RDP Server Setup
Before using RDP functionality, ensure the RDP server is properly configured:
- Install RDP Server: Install the MeshCentral RDP server
- Configure RDP Settings: Set up RDP configuration in the ServiceOps portal
- Test Connectivity: Verify communication between RDP server and agents
Network Configuration
- Firewall Rules: Configure firewall rules for both discovery and RDP communication
- Port Access: Ensure required ports are accessible (80, 443, 8443)
- SSL Certificates: Configure SSL certificates for secure communication
Security Considerations
- Antivirus Exclusions: Exclude MotadataRemote.exe from antivirus scans
- File Permissions: Ensure proper file permissions for both discovery and RDP components
- Authentication: Use strong authentication methods for both services
Auto-Upgrade Limitations
Important Note
The Auto-Upgrade feature does not support Combined Agents (Discovery + RDP). To auto-upgrade the Discovery and RDP agents, you must:
- Separate Upgrades: Upload Discovery and RDP agents separately
- Individual Management: Manage auto-upgrade for each agent type independently
- Version Coordination: Ensure both agents are compatible with your ServiceOps version
Upgrade Strategy
- Discovery Agent: Use the standard discovery agent for auto-upgrade
- RDP Agent: Use the standard RDP agent for auto-upgrade
- Combined Agent: Manual installation required for combined agents
Performance Considerations
Resource Usage
- Memory: Combined agents use more memory than individual agents
- CPU: Both discovery and RDP processes run simultaneously
- Network: Increased network traffic for both discovery and RDP communication
Optimization Tips
- Deploy During Off-Peak: Install during low-usage periods
- Monitor Resources: Keep track of system resource usage
- Configure Schedules: Set appropriate discovery and RDP session schedules
Uninstallation
Windows Agent
- Use Programs and Features to uninstall
- Or use the command line:
msiexec /x [agent-msi-file] /quiet - Once the agent is uninstalled, delete the agent directory (WinAgent) from the path
C:\ProgramData\Motadata.
Troubleshooting
This section helps you resolve common issues you might encounter during the combined agent installation and configuration.
For a more detailed guide on resolving RDP-related problems, refer to the RDP Installation and Troubleshooting guide.
Installation fails or rolls back
Ensure you are running the installer with administrator privileges. Check if all prerequisites, especially .NET and Visual C++ dependencies, are met.
Agent does not appear in the portal
Verify the URL, port, and protocol settings entered during installation. Check for network connectivity issues or firewalls blocking communication between the agent and the ServiceOps server.
RDP connection fails
Confirm the RDP Server (MeshCentral) is running and properly configured. Double-check that the asset was discovered before the RDP agent was installed and that all required firewall ports are open.