OS Vendor Patches
ServiceOps supports vendor-specific patch management for RedHat and SUSE Enterprise Linux. You can fetch RedHat patches through agent nomination or a satellite server, and manage SUSE patches through subscription registration codes tied to your SUSE Customer Center account.
A valid subscription is required to perform patch management for RedHat and SUSE Enterprise Linux.
To open the OS Vendor Patches page, navigate to Admin > Patch Management > Patch Administration > OS Vendor Patches.
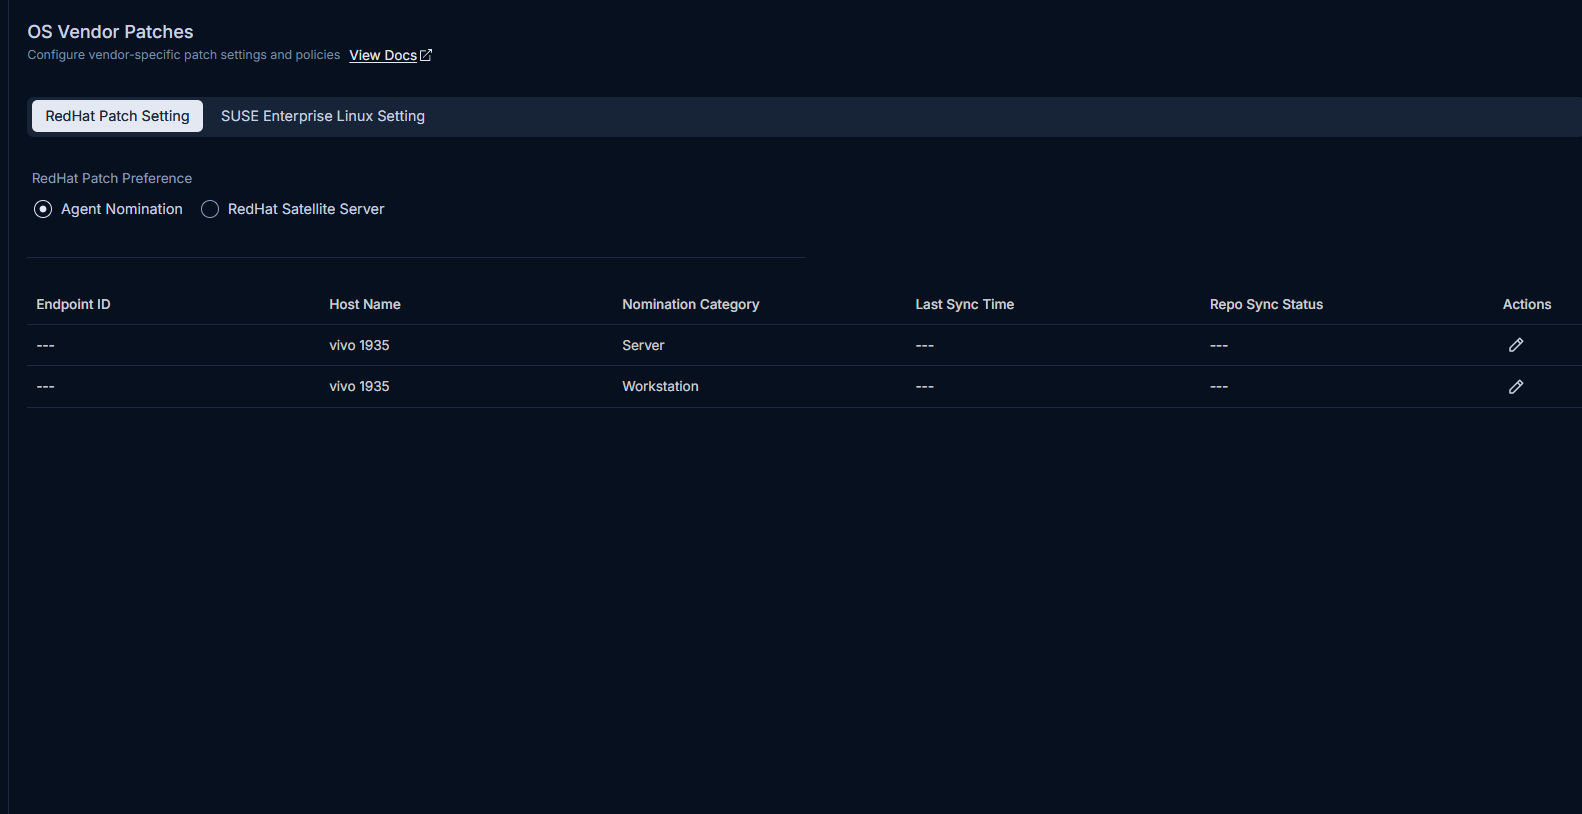
RedHat Patch Setting
The RedHat Patch Setting section lets you choose how ServiceOps fetches RedHat patches, either through nominated agents or a connected RedHat Satellite Server.
RedHat Patch Preference
Choose the preference that best suits your organizational needs for fetching RedHat patches:
- Agent Nomination: Select this option to nominate specific agents that will handle RedHat patch management.
- RedHat Satellite Server: Select this option to integrate with a RedHat Satellite Server for patch management.
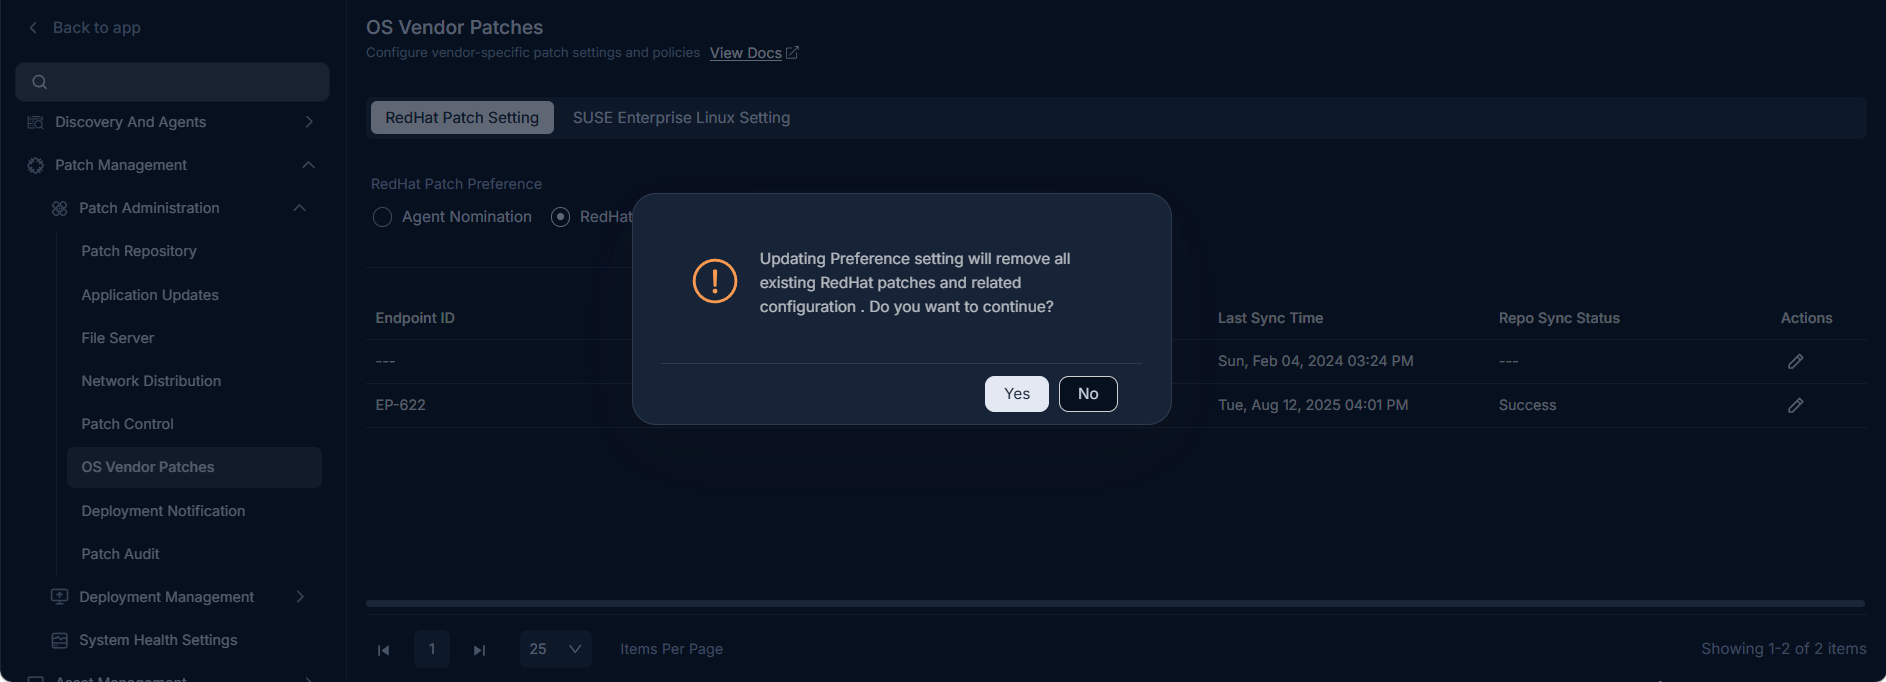
After selecting your preference, click Update to apply it.
Updating the preference removes all existing RedHat patches and agent nomination details from the Patch list.
Agent Nomination
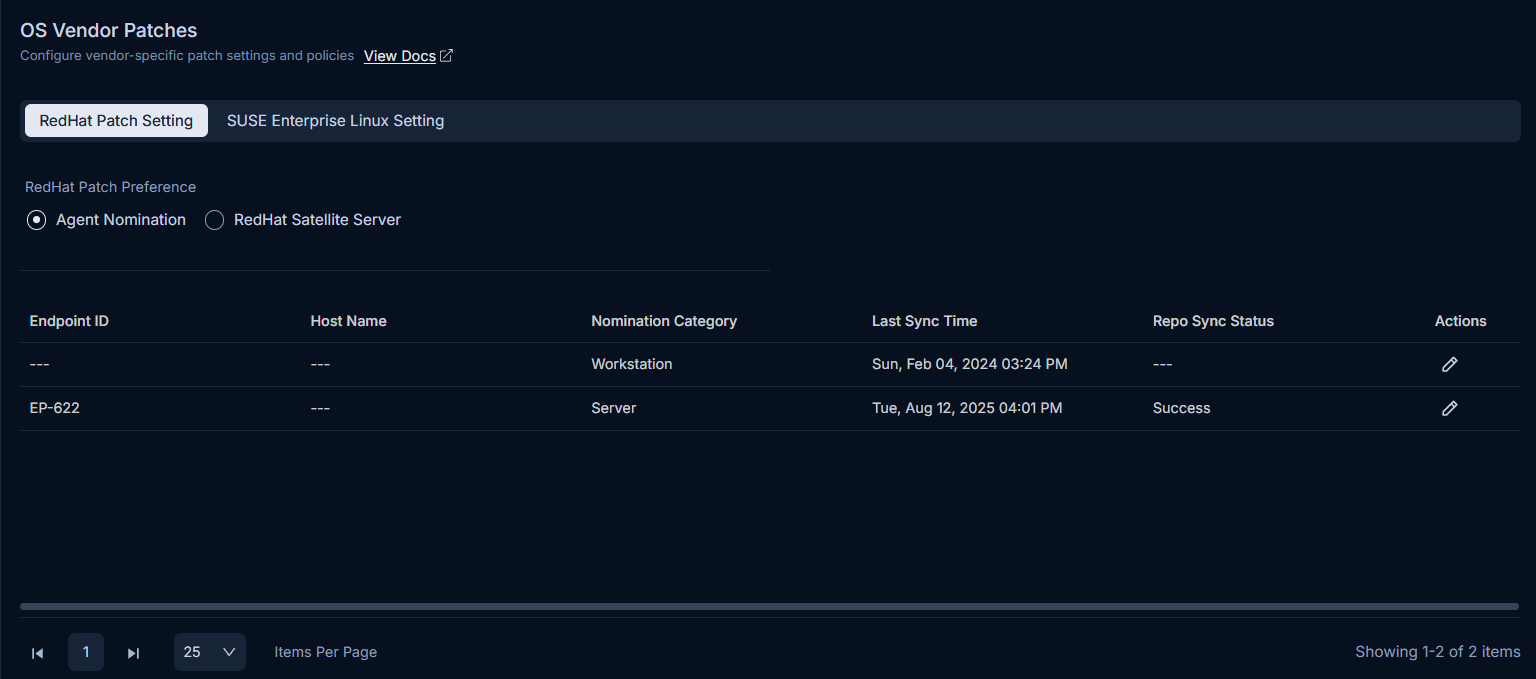
Agent Nomination lets you designate specific agents (Workstation and Server) to handle RedHat patch management on behalf of your environment.
Prerequisites
Confirm the following before nominating agents:
- Designated RHEL Host: Identify a specific Red Hat Enterprise Linux machine to act as the Nomination Machine. Avoid using a host that also runs production workloads.
- Supported OS Version: The Nomination Machine must run RHEL 7 or RHEL 8.
- ServiceOps Agent Installed: Install the ServiceOps Agent on the Nomination Machine and confirm the host appears in the ServiceOps Endpoints Scope.
- Registered to Satellite: Register the Nomination Machine with the Satellite Server, attach it to the correct organization, and assign it to a content view or lifecycle environment that exposes the required repositories.
- Full Repository Access: The Nomination Machine must have access to every repository enabled on the Satellite Server.
- Capacity and Connectivity: Provision adequate disk space, CPU, memory, and stable network connectivity to the Satellite Server. Repository sync is I/O- and bandwidth-intensive on the first run.
The Nomination Machine must have access to every repository enabled on the Satellite Server. If even one enabled repository is inaccessible, the repository synchronization step will fail and the entire RHEL patch flow will stop working. Partial coverage is not supported. Before configuration begins, either confirm full repository access or disable any repositories on the Satellite Server that are not required.
Only agents with an active subscription and an internet connection can be nominated. To nominate an agent:
Click the Edit icon next to the desired agent. The following popup appears:
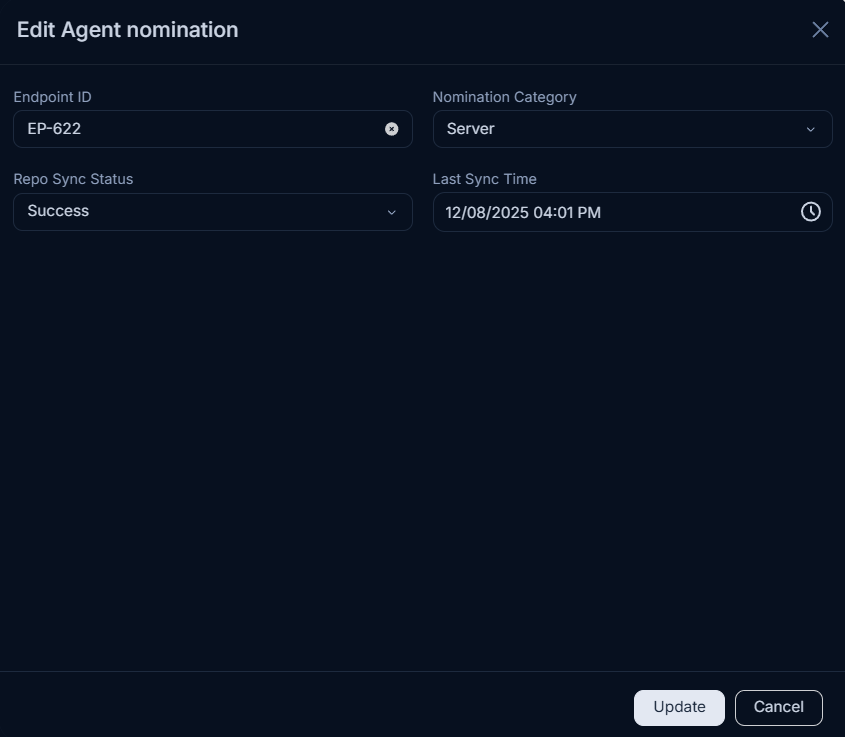
Provide the following details in the popup:
Field Description Agent ID Select the Agent ID to nominate. Only agents listed in the Endpoints Scope page are available. Nomination Category Displays the category for which the agent is nominated: Workstation or Server. Repo Sync Status Shows the status of the repository synchronization: success or failed. Last Sync Time Displays the date and time of the last synchronization with the RedHat repository. Click Update to save your changes. If no agents are nominated, the record remains blank.
RedHat Satellite Server Integration
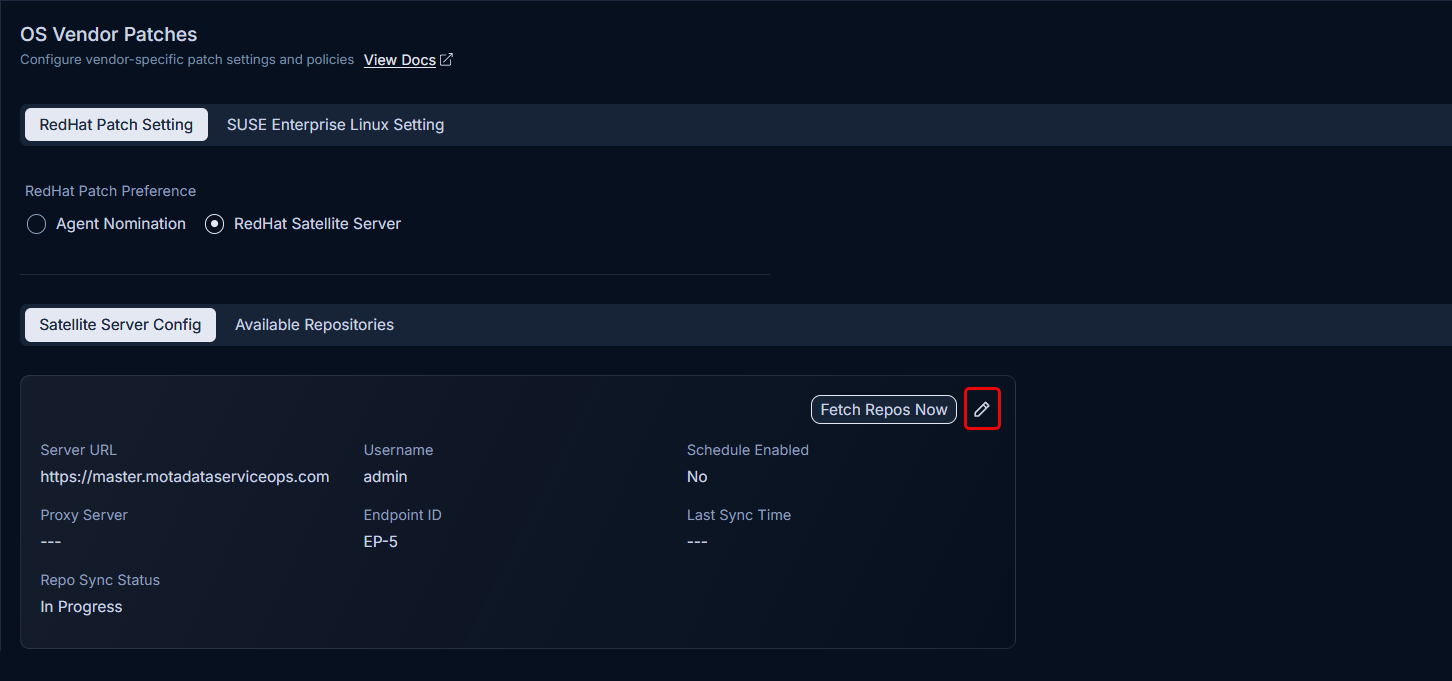
The RedHat Satellite Server integration lets ServiceOps pull patch data directly from your Satellite deployment, covering all RHEL systems managed through it.
Prerequisites
Confirm the following before configuring the satellite server:
- Operational Satellite Deployment: A supported, production-grade Red Hat Satellite Server is deployed, licensed, and operational.
- Repositories Enabled: All required RHEL repositories (base OS, AppStream, supplementary, EUS/E4S, and any third-party repositories) are enabled on the Satellite Server.
- Repositories Fully Synced: Every enabled repository has completed an initial full sync against Red Hat, and a recurring sync schedule is configured for ongoing updates.
- Valid Satellite Organization and Manifest: A Satellite organization exists with a valid, current Red Hat subscription manifest that covers all in-scope repositories.
- Admin User Account: An admin user account is available on the Satellite Server with permissions to read organizations, products, and repositories.
Configuration Steps
To configure the satellite server:
Click Edit and provide the following details:
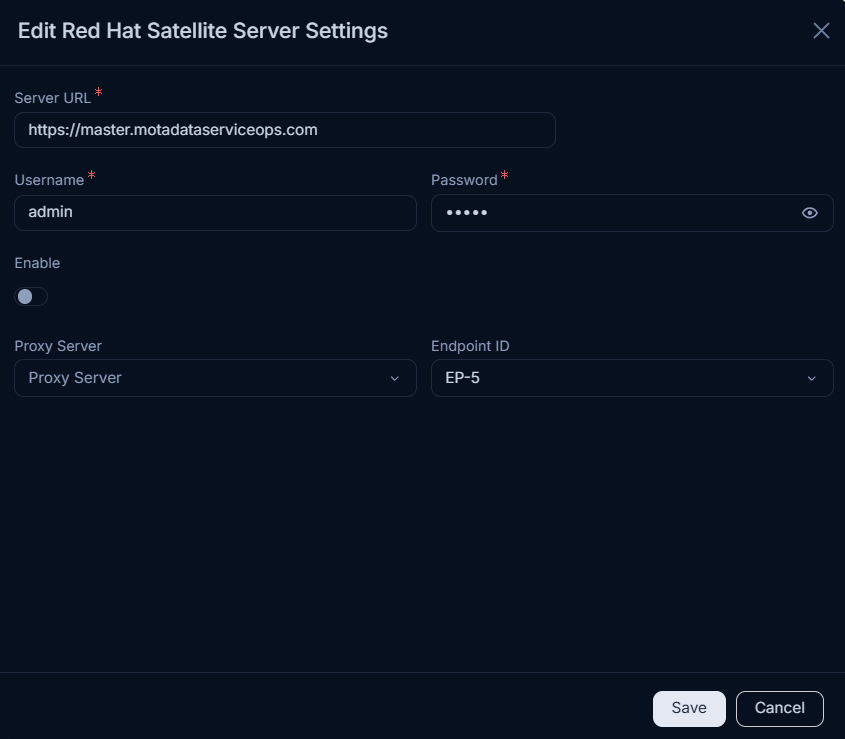
Field Description Server URL Enter the satellite server URL or IP address (e.g., https://satellite.serviceops.local).Username Enter the username for the satellite server. Password Enter the password for the satellite server. Enable Schedule Enable this option and specify the time to fetch patches daily. Proxy Server Select the appropriate proxy server if applicable. Certificate Upload the .pemcertificate obtained from the satellite server (see steps below).To obtain the certificate from your RedHat Satellite Server:
Log in to the RedHat Satellite Server web interface.
Navigate to Administer > Organizations.
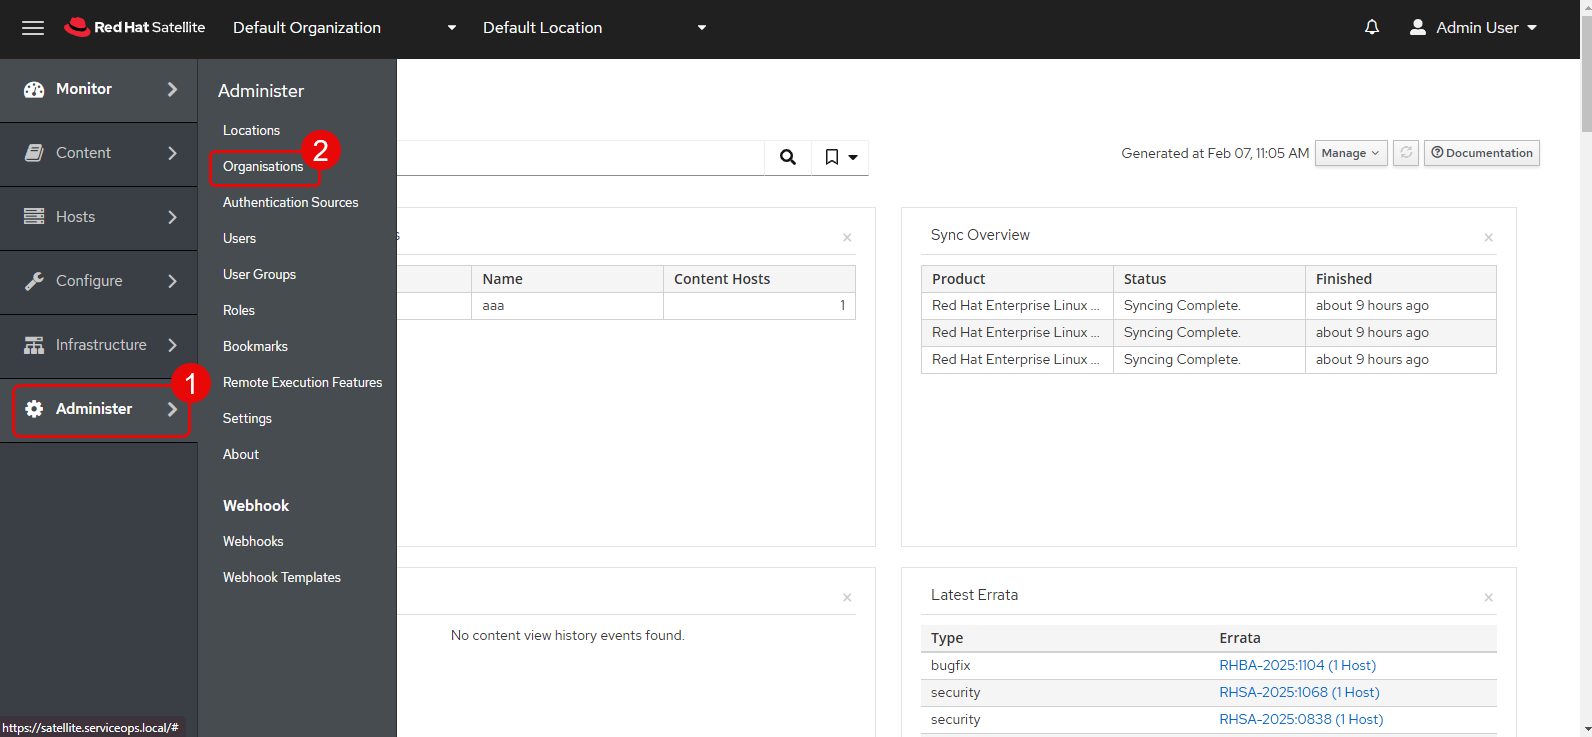
Click Edit on the Default Organization.
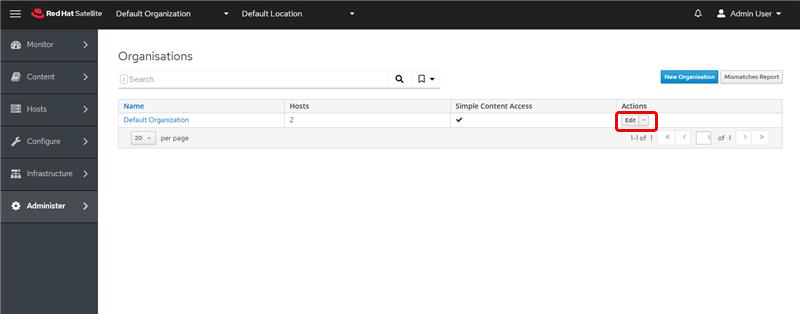
The organization details page appears:
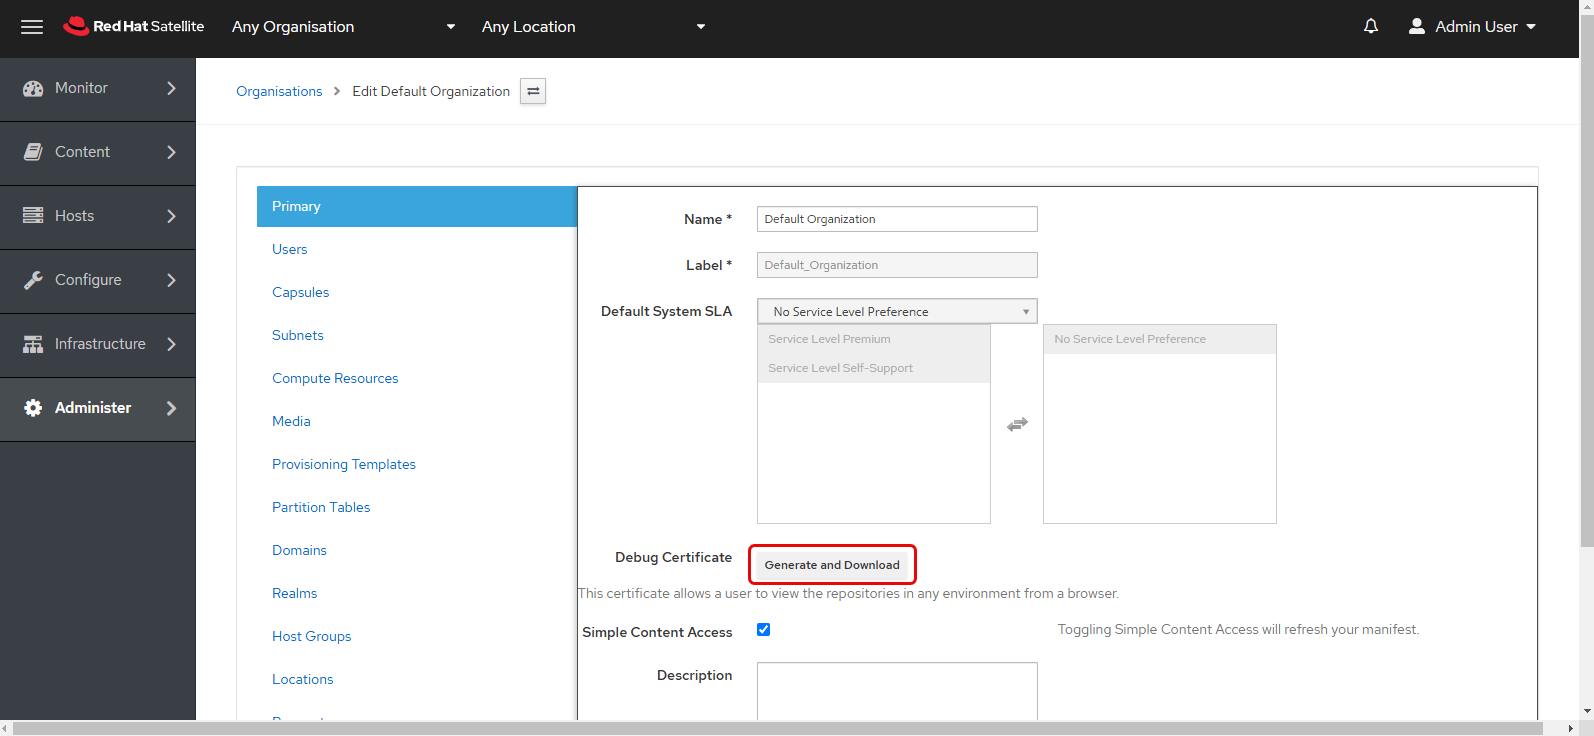
Click Generate and Download to download the certificate in
.pemformat.Upload the downloaded
.pemfile to the ServiceOps portal.
Once all details are provided, click Save. The saved server configuration appears as shown below:
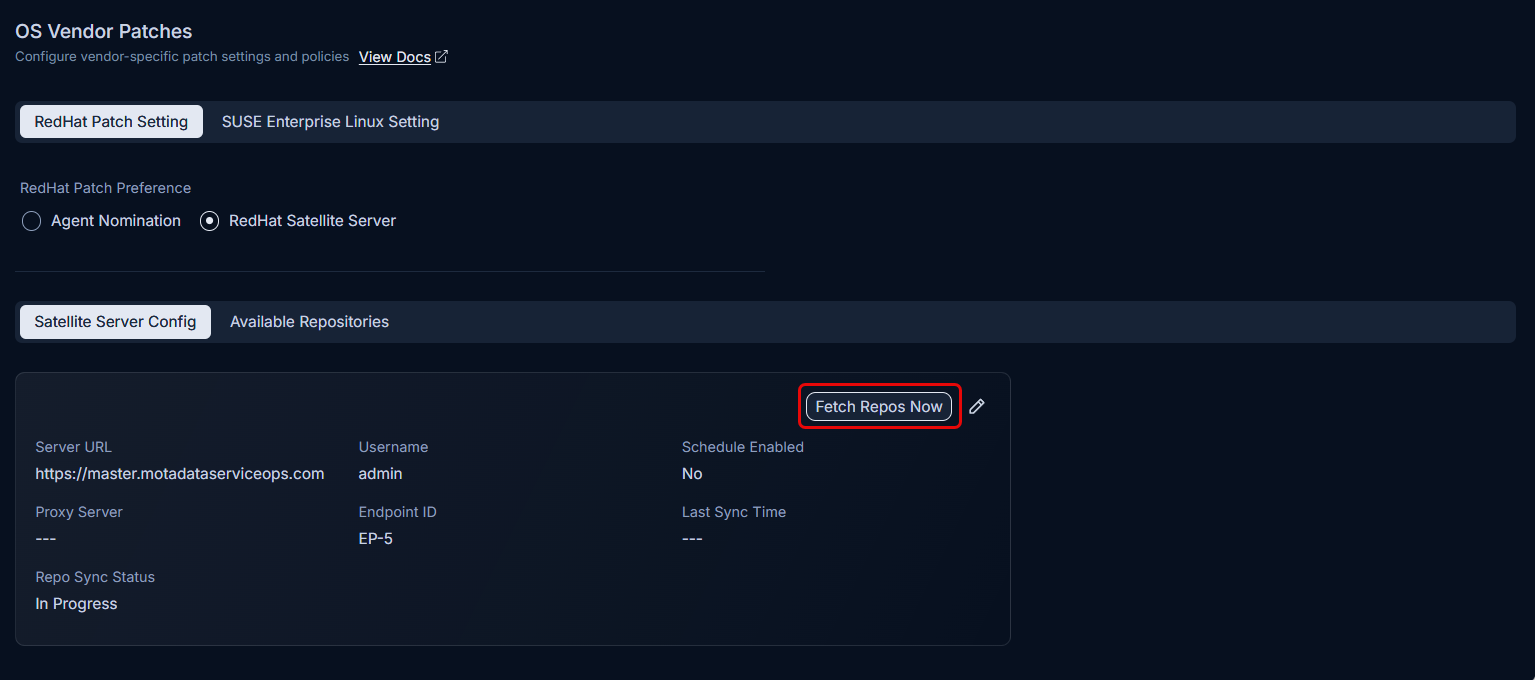
Click Fetch Repos Now to retrieve repositories.
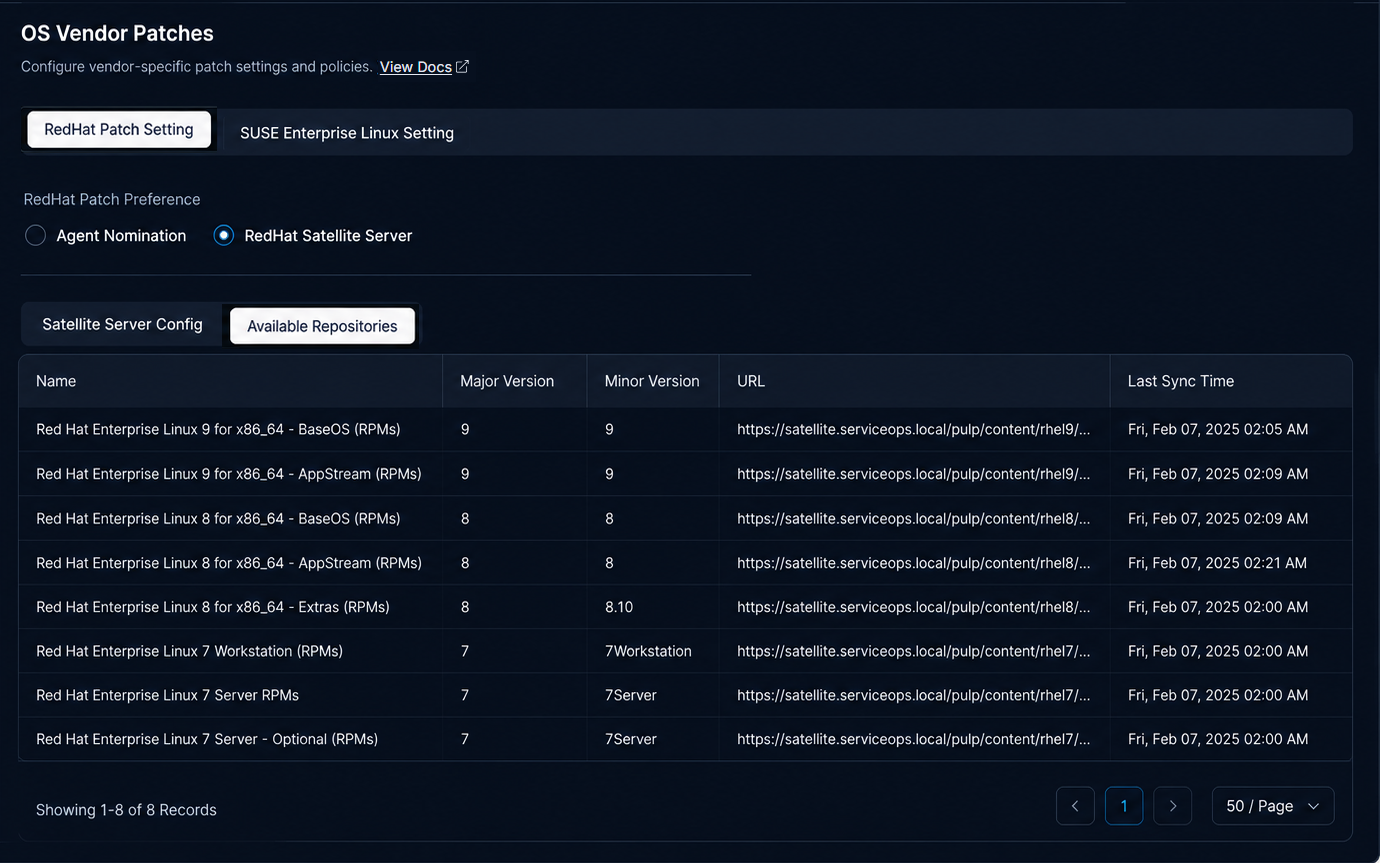
The repositories appear in the Available Repositories tab:
SUSE Enterprise Linux Setting
The SUSE Enterprise Linux Setting section lets you register SUSE subscriptions and fetch available patch repositories directly from the SUSE Customer Center.
Configure SUSE Subscription
Connect your SUSE Customer Center account to ServiceOps using subscription registration codes. Once registered, ServiceOps fetches patch repositories for the associated subscription type.
To get your registration codes from SUSE Customer Center:
- Sign in to SUSE Customer Center at
https://scc.suse.com/subscriptions. - Select your active SUSE subscription (Desktop or Server).
- Copy the Registration Code from your subscription details.
- Paste the registration code in the Actions column for the Desktop or Server subscription in ServiceOps.
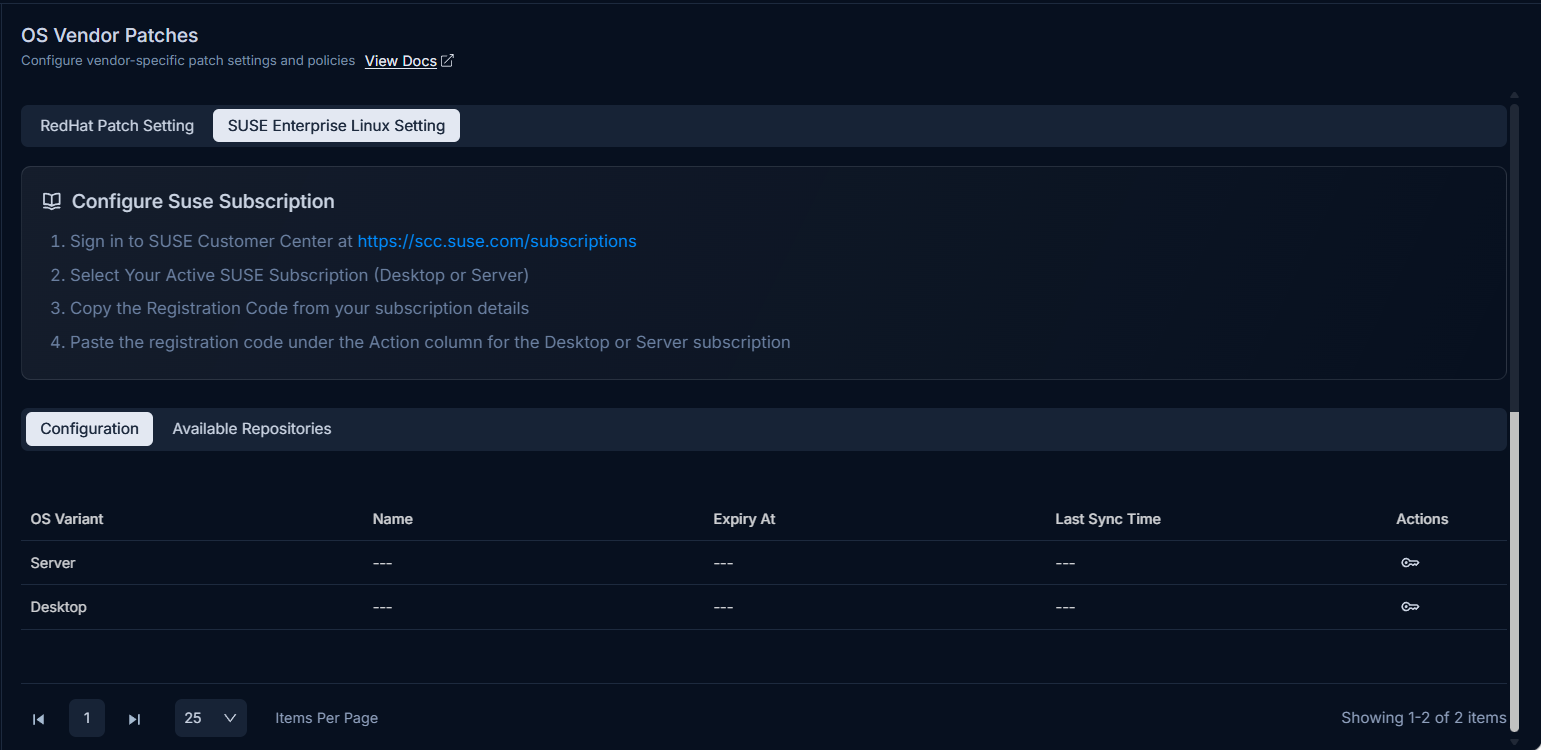
Configuration
The Configuration tab displays the two default SUSE subscription types and lets you attach registration codes to each.
| Column | Description |
|---|---|
| OS Variant | The SUSE subscription type: Server or Desktop. |
| Name | The subscription name fetched from the SUSE Customer Center API after a valid registration code is saved. |
| Expiry At | The subscription expiry date returned from the SUSE API. |
| Last Sync Time | The timestamp of the last successful SUSE API call for that subscription. |
| Actions | Click the key icon to open the Set Registration Code dialog for that subscription type. |
Set Registration Code
Click the key icon in the Actions column to open the Set Registration Code dialog for a subscription type.
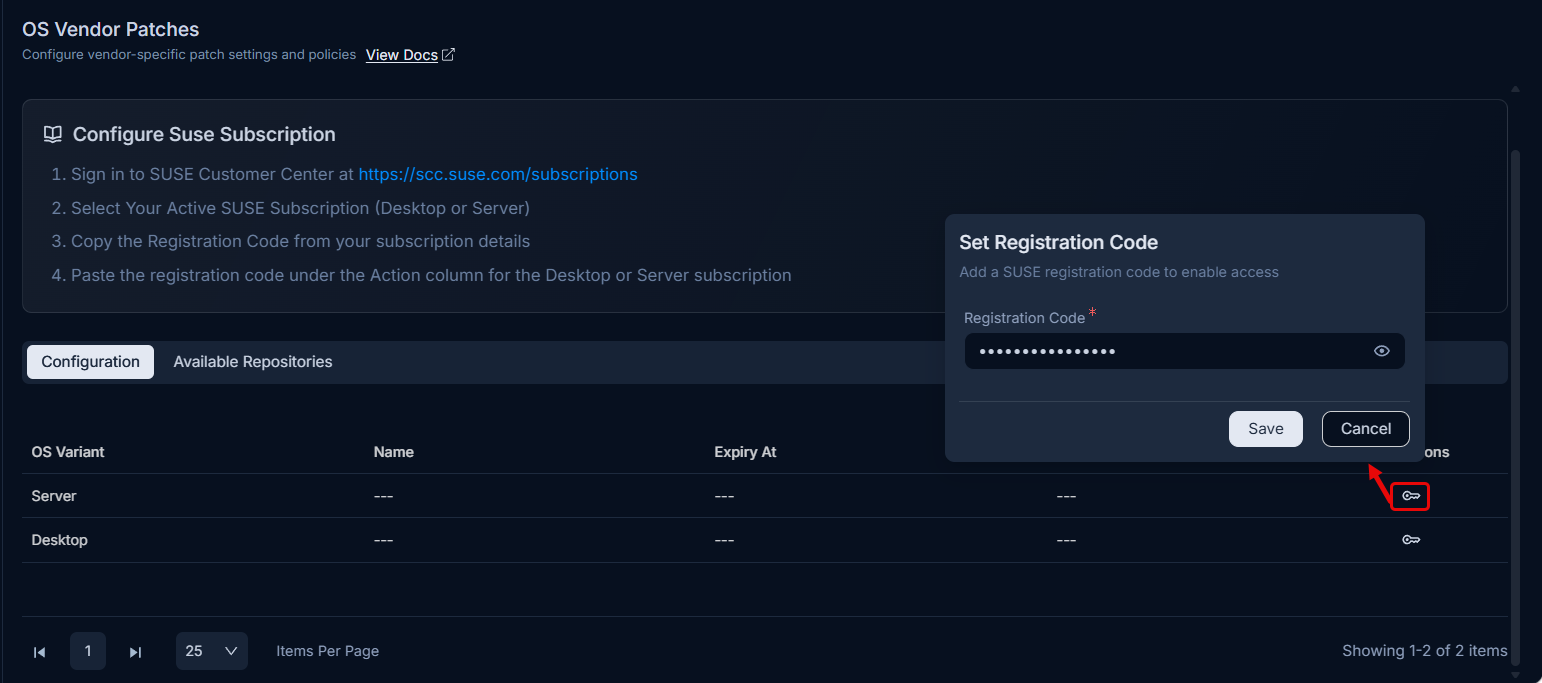
| Field | Description |
|---|---|
| Registration Code | Enter the registration code copied from your SUSE Customer Center subscription details. |
Click Save to apply the code. ServiceOps calls the SUSE Customer Center API and populates the Name, Expiry At, and Last Sync Time columns for that subscription type. Click Cancel to close the dialog without saving.
Name, Expiry At, and Last Sync Time values only populate after a valid registration code is saved and the SUSE API call succeeds.
After saving the registration codes, sync the patch database to fetch SUSE patches. Navigate to Admin > Patch Management > Patch Administration > Patch Repository and trigger a sync.
Available Repositories
The Available Repositories tab lists all SUSE patch repositories fetched from the SUSE Customer Center using the registration codes configured in the Configuration tab.
| Column | Description |
|---|---|
| Name | The name of the SUSE patch repository. |
| URL | The repository URL provided by the SUSE Customer Center API. |
| Description | A short description of the repository content. |
| Distro Target | The target distribution for the repository. |