File Server
Register, secure, and manage file servers used for patch storage, distribution, and upgrades.
The File Server is designed to streamline the registration, management, and secure communication of file servers with ServiceOps. It includes the following tabs:
- Configuration: Configure patch cleanup and storage alert settings.
- Server List: Displays a list of all the installed and connected file servers with options to test connectivity, edit, delete, or upgrade them in bulk using packages from the File Server Build tab.
- Credential Profile: Enables the creation and management of credentials required to establish a secure connection between ServiceOps and the file servers.
- File Server Build: Enables to upload the file server packages with builds supported from v8.6.4 onwards.
This enhanced structure improves visibility and strengthens security. Previously, communication between file servers and ServiceOps occurred without authentication, posing a potential risk and limiting UI visibility. With this new approach, all file server installations must be authorized via the Credential Profile, ensuring a more secure and manageable setup.
- From version 8.6.5, backward compatibility with older file servers has been discontinued. It is now mandatory to upgrade all existing file servers to the latest build to ensure continued functionality and integration with ServiceOps.
- If a file server becomes unavailable or goes offline during an ongoing download task, the system will automatically resume the download once the file server becomes available again.
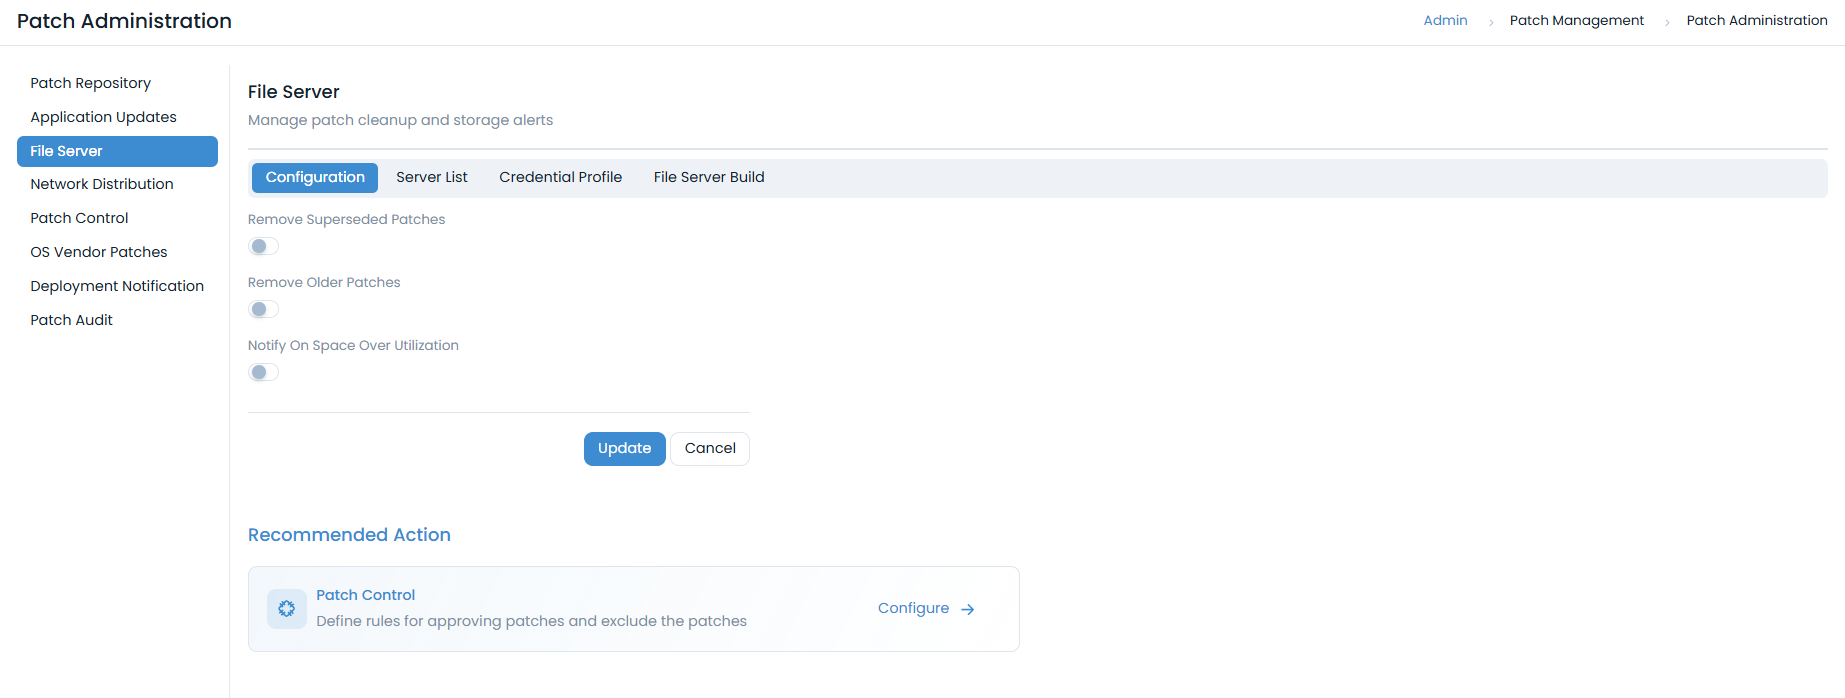
Configuration
Use the Configuration tab to manage patch cleanup and storage alert settings for the file server.
You can configure the following options:
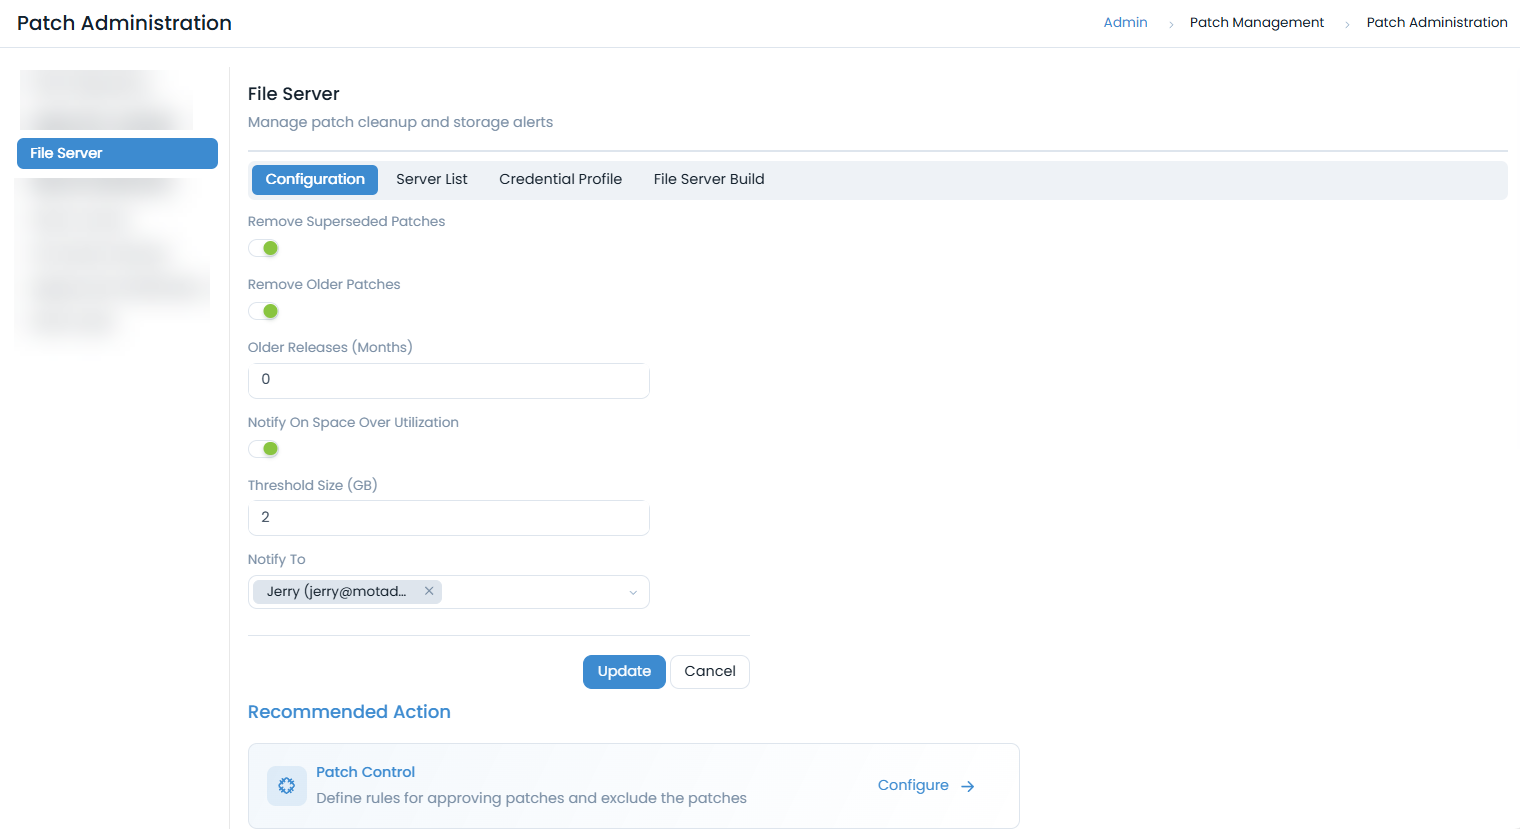
- Remove Superseded Patches: Automatically deletes patches from the file server that have been replaced by newer versions released by the vendor. Enabling this helps conserve storage space and ensures only the most current patches are available for deployment. This option is disabled by default.
- Remove Older Patches: Configures the system to automatically delete patches that are older than a specified number of months, calculated from their release date. When enabled, specify the Older Releases (Months) value. This feature helps maintain a lean patch repository by removing outdated patches. This option is disabled by default.
- Notify On Space Over Utilization: Activates a notification system that alerts specified recipients when the file server's storage usage exceeds a predefined threshold. This proactive alert helps prevent storage-related issues that could impact patch distribution. When enabled, the following parameters can be configured:
- Threshold Size (GB): Define the maximum storage size in Gigabytes (GB) that the file server can utilize before a notification is triggered.
- Notify To: Select the recipients who will receive these notifications form the dropdown. You can select multiple recipients.
When you are done, click Update to save the changes.
From v8.6.5 the URL field and Test Connection button have been removed from Patch Storage Configuration page to eliminate redundancy; connection testing can now be performed directly from the File Server list page via the new Test Connection action for each file server.
Test Connection Behavior Based on Version:
For versions earlier than v8.6.2: The system tests the File Server connection using the URL specified directly in the URL field.
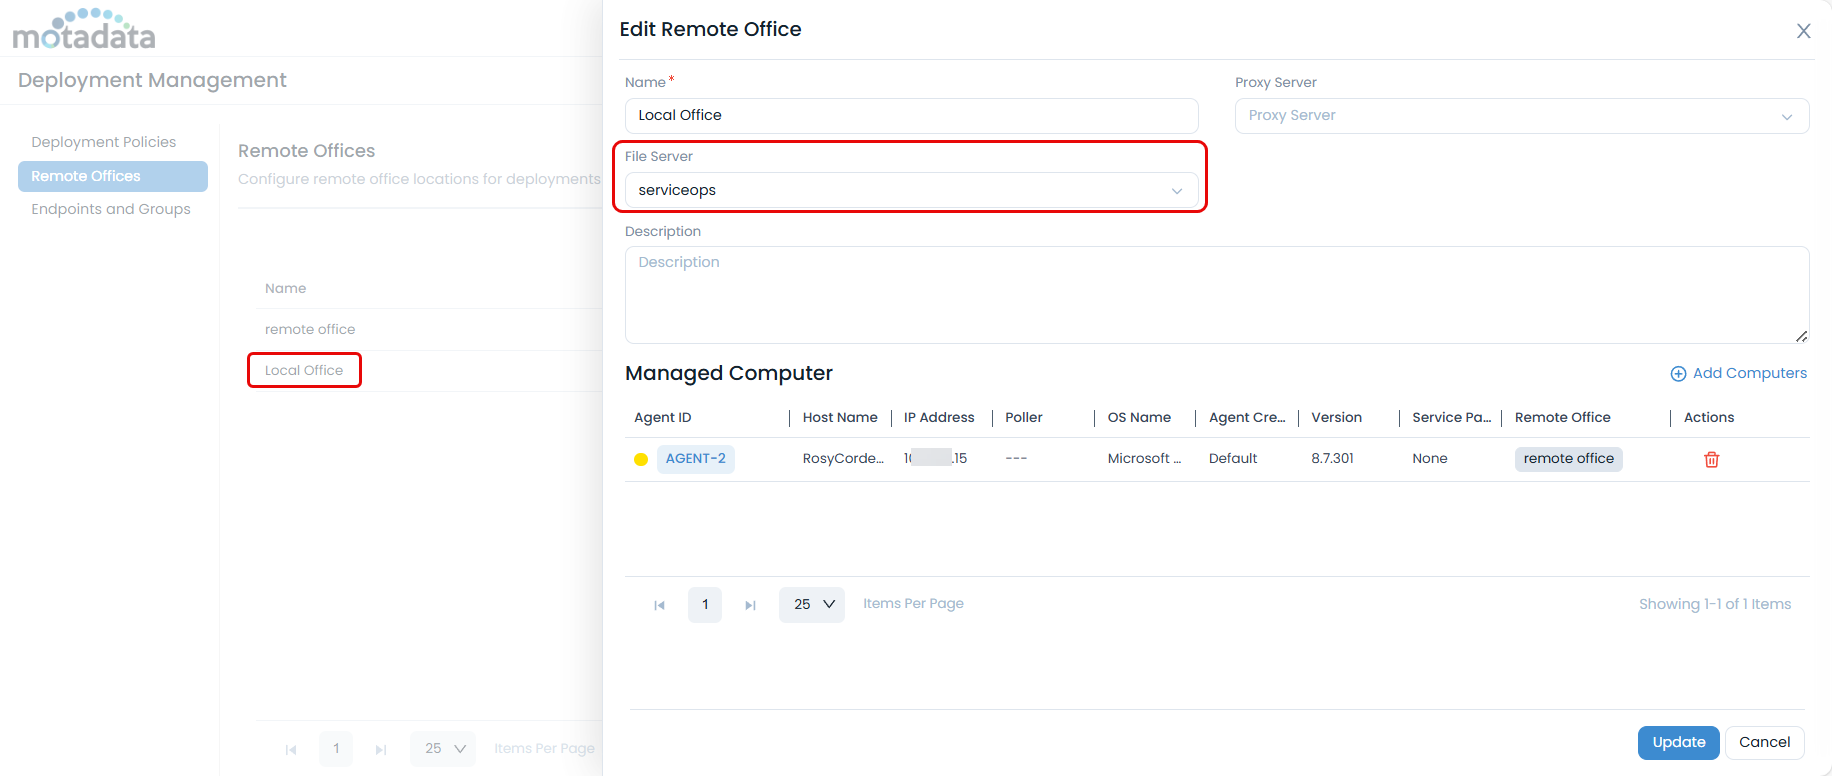
For version v8.6.2 to v8.6.4:
- If a File Server is configured under Patch Management > Deployment Management > Remote Offices > Local Office, the system prioritizes this setting and performs the Test Connection against the File Server defined there—even if a URL is specified in the Patch Storage Configuration.
- If no File Server is defined in the Local Office configuration, the system defaults to testing the connection using the URL specified in the Patch Storage Configuration.
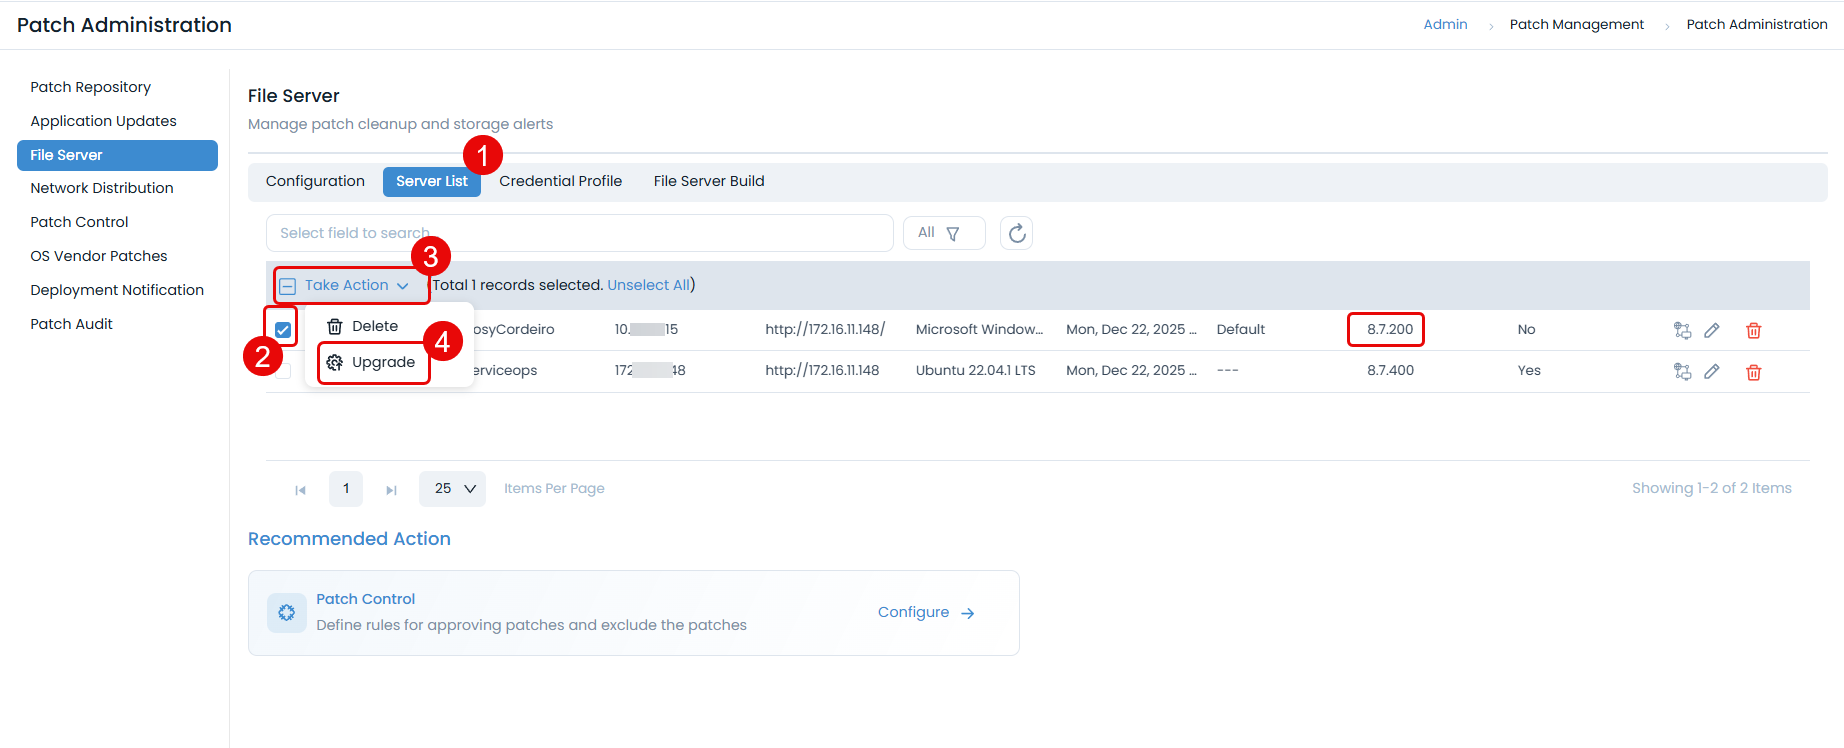
Server List
Displays a list of all installed and connected file servers (Windows and Linux) with options to test connectivity, edit, delete, or upgrade them in bulk using packages from the File Server Build tab. A green indicator signifies an active file server, while a yellow indicator denotes an inactive one. For more details on installation, refer to the File Server Installation section. This allows administrators to monitor the file servers currently in use and ensure they are properly integrated with the system.
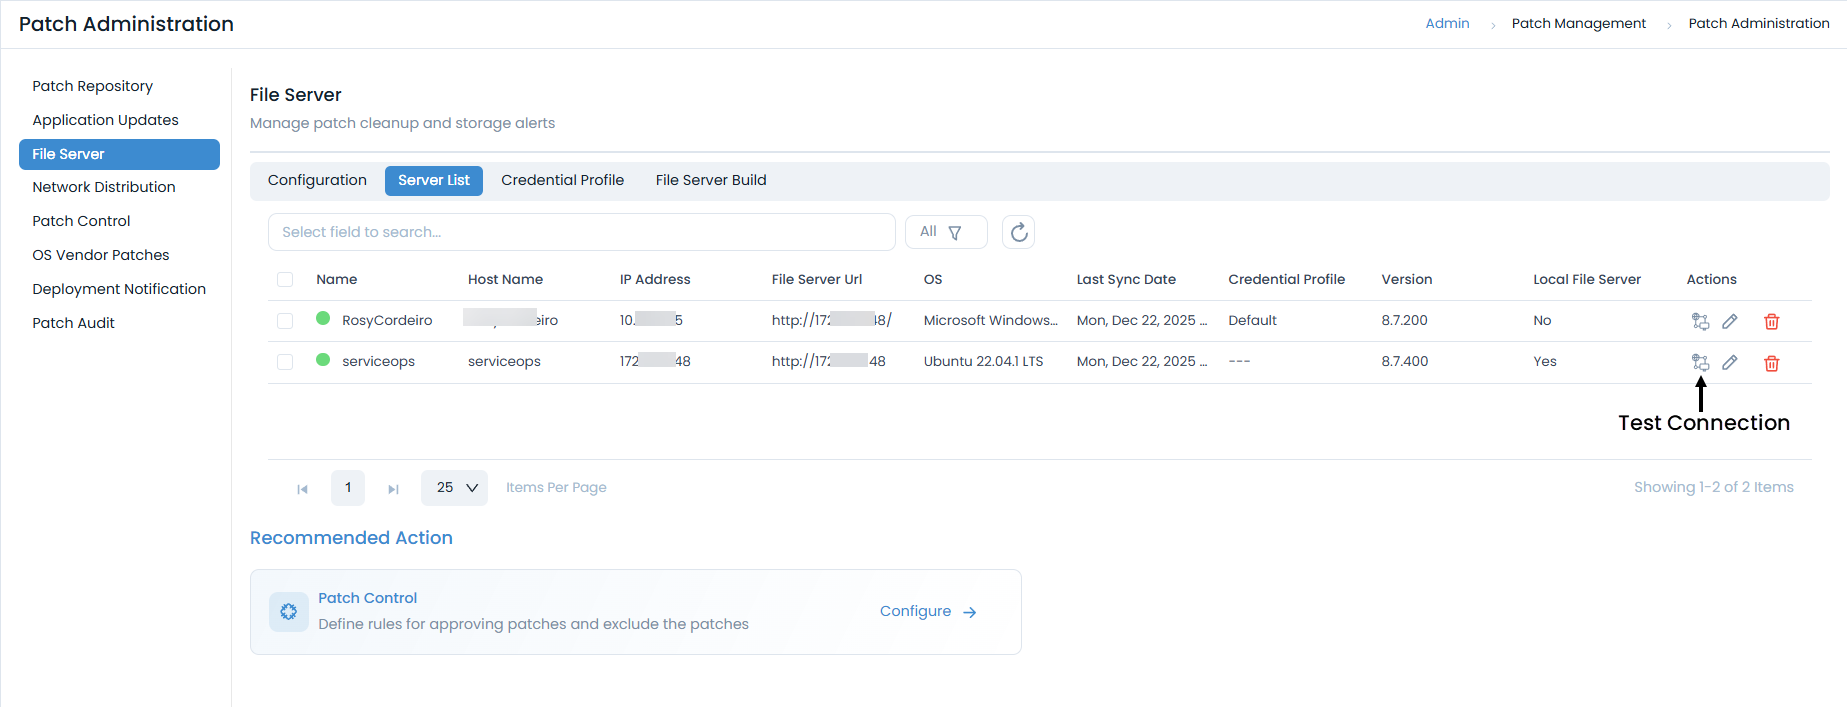
The table below provides details about the installed and connected file servers:
| Parameter | Description |
|---|---|
| Name | The unique name assigned to the file server. You can edit the name of the file server. |
| Host Name | The hostname of the server where the file server is installed. |
| IP Address | The IP address of the file server. |
| File Server Url | The URL used to access the file server. You can edit the URL of the file server. |
| OS | The operating system running on the file server (e.g., Microsoft Windows, Ubuntu). |
| Last Sync Date | The date and time when the file server last synchronized with ServiceOps. For example: If Mon, Dec 22, 2025 10:00:00 AM, then the last sync date will be Mon, Dec 22, 2025. This will be updated automatically by the system whenever the file server synchronizes with ServiceOps. |
| Credential Profile | The credential profile used to establish a secure connection with the file server. |
| Version | The version of the file server software installed. |
| Local File Server | Indicates whether the file server is local (Yes) or remote (No). |
| Actions | Provides options to perform actions such as testing connectivity, editing server details, or deleting the file server. |
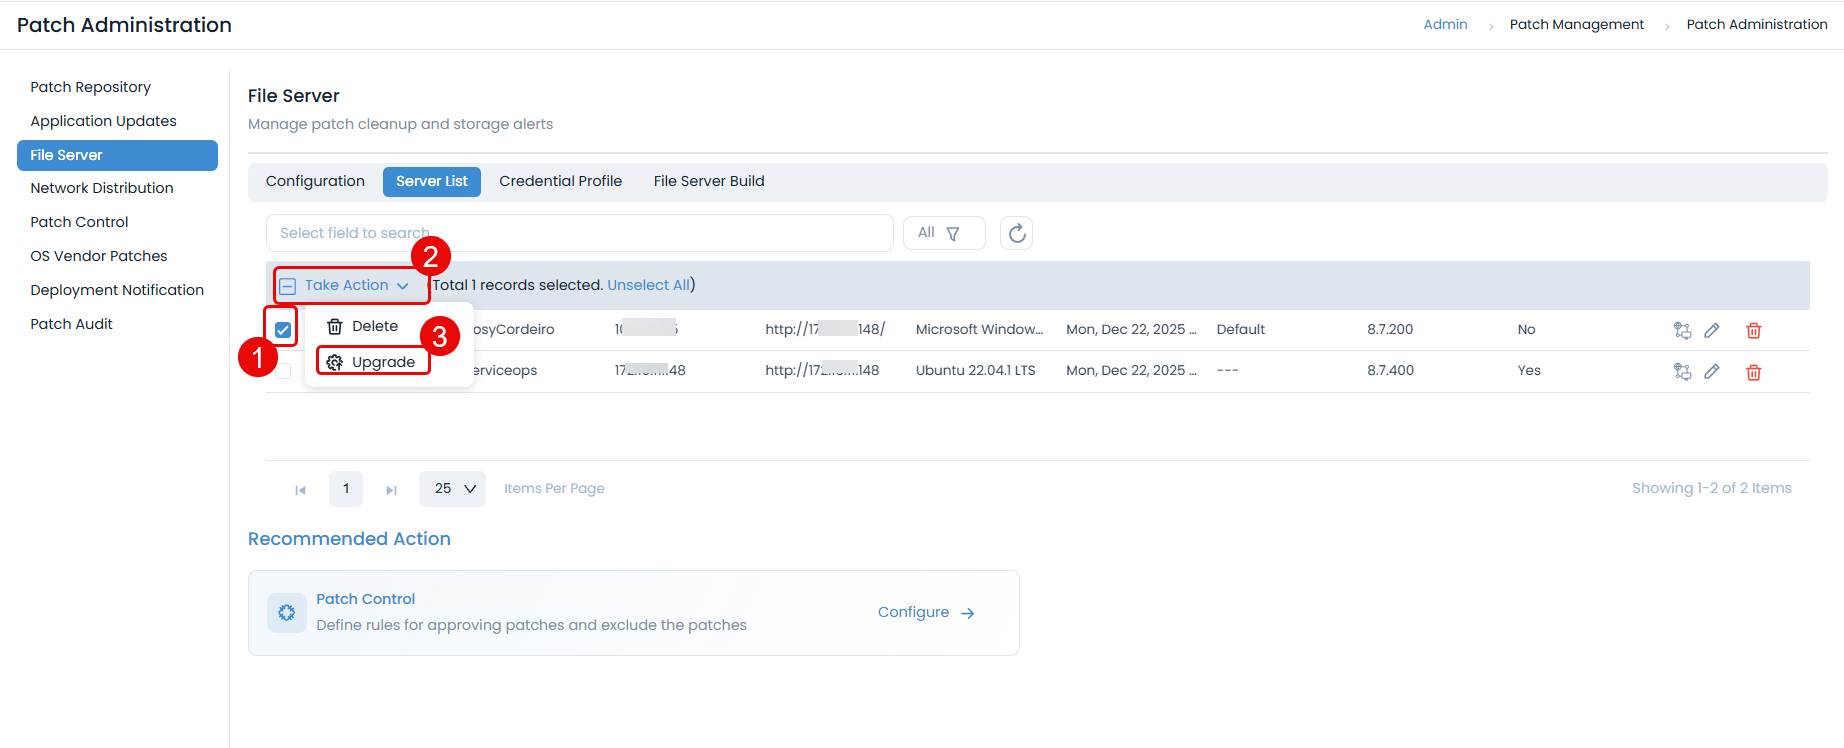
To upgrade the file server in bulk, follow the steps below:
- Select the file servers you want to upgrade. You can select multiple file servers at once. The version to which the file server will be upgraded is dependent on the version available in the File Server Build tab.
- Click Take Action.
- Choose the Upgrade option from the dropdown menu.
- The upgrade process will be initiated.
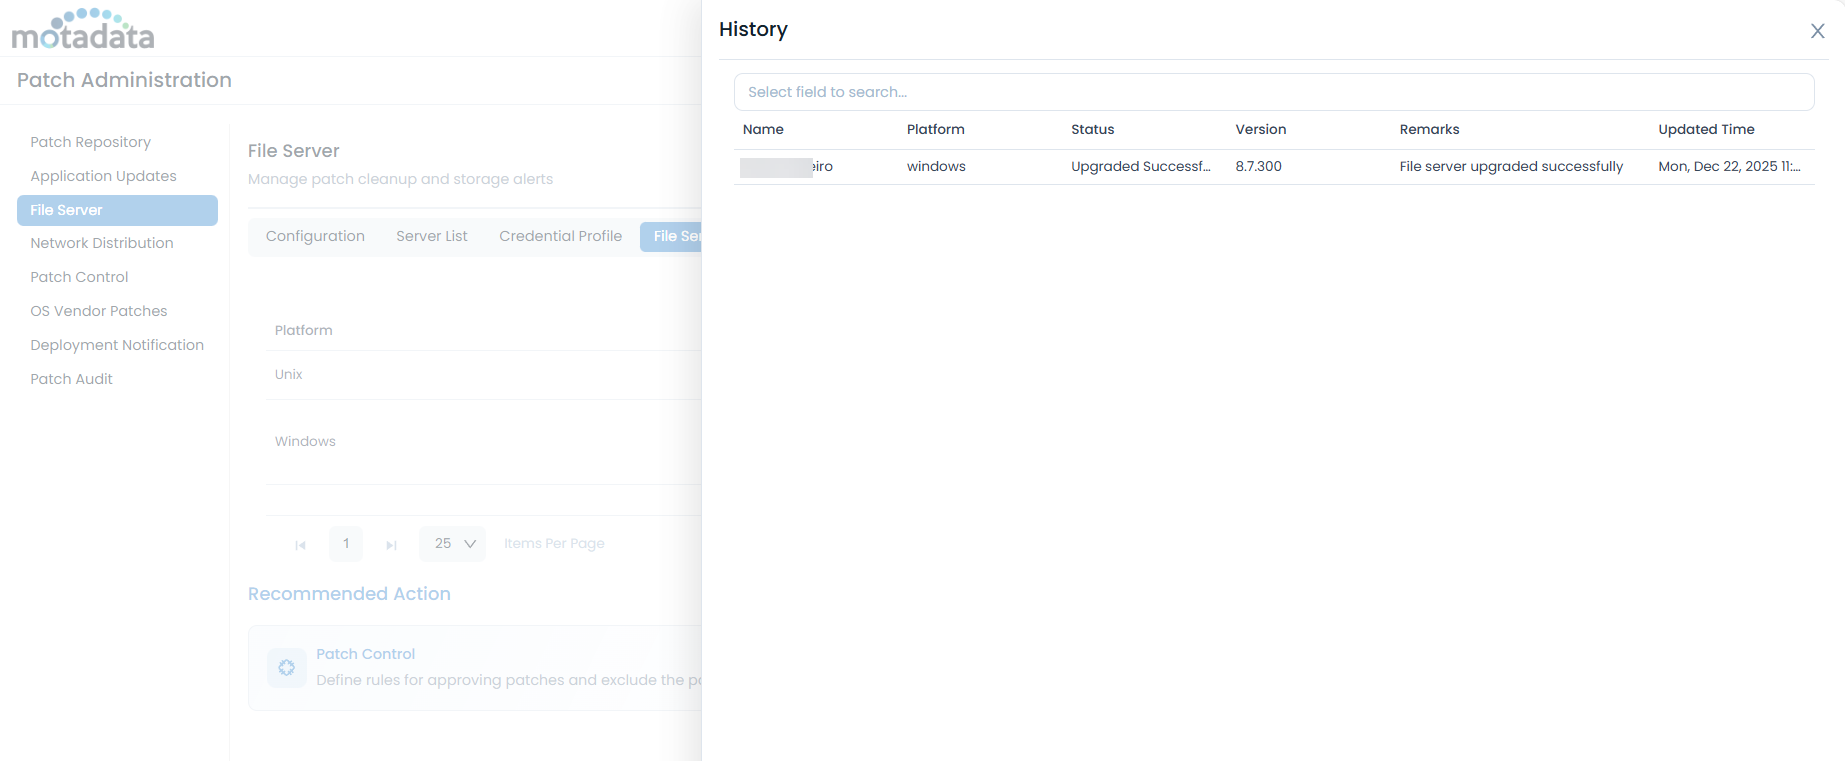
- You can view the upgrade status on the File Server Build History page.
Credential Profile
This tab enables the creation and management of credentials required to establish a secure connection between ServiceOps and the File servers. These credentials are used to generate an authorization key, which is essential during the file server installation. It also provides a default credential which can be used directly while installation.
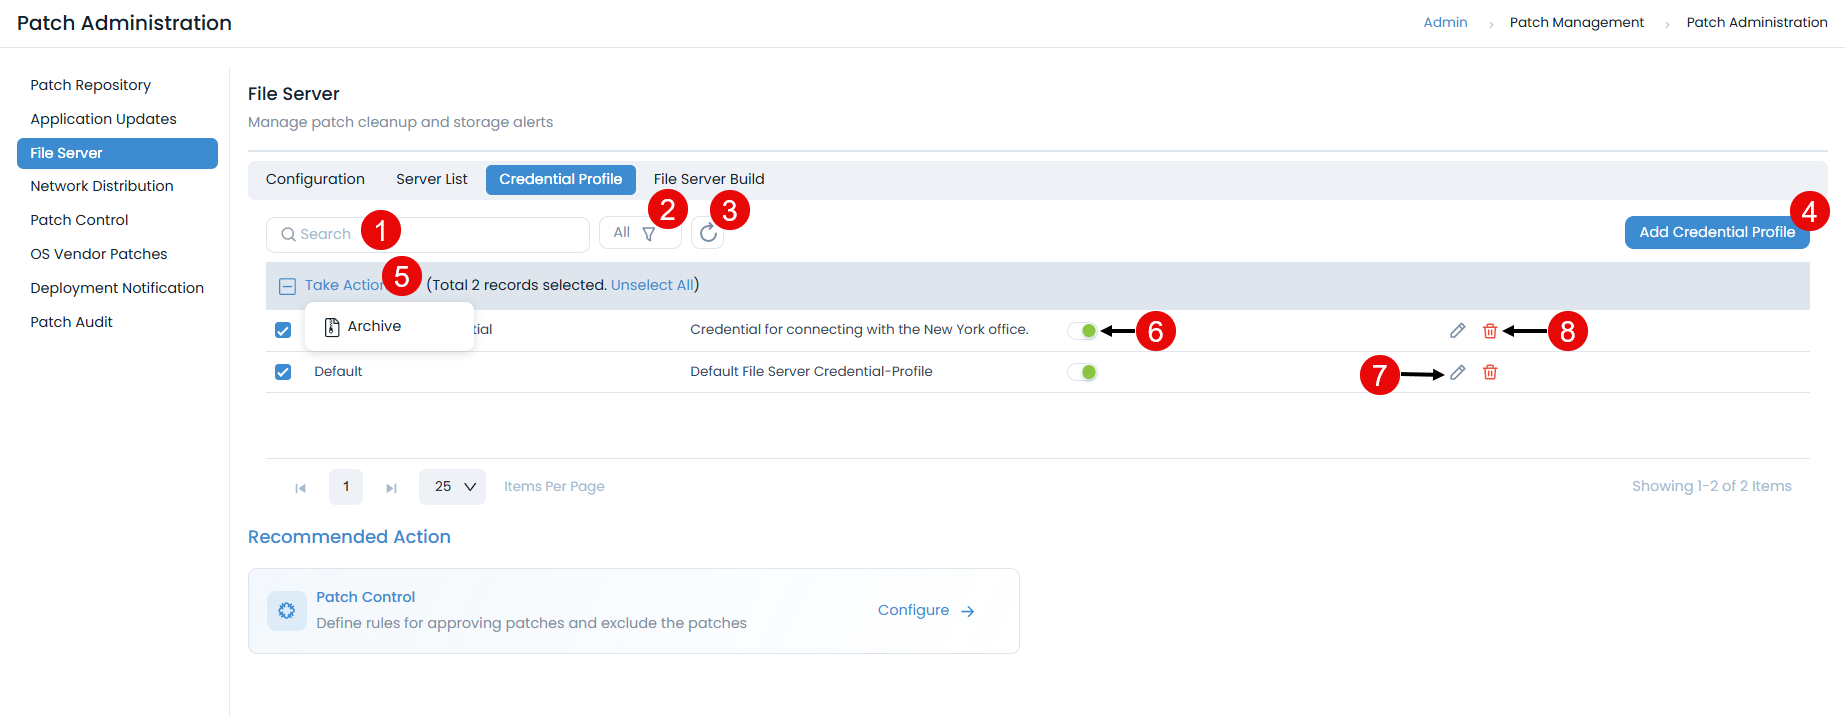
Here, you have the below options:
Search: You can search for the required credential profiles.
Filter: You can filter the credential profiles by selecting the desired option. The following filters are available:
Filter Records Displayed All Displays all active credential profiles that have not been archived, including both enabled and disabled profiles. Enabled Displays only those credential profiles that are currently active and can be used to authorize file server connections during installation. Disabled Displays only those credential profiles that have been deactivated and cannot be used for file server authorization until re-enabled. Archived Displays credential profiles that have been archived. Archived profiles are removed from the active list but retained in the system and can be restored if needed. Refresh: You can refresh the credential profiles list to view the latest one.
Add Credential Profile: You can create custom credential profiles.
Bulk Archive: you can select multiple credential and archive them in bulk.
Enable/Disable: You can enable or disable the credential. By default it is enabled.
Edit: You can edit the required credential.
Delete: You can delete the required credential. A confirmation dialog will appear. Click Yes to continue or Cancel to stop the process.
Adding Credential Profile
To add a credential profile,
- Click the Add Credential Profile button and the following popup appears.

- Enter the Credential Profile name.
- Enter a brief description about the profile.
- Click Add.
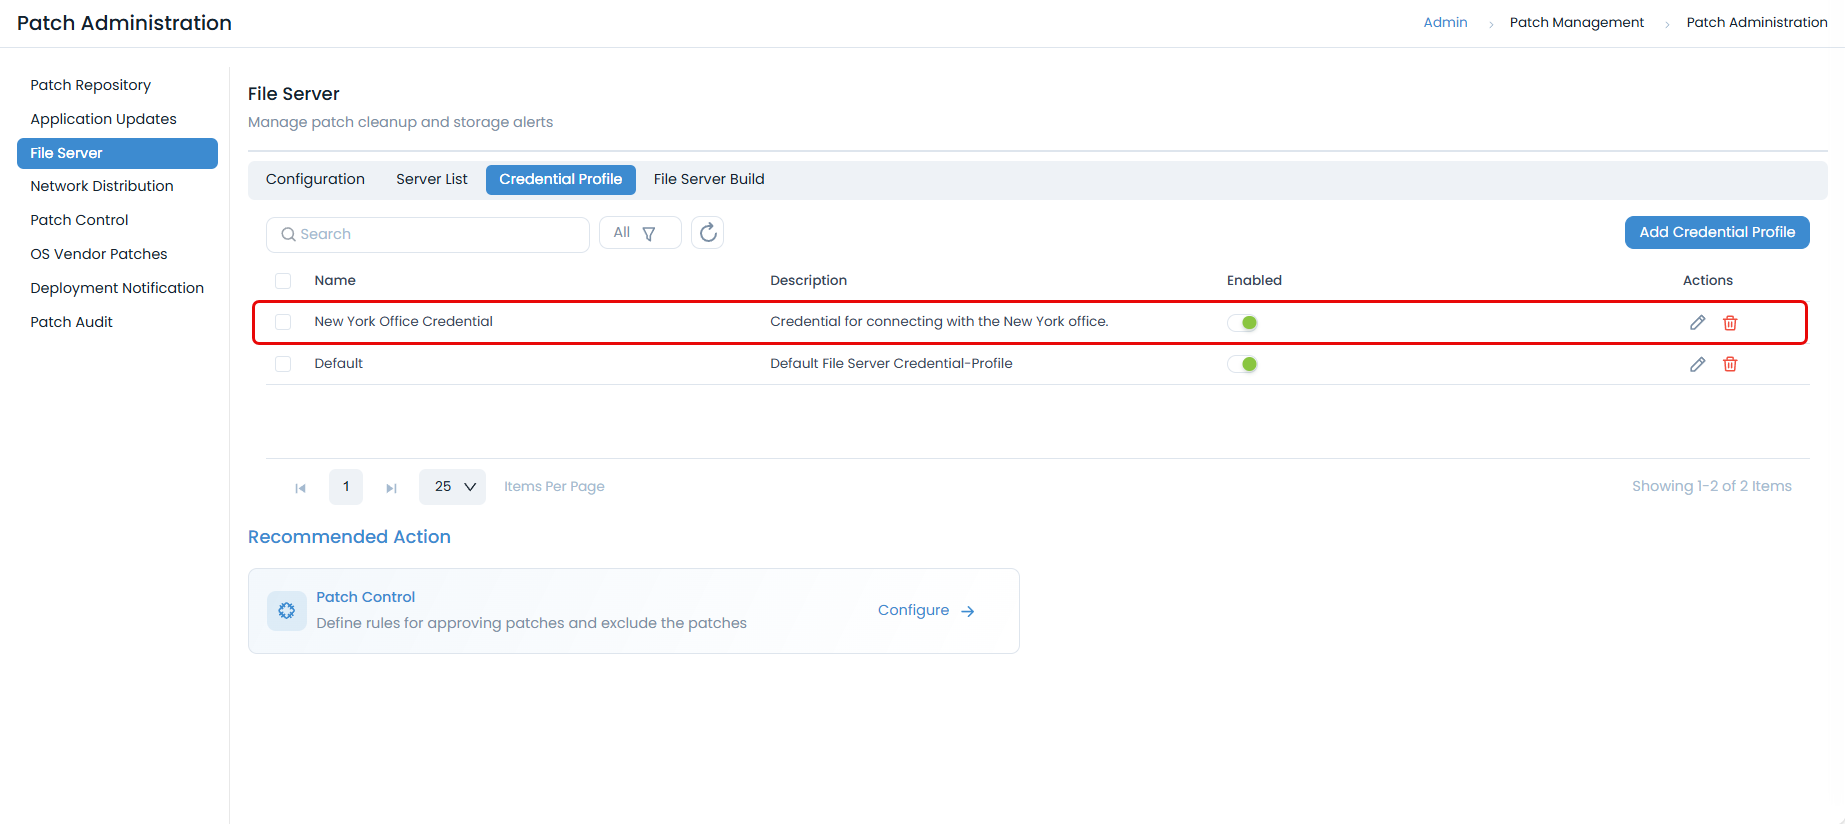
- Once done the profile will be available on the list page as shown below.
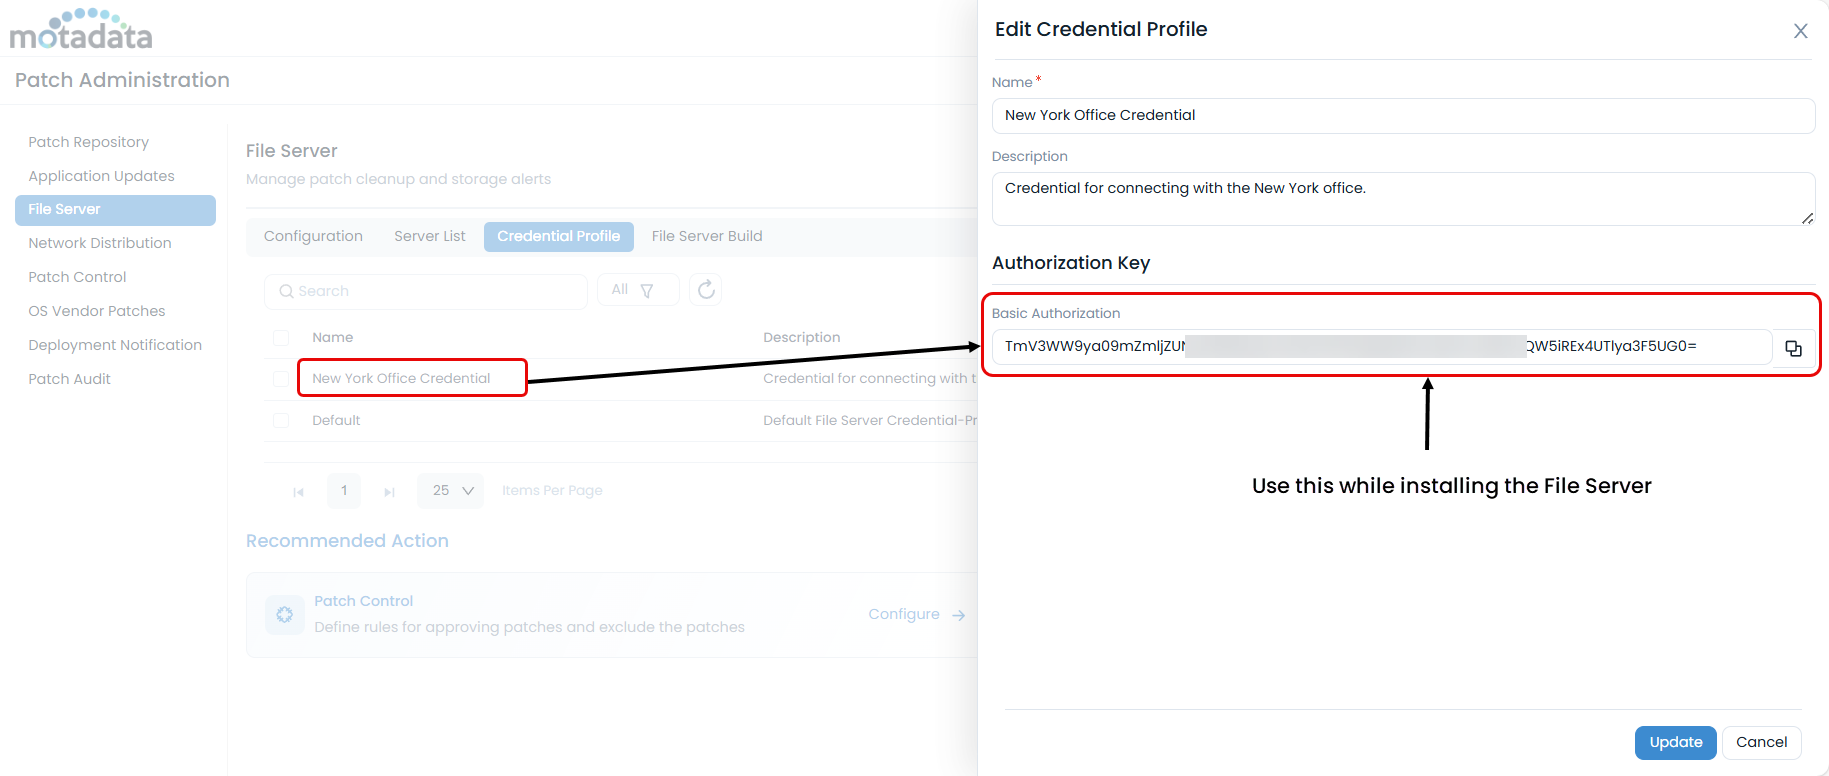
- You can now edit this profile and get the Secure Auth key required for File Server installation.
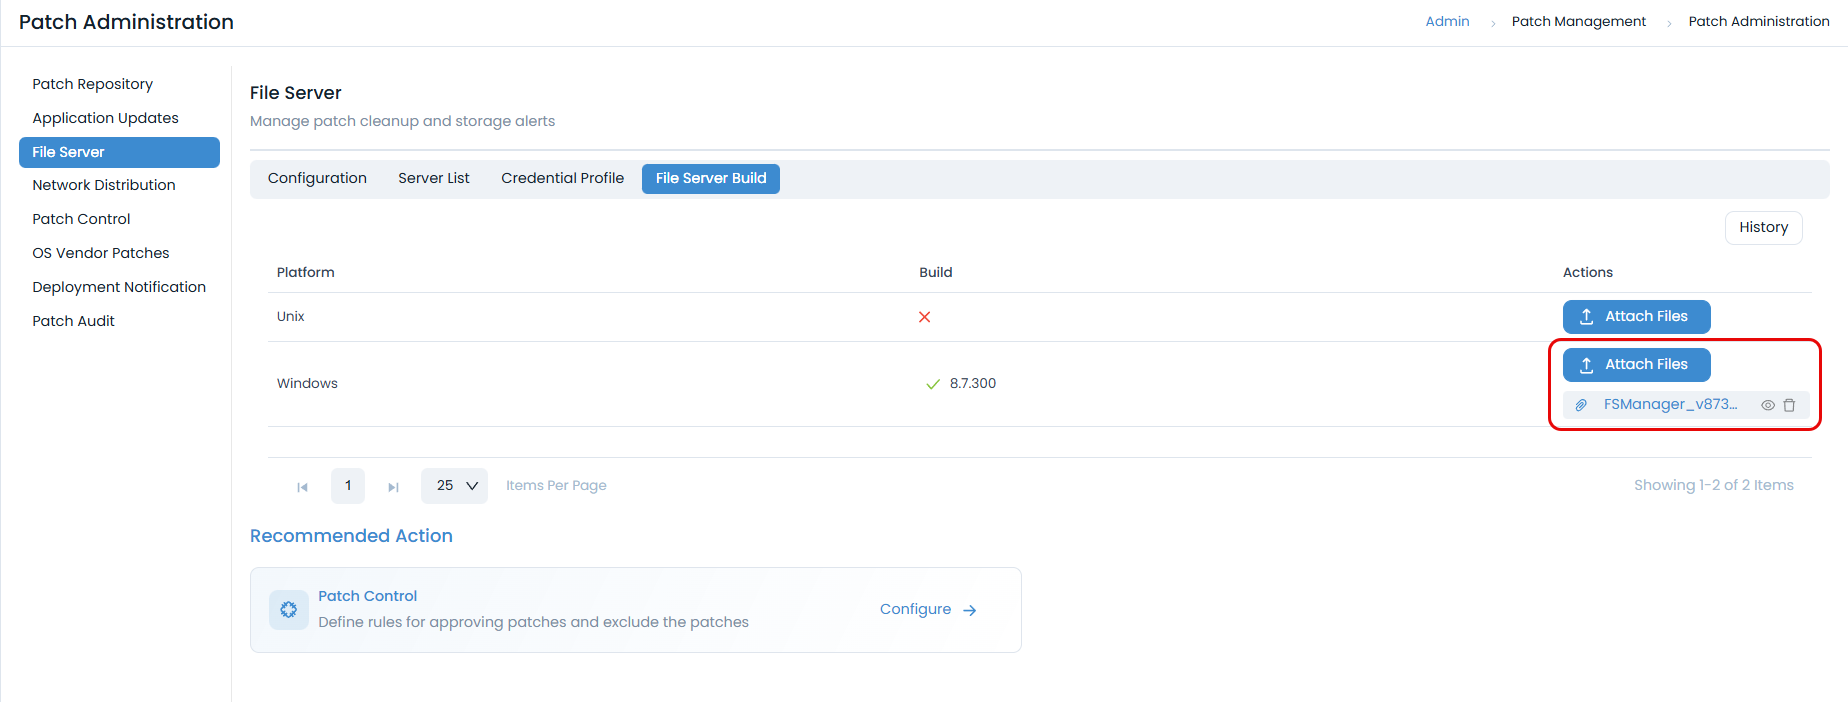
File Server Build
This tab enables to upload the required File Server build package for auto-upgrade and also view the upgrade history. You can get the File Server Build from the Download Links page.
This feature is supported from v8.6.4 onwards.
To upload the build,
- Click the Attach files button and upload the required build. Currently, Windows and Linux builds can be uploaded.
- Once uploaded, go to the Server List tab.
- Select the file servers that must be upgraded.
- Choose the Upgrade option and the process will be initiated.
- View the process status by clicking the History button.
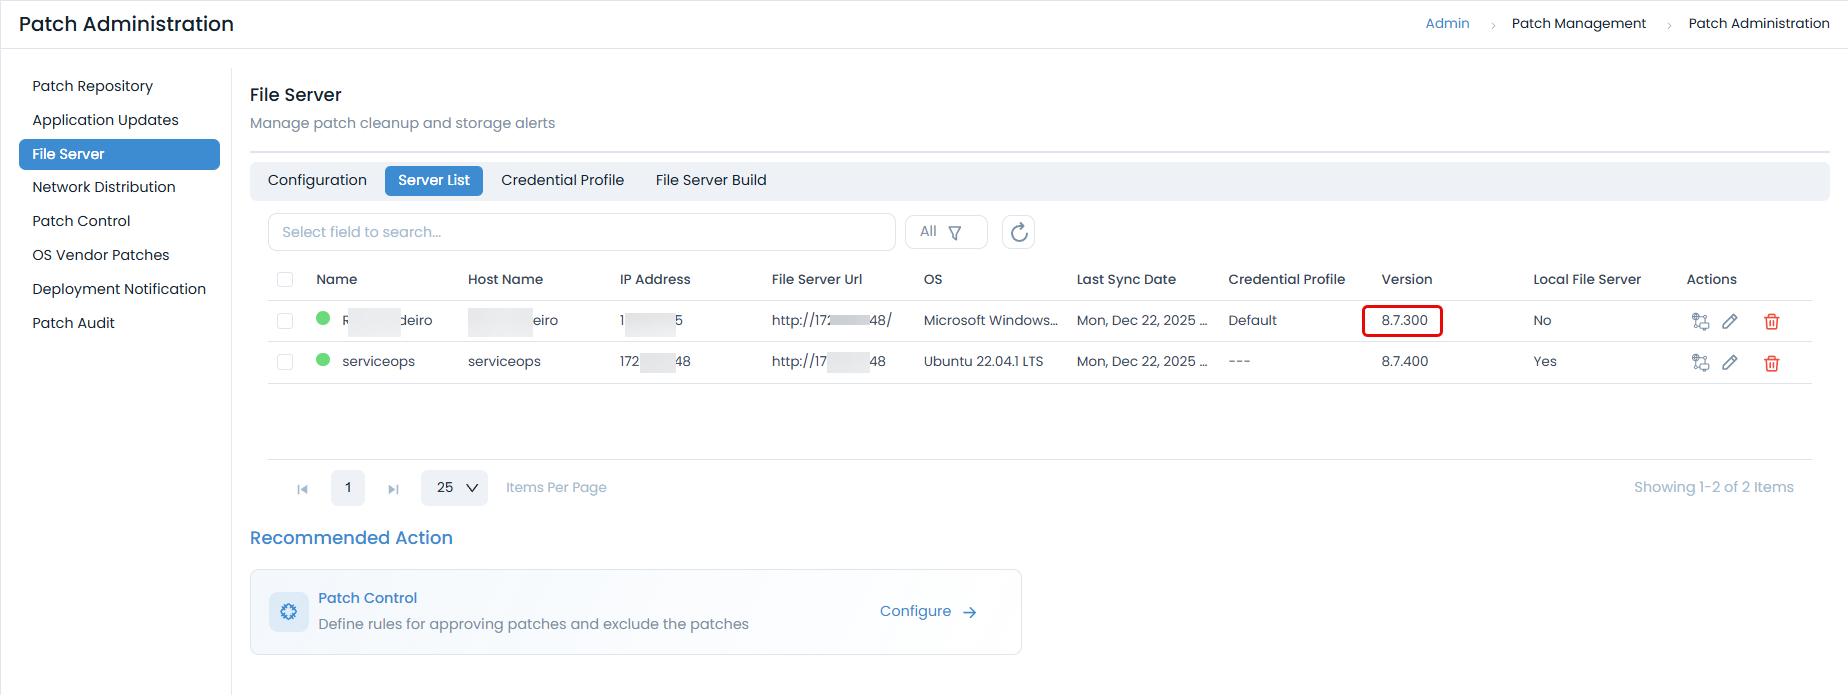
- Once upgraded, the file server version will be updated in the Server List tab as shown below.
Recommended Action: Configure Patch Control
After configuring the file server for fetching the patches, it's recommended to configure Patch Control to define approval policies and manage exclusions for the patches. This ensures systematic patch management aligned with your organizational policies.
For details, see Patch Control.