OS Deployment in ServiceOps
OS Deployment automates operating system provisioning across your IT environment. It uses MotadataPXE (Preboot Execution Environment) boot technology to load a deployment agent onto target machines over the network, then applies a captured OS image. You manage images and deployments entirely from the ServiceOps Admin panel, and technicians can initiate deployments remotely using a manual server login or a time-limited passcode. OS Deployment is available for on-premise deployments only.
How OS Deployment Works
OS Deployment follows a five-stage process, from initial setup and image capture to network boot, authentication, and final deployment on target machines.
- Setup: Install the poller and MotadataPXE utility on the designated machines.
- Image: Build the golden OS image using Image Creator and register its storage path in ServiceOps.
- Network: Configure your router or DHCP (Dynamic Host Configuration Protocol) server to point MotadataPXE (Preboot Execution Environment) boot requests to the TFTP server.
- Boot: The blank target machine boots over the network, launches OSDApp.exe, and validates credentials or a passcode.
- Deploy: ServiceOps runs the deployment task, applies the image, and reports installation history through the poller.
Architecture
The OS Deployment architecture is built around four components: the Image Creation Component on the golden machine, the TFTP Component on the Host/Poller machine, the OSD Component that runs on each target machine during deployment, and ServiceOps itself as the central management layer. These components work together over the local network, with DHCP directing PXE boot requests to the TFTP server, and the Poller bridging communication between ServiceOps and the target machines throughout the process.
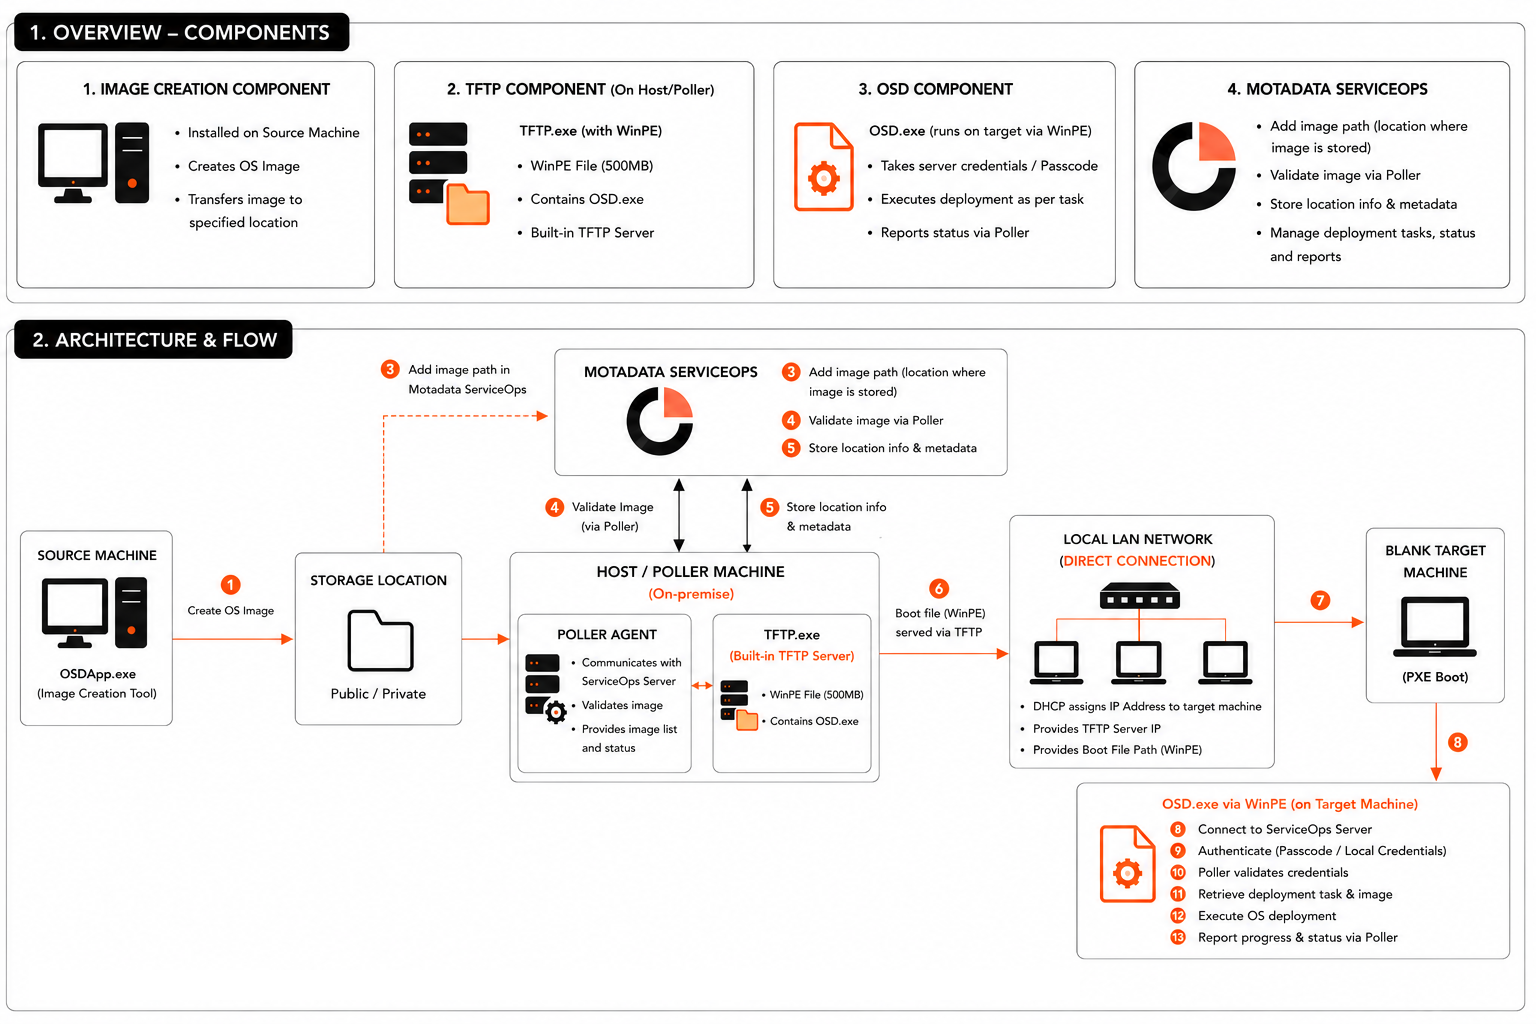
Components
| Component | Role |
|---|---|
| Image Creation Component | Installed on the source (golden) machine. Uses the Image Creator tool to capture the OS image and transfer it to a shared storage location. |
| TFTP Component | Runs on the Host/Poller machine. Serves TFTP.exe (bundled with WinPE and OSD.exe) to target machines over the network via the built-in TFTP server. |
| OSD Component | Runs on the target machine inside the WinPE environment after PXE boot. Authenticates using server credentials or a passcode, executes the deployment task, and reports status back through the Poller. |
| ServiceOps | Central management layer. Registers the image location, validates it through the Poller, stores metadata, and manages deployment tasks, status, and reports. |
Deployment Flow
- The golden machine uses the Image Creator tool to capture the OS image and save it to a shared storage location (public or private network path).
- ServiceOps registers the image by validating its storage path through the Poller Agent running on the Host/Poller machine.
- The DHCP server on the local LAN is configured with Option 66 (pointing to the Poller/TFTP host) and Option 67 (pointing to
TFTP.exe), directing any PXE boot request to the TFTP server. - When a blank target machine powers on, it performs an iPXE boot, contacts the DHCP server, and downloads
TFTP.exe(with WinPE andOSD.exe) from the TFTP server. - The target machine boots into WinPE and launches
OSD.exe, which connects to ServiceOps and authenticates using either local credentials or a time-limited passcode. - The Poller validates the credentials, and ServiceOps pushes the deployment task.
OSD.exeapplies the image and continuously reports progress and status back to ServiceOps through the Poller.
Business Use Cases
| Use Case | Scenario |
|---|---|
| New employee onboarding | Image machines before new hires arrive. One deployment task covers the entire batch. |
| Branch office rollout | Deploy a standard build to 20-200 machines without sending a technician on-site. |
| Security incident response | Re-image compromised endpoints with a known-good image to cut recovery time from days to hours. |
| Hardware refresh | Deploy a current golden image to all replacement machines in a single batch. |
| Post-merger standardization | Bring newly acquired endpoints to your approved OS build in one campaign. |
How This Documentation Is Organized
The OS Deployment section covers the full end-to-end workflow, not just the ServiceOps UI screens. Some steps happen outside the Admin panel entirely.
| Page | Where the work happens | What it covers |
|---|---|---|
| Setup | MotadataPXE host machine, DHCP server | Install MotadataPXE, configure TFTP, set DHCP options |
| Golden Machine Preparation | Reference workstation | Clean, configure, and Sysprep the machine before capture |
| Image | ServiceOps Admin panel | Capture the image with OSDApp, register it in ServiceOps |
| Deployment | ServiceOps Admin panel | Create deployment tasks, execute deployments on target machines |
| Reports and KPIs | ServiceOps Reports | Monitor deployment activity and audit completed campaigns |
Start with Setup if you are configuring OS Deployment for the first time. If your MotadataPXE server and DHCP are already configured, start with Golden Machine Preparation.
Prerequisites
Before configuring OS Deployment, confirm the following:
- You have Admin access to ServiceOps.
- Your account has an active OS Deployment license. Contact your Motadata account manager to enable it.
- The Discovery and Agents section is visible in your Admin panel.
- You have a Windows machine available to install the MotadataPXE Utility (
MotadataPXE.msi) and the Windows Poller (Poller_V87500.msi). - Your DHCP server allows configuration of Option 66 and Option 67 on the scope covering your target machines.
- You have a golden machine (a fully configured reference workstation or server) to capture the OS image from. Remove all non-essential or additional applications from the golden machine before capturing the image. Every application present on the golden machine is replicated to all target machines during deployment.
- A shared network path (UNC format, for example \fileserver\images) is available and accessible to all machines, including the golden machine and all target machines.
- The OS Deployment Manager role is assigned to any technician who will manage images and deployments.
Roles and Permissions
OS Deployment uses a dedicated permission set under the Manage OS Deployment permission group.
| Permission | What It Allows |
|---|---|
| View | Read-only access to OS Deployment. The user sees the Image and Deployment sections but cannot make changes. |
| Manage Image | Create, edit, and delete OS images in the Image section. Requires View. |
| Manage Deployment | Create, edit, and cancel deployment tasks in the Deployment section. Requires View. |
The out-of-the-box OS Deployment Manager role includes all three permissions. To assign the role, go to Admin > Users > Roles.
Known Limitations
- OS Deployment is available for on-premise deployments only. Cloud-hosted ServiceOps instances do not support this feature.
- OS Deployment supports Windows target machines only. Linux and macOS targets are not supported.
- Only offline images are supported. Live or online imaging of a running machine is not supported.
- The MotadataPXE.msi (TFTP service) must be installed on a Windows machine.
- Only one active deployment task can run per Poller at a time. Plan sequential deployment windows if you need to deploy different images through the same Poller.
- The 6-digit passcode is generated by ServiceOps and cannot be manually set.
- Image files are stored externally and must be accessible to both the golden machine during capture and the target machine during deployment. Common configurations include a shared network path (UNC), a separate drive not selected at image creation time, or a file server on another machine. ServiceOps does not manage image storage, replication, or backup.
- Machines that are already running cannot be targeted remotely. The machine must reboot and boot via MotadataPXE to receive a deployment.