Change Form
Streamline change management processes by customizing forms to efficiently plan, approve, and track changes within your organization.
This document guides IT administrators, IT staff, and implementation consultants in customizing change forms by modifying templates, adding custom fields, and configuring existing fields to capture structured information for effective change planning, risk assessment, implementation, and automation.
Navigating to the Change Form
To access and configure custom fields for change management, go to Admin > Change Management > Change Form. The page will appear, displaying the current layout of your change management form.
Understanding Field Types
The page displays two types of fields:
- Default Fields: These are the primary, built-in fields that come with the initial installation of the system. Default fields are essential for core change processes; their names cannot be changed, and they cannot be deleted.
- Custom Fields: These are additional fields that can be added to the change form from the Field Palette. Custom fields provide flexibility to meet specific organizational needs. They can be renamed, modified, and deleted as required.
System Fields
System fields are the core, built-in fields that form the foundation of any change record. While some properties can be adjusted, they cannot be removed. Key system fields include:
- Fill From Template
- Transition Model
- Requester (mandatory)
- Cc Emails
- Subject (mandatory)
- Description
- Start Date (mandatory)
- End Date (mandatory)
- Priority
- Urgency
- Impact
- Category
- Change Risk
- Change Type
- Change Reason
- Target Environment
- Technician Group
- Assignee
- Department
- Vendor
- Location
- Change Implementer
- Change Manager
- Change Reviewer
- Tags
- Attachment
Customizing the Change Form
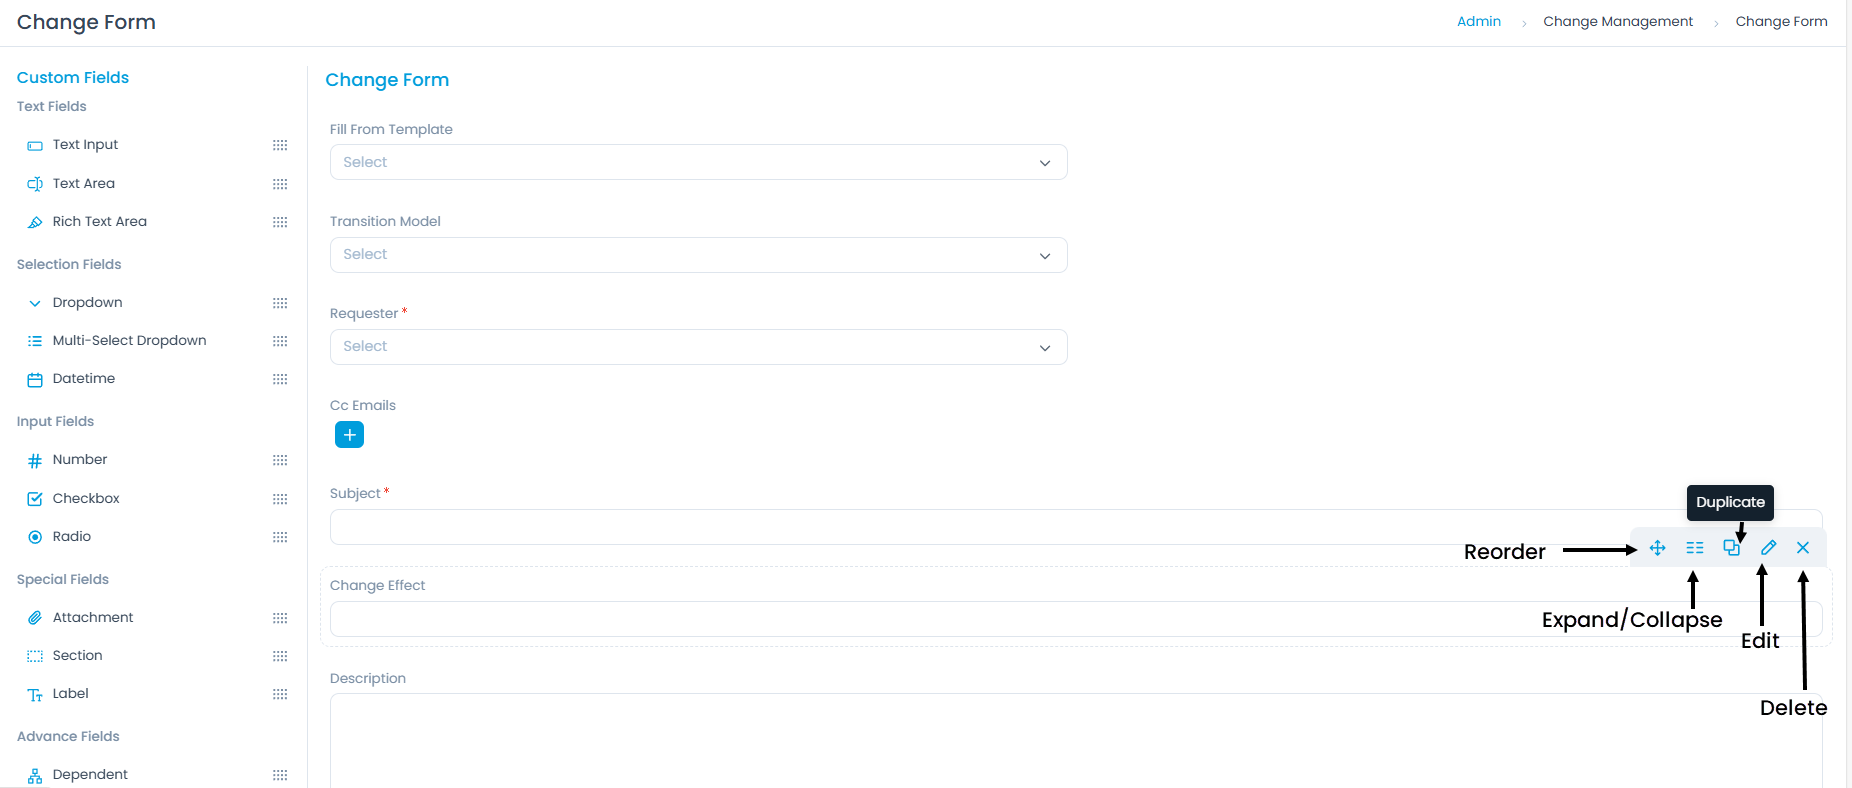
When managing fields on the change form canvas, various customization options are available to help you arrange and configure fields effectively. These options include:
- Reorder: You can easily change the display order of fields on the form. Simply drag and drop any field to its desired position within the form layout. This option is available for both default and custom fields.
- Expand/Collapse: This option allows you to adjust the visual width of fields. You can set a field to expand to a full row (one per row) or collapse to occupy half a row (two per row), enabling a more compact form design. This option is available for both default and custom fields.
- Duplicate: For custom fields, you can create an exact copy with all its configurations. This is useful for quickly adding similar fields without rebuilding them from scratch. This option is available only for custom fields.
- Edit: This option opens a configuration pop-up for the selected field, allowing you to modify its properties. You can change the field's name, set it as mandatory, define default values, show on the change form, and adjust other field-specific characteristics. For default fields, some editing options may be restricted.
- Remove: You can delete custom fields from the change form. This option is not available for default fields.
Deleting a custom field will permanently remove it and all its associated data from existing change records.
Adding Custom Fields
The Field palette (located on the left sidebar) provides a variety of custom field types that you can add to your change form. To add a new field, simply drag-and-drop the desired field type from the palette onto the form canvas.
For detailed information on each custom field type, including its specific configuration options, use cases, and how to set up properties like default values, character limits, and permissions, please refer to the Request Form documentation. This linked resource provides comprehensive guides for fields such as:
- Text Fields: Text Input, Text Area, Rich Text Area
- Selection Fields: Dropdown, Multi-Select Dropdown, Datetime
- Input Fields: Number, Checkbox, Radio
- Special Fields: Attachment, Section, Label
- Advance Fields: Dependent
Managing System Fields Visibility
System fields, such as Location, Category, Department, Change Reason, and Target Environment, are integral to change management. While they cannot be deleted, you can control their visibility on the change creation form. To hide a system field, enable the Hide option within its configuration.
Once a system field is hidden, it will no longer appear when users or technicians create new change records. This allows administrators to simplify forms for specific workflows by showing only the most relevant system fields.