Request Form
The Request Form feature allows administrators to design and customize the fields that appear when users or technicians submit new service requests. This ensures that all necessary and structured information is collected to speed up request processing, classification, and resolution.
As an administrator, you can manage both system fields (which are predefined by the platform, such as Requester, Subject, Description) and custom fields (organization-specific inputs).
Navigating to the Request Form
- Go to Admin > Request Management > Request Form.

- The page displays three main areas:
- Field Pallet (Left Sidebar): A drag-and-drop interface with all available custom field types.
- Form Canvas (Center): The main area where you can see the current form layout, including both system and custom fields. You can drag fields here to add them or reorder existing ones.
- User Fields Mapping (Top Right Icon): Allows you to map user attributes (e.g., Department, Location) to request fields, which can auto-populate form data when a user creates a request. The request fields dropdown will only show fields which are not mapped.

Form Customization Options
When you hover over any field on the canvas, a set of options appears, allowing you to:
Reorder: Drag and drop fields to change their order on the form.
Expand/Collapse: Adjust the field width to show one or two fields in a single row.
Duplicate: Create a copy of an existing custom field (not available for system fields).
Edit: Open the configuration popup for the field to modify its properties.
Remove: Delete a custom field.
cautionDeleting a custom field will permanently remove it and its associated data from all existing requests.
System Fields
System fields are the core, built-in fields that form the foundation of any request. They cannot be removed, although some properties can be adjusted. Key system fields include:
- Fill From Template
- Transition Model
- Requester (mandatory)
- Subject (mandatory)
- Description
- Cc Emails
- Status
- Priority
- Urgency
- Impact
- Category
- Technician Group
- Assignee
- Department
- Vendor
- Location
- Company (Only if Managed Services Provider feature is enabled)
- Tags
- Attachment
Custom Fields
The Custom Fields Pallet allows administrators to extend the form by adding new fields. These can be dragged and dropped into the form canvas.
Text Fields
Click to view the Text Fields
a. Text Input
- Description: A single-line text box for short inputs.
- Use Cases: Employee ID, Asset Tag, Ticket Reference Number.
- Configuration Options:
- Name: The display label for the field.
- Hint Text: Placeholder text that appears in the field by default.
- Default Value: A predefined value for the field.
- Character Limits: Set minimum and maximum characters required.
- Permissions: Configure view/edit rights for requesters and make the field mandatory for requesters or technicians.
- System Managed Field: Make the field non-editable. Its value will be populated by other system processes or integrations.
- PII (Personally Identifiable Information): Mark this field as containing sensitive data. When enabled, the system may apply data masking or restrict visibility to authorized personnel to comply with privacy regulations.
b. Text Area
- Description: A multi-line input box for longer text responses.
- Use Cases: Additional Notes, Justification for a Service Request, Error Messages.
- Configuration Options: Includes all
Text Inputoptions, but is designed for longer content.
c. Rich Text Area
Description: A multi-line input box with a formatting toolbar. Unlike a normal text area, this field allows users to create styled and media-rich content such as formatted text, hyperlinks, images, and embedded videos.
Use Cases:
- Change Request Justification (with formatted rollback plans, risk tables).
- Knowledge Article references within a request.
- Detailed incident reports with linked KBs, images, and training videos.
Key Functionalities: The toolbar of the Rich Text Area supports:
- Text Formatting: Bold, Italic, Underline, Font Size, Font Family, Headings, Alignment, Separator line, Text Color, Text Background, Bulleted/Numbered lists.
- Hyperlinks: Insert clickable links to websites or knowledge articles.
- Images: Insert inline images (e.g., screenshots, diagrams).
- Tables: Organize structured data (e.g., impact analysis tables).
- Videos (Embed): Add embedded training or troubleshooting videos.
- Import HTML: Import HTML code directly into the rich text editor with live preview functionality.
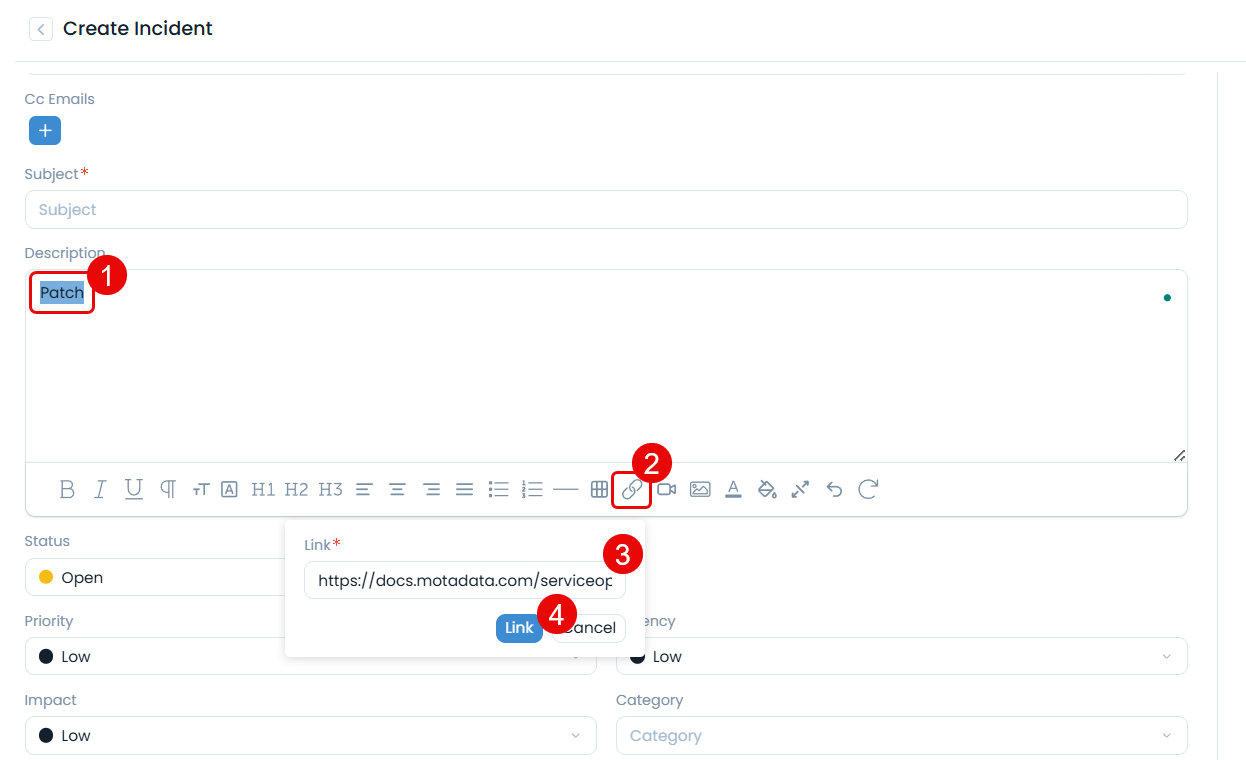
Adding Links
- Highlight the text you want to link.
- Click the 🔗 Link icon in the toolbar.
- Enter the URL (e.g.,
https://example.com/setup-guide). - Click Link. The text becomes clickable.
Adding Images
- Click the Image icon in the toolbar.
- Select the image from your local storage and click Add. The image will appear in the box.
- You can now resize or align it as per your requirement.

Adding Videos
Videos with embedded links can only be added. To add videos:
- Open the desired video link.
- Copy the video’s embed code (usually available under Share > Embed on the video platform like Youtube, Sharepoint).

Example:
<iframe width="560" height="315" src="https://www.youtube.com/embed/5ZuYag9f3R0?si=ayEIr0kuDqCDF06k" title="YouTube video player" frameborder="0" allow="accelerometer; autoplay; clipboard-write; encrypted-media; gyroscope; picture-in-picture; web-share" referrerpolicy="strict-origin-when-cross-origin" allowfullscreen></iframe>
- In the Rich Text Area field like Description, click the Video icon from the toolbar.

- Paste the highlighted embedded link in the Video Link dialog box as shown in the above screenshot and click Add. The video will appear inline.
Importing HTML
The Rich Text Area allows you to import HTML code directly, which is useful when you need to add complex formatted content or copy content from other sources. The Import HTML feature provides a split-pane view with HTML input and live preview.
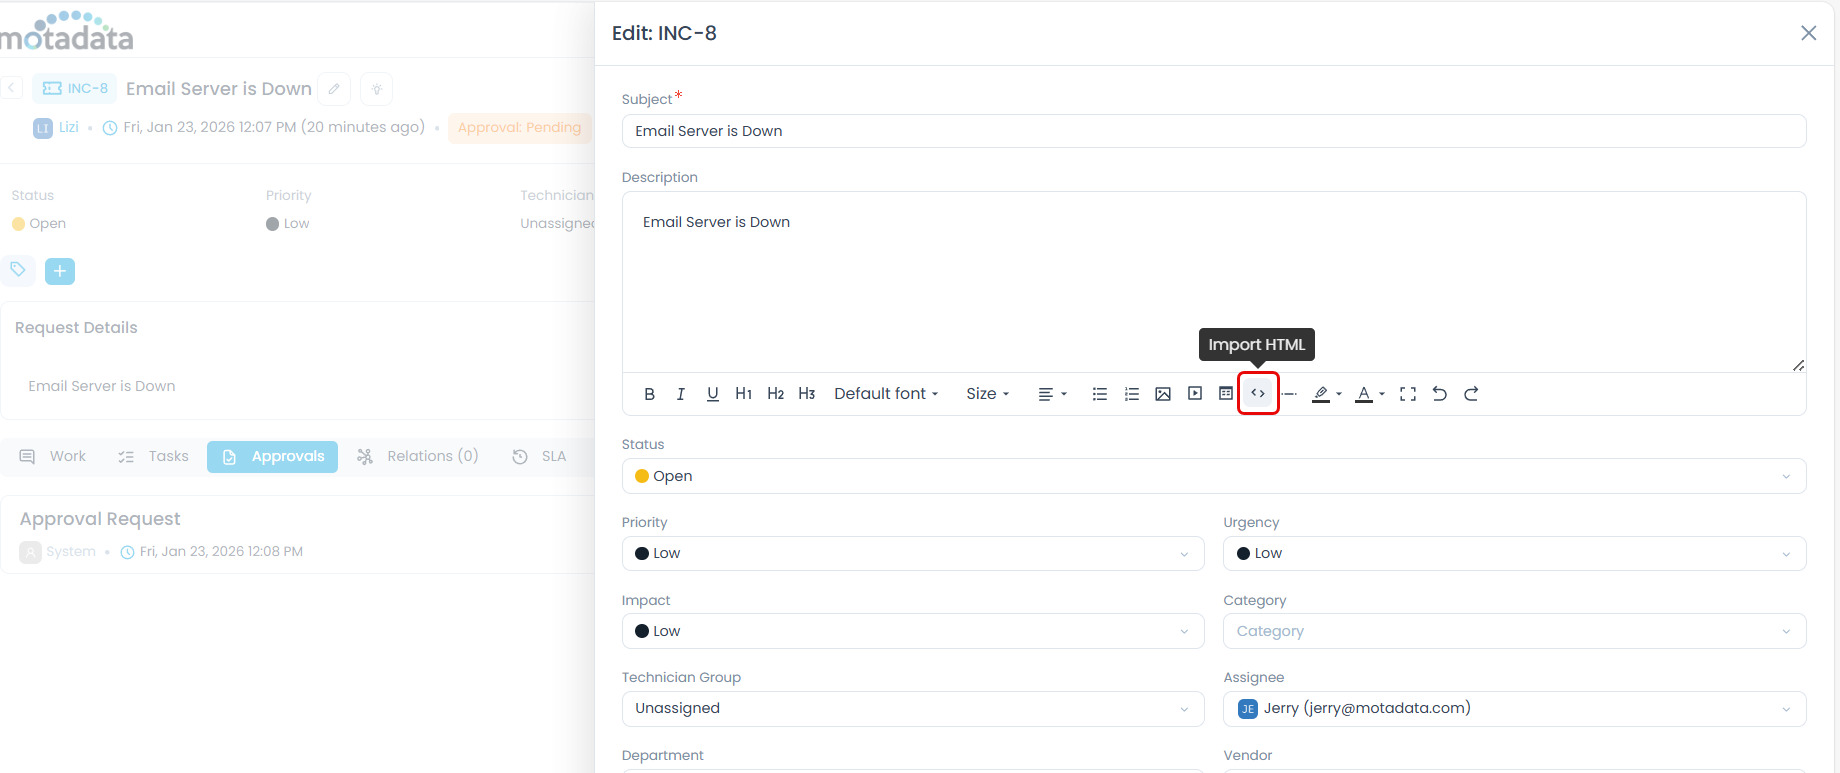
In the Rich Text Area toolbar, click the Import HTML icon (
<>).A modal window opens with two panels:
- HTML Input (Left Panel): Paste or type your HTML code here. The editor supports syntax highlighting and line numbers for easier editing.
- Preview (Right Panel): View the rendered output of your HTML code in real-time.
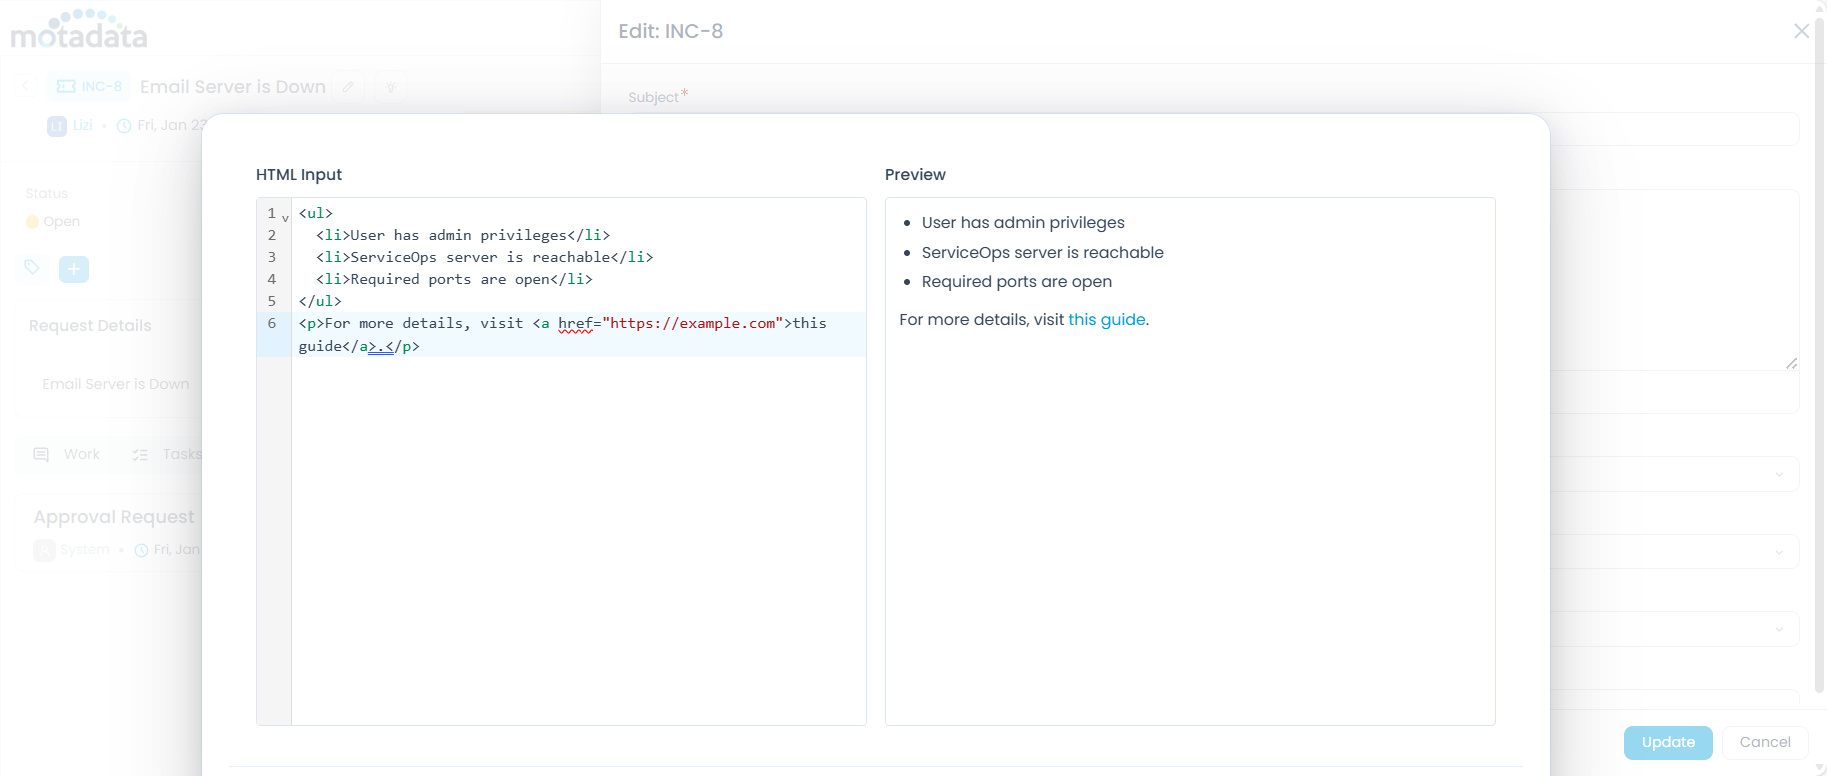
Enter your HTML code in the left panel. For example:
<ul>
<li>User has admin privileges</li>
<li>ServiceOps server is reachable</li>
<li>Required ports are open</li>
</ul>
<p>For more details, visit <a href="https://example.com">this guide</a>.</p>
Review the rendered preview in the right panel to ensure the content displays correctly.
Click Update to import the HTML content into the Rich Text Area field, or click Cancel to discard changes.
noteThe Import HTML feature is particularly useful when copying formatted content from external sources, creating structured lists, or adding complex HTML elements that are easier to write in code than using the visual editor.
Selection Fields
Click to view the Selection Fields
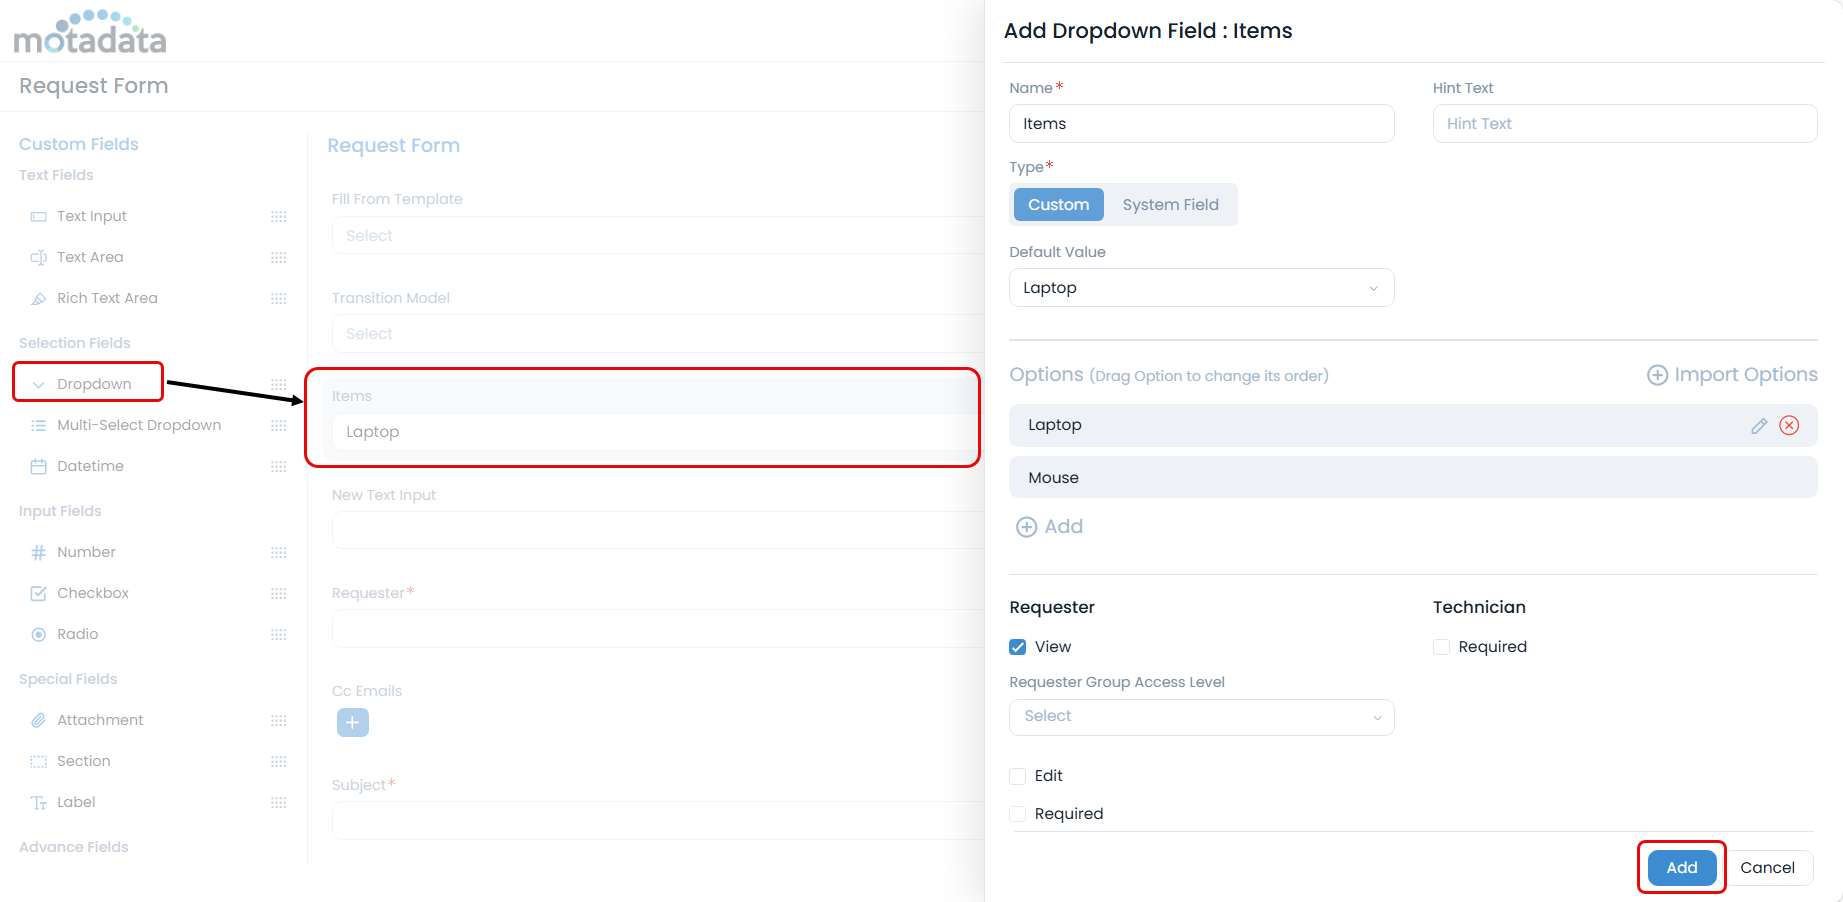
a. Dropdown
Description: A single-choice selection list.
Use Cases: Request Type, Department, Location.
Configuration Options:
- Type: Can be a
Customlist of options you define, or aSystem Fieldthat pulls data from existing fields like Technicians, Requesters, or Technician/Requester Groups. - Default Value: Set a default selection. The options will be available once added.
- Options: Manually add or import a list of choices. To add manually, click the Add link, enter the option, and select the green right symbol. If required you can also change the order of the options to be displayed in the form using drag and drop.
- Permissions: Configure view/edit rights for requesters and make the field mandatory for requesters or technicians.
- System Managed Field: Make the field non-editable.
- PII (Personally Identifiable Information): Mark this field as containing sensitive data.
- Type: Can be a
b. Multi-Select Dropdown
- Description: A list allowing multiple selections at once.
- Use Cases: Skills Required, Affected Services, Escalation Groups.
- Configuration Options: Similar to the standard
Dropdown, but allows users to select more than one option. It also includes the PII option.
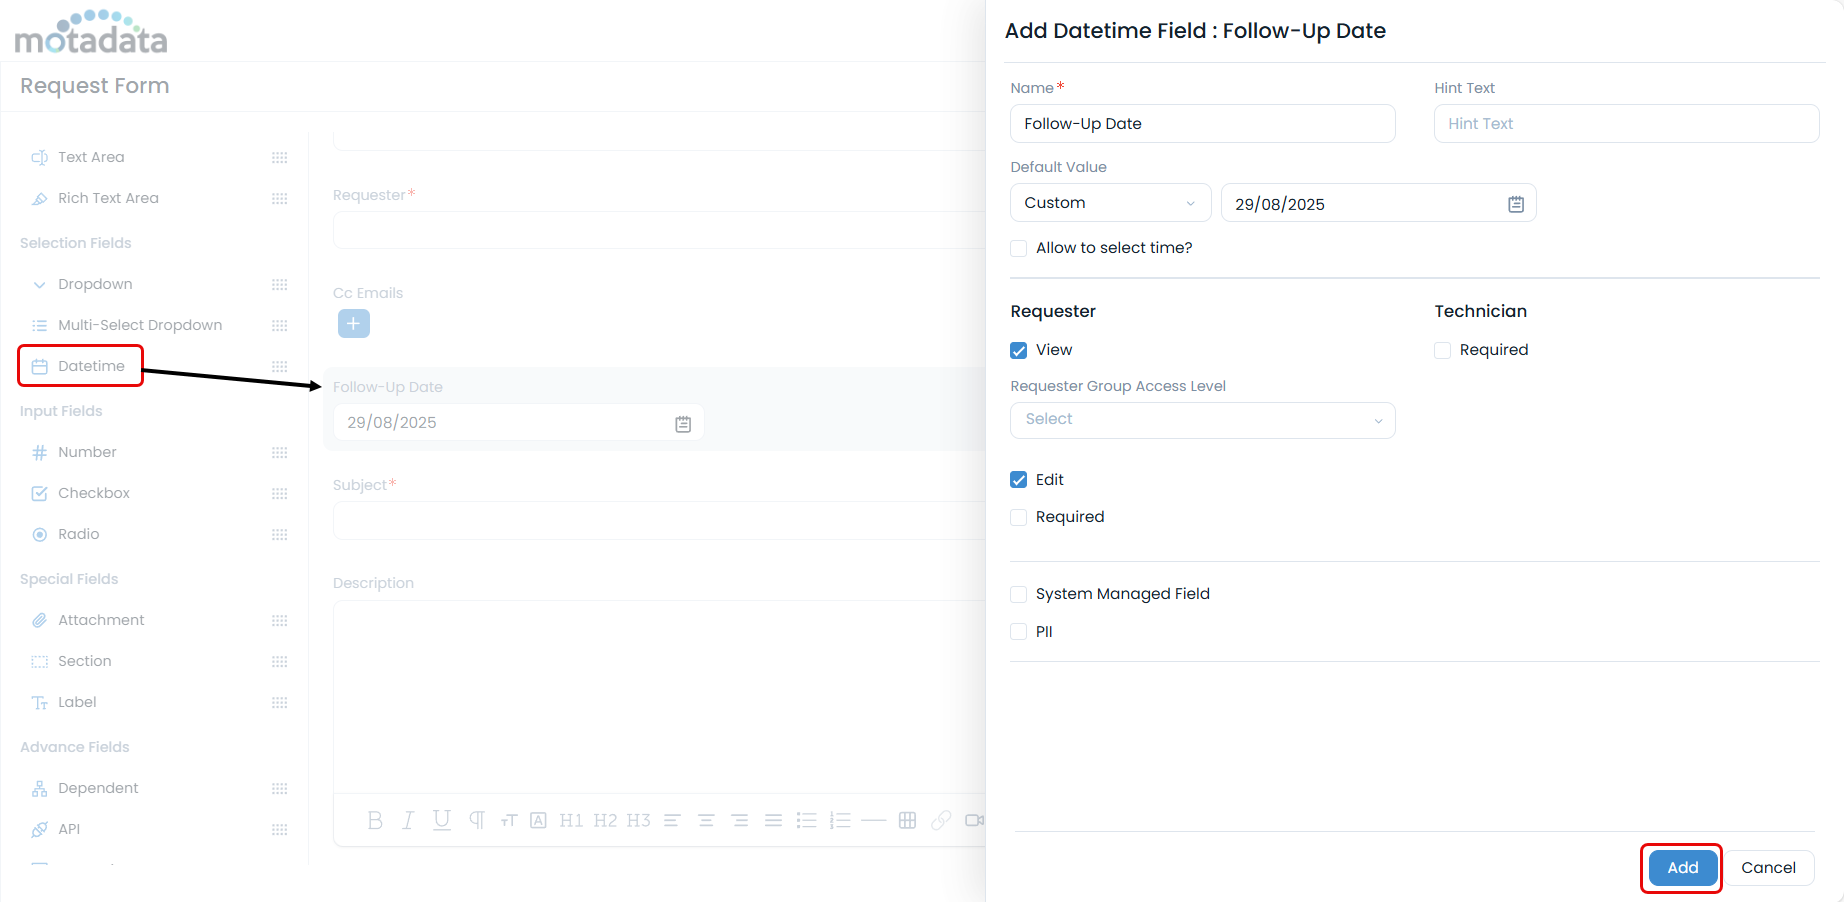
c. Datetime
- Description: Allows users to select both a date and time.
- Use Cases: Preferred Appointment Date, Change Implementation Window, Deadline.
- Configuration Options:
- Default Value: Can be set to the current date/time or a custom value.
- Allow to Select Time?: Enable or disable time selection alongside the date.
- Permissions: Configure view/edit rights for requesters and make the field mandatory for requesters or technicians.
- System Managed Field: Make the field non-editable.
- PII (Personally Identifiable Information): Mark this field as containing sensitive data.
Input Fields
Click to view the Input Fields
a. Number
- Description: Accepts numeric input only.
- Use Cases: Quantity of Assets, Employee Number, Budget Estimate.
- Configuration Options:
- Hint Text: Placeholder text that appears by default.
- Default Value: Set a default numeric value.
- Allow Decimal: Permit decimal values.
- Value Range: Set minimum and maximum required values.
- Permissions: Configure view/edit rights for requesters and make the field mandatory for requesters or technicians.
- System Managed Field: Make the field non-editable.
- PII (Personally Identifiable Information): Mark this field as containing sensitive data.
b. Checkbox
- Description: Allows one or multiple check options.
- Use Cases: Select applicable features, agree to terms, request add-ons.
- Configuration Options:
- Default Value: Pre-select one or more options.
- Options: Define the list of checkbox items.
- Permissions: Configure view/edit rights for requesters and make the field mandatory for requesters or technicians.
- PII (Personally Identifiable Information): Mark this field as containing sensitive data.
- Display Option Vertically: Align the options vertically instead of horizontally.
c. Radio
- Description: Allows a single choice from multiple options, displayed inline.
- Use Cases: Priority Selection, Approval Response (Yes/No), Urgency Levels.
- Configuration Options:
- Default Value: Set a default selected option.
- Options: Define the radio button choices.
- Permissions: Configure view/edit rights for requesters and make the field mandatory for requesters or technicians.
- System Managed Field: Make the field non-editable.
- PII (Personally Identifiable Information): Mark this field as containing sensitive data.
Special Fields
Click to view the Special Fields
a. Attachment
- Description: Lets users upload files. Supports formats such as PDF, HTML, and XML, and has a maximum file size of 1 MB.
- Use Cases: Screenshots, Error Logs, Approval Documents.
- Configuration Options:
- Button Text: Customize the text on the upload button.
- Permissions: Can be made mandatory for requesters or technicians.
- PII (Personally Identifiable Information): Mark this field as containing sensitive data.
b. Section
Description: A container used to group related fields together under a common heading.
Use Cases: Grouping fields under "Requester Details," "Issue Information," or "Approval Section."
Configuration Options:
- Name: The title of the section.
- Permissions: Control the visibility of the entire section for different requester groups.
noteThe rights will be managed as per the fields in the section.

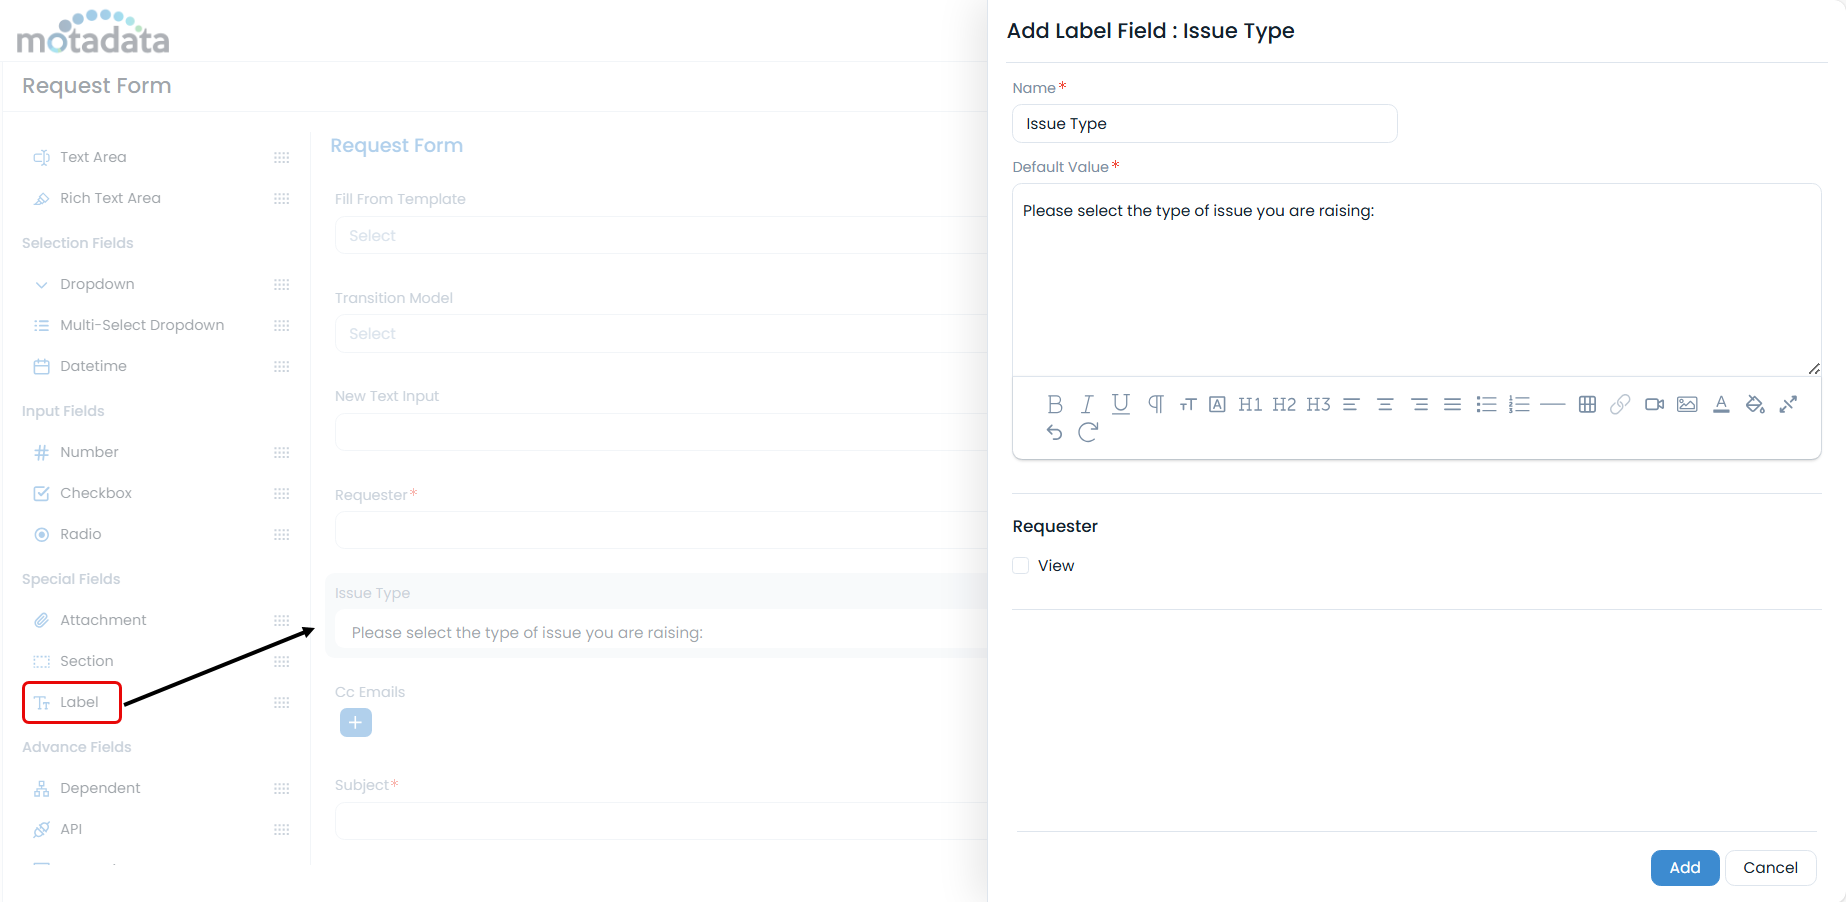
c. Label
Description: A non-editable text block used to display static information or instructions on the form.
Use Cases: Guidelines for filling out the form, disclaimers, IT policy notes.
Configuration Options: Set the display text.
Advanced Fields
Click to view the Advanced Fields
a. Dependent
- Description: Creates a parent-child relationship between fields, where the options in the child field depend on the selection made in the parent field.
- Use Cases:
- Category → Subcategory (e.g., IT → Hardware → Laptop)
- Location → Building → Floor
- Configuration Options:
- Type: Can be based on a
Customlist you create or aSystem Field(like Department, Location, or Category). - Hierarchy: Define the parent-child options.
- Allow user to select leaf node only: Restrict selection to the final level of the hierarchy.
- Display Entire Hierarchy in Report: Ensure the full hierarchy path (e.g., "Hardware > Laptop > Keyboard") is visible in reports.
- Type: Can be based on a
b. API
Description: A configurable button that executes an API call to fetch data from an external source. This field is used in conjunction with a
Dynamicfield to populate its options.Use Cases:
- Fetch a list of software assets from an asset management tool.
- Retrieve user details from an HR system.
- Query a project management tool for a list of active projects.
Configuration Options:
Button Text: Customize the label of the button (e.g., "Fetch Assets").
Type: Choose between a
Simple(REST API) orPlugin-based integration. If plugin is selected, select the required plugin from the dropdown list. These plugins are added from the Admin > Automation > Integrations > Plugin section. If simple is selected, enter the below details.- Request Type: Select the type as GET or POST.
- URL: Enter the API URL from where the data is to be fetched.
- Request JSON: Type the code for request JSON. This is required for POST request type.
- Header: Provide the custom headers that you want to add to the HTTP request or response. You can add multiple headers using the Add Header link in the form of Key and Value. For example: Key: Custom-Header Value: SomeValue.
- Credential Type: Select the type of credentials used for accessing the API. The options are:
- No Auth: Select if no authentication is required.
- Basic Auth: If selected, enter the Username and Password using which the API can be accessed.
- By Credential: If selected, select the credentials that you want to use for accessing the API. These credentials are created from the API Credential page.
- Output Mappings: Add the Key and Value of the fields that you want to map. You can add more fields using the Add Output Mapping link. Key are the fields added in the form. For Example: You can select a Dynamic field, Select Option as shown below.
Proxy Server: Select the proxy server to be used for Internet connection.

c. Dynamic
- Description: A dropdown field whose options are populated by the data returned from an API field.
- Use Cases: Displaying a list of selectable items fetched from an external system, such as available software, project names, or user lists.
- Configuration Options:
- Name & Hint Text: Standard display labels.
- Permissions: Control visibility for requesters.
To use a Dynamic field, an API field must first be configured on the form to provide the data.


Summary Table – Custom Fields
| Field Type | Description | Example Use Case |
|---|---|---|
| Text Input | Single-line text entry | Employee ID |
| Text Area | Multi-line free text | Request Justification |
| Rich Text Area | Text with formatting | Change Request Details |
| Dropdown | Single choice from list | Request Type |
| Multi-Select Dropdown | Multiple selections from list | Affected Services |
| Datetime | Pick date & time | Change Implementation Date |
| Number | Numeric value only | Number of Licenses |
| Checkbox | Multiple checkable options | Software Selections |
| Radio | One selection from radio buttons | Urgency Level |
| Attachment | File upload | Error Log Screenshot |
| Section | Group fields together | Requester Details Section |
| Label | Display static information | Instructions or Warnings |
| Dependent | Parent-child field relationship | Category → Subcategory Mapping |
| API | Button to fetch external data | Get software list from an asset tool |
| Dynamic | Dropdown populated by an API call | Display list of available software |
Best Practices for Using Custom Fields
Custom fields provide flexibility, but overusing them can make forms complex. Below are best practices for selecting the right field types across different ITSM scenarios.
1. Incident Management
Incidents are usually urgent and should have minimal fields for faster logging.
- ✅ Recommended Fields:
Dropdown(for Category/Subcategory),Text Input(for Asset Tag),Attachment(for screenshots). - 🚫 Avoid: Too many mandatory fields. Keep the form short to encourage quick reporting.
2. Service Request Management
Service requests often require structured data for approvals and fulfillment.
- ✅ Recommended Fields:
DropdownorMulti-Select Dropdown(for Service Type/Software),Number(for Quantity),Section(to group details),Dependent Field(for complex service mapping). - 🚫 Avoid: Rich text for basic requests. Use structured fields where possible.
3. Change Management
Change requests need detailed, structured, and formatted input.
- ✅ Recommended Fields:
Rich Text Area(for change description/rollback plan),Datetime(for start/end window),Radio(for Risk Level),Attachment(for implementation plans),Dependent Fields(for Change Category/Type). - 🚫 Avoid: Using only free-text fields, which makes reporting and analysis harder.
4. Problem Management
Problems need structured data for root-cause analysis and impact assessment.
- ✅ Recommended Fields:
Text Area(for known error description),Dropdown(for Impact Level),Multi-Select Dropdown(for affected services),Section(to group Symptoms, Impact, Root Cause). - 🚫 Avoid: Overloading with too many optional fields, which can slow down documentation.
5. General Best Practices
- Keep it Simple: Limit the number of mandatory fields.
- Use Dependent Fields Smartly: Ideal for Category/Subcategory or Location/Department mappings. Avoid over-nesting.
- Labels & Help Texts: Use clear field labels and hint text to guide users.
- Group Fields with Sections: Organize long forms into logical sections like "Requester Details" and "Request Details."
- Validate Where Possible: Use number fields for numeric data and dropdowns for predefined values to ensure data consistency.