Request Form Rule
Automate and optimize your request forms for enhanced user experience and streamlined data collection.
Request form rules enable you to make fields (system and custom) mandatory/non-mandatory, show/hide, enable/disable, set/clear value, or show/hide options based on certain conditions in the request form. These rules are applicable at the time of request creation, edit, or both, helping you to fetch the required details from the user.
To view the Request Form Rules, navigate to Admin > Request Management > Request Form Rules.
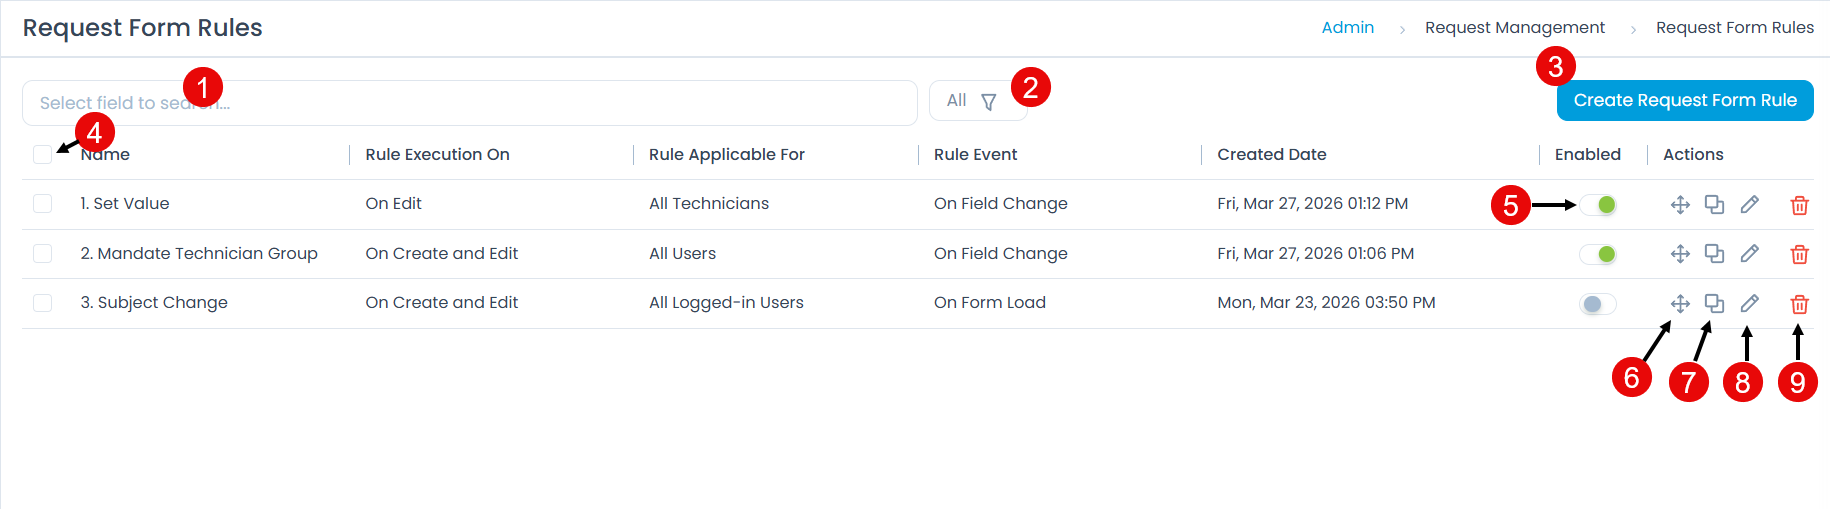
The page displays a list of already created rules along with the below options:
Search: You can look for a specific technician by searching them. The search is faceted and allows you to use specific criteria. More details can be found in the search section.
Filter: You can filter the form rule list by clicking the desired option. The following filters are available:
Filter Records Displayed All Displays all request form rules regardless of their status, including both enabled and disabled rules. Enabled Displays only those form rules that are currently active and will be evaluated and applied to the request form during creation, editing, or submission as per the rule configuration. Disabled Displays only those form rules that have been deactivated and will not be applied to the request form until re-enabled. Create Request Form Rule: You can create a request form rule.
Bulk Operations: You can enable, disable or remove the required form rules in one go.
Enabled: You can enable or disable a request form rule. By default it is enabled. If disabled the rule will not be applied to the Request Form.
Move: You can move the rule up and down using drag-and-drop.
Duplicate: You can create a duplicate rule based on the existing one.
Edit: You can edit the rule to make some changes in it.
Delete: You can delete the unwanted rules. A confirmation message appears. Click Yes to continue or Cancel to stop the process.
Create a Request Form Rule
To create a form rule, follow the below steps:
- The Request Form Rule actions like hide, non-mandate, disable, and clear value will not work for System Fields like Subject, Requester, Status, etc. as their default property has higher priority.
- A maximum of 10 actions can be added in the Request Form Rule.
- Click the Create Request Form Rule button on the top-right corner of the page. A popup appears.

- Enter the following details:
- Name: Enter the name of the Request Form Rule.
- Description: Enter a short description about the Request Form Rule.
- Rule Execution On: Select when you want to execute the rule. The options are:
- On Create and Edit: Select if you want the form rule to execute at the time of creating or editing a request.
- On Create: Select if you want the form rule to execute at the time of request creation only.
- On Edit: Select if you want the form rule to execute at the time of editing the request.
- Rule Applicable for: Select for whom the rule should be applicable. The options are: All Users, All Technicians, All Requesters, and All Logged-in Users.
- Rule Event: Select on which event the rule should get executed. The options are:
- On Form Load: Select to apply the rule when the form loads.
- On Field Change: Select to apply the rule when the value of a field changes.
- On Form Submit: Select to apply the rule when the form is submitted.
- Conditions: Define the conditions here that will be evaluated in the request form to apply the rule. The conditions are grouped into Request Fields, Requester Fields, and Logged-in Users Fields. You can define multiple conditions here. All the conditions work in AND form. It means the rule is applicable only when all the conditions are true.

- Condition Parameter: Select a condition parameter from the dropdown list.
- Operator: Select the operator: In/Not In from the dropdown list.
- Value: Select the value for condition. You can select multiple values of which the first value will be displayed in full, followed by the count of all additional values selected.
You can also click the Add Condition Group button to add more conditions in the Request Form Rule. Click on Remove All Conditions to remove all the conditions of the Request Form Rule.
Action: Select the action and its value(s) for the selected conditions from the given list. In the below figure, the priority field will become mandatory if the Support Technician Group is selected in the request form. You can add more actions using the Add Action button. The list of actions that can be configured are:
Show: To make the required field visible on the Request Form when the conditions of the form rule match.
Hide: To hide the required field on the Request Form when the conditions of the form rule match. Once a field is hidden, you can also apply the clear value and set value actions on it.
Mandate: To make the required field mandatory on the Request Form when the conditions of the form rule match.
Non-Mandate: To make the required field optional on the Request Form when the conditions of the form rule match.
Enable: To enable the required field on the Request Form when the conditions of the form rule match.
Disable: To disable the required field on the Request Form when the conditions of the form rule match.
Set Value: To set the value of the required field on the Request Form when the conditions of the form rule match. The Set Value action also supports dynamic population from Requester profile data. When configuring the action, select the target field, then choose From > Requester Field as the source. Supported Requester fields include contact number, email, manager, department, location, and compatible custom fields. Only fields with a matching data type appear in the selection list.
For example, For example, to auto-populate the Department field based on the selected requester, set the Rule Event to On Field Change, select Requester as the trigger field, then set the Action to Set Value, choose Department as the target field, and map it using From > Requester Field > Department.
noteThis replaces the standalone User Field Mapping configuration previously available under Request Management. All user field mappings should now be configured using Form Rules.
Clear Value: To clear the value of the required field(s) on the Request Form when the conditions of the form rule match. You can select multiple fields.
Show Options: To view the options of the required dropdown field on the Request Form when the conditions of the form rule match.
Hide Options: To hide the options of the required dropdown field on the Request Form when the conditions of the form rule match.
Run Custom Script: To run the custom script and get the data accordingly in the required field.
Filter Data: To filter the user details based on the selected user's and requester's field respectively. Additionally, it applies to the Classifiers on the Request and Change Details page.
For example, On Create Request page, if you want to filter the list of Assignee based on the User's and Requester's location, in the Form Rule, set the Action as Filter Data, Assignee, User's field - Location, and Requester's field - Location. Now, while creating/editing the Incident Request, the list of Assignee will appear based on the Location field.

- Reverse Actions if conditions are not matched: Enable if you want to reverse the actions when the conditions do not match in the request form. This is available only if Conditions are added.
- Once done, click Create.
Best Practices for Form Rules
Adhering to these best practices ensures that your form rules are efficient, robust, and provide an optimal user experience.
Planning & Design
- Identify Dynamic Field Behavior Requirements: During the requirement gathering phase, determine which fields should appear, become mandatory, be disabled, etc., based on user inputs or context.
- Choose Appropriate Rule Execution On Settings: Select
On Create,On Edit, orOn Create and Editbased on when the rule should apply. - Configure Rule Applicable For Correctly: Ensure
Rule Applicable Foris configured correctly (e.g., All Users, Technicians, or Requesters) to ensure the rule targets the intended audience. - Select Rule Events Based on Behavior: Use
On Form Loadfor initialization rules,On Field Changefor dynamic updates, andOn Form Submitfor validation.
Condition & Action Logic
- Define Conditions Precisely: Define conditions precisely using Request, Requester, or Logged-in User fields, ensuring logical clarity and predictable outcomes.
- Use Condition Groups: Utilize
Condition Groupsto handle multiple conditions, but avoid overly complex nested logic that's difficult to maintain. - Apply Show and Hide Actions: Dynamically control field visibility using
ShowandHideactions to keep forms clean and focused. - Use Mandate and Non-Mandate: Toggle field requirements (
Mandate/Non-Mandate) based on specific user actions or form contexts. - Use Enable and Disable Actions: Control edit permissions on fields using
EnableandDisableactions to maintain form integrity. - Use Set Value and Clear Value: Auto-populate fields with
Set Valuewhen logic applies andClear Valueto reset them when dependencies change. - Use Show Options and Hide Options: Dynamically filter dropdown options (e.g., categories or departments) using
Show OptionsandHide Options.
Advanced Features
- Implement Run Custom Script Judiciously: Use
Run Custom Scriptonly when necessary for complex logic, ensuring scripts are optimized and tested. - Use Filter Data: Dynamically narrow user lists (e.g., filter assignees by requester location) using
Filter Data.
Optimization & Maintenance
- Action Limit Awareness: Remember that each Form Rule supports up to 10 actions; create additional rules if more are needed.
- Enable Reverse Actions: Enable
Reverse Actions if Conditions Not Matchedto automatically revert form changes for a consistent user experience. Avoid usingReverse actionif a conditional field has a dependency on one or more form rules. - Maintain Proper Rule Ordering: Ensure proper
Rule Orderingusing drag-and-drop sequencing since rules are evaluated from bottom to top. - Use Enable/Disable Toggles: Control rule execution during testing or troubleshooting without deletion using
enable/disabletoggles. - Duplicate Existing Rules: Quickly create variations and maintain consistency across templates by duplicating existing rules.
- Test Form Rules Thoroughly: Test form rules across all possible input combinations to verify dynamic behavior and edge case handling.
- Document Every Rule: Document every rule's purpose, logic, and dependencies for ongoing maintenance and audit clarity. Practice properly naming the form rule to define its importance.
- Optimize for Large Forms: In case of a large number of fields, try grouping them within a section and apply the form rule on the entire section.
Use Cases
Use Case 1: Dynamic IT Support Request Form
Scenario: An organization utilizes ServiceOps for IT support and aims to implement a dynamic request form. This form should initially present only the Issue Type field, hiding other sub-fields. Subsequently, it should intelligently adapt based on the selected Issue Type. When a 'Software Issue' is chosen, software-related fields like Software Name and Software Version should become visible, while hardware-related fields are hidden. Conversely, if a 'Hardware Issue' is selected, Hardware Type should be shown, and software fields should be hidden.
Problem Solved: This dynamic form streamlines the request submission process by ensuring users are prompted for only the most relevant information based on their issue type. This reduces data entry errors, minimizes form clutter, and significantly enhances the user experience. The following interdependent rules are implemented to provide a tailored experience for different types of IT support requests.
1. Rule: Hide Fields on Form Load
Configuration's Role in Use Case: This rule ensures that when the form initially loads, only the essential Issue Type field is visible, providing a clean and focused starting point for the user.
Form Rule Configuration:

- Name:
Hide fields on form load- This name clearly indicates the rule's purpose: to hide specific fields as soon as the form is opened. - Description: Hides software-related and hardware-related fields when the form initially loads, making only the Issue Type field visible.
- Rule Execution On:
On Create- Configured to execute only when a new request is being created, ensuring the initial form state is clean. - Rule Applicable for:
All Users- Ensures that this initial clean form experience is consistent for all users, regardless of their role. - Rule Event:
On Form Load- Triggered immediately when the request form loads, establishing the initial field visibility. - Conditions: (No conditions needed as it applies on form load) - Since this rule defines the default state upon loading, no specific user input conditions are required.
- Actions:
Hide->Software Version- Conceals the 'Software Version' field to prevent clutter when it's not immediately relevant.Hide->Hardware Type- Conceals the 'Hardware Type' field to maintain a streamlined form when not applicable.
- Reverse Actions if conditions are not matched: Not Enabled - This rule sets an initial state and does not need to be reversed as subsequent rules will manage field visibility based on user input.
2. Rule: Show Hardware Type if Hardware Issue is Selected
Configuration's Role in Use Case: This rule is responsible for displaying and requiring hardware-specific information when a user identifies their problem as a hardware issue, while software fields remain hidden.
Form Rule Configuration:

- Name:
Show Hardware Type if Hardware Issue is Selected- Indicates that hardware-specific fields become visible when a hardware issue is chosen. - Description: Displays 'Hardware Type' field, and hides 'Software Name' and 'Software Version' fields when 'Hardware Issue' is selected in the Issue Type field.
- Rule Execution On:
On Create and Edit- Ensures consistent dynamic behavior whether the user is creating a new request or editing an existing one. - Rule Applicable for:
All Users- Provides a consistent and tailored experience for all users when selecting a hardware issue. - Rule Event:
On Field Change(forIssue Type) - The rule is triggered when theIssue Typechanges, enabling immediate form adjustments based on user selection. - Conditions:
Request - Issue TypeInHardware Issue- Activates the rule specifically when 'Hardware Issue' is selected, ensuring the form adapts correctly for hardware-related problems.
- Actions:
Show->Hardware Type- Makes the 'Hardware Type' field visible, requiring the user to provide necessary hardware-specific details.Hide->Software Version,Software Name- Conceals software-related fields to keep the form focused on hardware information.
- Reverse Actions if conditions are not matched: Enabled - Enabling reverse actions ensures that if the 'Issue Type' changes away from 'Hardware Issue', the form automatically reverts the visibility of 'Hardware Type' and other related fields, maintaining a clean and accurate form state.
Expected Outcome
When a new Incident is created, the form dynamically adjusts based on the selected Issue Type:
Initial Form Load: Only the
Issue Typefield is visible. All other sub-fields (Software Name,Software Version,Hardware Type) are hidden.If
Issue Typeis 'Software Issue': TheSoftware NameandSoftware Versionfields will become visible. TheHardware Typefield will be hidden, ensuring the form focuses on collecting relevant software-specific details.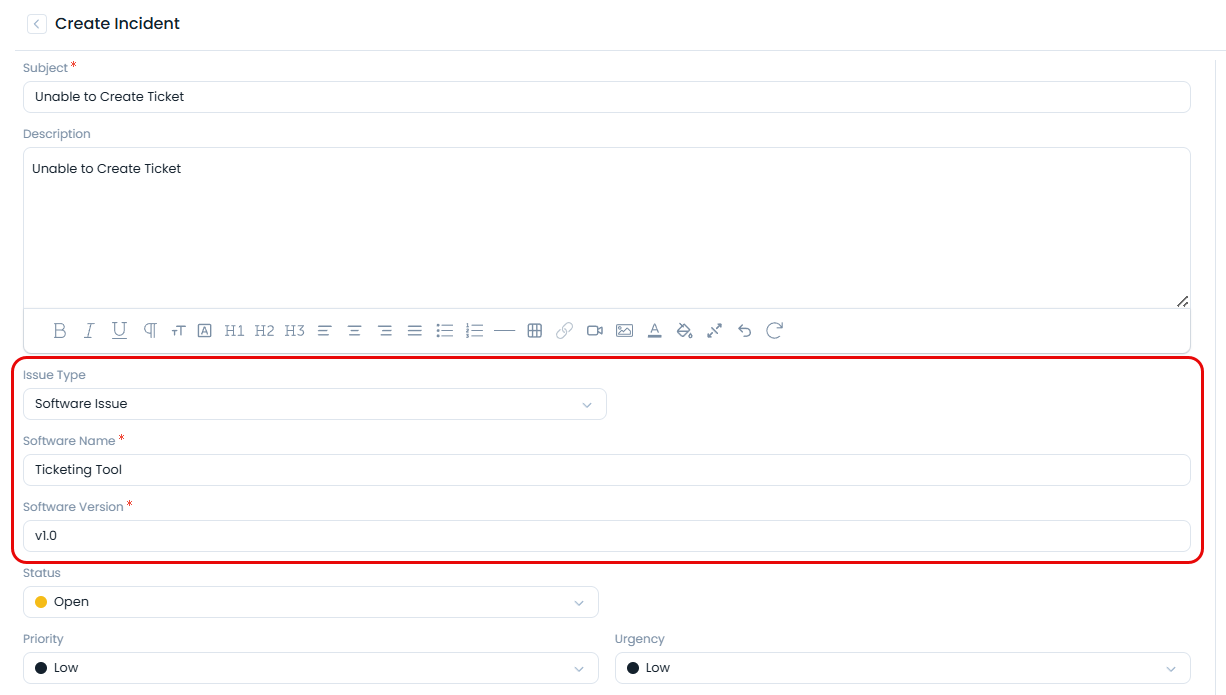
If
Issue Typeis 'Hardware Issue': TheHardware Typefield will become visible. TheSoftware NameandSoftware Versionfields will be hidden, tailoring the form to gather only essential hardware problem information.
Use Case 2: Dynamic Requester Filtering Based on User Location
Scenario: An organization wants to streamline the process of selecting requesters based on the location of the user creating the request. This ensures that only relevant requesters are presented to the user as per the user's location.
Problem Solved: This rule significantly improves efficiency in request creation by presenting only relevant requesters to the user. It reduces manual effort in searching for appropriate requesters and helps ensure that requests are handled by local support teams, leading to faster resolution times and improved service delivery.
Configuration's Role in Use Case: This rule sets the location field for the requester based on the user's location.
Form Rule Configuration:
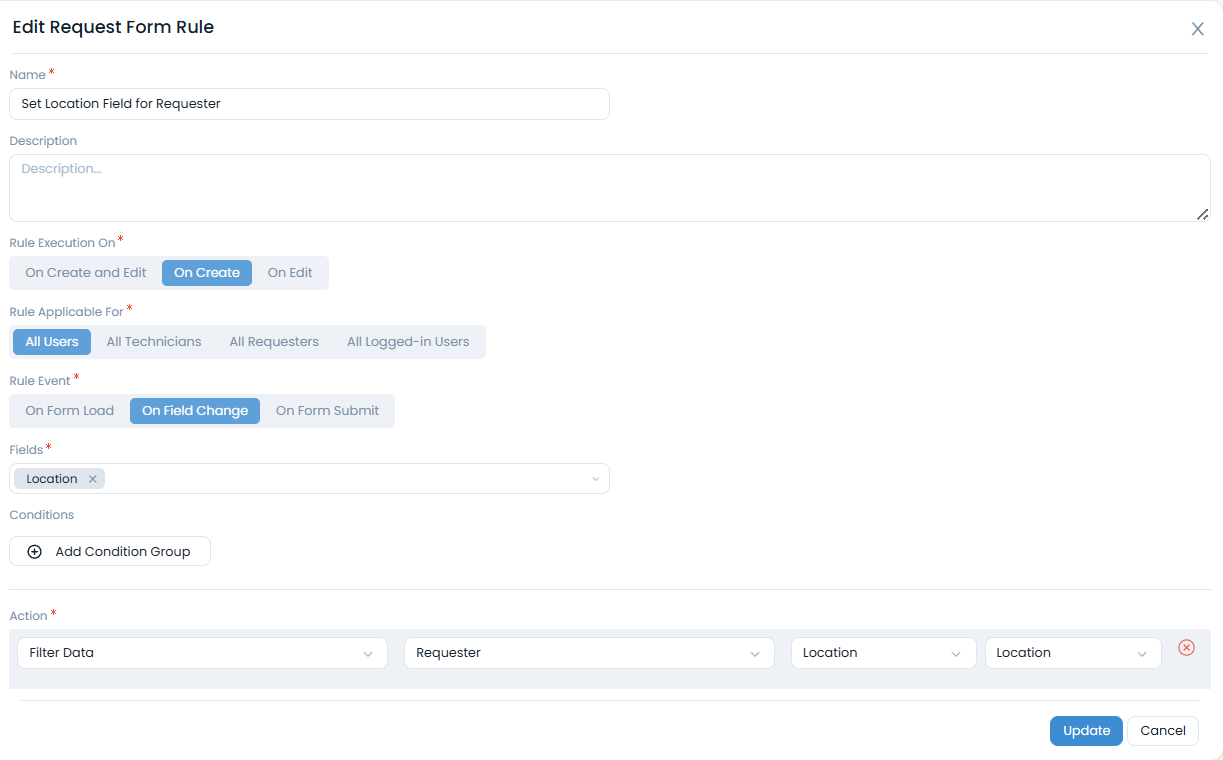
- Name:
Filtering Requesters by User's Location- This name clearly describes the rule's function: to set the location field for the requester. - Description: Filters the list of requesters on the Request page based on the location of the user creating the request.
- Rule Execution On:
On Create- Configured to execute when a new request is being created, ensuring the initial filtering is applied during creation. - Rule Applicable for:
All Users- Ensures that all users benefit from the intelligent requester filtering. - Rule Event:
On Field Change- The rule is triggered when the user's location field changes (user selects the location), allowing for the initial dynamic setting of the requester. - Fields: Select the fields for which the rule should be applied. In this case, select the
Locationfield for the Requester. - Conditions: (No specific conditions needed if applying to all requests.) - For this general filtering, no specific conditions are mandatory.
- Actions:
Filter Data->Requester,User's field - Location- This action is the core of the rule. It tells the system to filter theRequesterfield using theLocationdata from theUser's field(the person creating the request).
Expected Outcome
When creating an Incident Request:
- The list of available Requesters will be dynamically filtered to show only those technicians whose location matches the location of the user currently creating the request. For example, if the user's location is "Mumbai", the list of Requesters will be filtered to show only those technicians whose location is "Mumbai".
