The Workflow Builder - Design and Interface
The Workflow Builder: Automate complex processes, boost efficiency, and ensure consistent service delivery with intelligent, flexible workflows.
The Workflow Builder is an intuitive, visual environment that simplifies complex automation. It enables IT Admins and Technicians to easily construct, configure, and troubleshoot sophisticated workflows. The clear, logical interface ensures quick understanding and confident management of ITSM operations.
Designing Your Workflow
This section outlines the step-by-step process to create and configure a new workflow from scratch in the Workflow Builder.
To effectively design a workflow in the Workflow Builder, follow these steps:
Name Your Workflow: Start by providing a clear and descriptive name for your workflow that accurately reflects its purpose. This helps in easy identification and management later.
Select Module: Choose the relevant module (e.g., Service Desk, Asset Management) that your workflow will operate within. Selecting the correct module ensures your workflow has access to the appropriate data and actions within that specific ServiceOps area.
Define Workflow Type and Trigger:
- Workflow Type: Select whether your workflow will be
Event-based(triggered by specific occurrences, like a request being created) orPeriodic(scheduled to run at set intervals). Choosing the right type is crucial for the workflow's intended automation. - Configure Trigger: Based on your chosen workflow type, define the specific trigger conditions. For event-based workflows, specify the event (e.g., "Request is created"). For periodic workflows, set the schedule (e.g., "Run daily at 8:00 AM").
- Workflow Type: Select whether your workflow will be
Configure Flow and Action Nodes: Once the trigger is set and the workflow initiated, you can start building the core logic of your automation by adding and configuring various nodes:
- Flow Nodes: These nodes control the logic and branching of your workflow (e.g., conditional statements, loops).
- Action Nodes: These nodes perform specific tasks or integrations (e.g., sending notifications, updating records, calling external APIs).
By connecting these nodes on the canvas, you can construct a powerful and efficient automated process.
Key Elements of the Interface
Now that you understand the design process, let's explore the key visual elements of the Workflow Builder's interface:
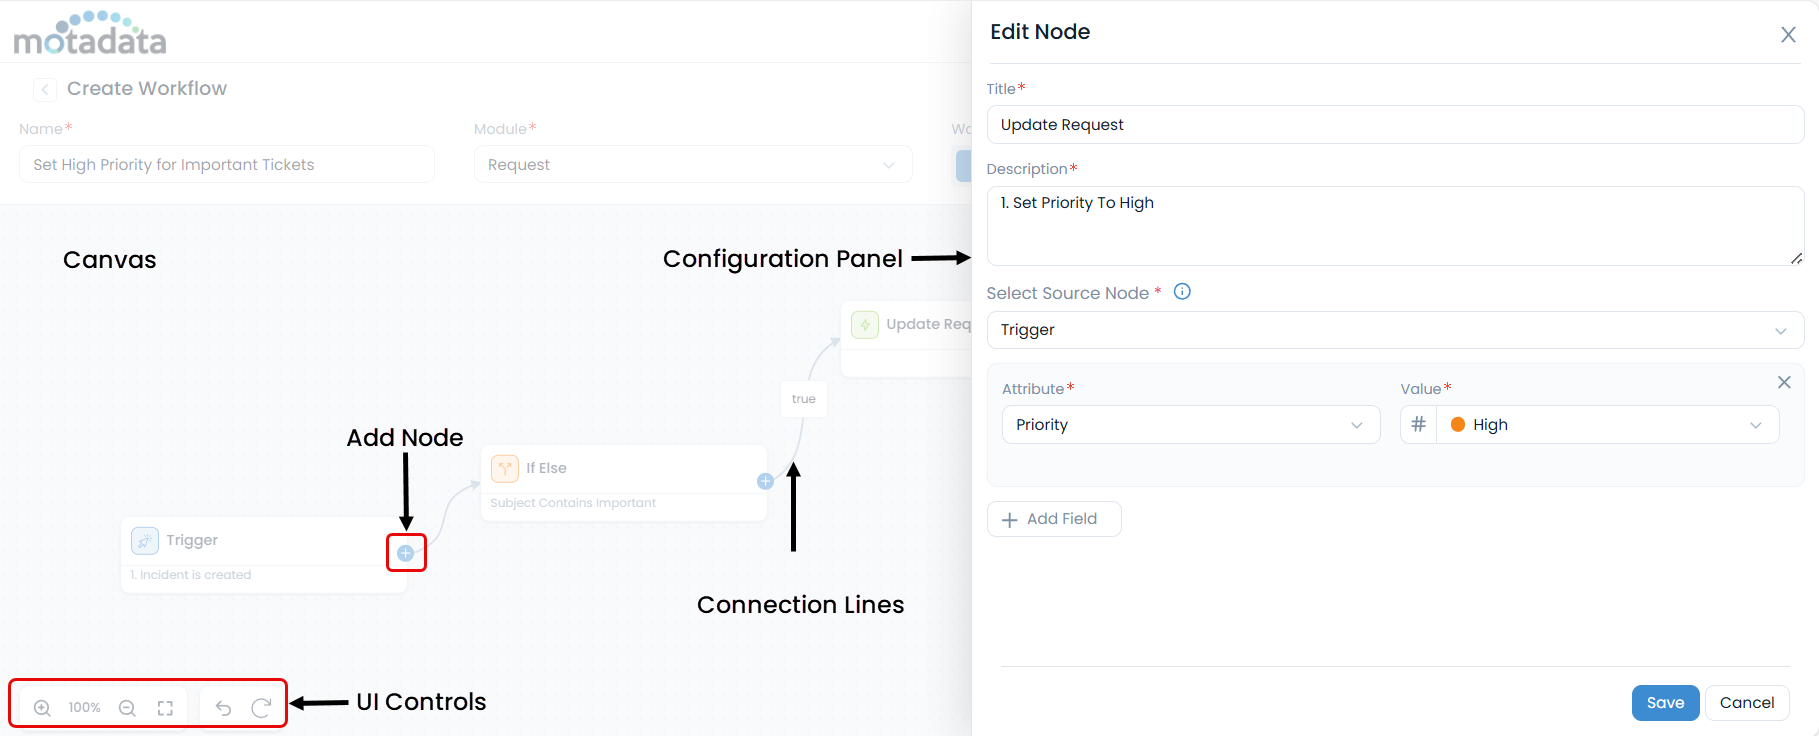
- Canvas: The primary workspace where workflow nodes are placed and connected. By default, each new workflow includes a "Trigger" node.
- Add Node Functionality: The flow and action nodes are added to the canvas by clicking an "Add Node" icon. This opens a side-drawer that allows you to select and configure the required node.
- Configuration Panel: Context-sensitive pages that appear when a node is selected, allowing for detailed configuration of its properties and conditions.
- Connection Lines: Visual connectors that illustrate the flow of data and execution between different nodes.
UI Controls
The Workflow Builder is equipped with several functionalities to enhance the user experience and ensure efficient workflow design and management:

Zoom In/Out: Users can zoom in and out of the canvas to manage large and complex workflows, enabling detailed inspection of specific sections or a high-level overview of the entire process.
Undo/Redo: Standard undo and redo functionalities are available, providing flexibility and reducing the risk of accidental changes during the design process.
Fit to Screen: Automatically adjusts the zoom level of the canvas to display the entire workflow within the visible area, ensuring all components are easily viewable without manual scrolling or zooming.