JBoss / WildFly
This guide explains how to instrument a Java application running on JBoss / WildFly by selecting a Linux agent or Windows agent for trace ingestion.
- Linux
- Windows
Prerequisites
- The Motadata Agent must be installed and running on the server where the JBoss/WildFly-based application is deployed. Also, the otelcol should be running as part of the Motadata Agent.
To check the agent status, open a Linux terminal and run:
service motadata-agent status
- Java Version must be 8 or higher. To check the version:
java -version
- The JBoss/WildFly installation directory (i.e.,
JBOSS_HOME/WILDFLY_HOME) is available. - Required permissions to edit server startup configuration and restart JBoss/WildFly.
- Application should be running on JBoss / WildFly (standalone mode supported via startup scripts).
Configuration Steps
Step1: Register the Application Service in Motadata ObserveOps (formerly known as AIOps)
Go to Menu > Settings > APM > Application Registration. Clicking the Application Registration button, you can register a new application.
From the application registration screen, select the instrumentation type Host/VM or Docker.
- Host/VM
- Docker
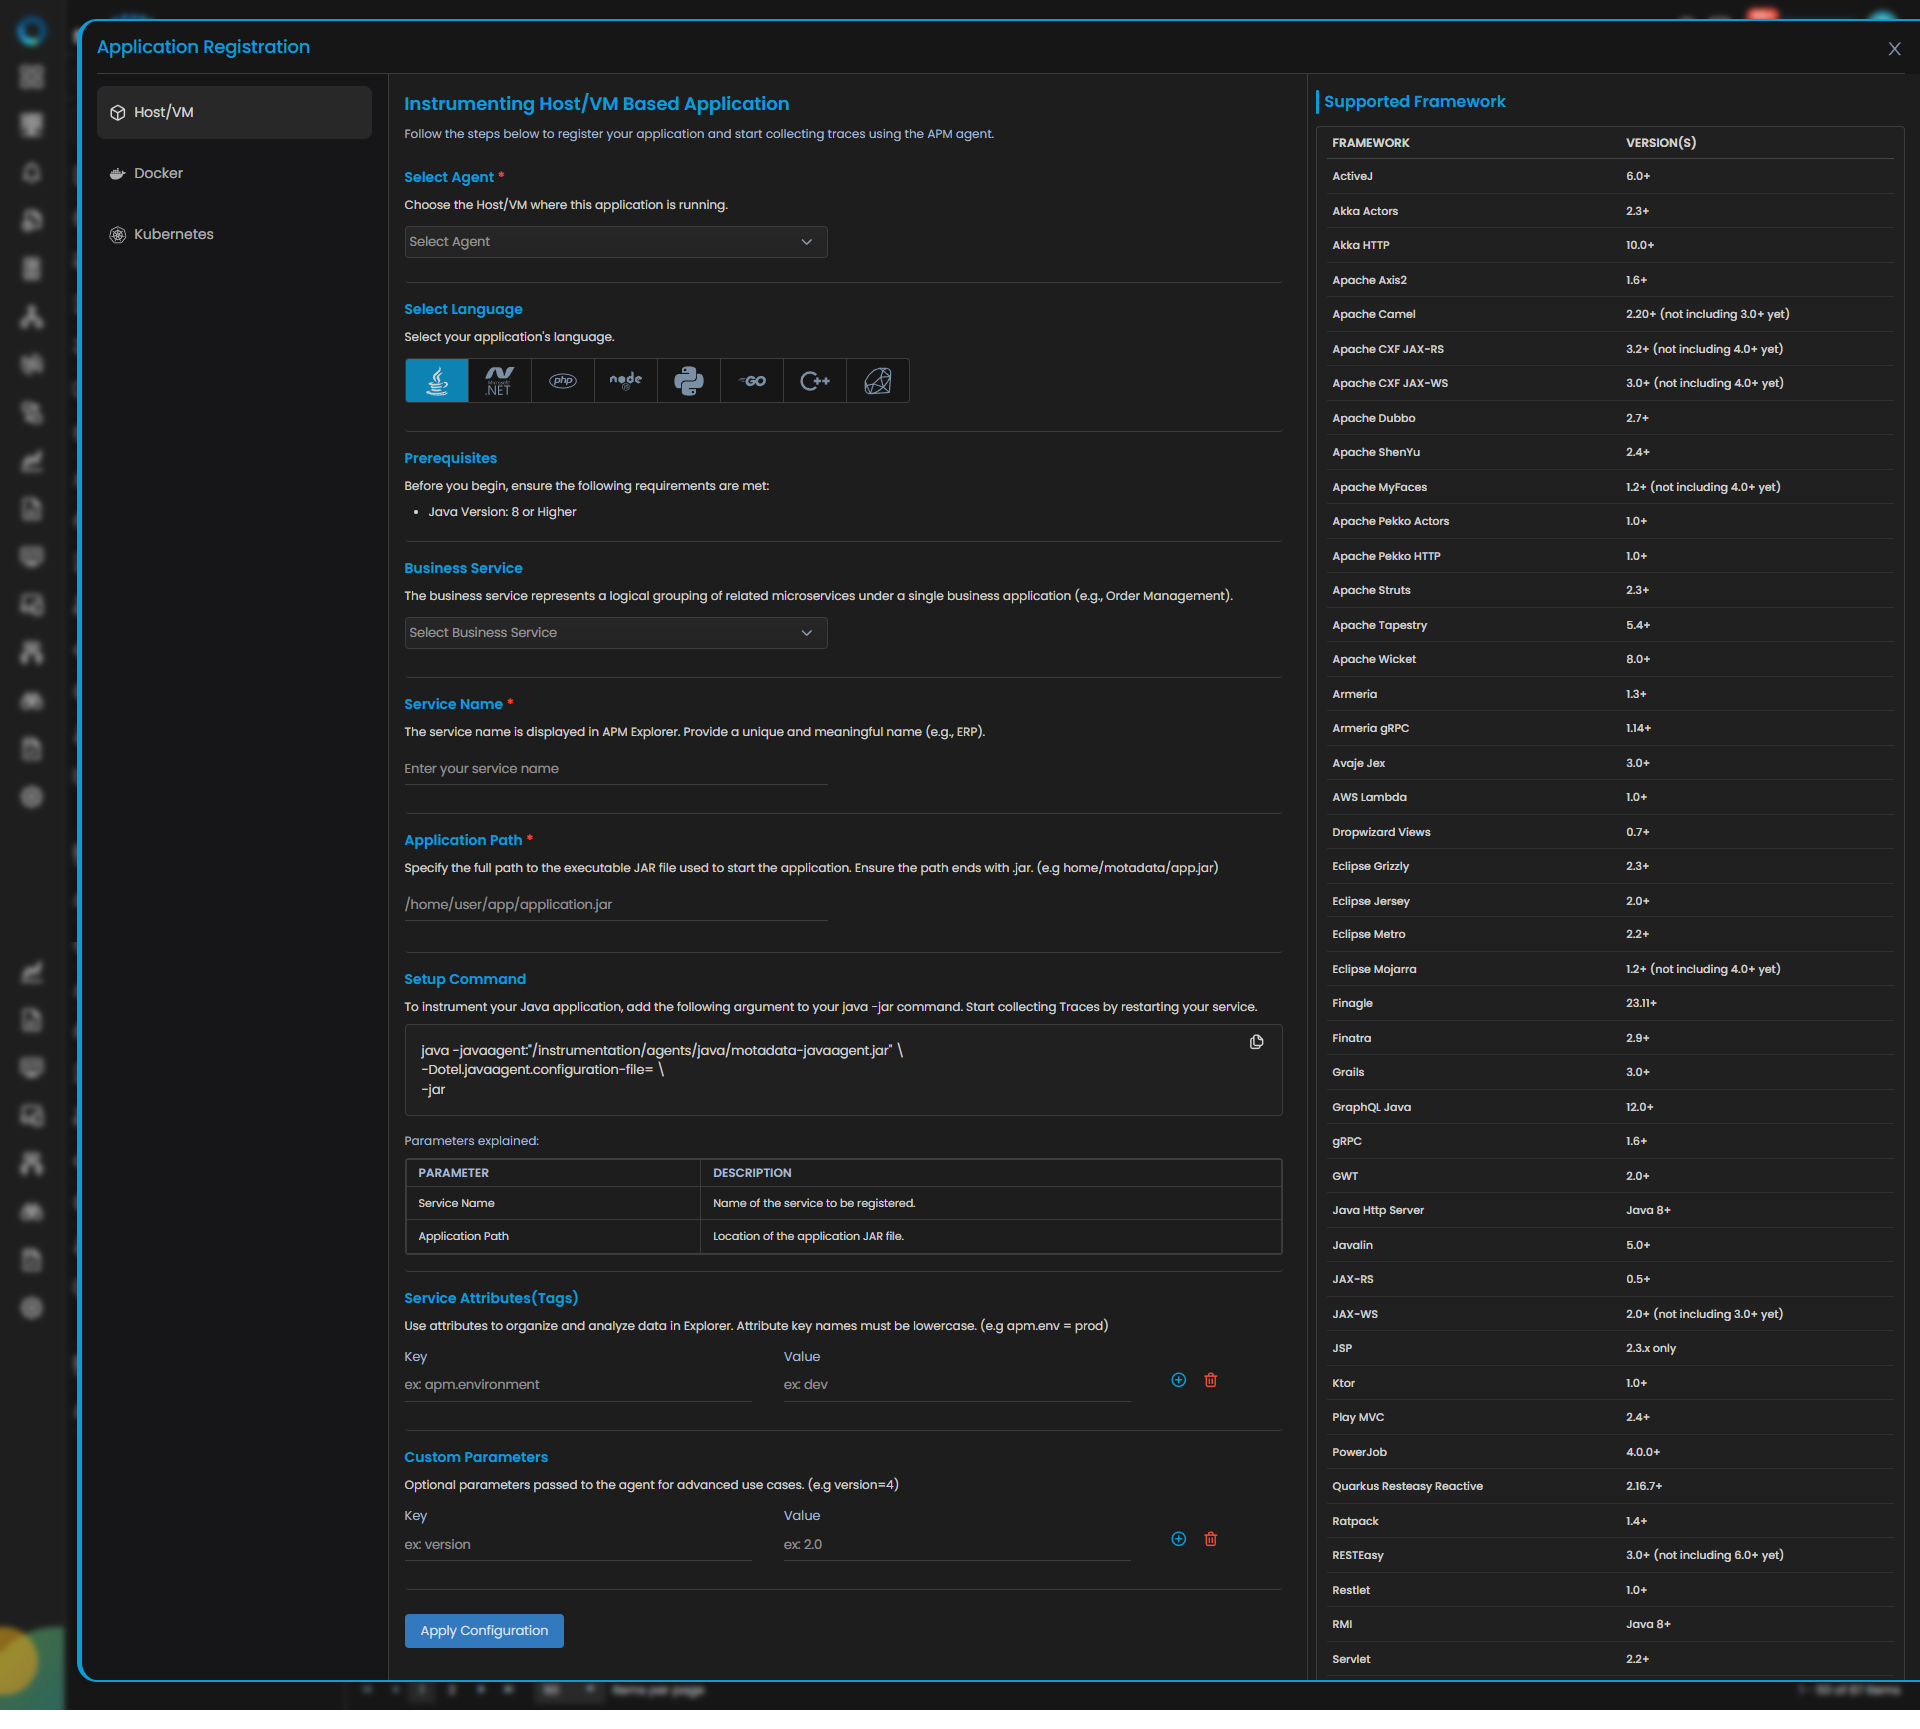
Java Trace Configuration
| Field | Description |
|---|---|
| Select Agent | Select the Host/VM where this application is running. You can configure Java application service for both Windows and Linux type agent. |
| Select Language | Select Java from the language icons. |
| Business Service | The business service represents a logical grouping of related microservices under a single business application (e.g., Order Management). Adding or selecting the available service group from the drop-down will add your application service to the dedicated business service group. |
| Service Name | Provide a unique and meaningful name (for example, jbossservice). |
| Application Path | Specify the executable/startup path used to start the service (as applicable in your environment). |
| Service Attributes(Tags) | Add key–value tags to your application for better filtering and organizing data in Explorer. Attribute keys must be in lowercase (for example, apm.env = prod). To add multiple Key-Value pairs you can click the add icon. |
| Add Custom Parameters | Allows you to define custom sampling or tagging parameters for advanced use cases. These optional parameters are passed to the agent (for example, version=4). |
Clicking the Apply Configuration button, you need to run the displayed Setup Command to instrument your Java application. Add the displayed argument to your java -jar command and restart the service to collect Traces.

Java Trace Configuration
| Field | Description |
|---|---|
| Select Agent | Select the Docker where this application is running. You can configure Java application service for Linux type agent. |
| Select Language | Select Java from the language icons. |
| Business Service | The business service represents a logical grouping of related microservices under a single business application (e.g., Order Management). Adding or selecting the available service group from the drop-down will add your application service to the dedicated business service group. |
| Service Name | Provide a unique and meaningful name (for example, jbossservice). |
| Application Path | Specify the executable/startup path used to start the service (as applicable in your environment). |
| Service Attributes(Tags) | Add key–value tags to your application for better filtering and organizing data in Explorer. Attribute keys must be in lowercase (for example, apm.env = prod). To add multiple Key-Value pairs you can click the add icon. |
| Add Custom Parameters | Allows you to define custom sampling or tagging parameters for advanced use cases. These optional parameters are passed to the agent (for example, version=4). |
Clicking the Apply Configuration button, you need to run the displayed Setup Command to instrument your Java application. Add the displayed argument to your java -jar command and restart the service to collect Traces.
Step2: Configure JBoss / WildFly for Instrumentation
JBoss/WildFly instrumentation is done by updating the server startup configuration so the Motadata Java Agent loads on every restart.
Locate standalone.conf
This file controls Java startup options.
For JBoss:
<JBOSS_HOME>/bin/standalone.confFor WildFly:
<WILDFLY_HOME>/bin/standalone.conf
Stop JBoss / WildFly
Use your standard operational stop method. If you start it using the standalone script, stop the process accordingly.
Modify standalone.conf
Navigate to the bin directory and open the file:
cd <JBOSS_HOME>/bin
vi standalone.conf
Or for WildFly:
cd <WILDFLY_HOME>/bin
vi standalone.conf
Add the following lines at the end of the file (or near the JAVA_OPTS definition):
JAVA_OPTS="$JAVA_OPTS \
-javaagent:/motadata/motadata/instrumentation/agents/java/motadata-javaagent.jar \
-Dotel.javaagent.configuration-file=/motadata/motadata/config/<ServiceName>.properties"
Replace the <ServiceName> with the exact service name you registered in Motadata ObserveOps.
Start / Restart JBoss / WildFly
Start the server using the standard script:
<JBOSS_HOME>/bin/standalone.sh
Or for WildFly:
<WILDFLY_HOME>/bin/standalone.sh
Step3: Verify Trace Ingestion
Once the Application is Running, you need to verify the below points:
- Confirm that the service has been registered successfully.
- On the service registration screen, the Service Trace Collection Status should display "Running."
- The traces will start appearing in the APM Explorer screen.
Prerequisites
- The Motadata Agent must be installed and running on the server where the JBoss/WildFly-based application is deployed. To check the agent status, press Win + R and run:
services.msc
- Java Version must be 8 or higher. To check the version using Command Prompt:
java -version
- The JBoss/WildFly installation directory (i.e.,
JBOSS_HOME/WILDFLY_HOME) is available. - Required permissions to edit
.batfiles and restart JBoss/WildFly (run editor as Administrator).
Configuration Steps
Step1: Register the Application Service in Motadata ObserveOps
Go to Menu > Settings > APM > Application Registration. Clicking the Application Registration button, you can register a new application.
From the application registration screen, select the instrumentation type as Host/VM.
Java Trace Configuration
| Field | Description |
|---|---|
| Select Agent | Select the Host/VM where this application is running. You can configure Java application service for both Windows and Linux type agent. |
| Select Language | Select Java from the language icons. |
| Business Service | The business service represents a logical grouping of related microservices under a single business application (e.g., Order Management). Adding or selecting the available service group from the drop-down will add your application service to the dedicated business service group. |
| Service Name | Provide a unique and meaningful name (for example, jbossservice). |
| Application Path | Specify the executable/startup path used to start the service (as applicable in your environment). |
| Service Attributes(Tags) | Add key–value tags to your application for better filtering and organizing data in Explorer. Attribute keys must be in lowercase (for example, apm.env = prod). To add multiple Key-Value pairs you can click the add icon. |
| Add Custom Parameters | Allows you to define custom sampling or tagging parameters for advanced use cases. These optional parameters are passed to the agent (for example, version=4). |
Clicking the Apply Configuration button, you need to run the displayed Setup Command to instrument your Java application. Add the displayed argument to your java -jar command and restart the service to collect Traces.
Step2: Configure JBoss / WildFly for Instrumentation (Windows)
On Windows, JBoss/WildFly startup options are controlled through standalone.conf.bat.
Locate standalone.conf.bat
For JBoss:
%JBOSS_HOME%\bin\standalone.conf.batFor WildFly:
%WILDFLY_HOME%\bin\standalone.conf.bat
Stop JBoss / WildFly
Stop the server using your standard method (script, service restart, or operational workflow).
Modify standalone.conf.bat
- Right-click
standalone.conf.bat> Edit - Or open Notepad as Administrator and open the file.
Append the following lines at the end of the file:
rem === Motadata APM Java Agent Configuration ===
set "JAVA_OPTS=%JAVA_OPTS% ^
-javaagent:C:\motadata\motadata\instrumentation\agents\java\motadata-javaagent.jar ^
-Dotel.javaagent.configuration-file=C:\motadata\motadata\config\<ServiceName>.properties"
Replace the <ServiceName> with the exact service name you registered in Motadata ObserveOps.
Start / Restart JBoss / WildFly
Start the server using:
%JBOSS_HOME%\bin\standalone.bat
Or for WildFly:
%WILDFLY_HOME%\bin\standalone.bat
Step3: Verify Trace Ingestion
Once the Application is Running, you need to verify the below points:
- Confirm that the service has been registered successfully.
- On the service registration screen, the Service Trace Collection Status should display "Running."
- The traces will start appearing in the APM Explorer screen.