Technicians
The Technicians are the one responsible for providing solution, handling requests, problems, changes, etc. You can convert a Technician to a requester. By default, all the Technicians are Requesters too.
To view the Technicians page, navigate to Admin > Users > Technicians and the list page appears.
List Page
The list page shows the details of the technicians as per the columns selected. You can view, add, edit, and delete the technicians. You can also search, filter, refresh, import, export, select columns to view in the grid, view the status and details of the technician, convert technicians to requesters, send an email to verify the user, and block technician.
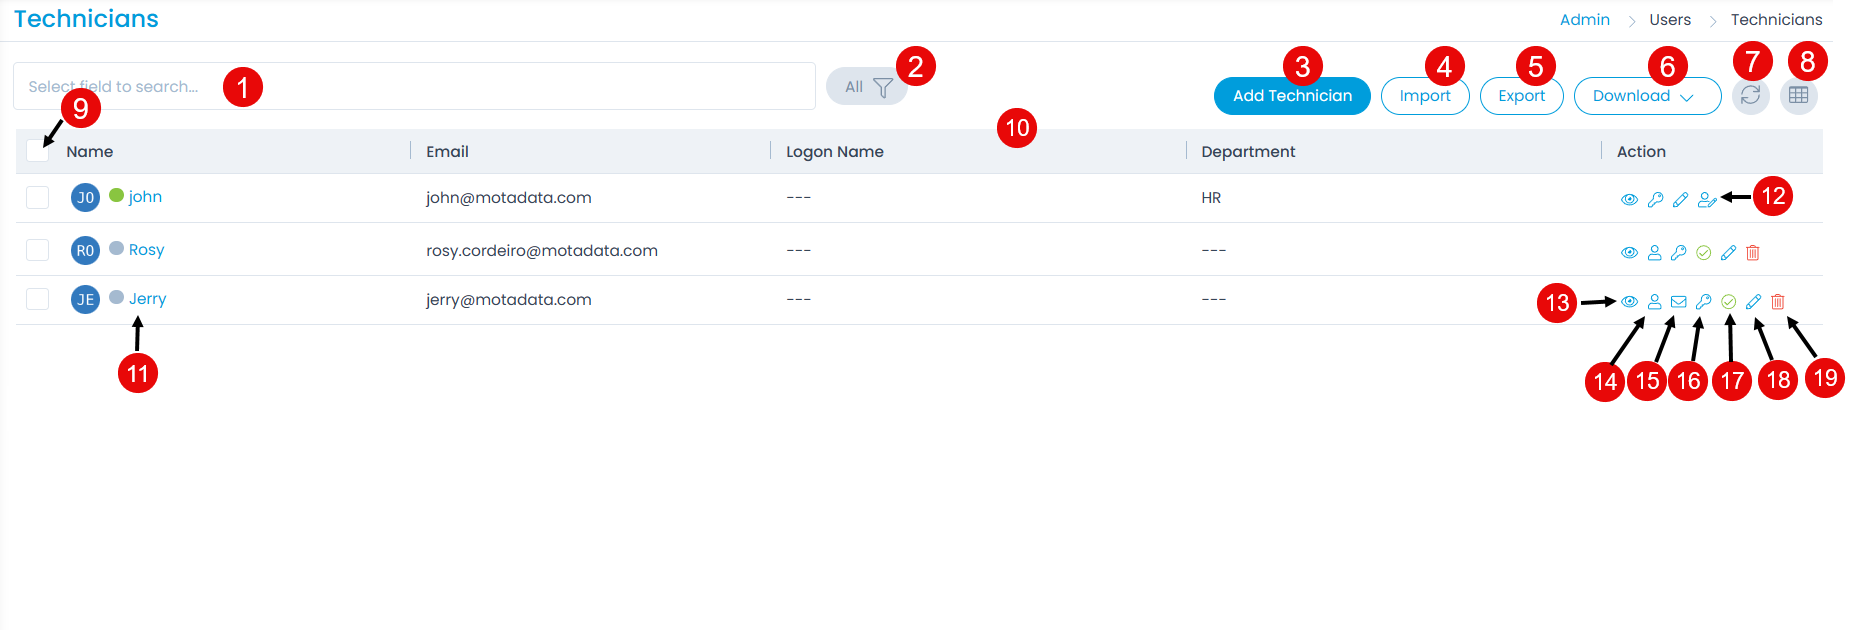
- Search: You can look for a specific technician by searching them. The search is a faceted search and allows you to find with specific criteria. You can also find more details in the search section.
- Filter: You can filter the technicians list by clicking the desired option. The options are: All, Verified, Unverified, Archived, Blocked, Unblocked, and Anonymized. If Verified is selected, all the technicians whose email addresses are verified will appear. The "verified" or "unverified" filter will reset only when the page is refreshed.
- Add Technician: You can add a technician.
- Import: You can import a list of technicians in one go.
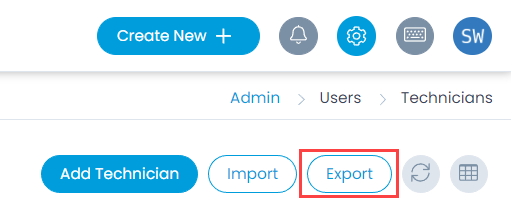
- Export: You can export a list of technicians in CSV or Excel format.
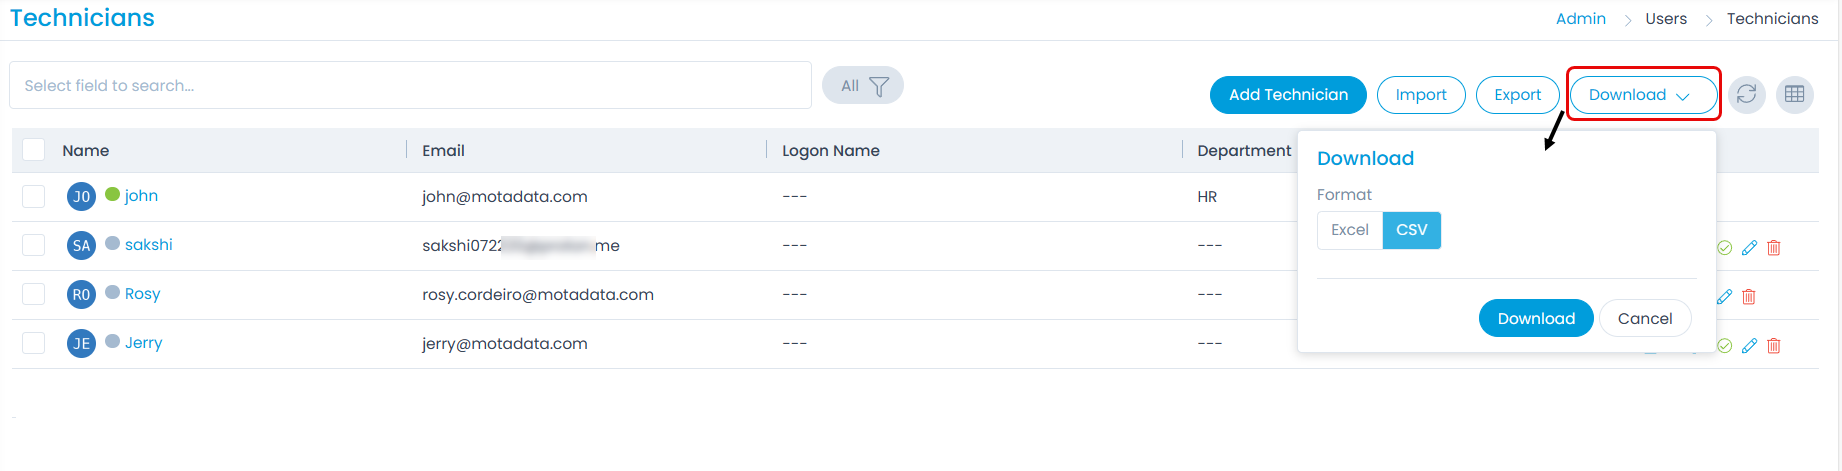
- Download: You can download the technicians list in Excel and CSV format. Also, you can password protect the Excel file.
- Refresh: You can refresh the technician list. This is useful when multiple people are working on the technician page and contents are updated frequently.
- Column Selection: You can select the columns that you want to be visible in the grid. To select the columns, click the Column Selection icon, select the desired columns, and click Apply. The columns will become visible in the grid.
- Bulk Operations: You can convert technicians to requesters, archive, block, unblock, restore, and clear the details of multiple technicians in one go.
- Grid: You can view the details of the technicians as per the columns selected.
- User Status: You can view whether the technician is logged in or logged out of the ServiceOps portal.
- Change Super Admin: You can change the super admin user.
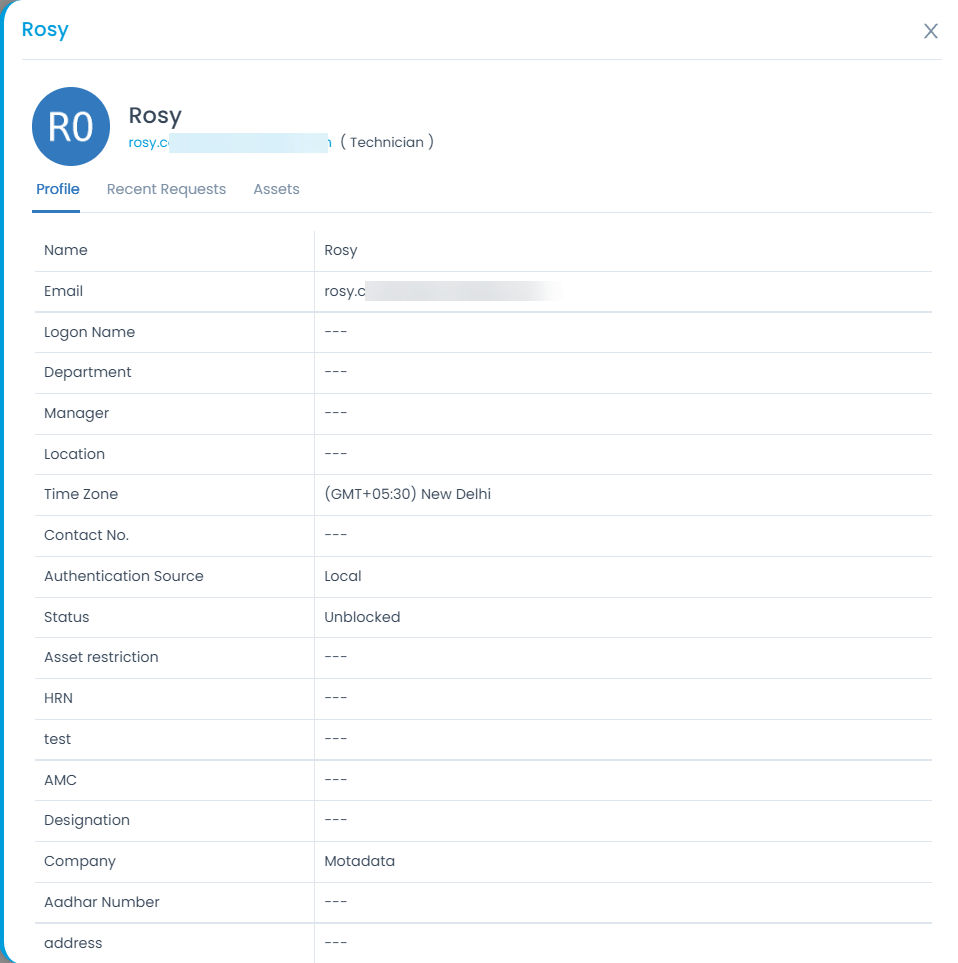
- View: You can view the details of the technician by clicking the eye icon as shown below.
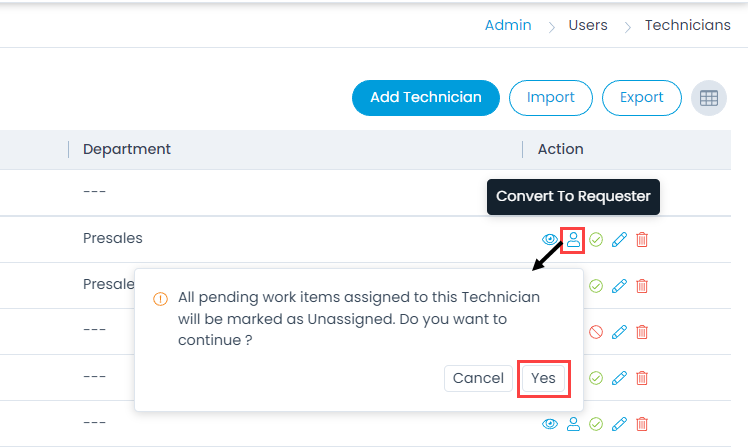
- Convert to Requester: You can convert the required technician to a requester. On doing so, the access permissions will also get changed.
- Send an Email to Verify the User: You can send an email to verify the technician user. The email contains the link using which the technician can verify and activate the account.
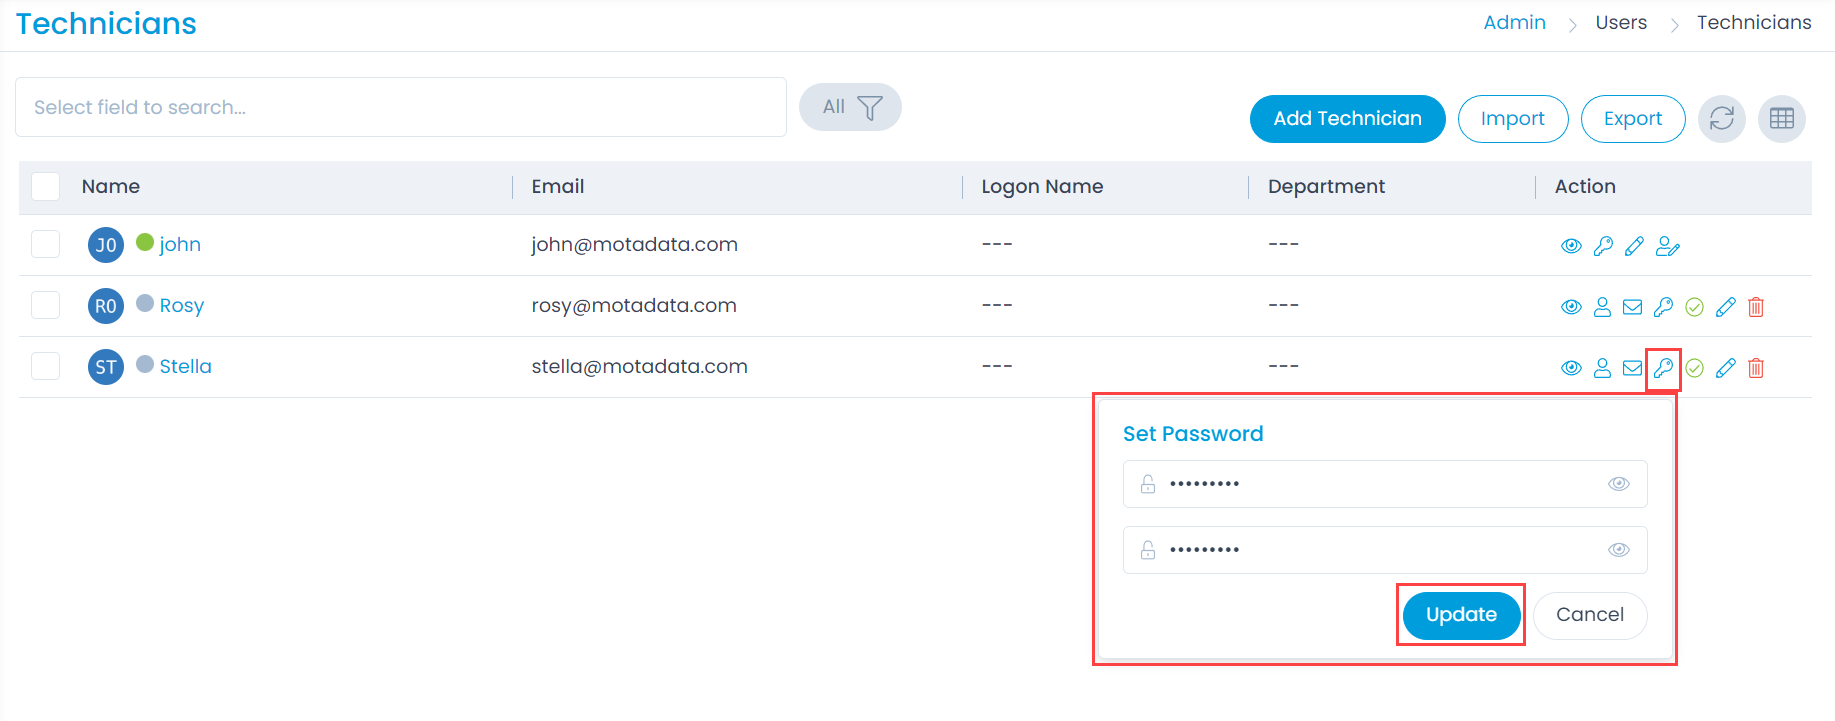
- Set Password: You can set the password of the technician. To set the password, click the key icon, enter the password, confirm it, and click Update as shown below. Once done, a confirmation message will appear.
- You can set a password for Database users only.
- The password of the LDAP and SSO users cannot be set when converted into technician.
- Once the password is set, the technician is redirected to the Reset Password page on the next login.
- The Super Admin cannot change the Tenant Admin's password.
- A notification is sent to the Technician when a Super Admin changes the password.
- The audit entry is displayed on the Security Configuration Audit page when the Super Admin changes the password of a Technician or Requester.
- Block Technician: You can block the desired technician.
- Edit: You can edit the details of the required technician.
- Delete: You can delete the technician if no longer needed.
Add Technician
To add a technician,
Click the Add Technician button and the page appears.
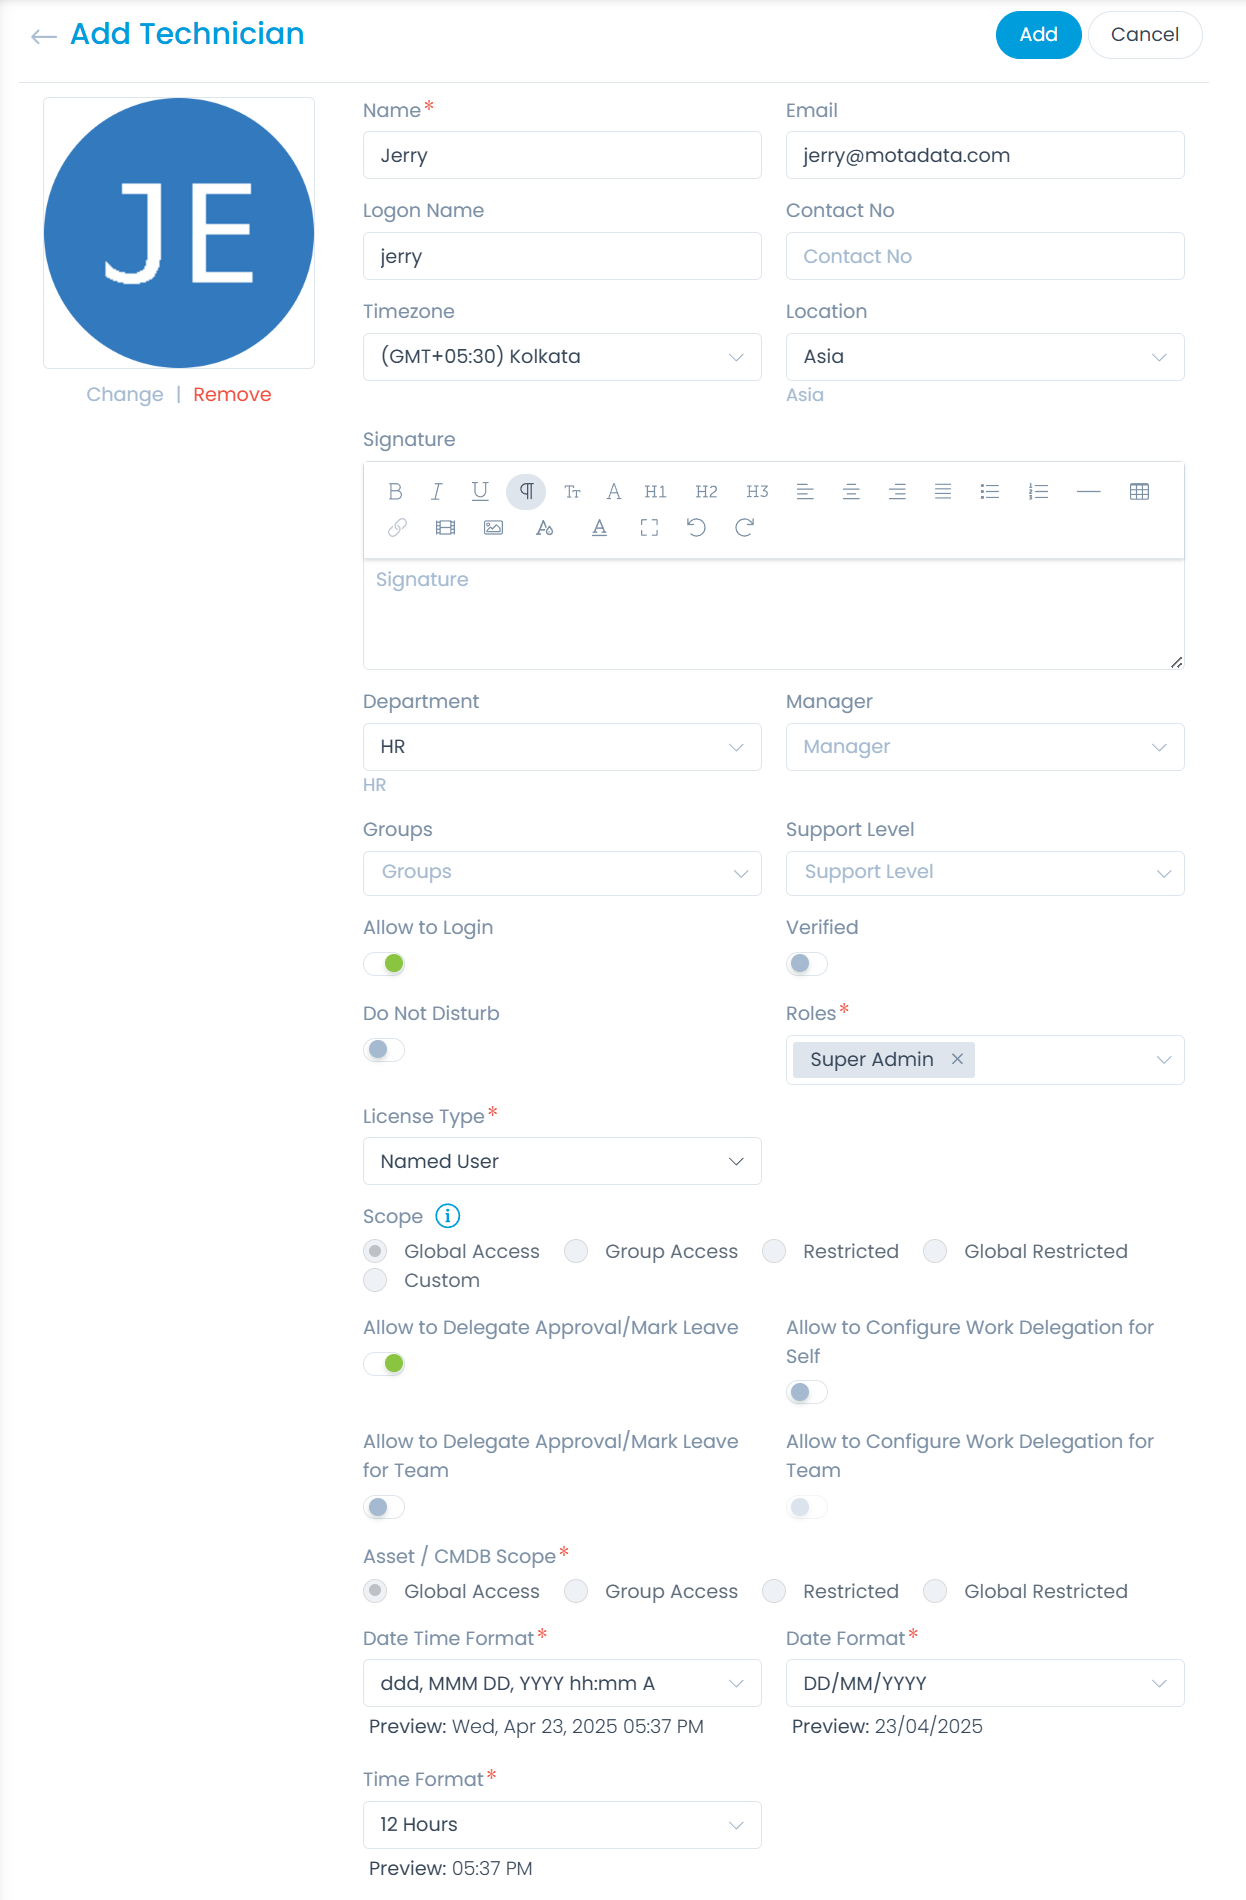
Enter the following details:
| Parameter | Description |
|---|---|
| Select Image | You can select an image to set the profile picture of the technician. If not set, it automatically takes the first two letters of the name. You can change the image using the Change link below the square box. |
| Full Name | Enter the full name of the technician. |
| Enter a unique email address for the technician. | |
| Logon Name | Enter the logon of the technician. You can use this to login instead of the email address. |
| Contact No. | Enter the contact number of the technician. |
| Time Zone | Select the time zone. |
| Location | Select the location. To create custom locations, click here. |
| Company | Select the company to which you want to associate the user. To add companies, click here. Note: This field is available only if Managed Services Provider feature is enabled. |
| Restrict Data Access to Own Company | If enabled the technician will have access to the data as per the selected company only. By default it is disabled. It gets enabled only if the Company is selected. Note: This field is available only if Managed Services Provider feature is enabled. |
| Signature | Enter the signature that you may want to add at the end of every email. |
| Department | Select the department in which the technician belongs. To create custom departments, click here. |
| Manager | Select the manager of the technician. |
| Groups | Select the groups to which the technician belongs. |
| Support Level | Assign the desired support level to the Technician. Levels available are Tier 0, Tier 1, Tier 2, Tier 3, and Tier 4. Tier 0 has the lowest priority. If left blank, the Support Level will be set as per the default option selected from the Request Preference tab. Note: Smart Balance auto-assignment will function only if the Support Level is assigned to a Technician. |
| Allow To Login | Enable if you want to allow the technician to login to the portal. |
| Verified User | Enable if the user is verified. |
| Do not Disturb | Enable if you want the technician to be in DND mode. |
| Roles | Select the roles to assign the responsibilities to the technician. For example, problem specialist is the technician who has to take care of every problem and provide a solution for the same. To create a custom Role, click here. It is a mandatory field. Note, If the "Dashboard Viewer" role is selected, the "Scope" field will become non-editable. |
| License Type | Displays the license applied to the user. Possible values are: Named and Concurrent. If Named and Concurrent is displayed, you can edit it as per the availability of license. |
| Scope | Select the scope of access to the technician. It applies to Request, Problem, Change, and Release modules. The options are: - Global Access: Technician can view all the requests. - Group Access: Technician can view only those requests that are assigned to their group. - Restricted: Technicians can view and perform operations on all the requests that are assigned to them. - Global Restricted: Technicians can view all the tickets but perform operation only on those that are assigned to them and the group to which they belong. - Custom: Technicians can access the Request, Problem, Change, and Release tickets based on the selected custom scope. |
| Allow to Delegate Approval/Mark Leave | Enable this option to allow technicians or requesters to delegate approval to anyone from the Edit Profile page and for technicians to mark their own leave. If disabled, neither delegation nor leave marking is possible, although technicians can still view leave records. The Delegate Approval tab in the Edit Profile page will also become read-only. This option is enabled by default. |

| Allow to Configure Work Delegation for Self | Enable this option to delegate your work to another technician when applying for leave, ensuring work continues smoothly in your absence. You can apply leave from the Technician Leave Calendar as shown below. By default, this option is disabled and can only be enabled if the "Allow to Delegate Approval/Mark Leave" field is also enabled. Note: These permissions do not apply to Super Admin. |

| Allow to Delegate Approval/Mark Leave for Team | Enable this option to allow technicians or requesters to delegate approval or mark leave for others from the My Team menu. If disabled, they cannot delegate approval or mark leave for team members, but they can still view leaves and currently delegate approvals for the team. This option is disabled by default. |
| Allow to Configure Work Delegation for Team | Enable this option to delegate the work of your team members when they apply for leave, ensuring work continues smoothly in their absence. By default, this option is disabled and can only be enabled if the "Allow to Delegate Approval/Mark Leave for Team" field is enabled. Note: These permissions do not apply to Super Admin. |
| Two-Factor Authentication | Displays whether the functionality is enabled for the Authenticator App method. You can also reset it using the Reset Two-Factor Authentication link. |
| Asset/CMDB Scope | Select the scope of access to the technician. The options are: - Global Access: Technician can view all the assets and CI. - Group Access: Technician can view only those assets and CI that are assigned to their group. - Restricted: Technicians can view and perform operations on all the assets and CI that are assigned to them. - Global Restricted: Technicians can view all the assets and CI but perform operation only on those that are assigned to them and the group to which they belong. Note: Manage User permission is required for CMDB Scope configuration. |
| Date Time Format | Select the date time format for the technician. The default value is set from the Account Details page. Once selected the preview will be available below the field. |
| Date Format | Select the date format. Once selected the preview will be available below the field. |
| Time Format | Select the time format. Once selected the preview will be available below the field. |
Once done, click Add, and the technician gets created.
If more than one technician is viewing the same request simultaneously, the end-user can view the details about all the current technicians who are viewing the request.
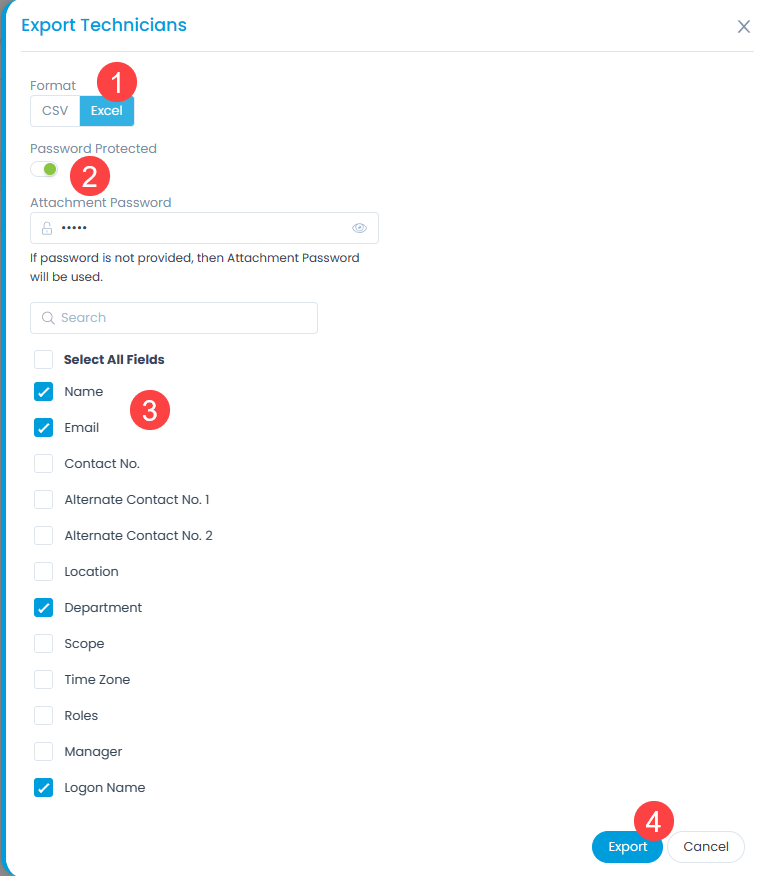
Export Technicians
To export the list of technicians,
- Click the Export button and a popup appears.
- Select the format in which you want to export the list. The options are CSV and Excel.
- If Excel is selected, you can enable the Password Protected option to secure the file. If enabled enter the Attachment Password. If not provided, the common password set from Edit User Profile page will be used.
- Select the fields that you want to export.
- Click Export and an email is received on the Administrator's Email-id with the link to download the list in the selected format.
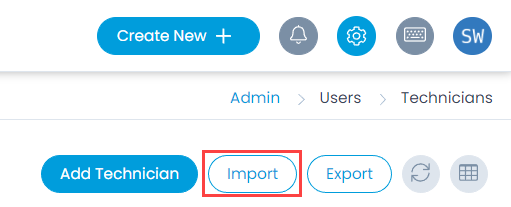
Import Technicians
To import technicians to ServiceOps,
- Click the Import button and the Technician Batches page appears.
- Click the Import CSV Batch button.
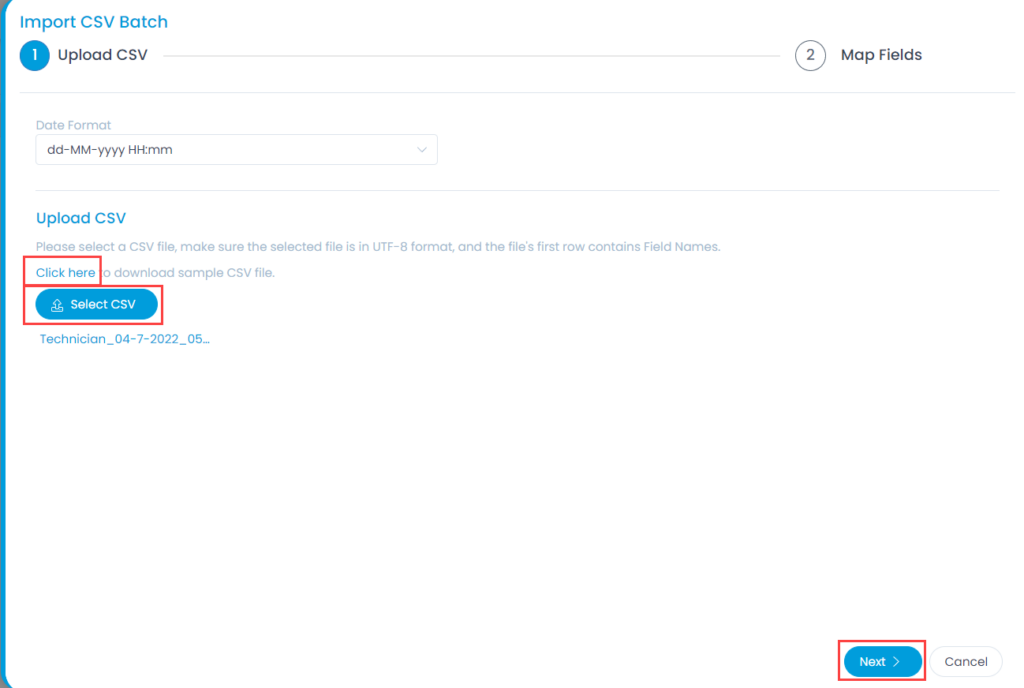
- Select the .csv file if you already have it filled with the respective fields. If not, download the sample file using Click Here, and fill in the details. Once the file is uploaded, click Next.

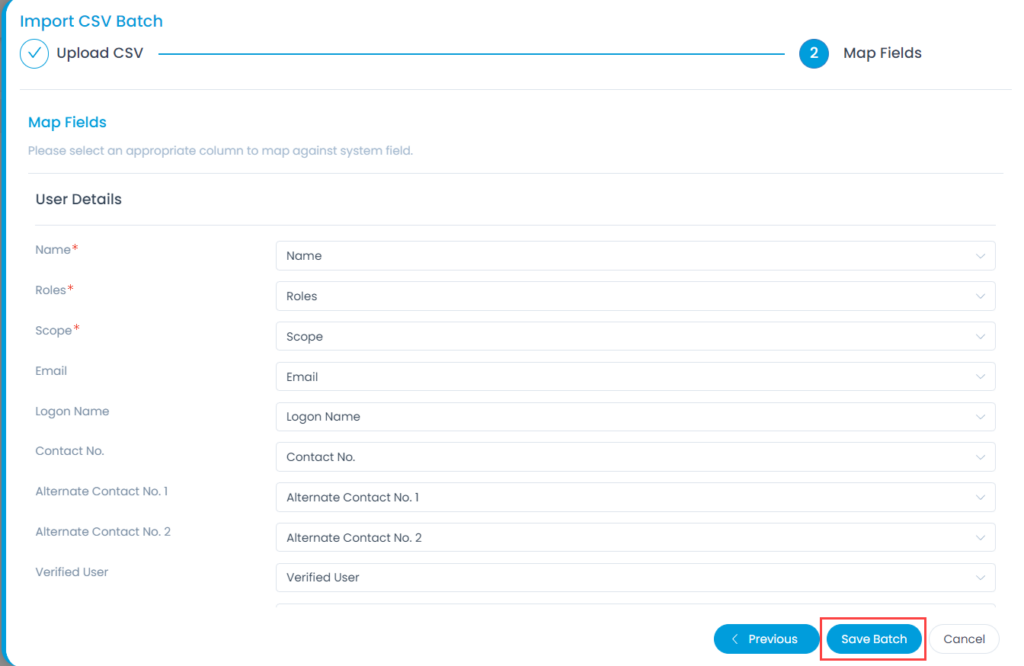
- Map the fields as per the requirement. By default it is mapped, only in case of removal or change of some parameters mapping is necessary, and click Save Batch.
- The Technician Batches page appears. It displays the status of the import along with the details like processing time, total records, success records, failed records, etc. as shown below. Once successful, the imported technicians will appear in the technician list page.

Block or Unblock Technician
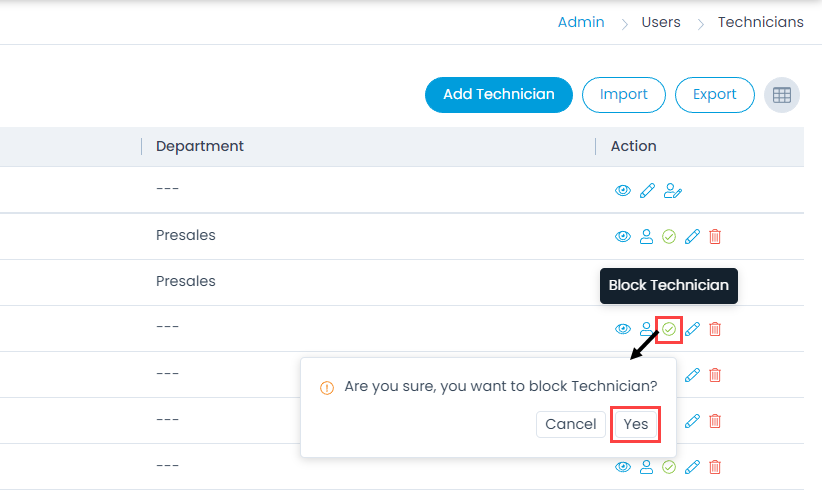
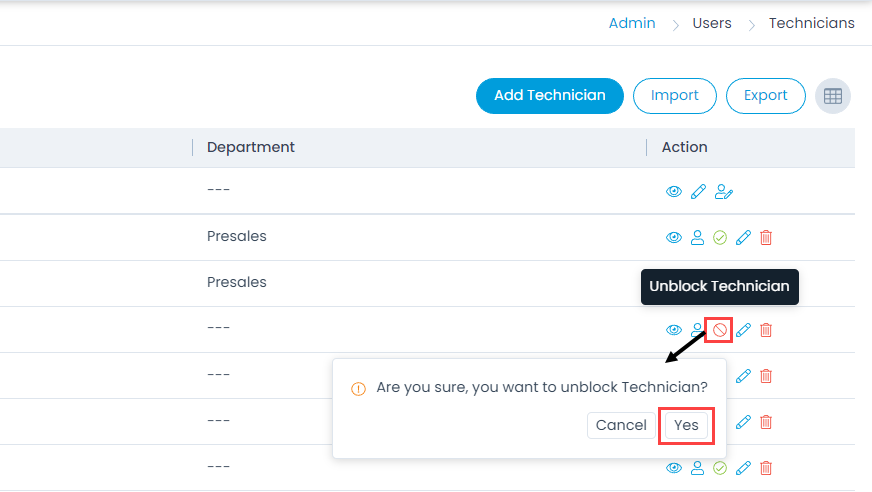
Any Technician can be blocked or unblocked directly from the list page. To block or unblock technician, click the respective icons as shown below. Once a technician is blocked the icon turns to red color. Additionally, you can view the reason for blocking the technician by selecting the Blocked Reason column using the Column Seection icon.
Convert Technician to Requester
You can convert a Technician to a Requester. This can be done using User icon from the list page. Once converted, all the pending work items assigned to this technician will be marked as unassigned.
Verify Technician via Email
When you create a technician, the system sends an email to verify the email address. The email address contains the link to reset the password. A technician can login to the system only after changing the password. To manually send the email, click on the Email icon.

Change Super Admin
In case a senior staff or Manager leaves/changes the Organization, there is a need to change the existing current Super Admin and assign other responsible person the rights of Super Admin.
In the list of Technicians, the first name is always of the Super Admin. In line to actions associated is the Change Super Admin feature as shown below:

To change the Super Admin,
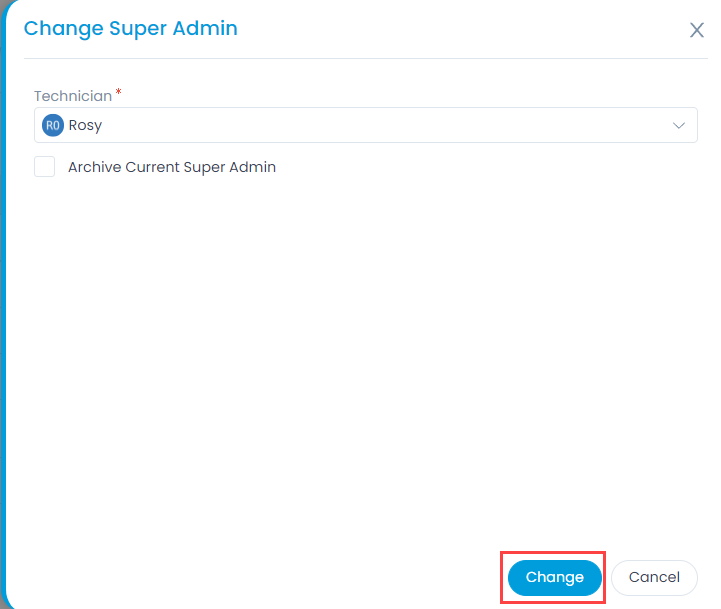
- Click the Change Super Admin icon and a popup appears.
- Select the technician to whom you want to assign the Super Admin role.
- You can also archive the current Super Admin using the checkbox to avoid using it again.
- Once done, click Change and the Super Admin user will get changed.
Once the Super Admin is changed, the two-factor authentication privileges also gets transferred to the new Super Admin.
Bulk Operations
Bulk Archive
This option enables you to archive multiple technicians in one go. To archive multiple technicians in bulk,
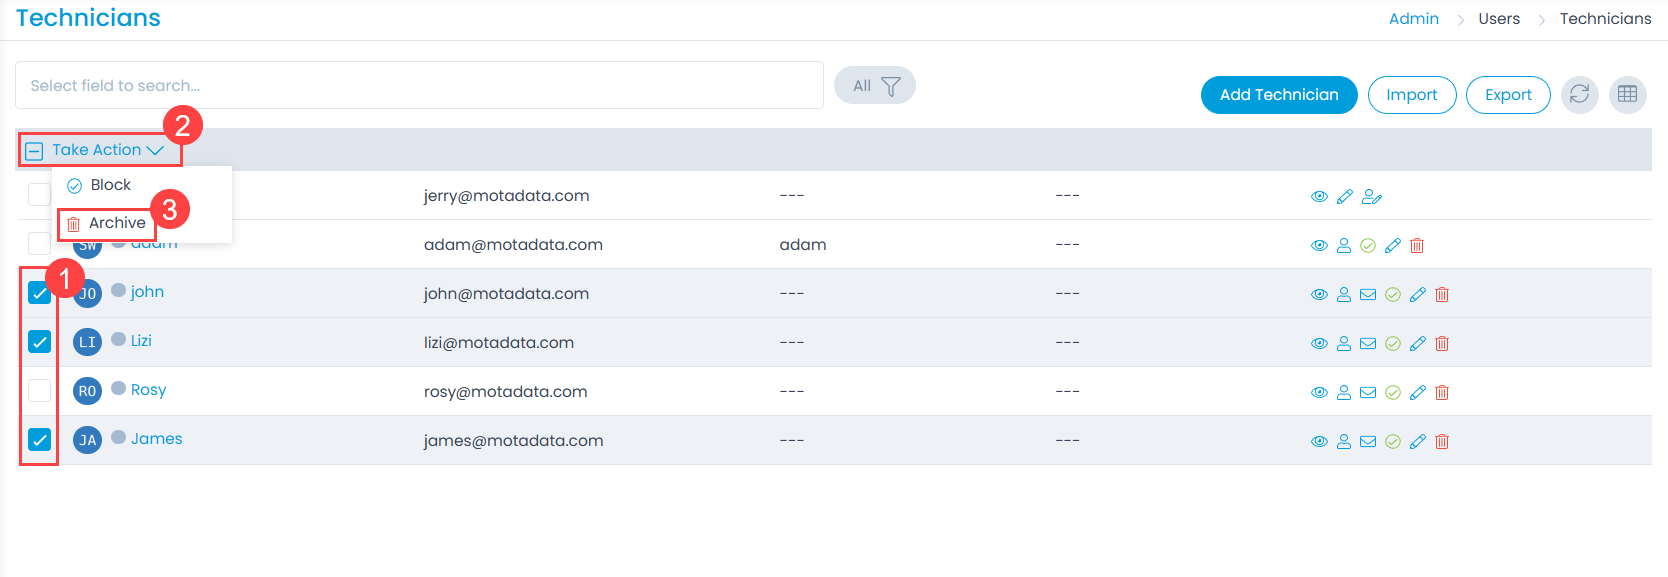
- Select the desired technicians.
- Click on the Take Action dropdown.
- Select the Archive option. A confirmation message appears. Click Yes to continue or No to stop the process. If Yes is clicked, the selected technicians will move to the Archive.
Block
This option enables you to block multiple technicians in one go.
To block,
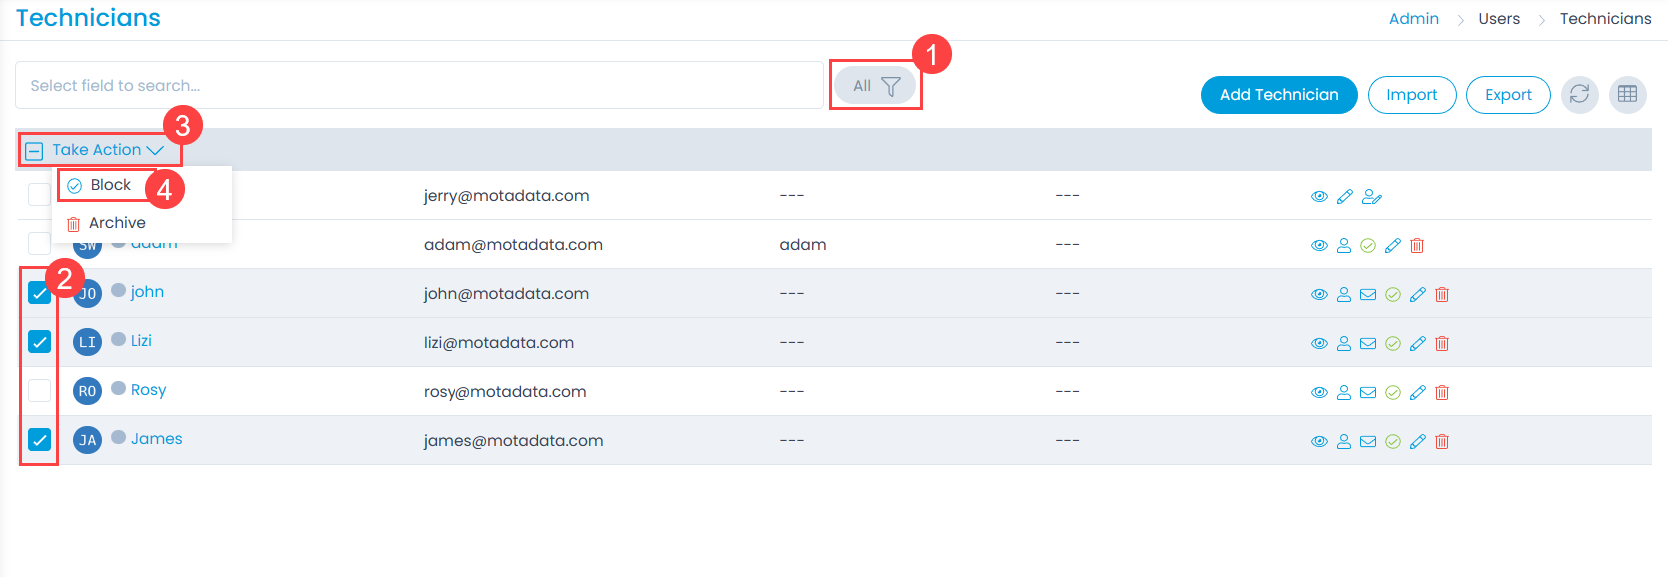
- Select the filter as All, Verified, Unverified, or Unblocked next to the Search field.
- Select the desired technicians.
- Click on the Take Action dropdown.
- Select the Block option. A confirmation message appears. Click Yes to continue or No to stop the process. If Yes is clicked, the selected technicians will get blocked.
- Similarly, you can unblock the technicians in one go.
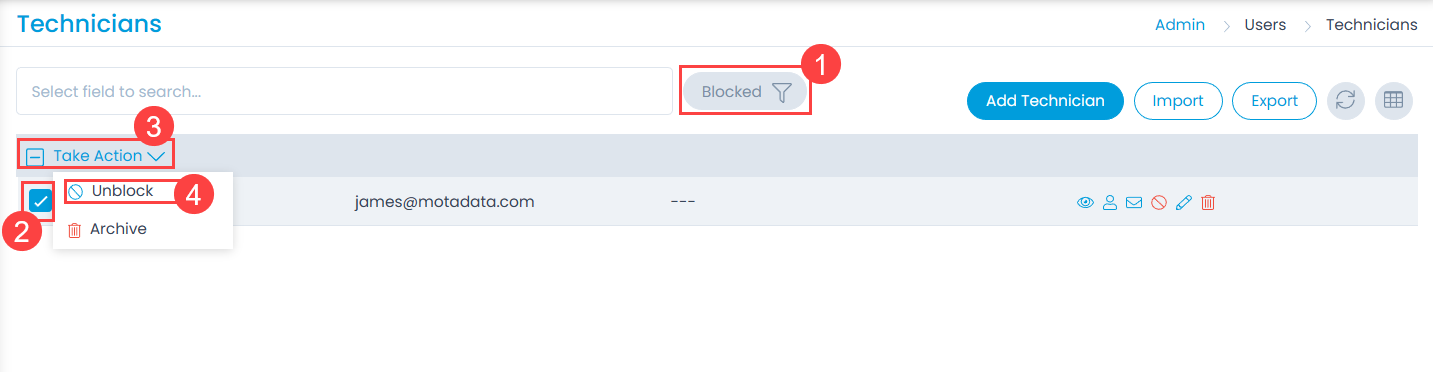
Unblock
This option enables you to unblock the blocked technicians in one go.
To unblock,
- Select the filter as Blocked next to the Search field.
- Select the desired technicians.
- Click on the Take Action dropdown.
- Select the Unblock option. A confirmation message appears. Click Yes to continue or No to stop the process. If Yes is clicked, the selected technicians will get unblocked, and will appear in the technicians list.
Convert to Requester
This option enables you to convert the technicians to requester in one go.
To convert,
- Select the desired technicians.
- Click on the Take Action dropdown.
- Select the Convert to Requester option. A confirmation message appears. Click Yes to continue or No to stop the process. If Yes is clicked, a confirmation message will appear and the selected technicians will get converted to Requester.
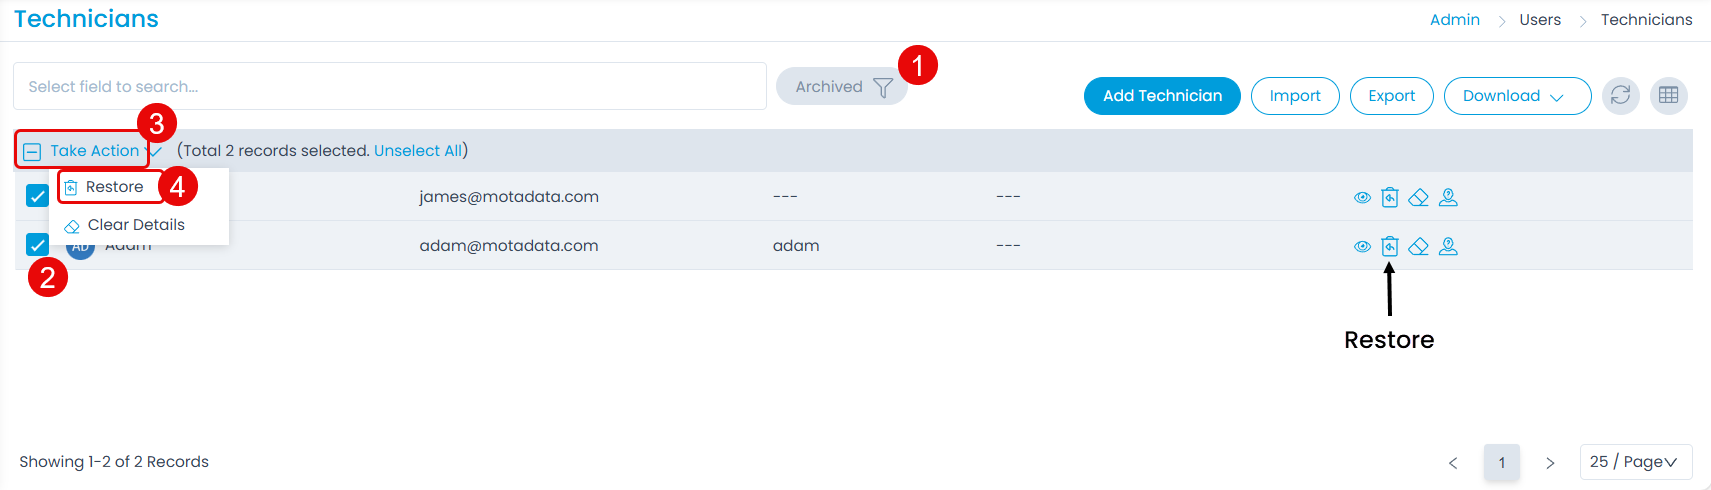
Restore
This option enables you to restore the archived technicians in one go.
To restore,
- Select the filter as Archived next to the Search field.
- Select the desired technicians.
- Click on the Take Action dropdown.
- Select the Restore option. A confirmation message appears. Click Yes to continue or No to stop the process. If Yes is clicked, the selected technicians will get restored, and will appear in the technicians list.
- In case both the Logon Name and Email Address of the technicians are cleared, at the time of restore, the user will be asked to first enter the details. Once entered, the details need to be updated, and then the user will get restored.
- Bulk Restore will not function for users without the email and logon name.
You can also restore a single technician by clicking the Restore icon next to the desired name as shown above.
Clear Details
This option enables you to clear the email address and/or logon name of the archived technicians in one go.
To clear the details,
- Select the filter as Archived next to the Search field.
- Select the desired technicians.
- Click on the Take Action dropdown.
- Select the Clear Details option. A dialog appears.
- Select the option that you want to clear as Logon Name and/or Email.
- Click Clear and the details will get cleared.
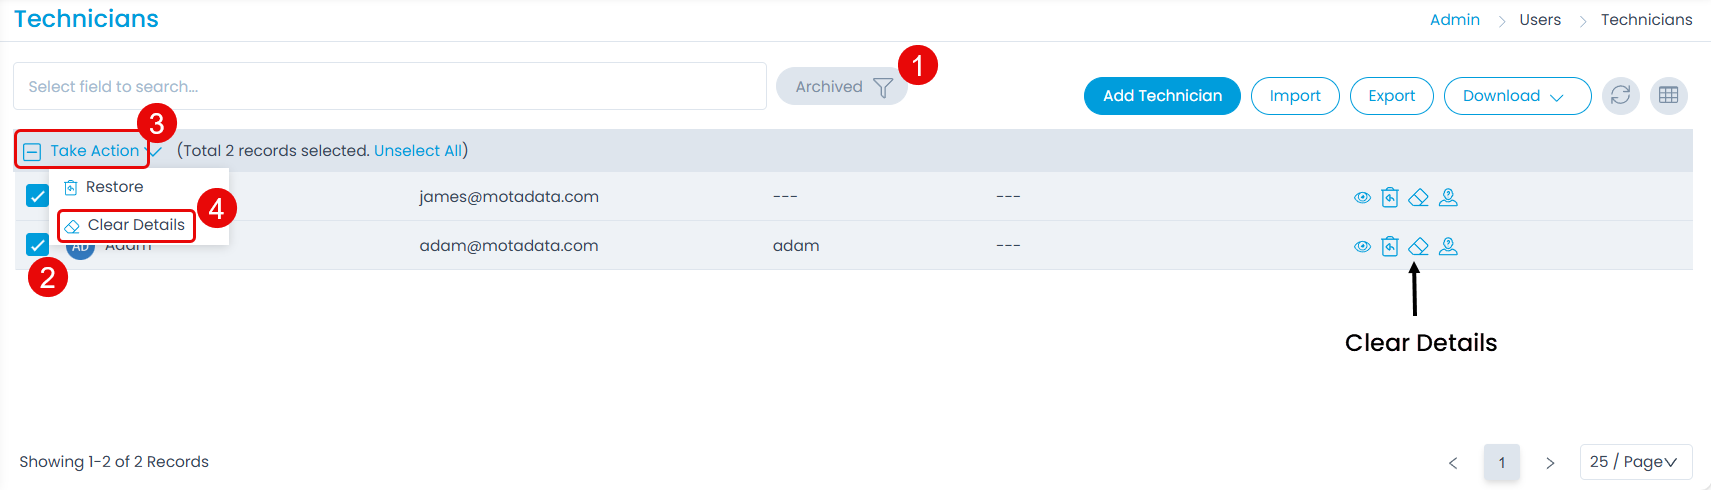
You can also clear the details of a single technician by clicking the Clear Details icon next to the desired name as shown above.
- In case both the Logon Name and Email Address are cleared, at the time of restore, the user will be asked to first enter the details. Once entered, the details need to be updated, and then the user will get restored.
- Bulk Restore will not function for users without the email and logon name.
Anonymize
Anonymize means to remove the identifying information from data so that individuals cannot be personally identified. It is often used in the context of protecting privacy, especially in situations where personal data is shared or analyzed, such as in research, medical records, or online activities. For example, when data is anonymized, names, addresses, and other personal details are removed or replaced with generic labels to prevent the identification of individuals.
To anonymize the user,
- Select the filter as Archived next to the Search field.
- Click the Anonymize icon next to the user in the Action column.
- A confirmation message will appear. Click Anonymize to continue the process.
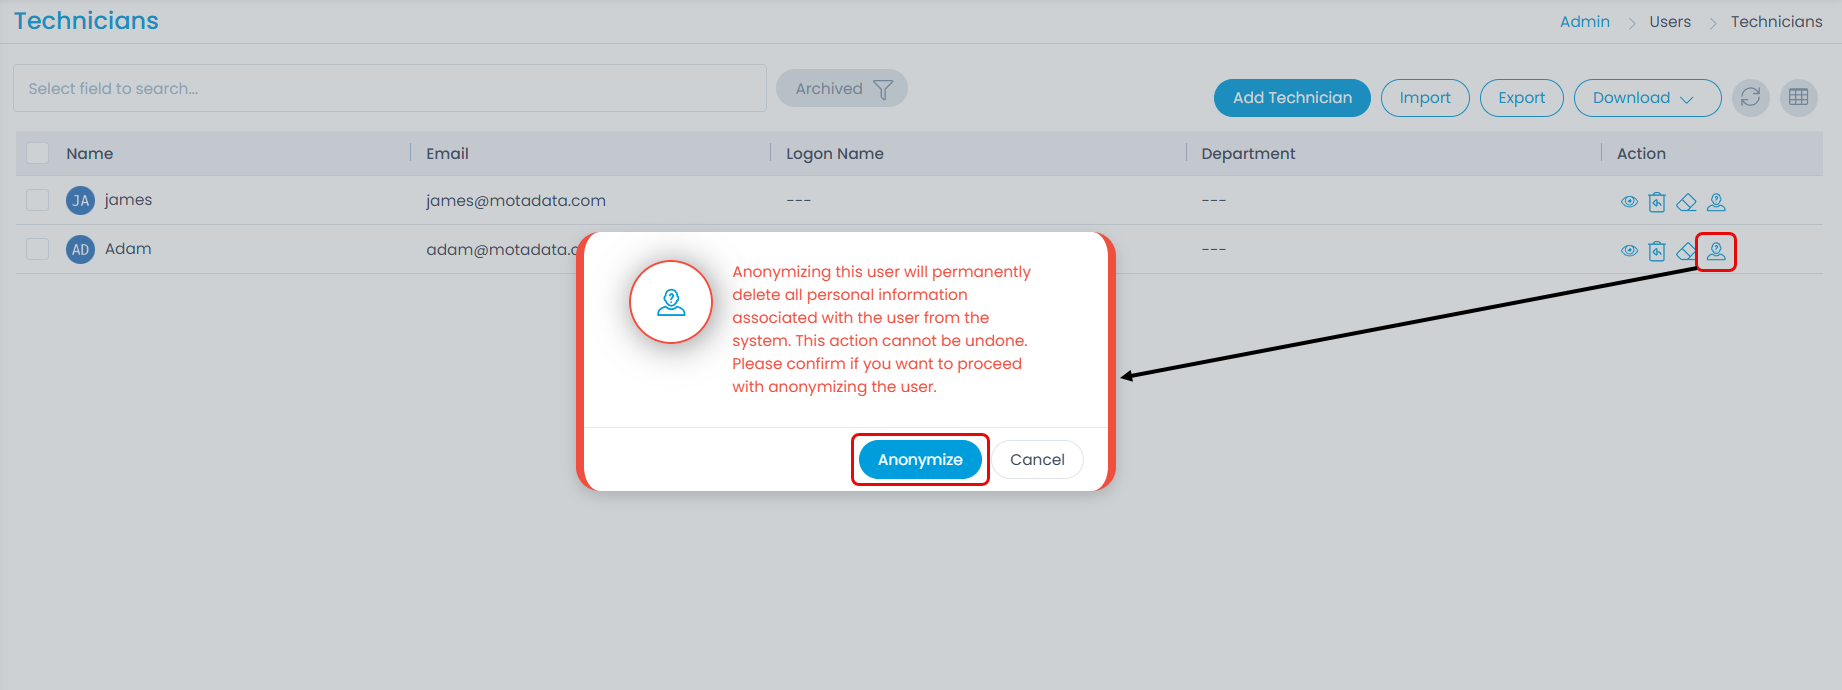
- Once the user is anonymized, its entry will be moved from the "Archived" list to the "Anonymized" list. Also, the PII data of the requests related to the anonymized user will be deleted.
Once anonymized, the user cannot be restored.
