Slack App Config
Slack is an application to communicate with your team members. Using Slack for incident creation and management will become easier if you add the ServiceOps Virtual Agent as an app within Slack. Once added, you can generate or review requests from Slack without signing-in to the Support Portal or accessing the virtual chat agent from the portal.
You can integrate a custom-built Slack app that connects your ServiceOps Portal, enabling the Virtual Agent to send responses to the requester over the Slack application.
Applicable Version
This functionality is applicable from version 7.7 and above.
Prerequisites
- ServiceOps hosted on a public URL
- SSL Certificate enabled
- Requester created in the ServiceOps portal
- Slack account created with the same requester email ID as created in the above point.
Creating and Configuring Slack App
To create a Slack application, follow the below steps:
Step 1: Create a Slack account.
Step 2: Create a Workspace to be associated with your account.
Once created, you will get redirected to the Slack API page.
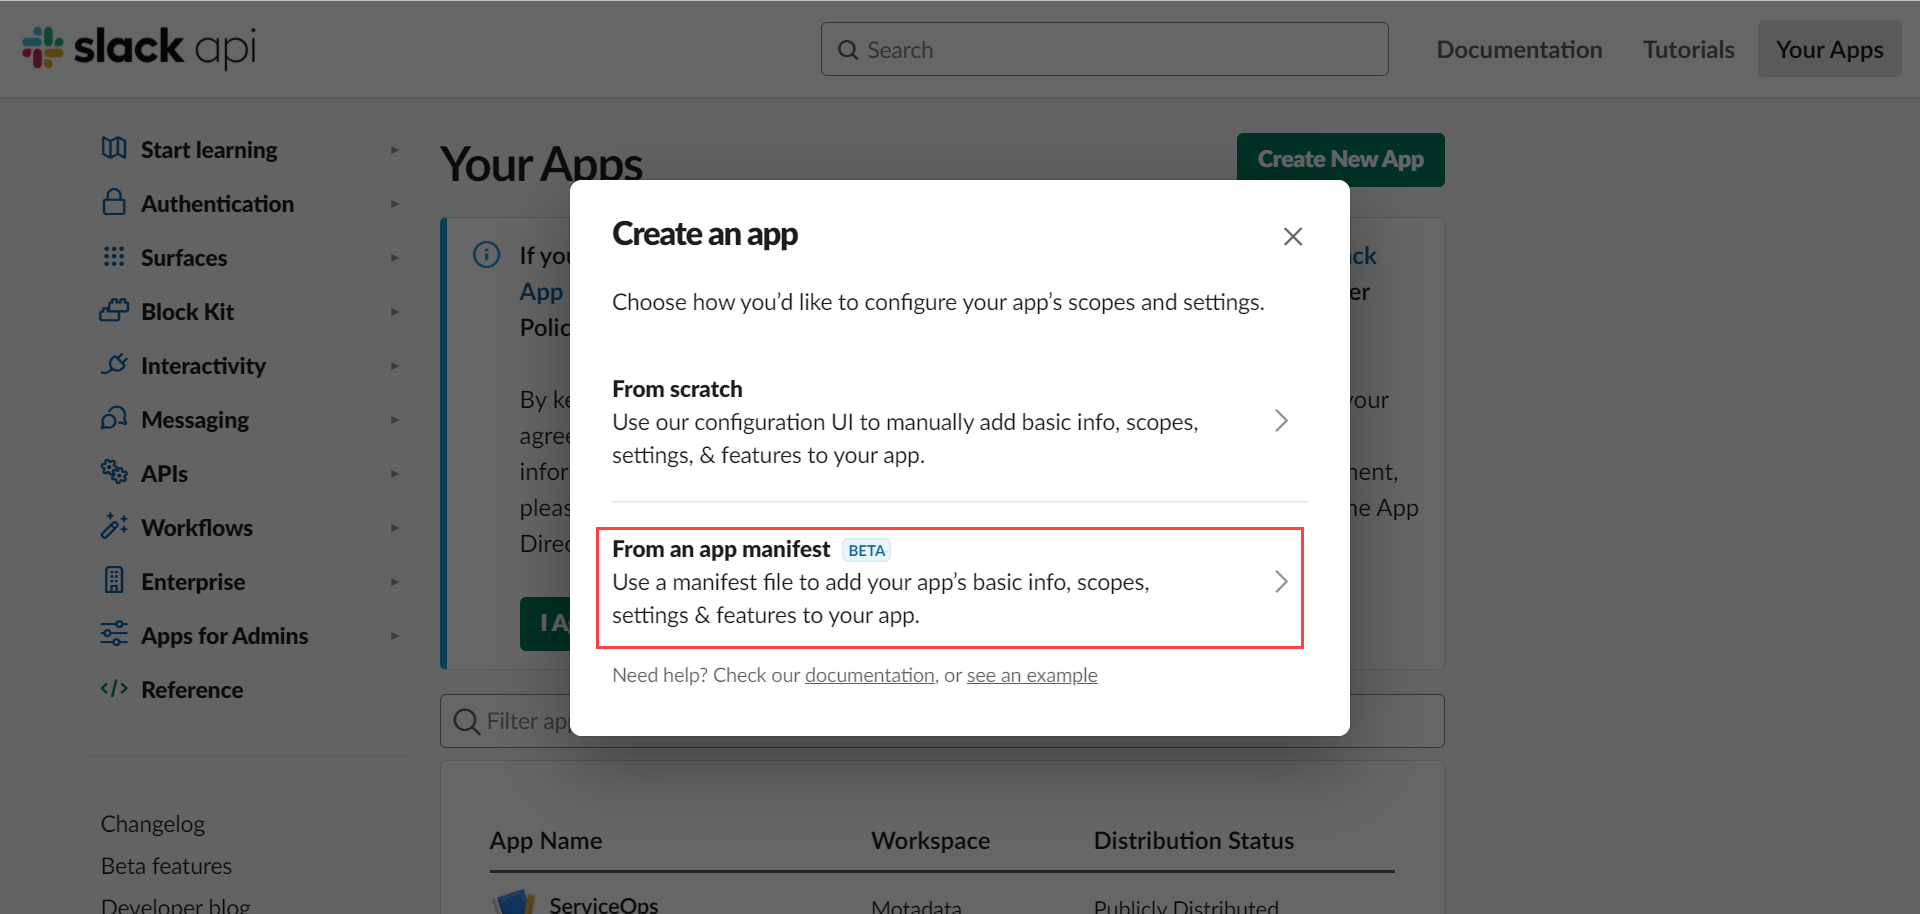
Step 3: Create an App, and the following pop-up will appear.
Select the option “From an app manifest”.
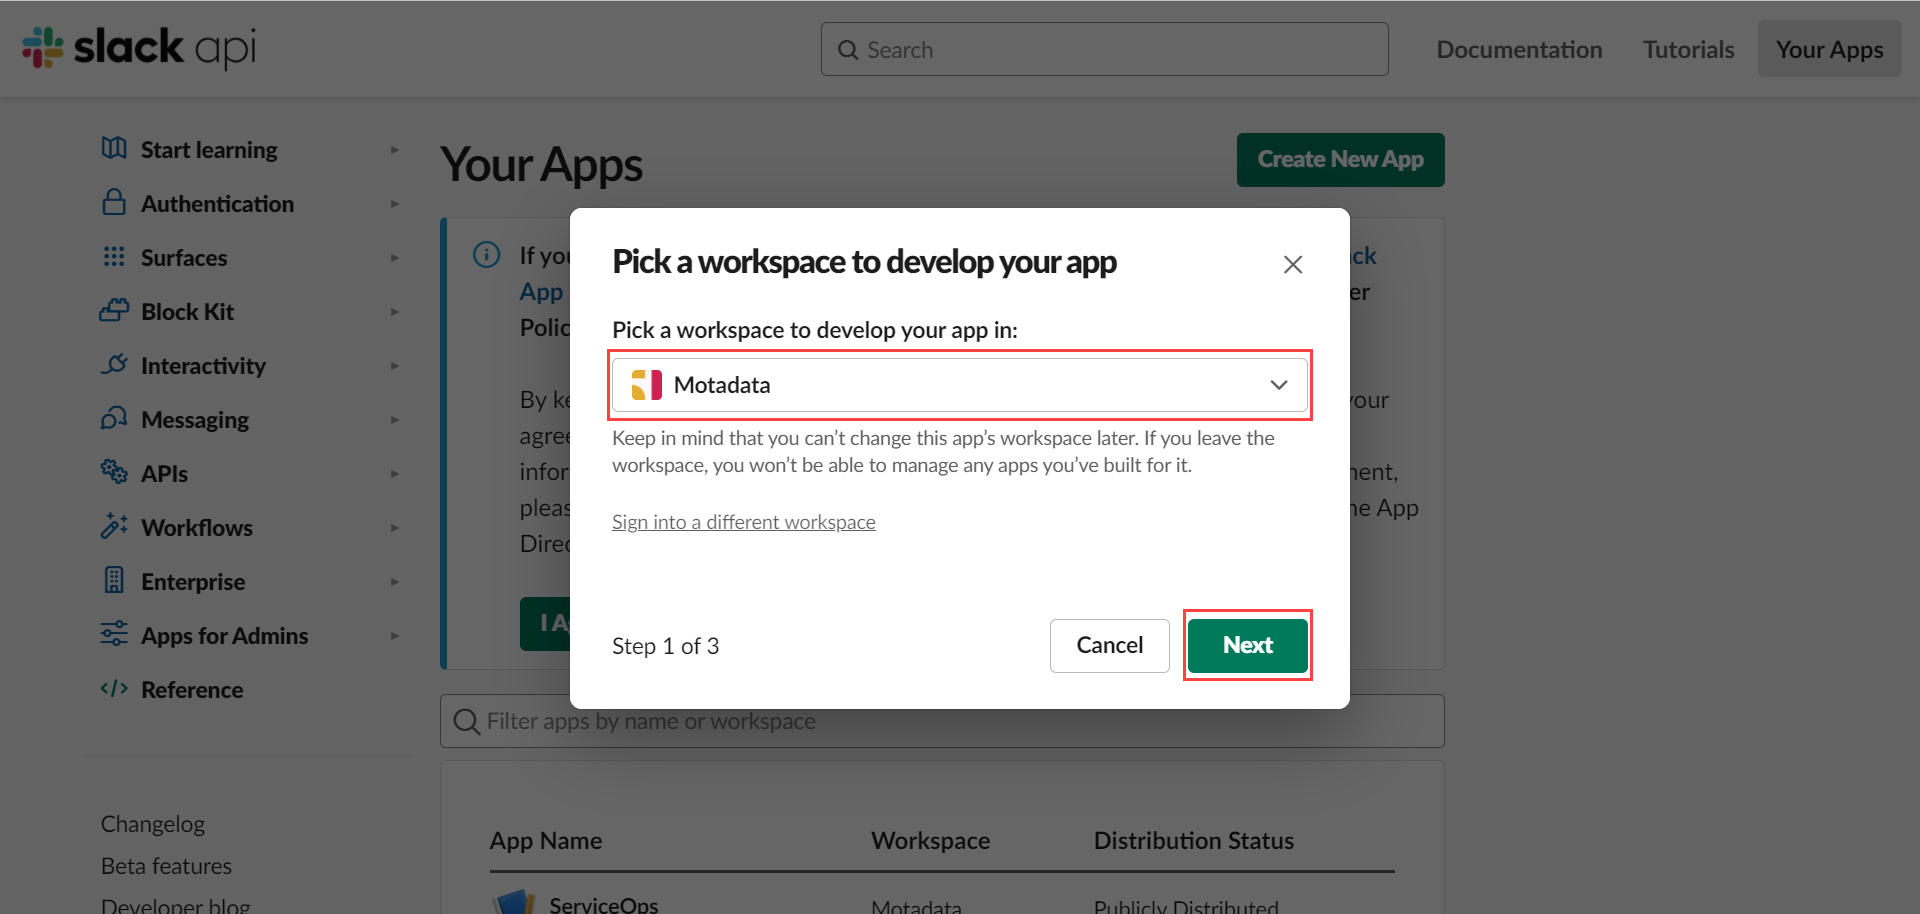
Step 4: Select a workspace and click Next.
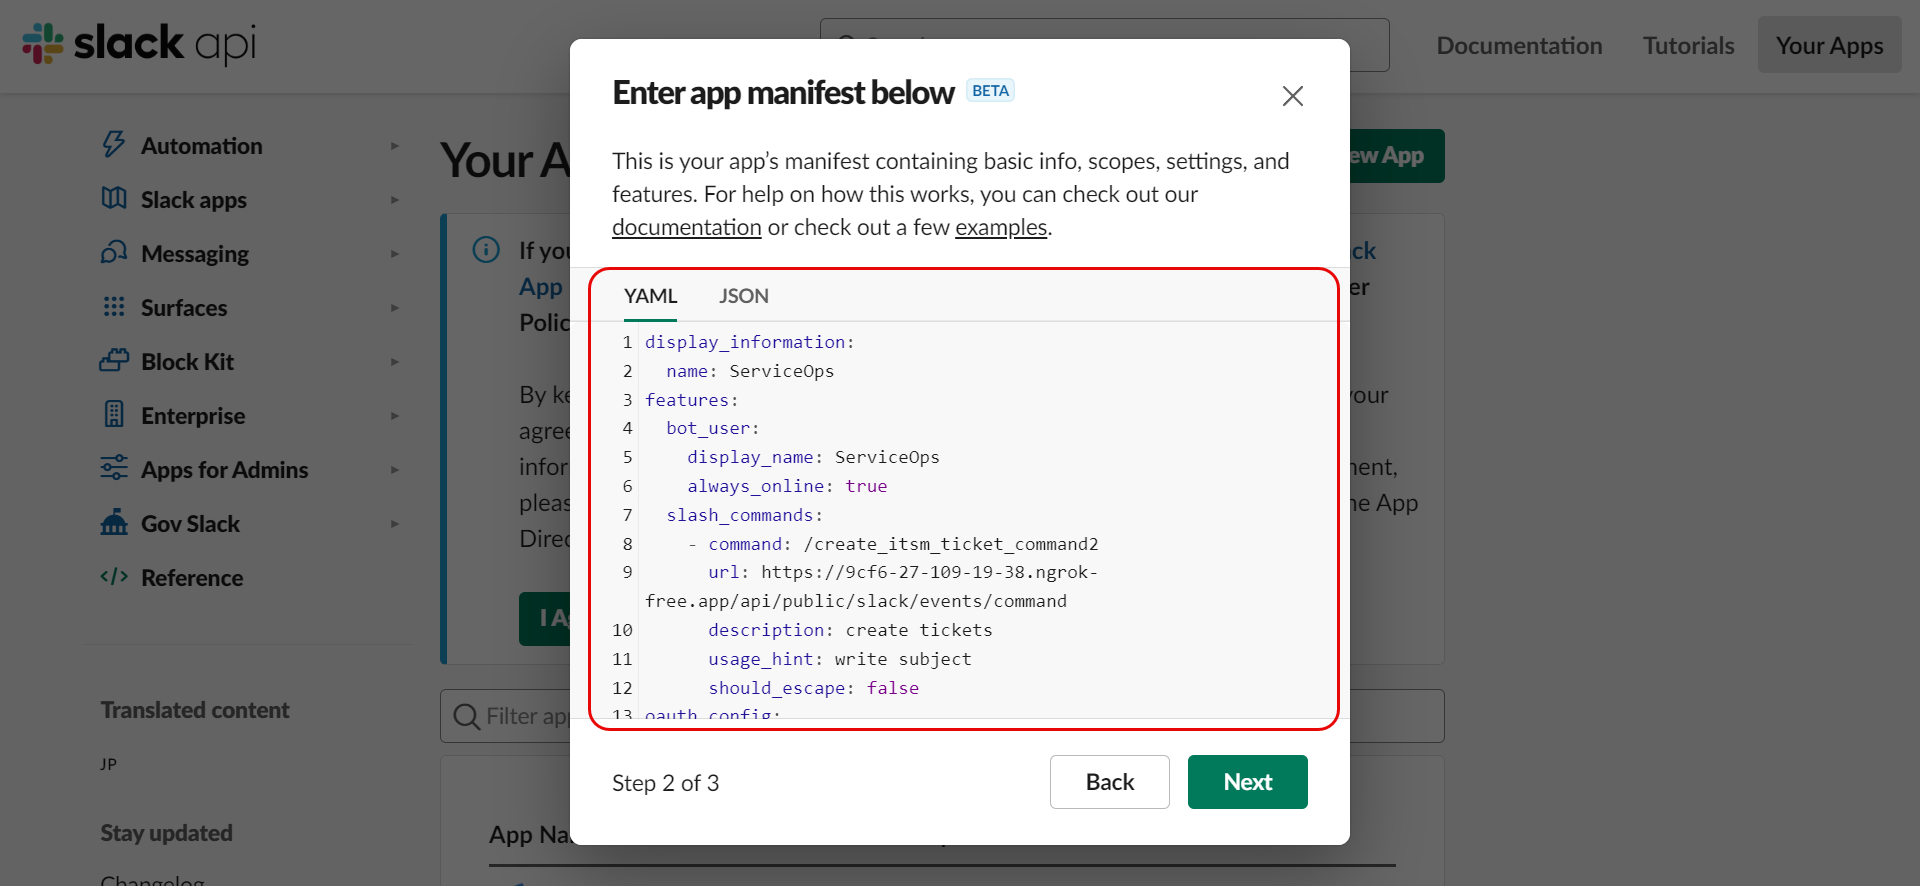
Step 5: Use the below sample YAML or JSON code and replace all the highlighted URLs with the ServiceOps URL. Once done, copy the entire code.
- YAML Code
- JSON Code
display_information:
name: ServiceOps
features:
bot_user:
    display_name: ServiceOps
    always_online: true
slash_commands:
    - command: /create_itsm_ticket_command
    url: https://sso.motadataserviceops.com/api/public/slack/events/command
    description: create tickets
    usage_hint: write subject
    should_escape: false
oauth_config:
redirect_urls:
    - https://sso.motadataserviceops.com/api/public/slack/install
scopes:
    bot:
    - app_mentions:read
    - channels:history
    - chat:write
    - commands
    - groups:history
    - im:history
    - mpim:history
    - team:read
    - users.profile:read
settings:
event_subscriptions:
    request_url: https://sso.motadataserviceops.com/api/public/slack/readMessage
    bot_events:
    - message.im
    - message.mpim
interactivity:
    is_enabled: true
    request_url: https://sso.motadataserviceops.com/api/public/slack/events
org_deploy_enabled: false
socket_mode_enabled: false
token_rotation_enabled: false
{
    "display_information": {
        "name": "ServiceOps"
    },
    "features": {
        "bot_user": {
            "display_name": "ServiceOps",
            "always_online": true
        },
        "slash_commands": [
            {
                "command": "/create_itsm_ticket_command2",
                "url": "https://9cf6-27-109-19-38.ngrok-free.app/api/public/slack/events/command",
                "description": "create tickets",
                "usage_hint": "write subject",
                "should_escape": false
            }
        ]
    },
    "oauth_config": {
        "redirect_urls": [
            "https://9cf6-27-109-19-38.ngrok-free.app/api/public/slack/install"
        ],
        "scopes": {
            "bot": [
                "app_mentions:read",
                "chat:write",
                "commands",
                "groups:history",
                "im:history",
                "mpim:history",
                "team:read",
                "users.profile:read"
            ]
        }
    },
    "settings": {
        "event_subscriptions": {
            "request_url": "https://9cf6-27-109-19-38.ngrok-free.app/api/public/slack/readMessage",
            "bot_events": [
                "message.im",
                "message.mpim"
            ]
        },
        "interactivity": {
            "is_enabled": true,
            "request_url": "https://9cf6-27-109-19-38.ngrok-free.app/api/public/slack/events"
        },
        "org_deploy_enabled": false,
        "socket_mode_enabled": false,
        "token_rotation_enabled": false
    }
}
Step 6: In the “Enter app manifest below” section, replace the default YAML or JSON code with the above modified and copied code (step 6), and click Next.

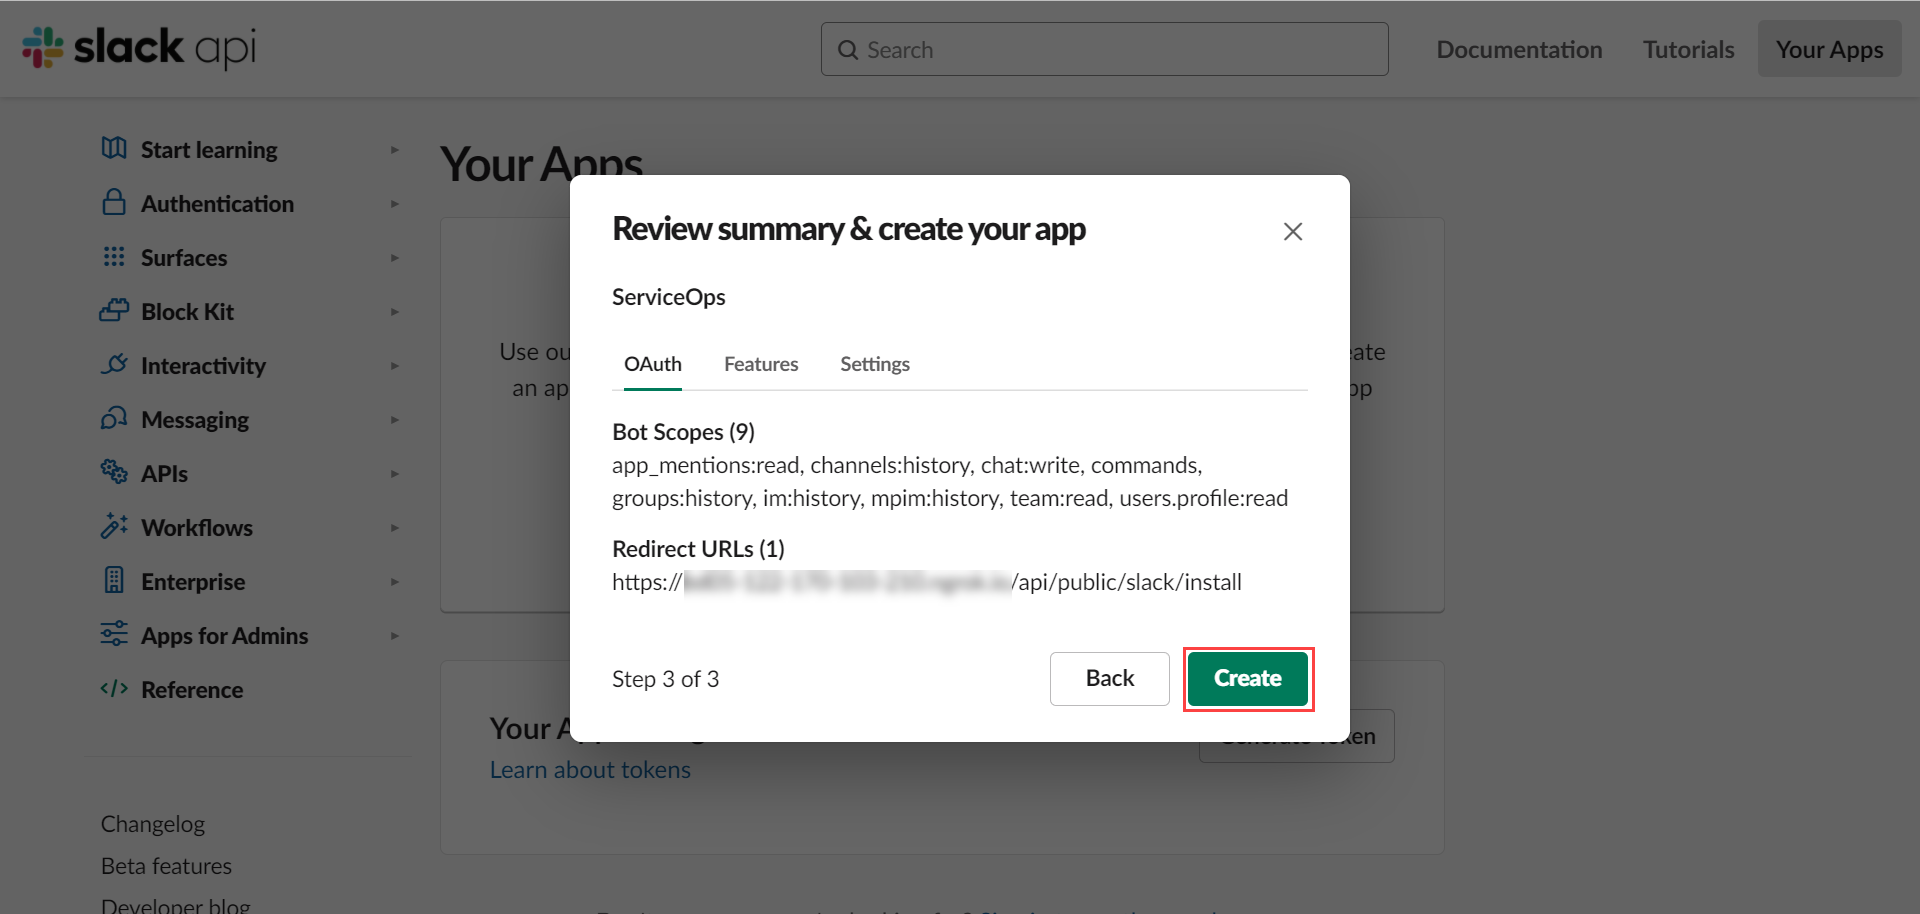
Step 7: Click Create.
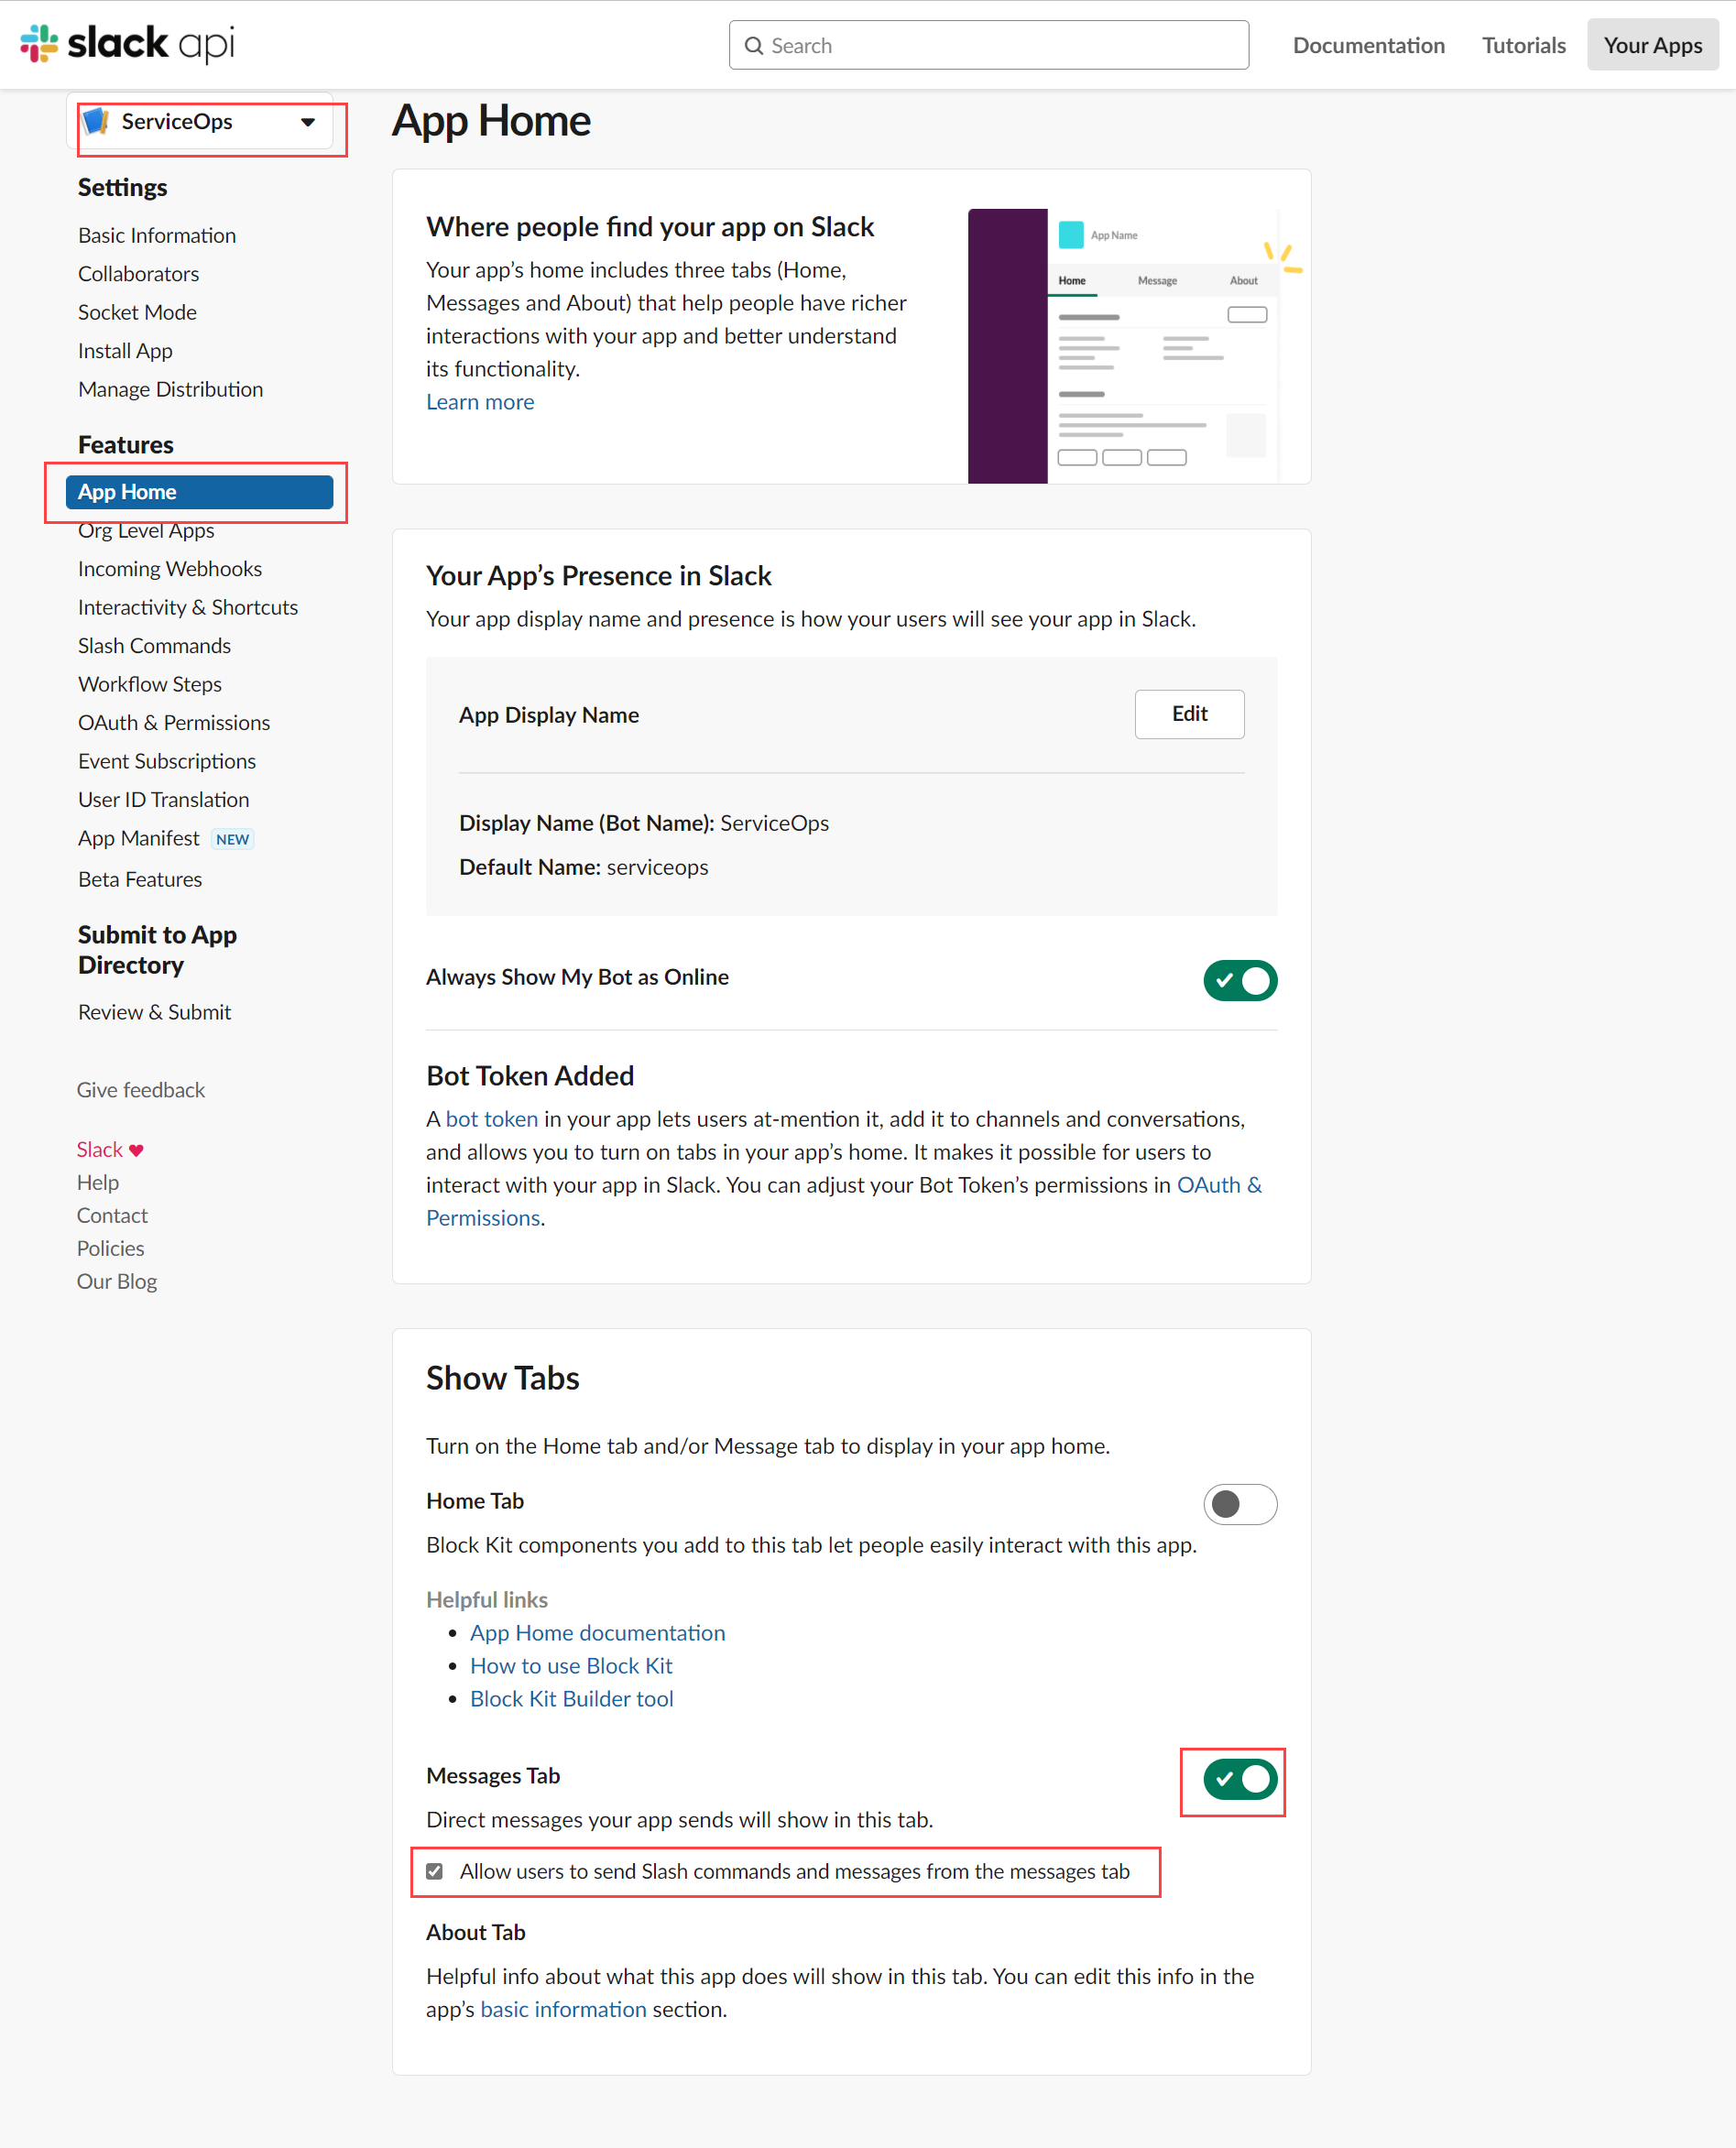
Step 8: Select the created app and navigate to Features > App Home > Show Tabs > Messages Tab section. Enable the option “Allow users to send Slash commands and messages from the messages tab”, as shown below.
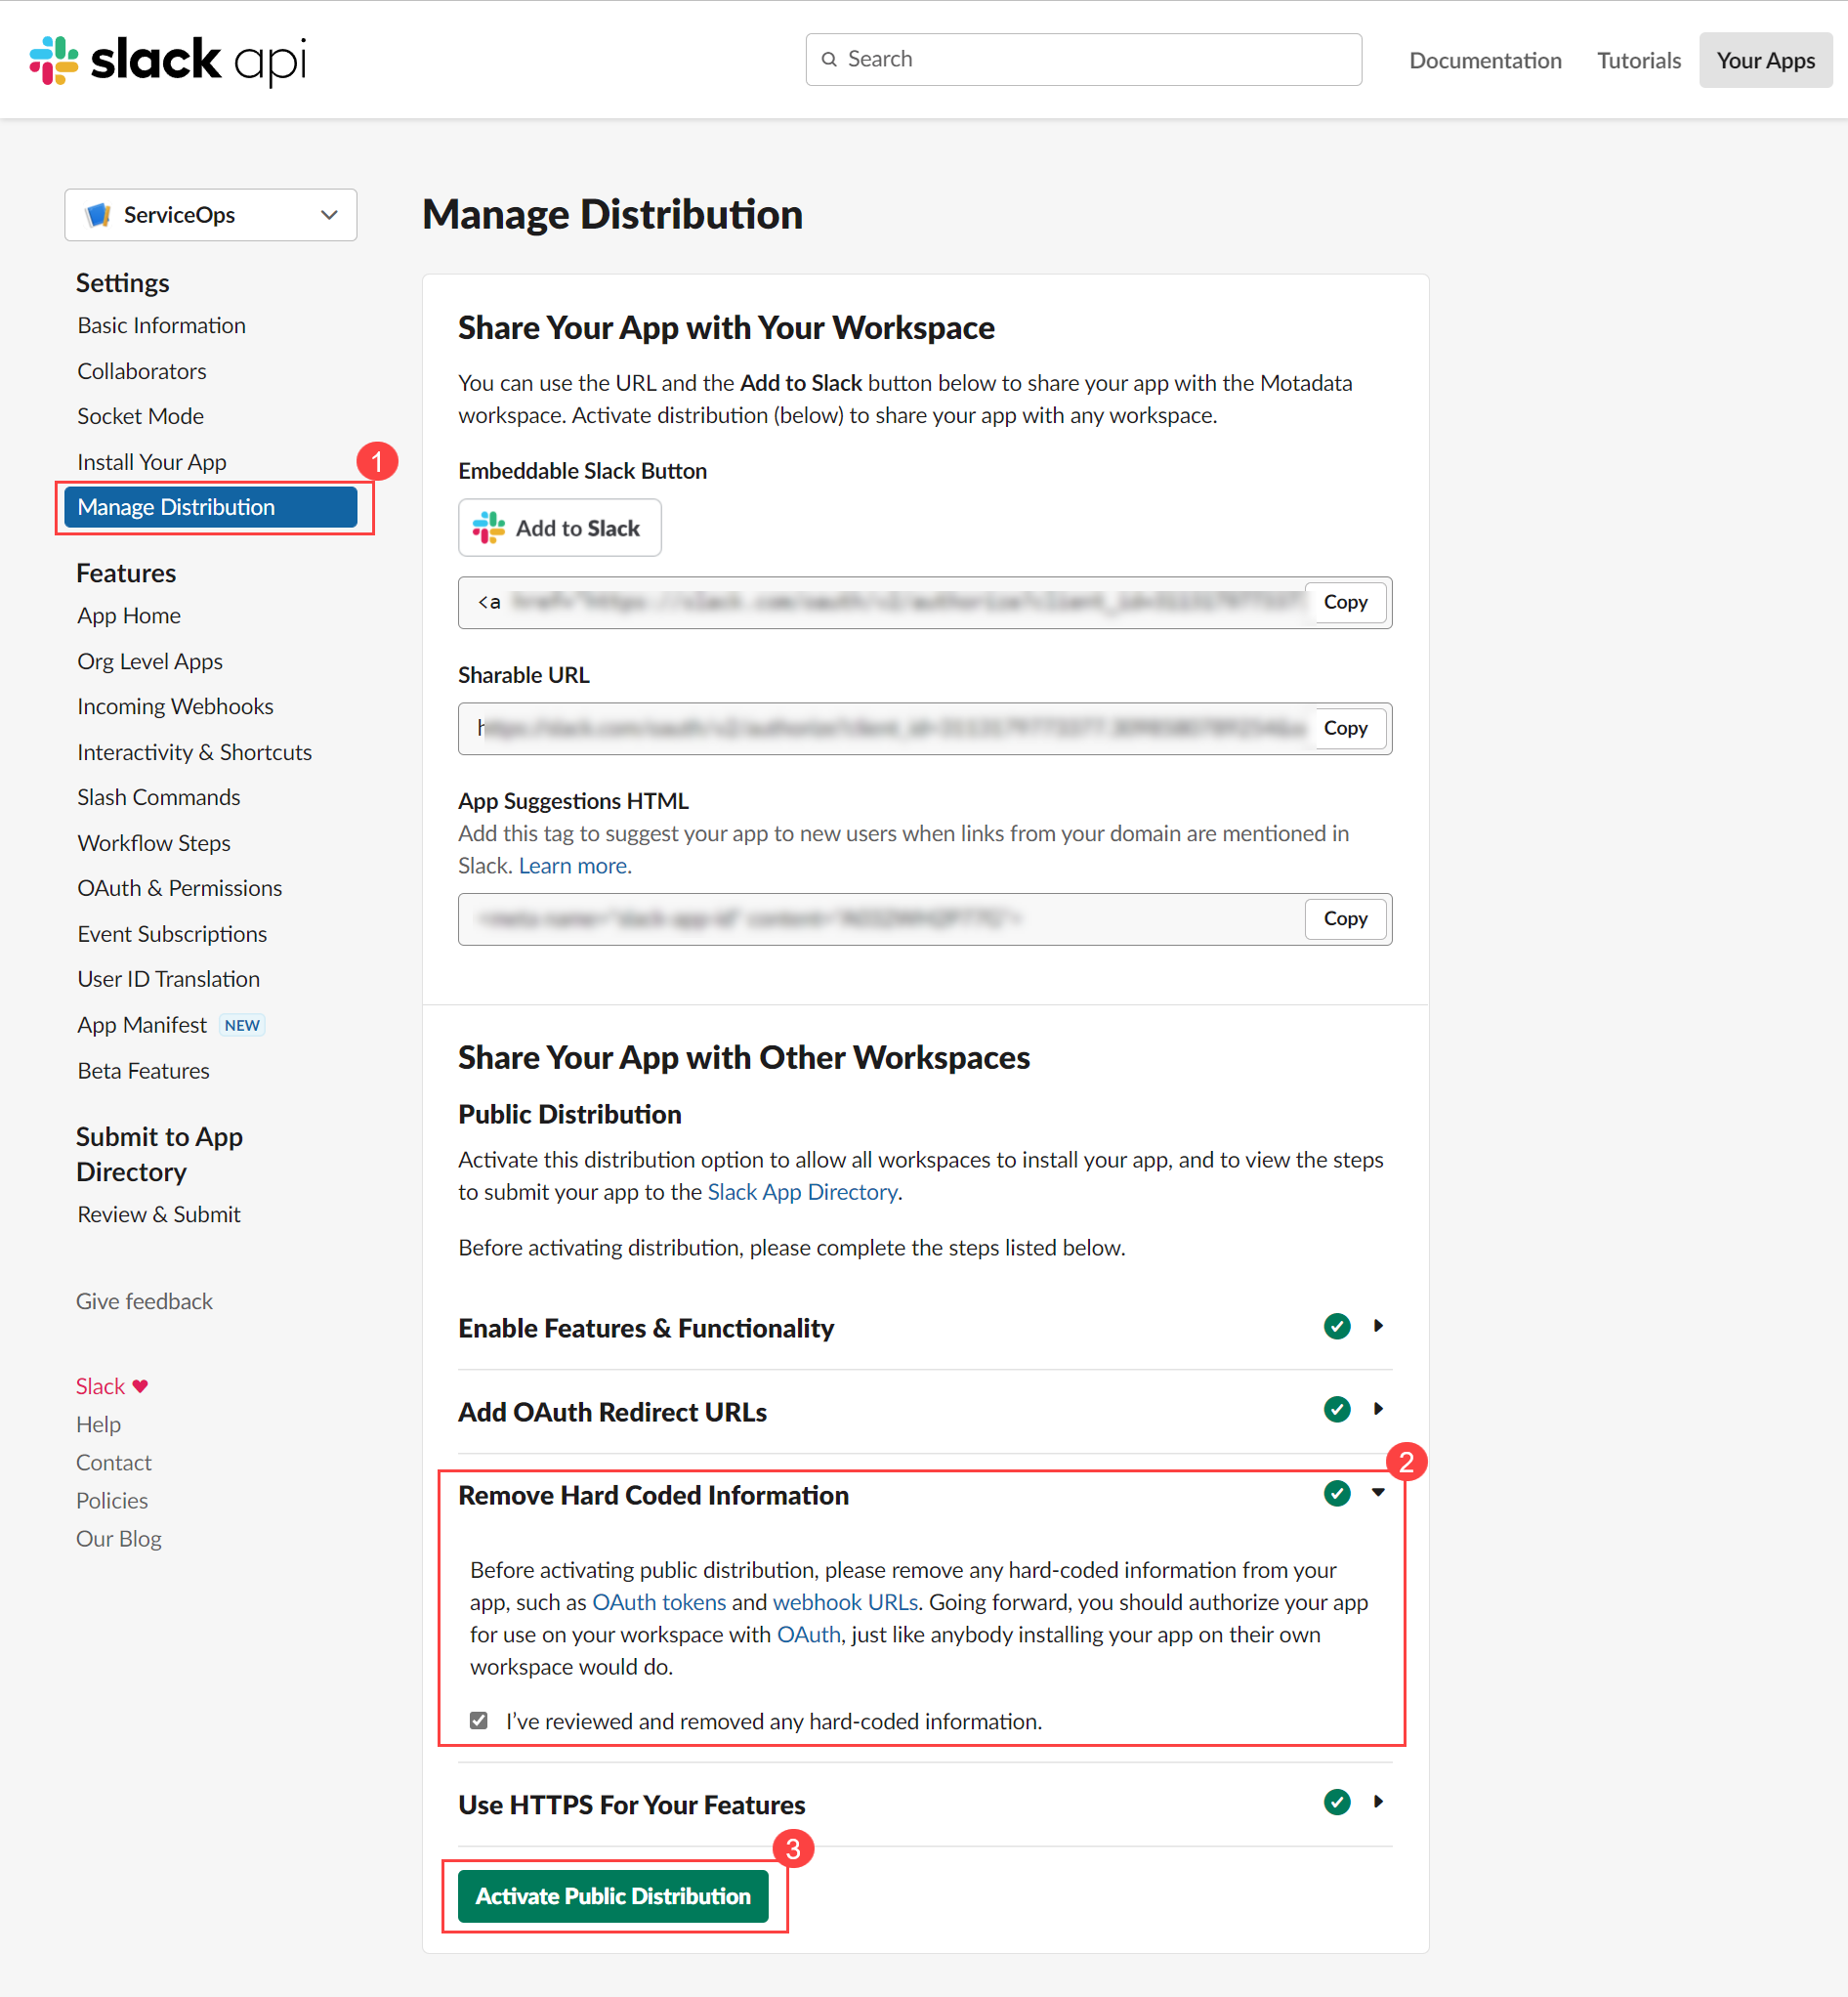
Step 9: Navigate to Settings > Manage Distribution.
- Select the “Remove Hard Coded Information” section and enable the option “I’ve reviewed and removed any hard-coded information”.
- Activate the application using the “Activate Public Distribution” button.
Step 10: Sign-in to the ServiceOps Portal and configure the Slack App settings.
- Navigate to Admin > Support Channel > Virtual Agent > Slack App Config page.
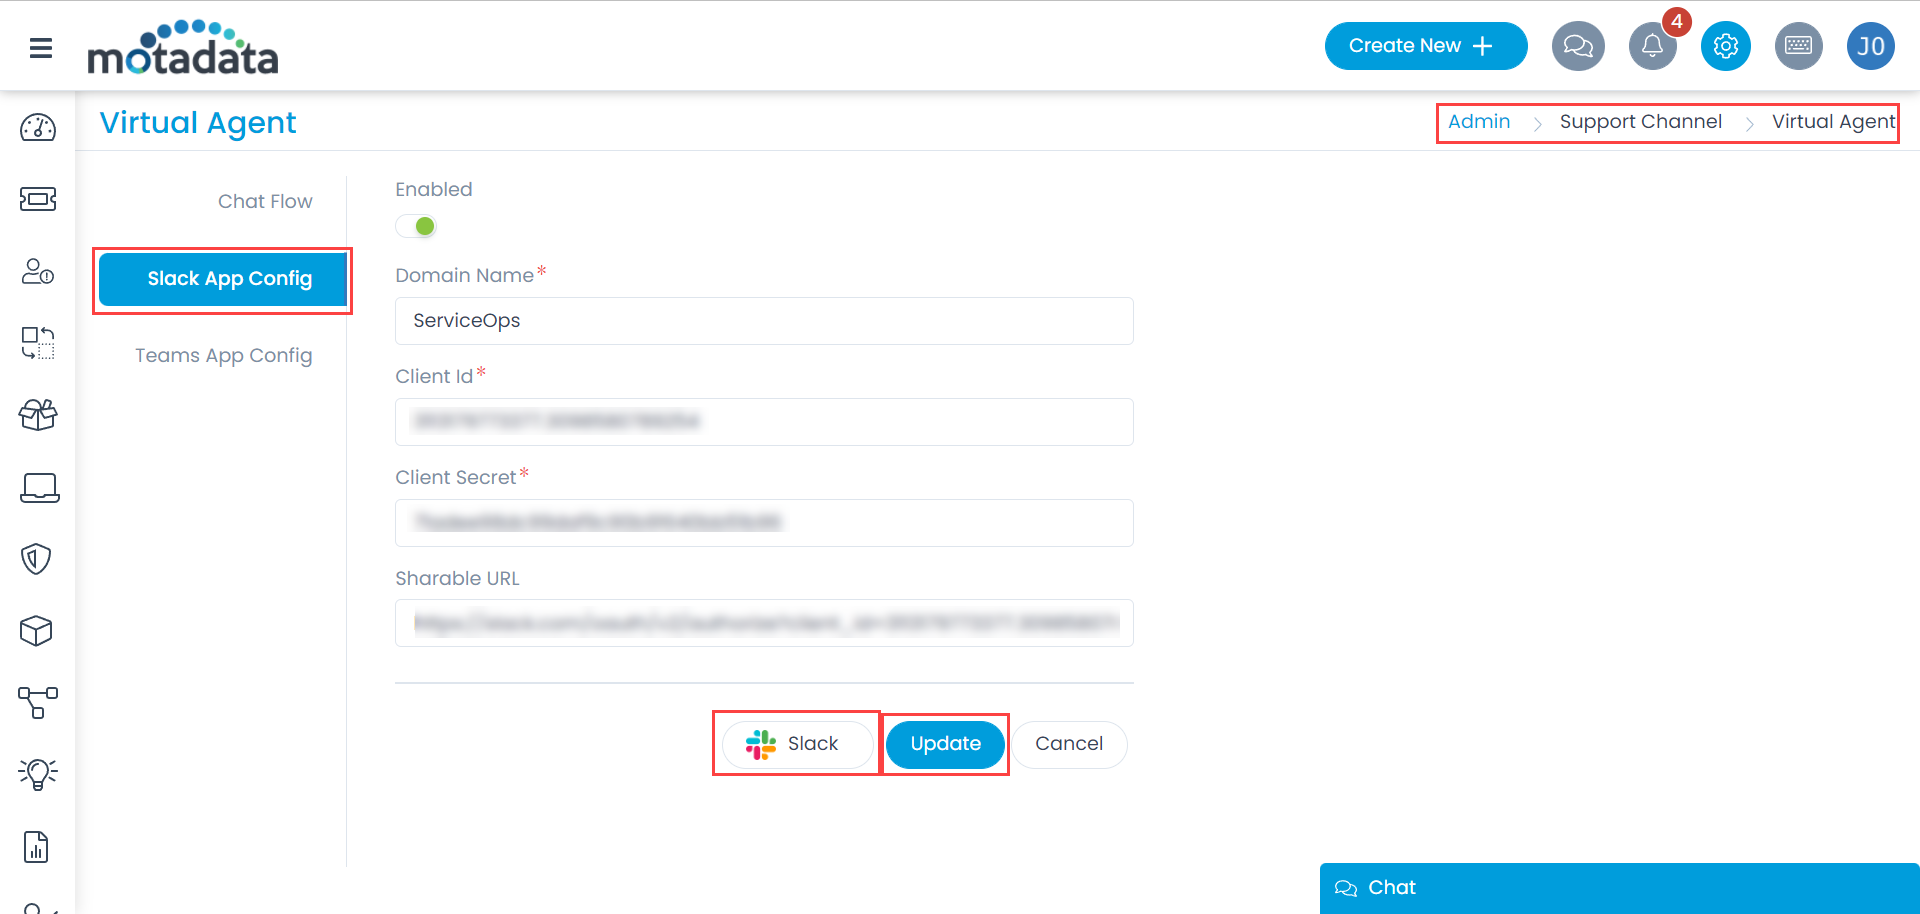
- Enable the Slack functionality to allow requesters to chat via the Slack application.
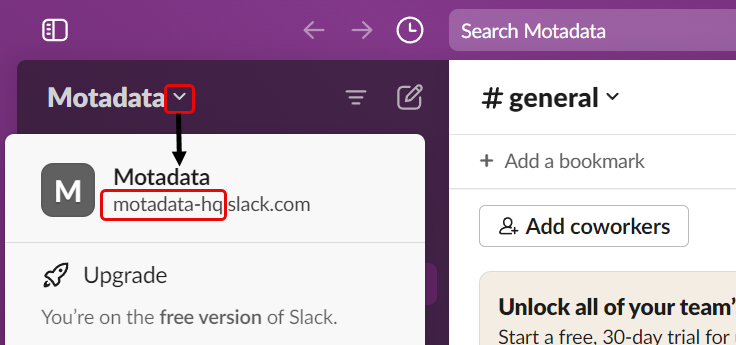
- Domain Name: Provide the domain name on which the user will use the application. The domain name can be found under the Workspace name from the Slack account as shown below. The text before .slack.com is the domain.
- Client ID: Provide the Slack client ID.
- Client Secret: Provide the secret ID of the Slack client. You can get these details from the Slack API page, as shown below.
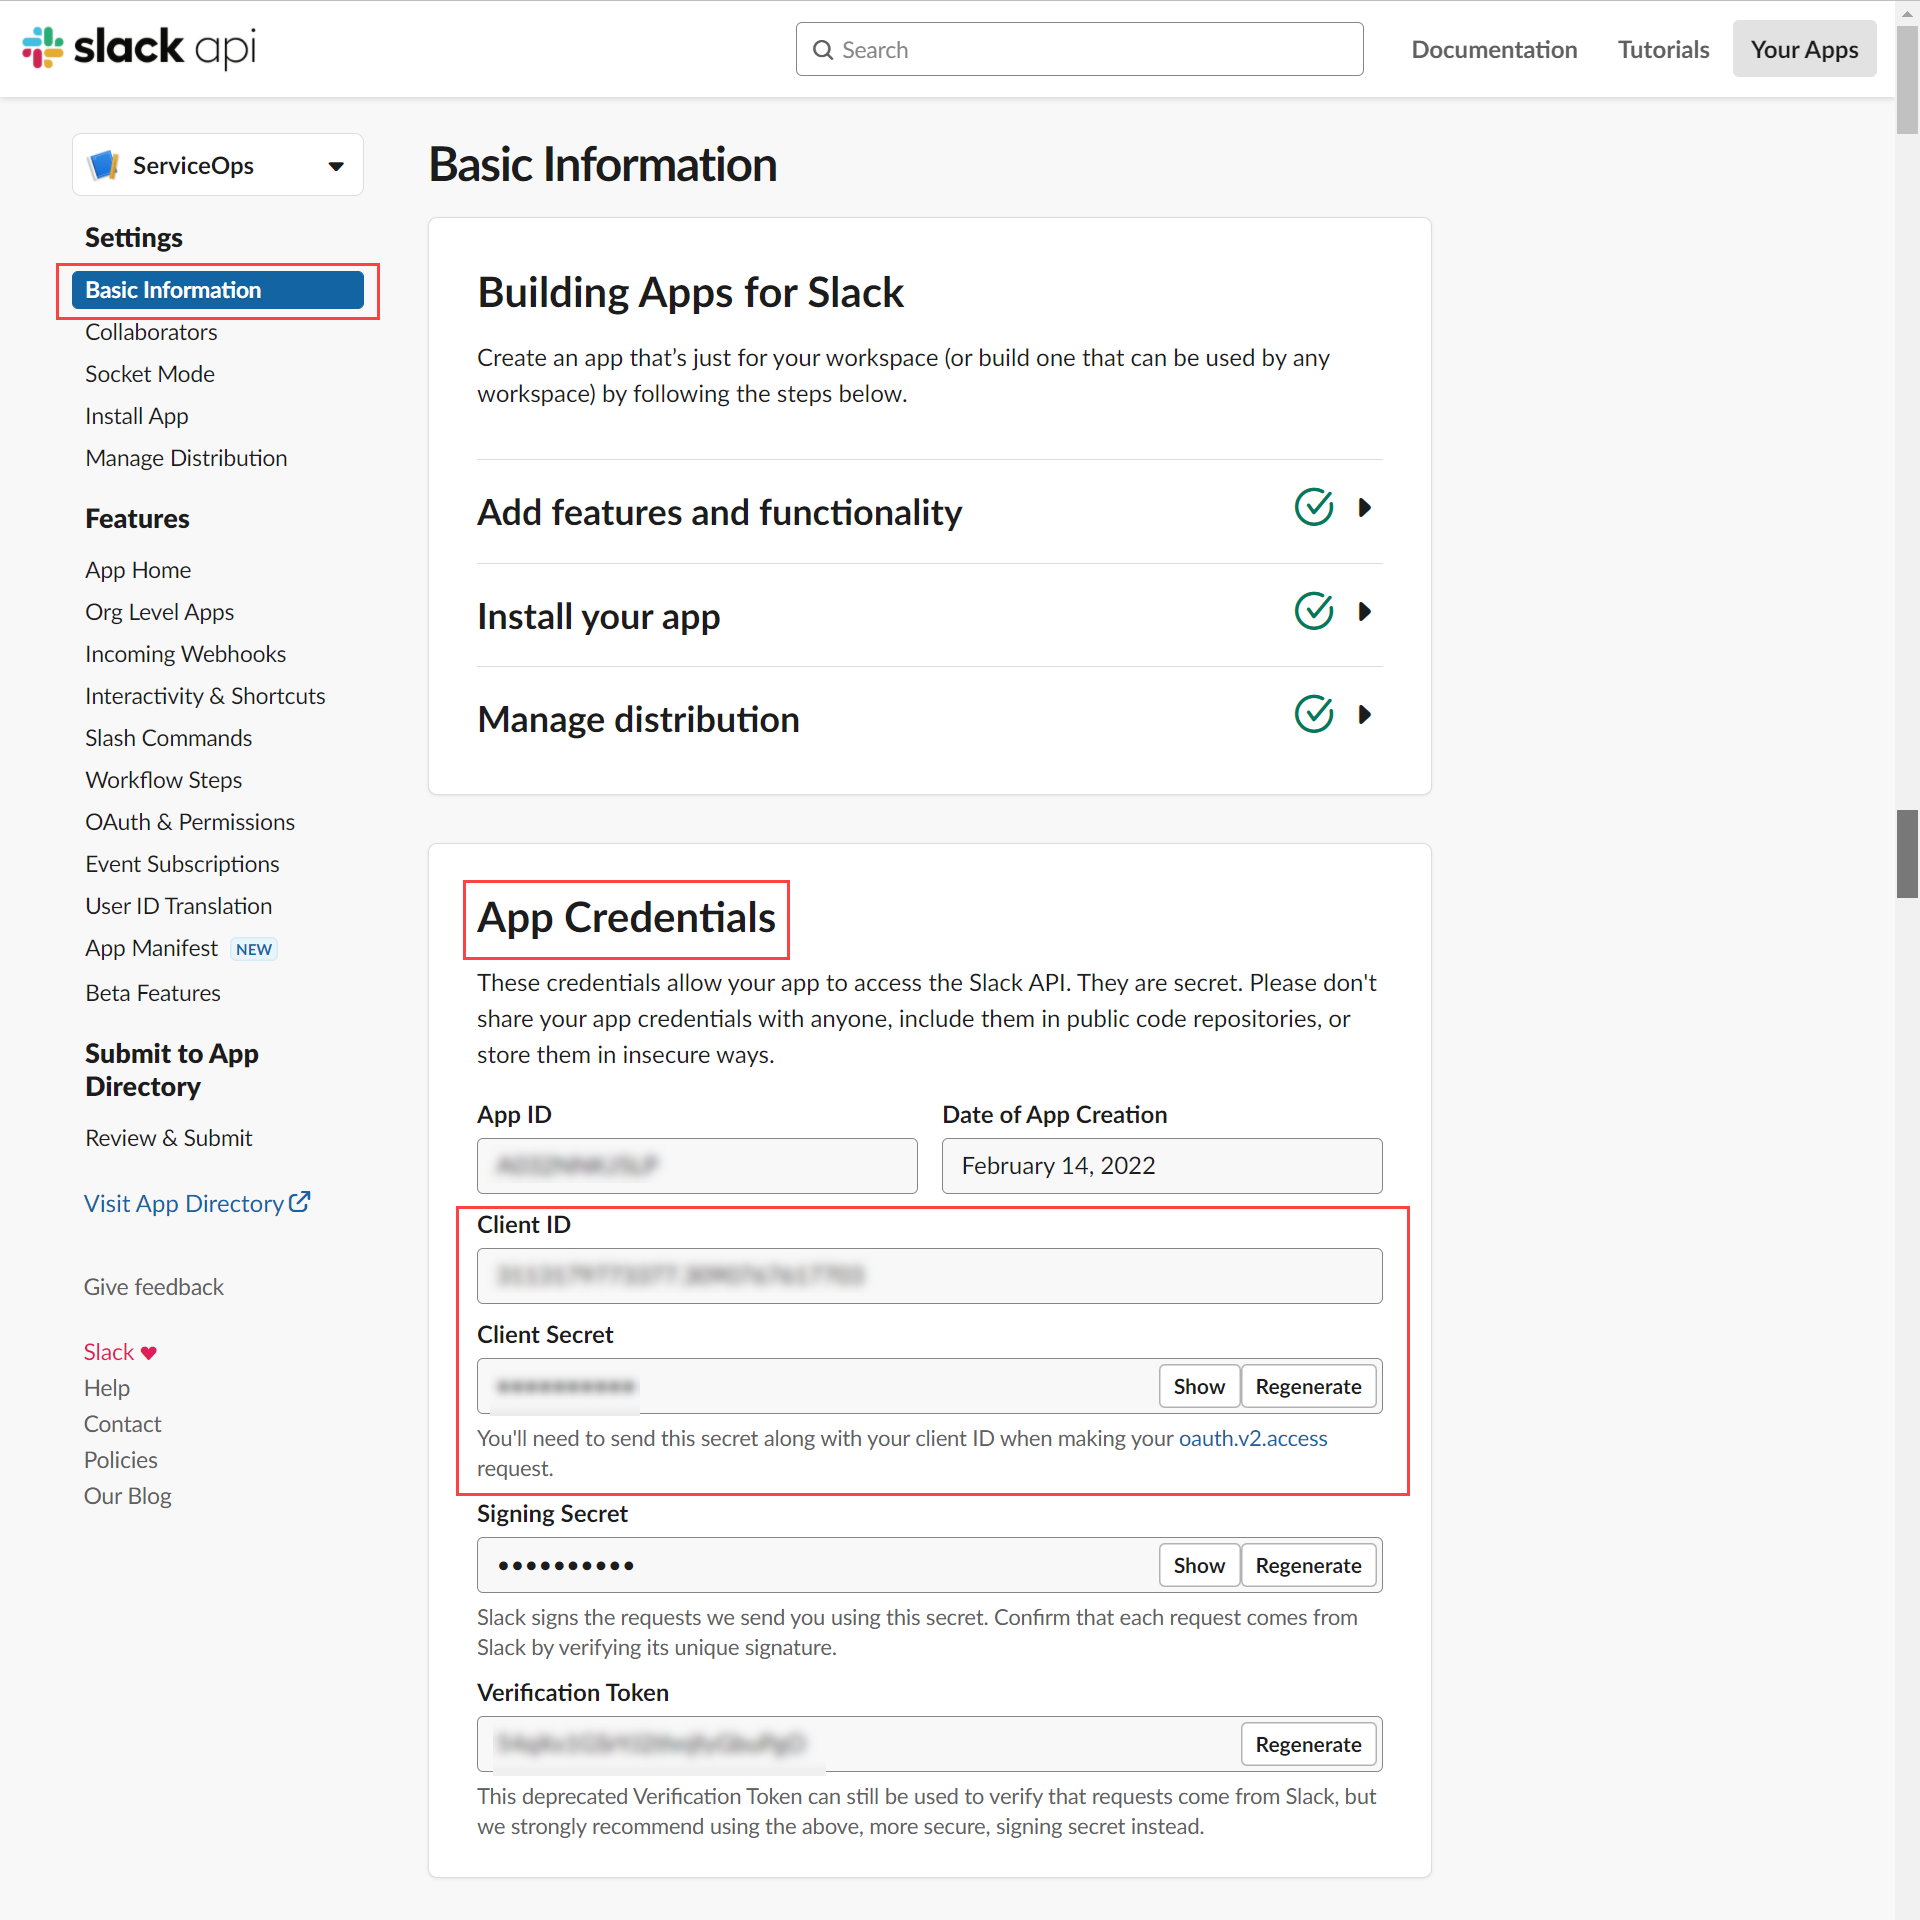
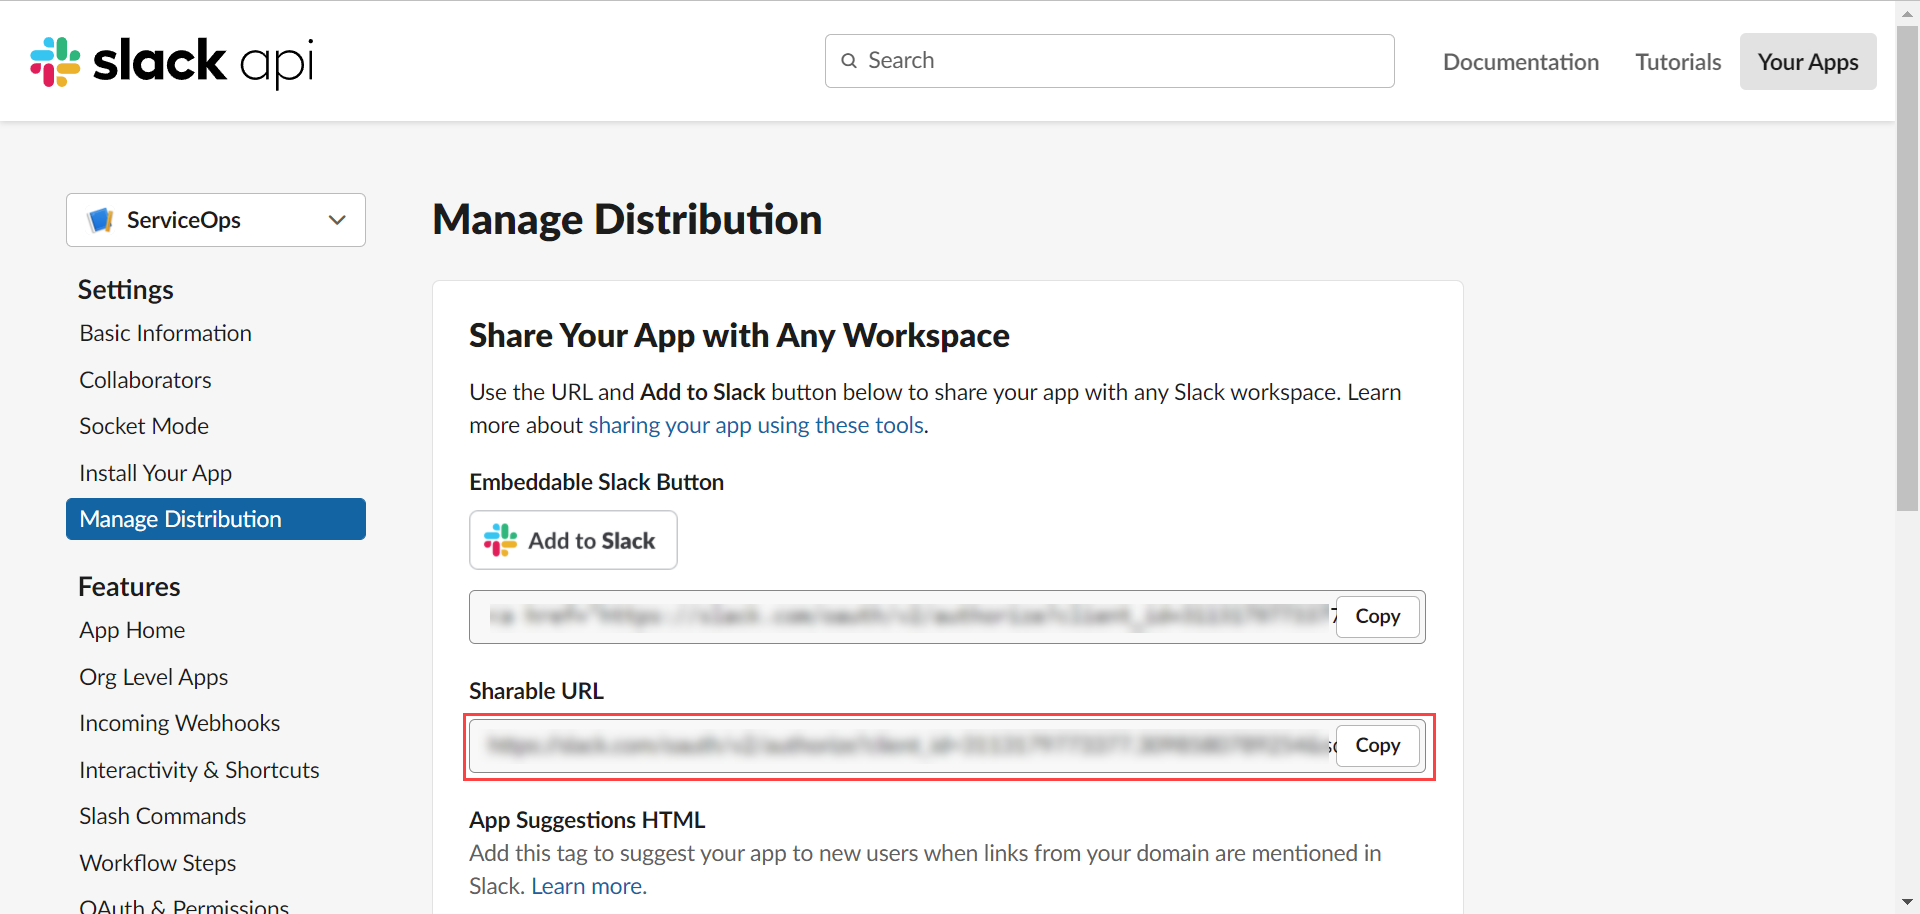
- Sharable URL: This is the shareable URL received from the Slack client. You can get this from the Slack API page, as shown below. Once configured, the Virtual Agent can send responses to the Slack application.
Step 11: Click Update, and a confirmation message will appear.
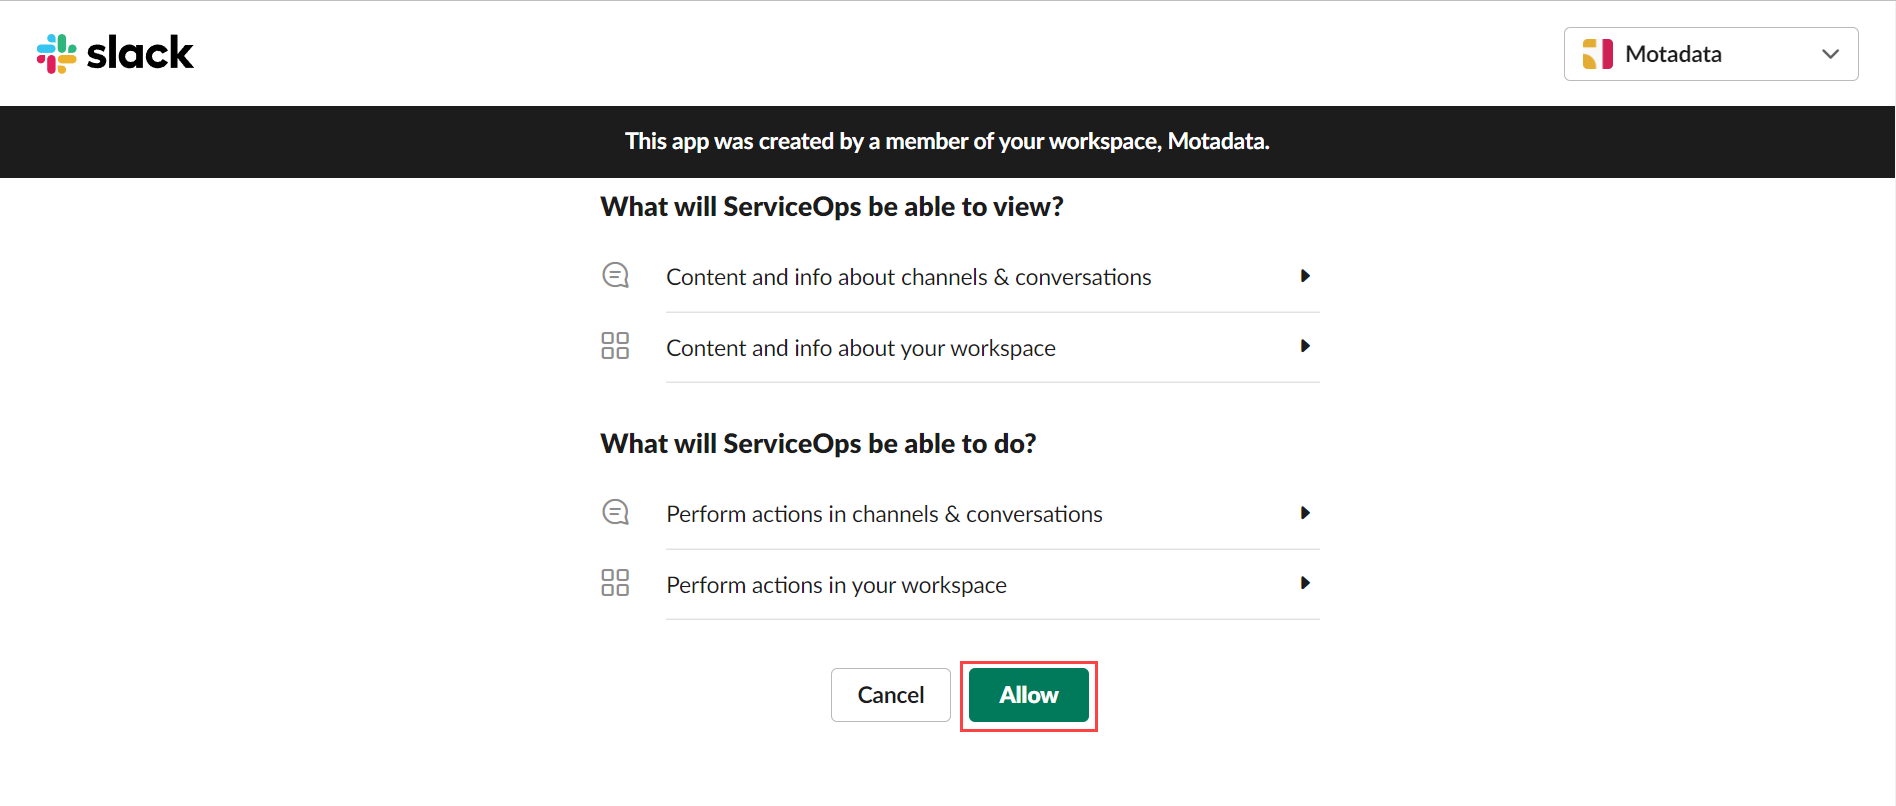
Step 12: Click Slack and the below page will appear.
Click Allow, and a confirmation message “Success! Successfully installed Slack App” will appear.
Step 13: Open the Slack application. You will find the ServiceOps App in the Apps section, as shown below.
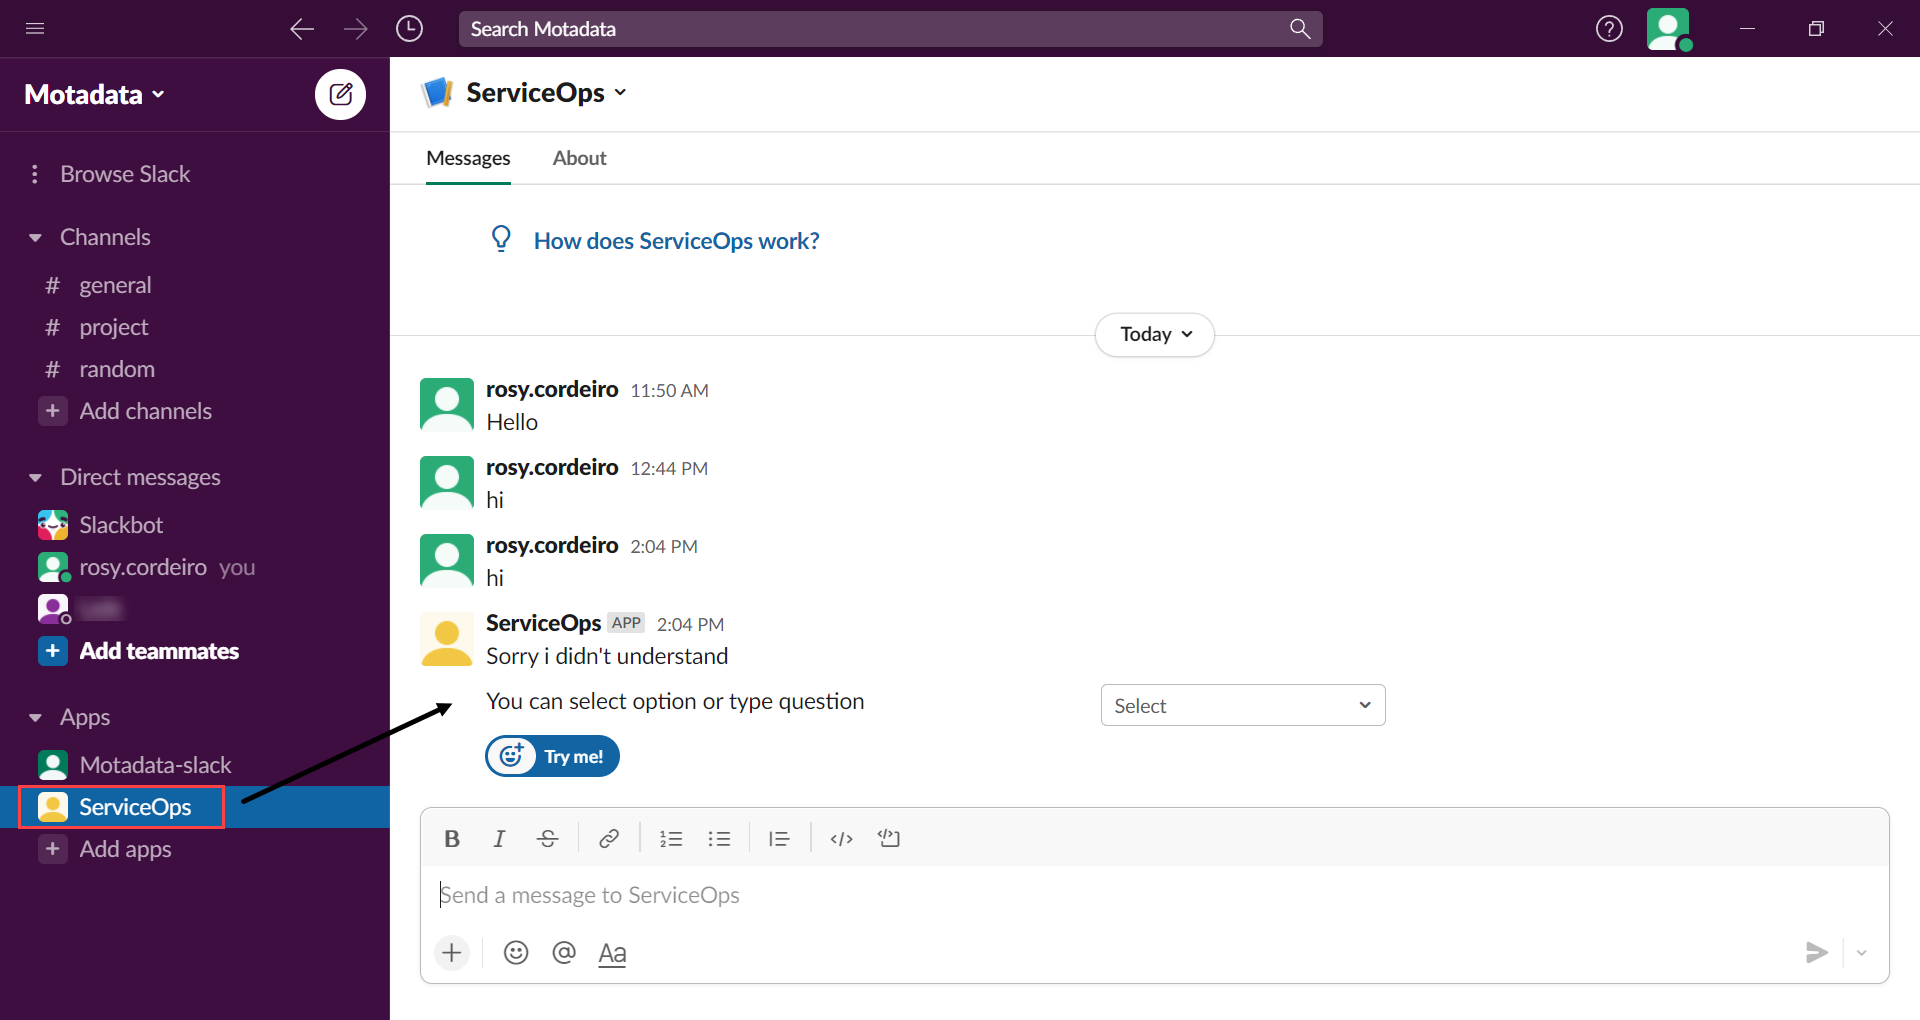
Now, you can chat with the ServiceOps Virtual Agent.