User Imports
Motadata allows you to import the users belonging to different servers. For example AD users, Okta user, etc.
Motadata ServiceOps establishes a connection with the services using the provided information and fetches the employee details from the server into the Motadata ServiceOps.
To view the User Imports page, navigate to the Admin > Users > SSO Configurations > User Imports tab, and the page appears.
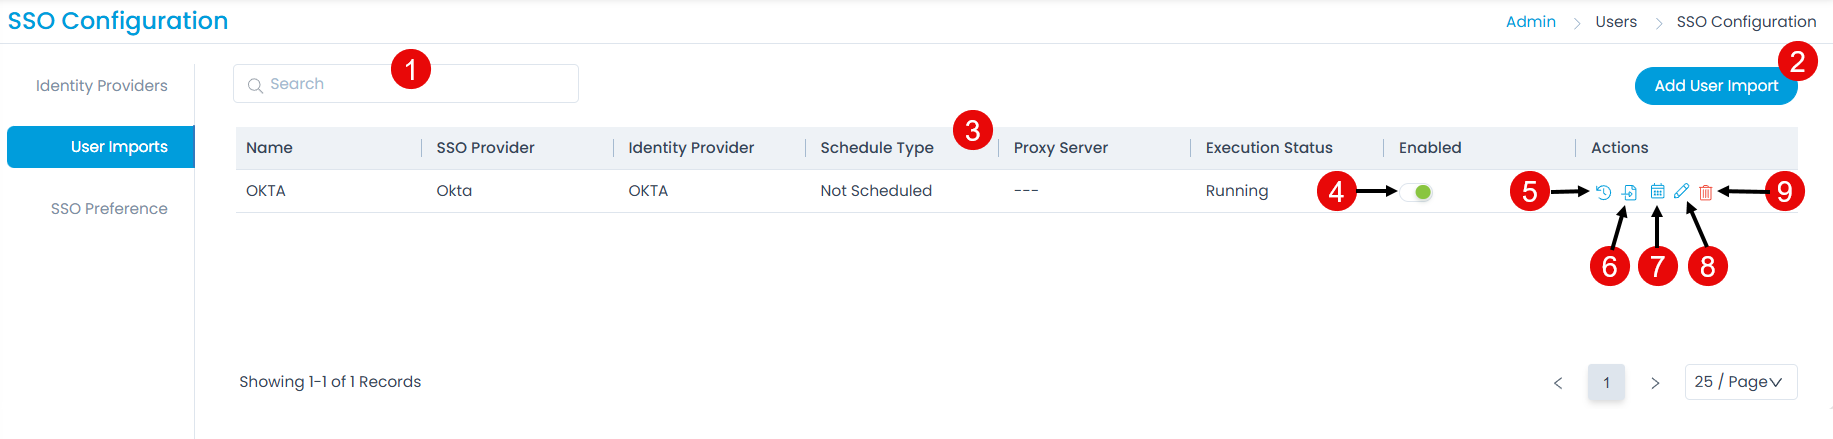
The page provides the following features:
- Search: You can search for the required service using the keywords.
- Add User Import: You can import users.
- Grid: Displays the details of the import.
- Schedule Enabled: You can enable or disable the schedule.
- Show History: You can view the user import history for each Identity Provider individually.
- Import Users: You can import the users of the desired identity provider into ServiceOps.
- Scheduler: You can create a schedule for each Identity Provider individually, based on which the users will get synchronized.
- Edit: You can edit the configurations.
- Delete: You can delete the configuration if required.
Add User Import
To configure import,
- Click the Add User Import button and the popup appears.

- Enter the following details:
- Name: Enter the name of the user import.
- Enabled: Enable the functionality. By default, it is disabled.
- SSO Provider: Select the provider of SSO functionality. The options are: Okta, One Login, Azure AD / Office 365, and Key Cloak. Based on this, the parameters will appear in the Configuration tab.
- Identity Provider: Select the identity providers whose users you want to import. For more details, refer to Identity Providers.
- Proxy Server: Select the proxy server.
- Block missing users (If not blocked, missing users will be deleted): If enabled, the missing users will be blocked. If disabled they will get archived. This allows blocking or archiving users based on their status in each identity provider:
- KeyCloak, OneLogin, and Azure: Deleted
- Okta: Deactivate
- JumpCloud: Deleted or Suspended Thus, the users with the above statuses will be automatically blocked in ServiceOps during import. Additionally, if the users are reactivated in the identiy provider, they will be unblocked in ServiceOps on the next sync.
- Users archived in ServiceOps due to the Identity Provider will not be automatically un-archived.
- Here, you can import both Azure AD and Office 365 users.
- Office 365 uses Azure Active Directory for user management; hence the configurations of both the services are identical.
- In the Configuration tab, configure the details as per the selected SSO Provider:
For Azure/Office 365
- Client ID: Enter the Client ID copied from Azure.
- Client Secret: Enter the Client Secret copied from Azure.
- Tenant ID: Enter the Tenant ID copied from Azure.
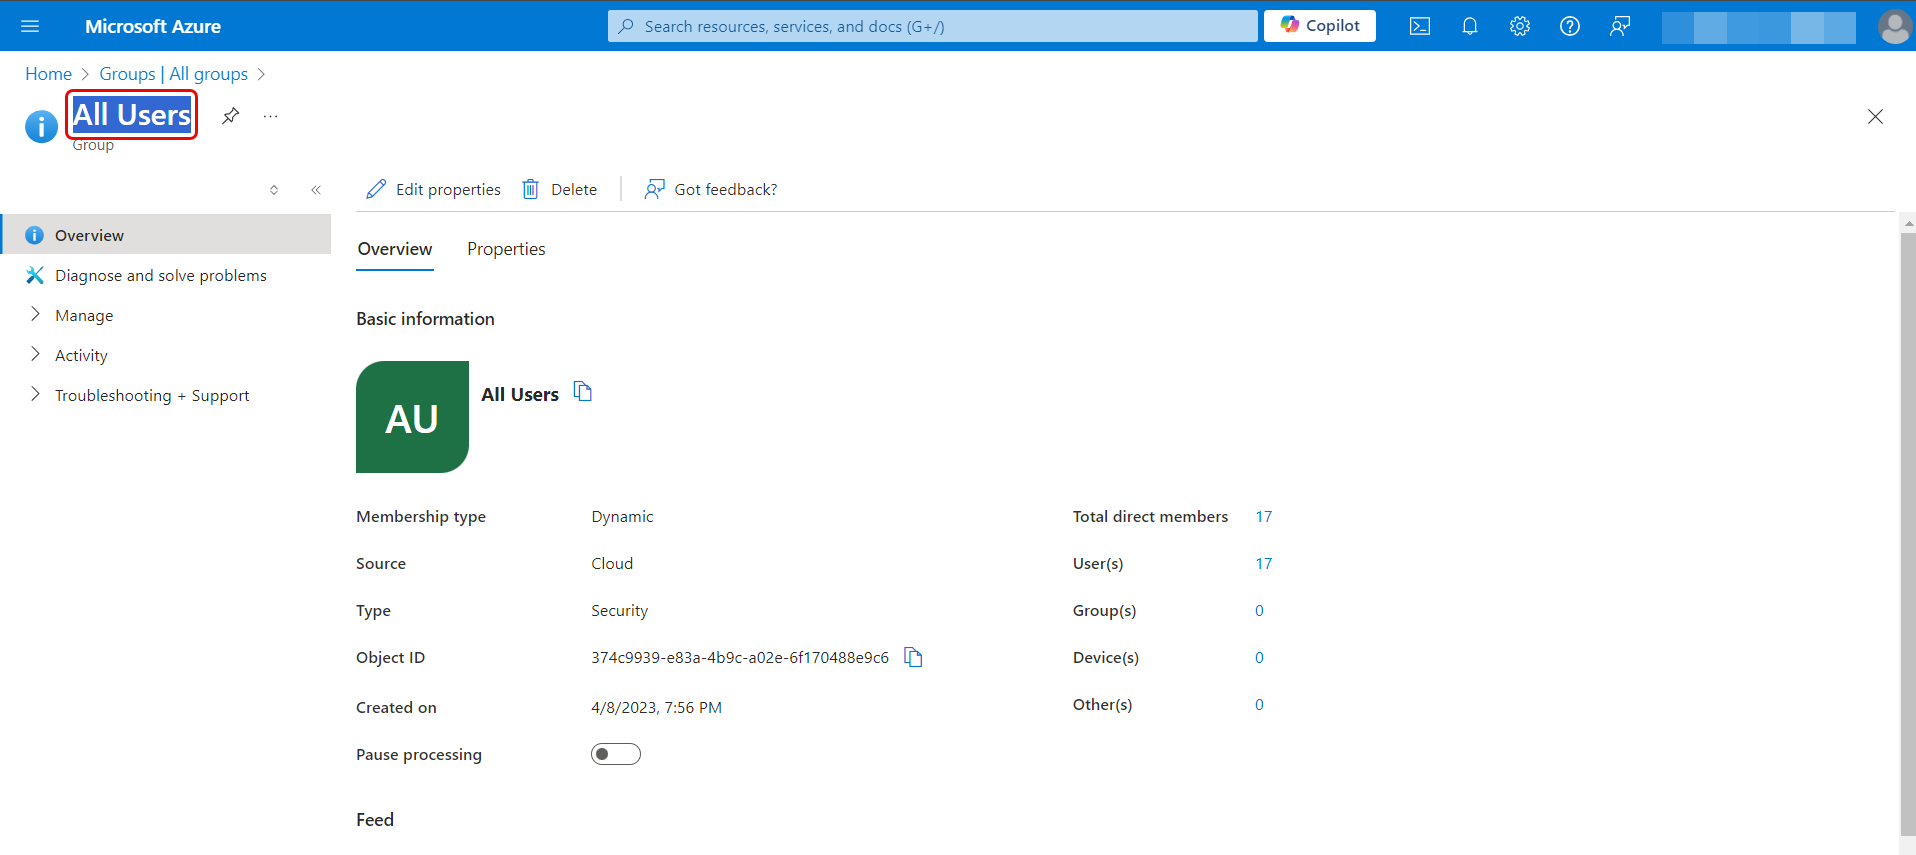
- Group Filter: Enter the group name whose users you want to import from the Azure AD. The group name should be same as that provided in the Azure AD portal. For example, in the below figures, "All Users" Group name is configured in the ServiceOps Portal.
Once the group is configured, users belonging to this group only will be imported.

- Add Notification Email: Add the email address of the users who should be notified about the import.
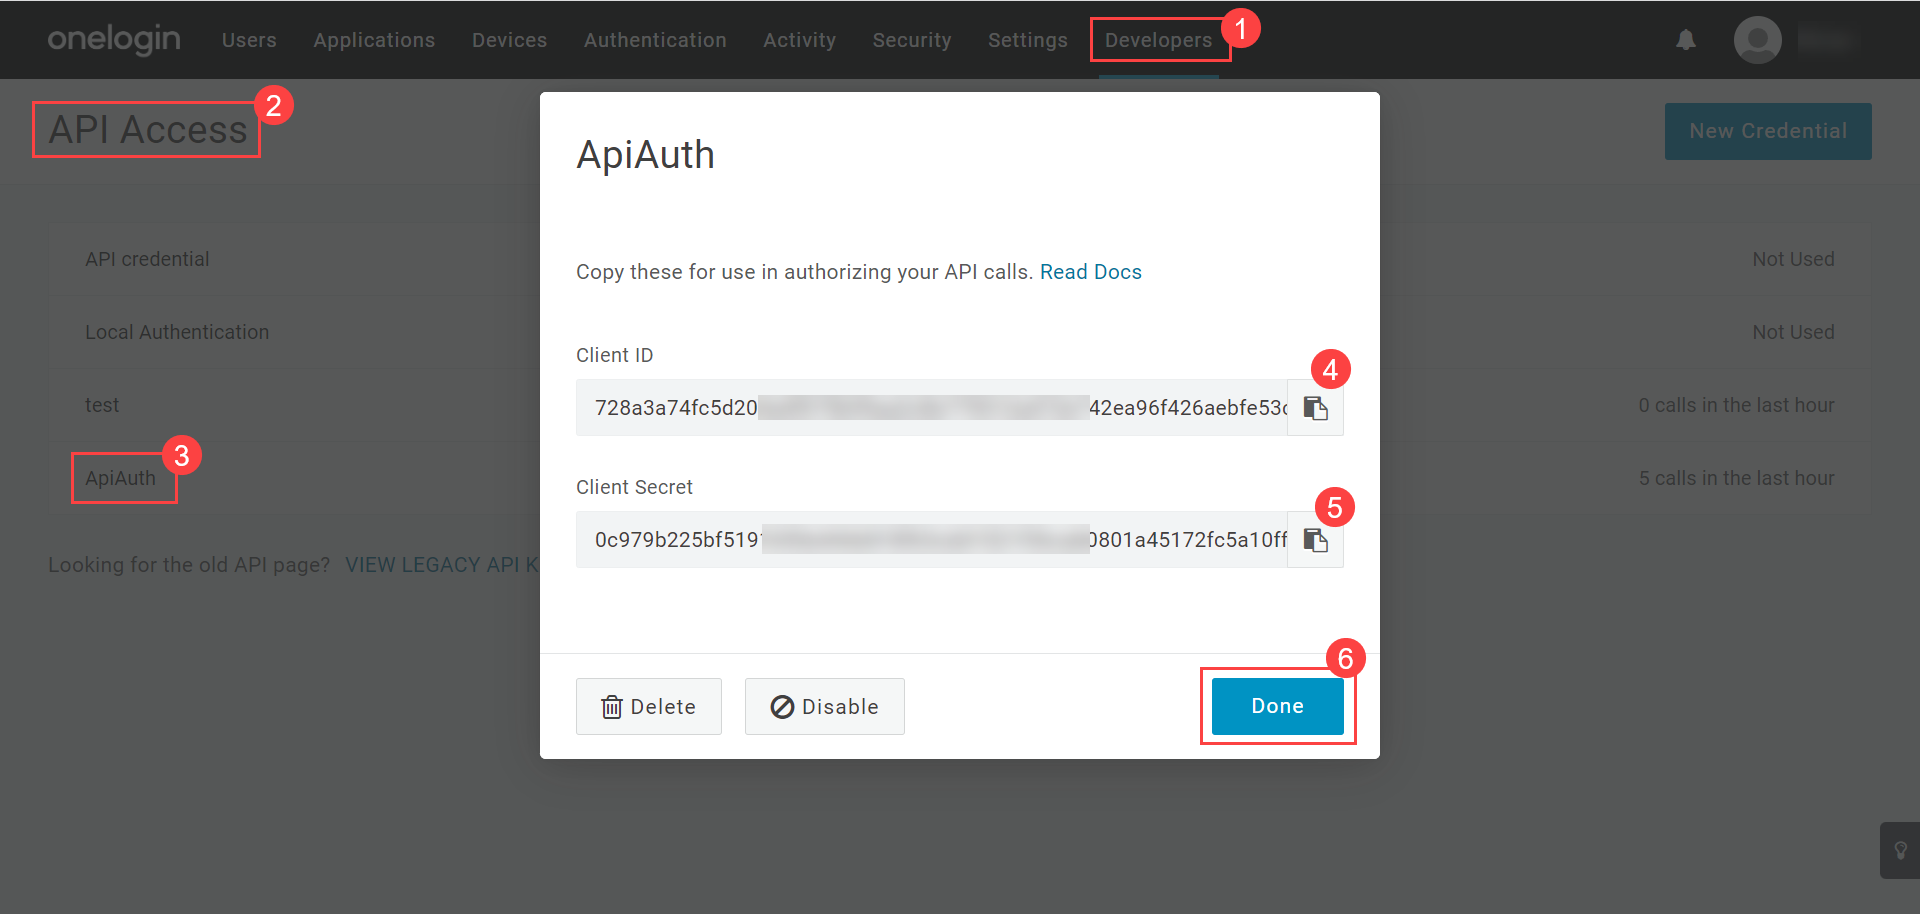
To get the Client ID, Client Secret and Tenant ID details, follow the below steps:
- Sign in to the Microsoft Azure portal.
- In the Azure services section, click Azure Active Directory > App Registration, and select the SSO App created from the Enterprise Application for Identity Providers.

- Once selected, the following overview page appears.
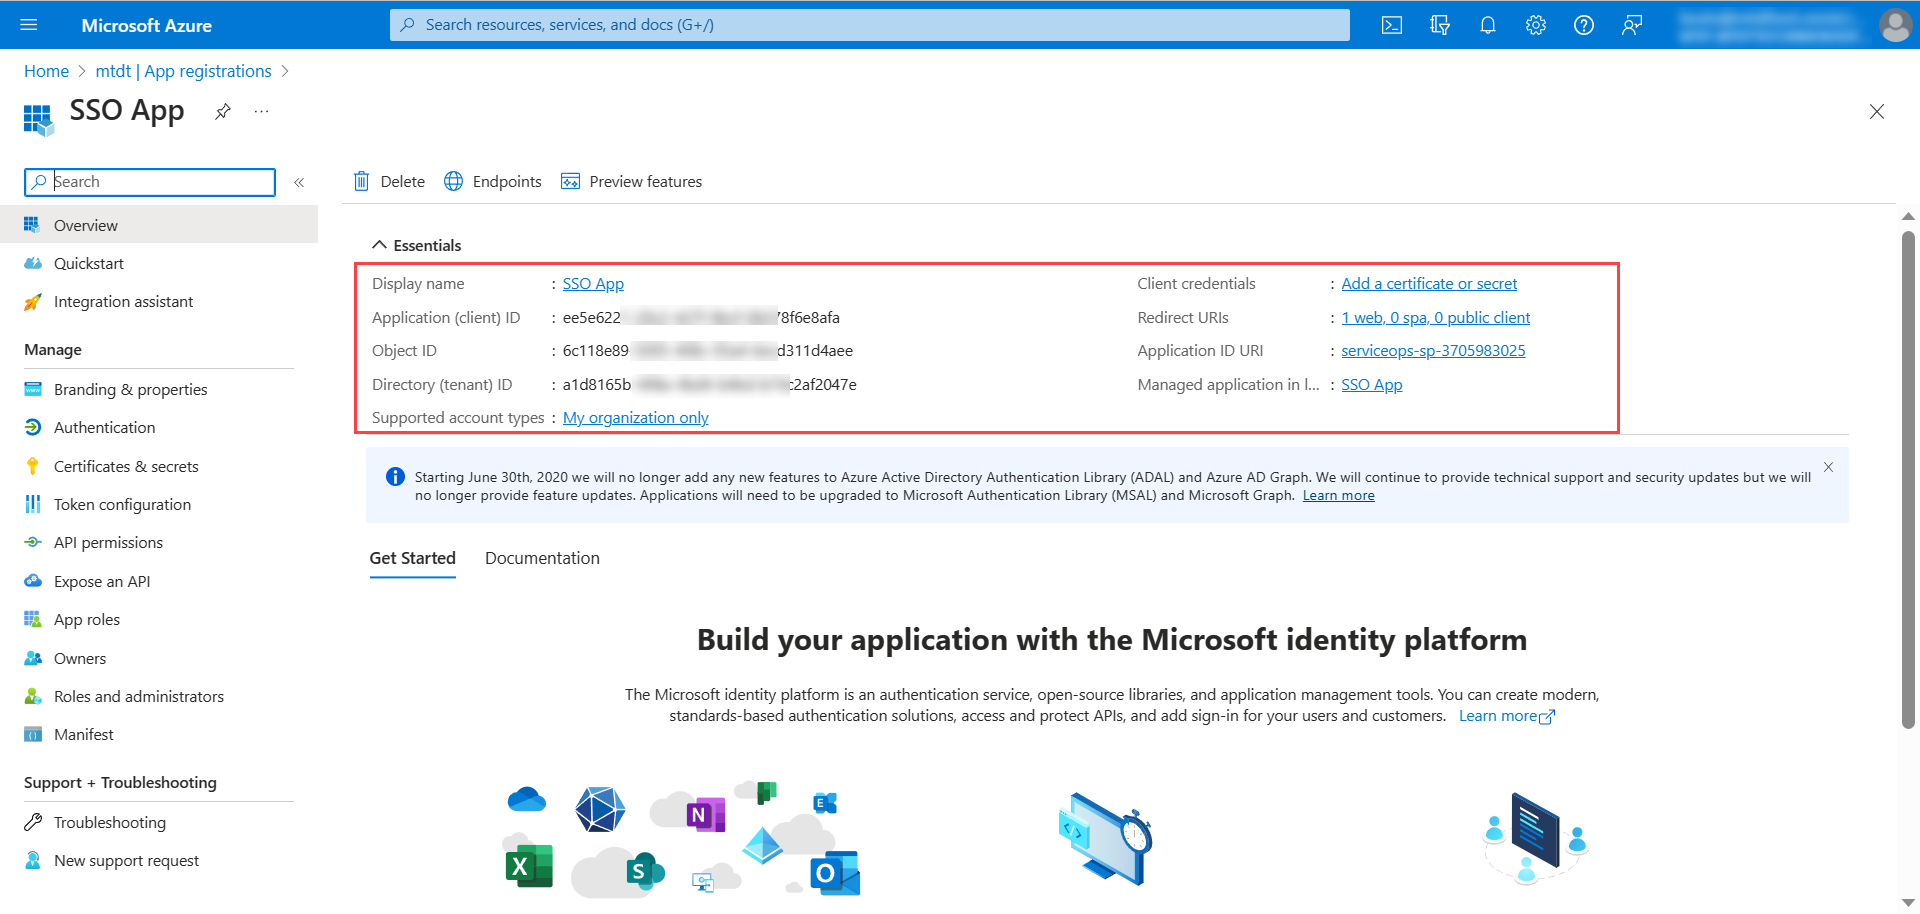
Copy the Client ID and Tenant ID and paste them in ServiceOps.
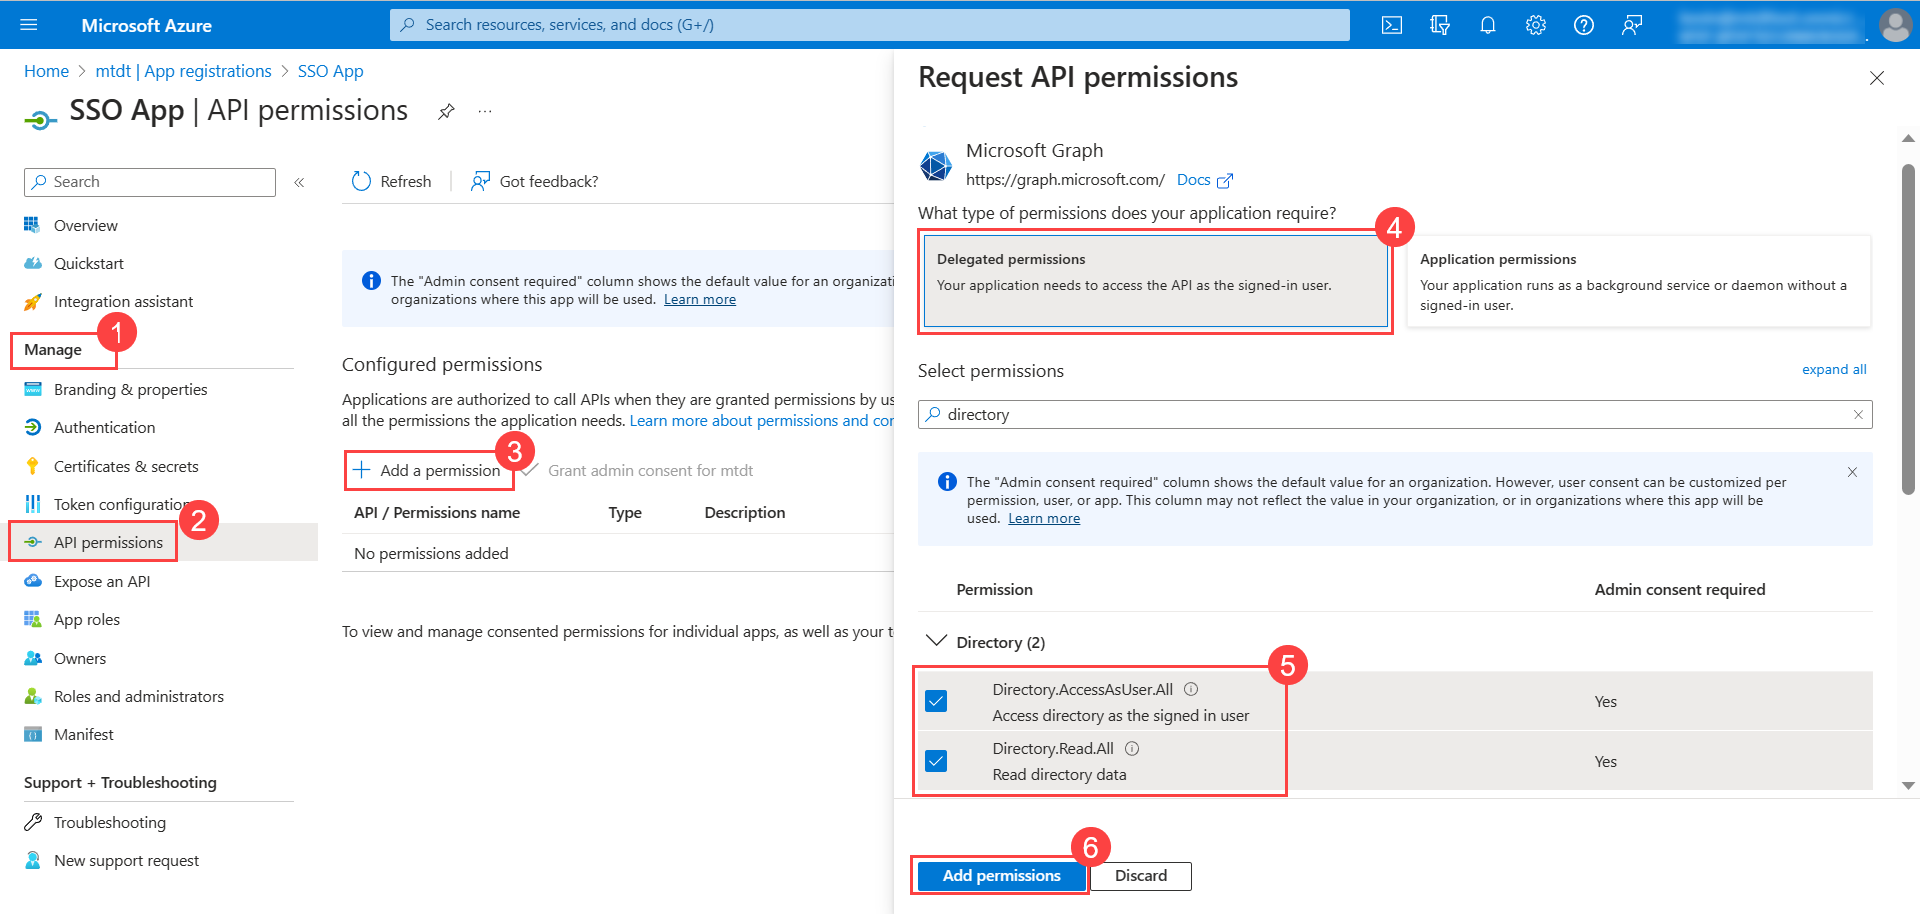
- Next, go to Manage > API Permissions tab, and click Add a permission to add permissions for the application.
- The Request API Permissions popup appears. Click Microsoft Graph.
- In the Delegated Permissions tab, search for Directory, and select the below permissions:
- Directory.AccessAsUser.All
- Directory.Read.All
- Once done, click Add permissions.
Similarly, in the Application permissions tab, select the Directory.Read.All permission as shown below.
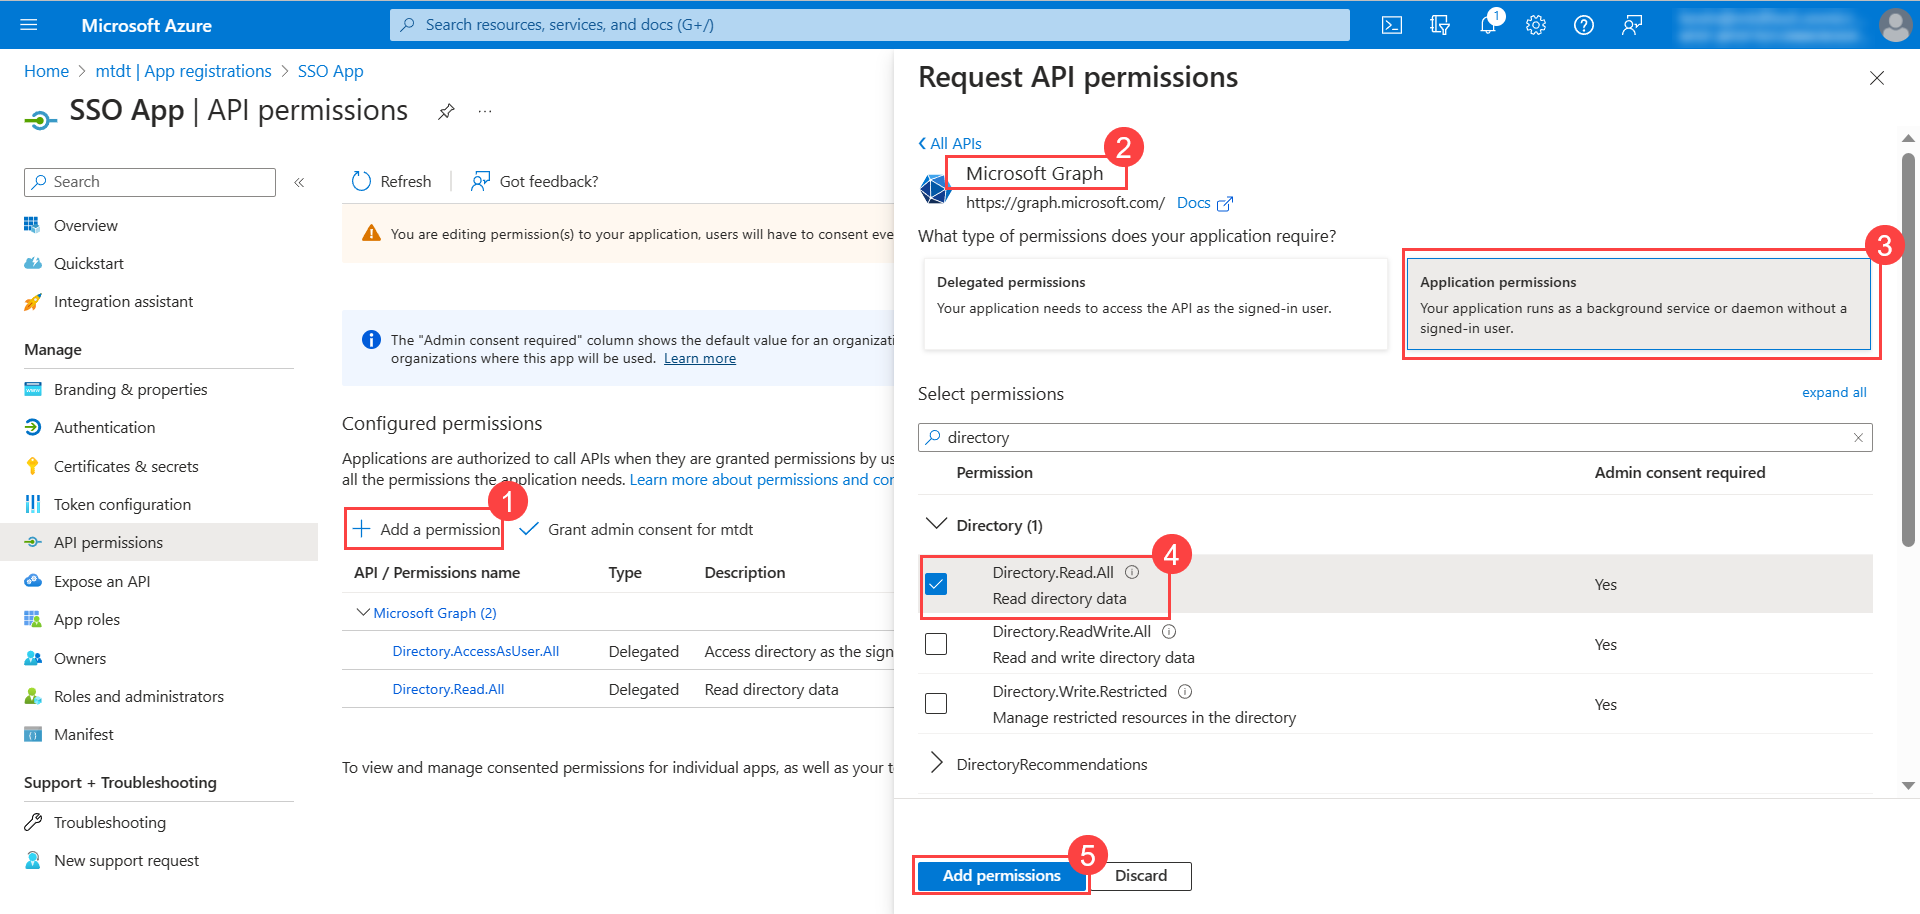
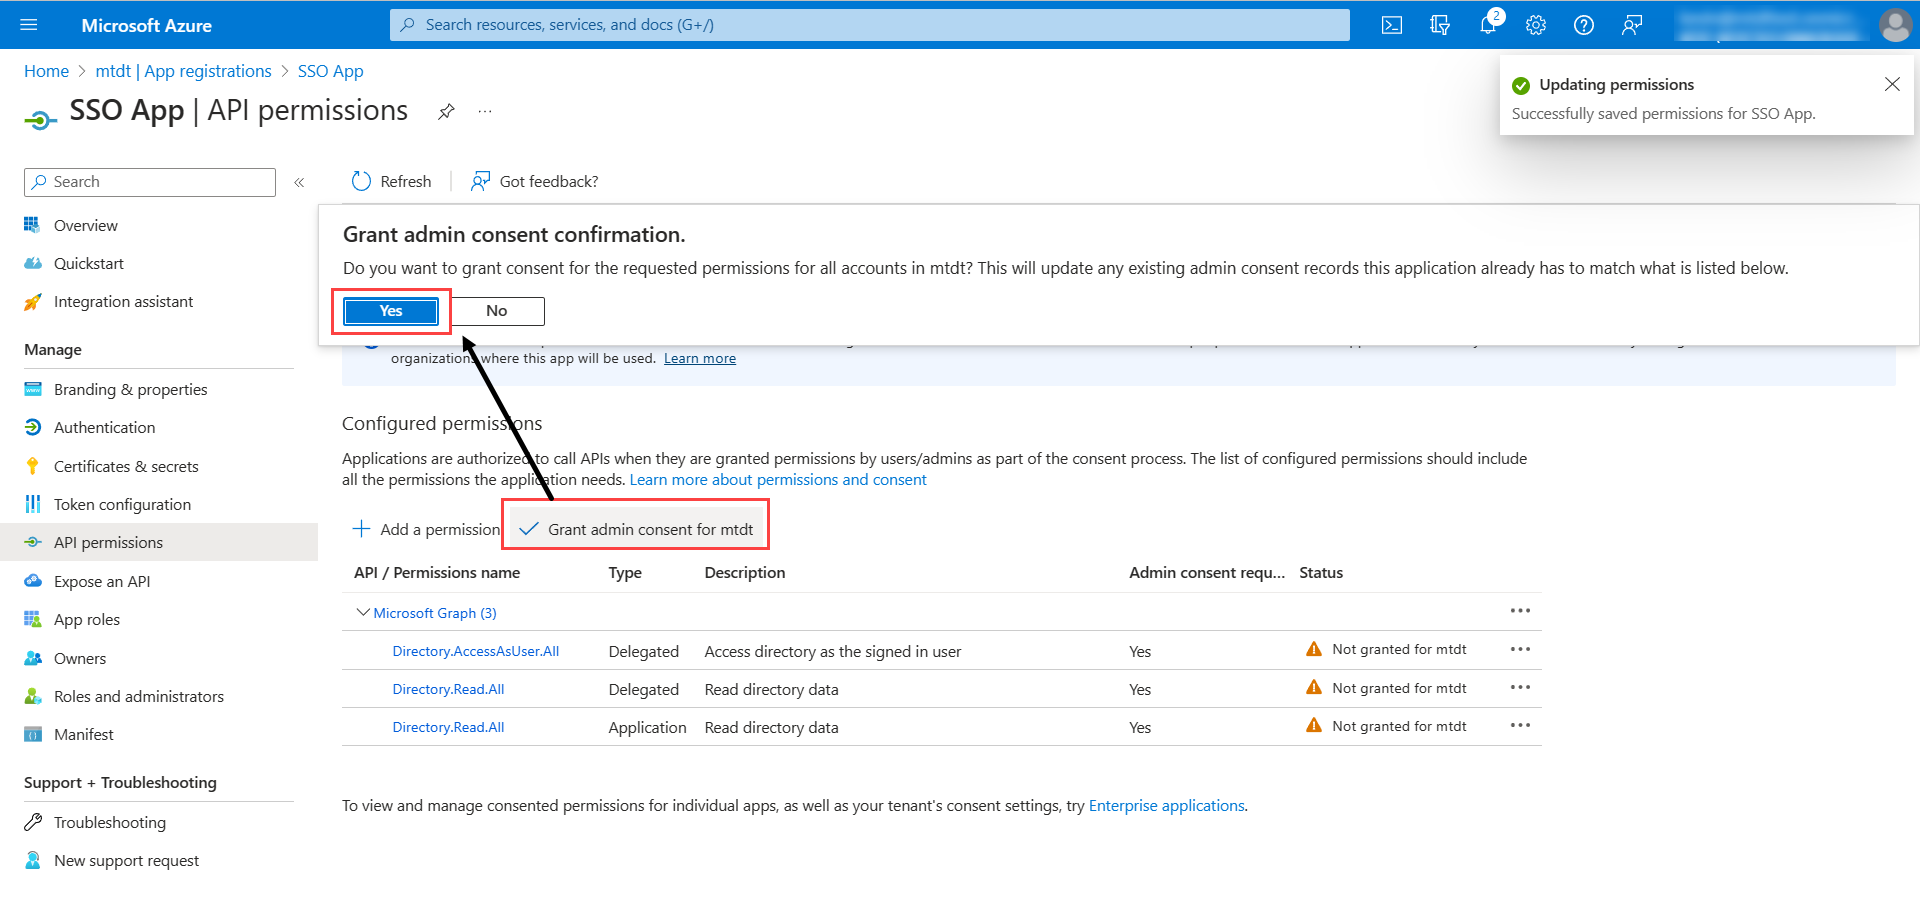
- Click Grant admin consent for mtdt to grant the admin consent for the requested permissions.
- Next, go to Certificates & secrets > Client Secrets tab, and click New client secret. The following popup appears.
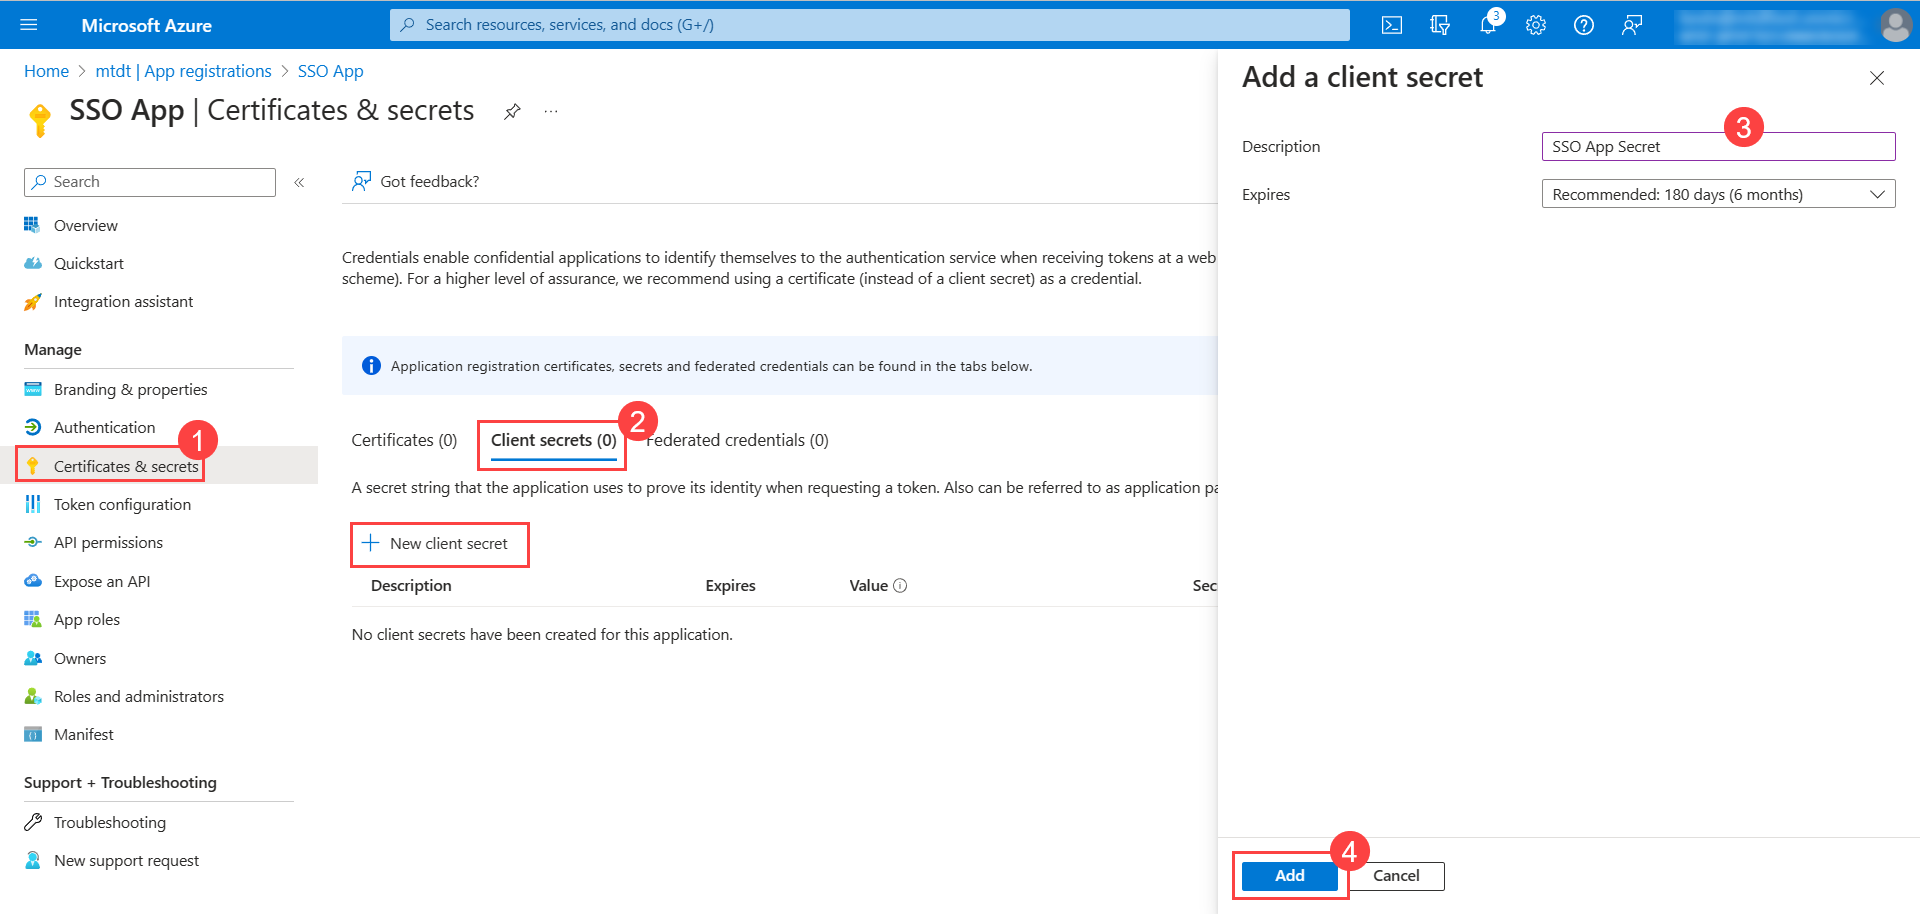
- Enter the description, select the expiry, and click Add. The client secret will appear on the screen. Copy it and use it in ServiceOps.

For Okta
- API Key: Enter the OKTA client’s API Key (API Token). To generate the token,
- In the OKTA client, click the menu icon, and navigate to the Security > API > Tokens tab.

- Click Create Token button, and a popup appears.

- Enter a name for the token and click Create Token. A popup displaying the created token appears as shown below:
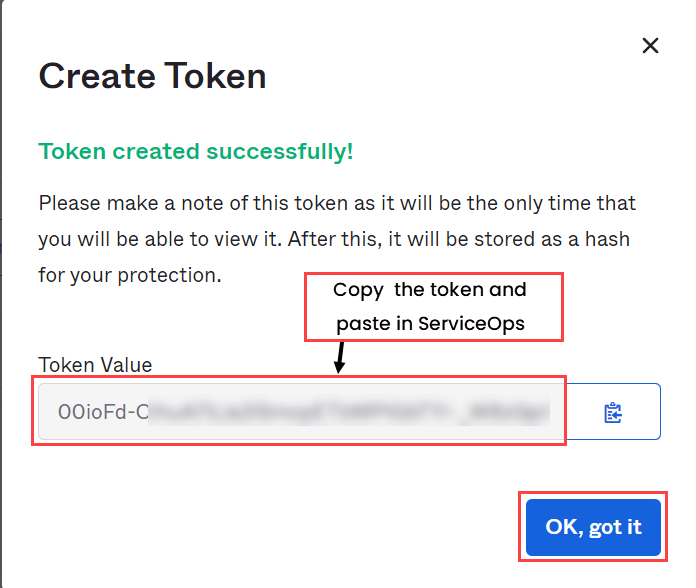
- Copy the token and use it in the API Key field.
- The token appears only once at the time of creation. Hence, it is recommended to save the token locally for future use.
- Tokens are valid for 30 days from creation or last use, so the validity automatically gets refreshed with each API call. Tokens that remain unused for 30 days expire.
- Domain URL: Enter the domain URL of the OKTA client.
- Group Filter: Enter the Group name available in OKTA whose members you want to import.
- Add Notification Email: Add the email address of the users who should be notified about the import.
For One Login
- Client ID: Paste the Client ID copied from the One Login portal.
- Client Secret: Paste the Client Secret copied from the One Login portal.
- Domain URL: Enter the Domain URL of the one login.
- Group Filter: Enter the Group Filter whose users you want to import from the OneLogin.
- Add Notification Email: Add the email address of the users who should be notified about the import.
For Key Cloak
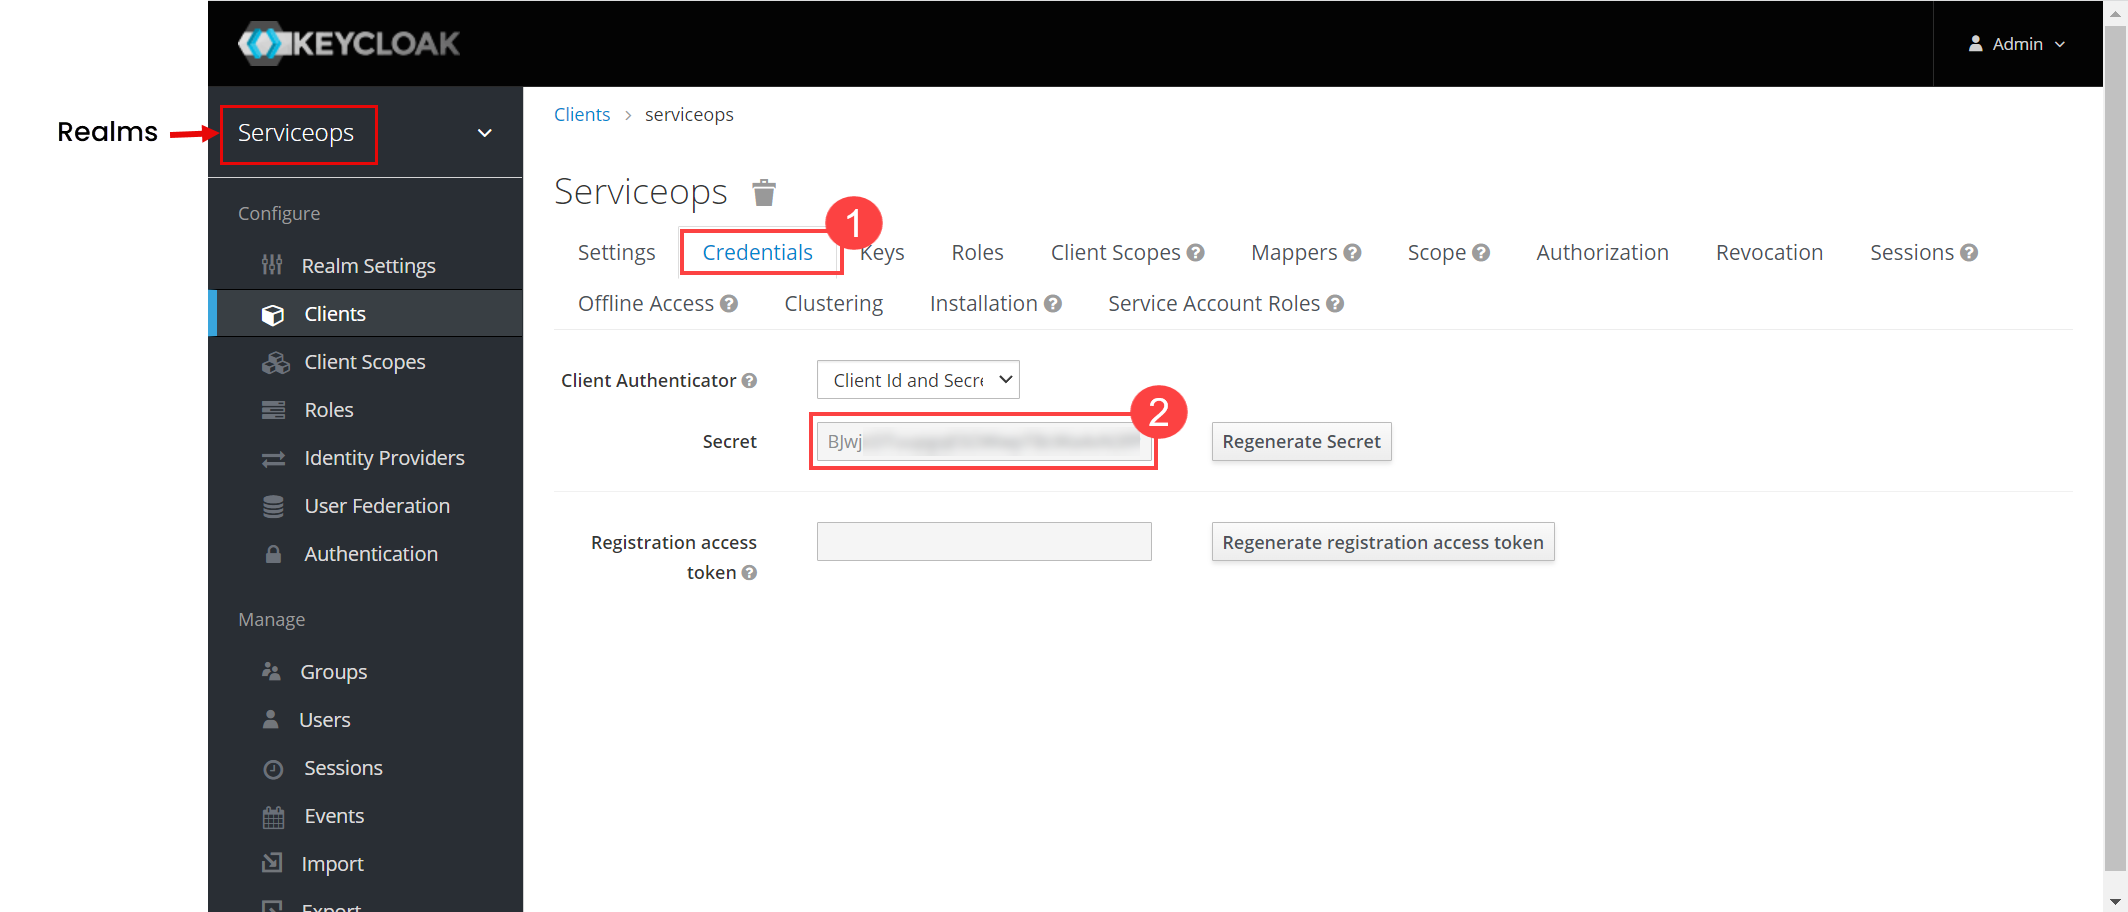
- Client ID: Enter the Client ID. You can get the client id from the Key Cloak, as shown below.
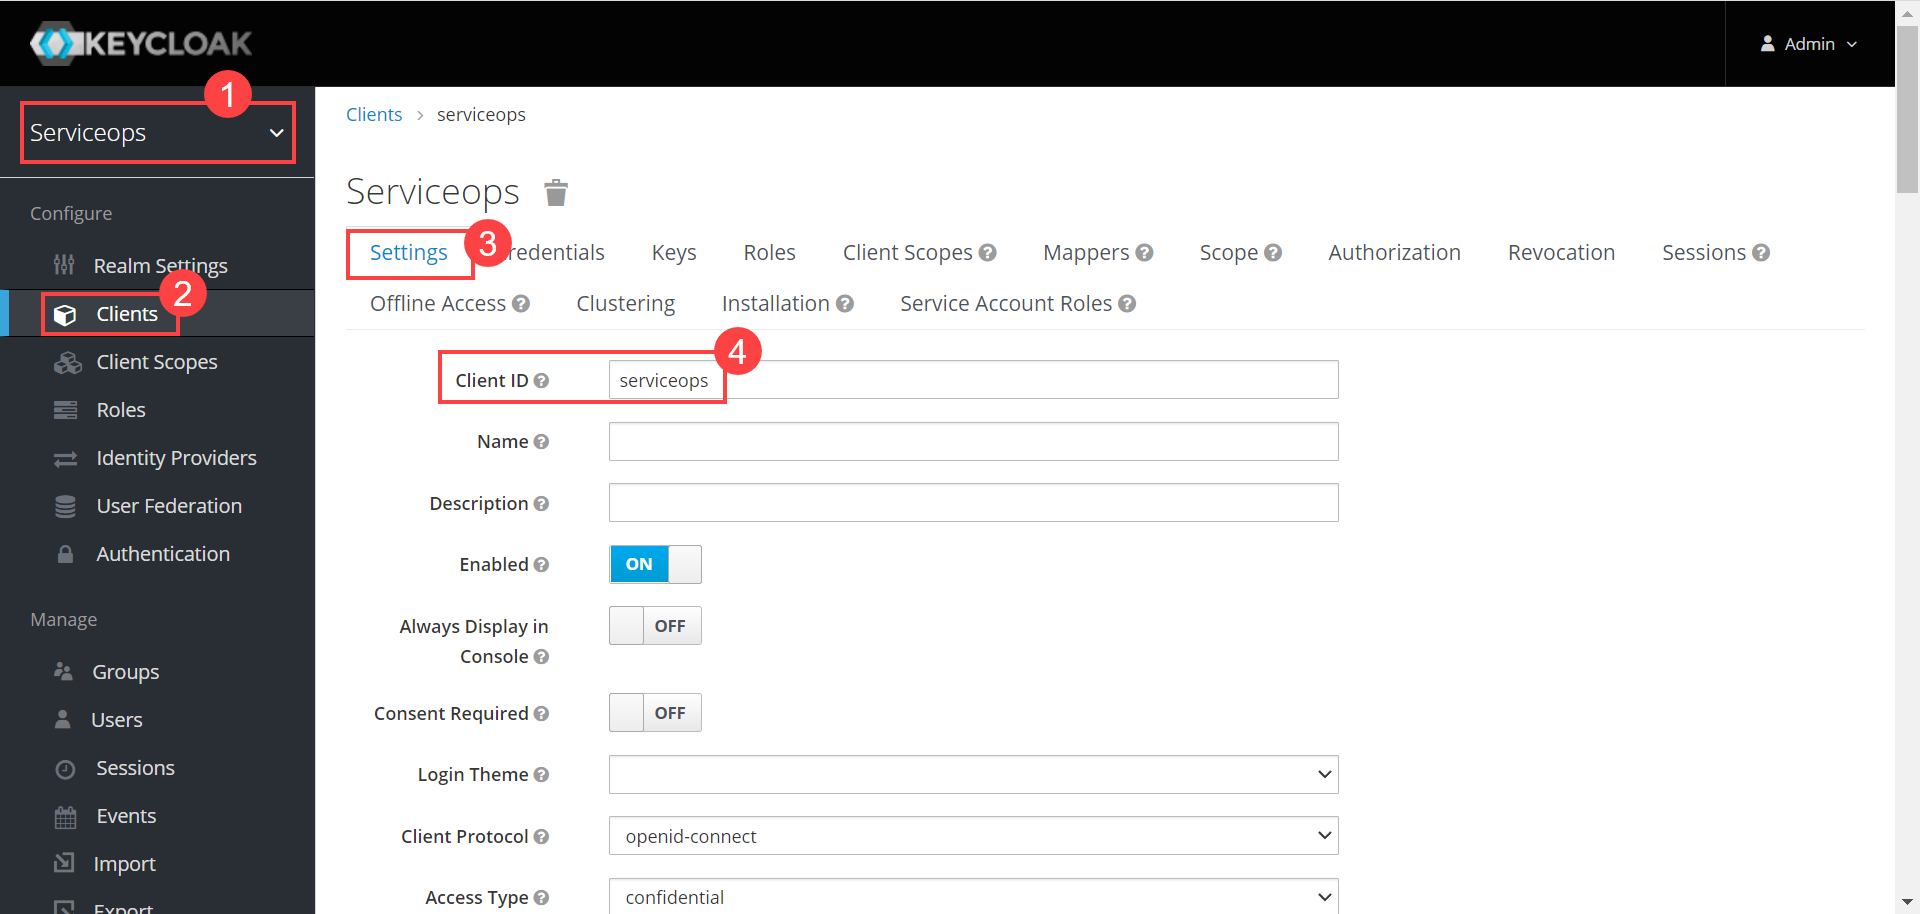
- Client Secret: Enter the Client Secret. You can get these details from Key Cloak, as shown below.
- Domain URL: Enter the domain URL of the Key Cloak client.
- Group Filter: Enter the Group whose users you want to import from the Key Cloak.
- Realms: Enter the realms name created in Key Cloak.
- Add Notification Email: Add the email address of the users who should be notified about the import.
For JumpCloud
- Navigate to Admin > Users > SSO Configuration > User Imports tab and click Add User Import. The following popup appears.
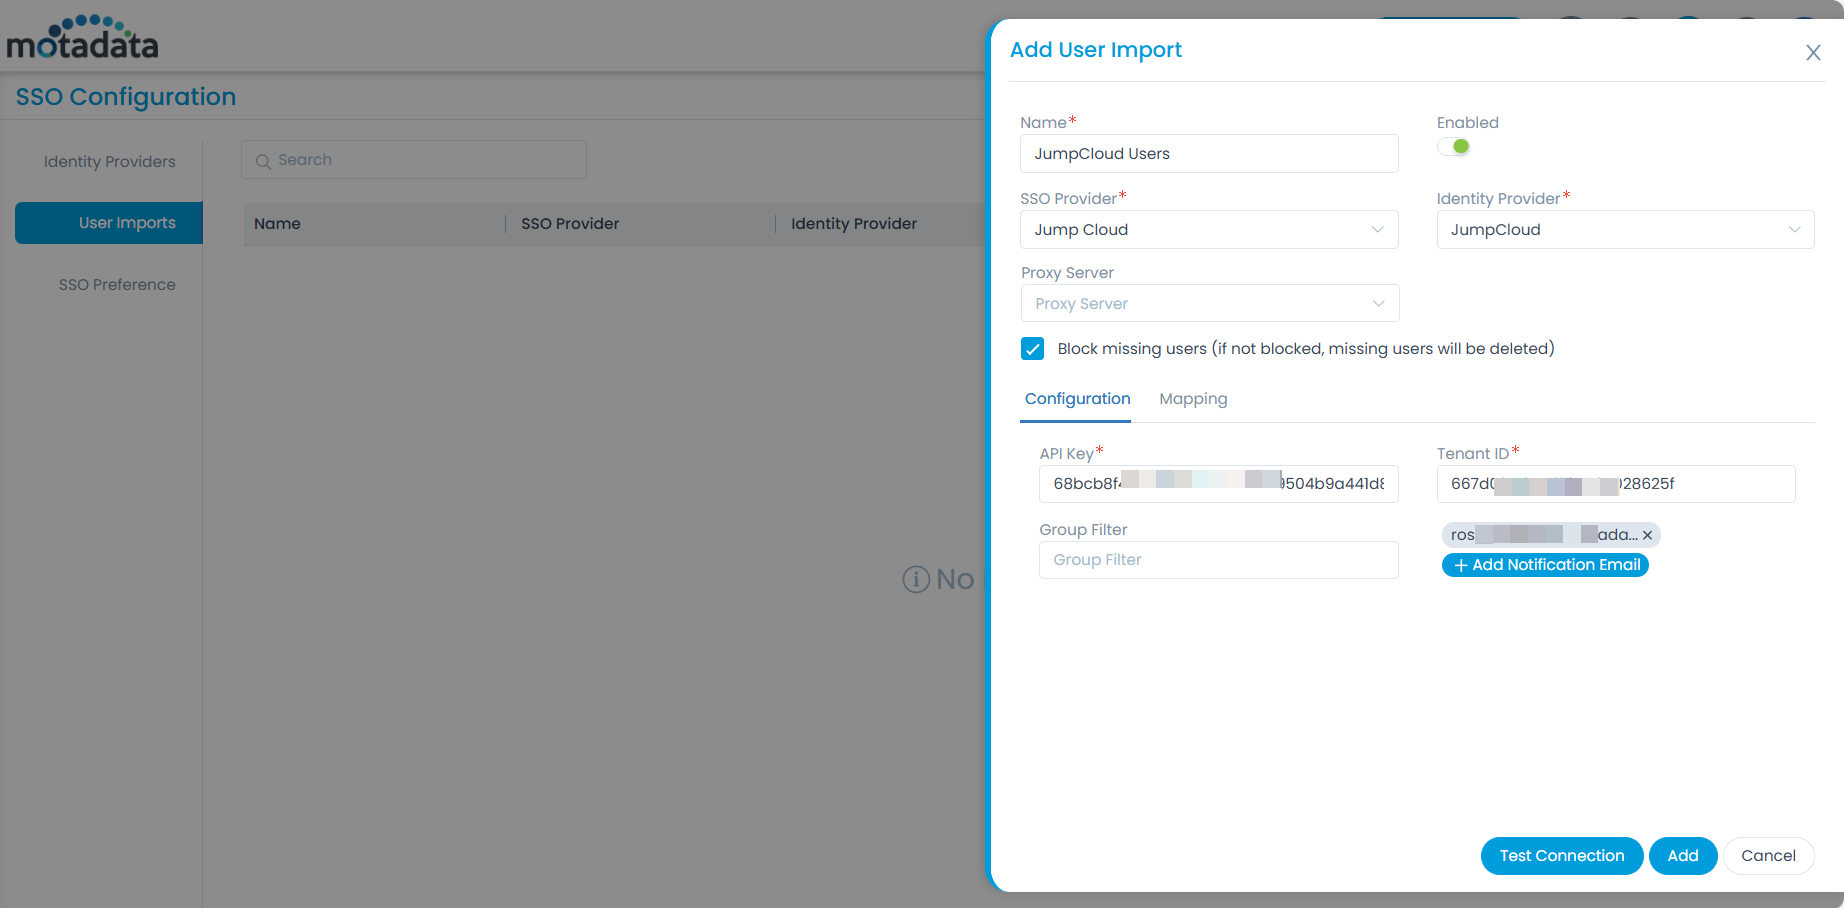
- Enter the below details:
- Name: Enter the name of the user import.
- Enabled: Enable the functionality.
- SSO Provider: Select the provider of SSO functionality.
- Identity Provider: Select the JumpCloud Identity provider whose users you want to import.
- Proxy Server: Select the proxy server to be used.
- In the Configuration tab, configure the details from the JumpCloud portal.
API Key: Copy and paste the API key generated from the JumpCloud portal. To generate the API Key, click the username in the JumpCloud portal on the screen's top-right corner and select the My API Key option.
noteThe API key generated will be valid for 24 hours only. After this period, you will need to generate a new key.
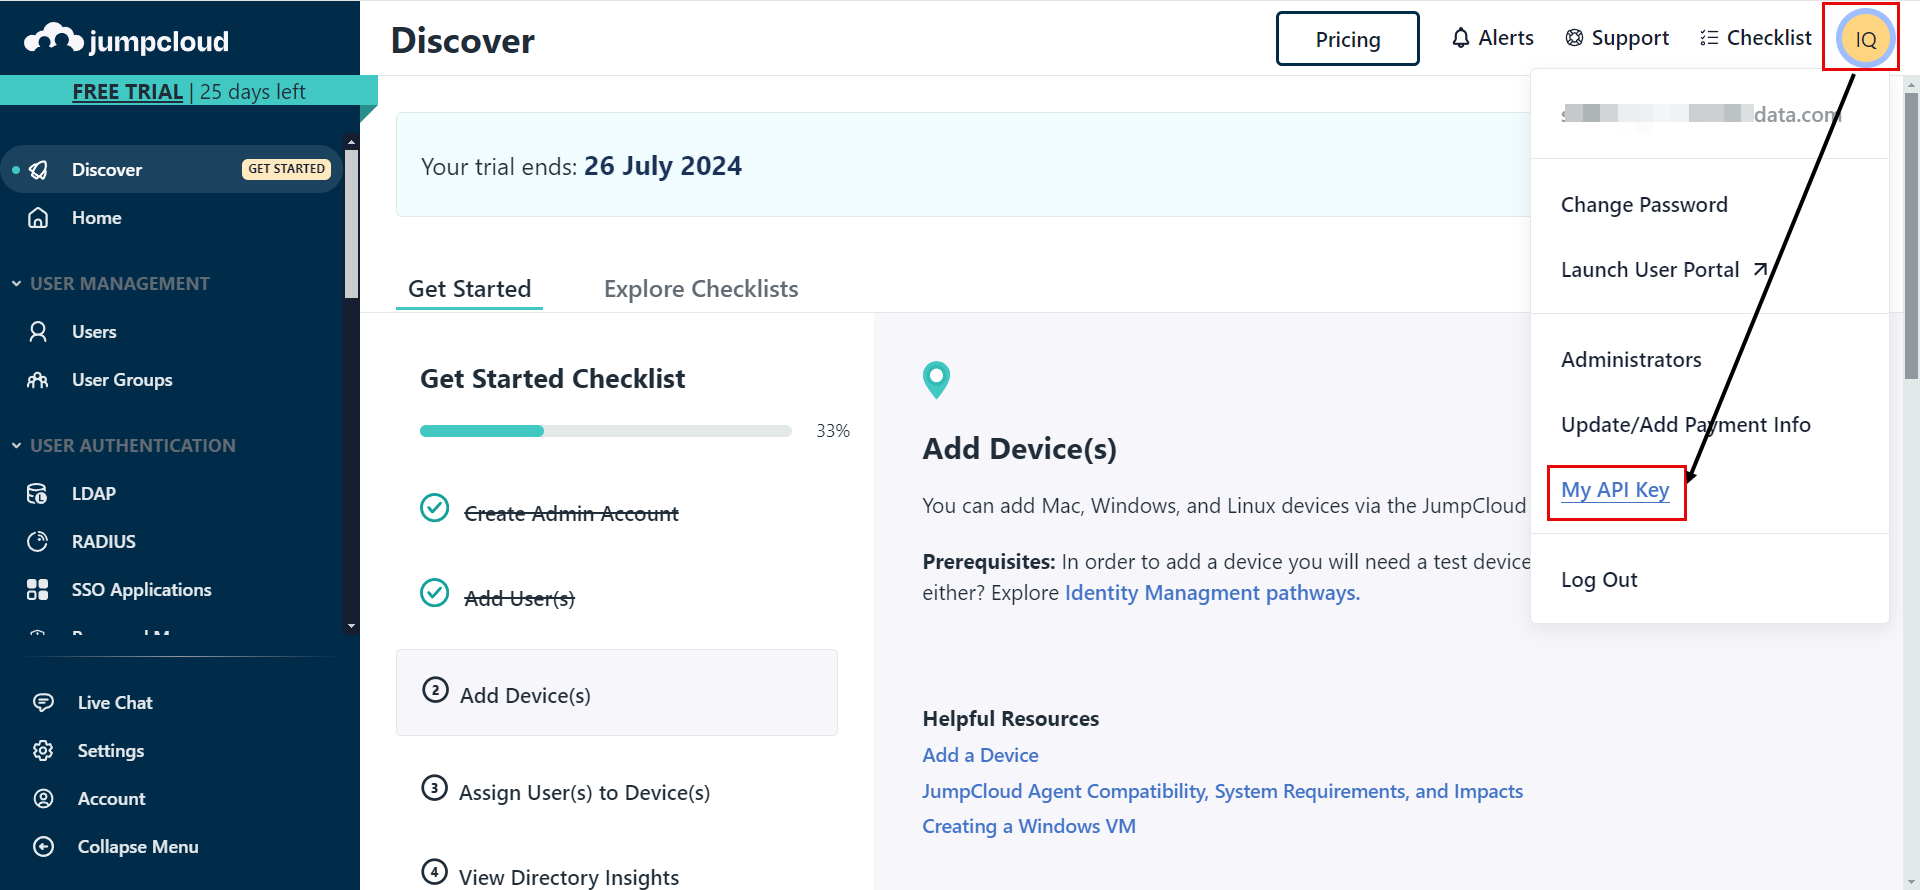
Once selected, click the 'Generate New API Key' button, copy the generated API Key, and paste it into ServiceOps.

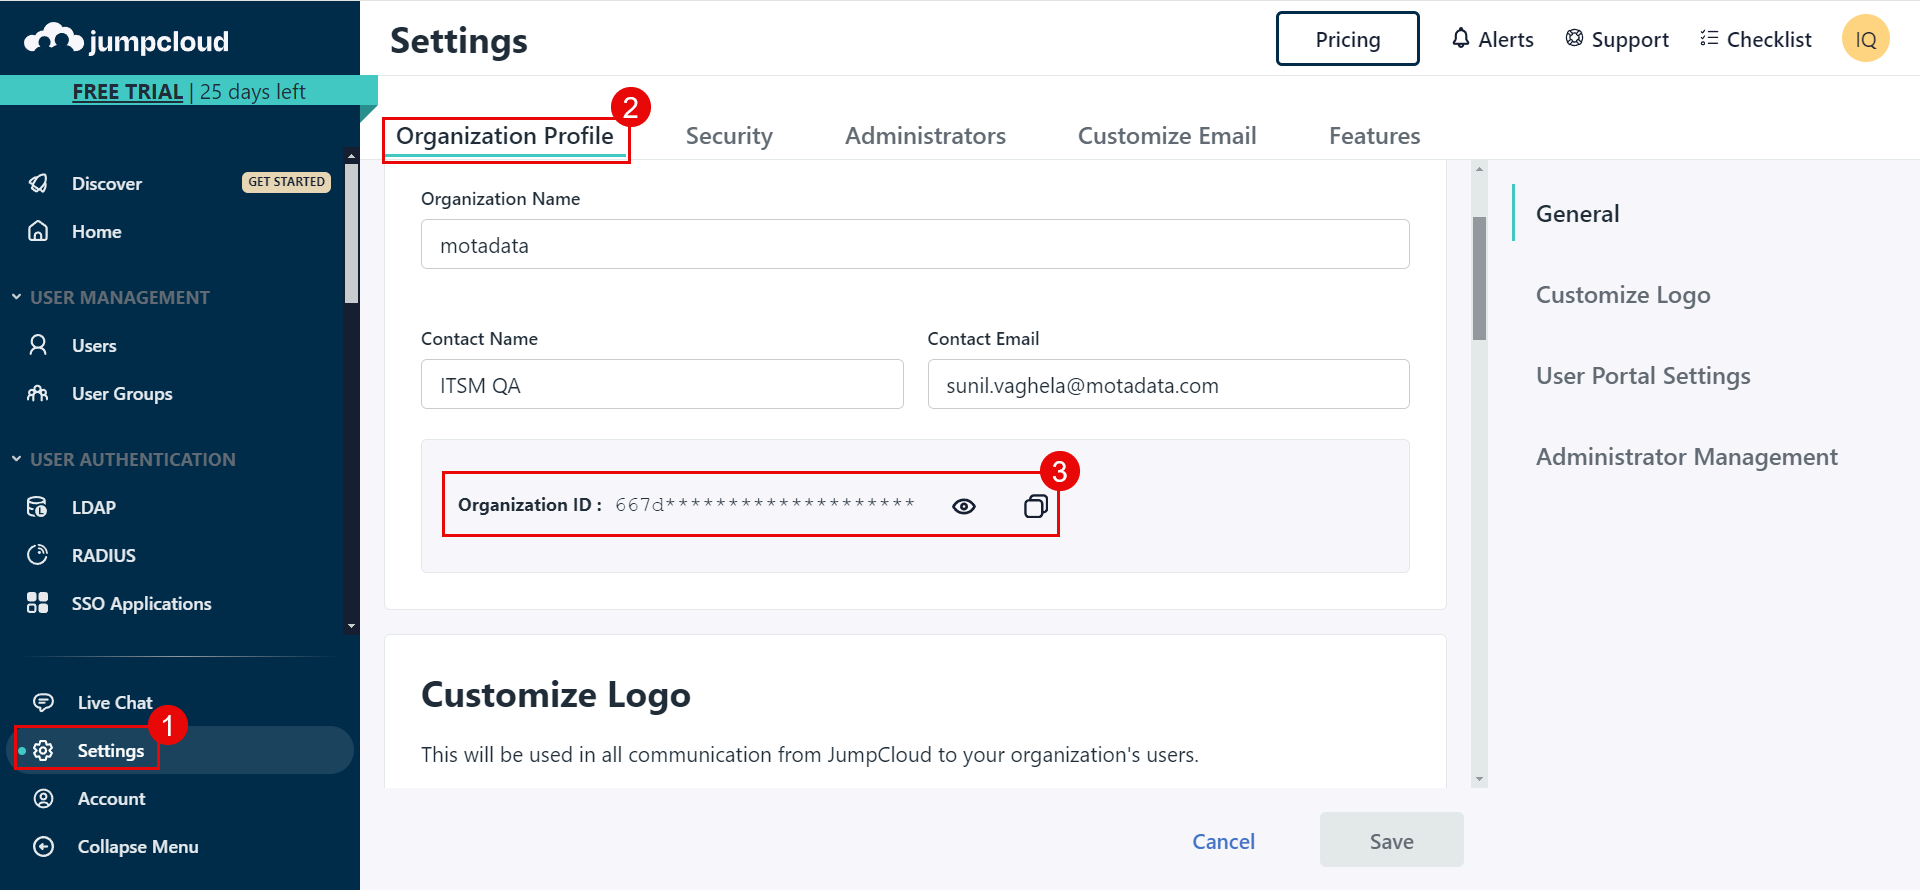
Tenant ID: Copy and paste the Tenant ID (Organization ID) from the JumpCloud portal into ServiceOps. You can get it from Settings > Organization Profile tab.
Group Filter: Enter the username of the user group whose users you want to import in ServiceOps.
Add Notification Email: Add the email address of the users who should be notified about the import.
- In the Mapping tab, map the fields that you want to import as shown below:

- In case of Key Cloak, it provides limited user details. Hence, to map additional fields, you need to create custom fields in Key Cloak. To do so, select the required realm, and navigate to Users > User (Rosy) > Attributes tab. In this case, Realm is Serviceops.

Enter the Key name and value in the table, and click Add. You can now use this field to map by adding the prefix “attributes.” to the key name.
- In case of JumpCloud you can map up to five attributes, separated by commas, in the Email and Username fields. The system checks each attribute sequentially; if one value is blank, it moves to the next. The priority is determined by the order in which attributes are added.
Once all the details are filled, you can check the connectivity by clicking the Test Connection button.
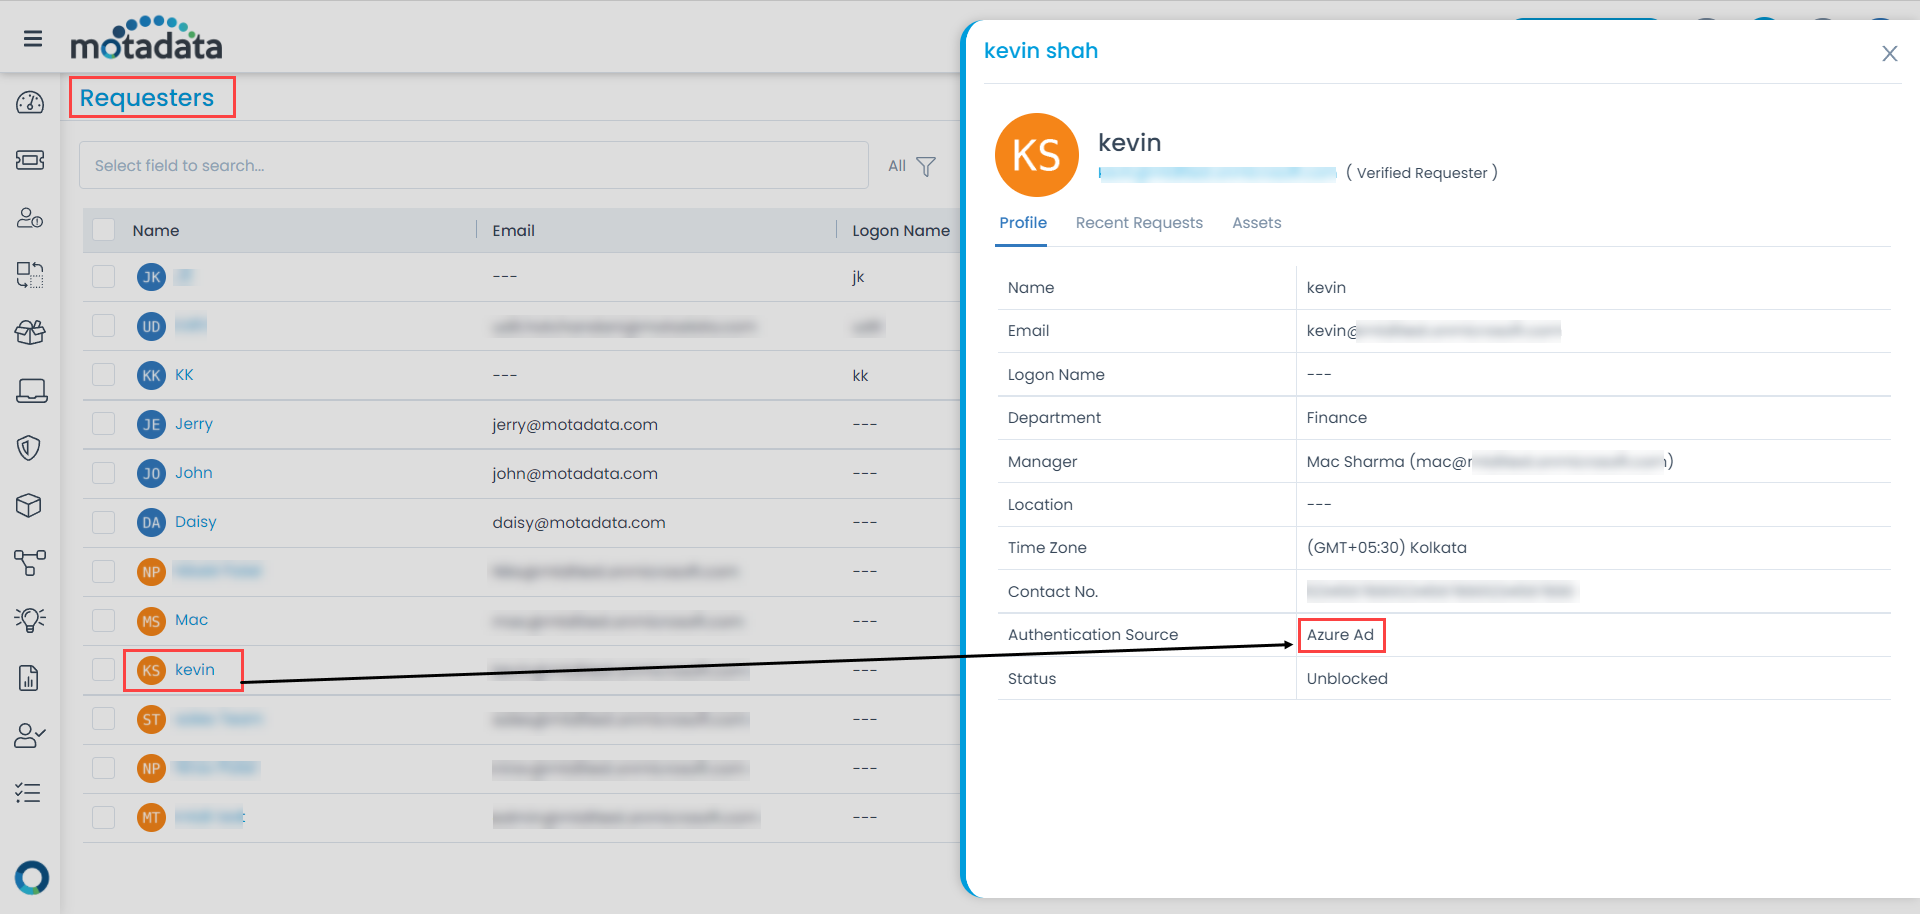
Once the connection is successful, click Add, and the imported users will get added as requesters in the ServiceOps as shown below:
Show History
Once the users are imported, you can view its history by clicking the Show History icon in the Actions column next to the created import. It displays the details like SSO Provider, Created Date, Total Fetched Users, Total Created Users, Total Failed Users, Total Blocked/Deleted Users, Total Unblocked Users, and Total Updated Users.

Additionally, you can view the list of users created, failed, blocked, and unblocked by clicking on the count link as shown below.

Also, you can export the list of users in CSV and Excel Format. Moreover, the excel file can be password-protected.
Import Users
Click the Import Users icon in the Actions column to import the users from the desired server to ServiceOps. Once clicked, the imported users get added as requesters in the ServiceOps as shown below.
Create Schedule
Scheduling allows you to periodically import employee details from the server. This feature helps you to keep the Requesters list up to date.
To create a schedule,
- From the list page, click the Scheduler icon in the Actions column. A popup appears.

- Enable the scheduler.
- Select the Schedule Type. The options are:
- Once: If selected the schedule will run only once as per the start date selected in the Start At field.
- Daily: If selected the schedule will run daily as per the Start At and Time selected. The Start At field depicts the date and time when the schedule should start.
- Weekly: If selected the schedule will run weekly as per the Start At, Day, and Time selected. The Start At field depicts the date when the schedule should start. Day depicts the day on which the schedule should run.
- Monthly: If selected the schedule will run once in a month as per the Start At, Date, Time, and Month(s) selected. The Start At field depicts the date when the schedule should start. Date is the date of the month on which the schedule should run.
- Once done, click Update to save the schedule.