Agent
This page enables you to perform disocvery and agent related operations. It has the following tabs:
- Agent Installation
- Agent Build
- Agent Installation History
- Discovery Agent
- RDP Agent
- Mobile Agents
- Discovery Poller
- Agent Credential Profile
Agent Installation
Motadata ServiceOps provides you with multiple options to install an agent. They are:
- From the ServiceOps portal
- Using GPO
- Using Utility
- Local Installation
This tab allows you to install an agent in multiple machines that fall in the configured network, using the discovery or poller service.
Agent Installation via Poller
Before you install or uninstall the agent using poller, check the following:
- Poller is registered with the main server. You can check this from Admin > Asset Management > Asset Discovery > Discovery Poller.
- Ensure that the required build file is uploaded in the Admin > Asset Management > Asset Discovery > Agent Build.
To create an agent scan, click Create Agent Installation, and a popup appears.


Enter the below details:
- Name: Enter the name of the network scan.
- Fetch from Domain: Enable to discover the agents from the domain. If enabled, enter the domain details. For more details, refer to the link Domain Scan. If disabled enter the below details.
The poller service will execute for all the computers that fall within the configured domain network. Hence, you cannot select specific Computers of the network.
Poller: Select the poller for which you want to create the scan. This can be set at the time of configuration only.
Agent Type: Select the type of agent. The options are:
Discovery
RDP
Discovery with RDP
If Discovery is selected, select the Communication Type.
Agent Credential Profile: Select the credential profile to create the scan.
Communication Type: Select the type of agent-server communication using which the assets should be discovered. The options are:
Direct Communication: Select when the agent is installed in a network where the server is directly reachable.
Poller Communication: Select when the agent is installed in a network where the server is not directly reachable. If selected enter the Poller URL.
Syntax: protocol://ip-address:port-number
Example: http://10.20.40.131:8080
noteThe port number should be accessible from both the target and the server side machines.
For HTTP protocol, enter the IP address of the machine in which the poller agent is installed.
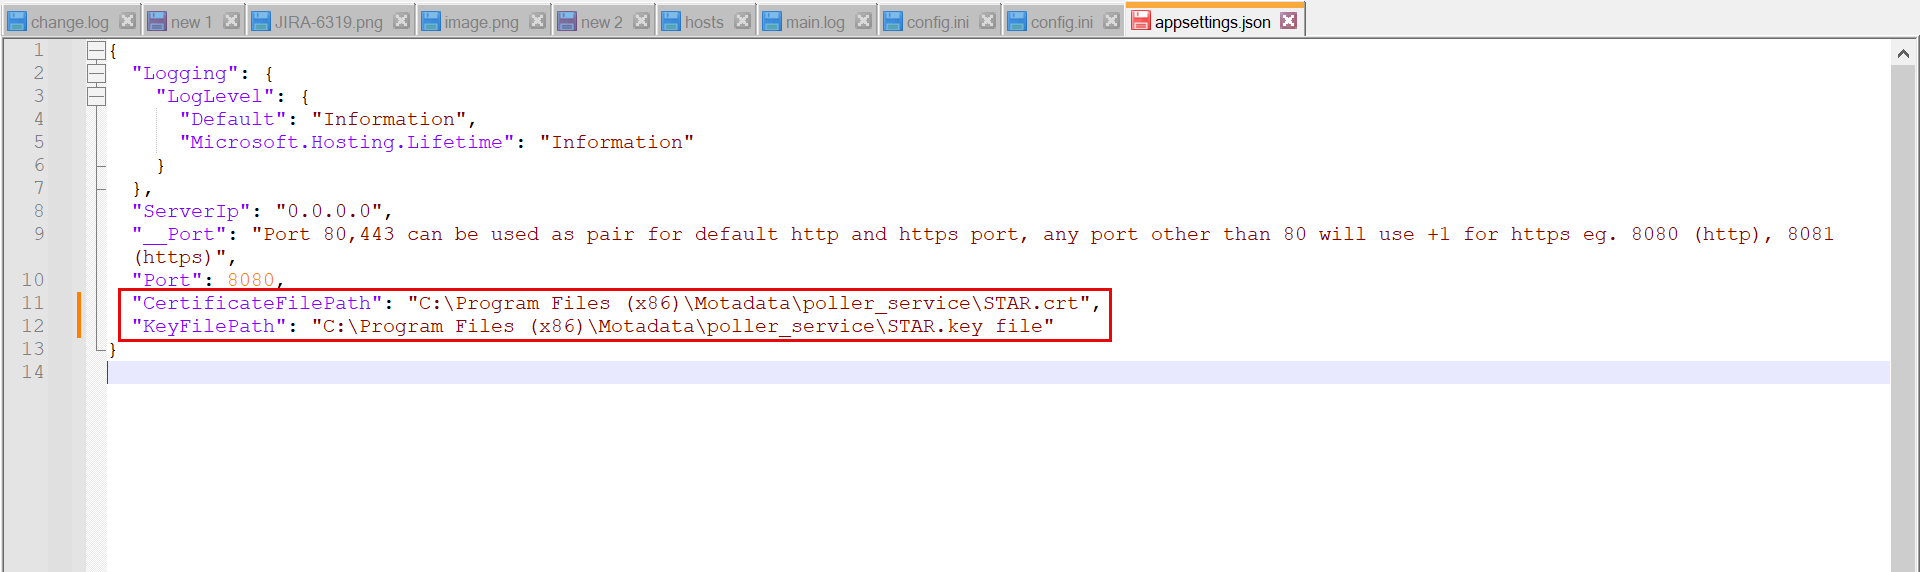
For HTTPS protocol, add the host entry in the "C:\Windows\System32\drivers\etc" path on all machines where the agent needs to be installed, including the poller machine. Additionally, add the SSL certificate and key in the poller agent.

Once done, navigate to the "C:\Program Files (x86)\Motadata\poller_service" location, and open the appsettings.json file as shown below.
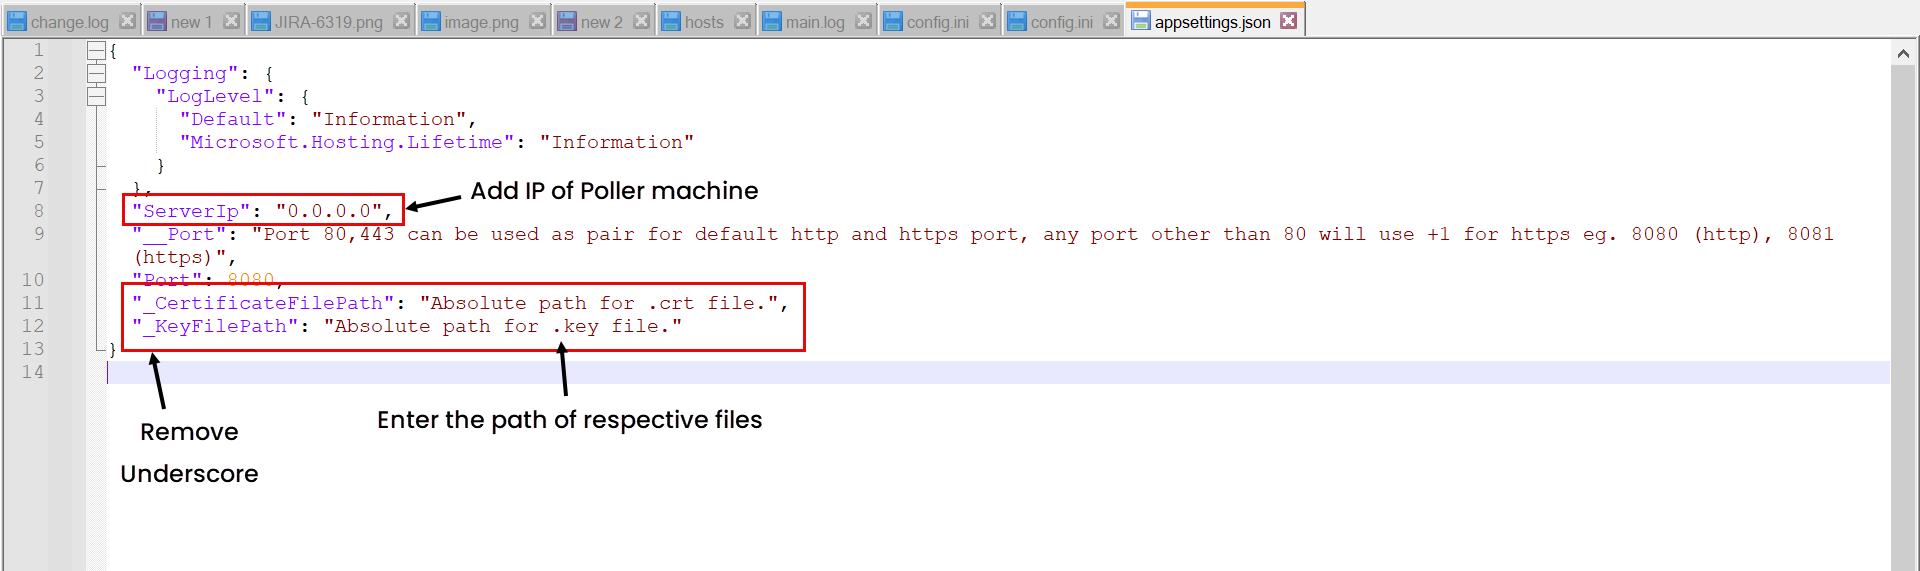
Now, remove the underscore from CertificateFilePath and KeyFilePath parameters and replace their values with the location of both the files as shown below.
Next, restart the poller service or wait for next scan cycle.
Scan Type: Select the type of IP Range. The options are:
- Entire Network: All the IPs in the whole network will be scanned for the discovery. If selected, enter the IP Range Start.
- Specific IP Range: Select if assets from a specific IP Range is to be scanned. If selected, enter the IP Range Start and IP Range End for discovery. Also, you can enter certain IP addresses to skip the scan in the Exclude IPs field. If required, you can import a list of IP Addresses to exclude from scanning using the Import Exclude IPs link.
- Specific set of IPs: Select if you want to scan only specific IP Addresses for asset discovery. If selected, enter the IP Addresses. You can also import the IP Addresses in bulk using the Import IP Addresses link.
Description: Enter the description about the agent network scan.
Credentials: Select the credentials to be used from the dropdown. You can also create new credentials using the Adding Credential link.
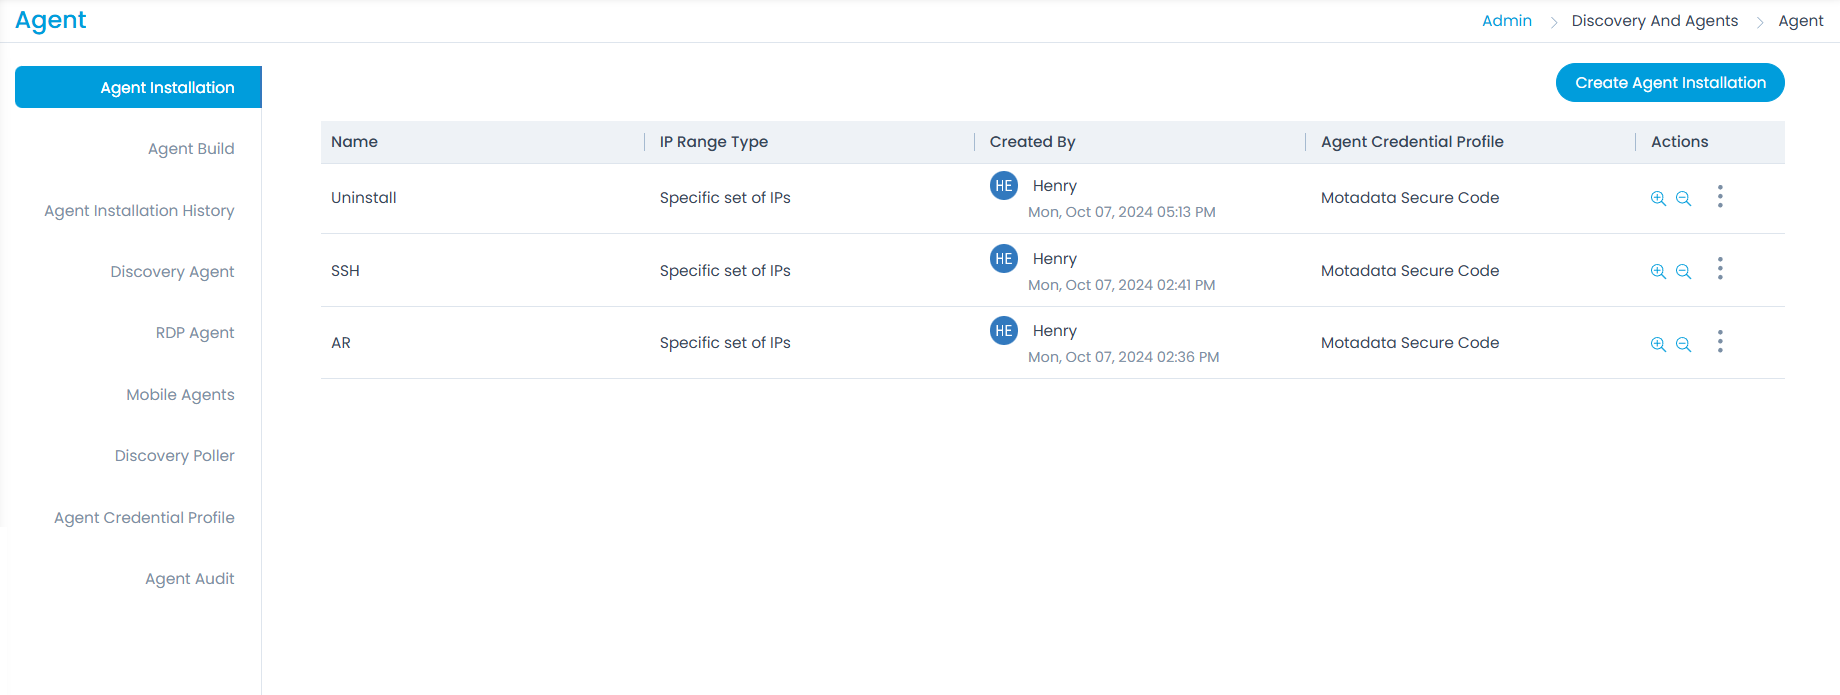
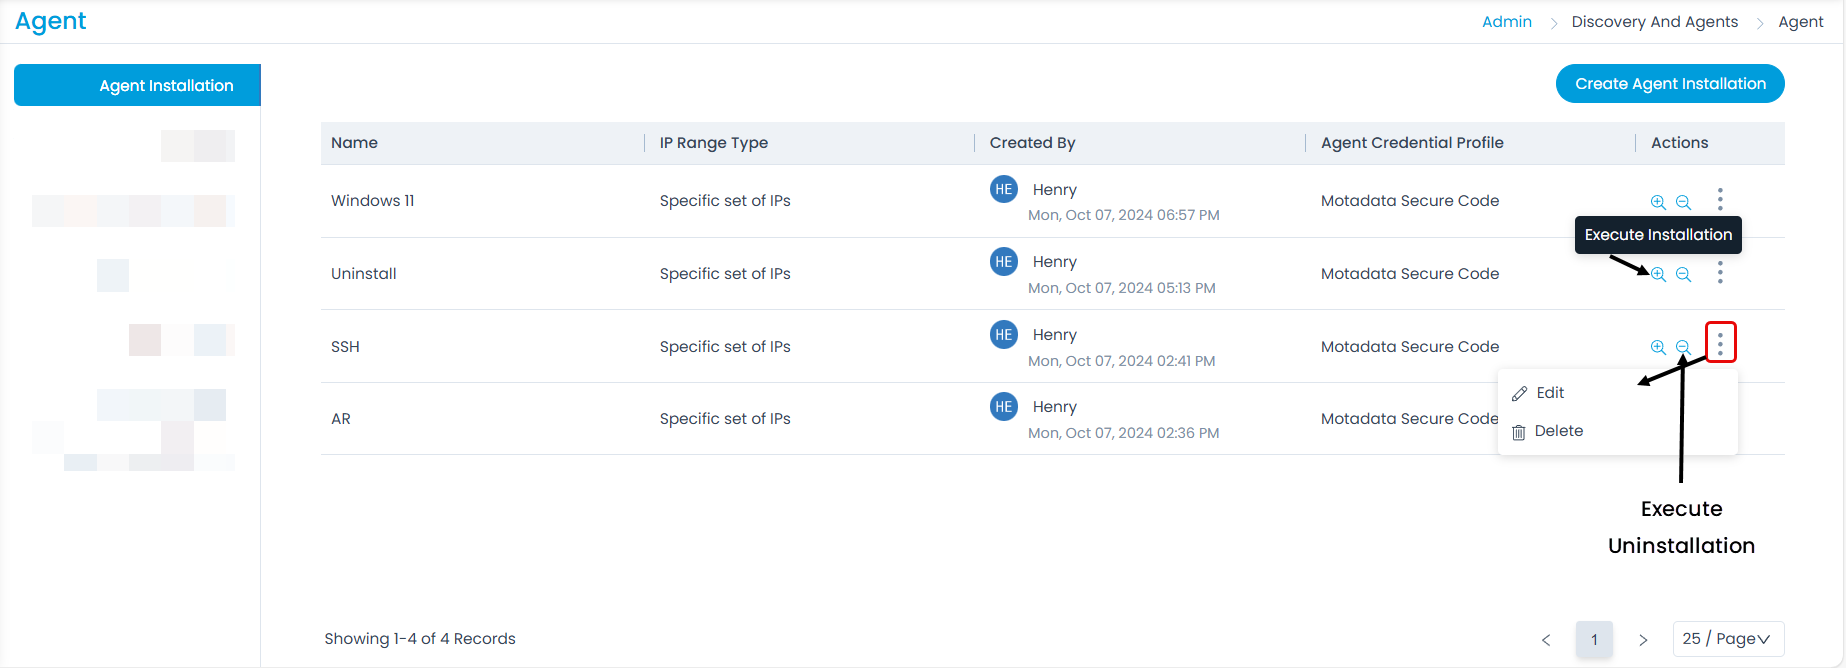
Once all the details are filled, click Save. The created network will appear on the list page. Now, you can do the following:
- Execute Installation: You can install the agent in machines based on the configured domain or network.
- Execute Uninstallation: You can uninstall the agent from machines based on the configured domain or network.
- Edit: You can edit the scan.
- Delete: You can delete the scan if not required.
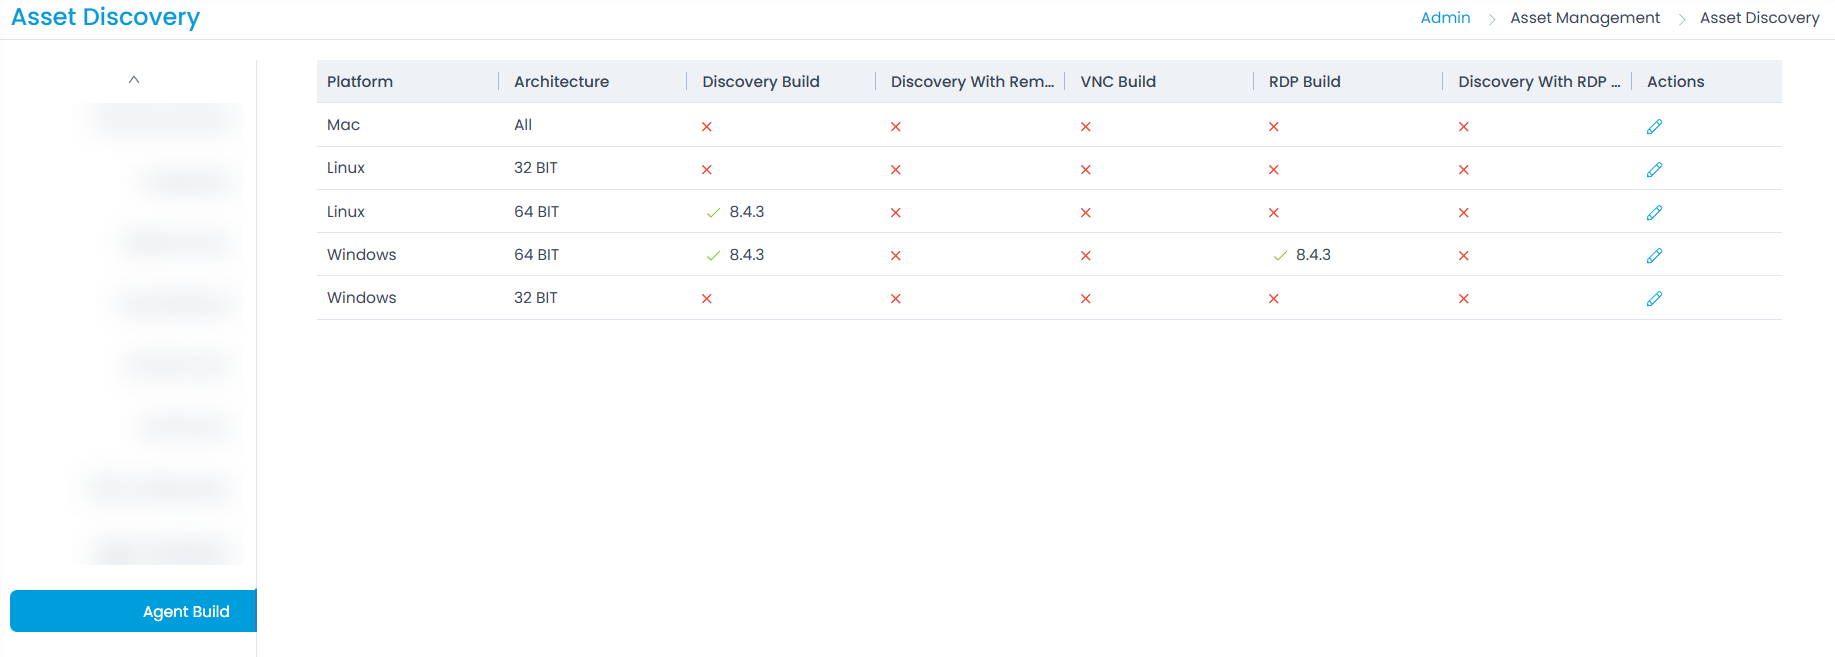
Agent Build
It displays the list of various platforms with their architecture. Here, you can upload the agent and perform zero-touch Agent package installation in the remote machine. This list shows the various agent builds with their updated status.
Prerequisites at Main Server
- python3-pip should be installed
- python3 -m pip impacket should be installed
- apt install msitools
- python3 -m pip install smbprotocol
- python3 -m pip install pyreadline
- You can also install the above prerequisites using a script.
- Check whether impacket is available in the Main Server. You can verify the packet from this location “/opt/flotomate/main-server/config/”.
- Windows discovery and RDP agent auto upgrade is supported from v8.4.504 onwards.
- Linux and Mac agent auto upgrade is supported from v8.4.3 onwards.
Here, you can edit, and upload the builds using the Edit Icon.
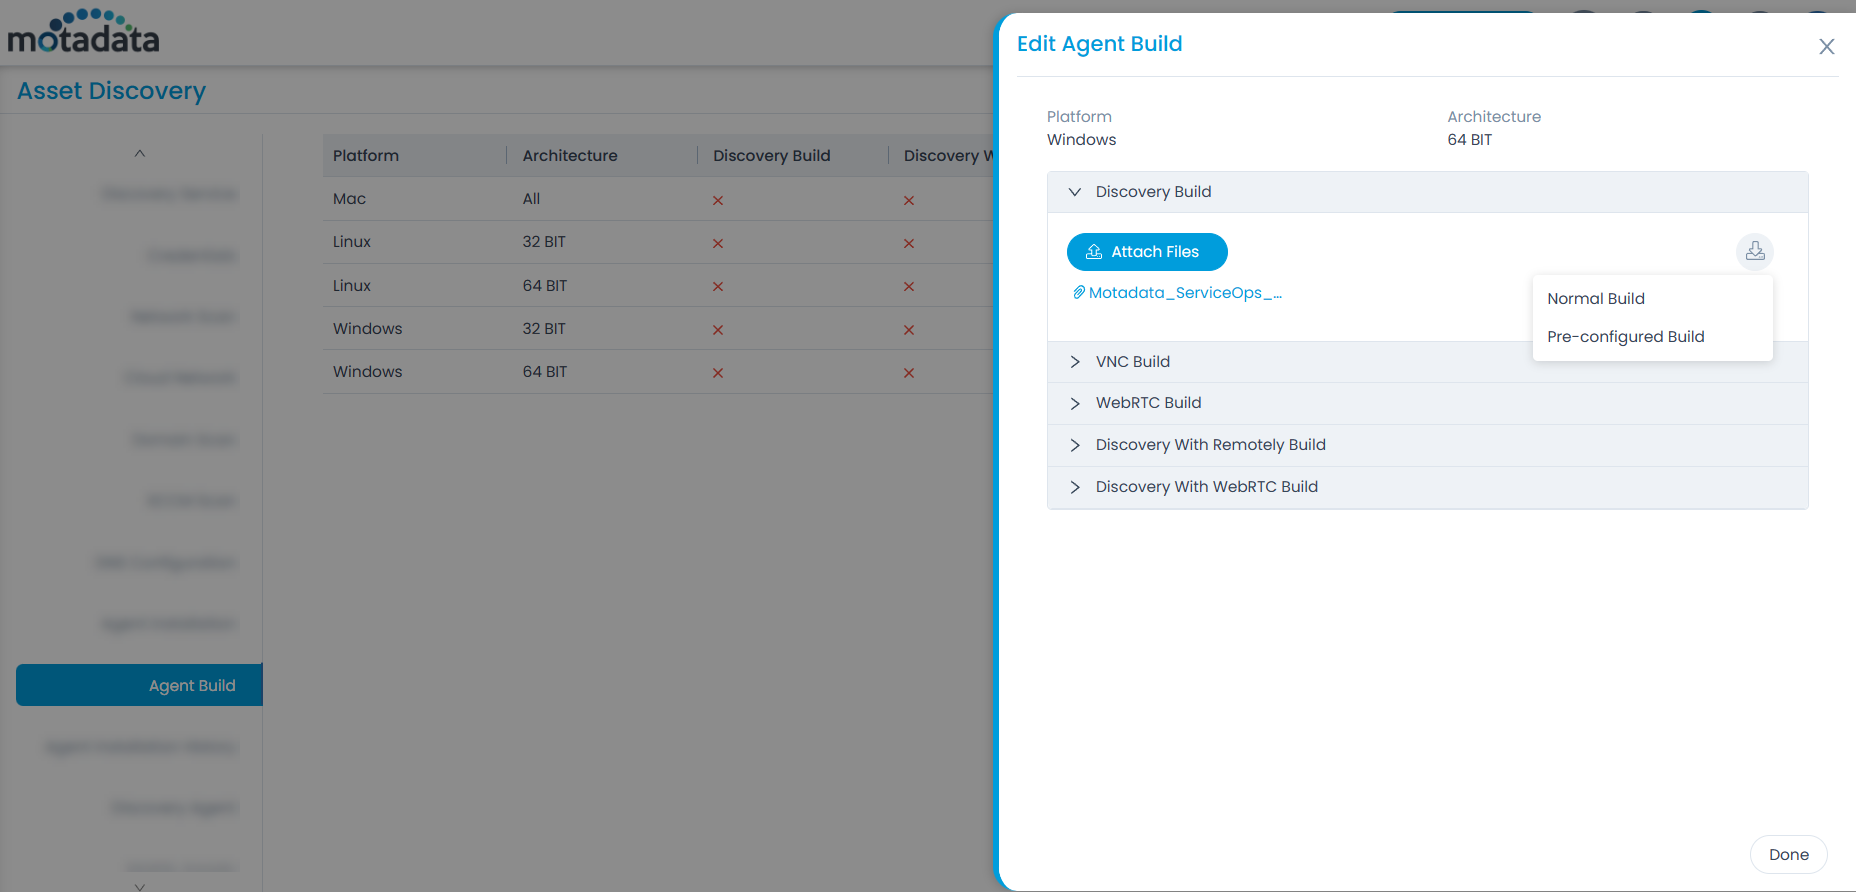
To perform the zero-touch Agent package installation in the remote machine,
- Upload the Agent. Once done, the Download icon appears as shown above.
- Click on it and the following two options will be available:
- Normal Build: This will download only the Agent build.
- Pre-configured Build: This will download a zip file containing the Agent and install.bat/install.sh file. The install.bat file is for Windows and install.sh is for Linux and mac machines.
- Move the install file to the respective machine and run it with Administrator rights.
- The Agent will get directly installed in the remote machine without following the Agent installation steps.
Agent Installation History
This tab enables you to view the complete scan history of the agents.
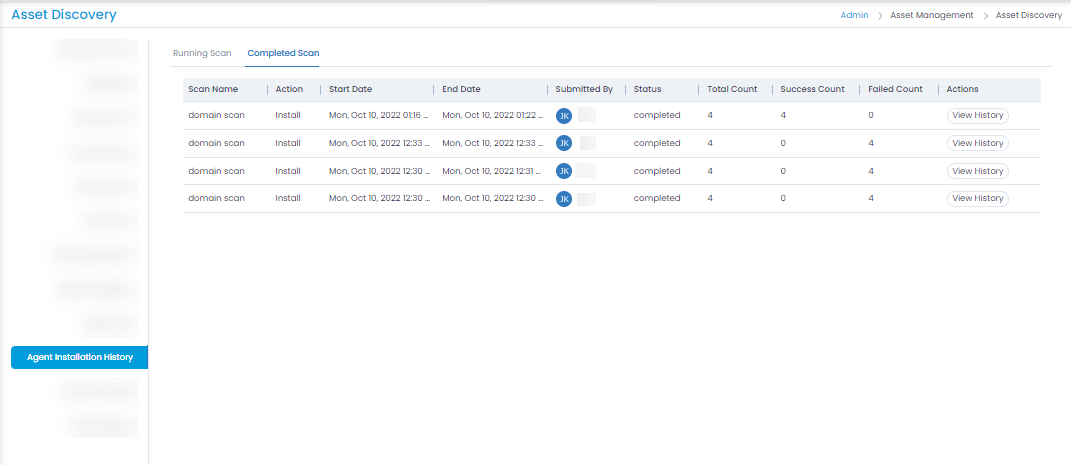
Here, you can click the View History button to view the history of individual scan as shown below. It displays the total count along with its bifurcation. You can also download the scan report in PDF format using the Download History button.
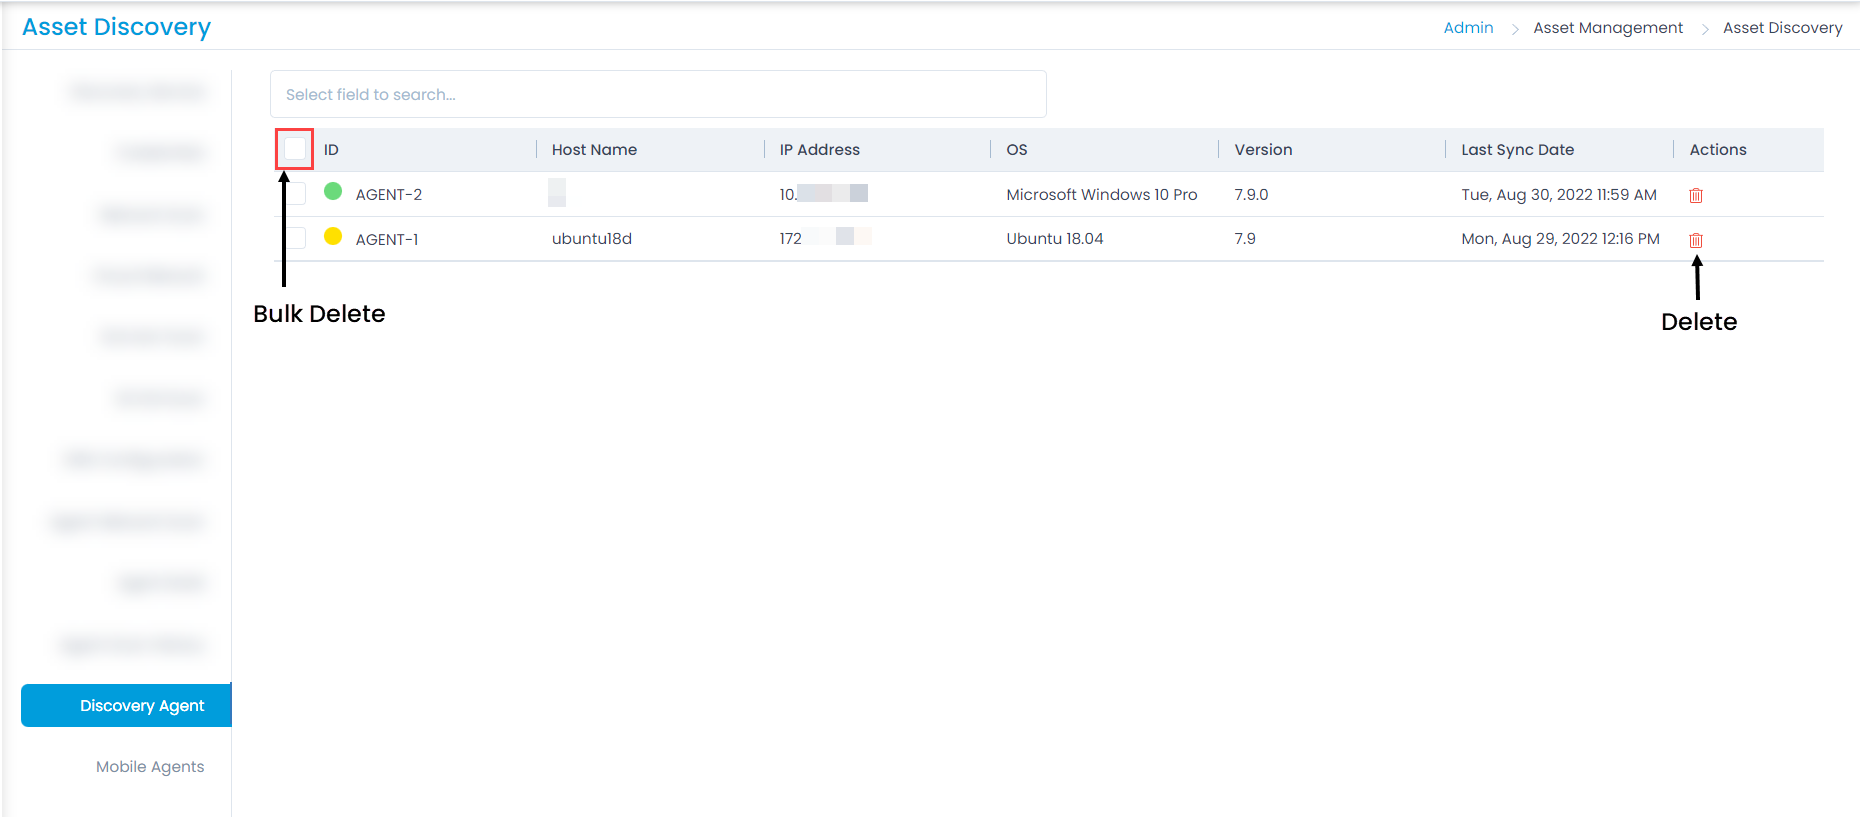
Discovery Agent
This tab displays the list of the agents which are installed for scanning the network. Thus, the discovery of assets is scanned and fetched by these agents. You can have multiple agents too.
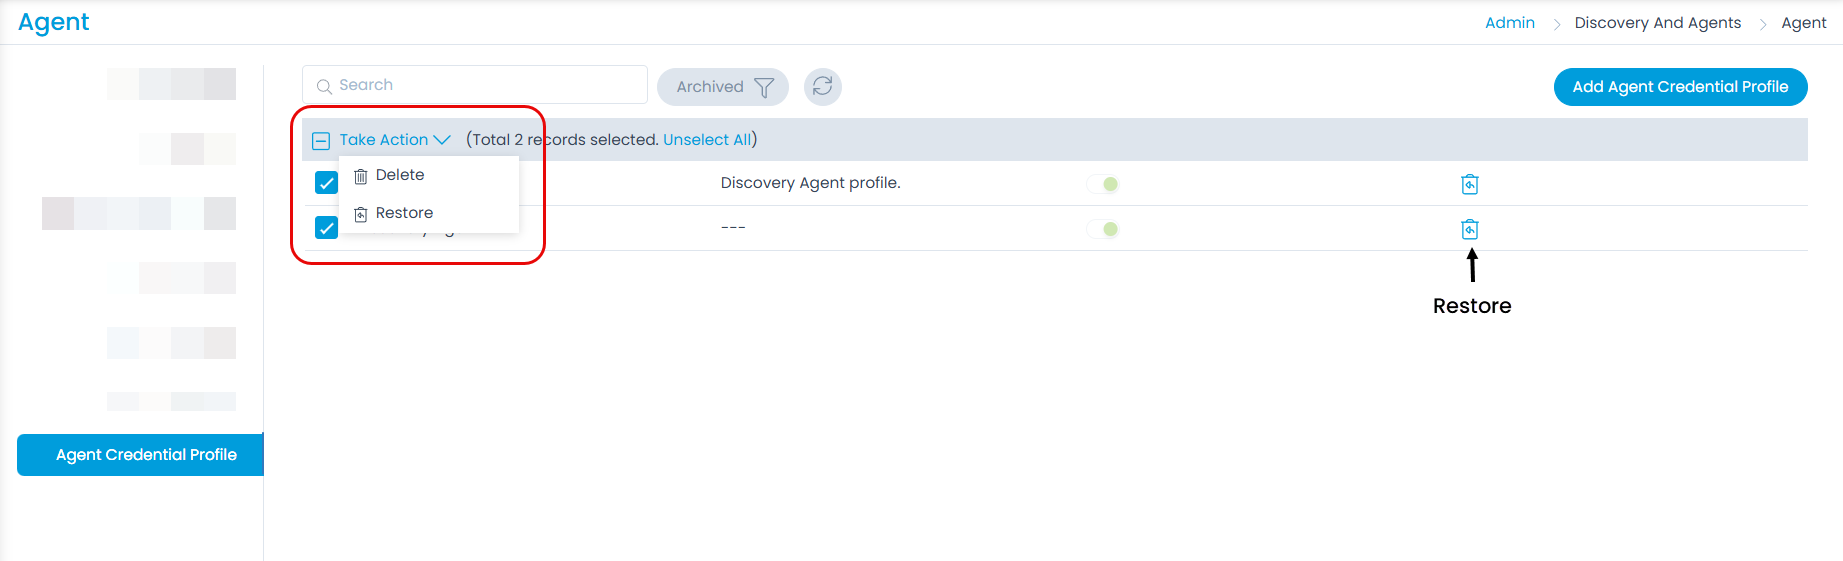
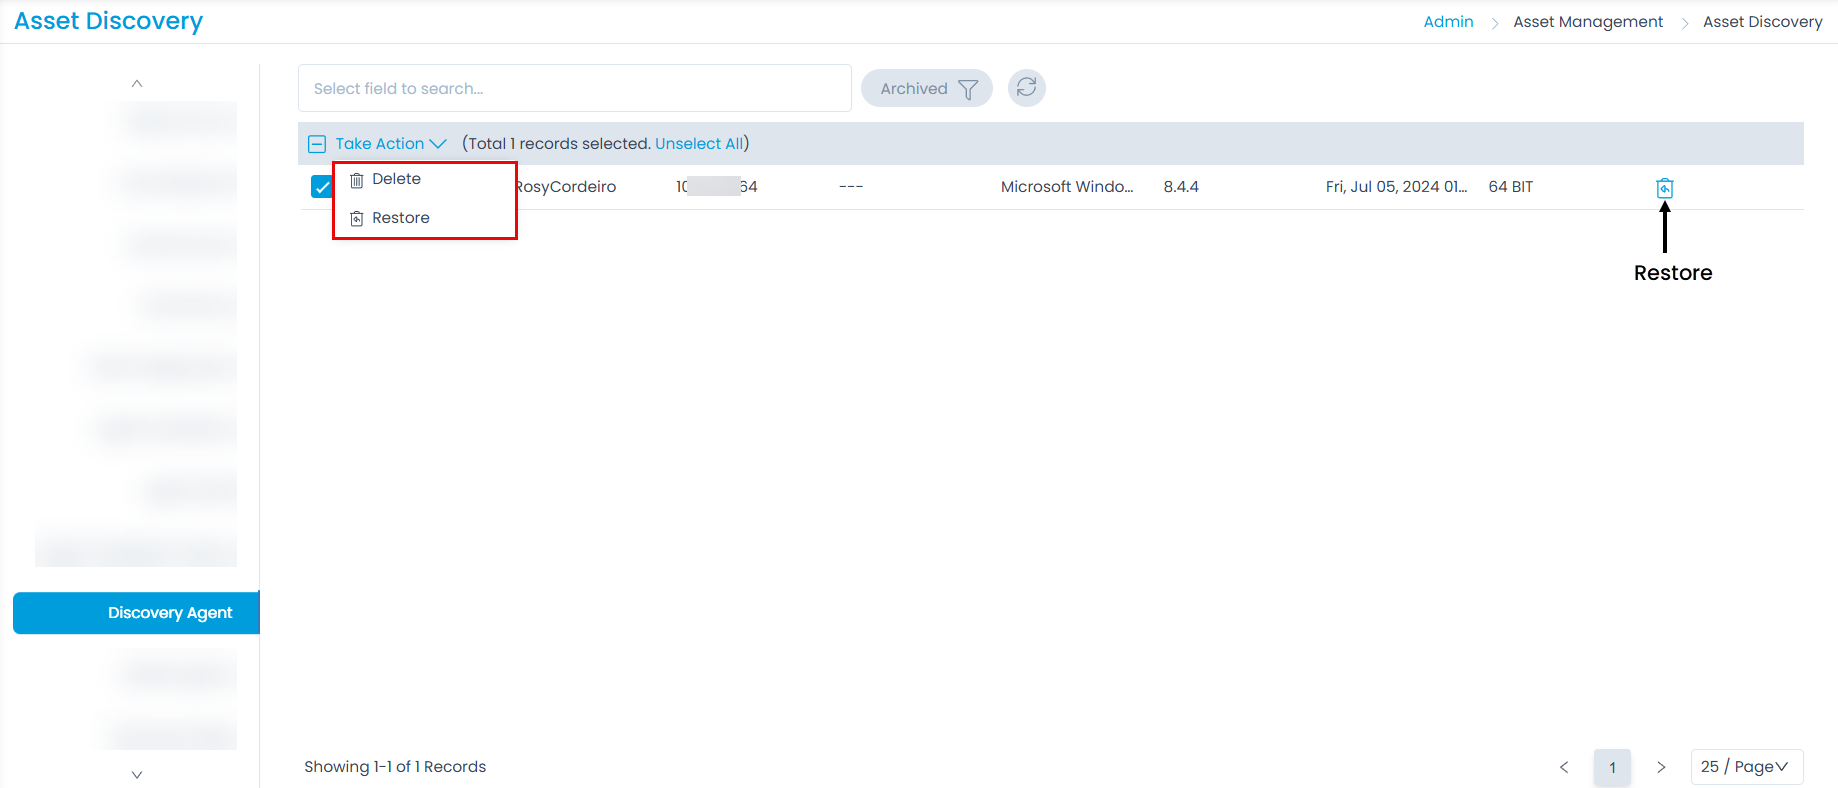
Once the agents are discovered, you can archive them from here if required.
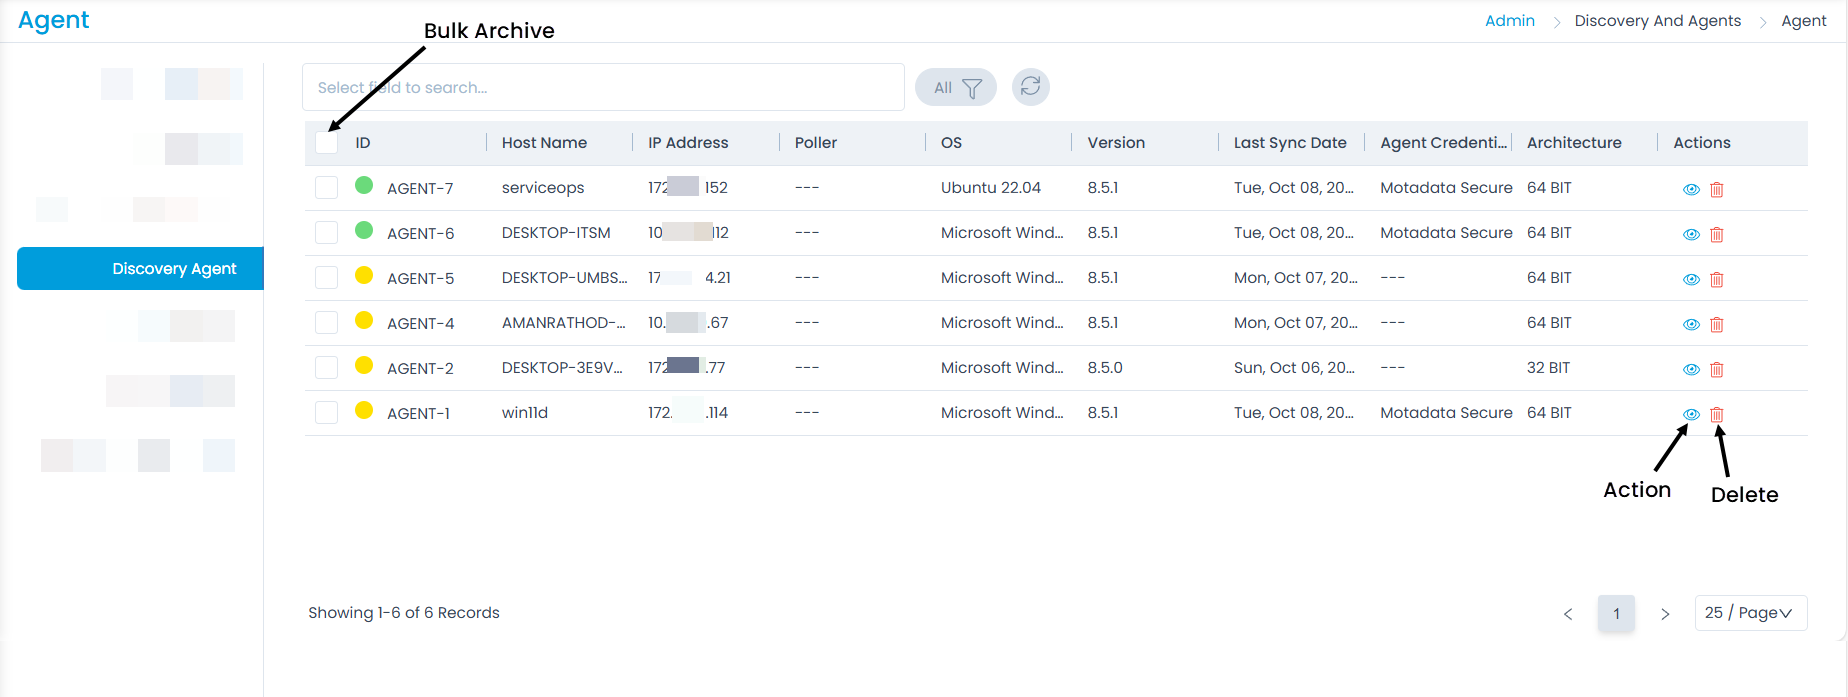
Once archived, you can restore or delete the agents in bulk or individually using the respective options as shown below.
Also, you can perform actions on the agent logs, by clicking the Eye icon. Here, you can request for the logs and then download them.

RDP Agent
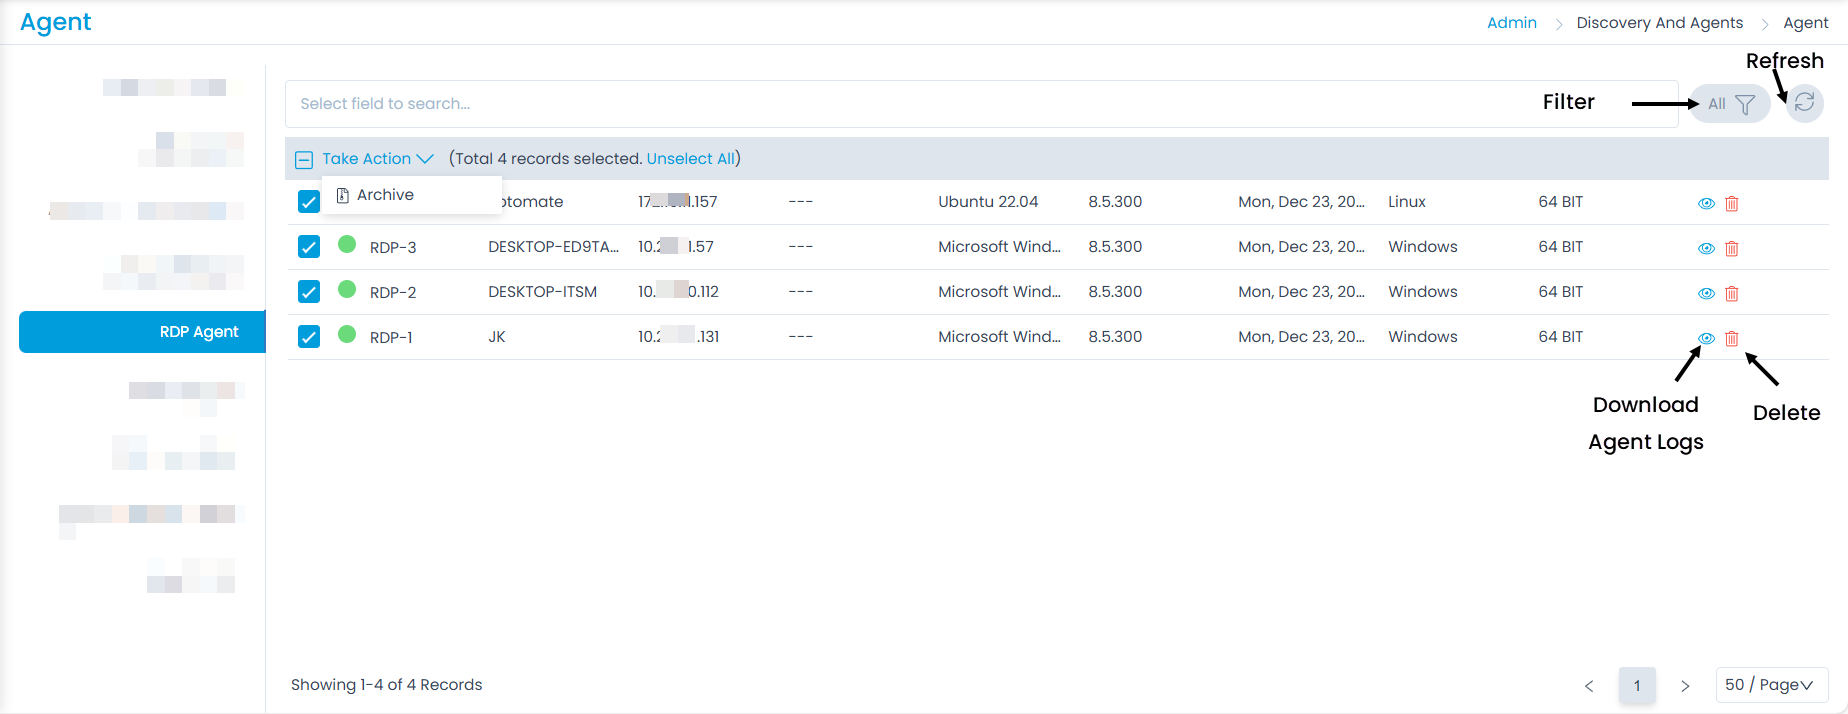
This tab displays the list of installed RDP agents using which remote session can be established. Once the agents are discovered, you can search, view, bulk archive, and delete the agents with whom the RDP session was established. Also, you can download the logs to quickly investigate and resolve the issue using the Action icon (Eye).

Mobile Agents
This tab displays the discovered mobile agents.
Once discovered, you can delete them from here if required. Also, you can configure the settings for mobile discovery.

- Mobile Discovery: Enable if you want to discover the mobile devices.
- Discovery Cycle: Set the discovery cycle to run as per the set time in minutes. The default value is 30 minutes. For Example: If 30 minutes is set the the discovery cycle will run after every 30 minutes.
- Refresh Cycle: Set the time in minutes to refresh the cycle. The default value is 5 minutes.
- Scan this QR Code for Mobile Discovery: You need to scan the QR code to discover your mobile.
Once done, click Update.
Discovery Poller
This tab displays the list of pollers which are installed for scanning the network. Thus, the discovery of assets is scanned and fetched by these pollers. You can have multiple pollers too. Also, you can upgrade multiple pollers in bulk.
This tab is available only for SaaS application.
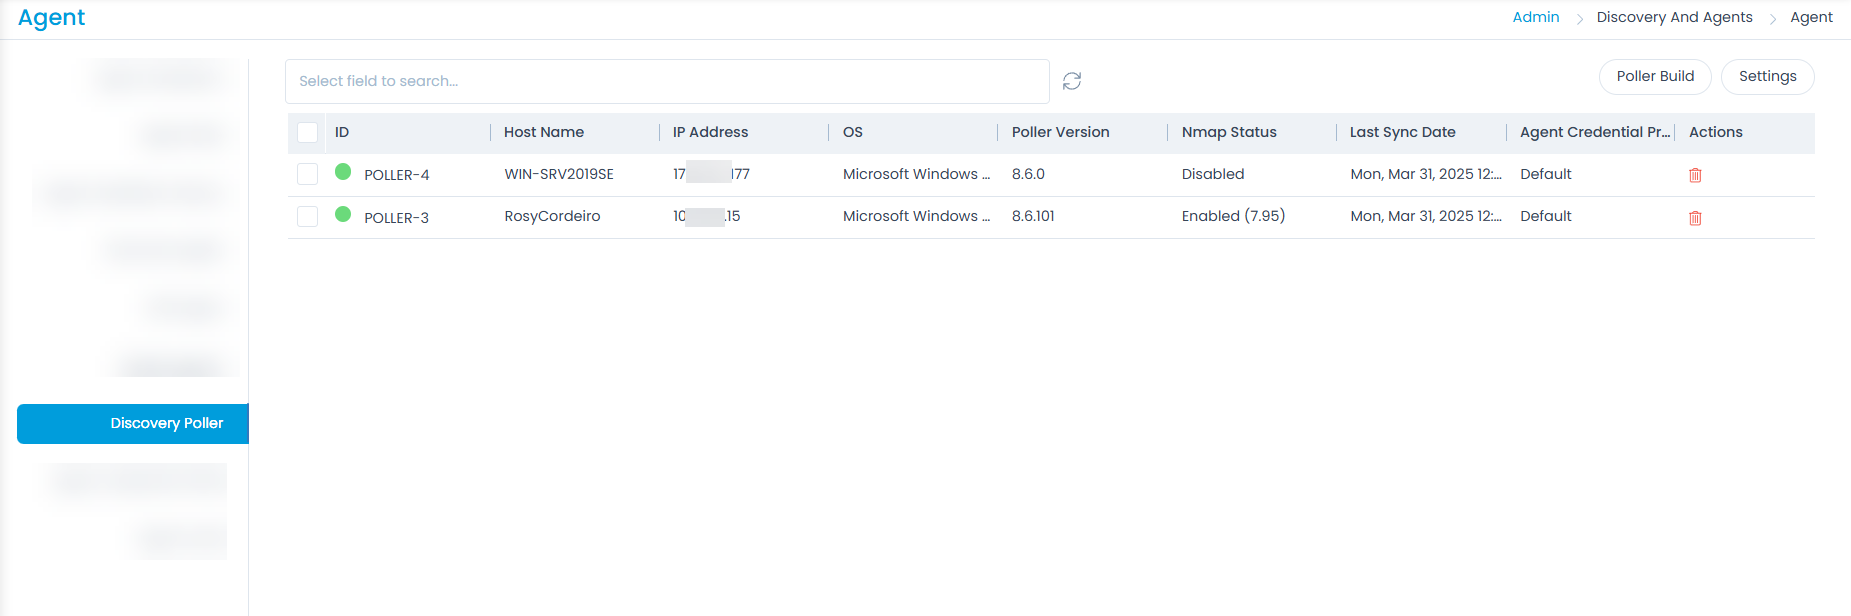
Here, you have the below features:
- Poller Build: You can upgrade the poller's version by uploading the build here.
- Settings: You can set the poller's Refresh Cycle in minutes. The default value is 5 minutes.
- Bulk Actions: Once the poller is available, you can perform the following bulk operations:
- Delete: You can select multiple pollers to delete them together.
- Upgrade: You can upgrade the version of multiple pollers.
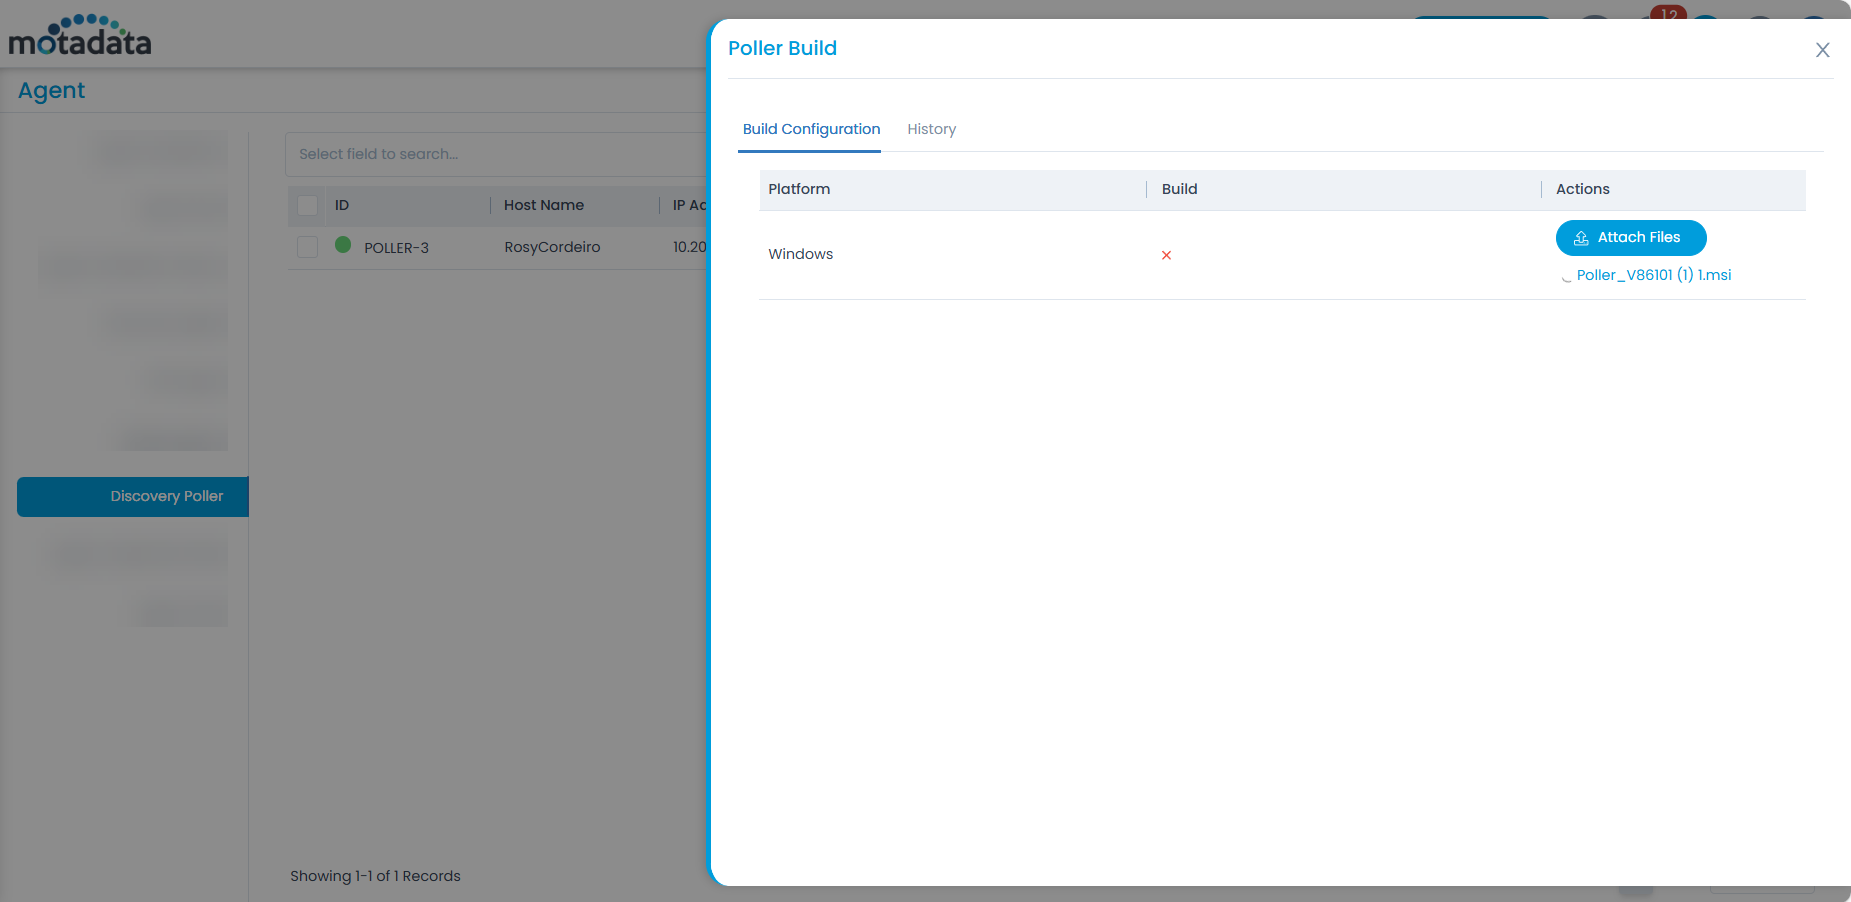
Poller Build
This enables to manually upgrade the Poller Agent on multiple systems.
This functionality is applicable from v8.6.1 onwards.
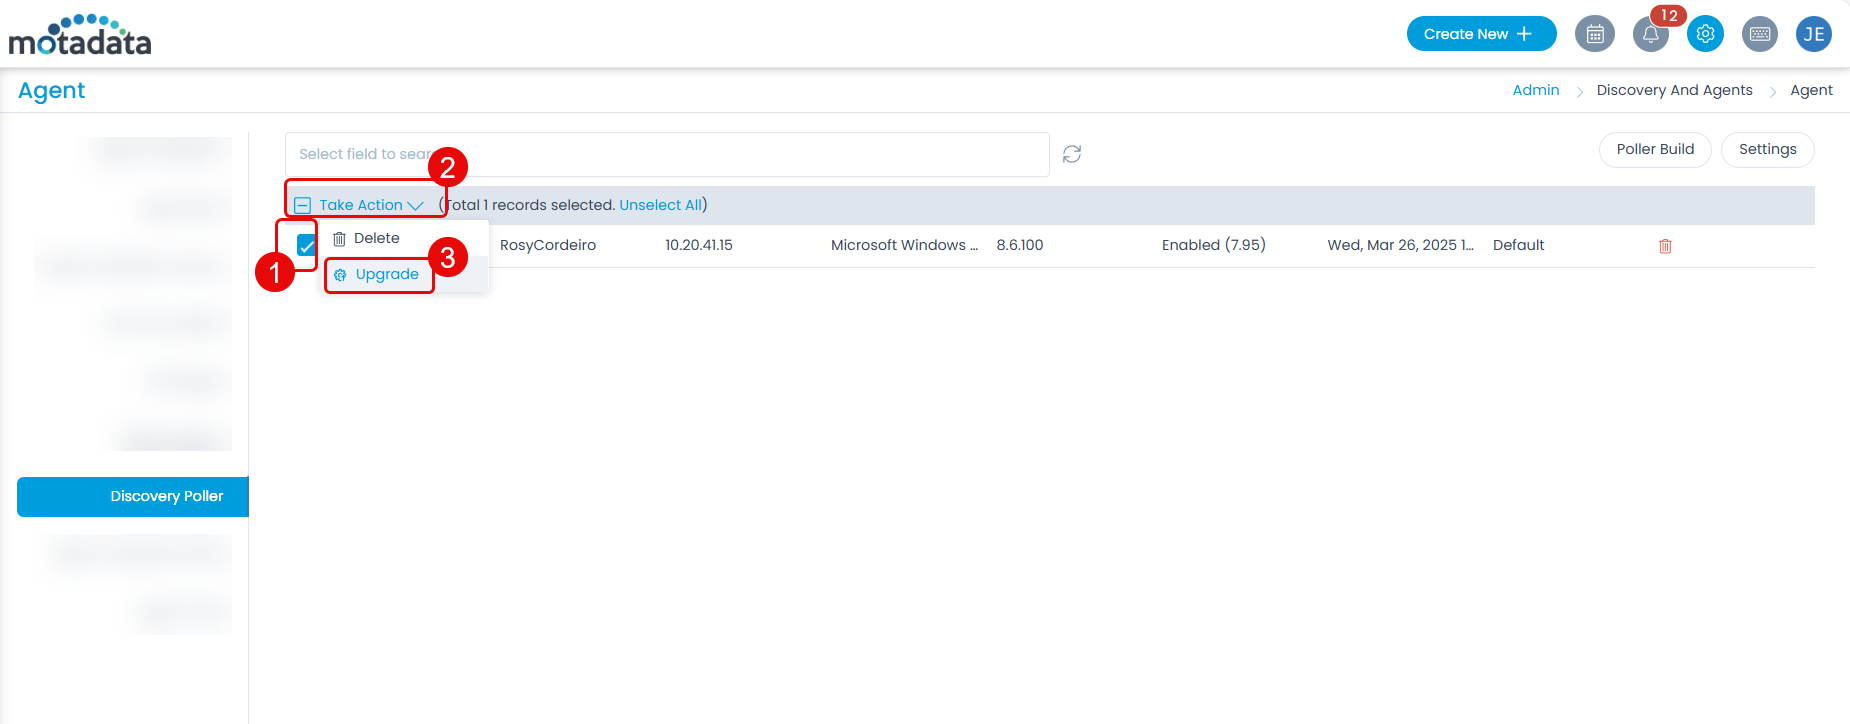
To upgrade the poller agent in bulk,
- Click the Poller Build button and the below popup appears.
- Click Attach Files and upload the required build.
- Next, select the pollers from the grid
- Click Take Action and select Upgrade. A confirmation message appears. Click Yes to continue or No to stop the process.
Once the process initiates, you can view the history of the Poller agent installation in the History tab of the Poller Build as shown below.

It displays the details like:
- ID: Poller ID
- Status: Status of the poller build. The status include:
- Requested : The poller upgrade is requested from ServiceOps to the machine.
- Initiated : The end machine has started the poller upgrade process.
- Success : The poller version in the end machine has been successfully upgraded to the one uploaded in the build.
- Failed : The end machine has failed to upgrade the poller to the uploaded build.
- Updated Time: Time when the poller was last updated.
- Remarks: Displays the result.
Agent Credential Profile
The Agent-ServiceOps application communication is enhanced using the Agent Credential Profile. Currently, the communication takes place using the activation code and static client credentials, posing a security risk. Hence, a new approach is introduced to address this, where the Agent Credential Profile must be created to generate an authorization key. This key is then used at the time of installing the Agent (Discovery, RDP, or Poller). However, to support the older versions, activation code functionality also exists.
This functionality is applicable from v8.5.1 onwards.
On upgrade, If the Agent Communication Settings is not enabled, you can use the Secure Auth and Activation Code to estabish communication with the Agent and Poller.
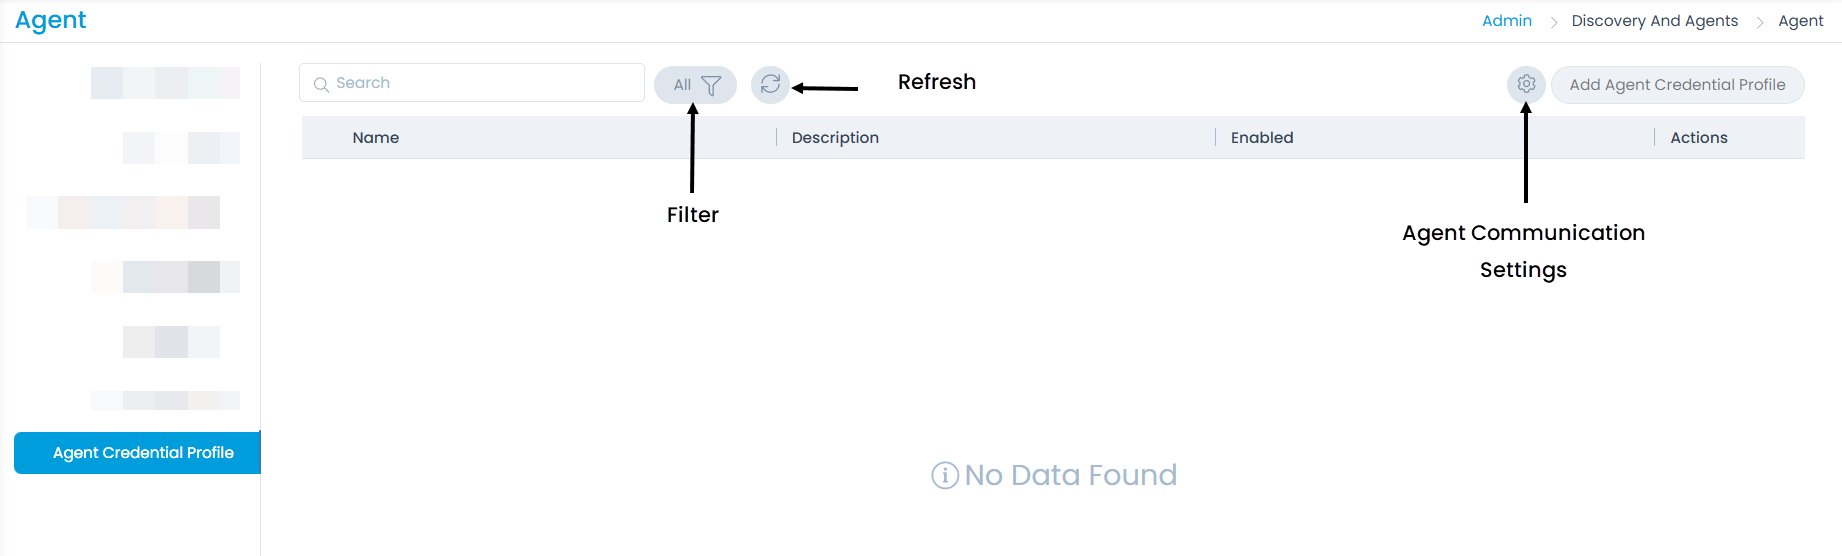
To view the Agent Credential Profile page, navigate to the Admin > Discovery and Agents > Agents > Agent Credential Profile tab and the following page appears.
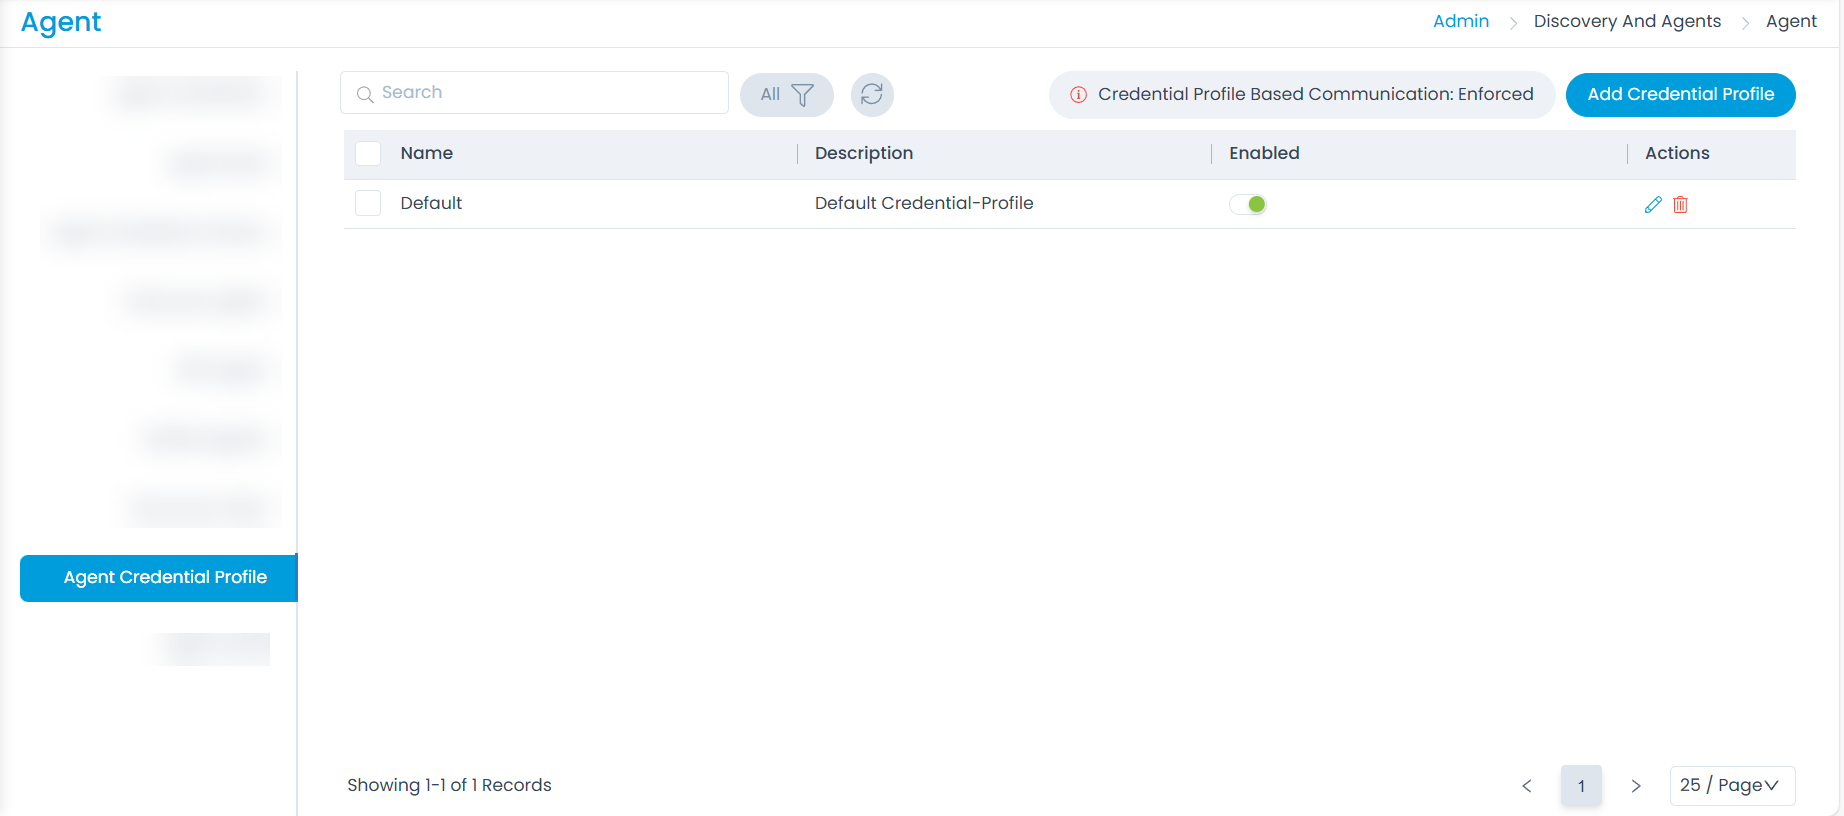
Previously, the Agent Communication Settings was available on the UI. From v8.6.0 it has been removed and made backend-configurable. Based on its backend value, the Credential Profile communication will be marked as either Enforced or Optional during upgrade as shown below.
The page displays the following features:
Search: You can search for the required credential profiles.
Filter: You can filter the profiles by selecting the desired option. The options are: All, Enabled, Disabled, and Archived.
Refresh: You can refresh the credential profiles list to view the latest one.
Credential Profile Based Communication Status: It displays whether the credential profile based communication is enforced or optional.
- If Enabled: UI shows "Credential Profile Based Communication: Enforced" (non-editable). Only Credential Profiles are accepted for agent and poller communication; Activation Code-only setups are denied when enforced.
- If Disabled: UI shows "Credential Profile Based Communication: Optional" (non-editable). When communication is optional, agents and pollers can use either method.
Additionally, a default Agent Credential Profile will be auto-created if communication is marked as Optional during upgrade. This change ensures smoother Agent and Poller communication during upgrade without impacting the existing infrastructure. Not applicable for fresh installations after version 8.5.1.
- Add Agent Credential Profile: You can add agent credential profiles to establish a secure communication between the ServiceOps server and the agent.
Adding Agent Credential Profile
To add an agent credential profile,
- Click the Add Agent Credential Profile button and the following popup appears.

- Enter the Credential Profile name.
- Enter a brief description about the profile.
- Click Add.
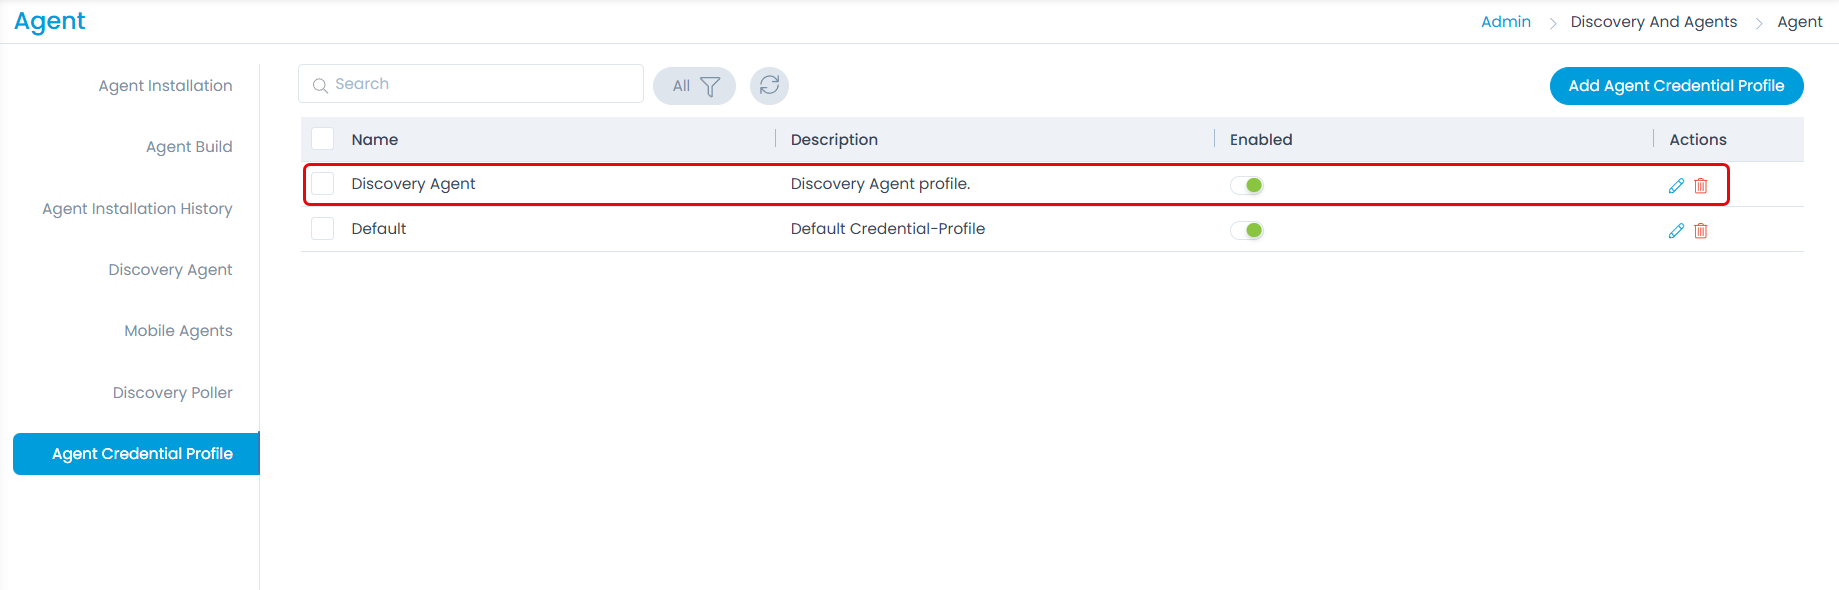
- Once done the profile will be available on the list page as shown below.
- You can now edit this profile and get the Secure Auth key required for agent installation.

Archiving, Restoring, and Deleting Agent Credential Profile
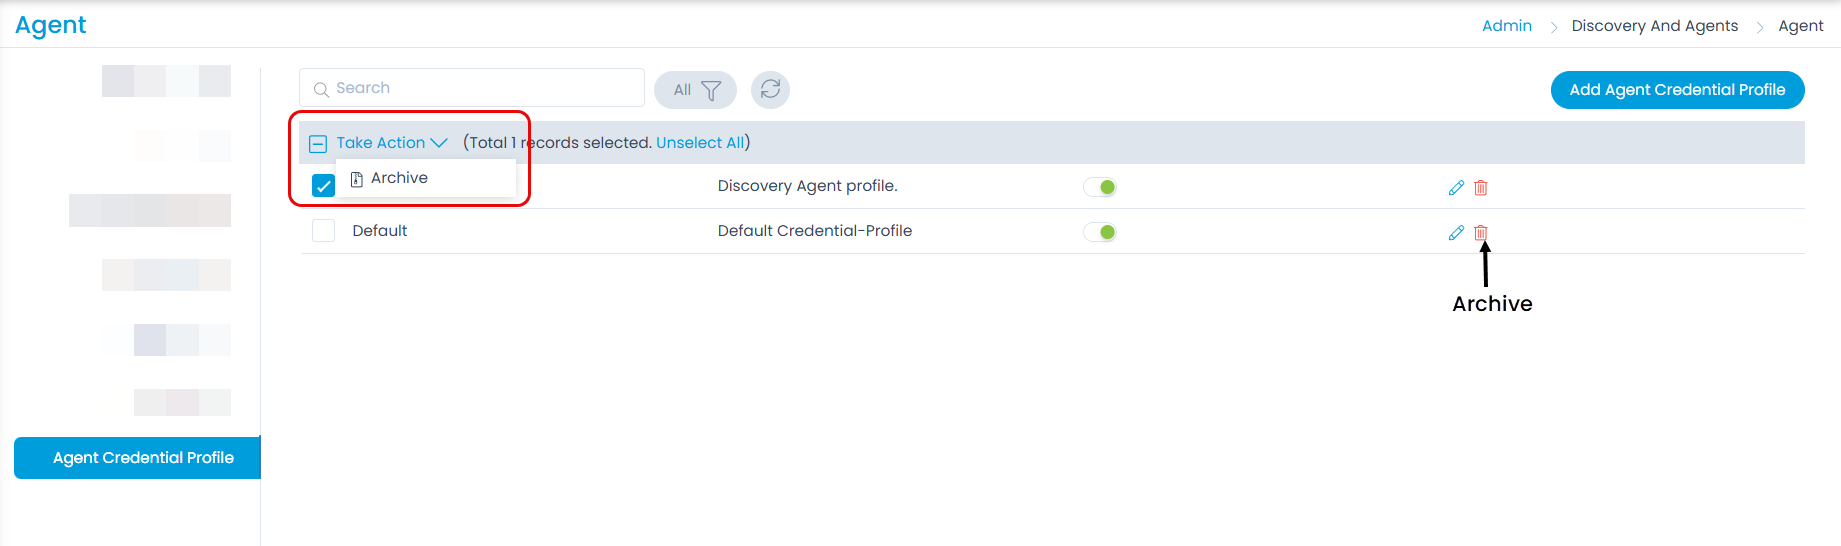
- You can also archive the profile if required. You can archive either using the Bulk Archive option or individually using the Archive option as shown below.
Once the profile is deleted or archived, the communication will stop. In such a situation, you can either restore the agent credential profile or create a new one and then use it for agent installation.
- Once archived, the profile will be moved to the Archived list.

- From the archived list you can either delete or restore the agent credential profile using the respective icons as shown below.