Agent Bulk Installation Using GPO
What is a Group Policy?
A group policy contains configurations that help the network administrators to control the environment of Active Directory users and computers.
What is a Group Policy Object?
Group Policy Objects (GPOs) are a group of policy settings based on which certain actions can be enforced on all users and computers in the Active Directory Domain. Using this you can deploy software packages for multiple users, thus saving time and money.
Microsoft provides a simple way to deploy software and also a quick solution to uninstall it when needed.
For example: If you want to install agents in bulk for all the users and computers, you can create a GPO policy.
Configuring the Group Policy Object
To create a Group Policy Object, follow the below steps:
To apply a Group Policy, either Domain or Local administrator rights are required.
- Open the Server Manager from the menu and navigate to Tools > Group Policy Management.

- Expand the Domains tree, select the desired domain, right-click, and select the option Create a GPO in this domain and Link it here.
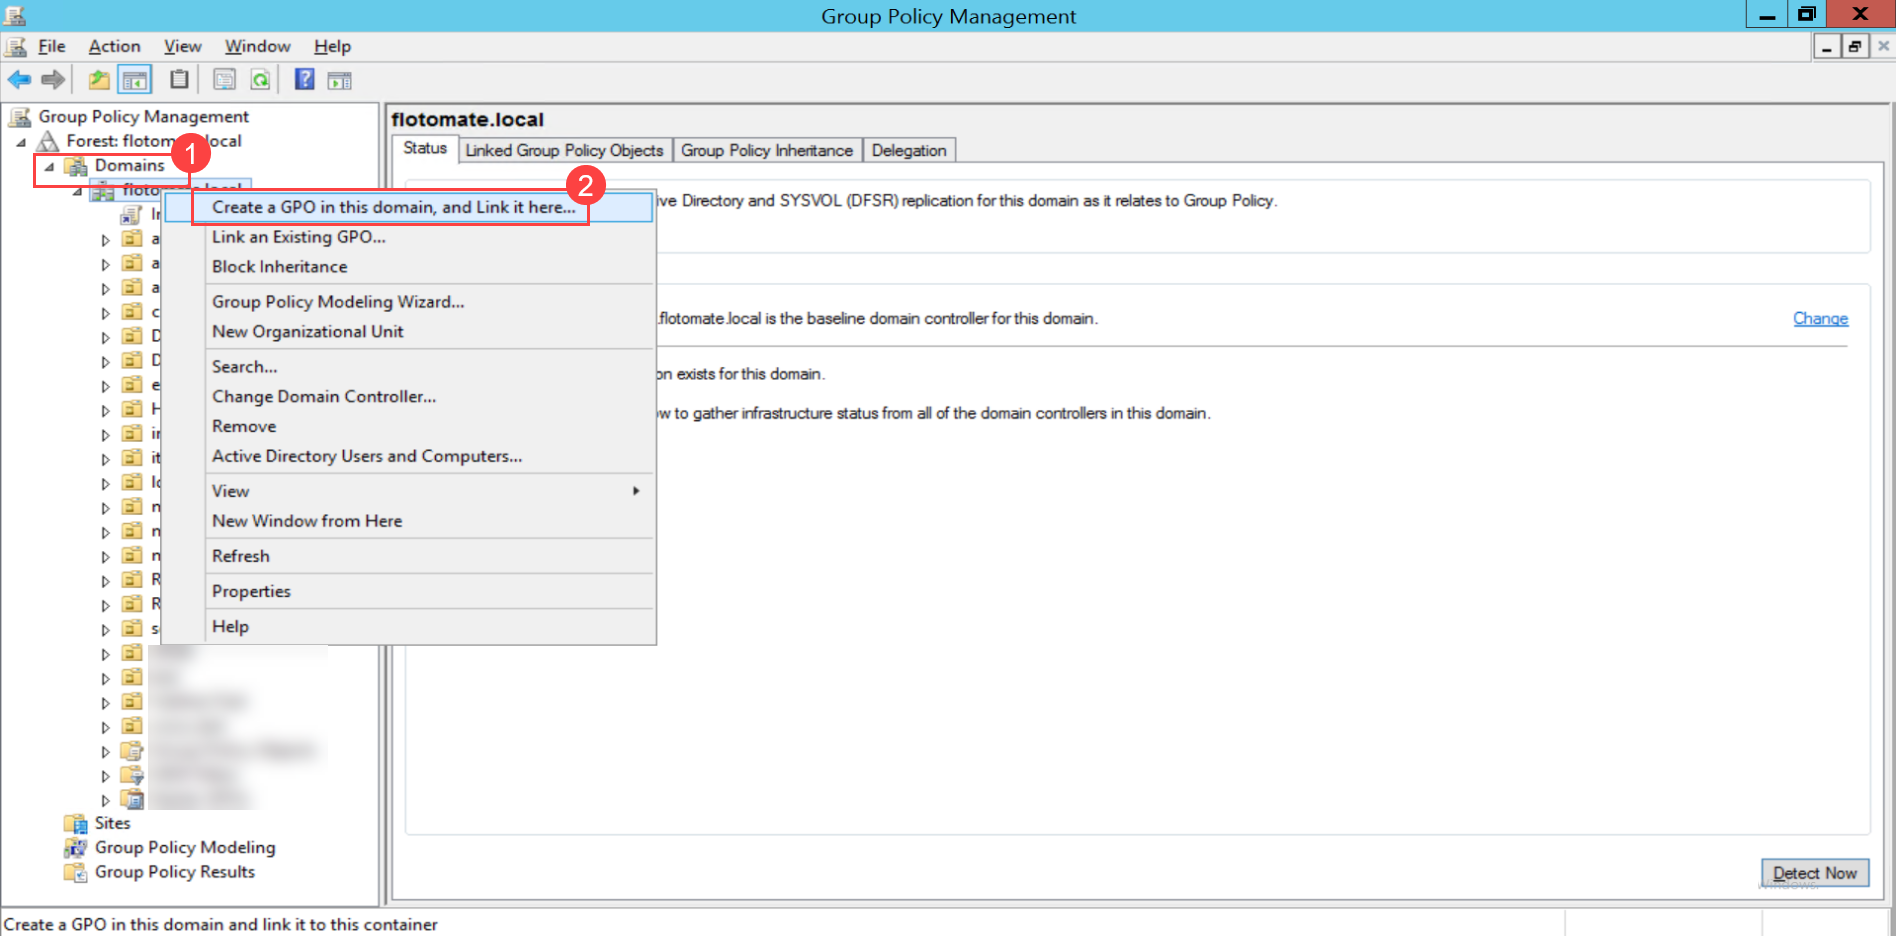
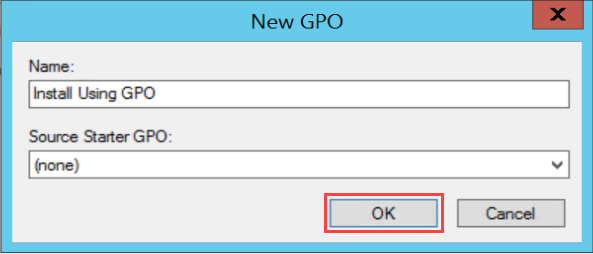
The following popup appears.
- Create a new GPO policy by entering the name and clicking OK.
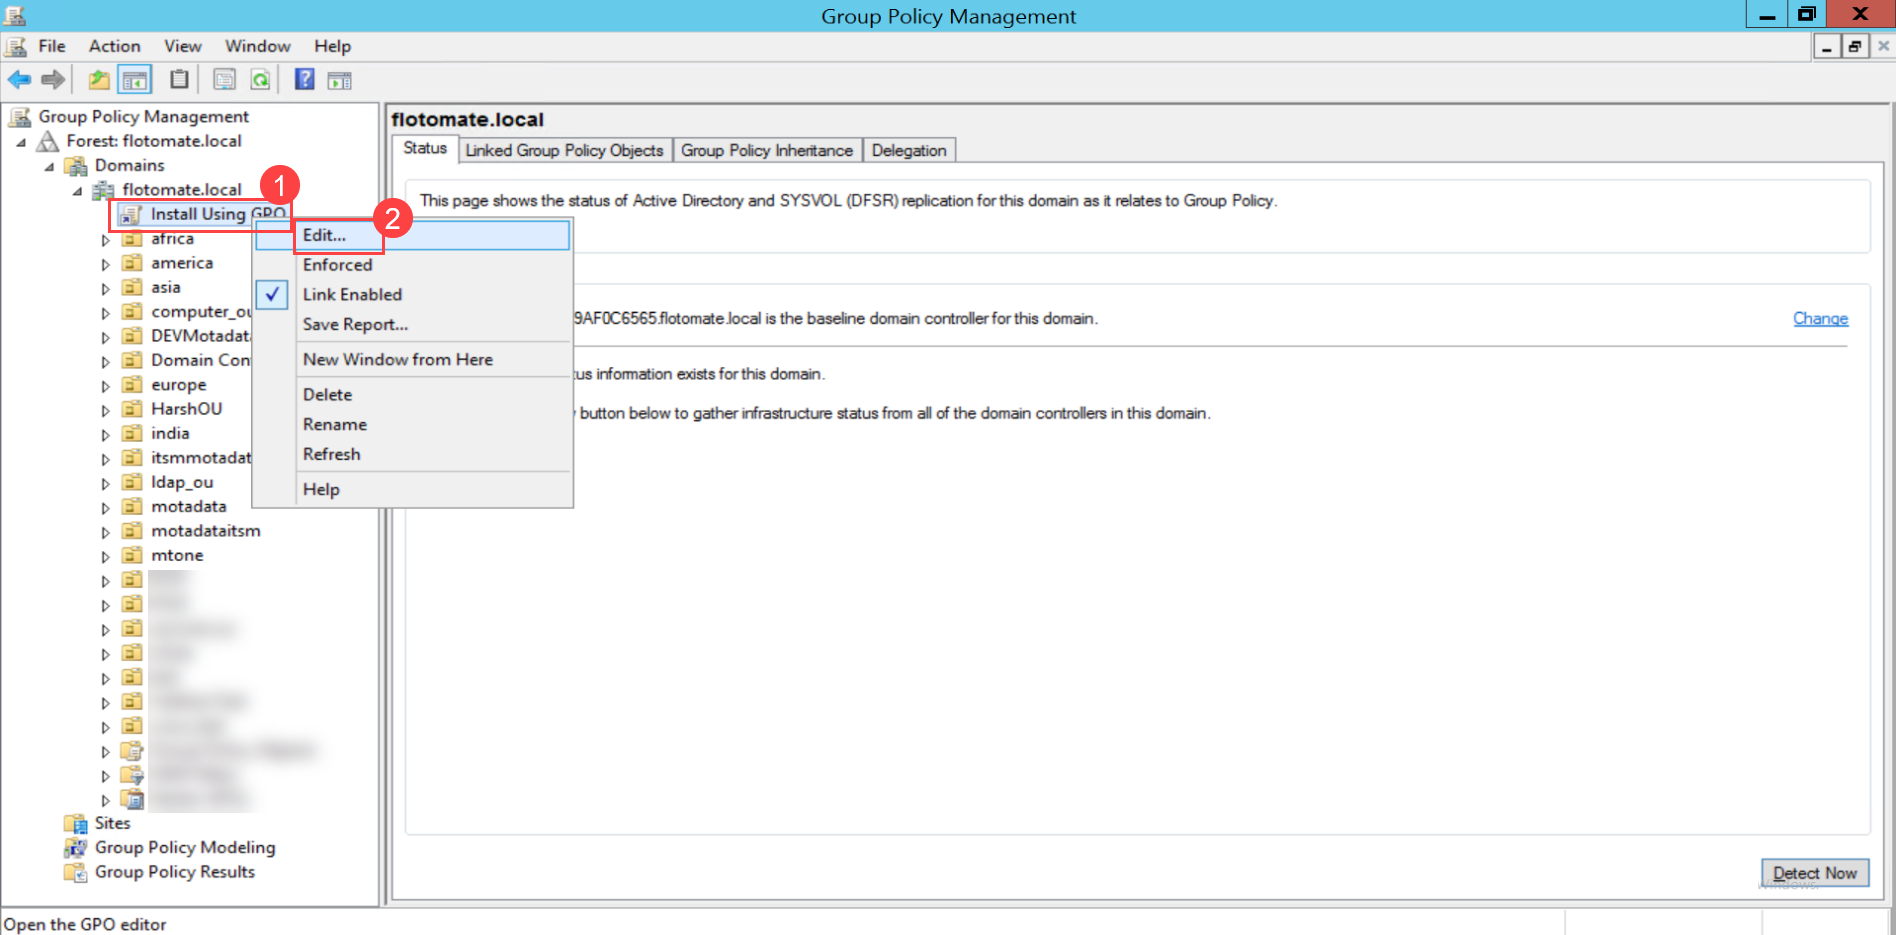
- Right-click the created policy (Install Using GPO) and select Edit.
- In the Group Policy Management Editor, navigate to Computer Configuration > Policies > Software Settings > Software Installation. In the right pane, right-click and select New > Package.
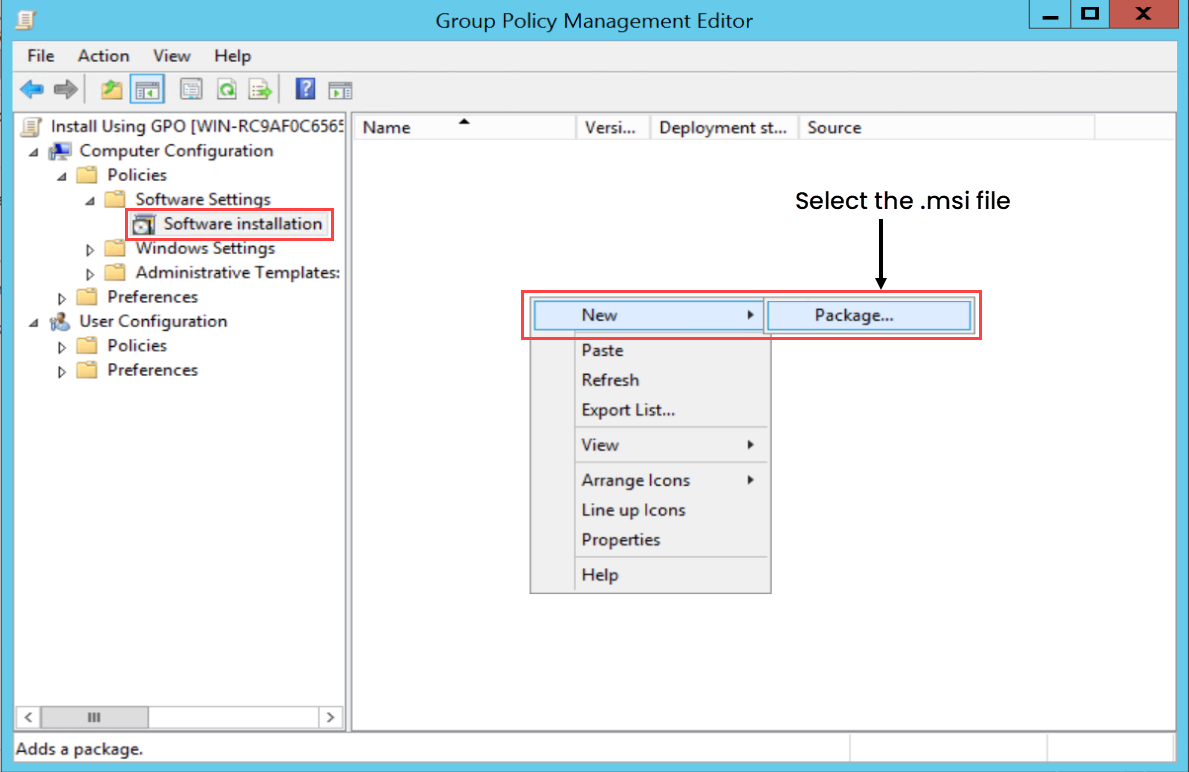
A dialog appears. Select the pre-defined agent setup file and click Open.
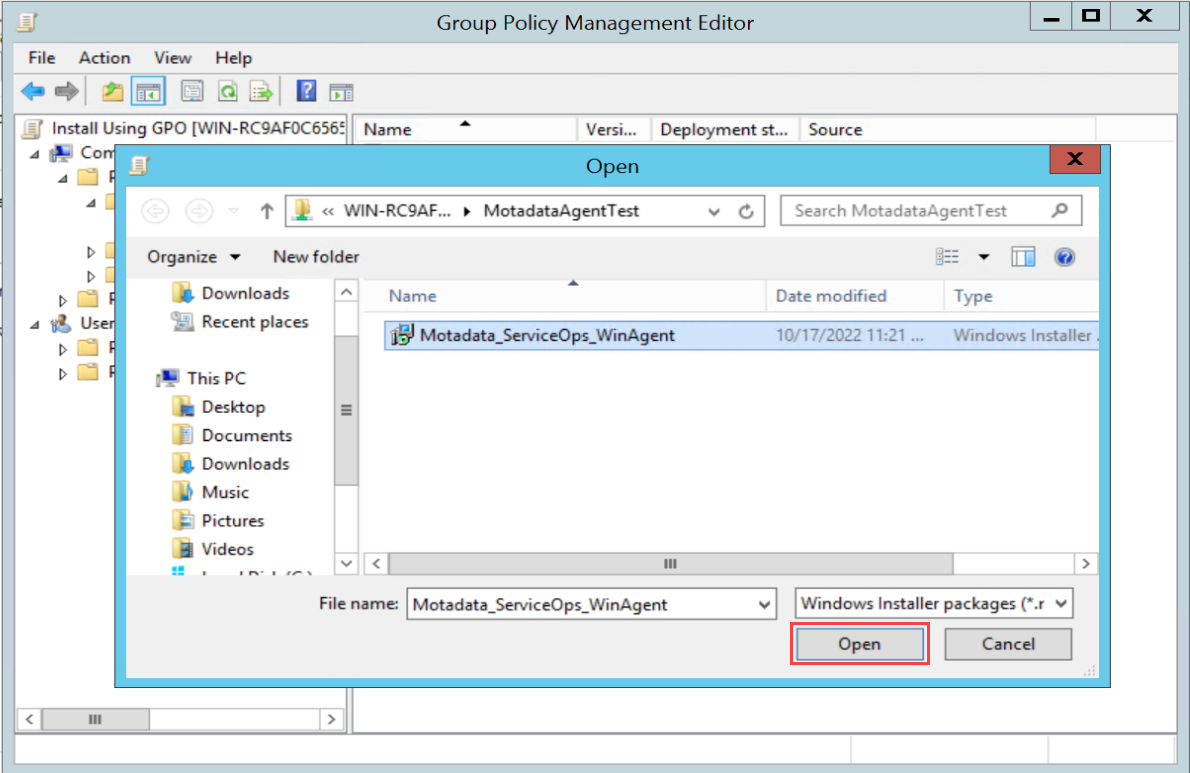
- To get the pre-defined agent setup file, contact the Motadata Support or Implementation team.
- This file must be publicly accessible from the target machine.
- When performing an upgrade, ensure that the old MSI file is not deleted or removed before installing the new one. Additionally, the new MSI file must be publicly accessible for the upgrade to proceed successfully.
The agent file gets added.
- Next, navigate to Computer Configuration > Policies > Software Settings > Software Installation, right-click, and select Properties.
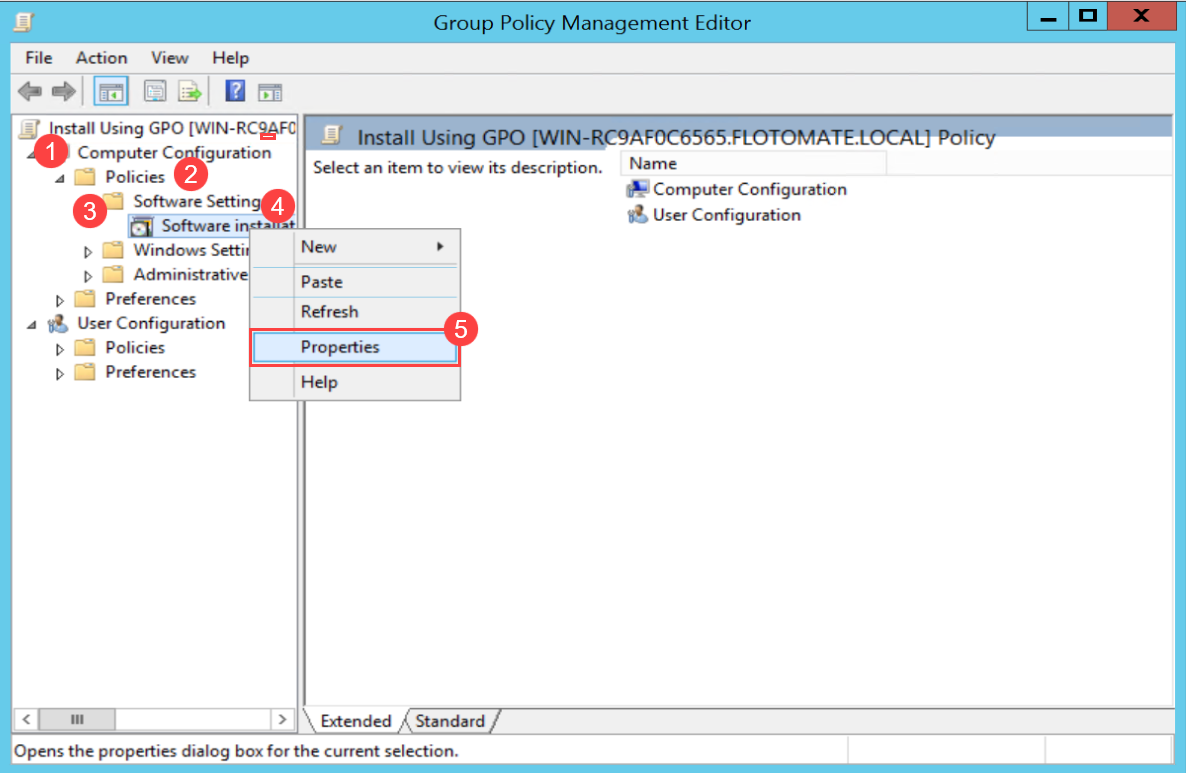
- In the Software Installation Properties window, select the General tab, browse, and select the default package location. Also, select the options: Assign and Basic, as shown below.
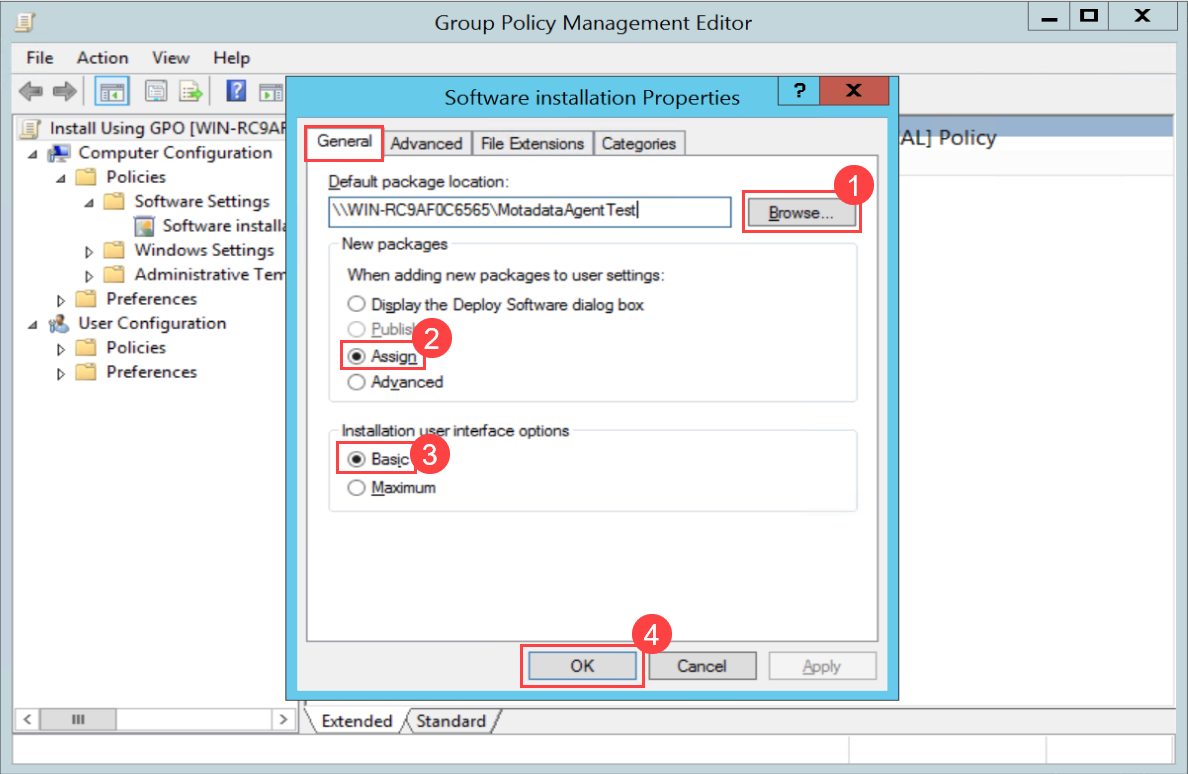
The shared folder path given in the Default Package Location must be publicly accessible from the target machines.
Once done, click OK, and select the Advanced tab.
- In the Advanced tab, enable the option Uninstall the applications when they fall out of the scope of management..
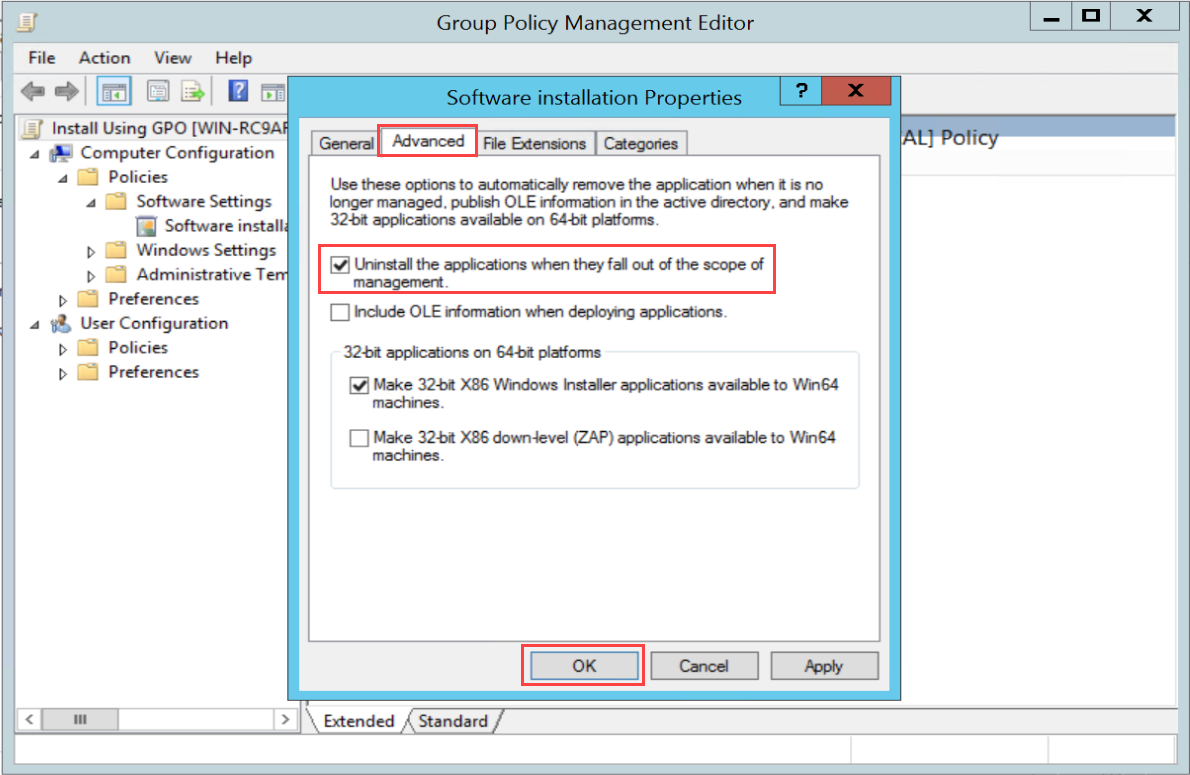
Once done, click OK, and set the properties of the agent.
- Right-click on the agent and select Properties.
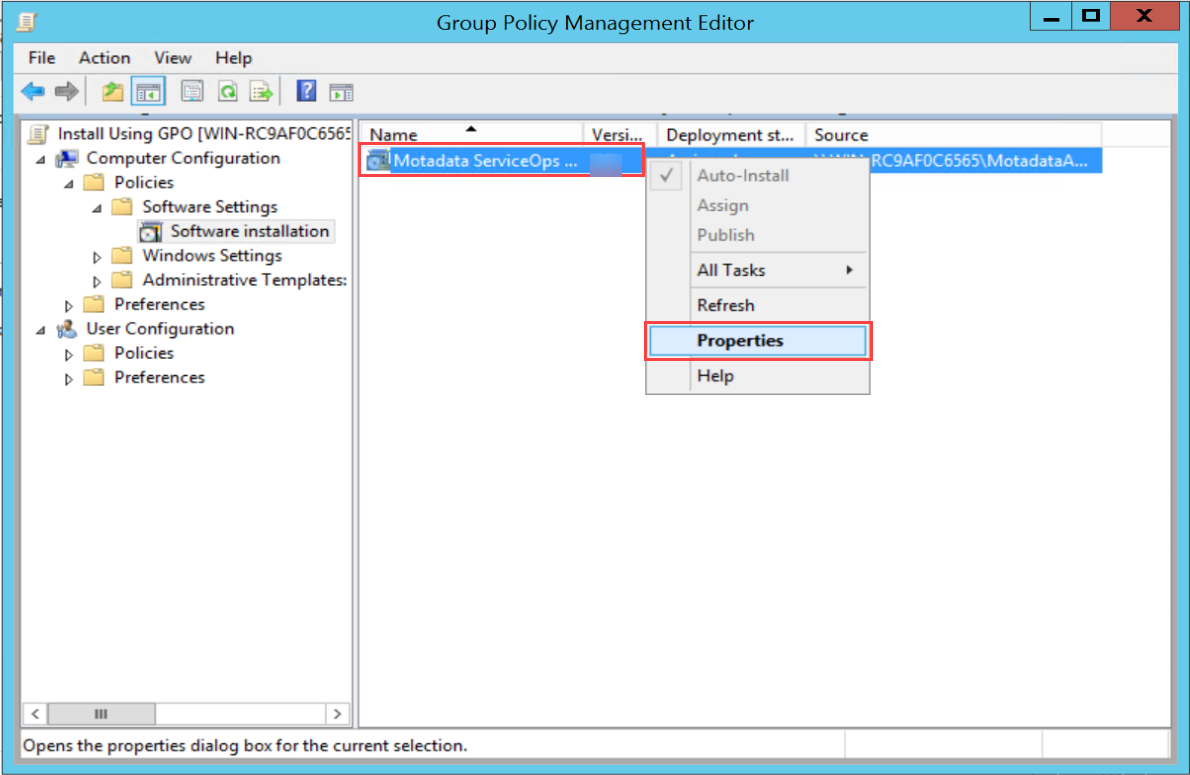
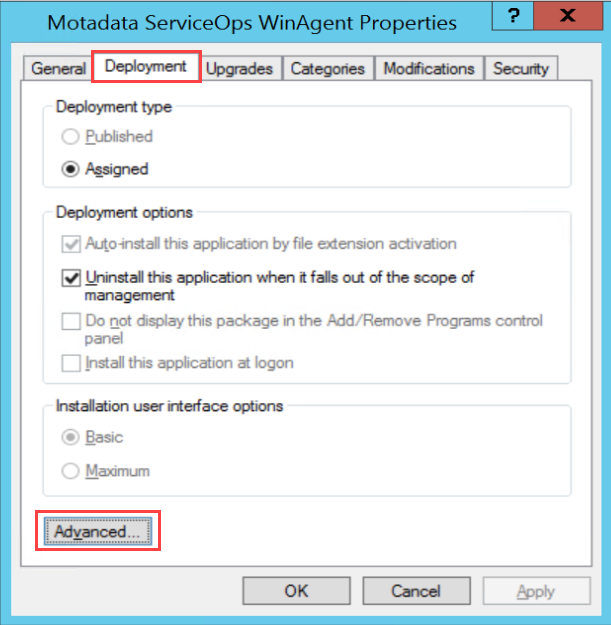
- In the Properties window, select the Deployment tab, click Advanced, and enable the option Ignore language when deploying this package.
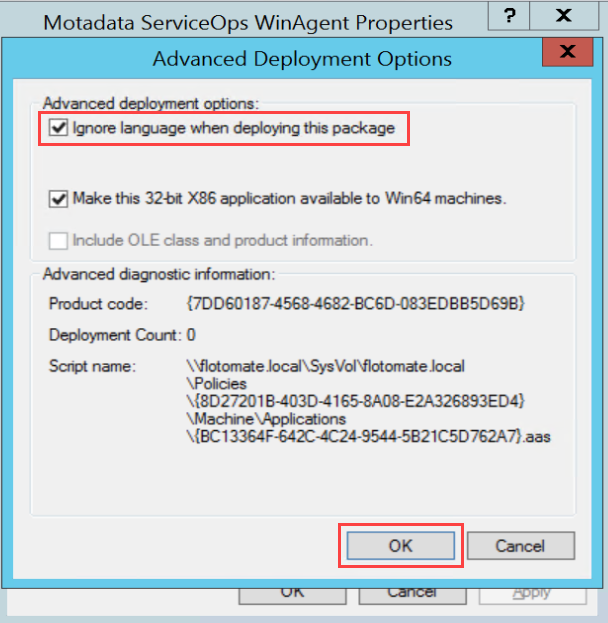
Once done, click OK, and your GPO policy is created.
Once the GPO policy is created, the Software Installation process begins when a system restarts, or you can start it manually by typing the following command in the CMD of a node.
gpupdate /force
In ServiceOps, the agents installed using this policy will appear on the Hardware Assets list page and the Discovery Agent tab of Admin > Asset Management > Asset Discovery, respectively.
In case of failure in installation, change the rules, and make the changes. To do so, Open Group Policy Management and change the below configurations:
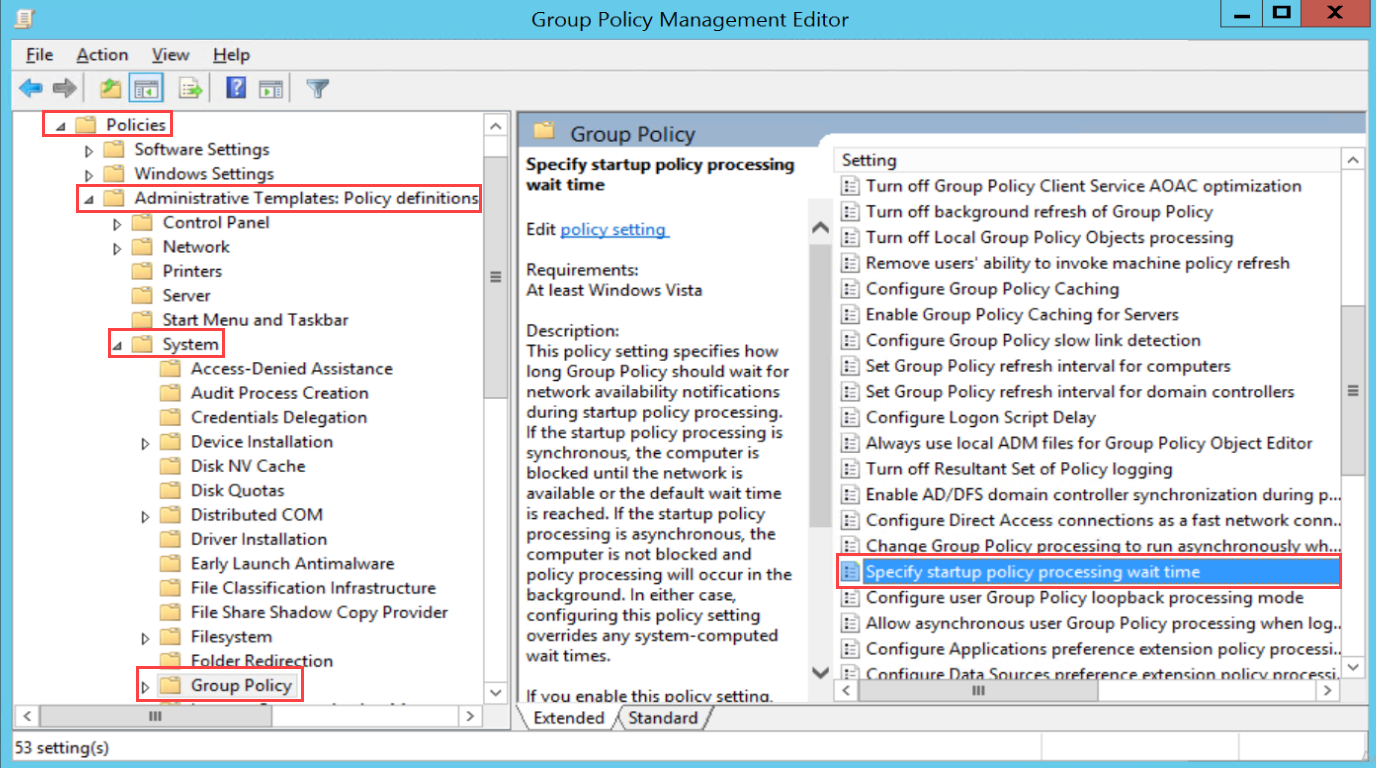
- In the Computer Configuration > Policies > Administrative Templates > System > Group Policy, enable the option Specify startup policy processing wait time. Set the Amount of time to wait (in seconds) as 600. It is the approximate average time taken to install the agent on the target machine. You can increase it if the target machine is slower or, due to latency in the network, the agent is not installed.
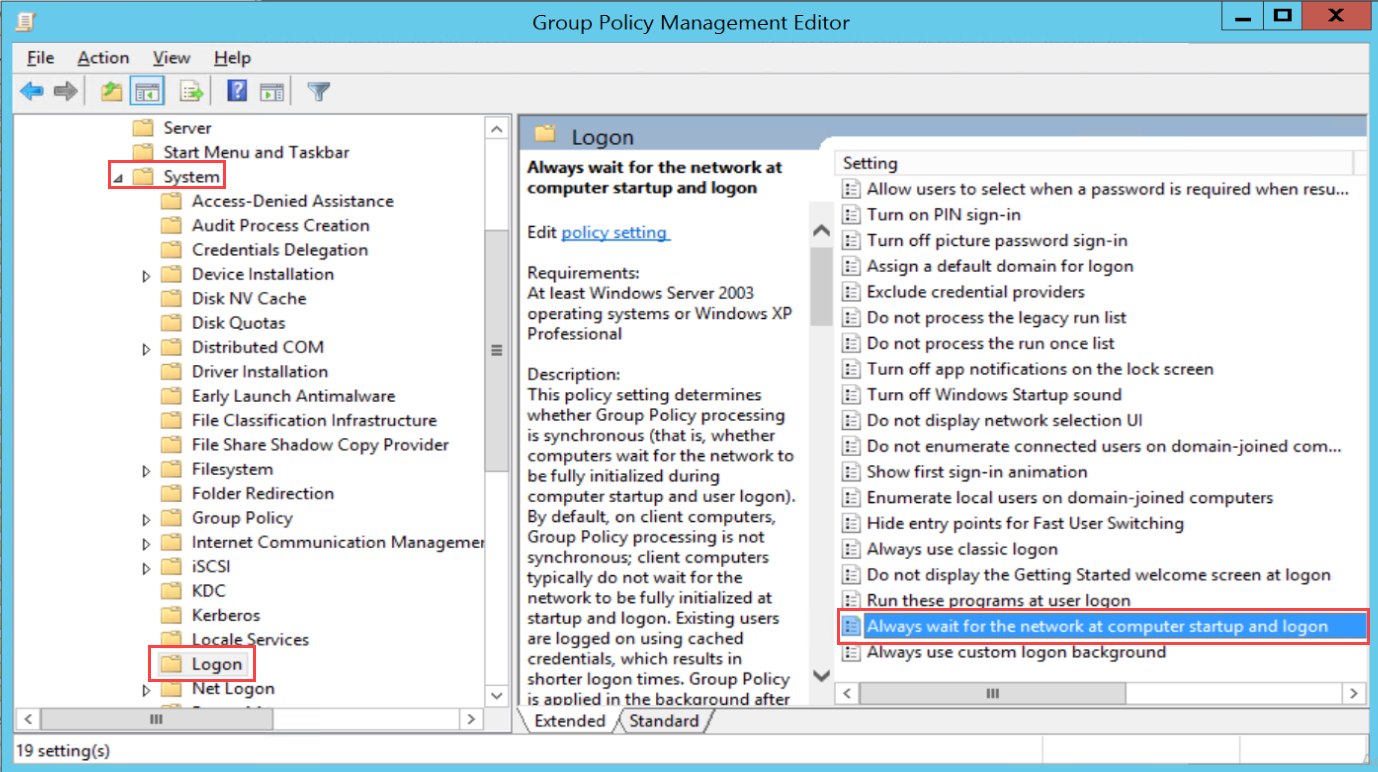
- In the Computer Configuration > Policies > Administrative Templates > System > Logon, enable the parameter Always wait for the network at computer startup and logon.
Agent Uninstallation Using GPO
To uninstall the agent from multiple machines,
Navigate to Computer Configuration > Policies > Software Settings > Software Installation folder.
Here, select the agent (Motadata ServiceOps), right click it, select All Tasks, and Remove.

The following Remove Software dialog appears.
- Select the "Immediately uninstall the software from users and computers" option and click OK. The agent will be uninstalled from the target machines.

The uninstallation will take place after the next system reboot.