Software Rules
In the Service Based industry there are some pre-defined regulations for all the management softwares that are pre-defined while installation. Here, in the Asset management part, assets are broadly divided in 3 divisions which includes Hardware, Software, and Non IT.
Now, here Software as an asset plays a key role because the management of the software assets sounds to be a very tedious job. Thus, various pre-defined rules allows you to notify fewer violations if they occur.
To view the Software Rules page, navigate to Admin > Asset Management > Software Rules.
Below is the list of pre-defined software rules:
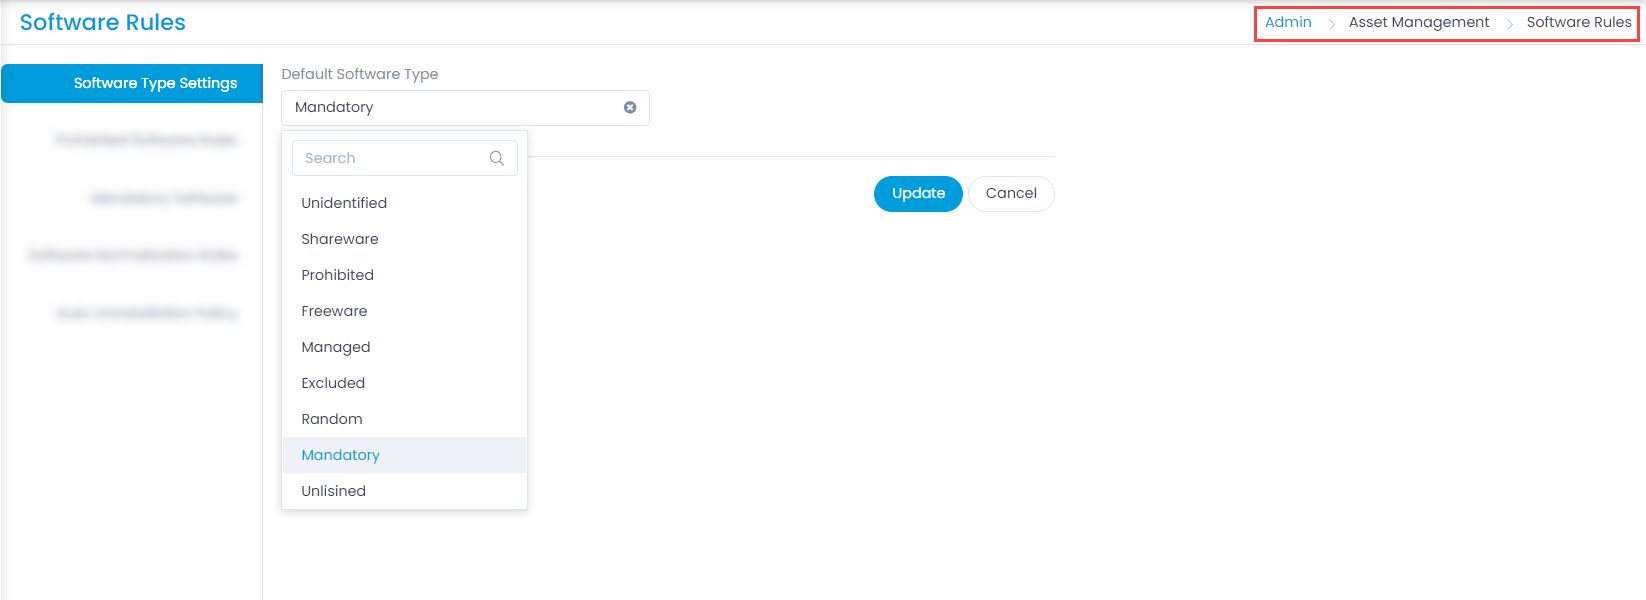
Software Type Settings
This allows you to set the ‘Default Software Type’ to any from the pre-defined types. Thus, if any asset is added or discovered the Software type would be by default the selected one here.

Prohibited Software Rules
This tab enables you to create rules to prohibit (blacklist) certain softwares in the assets of the organization, enabling the precise management of software usage. Additionally, it helps in safeguaurding against security threats, ensure compliance, and streamline the IT environment. For example, torrent clients are prohibited at most workplaces.
Motadata has a default Prohibited Type called Prohibited, to flag certain Software Assets. The process of flagging can be done both manually and through automation by adding a rule.
Flagging a Software as Prohibited has the following behavior:
When a prohibited Software is discovered during discovery, a notification is sent to the user of the Installed Asset (Used by) and the Admins. A prohibited Software is displayed in the "All Prohibited Software" filter. Any asset can be changed to prohibited manually by changing the ‘Software type’. If all the prohibited types are to be listed down, they can be done as below:

Flagging a Software as Prohibited is done via adding a software rule with condition too.

Here, you can do the following:
- Computer Exclusion: You can add assets that you want to ignore for prohibited software.
- Scan Existing Softwares: You can scan all the existing softwares, and accordingly prohibit, and send them to the Auto Uninstallation Policy.
- Add Software Rule: You can add rules to prohibit or allow softwares.
- Bulk Actions: You can select multiple rules and enable, disable, or delete them in one go.
- Enabled: You can enable or disable the prohibited/allowed software rule.
- Edit: You can edit the rule.
- Delete: You can delete the rule if not required. A confirmation message will appear. Click Yes to continue or Cancel to stop the process.
- Grid: You can view a list of rules along with their description.
Computer Exclusion
The Computer Exclusion feature allows you to exempt specific hardware assets from being flagged under the Prohibited Software rule. In scenarios where certain systems require otherwise restricted software for valid operational or administrative reasons, this feature provides flexibility and control. By configuring Computer Exclusion, you can:
- Allow specific computers to run the prohibited software without triggering alerts or violations.
- Maintain compliance across the organization.
- Prevent false alarms
To exclude computers,
- Click on Computer Exclusion and a popup appears. It will display the list of excluded computers.
- To add more computers to the list, click the Add to Exclusion List button and a list of hardware assets appears.
- Select the assets to exclude.
- Click Add.
- Lastly, click Done. The prohibited software rules will now ignore these computers and allow them to run the software.


Add Software Rule
To create a software rule,
- Click the Add Software Rule button and a popup appears.
- Enter the Name and Description of the rule.
- Add Conditions based on which the software will be marked as prohibited. You can add multiple conditions using the Add Condition Group button. To delete conditions, you can use the Remove All Condition.

- Once you're done, click Add. The rule will be enabled by default. Whenever the configured conditions match a software, the rule will automatically trigger and uninstall the software based on the auto-uninstallation policy.
Mandatory Software
This provides an option to select mandatory list of software that must be installed on all the computers. After each scan check the list of software against the mandatory list. If there are missing software installations then send an email alert similar to what is sent for the prohibited software installation.
The page displays a list of mandatory software along with their details as shown below.

Here, you have the below options:
- Computer Exclusion: You can add assets that you want to ignore for prohibited software. For more details, refer to the section Prohibited Software Rules.
- Add Mandatory Software: You can add software that must be installed on the computers.
- Enable/Disable: You can enable or disable the rule.
- Delete: You can delete the rule if not required.
Add Mandatory Software
To add the software in mandatory list,
- Click the Add Mandatory Software button and a popup appears.
- Select the desired software from the list.
- Click Done.

Software Normalization Rules
Software Normalization is a rule based automation that:
- Makes changes in the Software Asset Details when some specific set of condition(s) are triggered.
- Adds a consolidating Software that fulfils the pre-defined conditions.
- Manages a controlled Software installation type by putting Software either in white list or black list (Prohibited Software).
Software Normalization can be useful in cases where, managing each and every Software Asset discovered is not possible and need is to manage a small set of Software Assets for the purpose of compliance management. Thus, here Software Normalization can be used to change the Type of Software satisfying some predefined conditions.
Also, where the users want to control the kind of software that can be installed or uninstalled in their Computers. And, expect notifications of an un-authorized instance of an installation. In such a case, one can mark all unauthorized Software as Prohibited (black list). Thus, whenever, a Prohibited Software is discovered a notification is sent to the user and admin.
Setting Software Normalization
A user can create Normalization rules that can have two kinds of actions:
- Upon trigger, Normalization sets certain field values of a Software Asset. For example: Adding a Product to a Software Asset.
- Upon trigger, Normalization consolidates all Software, satisfying the Normalization rules, into a single suit.
Create a Normalization Rule for Field Assignment
To create a normalization rule,
- Click on Add Software Normalization Rule and a popup appears.
- Enter the below details:
- Name: Change Software Type
- Description Statement: It will change the software type.
- Condition Statement 1: When the product= is In = Adobe Photoshop.
- Action for condition Statement 1: Set software type to = Managed

- Here, the rule type is as Field Assignment.
- Set the condition as Product Equals to Adobe Photoshop; this means that the rule is applicable on Software Assets with Product as Adobe Photoshop.
- Add an action: Set Software Type to Managed. The set action will be performed when the rule is triggered.
- Turn on Include Normalized Softwares in Next Run. Turning on this option allows Software that have been normalized by this rule or any other rule to be included, if conditions are satisfied during its next run.
- When you are done creating a rule, click on Update.
Create a Normalization Rule for Suite To create a normalization rule,
- Click on Add Software Normalization Rule and a popup appears.
- Enter the below details:
- Name: Microsoft Office Suite
- Description Statement: It will contain all Office software.
- Rule Type: Software Suite
- Condition Statement 1: When the Name = Visual, and
- Condition Statement 2: When the Name = Microsoft
- Action for Condition Statement 1 and 2: Add to Suite = Microsoft Visual Studio Code

- Here, the rule type is as Software Suite.
- Set the condition as Name Equals to Microsoft or Visual; this means that the rule is applicable on Software assets with Product as Microsoft Visual Studio.
- Add an action: Add to Suite. The set action will be performed when the rule is triggered.
- Turn on Include Normalized Softwares in Next Run. Turning on this option allows Software that have been normalized by this rule or any other rule to be included, if conditions are satisfied during its next run.
- When you are done creating a rule, click on Update.
Auto Uninstallation Policy
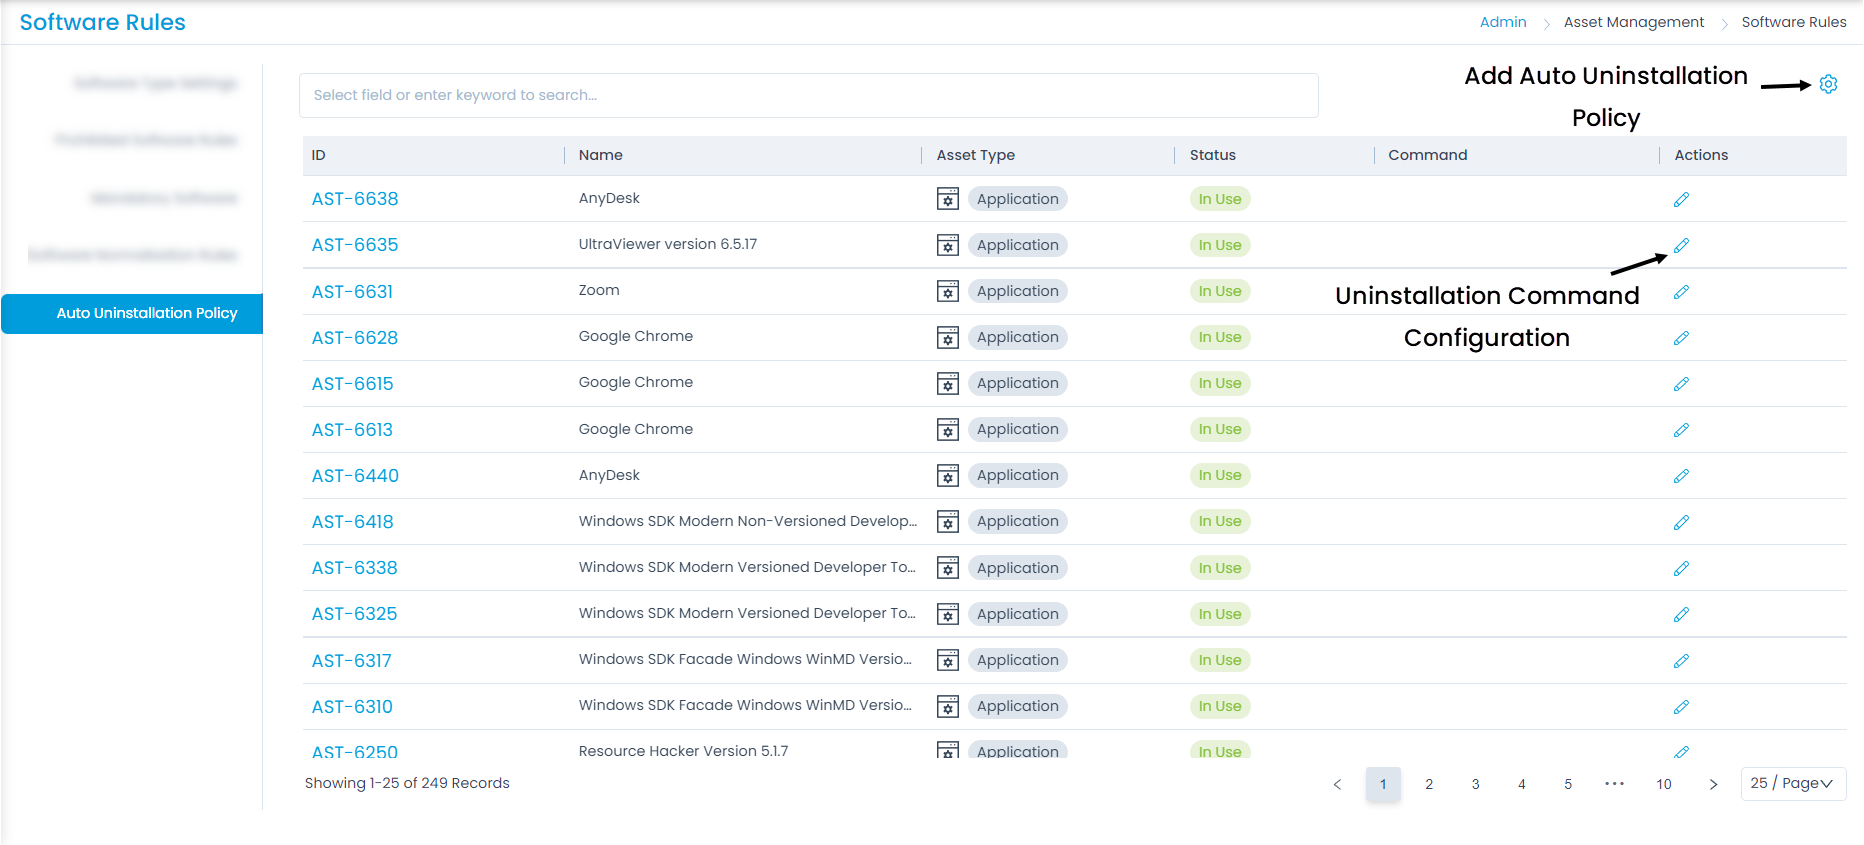
This tab enables you to create a policy using which a software can be uninstalled from all the computers automatically. You can also add an uninstallation command.

The page displays a list of prohibited software which you can uninstall using the auto-uninstallation policy. You can also click on the ID to view the asset details.
Uninstallation Command Configuration
To add a command to uninstall a software,
- Click the Edit icon next to the desired software and a popup appears.
- Select the option to Generate Uninstall String as Pre-fill Uninstall Command and I will Specify myself.
- In the Uninstall Command with Silent Switch field enter the command. This is used for the silent uninstallation of software, particularly for exe files.
- Once the command is entered, click Update.

Add Auto Uninstallation Policy
- Automatic Uninstallation: Enable if you want to apply the policy to uninstall software automatically.
- Uninstall Software After: Specify the number of days/hours/minutes after which the software should be uninstalled automatically.
- Once configured, click Update.
