Configuring Microsoft Azure for OAuth
Connect ServiceOps to Microsoft Azure using OAuth to send and receive emails securely, without storing passwords in the system.
What is Microsoft Azure?
Microsoft Azure is a public cloud computing service owned by Microsoft. It provides a wide range of cloud services, including analytics, storage, computing, and networking.
What is OAuth?
OAuth is an Open Standard Authorization protocol that allows you to authenticate one application communicating with another on your behalf without sharing the password. It uses client secret values instead of a password to allow access to a secured resource, keeping email communication secure.
This functionality is applicable from version 7.9 and above.
How OAuth Works with ServiceOps
ServiceOps uses the Azure AD application you register as a secure intermediary for email authentication. During setup, you provide the Client ID, Client Secret, and Scope to ServiceOps. When ServiceOps needs to send or receive email, it contacts Azure using these credentials to obtain a short-lived access token. Azure validates the credentials against your app registration and returns the token. ServiceOps uses that token to access the mailbox and refreshes it automatically before it expires, so no passwords are stored in ServiceOps at any point.
Prerequisites
Internet connectivity between ServiceOps and Microsoft Azure/Office 365 is required.
Redirect URL must use HTTPS. A valid SSL Certificate is required to enable HTTPS in ServiceOps.
Configure your firewall settings to allow communication between ServiceOps and the following Microsoft Office 365 URLs:
login.microsoftonline.com(For Enterprise applications)outlook.office365.com(SMTP, IMAP, and POP3, for Enterprise applications)login.live.com(For Personal accounts)
Whitelist these URLs to ensure they are not blocked by your organization's network infrastructure. For a complete list, refer to Office 365 URLs and IP address ranges.
The Microsoft Azure user must have administrator rights.
Configuring Microsoft Azure as Incoming Email Server
To configure Microsoft Azure as the incoming email server:
- Sign in to the Microsoft Azure portal.
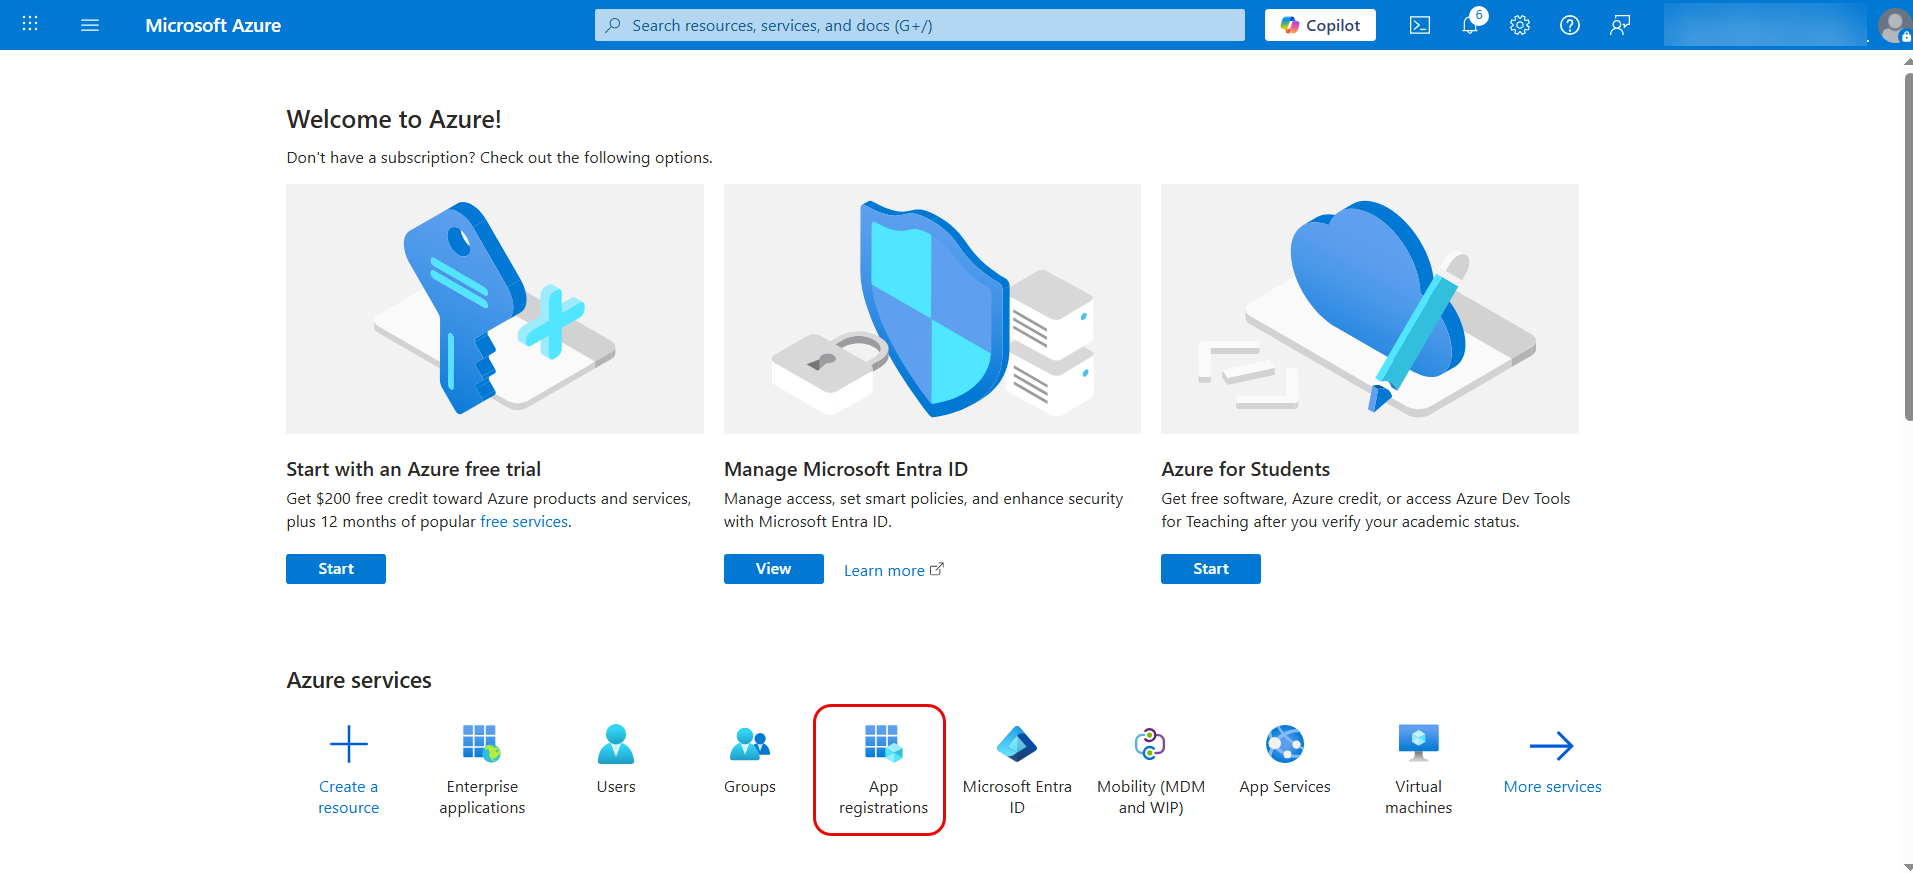
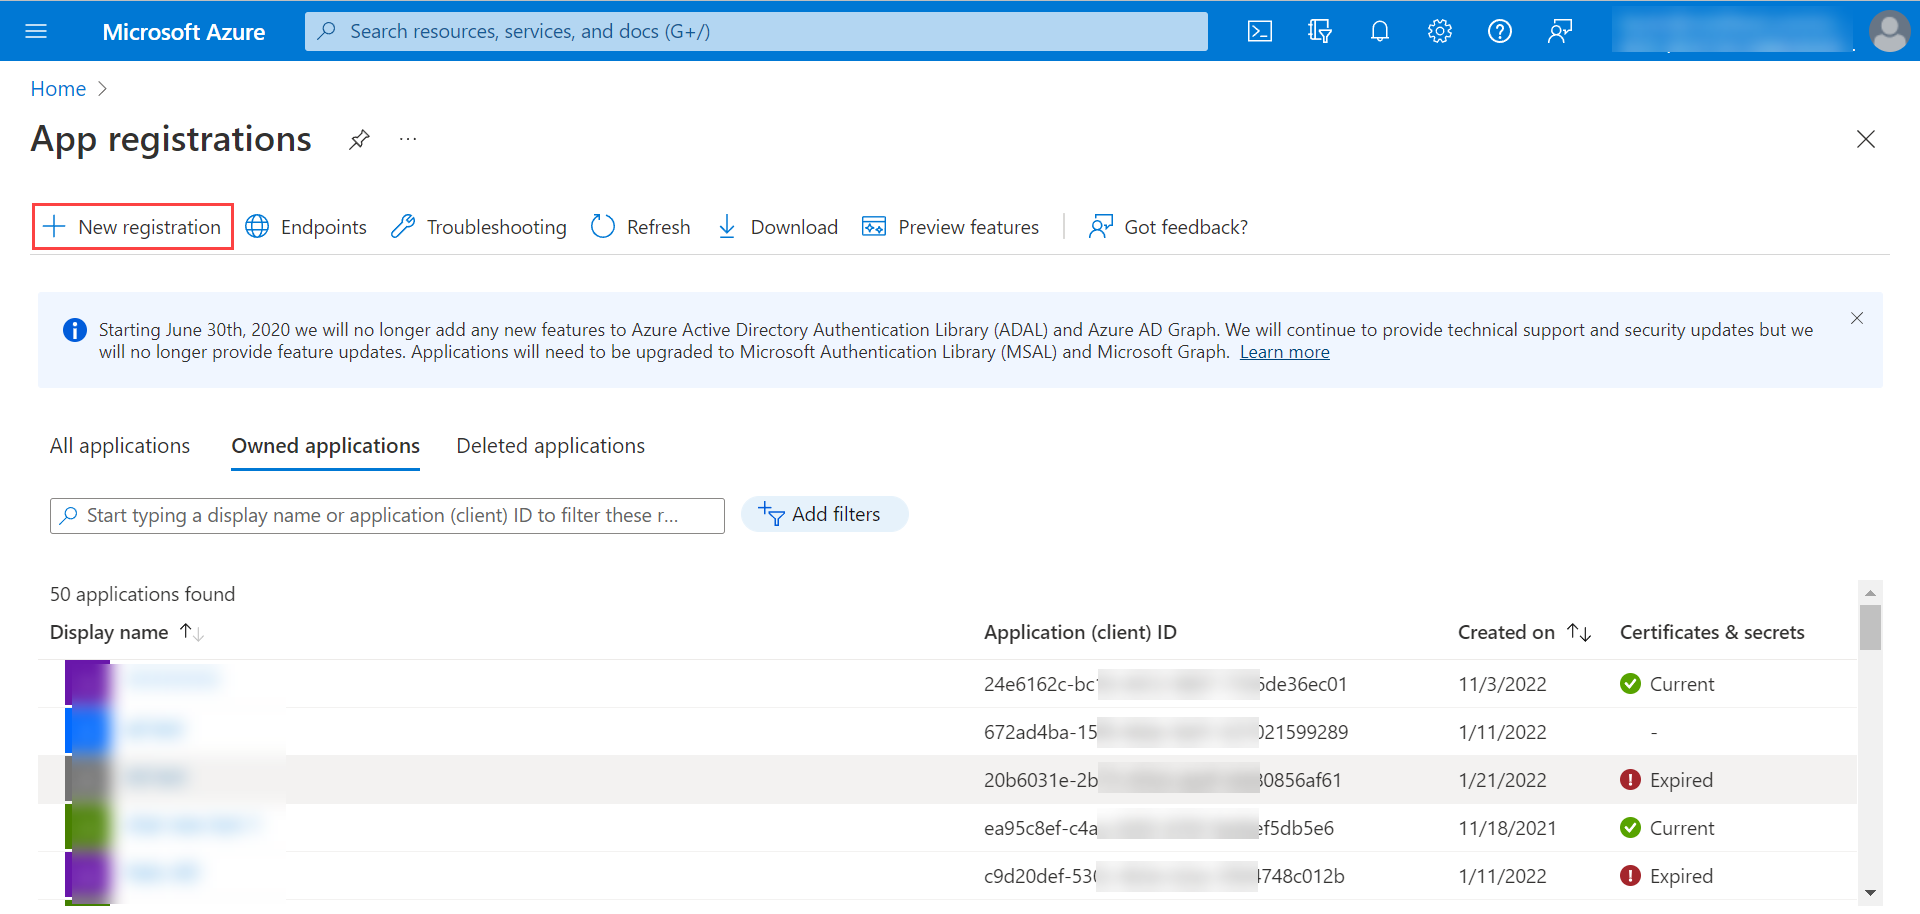
In the Azure services section, click App registrations > New Registration.
Multiple ServersCreate a separate app for each incoming email server in ServiceOps if multiple servers are configured with different domains.
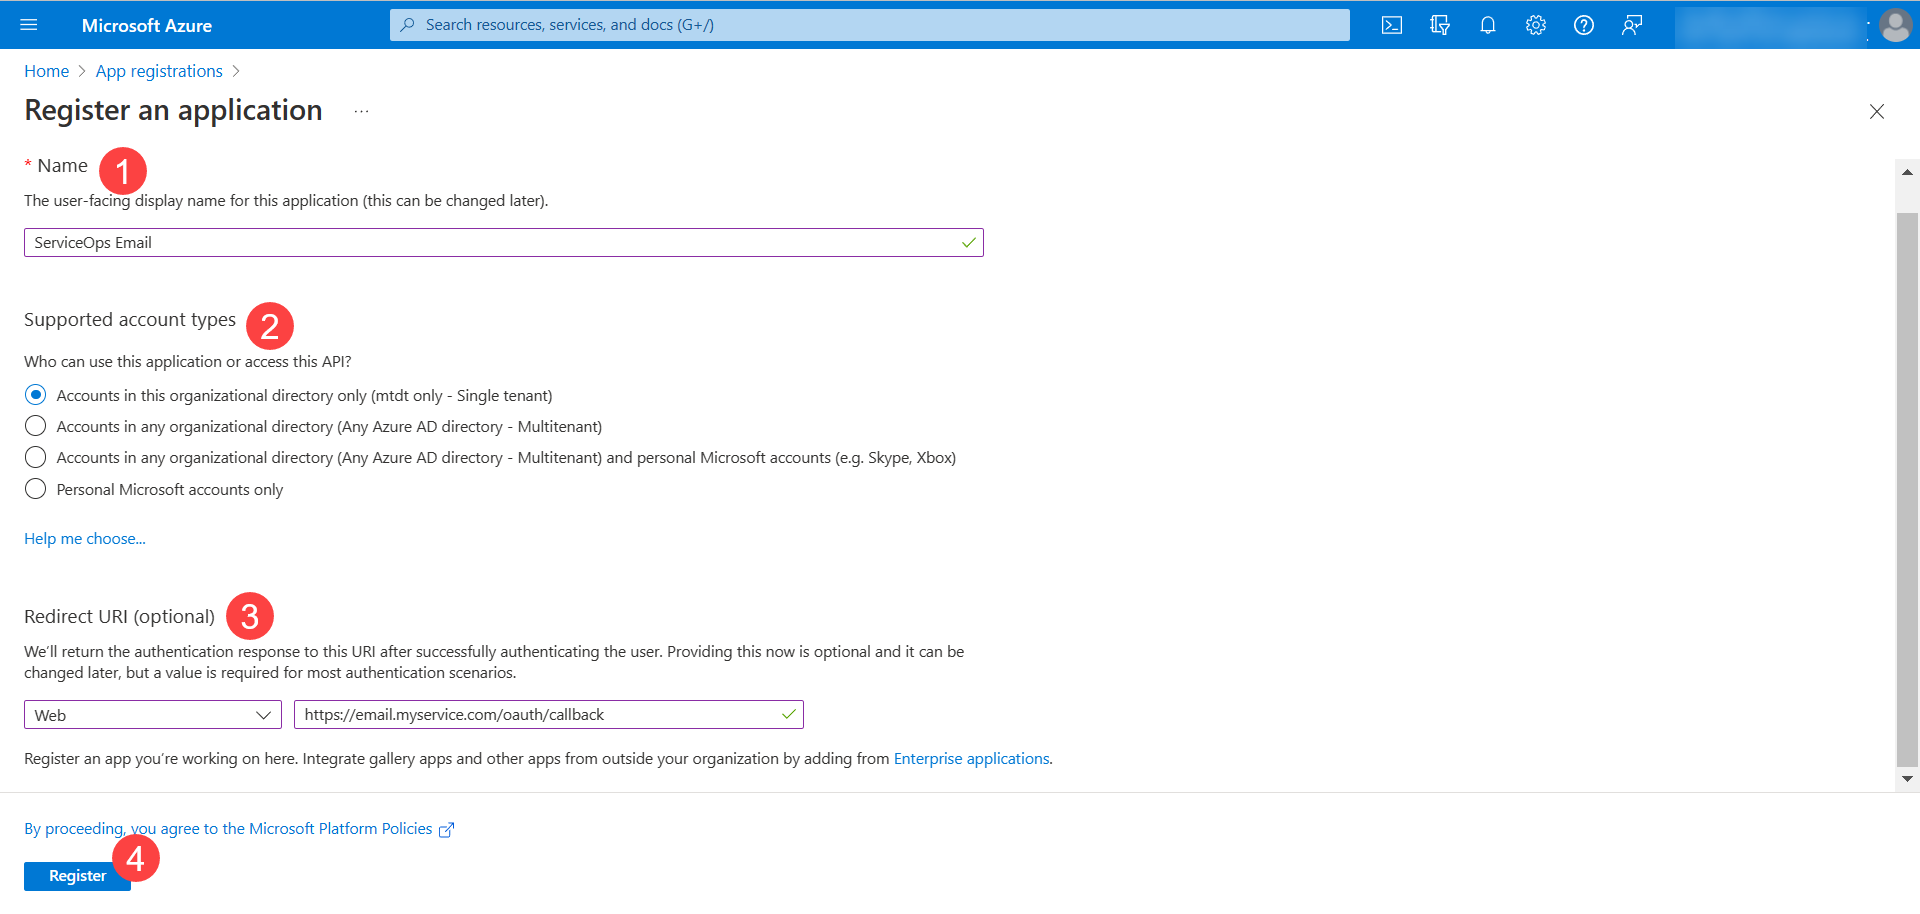
Enter the name and select the Supported account types. Under Redirect URI, select Web as the platform and enter the redirect URI.
Syntax:
https://{server URL}/oauth/callbackExample:
https://dummy.com/oauth/callbackClick Register.
The application appears in the list.

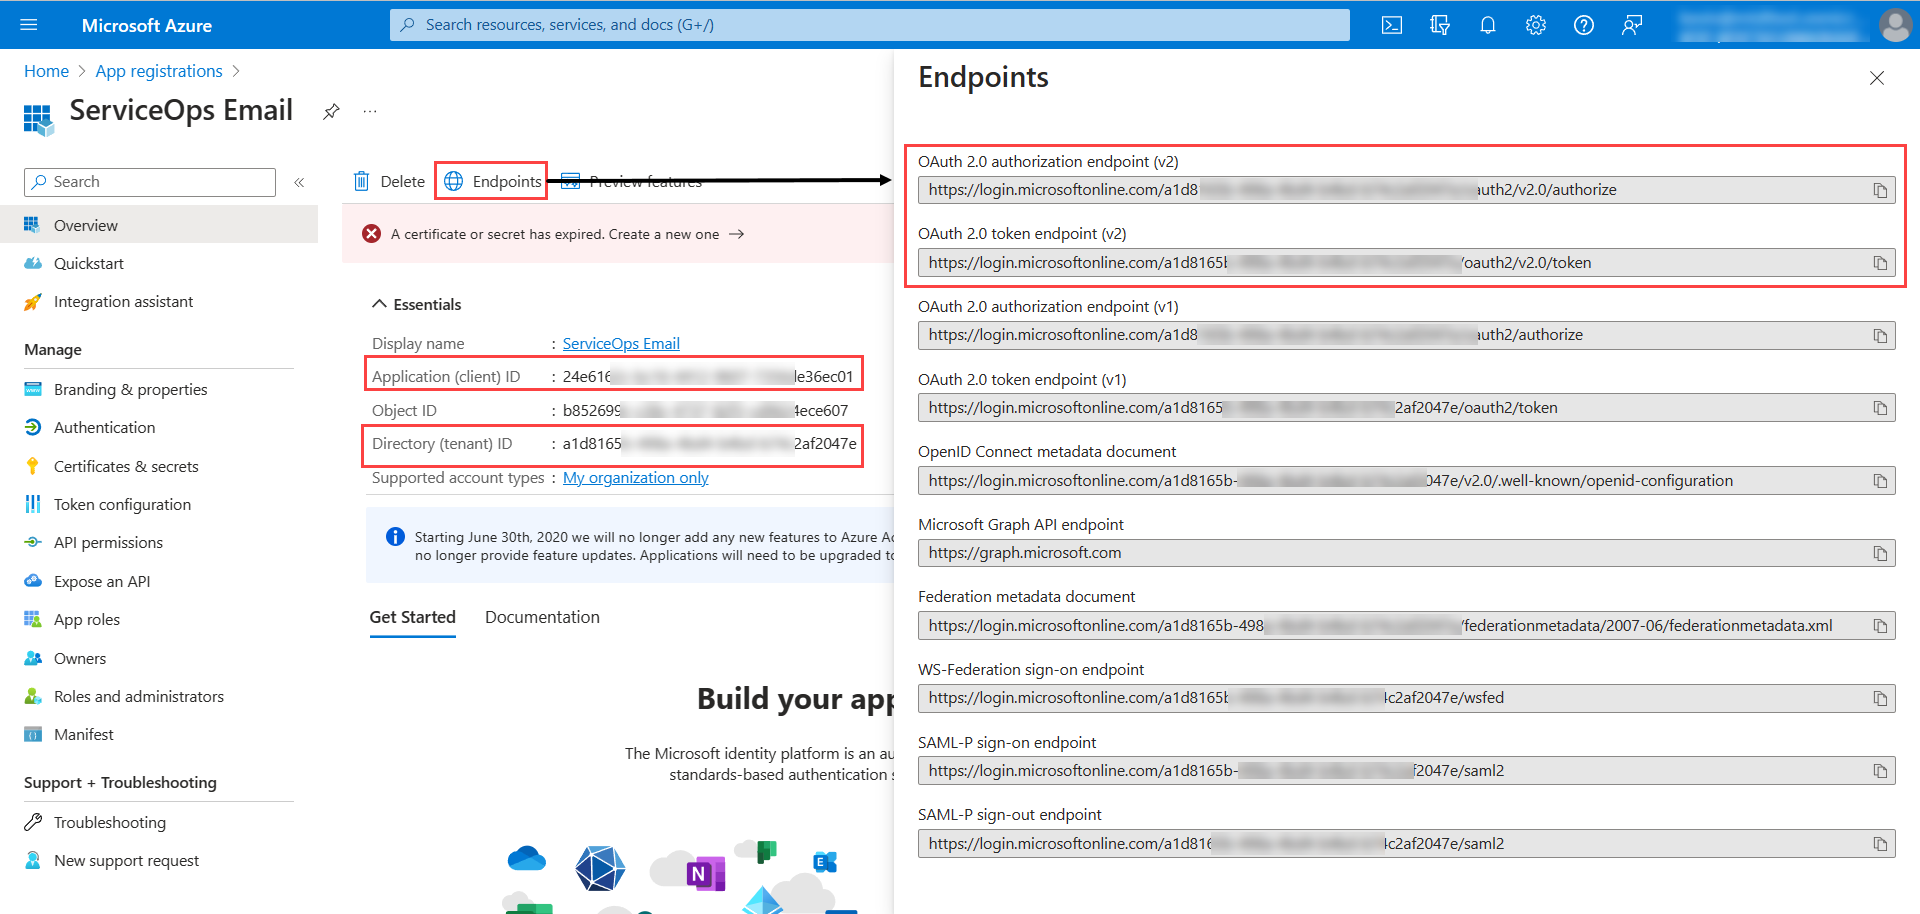
- Click on the application. Copy the Application (client) ID and paste it in ServiceOps. For the Authorization and Token URL, click the Endpoints tab and copy the OAuth 2.0 authorization endpoint (v2) and OAuth 2.0 token endpoint (v2) URLs, or use the Tenant ID from Overview to construct both URLs.
- Go to Manage > Certificates & secrets > Client secrets and click New Client Secret.
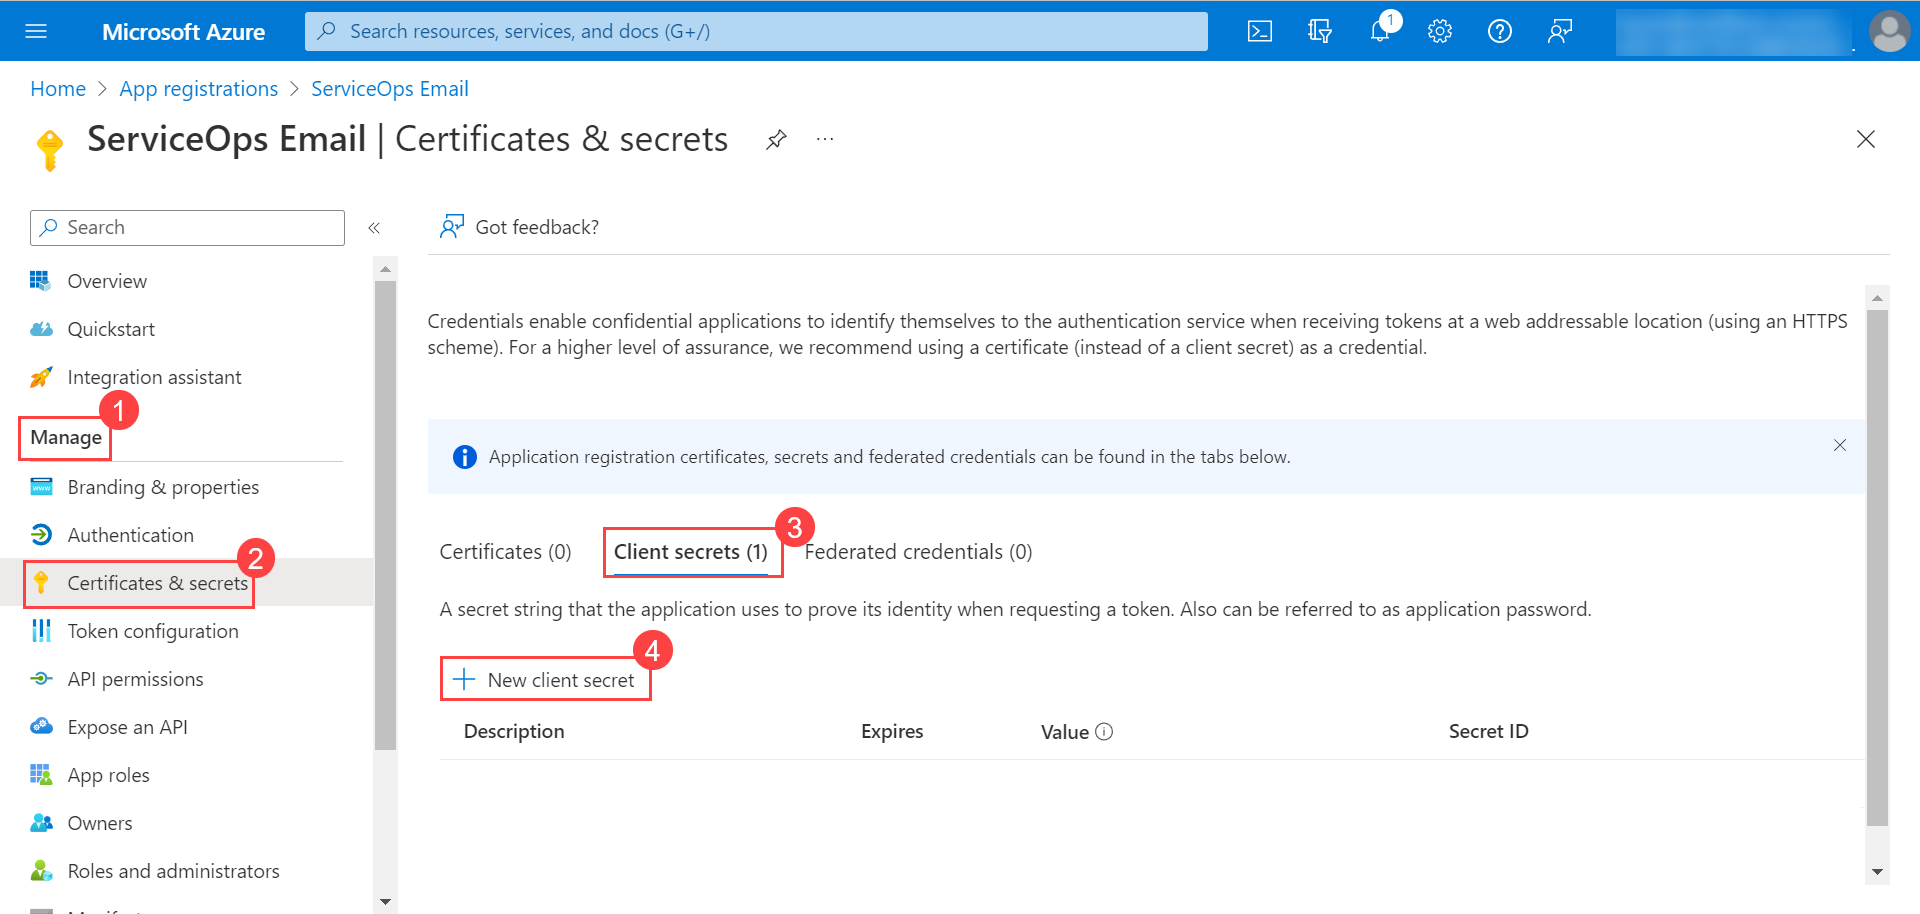
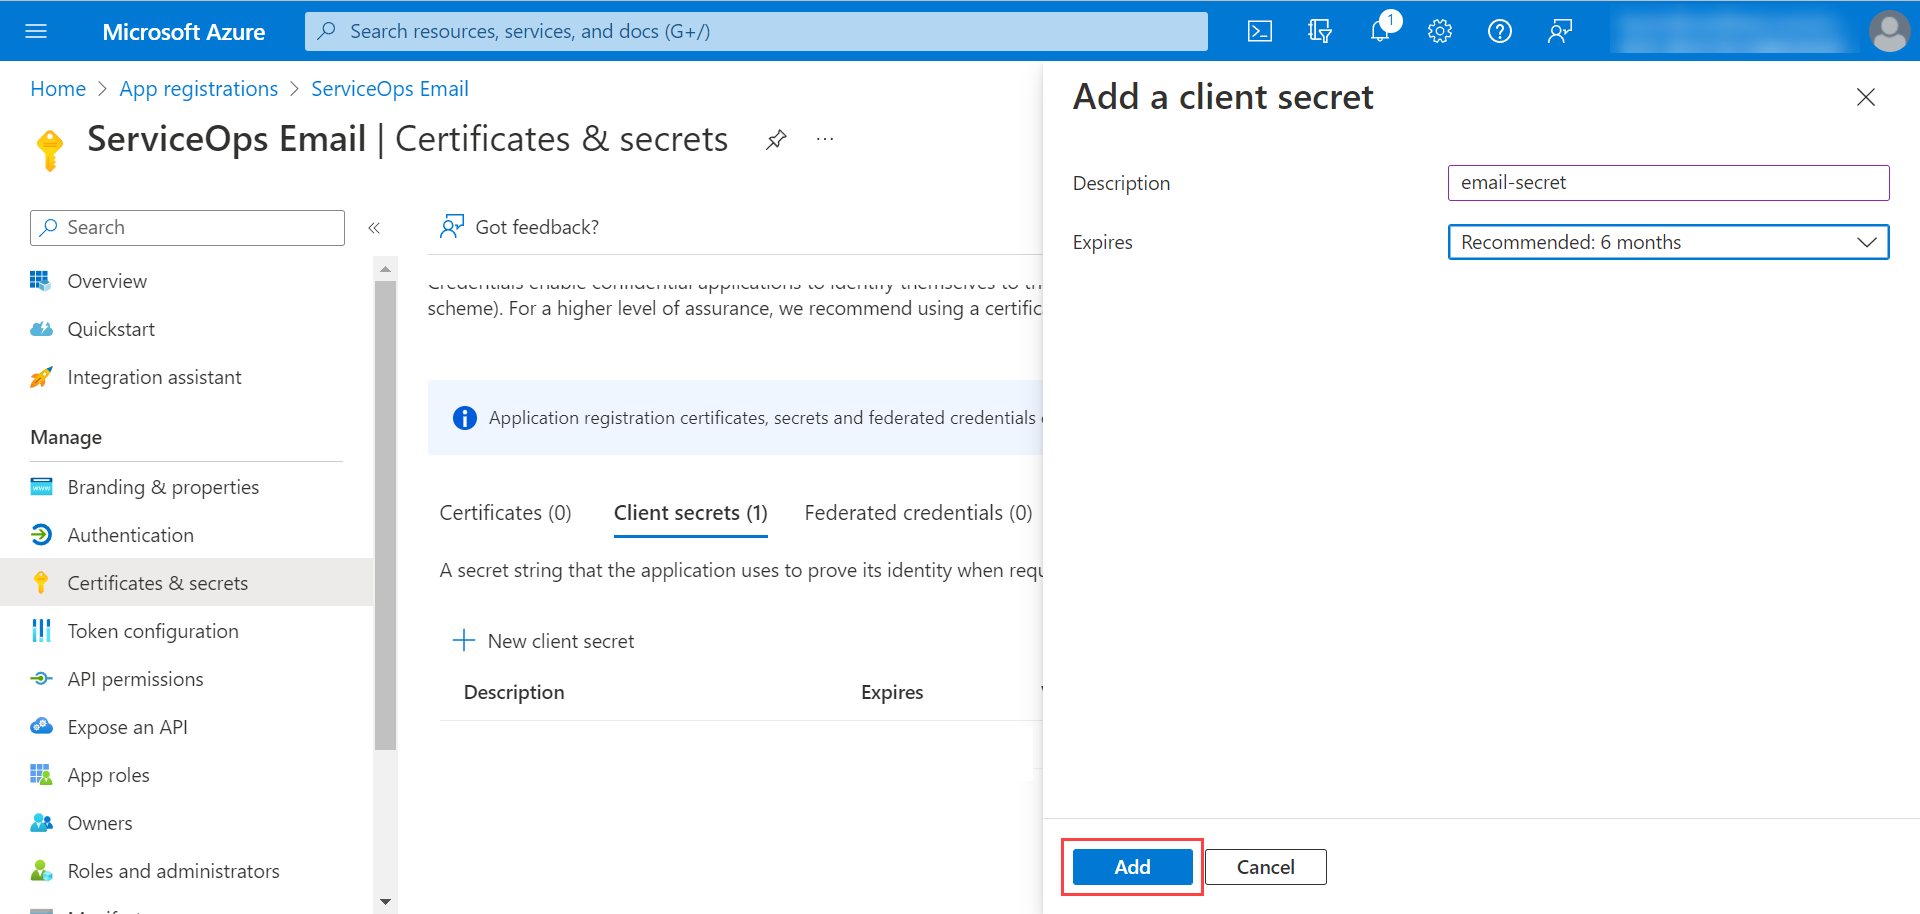
- Enter the description, select the expiry time, and click Add.
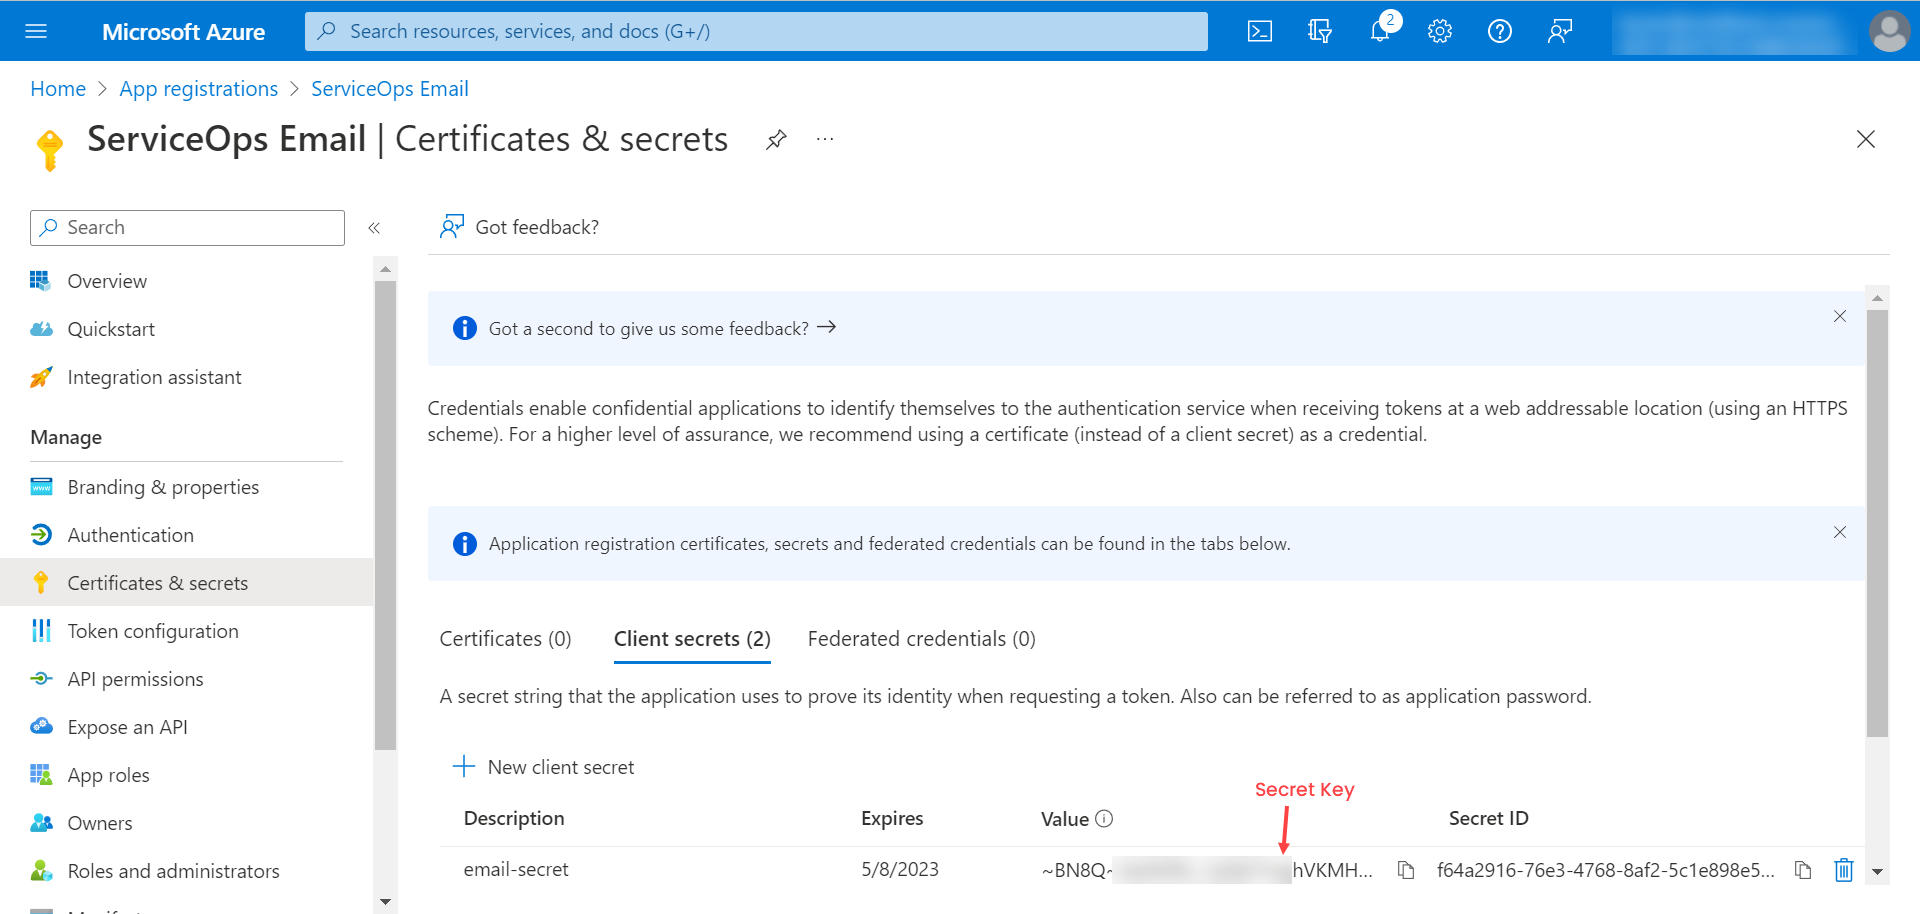
The secret appears in the table. Copy the value.
Save Client SecretThe client secret value can be viewed only once immediately after creation. Save the secret key before leaving the page.
- Go to Manage > API Permissions and click Add a permission.
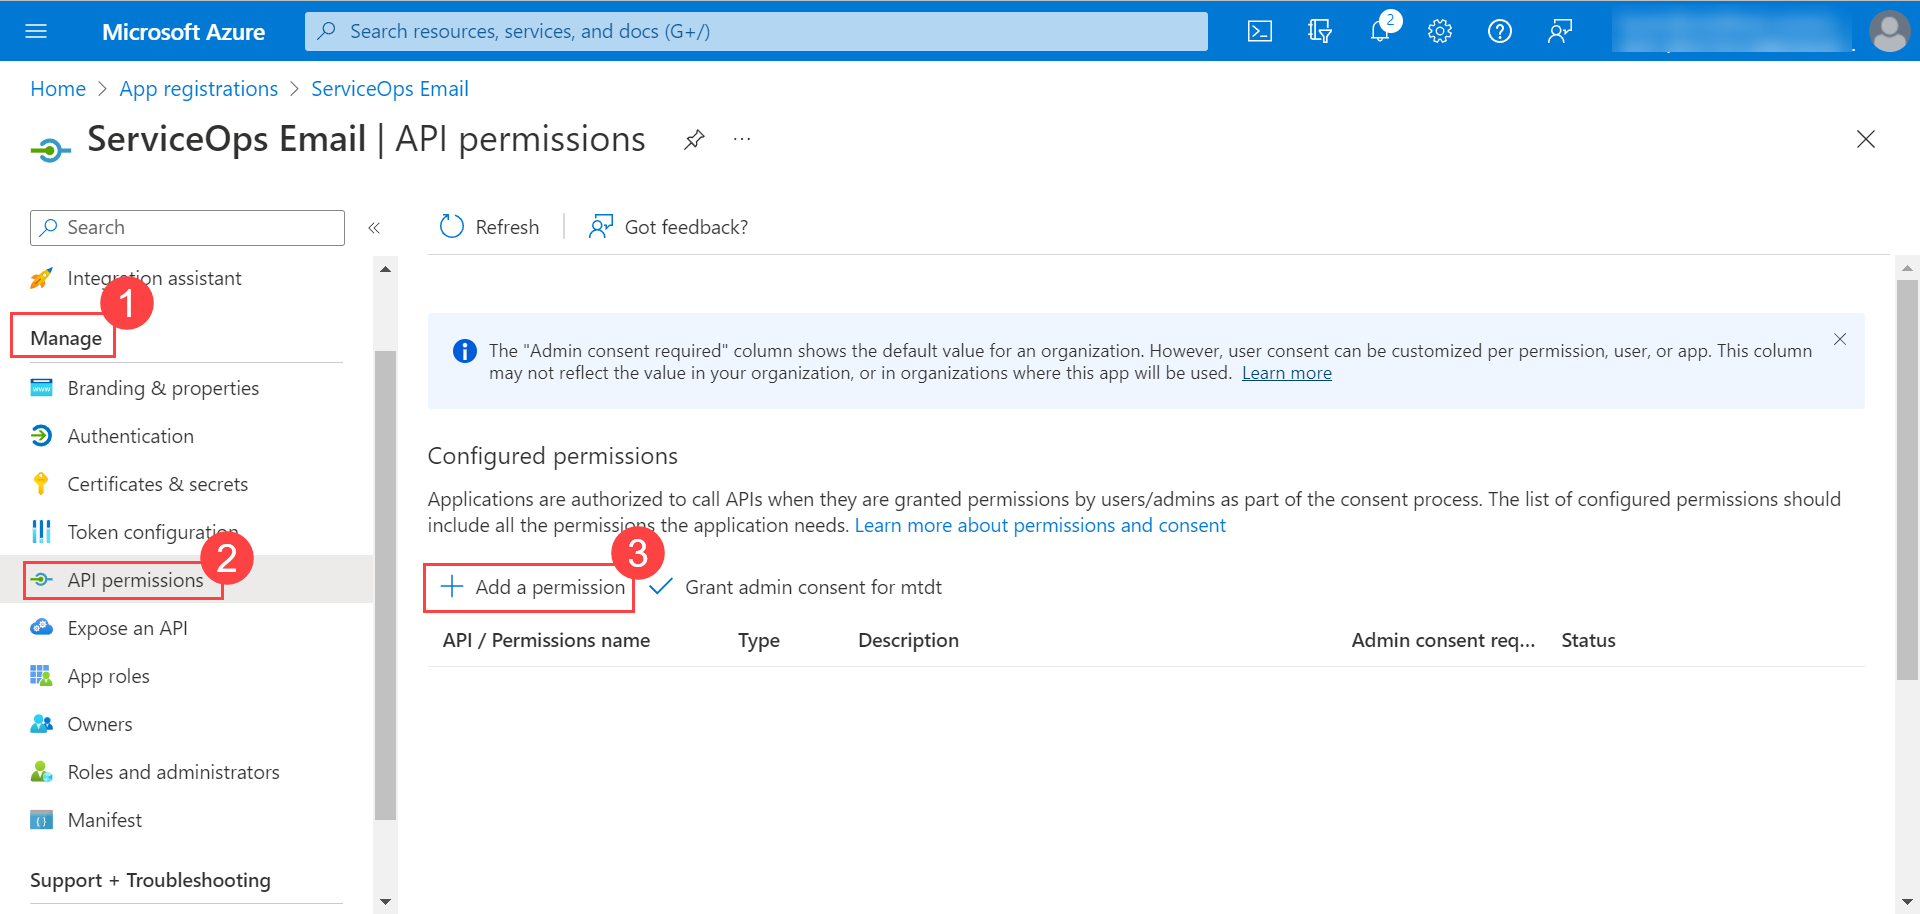
- In the Request API Permissions popup, click Microsoft Graph.
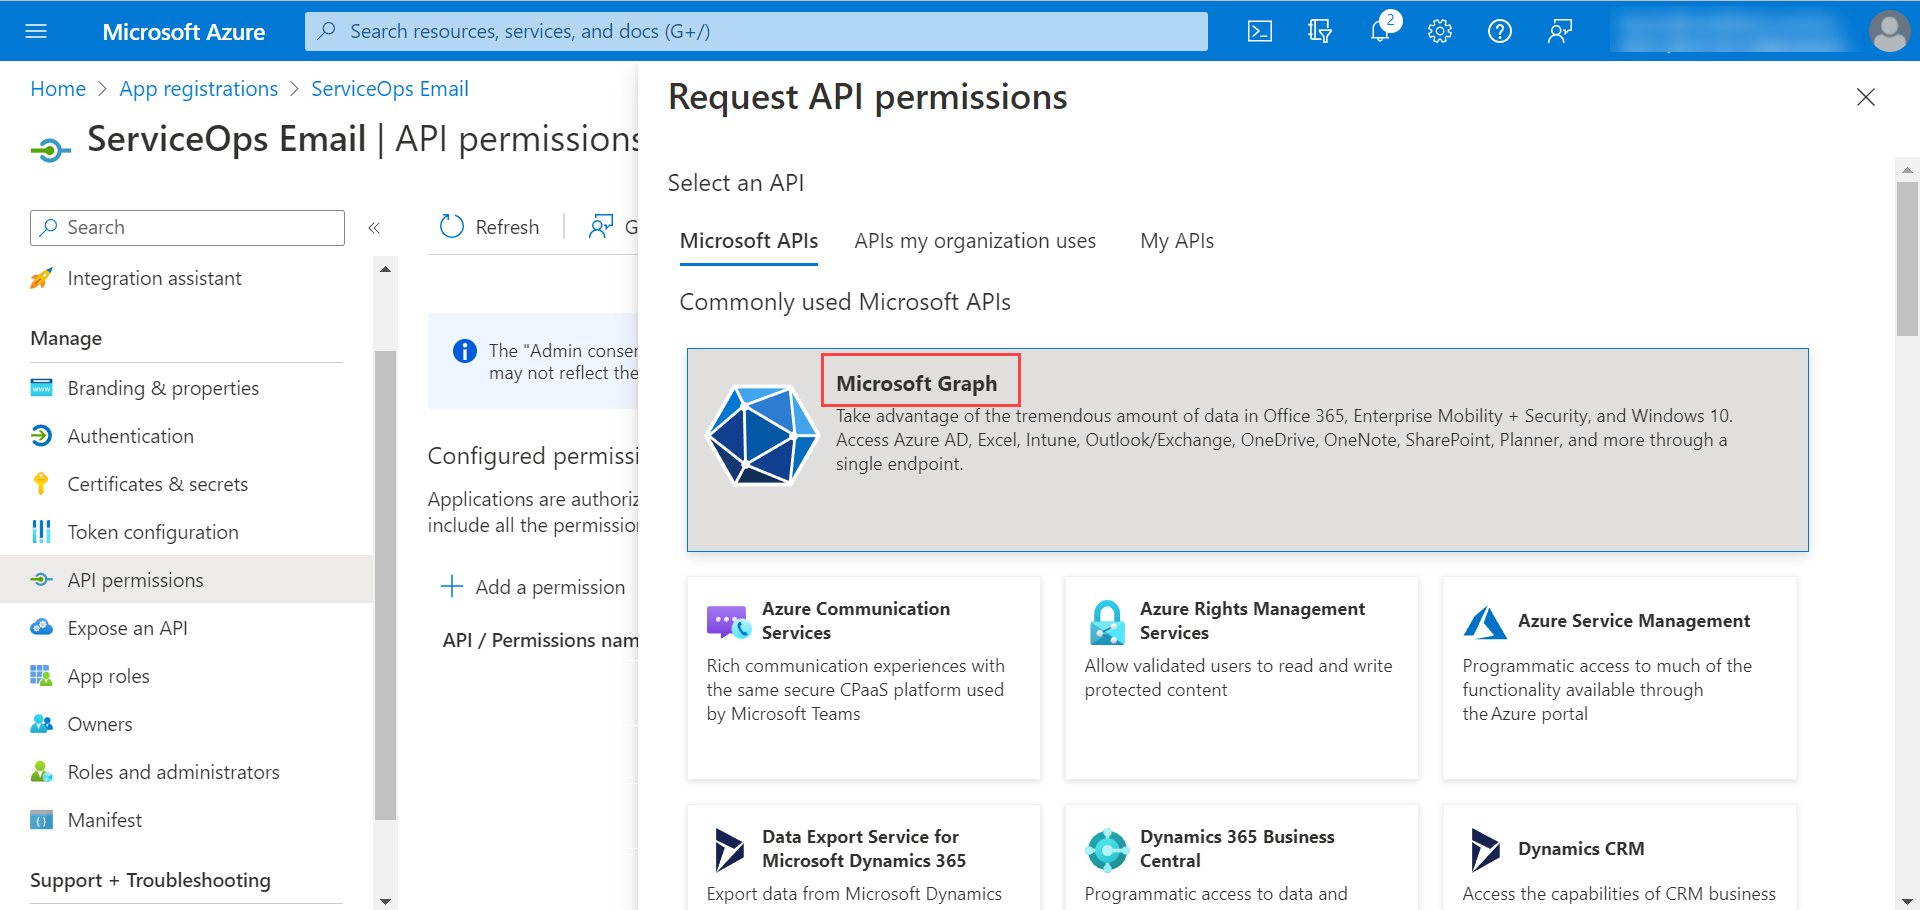
- Add permissions for IMAP or Office 365 Exchange Online (MAPI).
IMAP
Select Delegated Permissions, select the desired permissions, and click Add Permissions.
The Azure application must have the following Delegated permissions for IMAP. Microsoft Graph (Delegated Type):
IMAP.AccessAsUser.AllMail.Read

Office 365 Exchange Online (For MAPI)
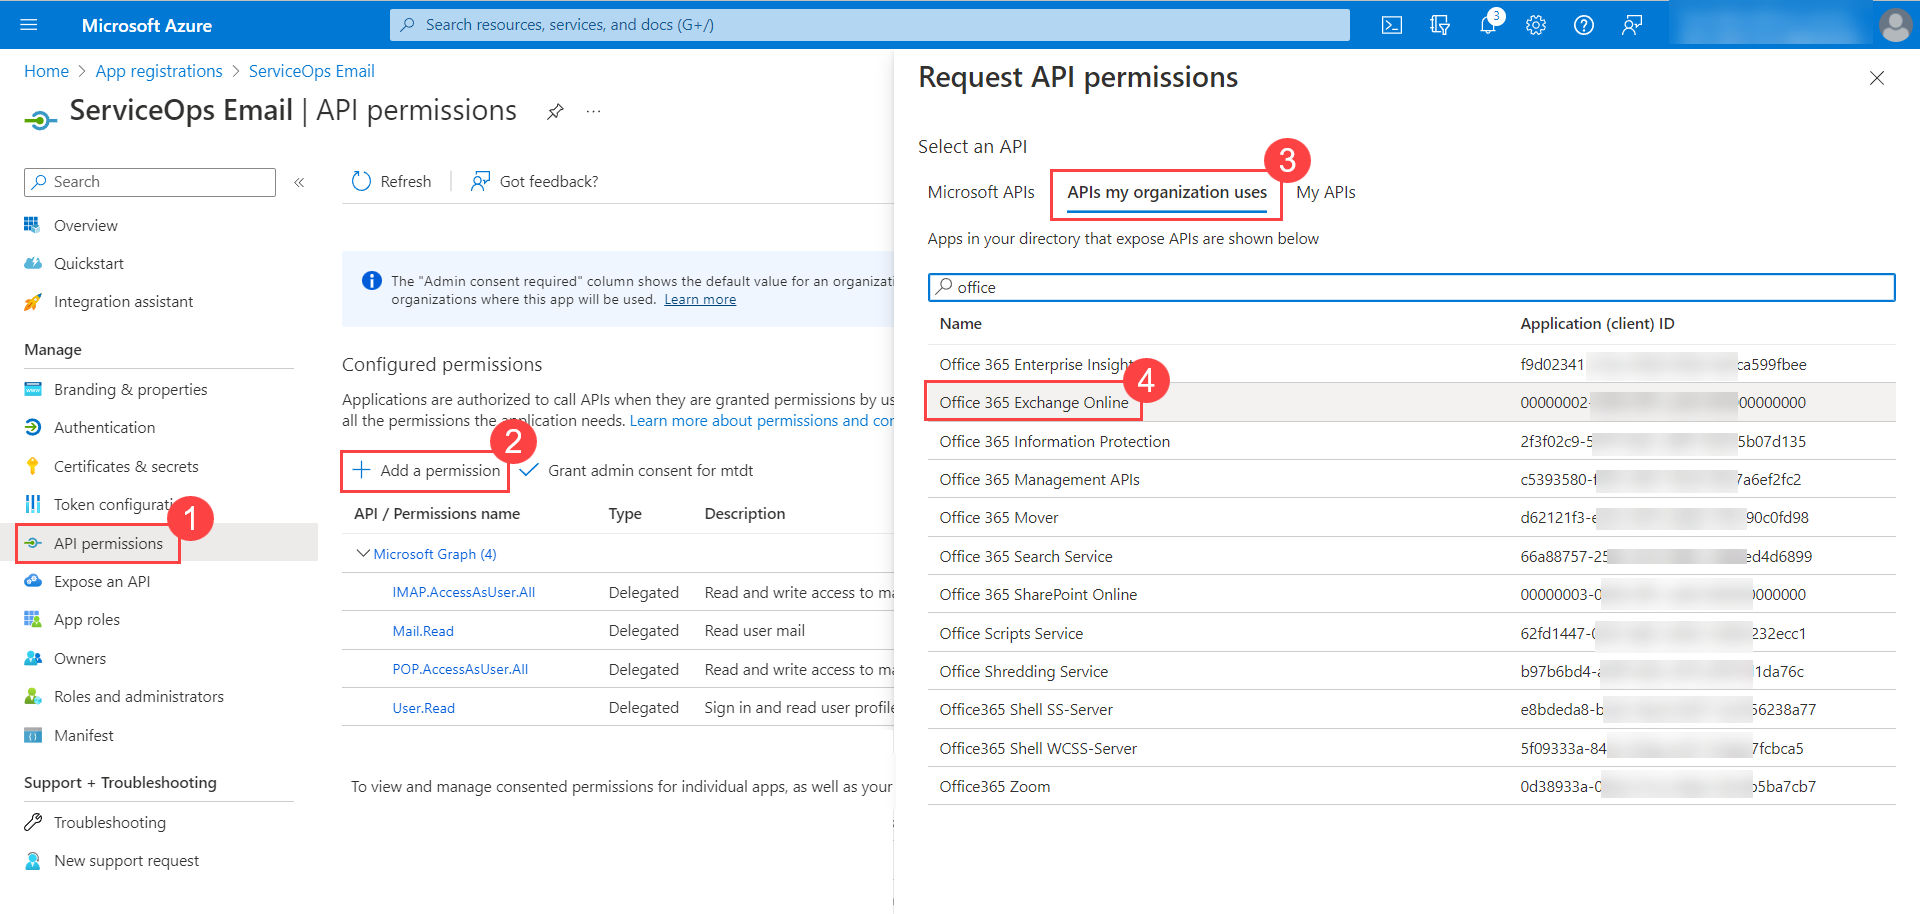
Click Add a Permission > APIs my organization uses, search for Office 365 Exchange Online, and click on it.
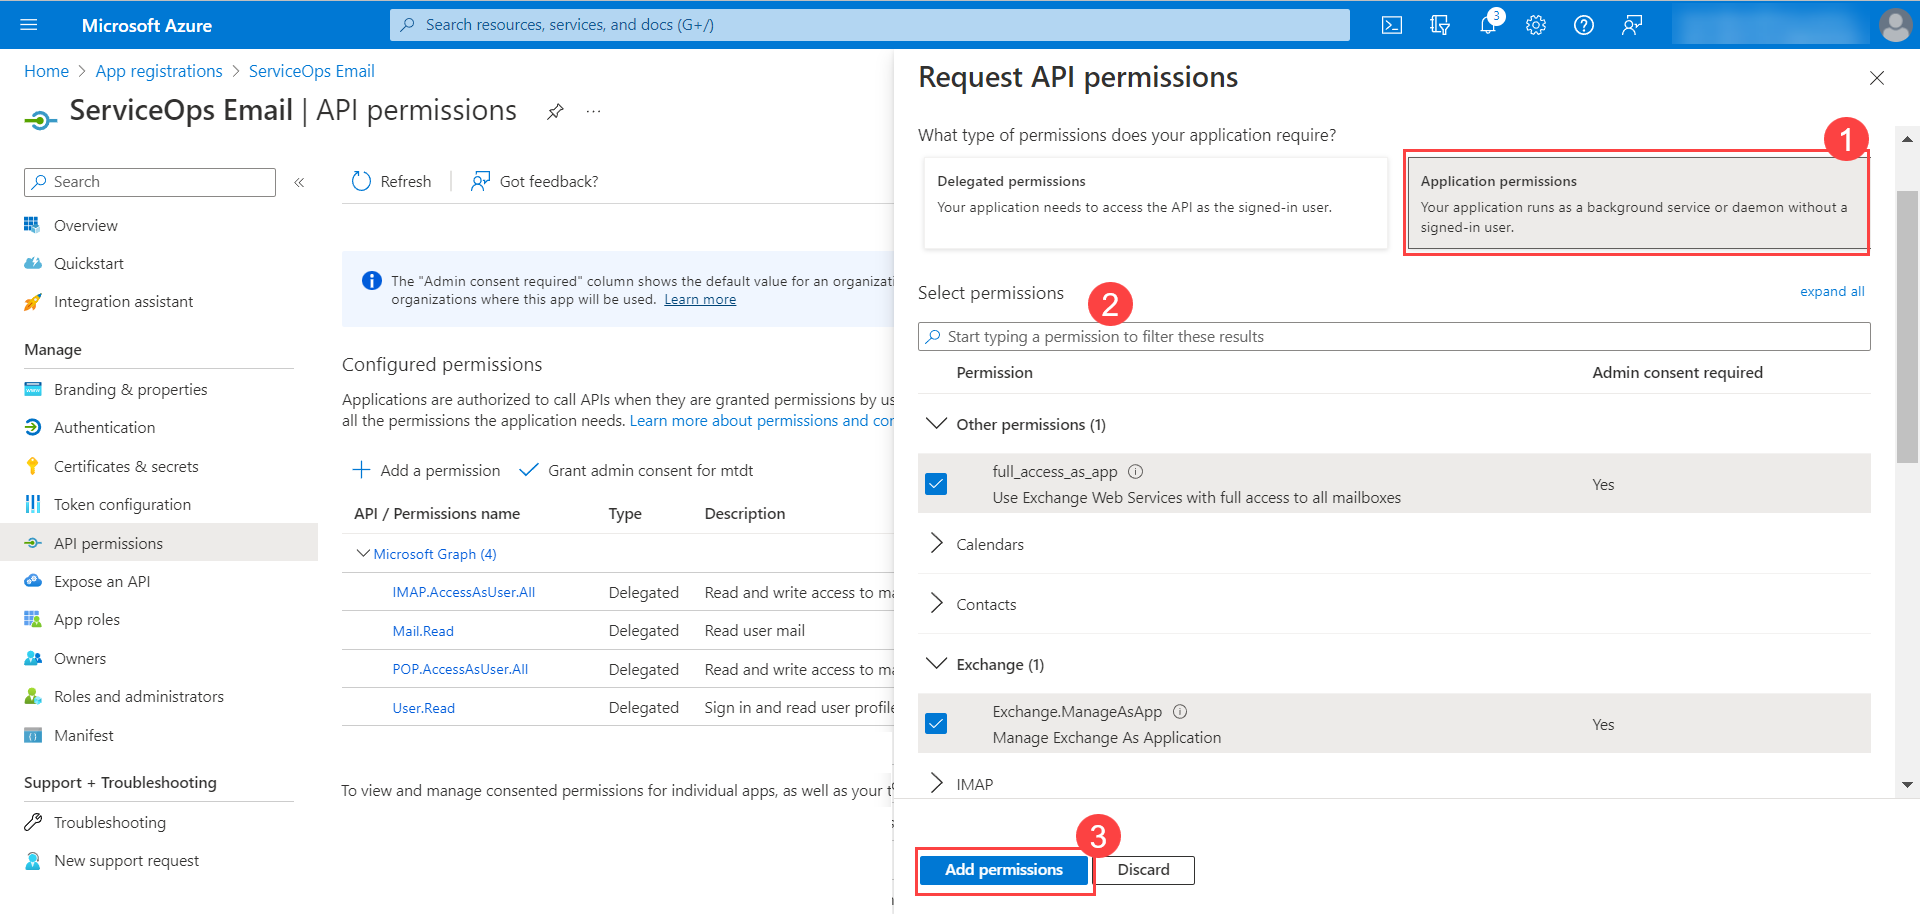
Required MAPI PermissionsThe Azure application must have the following Application permissions for MAPI. Office 365 Exchange Online (Application Type):
Exchange.ManageAsAppFull_access_as_appMail.ReadMail.ReadWrite
Click the Application permissions tab, select the desired permissions, and click Add Permissions.
Click Grant admin consent for {application name}. Click Yes in the confirmation window.
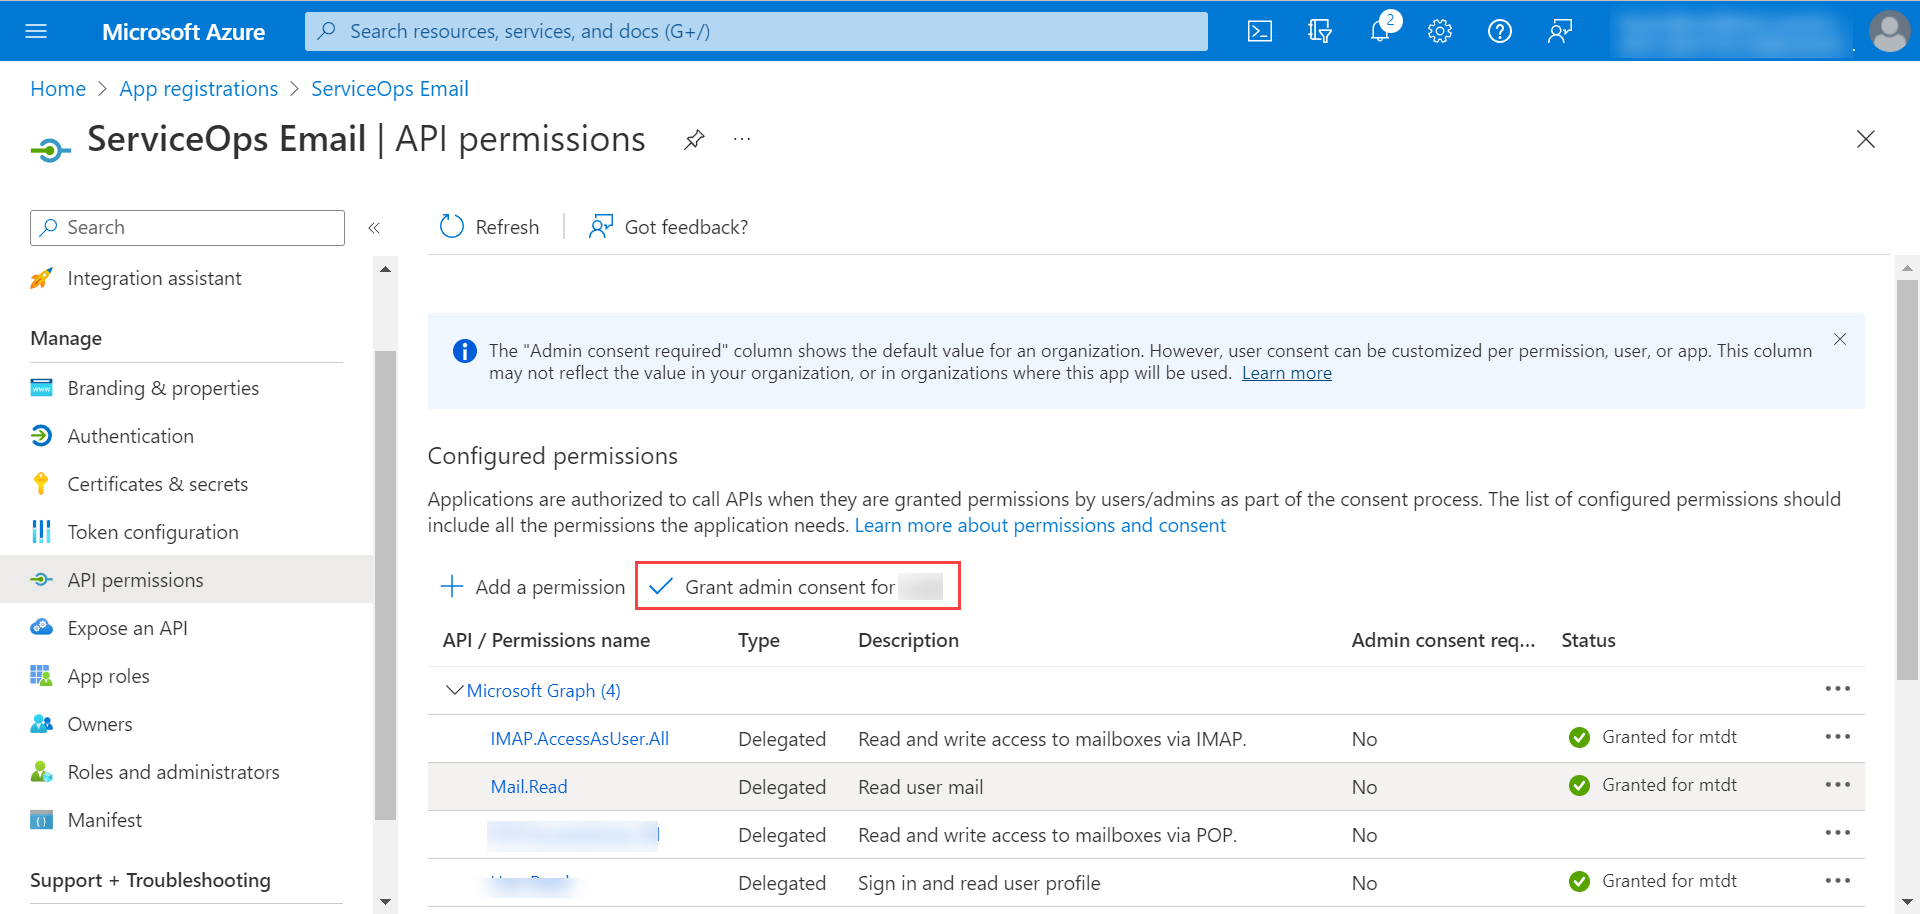
The Grant admin consent option is available only when logged in as an Azure Global Administrator. For more details, refer to Grant Tenant-wide admin consent to an application.
- For IMAP, register your Azure AD Application service principals in Exchange Online and grant mailbox access. For more details, refer to Register service principals in Exchange.
- For IMAP and MAPI, restrict mailbox access so that the Azure app can access only a single mailbox. For more details, refer to Limiting application permissions to specific Exchange Online mailboxes.
Configuring Microsoft Azure in ServiceOps (Incoming)
Navigate to Admin > Support Channel > Emails > Incoming Email Servers and click Add Incoming Email Server.
After upgrading ServiceOps from version 8.0 to 8.1, check for additional parameters not available in the previous version.
- Version 8.0: Client ID, Client Secret, Tenant ID, and Authorization URL.
- Version 8.1 and later: Client ID, Client Secret, Authorization URL, Token URL, Scope, and Redirect URL.

| Parameter | Description |
|---|---|
| Name | Enter the name of the email server. |
| Enter the email address of the Azure user. | |
| Technician Group | Select the technician group assigned when a new request is created via email. |
| Category | Select the category assigned to tickets created via this email server. |
| Proxy Server | Select the proxy server. |
| Email Provider | Select Other. |
| Server | Enter the server address per protocol: IMAP: outlook.office365.com, POP3: outlook.office365.com, MAPI: outlook.office365.com. |
| Port | Enter the port number. Auto-populated based on Protocol and Security Type. Common values: IMAP: 993, POP3: 995. |
| Protocol | Select IMAP, MAPI, or POP3. |
| Security Type | Select None, SSL, or TLS. |
| Email Auth Type | Select OAuth. |
| Client ID | Paste the client ID from Step 4. |
| Client Secret | Paste the client secret from Step 7. |
| Authorization URL | Enter the OAuth 2.0 authorization endpoint (v2) URL from Step 4. |
| Token URL | Enter the OAuth 2.0 token endpoint (v2) URL from Step 4. |
| Scope | Enter the scope per protocol: IMAP: offline_access https://outlook.office365.com/IMAP.AccessAsUser.All, MAPI: offline_access https://outlook.office365.com/EWS.AccessAsUser.All, POP: offline_access https://outlook.office365.com/POP.AccessAsUser.All. |
| Redirect URL | Editable field. Set from the Application Settings Base URL. |
| Enabled | Toggle to enable or disable the server. |
| Company | Select the company assigned to requests created via email. Available only if the Managed Services Provider feature is enabled. |
| Primary | Enable to use this server as the primary incoming server. |
| Outgoing Email Server | Enable to associate an outgoing email server. |
| Outgoing Email | Select the outgoing email server from the dropdown. |
| Filter Type | Select whether to allow or ignore emails received. |
| Emails | Add email addresses evaluated based on the filter type. |
| Domains | Add domains evaluated based on the filter type. For example: yahoo.com. |
| Keywords | Add keywords evaluated based on the filter type. The system checks the email subject and body. |
- Active Directory Users:
- Authorization URL: Use the OAuth 2.0 authorization endpoint (v2) from Step 4, or construct it using the Tenant ID:
https://login.microsoftonline.com/{Tenant-ID}/oauth2/v2.0/authorize - Token URL: Use the OAuth 2.0 token endpoint (v2) from Step 4, or construct it:
https://login.microsoftonline.com/{Tenant-ID}/oauth2/v2.0/token
- Authorization URL: Use the OAuth 2.0 authorization endpoint (v2) from Step 4, or construct it using the Tenant ID:
- Non-Active Directory Users:
- Authorization URL:
https://login.live.com/oauth20_authorize.srf - Token URL:
https://login.live.com/oauth20_token.srf
- Authorization URL:
Click Save. Verify connectivity using the Test Connection button from the server list page.
Monitoring Incoming Email Server Health
Each incoming email server card displays a real-time status indicator (Reachable or Unreachable), the Last Sync Time of the most recent polling cycle, and an Inbound Queue count showing emails pending processing. When a server becomes unreachable, an inline error message appears on the card. Click the link in the error message to view the error details. ServiceOps sends an in-app notification to the Super Admin and all users with the Manage Support Channels permission. A recovery notification is generated when the server returns to a reachable state.
Configuring Microsoft Azure as Outgoing Email Server
To configure Microsoft Azure as the outgoing email server:
Follow Steps 1 to 9 from the Incoming Email Server section above.
Add permissions for SMTP. Select Microsoft Graph > Delegated Permissions, select the SMTP permission, and click Add Permissions.
Required SMTP PermissionThe Azure application must have the SMTP.Send Delegated permission.
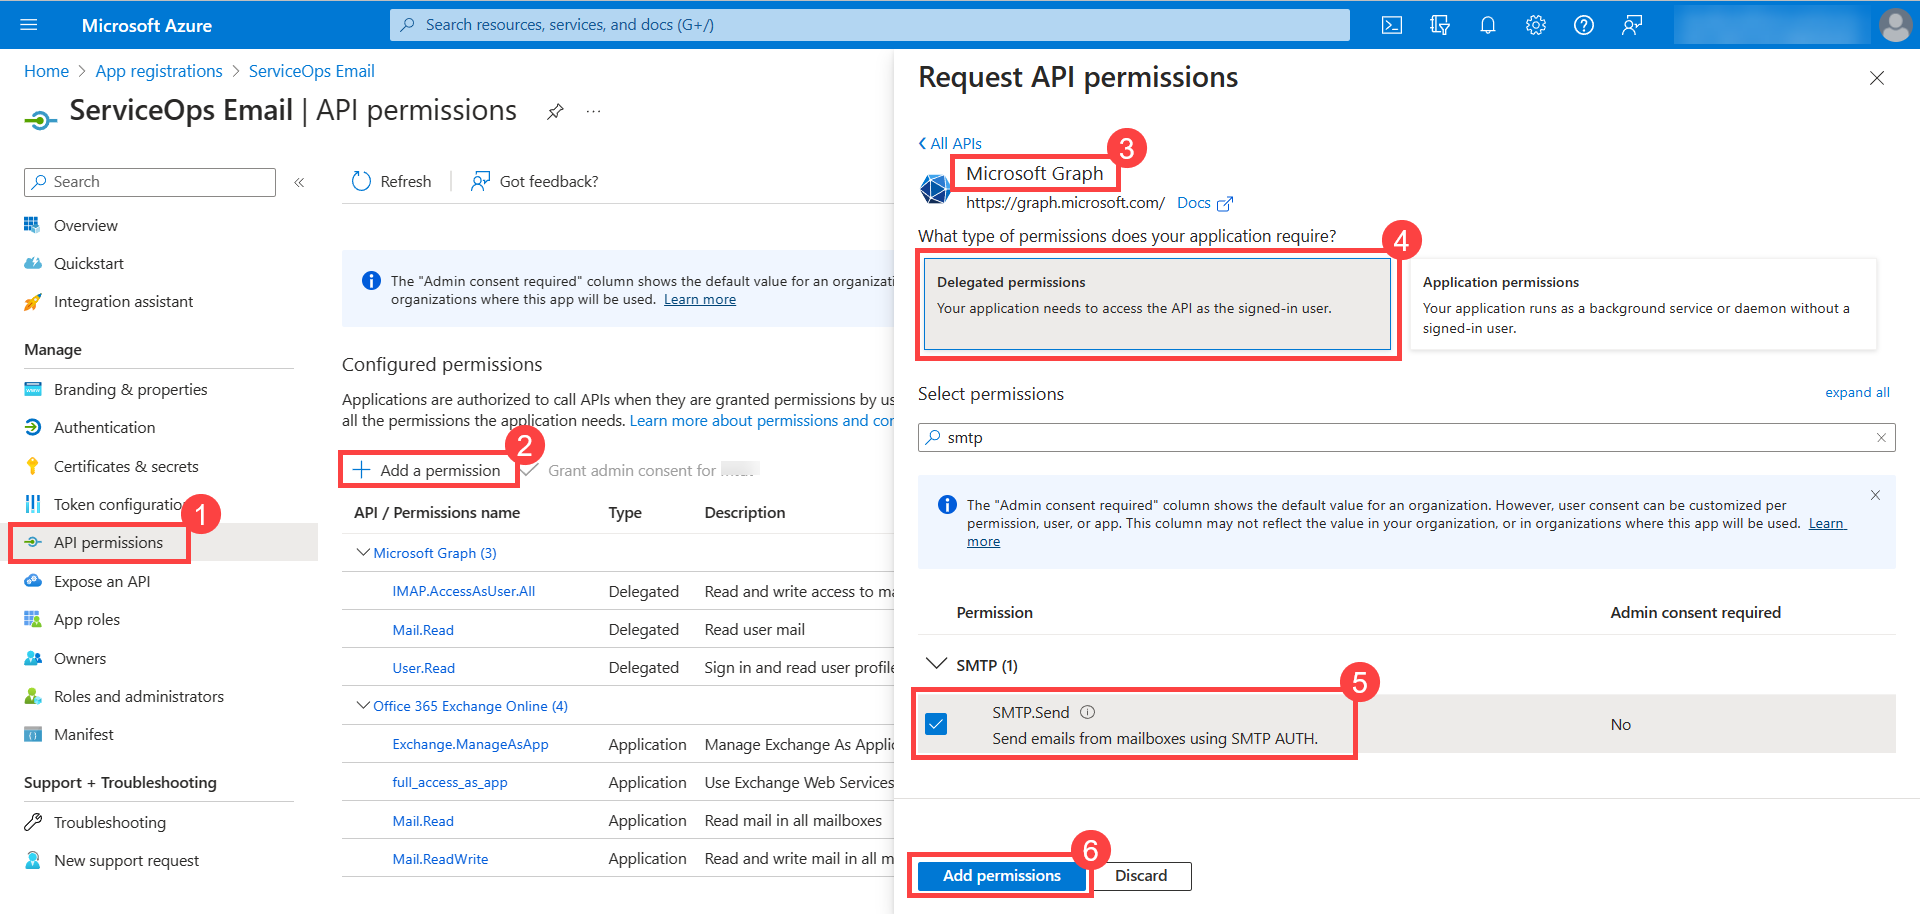
Click Grant admin consent for {directory}. Click Yes in the confirmation window.
The Grant admin consent option is available only when logged in as an Azure Global Administrator. For more details, refer to Grant Tenant-wide admin consent to an application.
Configuring Microsoft Azure in ServiceOps (Outgoing)
Navigate to Admin > Support Channel > Emails > Outgoing Email Servers and click Add Outgoing Email Servers.

| Parameter | Description |
|---|---|
| Name | Enter the name of the email server. |
| Enter the email address of the Azure user used for authentication. | |
| Protocol | Select SMTP or MAPI. |
| Sender Name | Enter the name of the sender. |
| Email Provider | Select Other. |
| Server | Enter the server address: SMTP: smtp.office365.com, MAPI: outlook.office365.com. |
| Port | Enter the port number. Auto-populated based on Protocol and Security Type. Common values: SMTP (TLS): 587, SMTP (SSL): 465. |
| Security Type | Select None, SSL, or TLS. |
| Authentication Needed | Enable if the user must authenticate to the server. |
| Email Auth Type | Select OAuth. |
| Username | Enter the server username. |
| Client ID | Paste the client ID from Step 4. |
| Client Secret | Paste the client secret from Step 7. |
| Authorization URL | Enter the OAuth 2.0 authorization endpoint (v2) URL from Step 4. |
| Token URL | Enter the OAuth 2.0 token endpoint (v2) URL from Step 4. |
| Scope | Enter the scope per protocol: SMTP: offline_access https://outlook.office365.com/SMTP.Send, MAPI: offline_access https://outlook.office365.com/EWS.AccessAsUser.All. |
| Redirect URL | Editable field. Set from the Application Settings Base URL. |
| Reply-To Email | Enter the email address to which recipient replies will be directed. Set this to a monitored mailbox so replies are captured and converted into tickets. |
| Proxy Server | Select the required proxy server. Leave blank if ServiceOps has direct internet access. |
| Enabled | Toggle to enable or disable the server. |
| Primary | Enable to use this server as the fallback when other configured outgoing servers are unavailable. |
| Filter Type | Select Allow to send emails only to the specified addresses or domains (all others are blocked), or Ignore to silently block emails to the specified values (all others are allowed). If no filter is configured, ServiceOps sends emails to all recipients by default. |
| Emails | Enter specific email addresses to filter. With Allow, only these addresses receive emails. With Ignore, emails to these addresses are silently blocked. Example: hr@company.com. Multiple entries work as OR conditions. |
| Domains | Enter domain names to filter, without the @ symbol. Example: company.com. With Allow, only addresses in these domains receive emails. With Ignore, all addresses in these domains are silently blocked. Multiple entries work as OR conditions. |
- Active Directory Users:
- Authorization URL:
https://login.microsoftonline.com/{Tenant-ID}/oauth2/v2.0/authorize - Token URL:
https://login.microsoftonline.com/{Tenant-ID}/oauth2/v2.0/token
- Authorization URL:
- Non-Active Directory Users:
- Authorization URL:
https://login.live.com/oauth20_authorize.srf - Token URL:
https://login.live.com/oauth20_token.srf
- Authorization URL:
Click Save. Verify connectivity using the Test Connection button from the server list page.
If you face issues connecting to the SMTP server, ensure that SMTP Authentication is enabled from the Microsoft Admin Center account.
Enabling SMTP Authentication in Microsoft 365
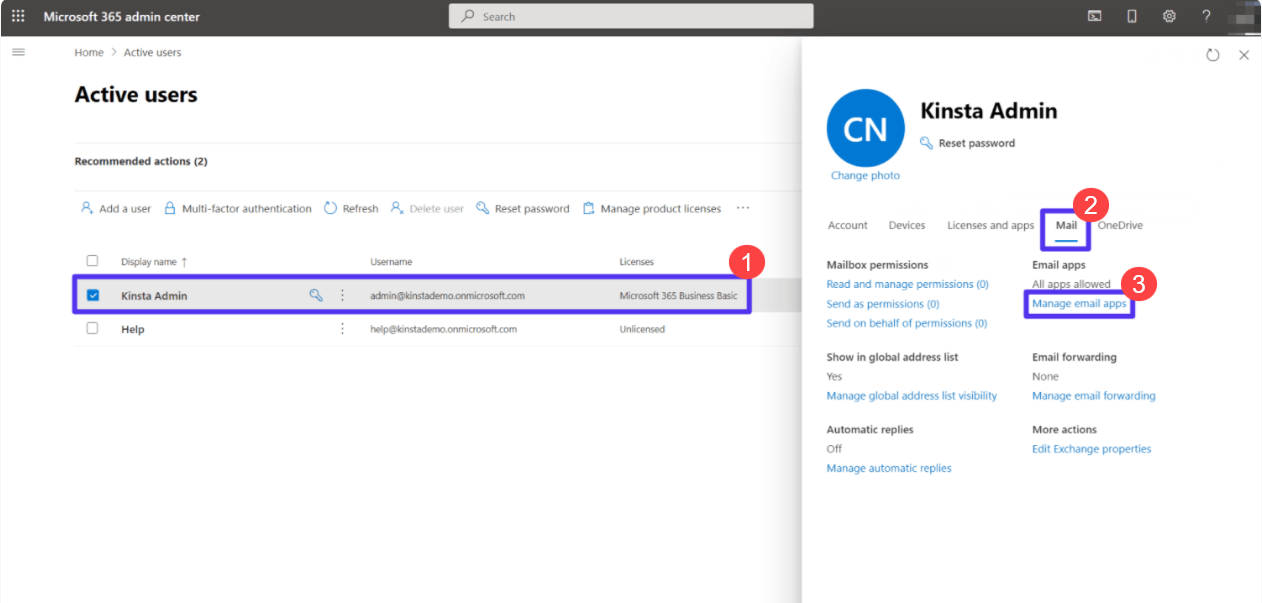
- Sign in to your Microsoft 365 Admin Center with an admin account.
- Navigate to Users > Active Users, click the desired email address.
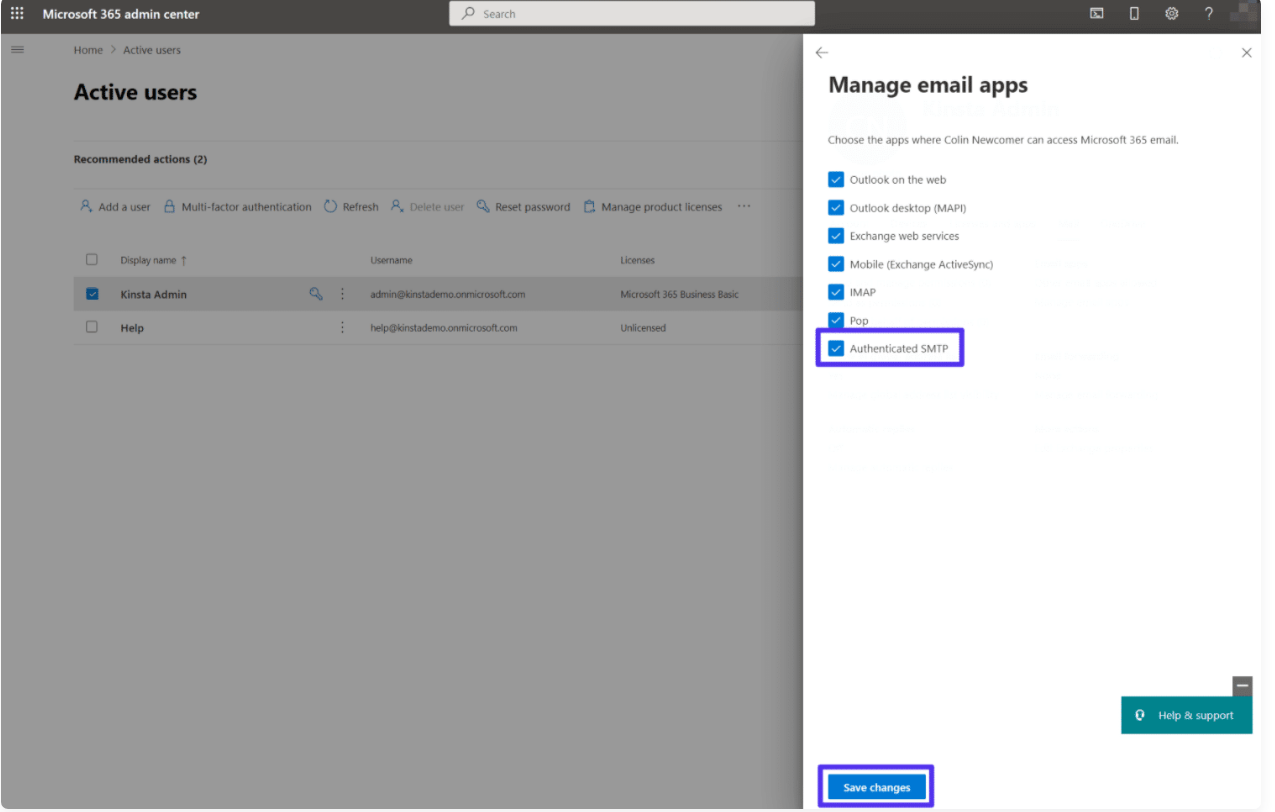
- Select the Mail tab and click Manage email apps.
- Select Authenticated SMTP and click Save changes.
Monitoring Outgoing Email Server Health
Each outgoing email server card displays a real-time connection status indicator (Reachable or Unreachable). When a server becomes unreachable, an inline error message appears on the card. Click the link in the error message to view the error details. ServiceOps sends an in-app notification to the Super Admin and all users with the Manage Support Channels permission. A recovery notification is generated when the server returns to a reachable state.