Creating a Service Catalog Template
A Service Catalog Template allows you to define a service. You can define a Template in a particular Service Category. A Template is defined with respect to the following:
- Form fields that will capture the custom data.
- Specific workflow to automate the handling of the life-cycle of the Requests created using the Template.
- Specific SLA to control the response and resolution time, and escalation.
- Specific Approval workflow to add supervision.
- Create associated task for Requests using the Template.
- Create scenario to perform a task for requests using the Template.
- Form rules that will show/hide, mandate/non-mandate, enable/disable the required fields in the service catalog form.
- Specific Email Notification for Requests using the Template.
- Custom Rules ensure that any modifications to service request attributes are accompanied by appropriate comments or notes, enforcing organizational compliance during request processing
- Specific print templates for printing the request.
For Example: A Template called On-Boarding is used to create a Service Item. The HR department will use this to create a Service Request for the on-boarding of new employees in the Marketing department. Learn about the Use Case.
You can also watch the video Service Catalog.
Service Catalog Form
You can create a Service Catalog Form by dragging and dropping the required fields on the form from the left sidebar. The tab displays two types of fields:
- Custom Fields: These are the fields that can be added, edited, renamed, and removed from the form if not required. For more details on the fields, refer to the link Request Form.
- System Fields: These are the fields that cannot be renamed. But, you can add, edit, and remove them. Once these fields are used, they are not available in the pallet for reuse.
- You can add as many custom fields as required in the Request and Service Catalog.
- To view the Category System field on the Support Portal Service Request Details page, it should be enabled from the Request Form.
- The Description system field is configurable.You can show or hide it in the Service Request creation form.
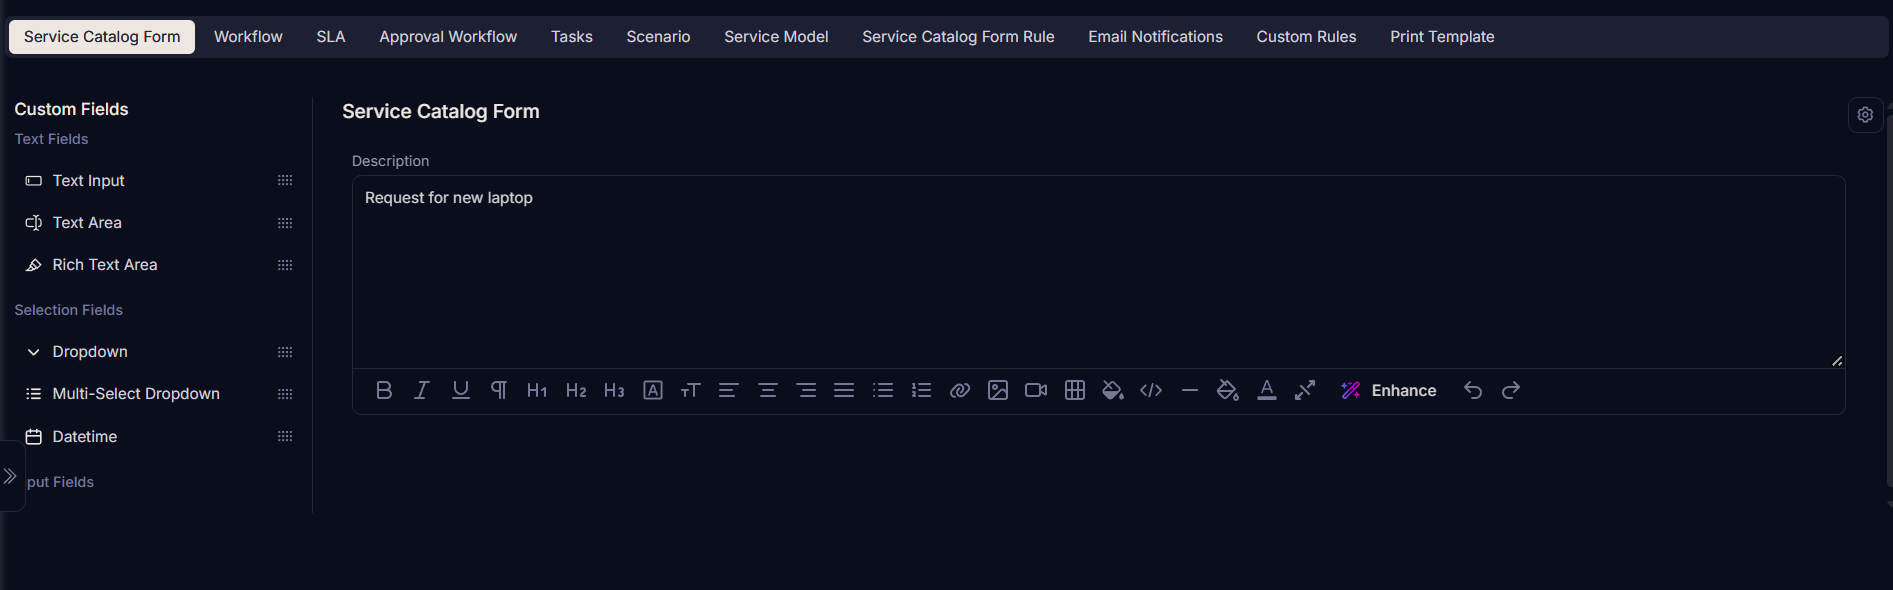
Once the fields are added to the form, you can re-order, expand/collapse the width, create a duplicate field based on the existing ones, edit, or remove them if required. The duplicate field option is available only for the custom fields.
You can also map the user fields with the requester fields using the User Fields Mapping option.
Workflow
Workflow automation enables the Administrators to channel tickets through a funnel with the predefined rules. Administrators set the rules that interact with the ticket details (Department, Type, Support Level, etc.) and even change them if required.
Implementation Behavior:
- The Workflow created here will work specifically for Requests created using an On-Boarding Template.
- The Workflow created here works parallel with the generic in Admin. Both the Workflows might get initiated together and perform their own actions after checking their conditions.
- The Template Workflow is initiated based on the Trigger Event of a workflow.
Here, clicking on the Workflow tab, displays all the Workflows specific for that Template, if any. To add a new Workflow, click on the Create Workflow button, and the page appears.
Enter a name for the Workflow, add trigger events, add flow nodes, conditions, and select actions.
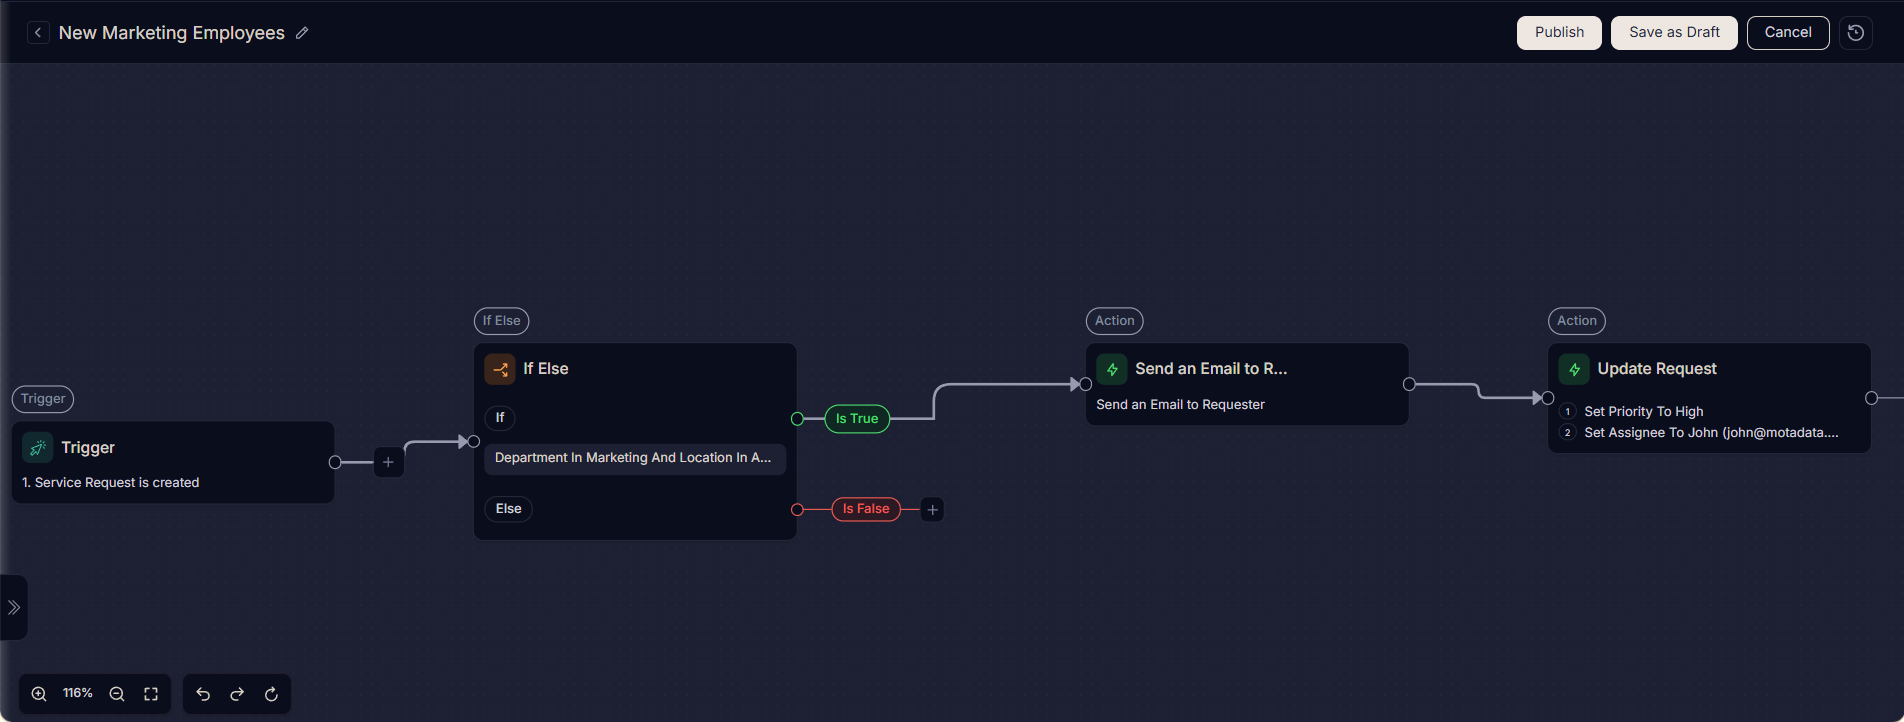
The above Workflow will work on the Service Requests satisfying the parameters: Department equals to Marketing and Location equals to Asia. The following actions are taken when a Request satisfies the parameters:
- Request is assigned to a Technician.
- Priority is set to High.
- An Email is sent to the Requester.
SLA
Service Level Agreements (SLAs) define the commitment between Requestors and the IT service provider in an organization. SLAs determine the level of urgency, response time, and the time required for the tickets to get resolved. They also govern the escalation rules when tickets are not resolved or responded within a stipulated time frame. SLAs can be set for a department and a sub-department.
Implementation Behavior:
- An SLA created here will work specifically for Requests created having the On-Boarding Template.
- Template SLA will decide the Response and Resolution time of Requests created using the On-Boarding Template.
- The system SLA will not work along with the Template SLA.
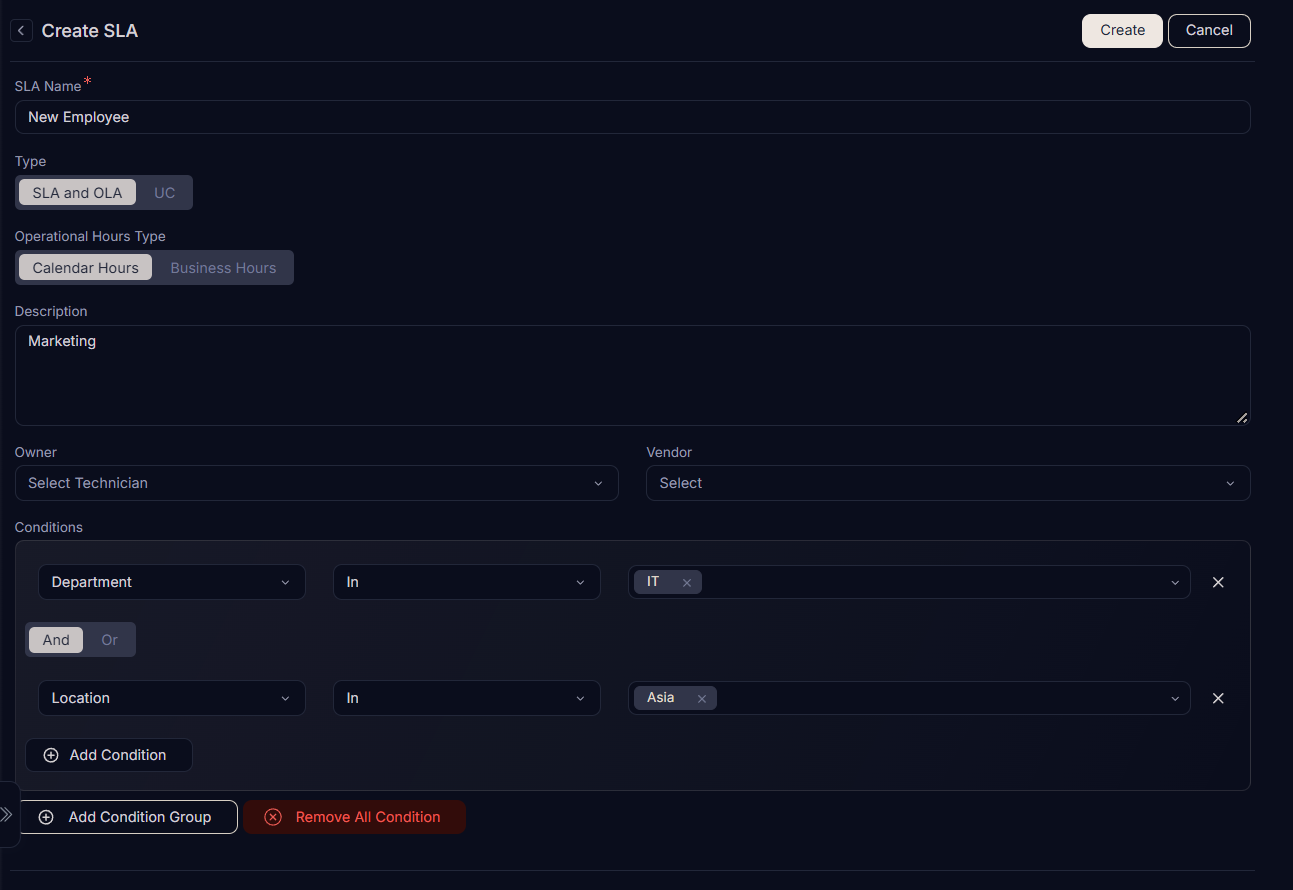
Click the SLA tab and a list of already created SLAs specific to the template will appear, if any. To create an SLA, click on the Create SLA button, and the page appears.
Enter the Name, set Operational Hours Type and Description. Set the condition as Department no equals to IT and Location equals to Asia. For more details, refer to the link Create SLA.
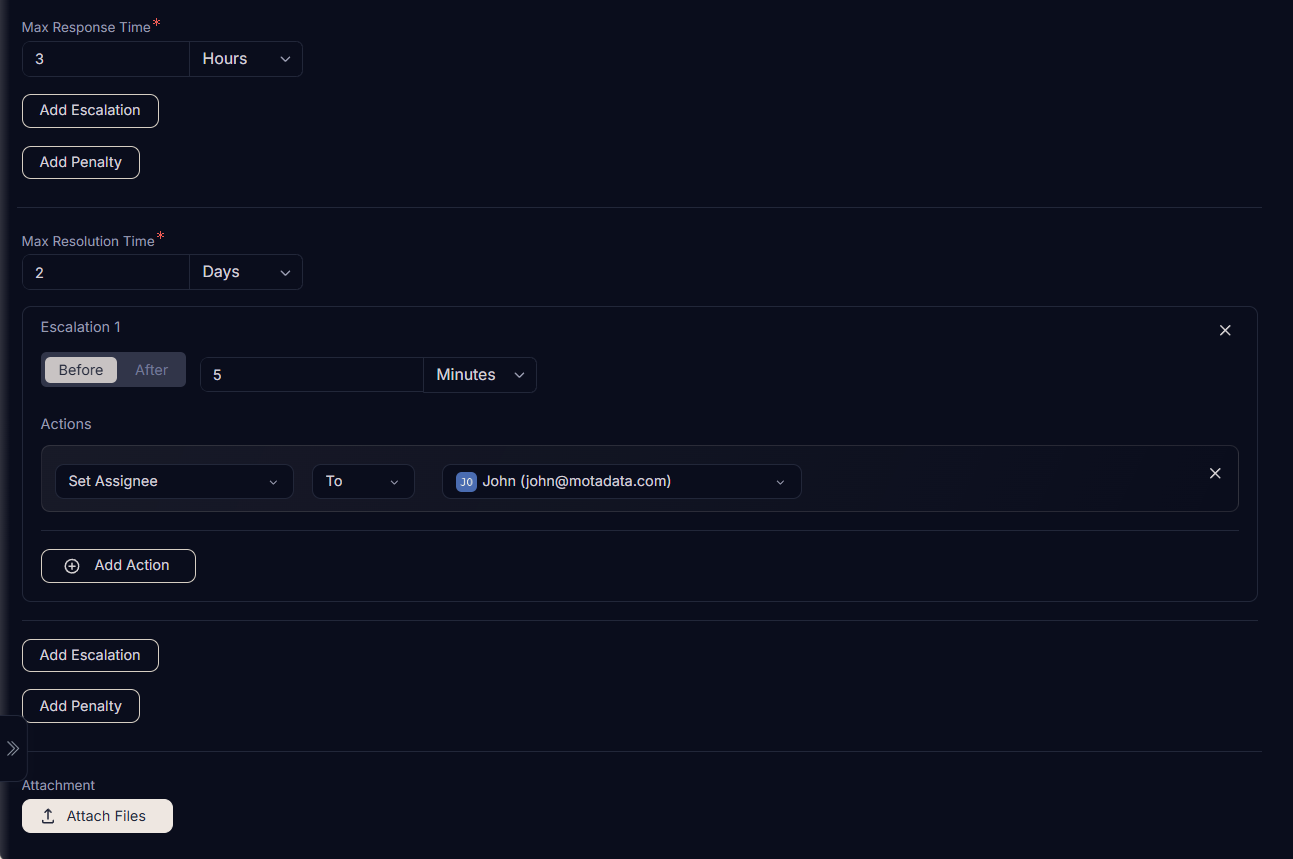
Then set the Maximum Response and Resolution Time, and Escalation in case of violation. Here, the Maximum Response time is set as 3 hours. The Maximum Resolution time is set as 2 days and on violation the assigned Technician is changed.
Approval Workflow
The Approval Workflow helps to automate the Approval process for a Request. An Approval Workflow, when initiated, creates an Approval and adds approvers to it.
Implementation Behavior:
- An Approval Workflow created here will work specifically for Service Requests created using the On-Boarding Template.
- The generic Approval Workflow in Admin does not work in Requests created using a Service Item.
Click the Approvals tab and a list of existing Approval Workflows specific to the Template will appear. To create an approval, click on the Create Approval Workflow button and the page appears.
Enter a name, add condition(s), and set approvers in the Approvals section. For more details, refer to the link Create Approval Workflow.
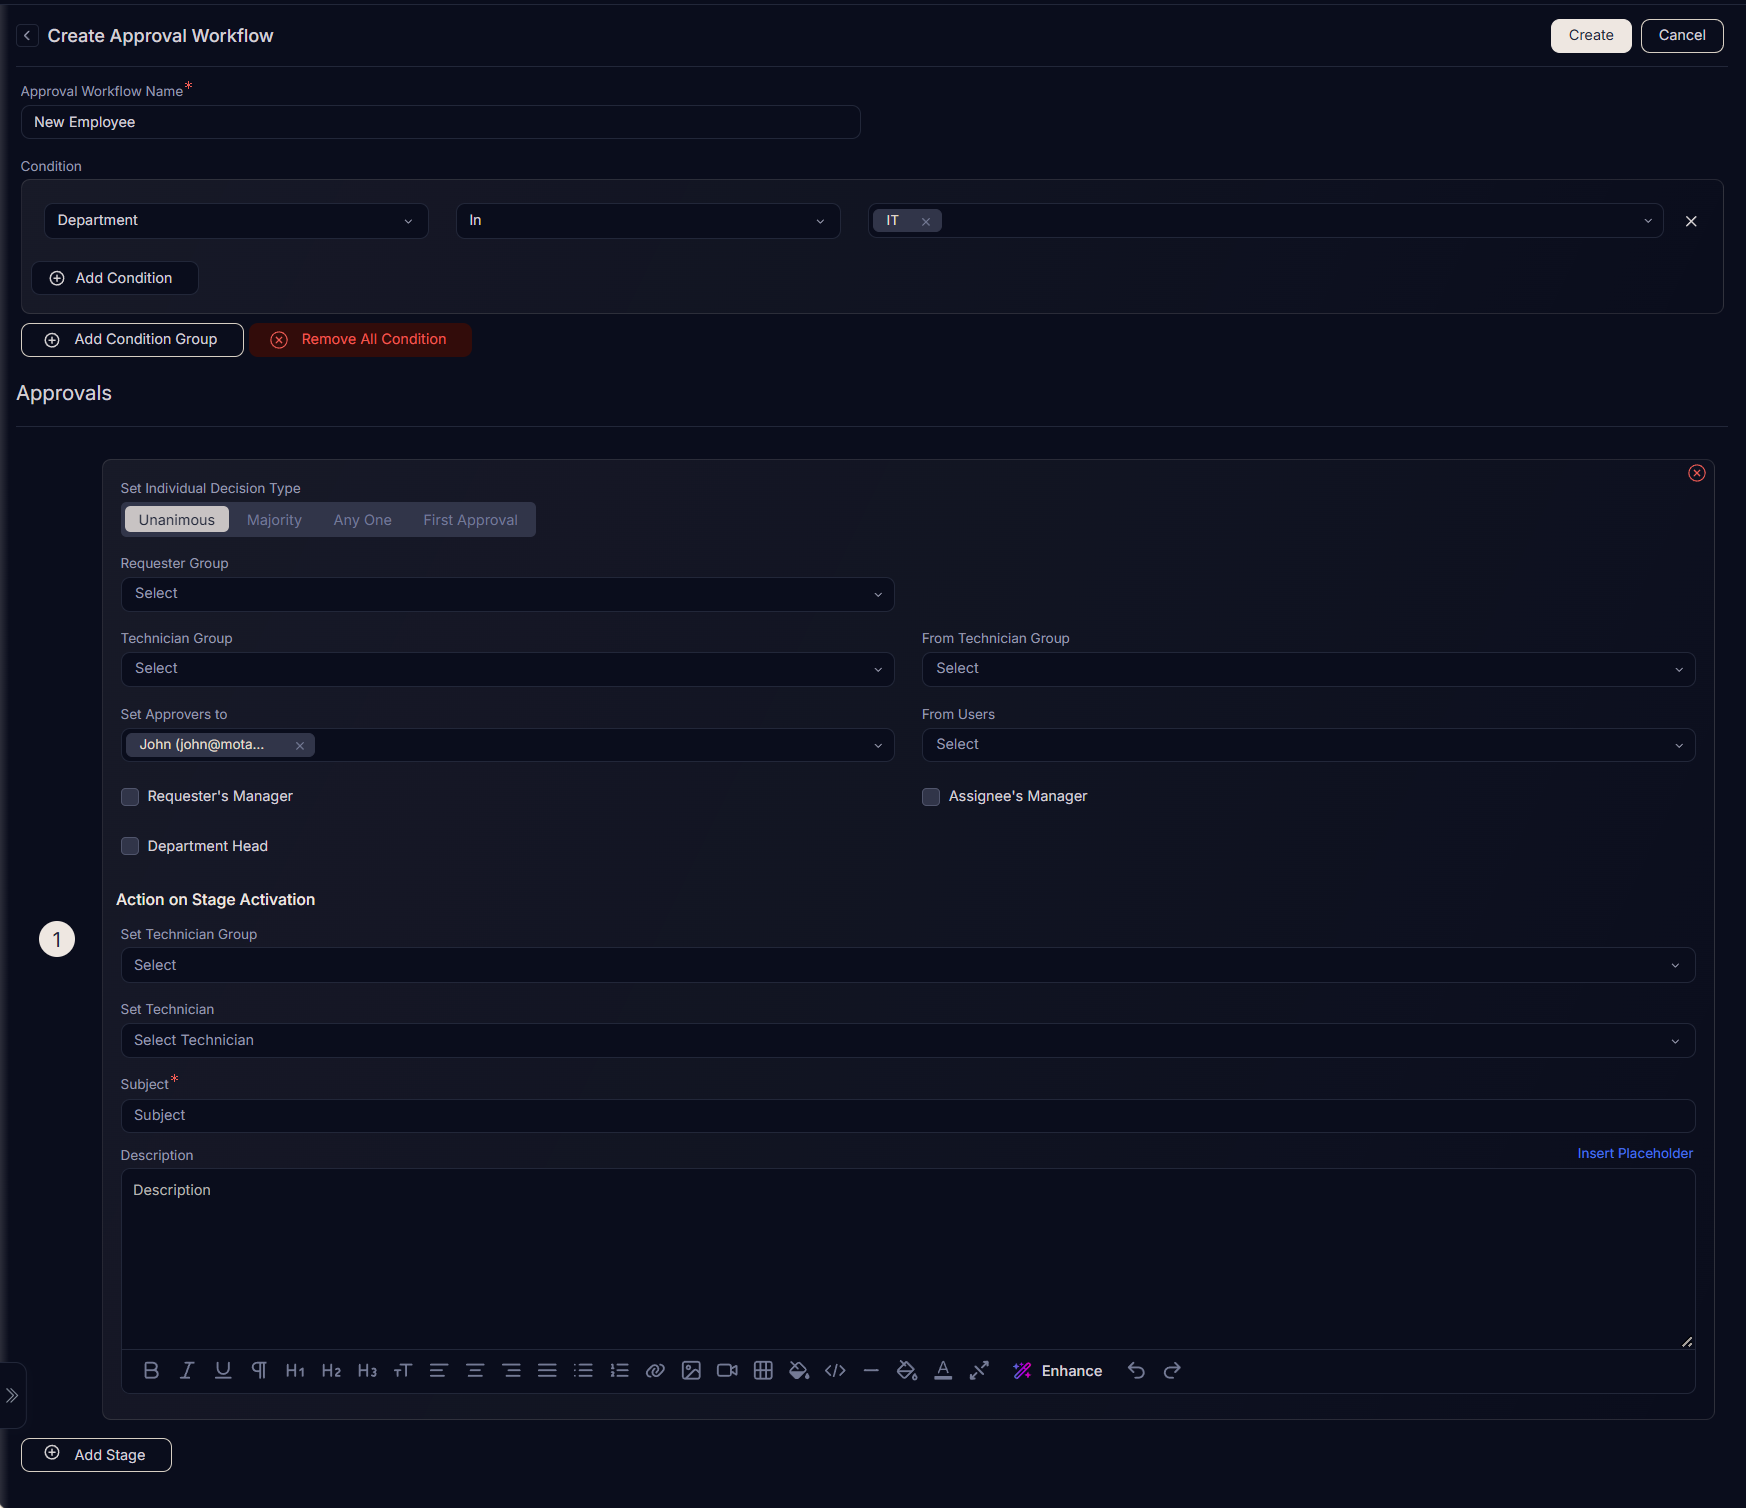
Any Request (made using the template) having the Department IT will have the below output:
- A single stage Approval will be created and the stage of the Approval will have a single Approver.
Tasks
You can pre-define tasks that will be added to the Request. You can break the tasks stage wise; meaning tasks at one stage has to be completed to move to another stage. You can add tasks up to 15 stages.
Click the Task tab and a list of already created tasks will appear. To create a task in stage 1, click the Create Task button in the same section and a side popup appears.
Enter the Name, Assigned To, Task Type, Technician Group, Priority, Notify Before, Estimated Time, and Description. For more details on fields, refer to the link Creating a Task.
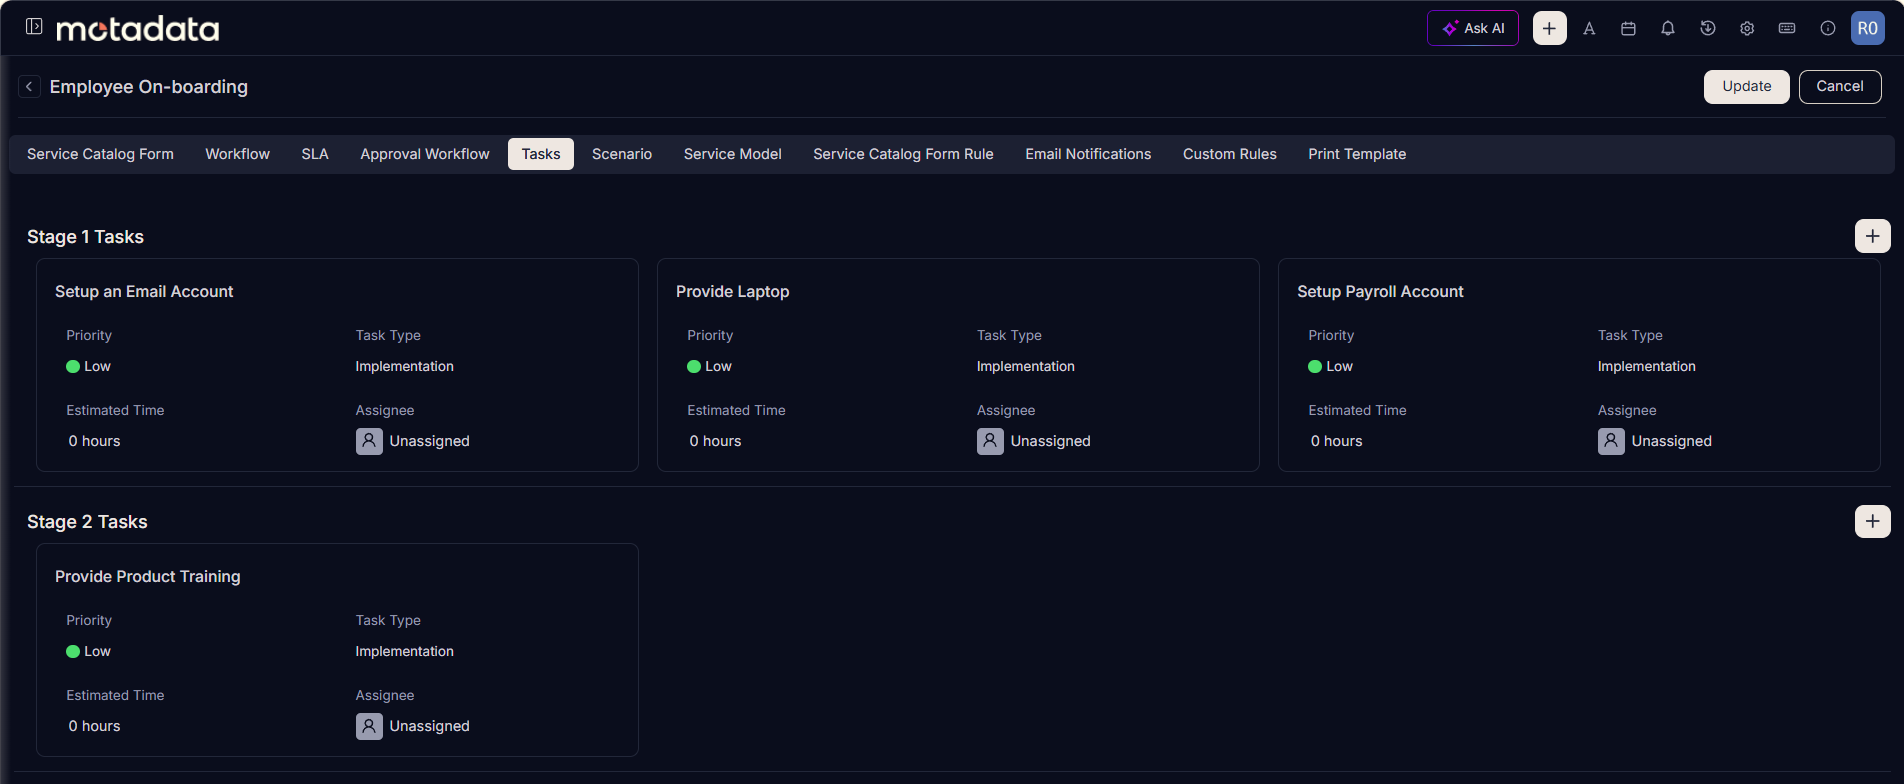
Notes:
- The Task thread created here will not be disturbed by a Task created manually in the Request.
- Tasks of one stage is visible at a time.
Scenario
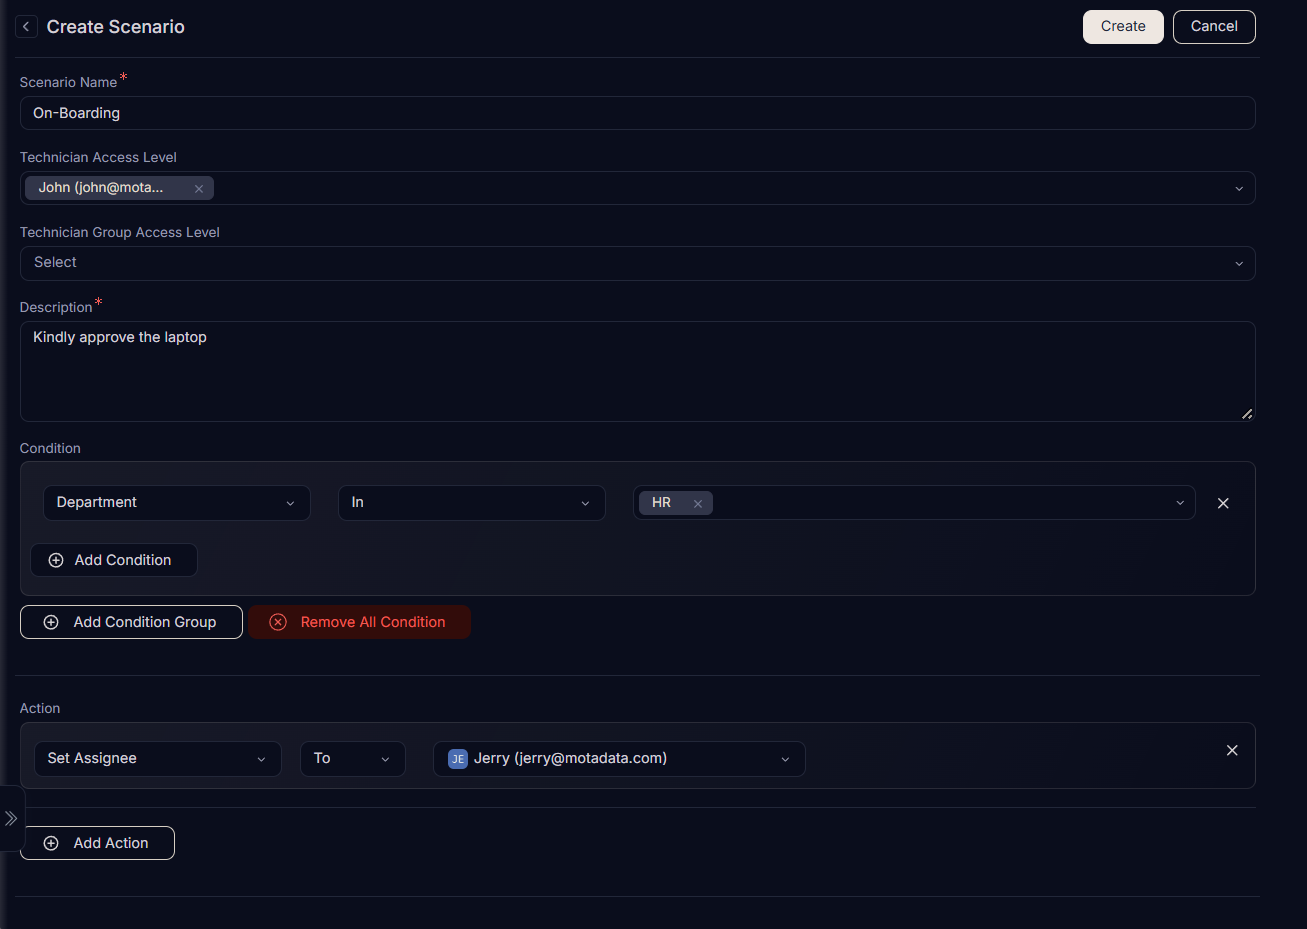
You can create scenarios specifically for Requests created using the Template. A scenario is a set of actions when applied that can modify a ticket. You can create n number of scenarios in a template each with its own set of conditions.
Click the Scenario tab and a list of already created scenarios will appear. To create a Scenario, click on the Create Scenario button and the page appears.
Enter the Scenario Name, Technician Access Level, Technician Group Access Level, Description, Condition, and Action. For more details on fields, refer to the link Create Scenario.
Service Model
A Transition Model is a concept that describes how a Service Request transits from one state to another in ServiceOps.
This section enables you to create and manage the transition models. These models help in changing the status of the Service Requests automatically based on certain conditions. For example, if you want to change the Status of a ticket from Open to InProgress when a particular Assignee is assigned. This requirement can be fulfilled using the Transition model. Read on, to know how a Service Model can be created and used in achieving the desired result.
To view the list page,
Navigate to Admin > Service Catalog > Service > Service Model and the below page appears.
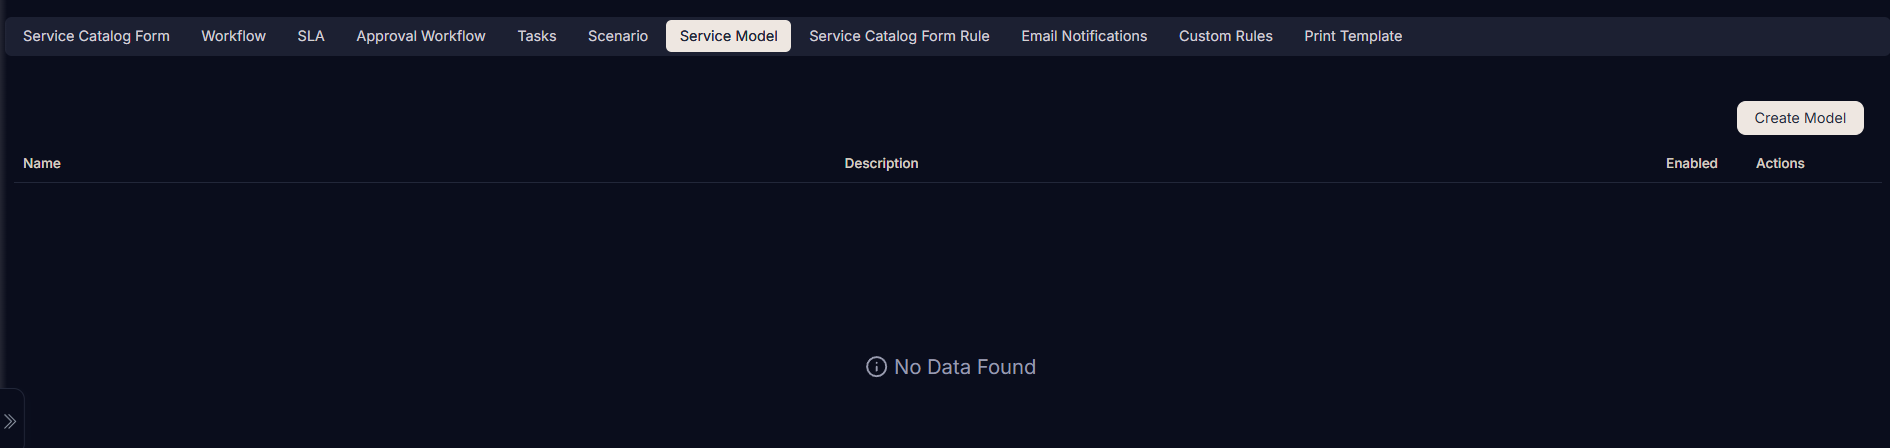
Here, you can view the list of service models, create, edit, and delete them using the respective icons.
Create Model
To create a Service Model,
- Navigate to Admin > Service Catalog > Service > Service Model tab, and click the Create Model button. The following page appears.
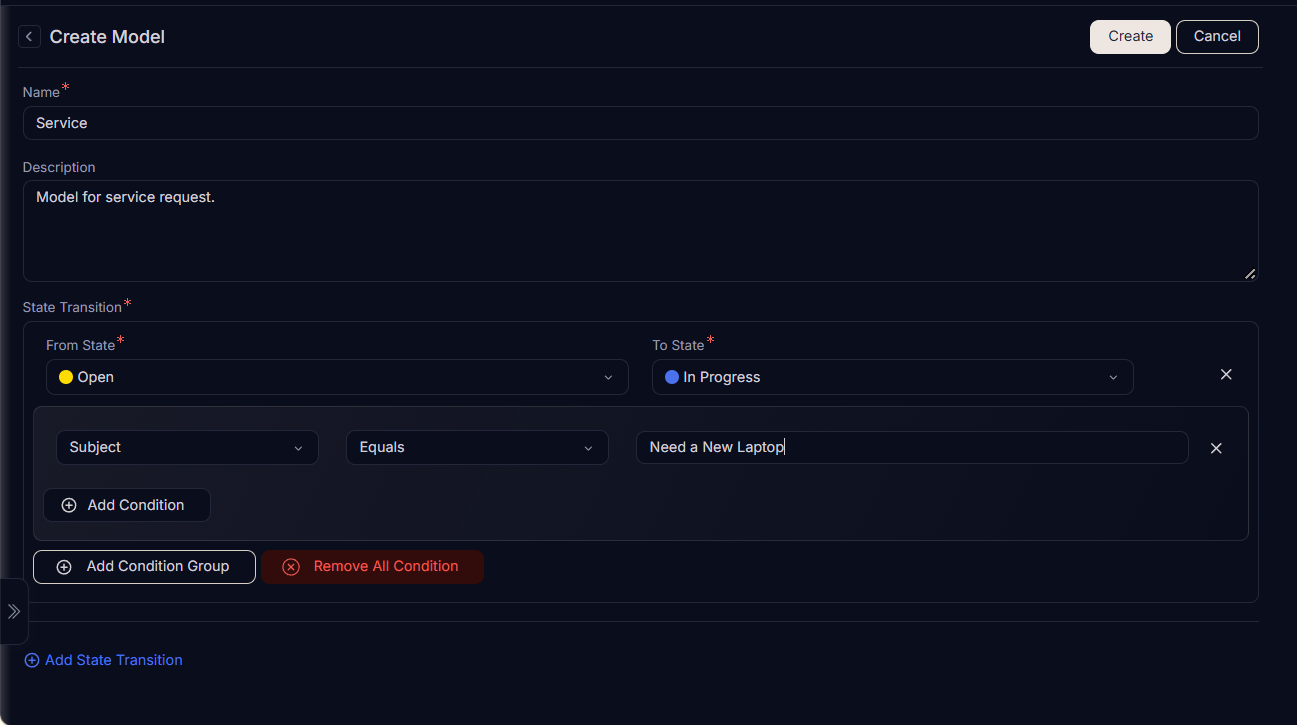
- Enter the following details:
- Name: Enter the name of the transition model. Here, Service Model is used.
- Description: Enter a brief description about the model.
- State Transition: Click the Add State Transition link and select the From State and To State options. You can add multiple transitions. Once done, Add the Condition Group based on which the ticket’s status will change automatically, when the set conditions match. You can add multiple condition groups. For example, in the above figure, the From State - Open and To state - InProgress is set with Condition as Subject - Need a new Laptop.
- Once done, click Create, and the model is available on the list page. By default, it is enabled. Now, this model will be applied either at the time of Service Request creation for this particular service or edition from the Details page.
- You can create only one Service Model. Also, the model created here will be used for all the Service Requests related to this service.
- Each Service will have different Service Models. Thus, Service models are Service specific.

- To edit the model details, click the Edit icon on the list page, make the changes, and save it.
- To delete the model, click the Delete icon.
Service Catalog Form Rules
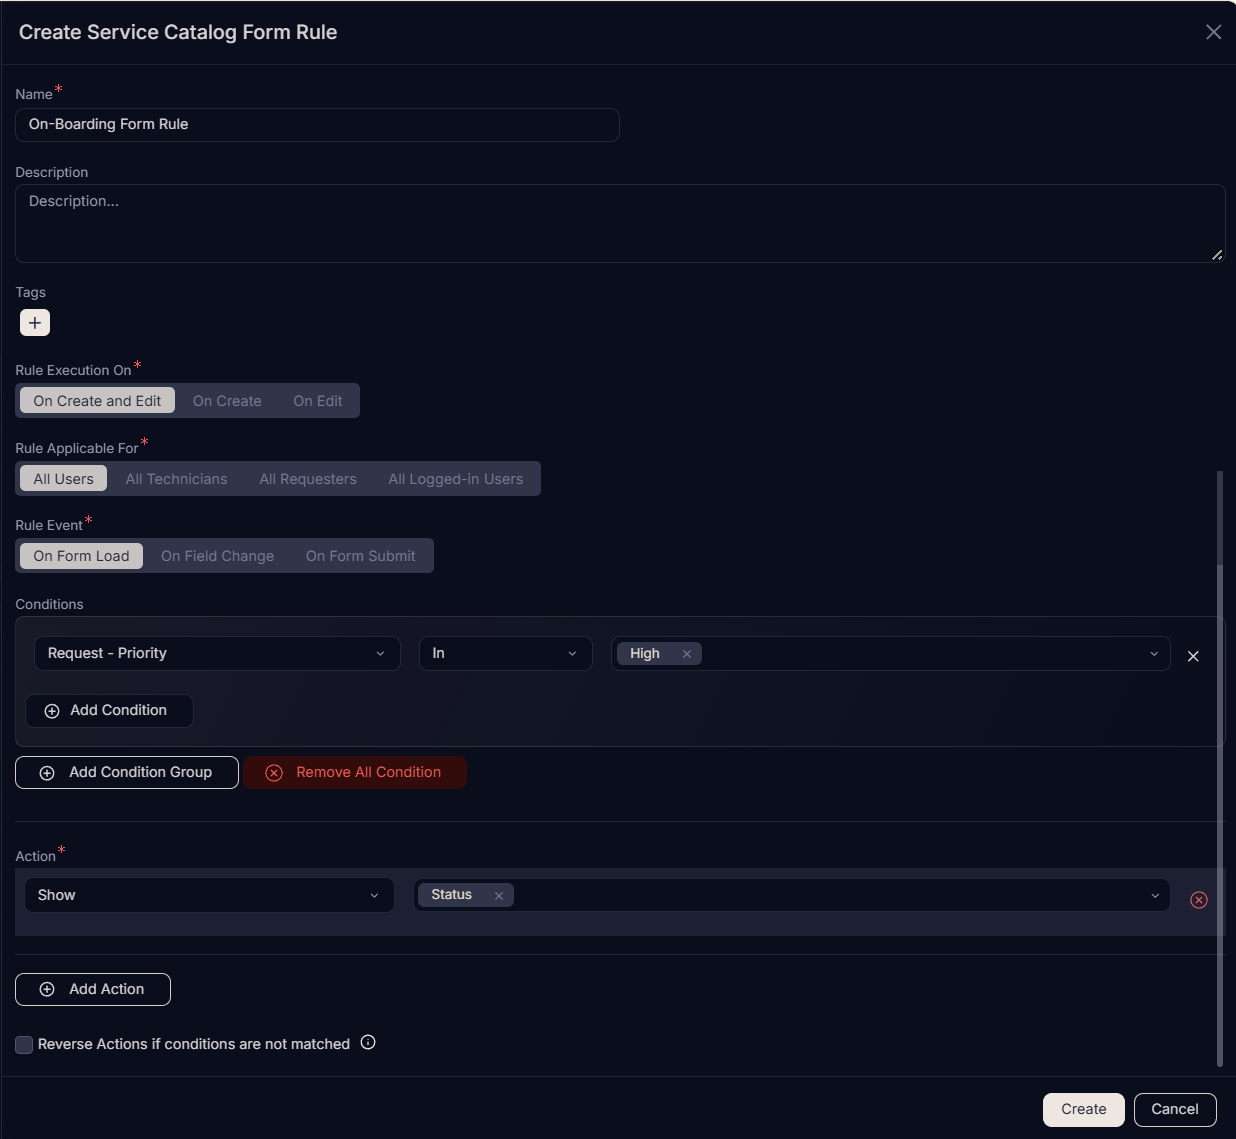
The Service Catalog Form Rules enable you to make fields mandatory/non-mandatory, show/hide, or enable/disable based on certain conditions in the Service Request Form.
Click the Service Catalog Form Rules tab and a list of already created form rules will appear, if any. To create a form rule, click on the Create Service Catalog Form Rule button and a side popup appears.
Enter the Name, Description, set the required configurations, and click Create. For more details on the fields, refer to the Request Form Rule page.
Email Notifications
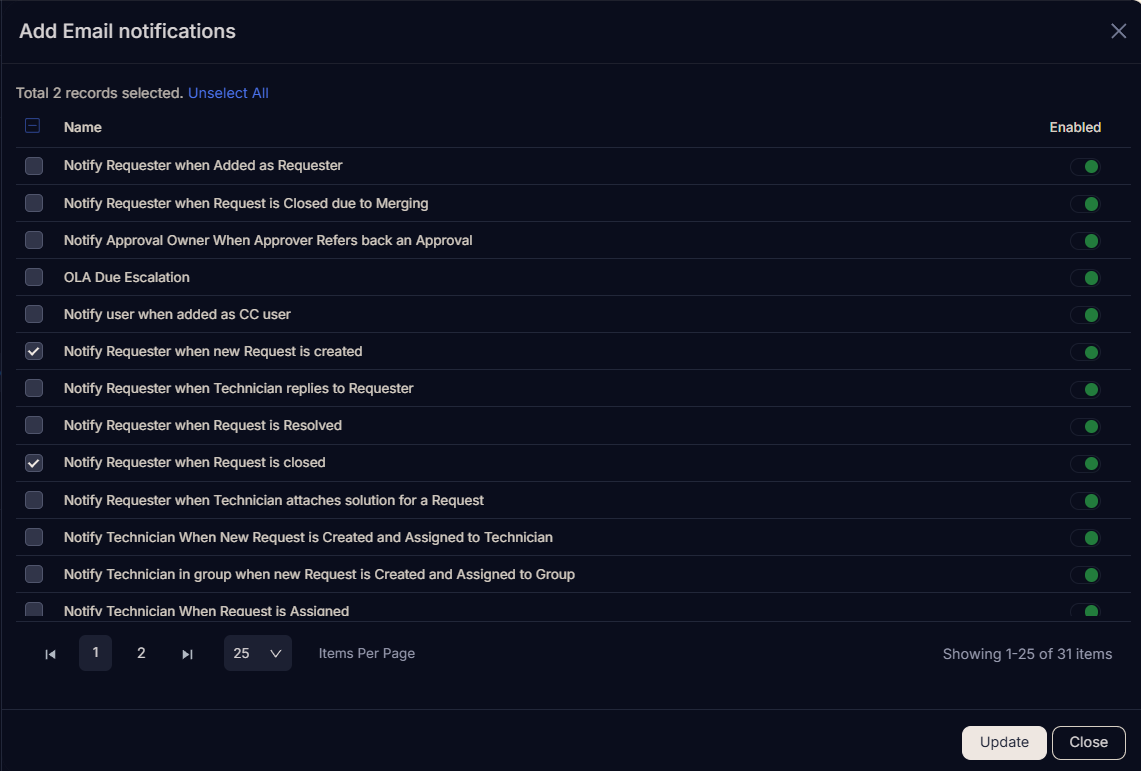
You can add the email notifications specific for service requests created using the template. These are the default email notifications that can be added, modified as per requirement, and used in the template.
Click the Email Notifications tab, and a list of already added notifications will appear, if any. To add an email notification, click the Add Email Notifications button and a side popup appears.
- Select the required notifications from the list and click Update. It displays all the active email notifications.
- Once added, you can click on the required email notification and edit it as per your need. For more details on fields, refer to the link Email Notification.
Custom Rules
The custom rules help you to enforce the organization’s compliance while processing a service request. Using these rules you can ensure that any change in the service request attributes is supported by proper comments or notes. For example, a serivce request should not move to the resolved state if there is no technician assigned to it. Similarly, you can use custom rules to enforce the approval workflows and closing tasks to close a request.
For detailed information on Custom Rules, refer to the Incident Custom Rules page.
While the core principles of Custom Rules are outlined in the Incident Custom Rules, Service Catalog Templates may include additional fields or configurations that are specific to service requests. These options can be found and configured directly within the Custom Rules section of your Service Catalog template settings. Always refer to the in-application configuration for the most current and detailed list of available service-specific custom rule fields and their functionalities.
Print Template
Create print templates for individual service requests of the Service Catalog. When printing a request, templates created here and those created under the Request Management section are both available for selection on the Request Details page.
To view the Print Template tab, navigate to Admin > Service Catalog > Service Details page > Print Template.

The tab displays two sub-tabs: Technician Portal and Support Portal. Each sub-tab maintains its own list of print templates, so you can define different print layouts for technicians and requesters.
The page has the following controls:
- Search: Enter a template name to filter the list.
- Create Print Template: Click to open the create form and add a new print template.
- Enabled: Toggle a template on or off. Only enabled templates appear as options when printing a service request.
- Duplicate: Create a copy of an existing template. Use this to base a new template on an existing layout without starting from scratch.
- Edit: Modify the name, description, or print format of an existing template.
- Delete: Remove a template that is no longer required. A confirmation message appears. Click Yes to delete or Cancel to stop.
Create Print Template
To create a print template, follow these steps:
- Click the Create Print Template button. The Create Print Template page opens.

- Enter the following details:
| Field | Description |
|---|---|
| Template Name | Enter the name of the template. Required. |
| Template Visibility | Select where the template is available for printing. Choose Technician Portal, Support Portal, or both. Required. |
| Template Description | Enter a short description of the template. |
| Print Format | Build the print layout using the rich-text editor. Use the Insert Placeholder link at the top right of the editor to insert dynamic field values such as {#requesterId#}, {#subject#}, {#description#}, or custom field placeholders like {#custom.service_catalog.Laptop Specifications#}. Required. |
Configure the Placeholder Configuration section. This section defines which columns are displayed when a multi-value placeholder (such as a related record list) renders in the printed output.
- Click Add Placeholder Configuration to add a configuration block.
- In the Placeholder dropdown, select the placeholder type to configure (for example, Merge Requests).
- Click Select Columns to choose which fields appear in the printed table for that placeholder. Selected columns are shown as removable tags (for example, ID, Subject, Technician Name, Merge Type, Ticket URL). Click the delete icon on any tag to remove that column if required.
- Click Remove All Columns to clear all selected columns for that configuration block.
- Click the red trash icon on the top right of a configuration block to delete the entire placeholder configuration.
- Click Add Placeholder Configuration again to configure an additional placeholder.
Click Create. The template is disabled by default. Enable it from the Print Template list to make it available when printing a service request. The created template appears on the Request Details page at the time of printing, as shown below.
