Integration Actions
Integration Actions extend workflow automation by enabling seamless interaction with external systems, allowing for triggering actions, retrieving data, and synchronizing information across various third-party applications.
Integration Actions enable your workflows to interact seamlessly with external applications and services, extending the automation capabilities of ServiceOps beyond its native functions. By leveraging these actions, you can create a unified automation ecosystem, trigger actions in third-party tools, and synchronize data across various platforms.
HTTP Request Actions
The HTTP Request Actions category allows workflows to communicate with any external system that exposes a REST API or webhook endpoint. This category contains actions like Run Webhook, which replaces the deprecated "Run Webhook" action and provides enhanced capabilities for robust integration.
Run Webhook
Purpose:
- Automate external processes: Trigger actions in other applications (e.g., create a ticket in a third-party ticketing system, update a record in a CRM, send a custom notification).
- Retrieve external data: Fetch information from external databases or services to inform subsequent workflow decisions.
- Synchronize data: Keep data consistent across ServiceOps and integrated systems.
The Run Webhook action is available across the Request, Change, Problem, Task, and Service Catalog modules.
Key Configurations:
Name (Mandatory): A unique identifier for the node within the workflow.
Description (Optional): Additional context for the webhook's purpose.
Select Source Node: Choose the upstream node from which this action receives its input data (e.g.,
Trigger).HTTP Method (Mandatory): Select the HTTP method for the webhook. The supported methods and their applicable fields are:
HTTP Method Applicable Fields GET URL, Headers, Query Parameters, Credential Type, Credential, Proxy Server, Test Connection POST URL, Request JSON, Headers, Query Parameters, Credential Type, Credential, Proxy Server, Test Connection PUT URL, Request JSON, Headers, Query Parameters, Credential Type, Credential, Proxy Server, Test Connection PATCH URL, Request JSON, Headers, Query Parameters, Credential Type, Credential, Proxy Server, Test Connection DELETE URL, Headers, Query Parameters, Credential Type, Credential, Proxy Server, Test Connection URL (Mandatory): Specify the target endpoint URL. Dynamic placeholders are supported to include data from previous workflow nodes.
Request JSON (Applicable for POST, PUT, and PATCH requests): Compose the payload using dynamic placeholders from the workflow. DELETE requests do not include a request JSON.
Headers (Optional): Define custom headers as key-value pairs for authentication (e.g., API keys, tokens) or content-type specification.
Query Parameters (Optional): Define key-value pairs to be appended to the URL. Dynamic variables are supported.
Credential Type: Select the authentication method:
No Auth,Basic Auth, orBy Credentials.- When
Basic Authis selected, you will need to provideUsernameandPasswordfields. - When
By Credentialsis selected, select the specific credential to use from a dropdown list. You can create these credentials from the API Credential page.
- When
Proxy Server (Optional): Specify a proxy server if required for network access.
Test Connection: Trigger a test execution of the webhook directly from the configuration panel. The system returns a success or failure response based on the API call result.
Output Paths:
- Success Path: Triggered when the external system responds with a successful status code (2xx).
- Failure Path: Triggered for failed responses (4xx/5xx), allowing for error handling and alternative workflow paths.
Execute Plugin
The Execute Plugin action allows workflows to run custom scripts or pre-defined plugins installed within the ServiceOps environment. This provides a flexible way to extend core functionality or perform specialized tasks that are not available through standard actions.
Purpose:
- Custom Logic Execution: Implement unique business logic or data manipulations specific to your organization's needs.
- Specialized Tasks: Perform operations that require specific system access or advanced scripting capabilities.
Key Considerations:
- Plugins typically require pre-configuration and installation in the ServiceOps environment.
- Ensure that the plugin is designed to accept inputs and provide outputs compatible with workflow data.
Key Configurations:
- Title: A descriptive name for the Execute Plugin action.
- Description: A brief explanation of the plugin's purpose or function.
- Select Source Node: Choose the upstream node that provides input data to the plugin (e.g.,
Trigger). - Plugin: Select the specific pre-configured plugin to execute from the available options.
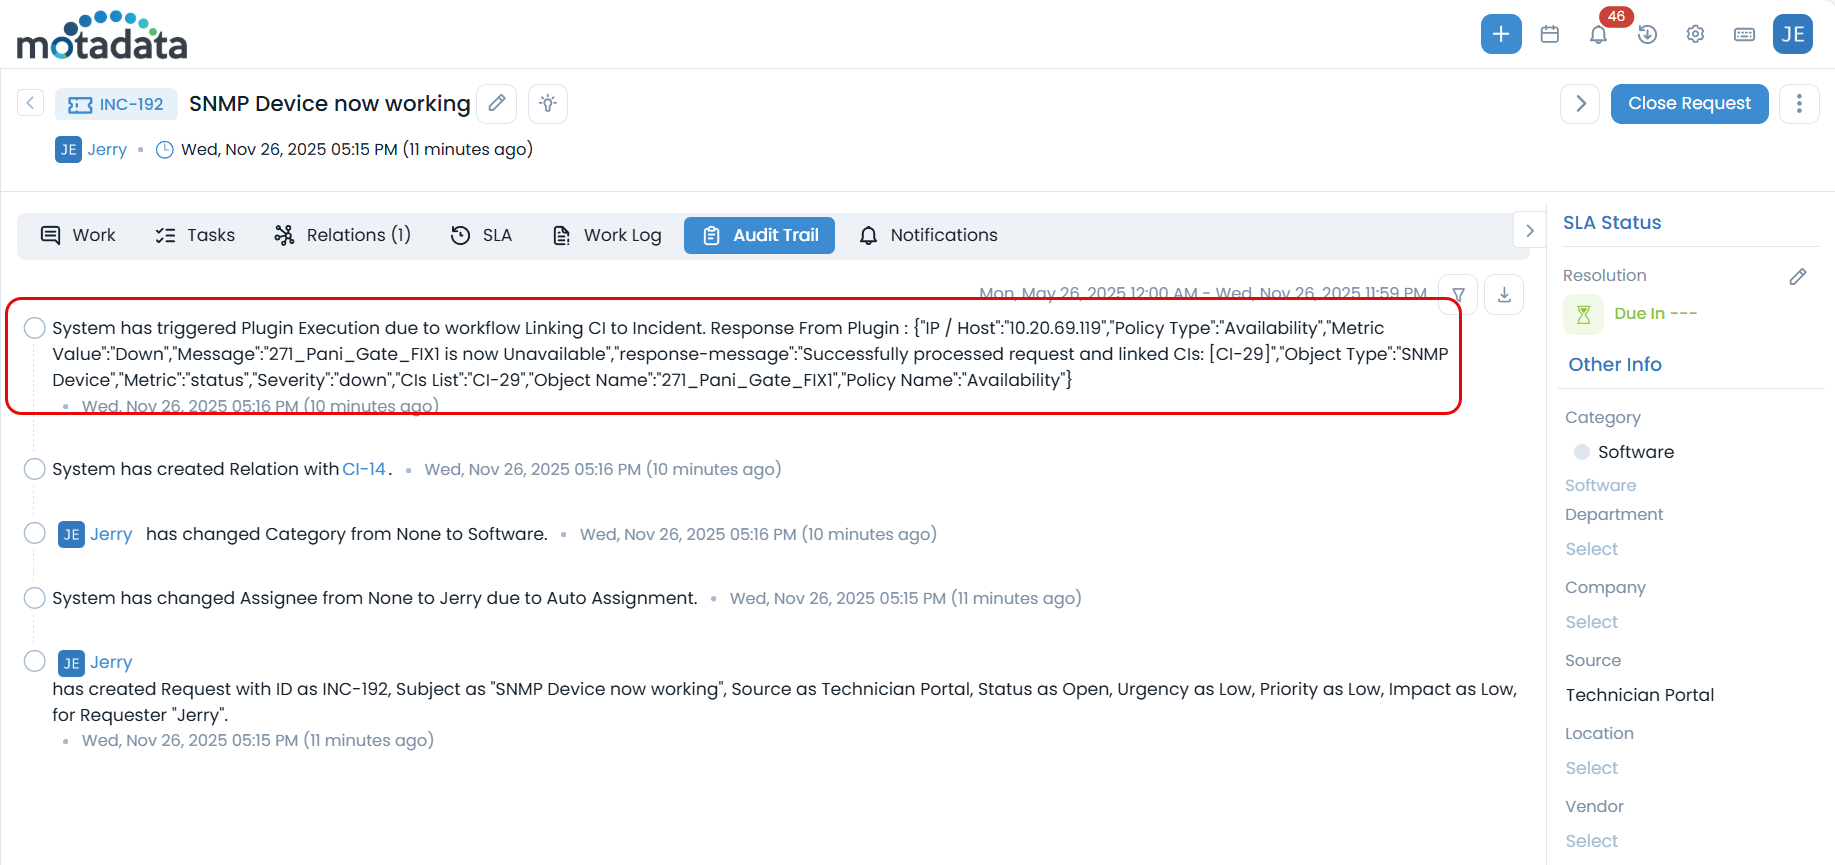
Usecase: Incident-CI Linking
Scenario: When an incident request's category is changed from any to any, the system automatically links the incident with a Configuration Item (CI) using a pre-configured plugin. This ensures that incidents are always associated with the relevant CIs for better impact analysis and resolution.
Prerequisites:
- Ensure a plugin for CI linking (e.g., "ITSM Plugin - Linking of CI to Incident Requests") is installed and configured in ServiceOps. You can find more details on plugin configuration here.
- Ensure that the plugin is designed to accept inputs such as
Request.IdandUnique Identifier Type(e.g.,IP address) and provides outputs compatible with workflow data.
Configuration Steps:
Module: Select
Request.Event Type (Trigger Node): Configure a trigger for
Category is changed. This trigger will initiate the workflow whenever the category of a request is changed.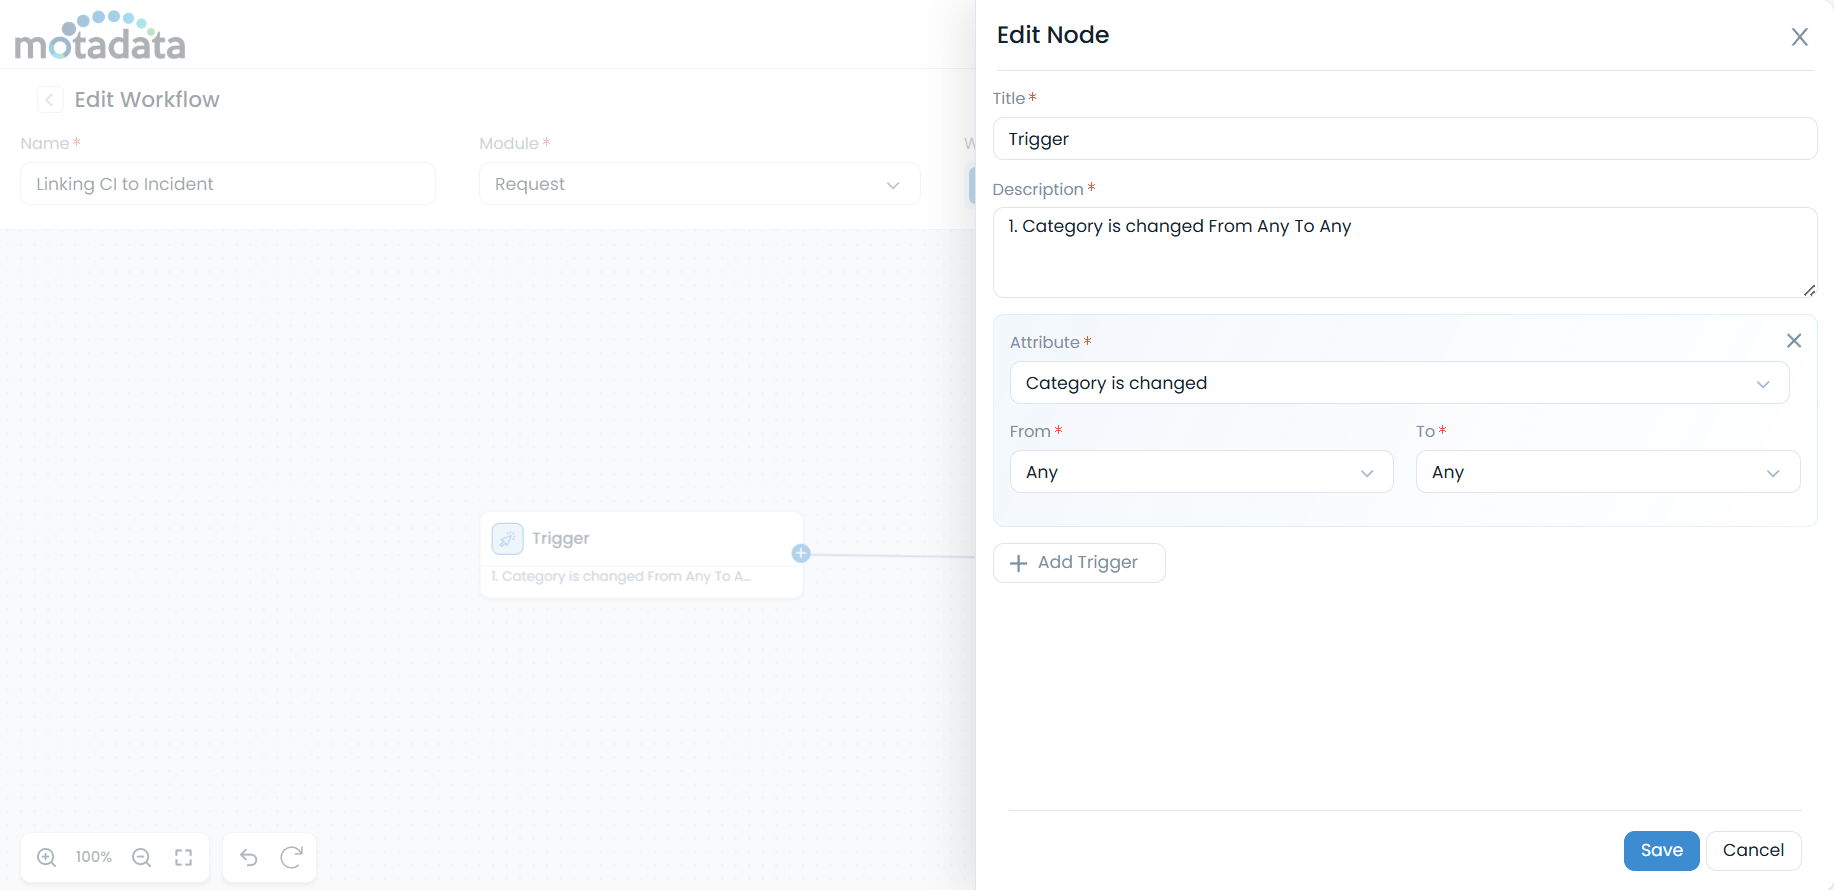
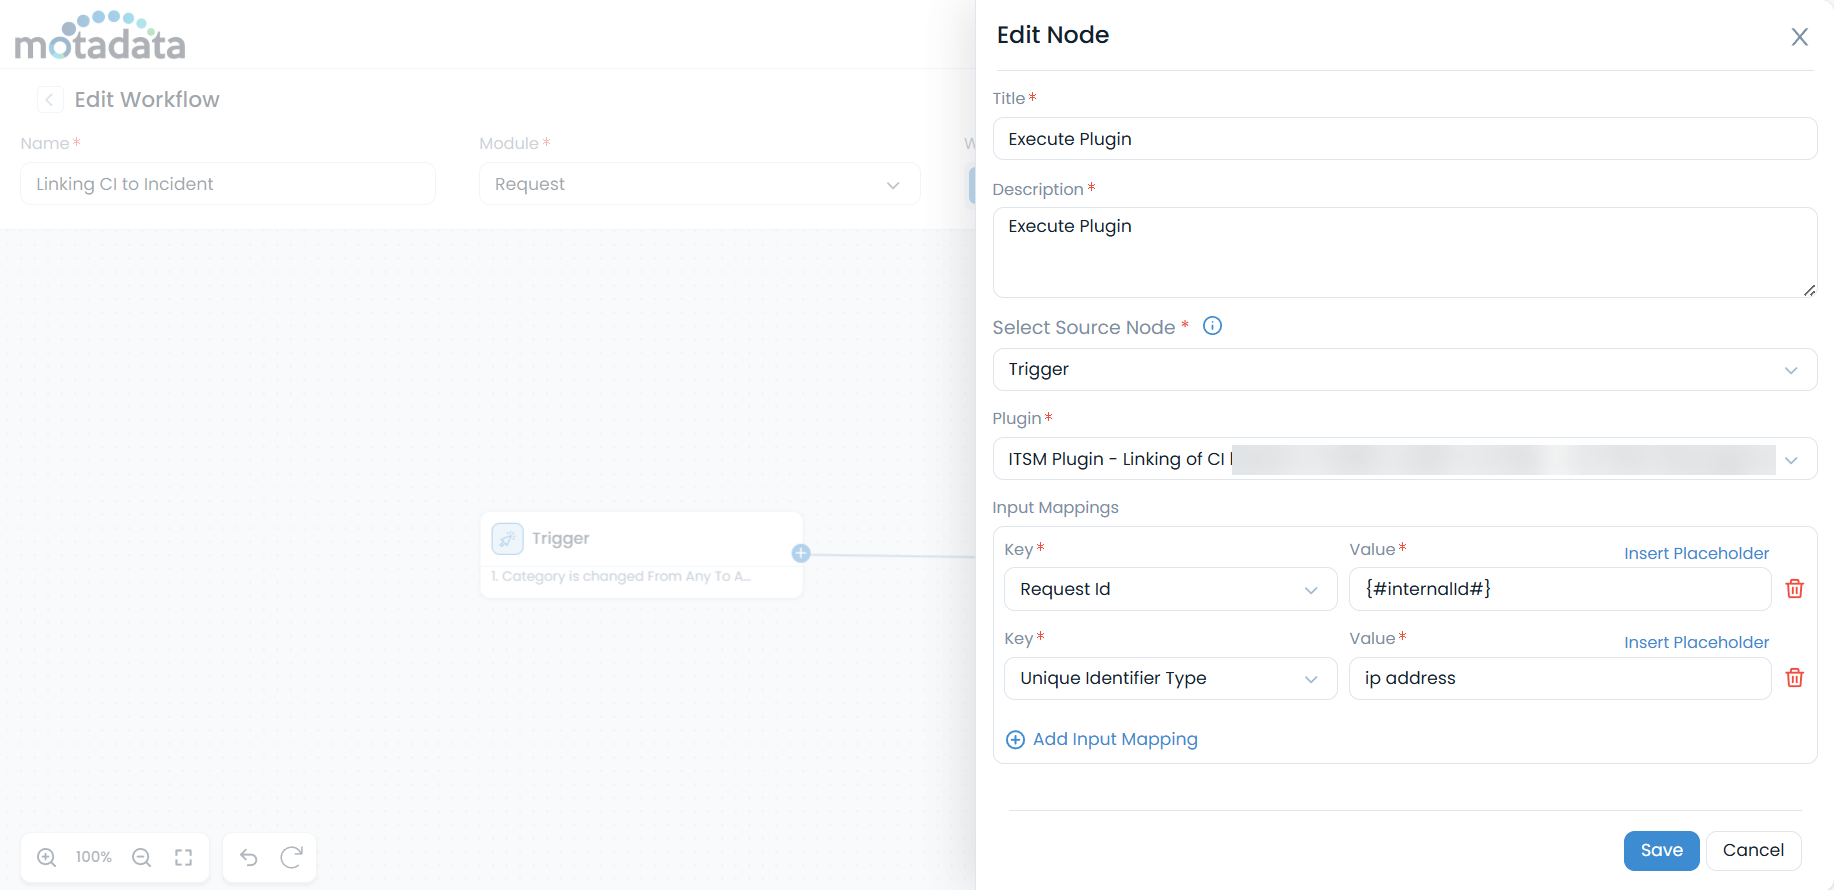
Action Node (Execute Plugin): Add an "Execute Plugin" action node and configure it as follows:
- Title: Execute Plugin
- Description: Execute Plugin
- Select Source Node: Trigger
- Plugin: Select the appropriate plugin for CI linking (e.g., "ITSM Plugin - Linking of CI to Incident Requests")
- Input Mappings: Define the key-value pairs to map ServiceOps workflow data to the plugin's required fields.
- Key:
Request.Id, Value:#internalId# - Key:
Unique Identifier Type, Value:ip address
- Key:
Verification: After the workflow is published and active, verify the automated CI linking:
- Change the category of an existing incident.
- Check the Relations tab of the incident to confirm that a CI has been automatically linked.
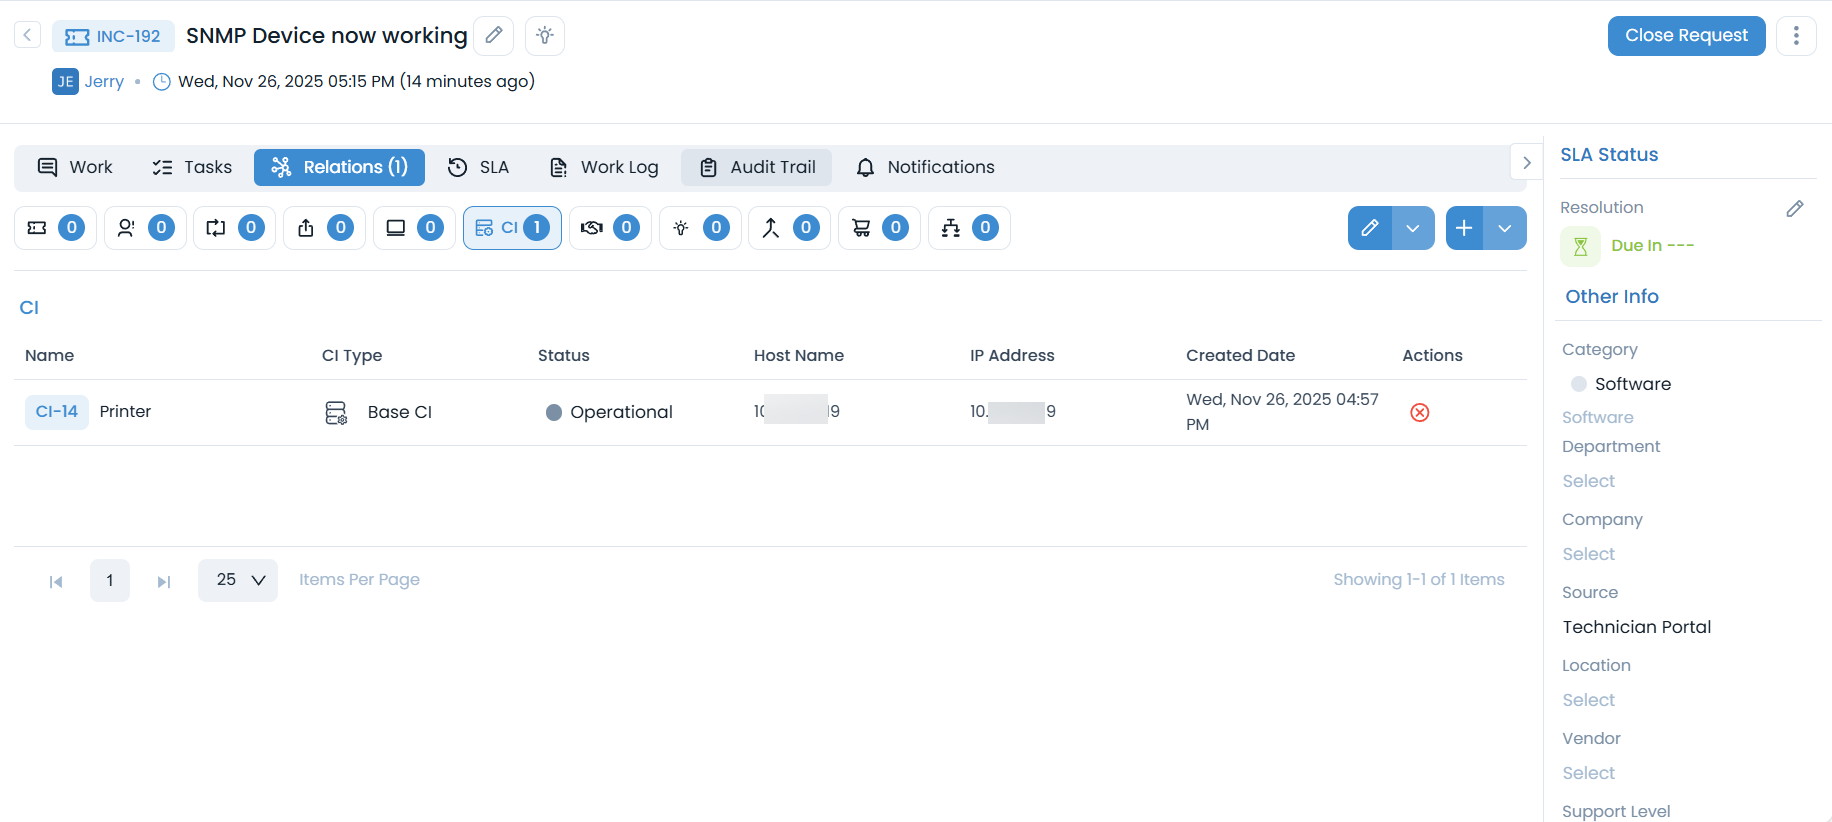
- Review the Audit Trail of the incident to see the plugin execution details.
Execute App Integration Actions
The Execute App Integration action allows workflows to trigger predefined actions within integrated Microsoft Active Directory. This action is designed to streamline user and group management operations within Active Directory directly from ServiceOps workflows.
Purpose:
- Automate Active Directory Operations: Initiate specific operations in Active Directory, such as creating users, updating user attributes, or managing group memberships.
- Synchronize User Data: Ensure consistency between ServiceOps and Active Directory by pushing or pulling relevant user information.
Key Configurations:
- Select Source Node: Choose the upstream node from which this action receives its input data (e.g.,
Trigger). - Application: Select
Microsoft Active Directory. - App Integration: Select the specific integration to use. This represents the action to be performed within Active Directory (e.g., "Create User", "Update User Attribute").
- Input Mappings: Define key-value pairs to map ServiceOps workflow data to the required fields of the Active Directory action.
- Key: Select the Active Directory field to populate. Available keys include:
Action,Password,Base DN,UserType,mail,Username, anduserAccountControl. - Value: Provide the corresponding value, which can be static text or dynamic data from previous workflow nodes.
- Key: Select the Active Directory field to populate. Available keys include:
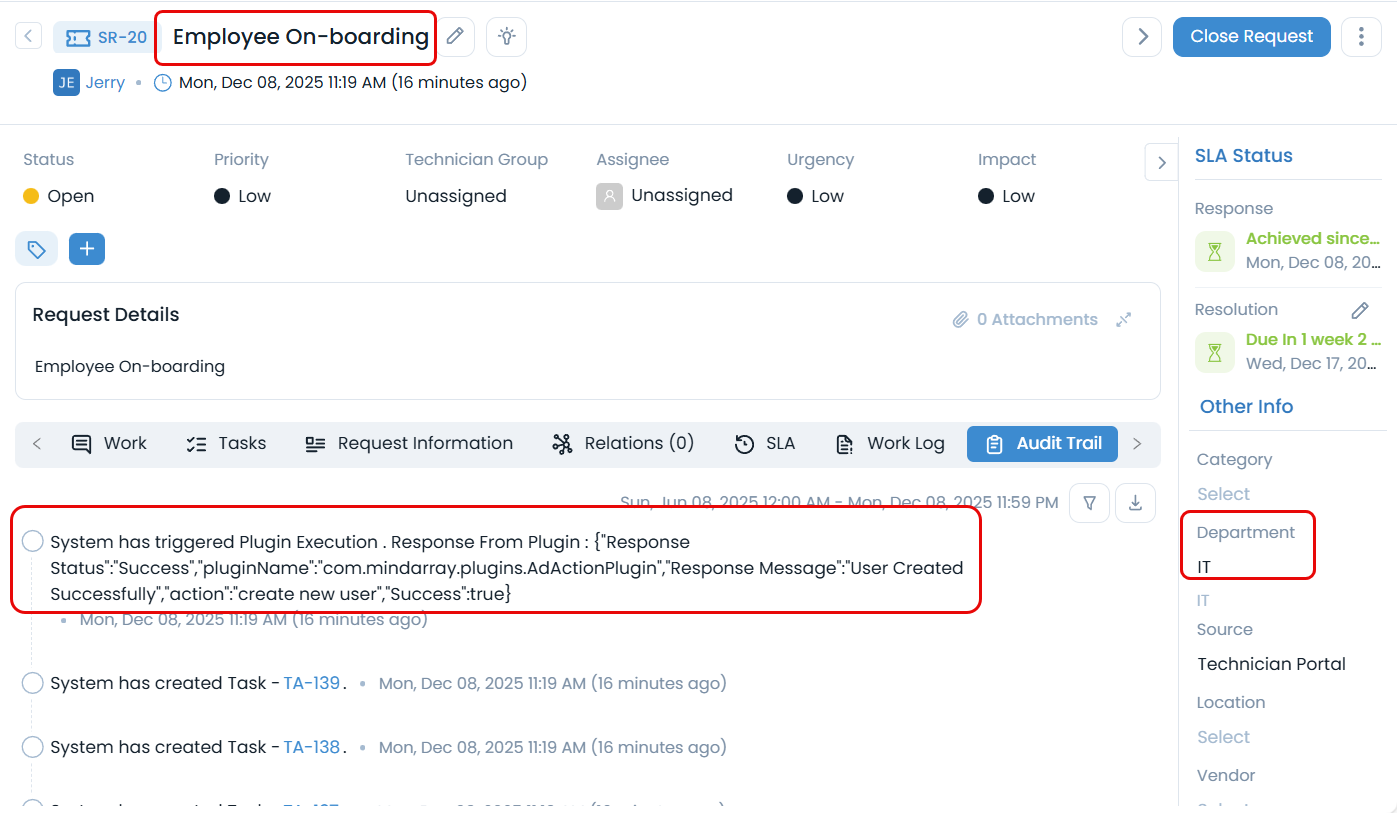
Usecase: Automate User Creation in Active Directory for Employee Onboarding
Scenario: When a new employee onboarding request is raised in ServiceOps, a workflow automatically creates a corresponding user account in Microsoft Active Directory. This streamlines the onboarding process and ensures that new employees have immediate access to necessary IT resources.
Prerequisites:
- Ensure that Integration Connector is installed for the Microsoft Active Directory application in ServiceOps. You can find more details on Integration Connector configuration here.
- Ensure that the Microsoft Active Directory application is configured in ServiceOps. You can find more details on Microsoft Active Directory application configuration here.
- Ensure that the "Employee On-boarding" service request template is configured in ServiceOps. You can find more details on service request template configuration here.
Configuration Steps:
Module: Select
Request.Event Type (Trigger Node): Configure a trigger for
Service Request is created. This trigger will initiate the workflow whenever a new service request is created.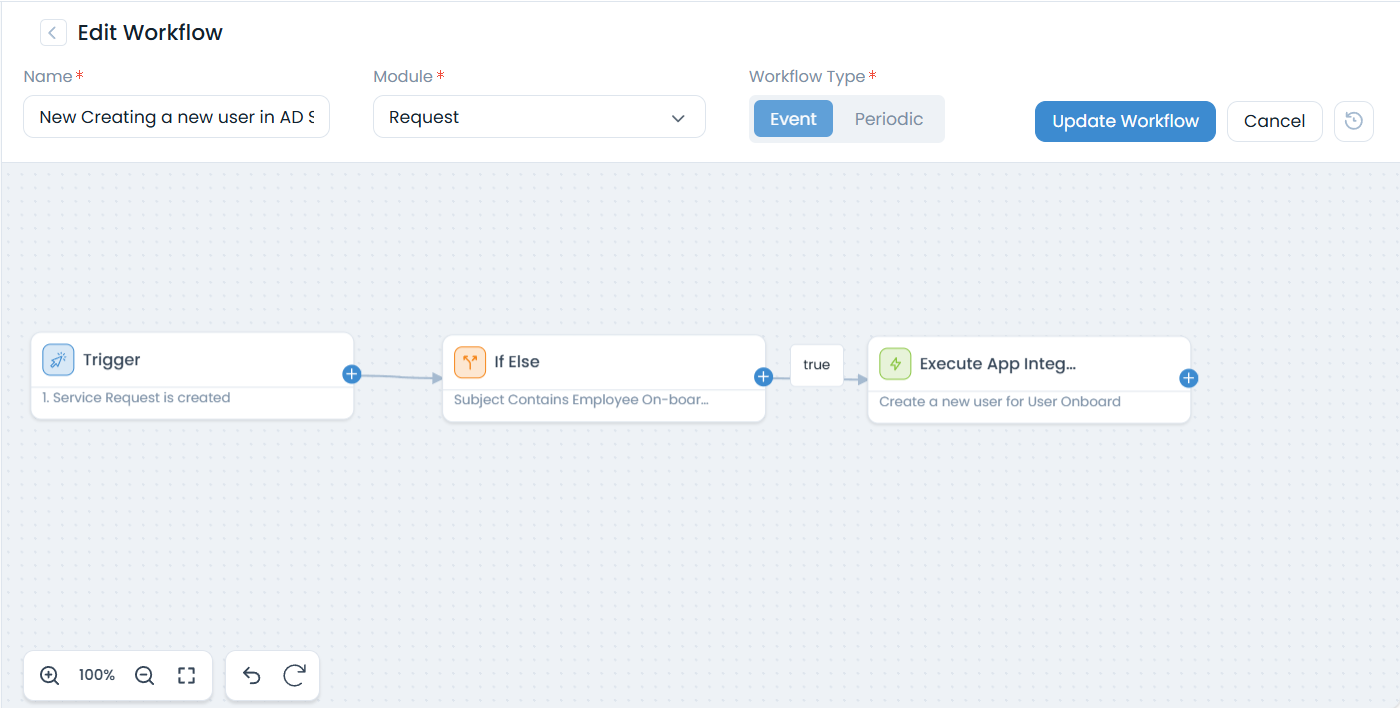
Condition Node (If Else): Add an "If Else" condition node to check if the
Subjectof the request contains "Employee On-boarding" and theDepartmentis "IT".
Action Node (Execute App Integration): On the
truepath of the "If Else" node, add an "Execute App Integration" action node and configure it as follows:- Title: Execute App Integration
- Description: Create a new user for User Onboard
- Select Source Node: Trigger
- Application: Select
Microsoft Active Directory - App Integration: Select the appropriate integration for creating a user (e.g., "AD App" with action "Create New User").
- Input Mappings: Define the key-value pairs to map ServiceOps workflow data to the Active Directory user creation fields.
- Key:
mail, Value:lizi@flotomate.local(or dynamic data from the request) - Key:
Action, Value:Create New User - Key:
Username, Value:lizi(or dynamic data from the request)
- Key:

Verification: After the workflow is published and active:
- Raise an "Employee On-boarding" request.
- Verify that a new user is created in Active Directory.
- Review the Audit Trail of the ServiceOps request to confirm the successful execution of the app integration action.