Hardware Asset Details Page
On the Asset Details page, you can view the complete details of the asset and perform the desired activity. To view the Asset Details page, on the Asset List page click on the Asset ID, and the below page appears.
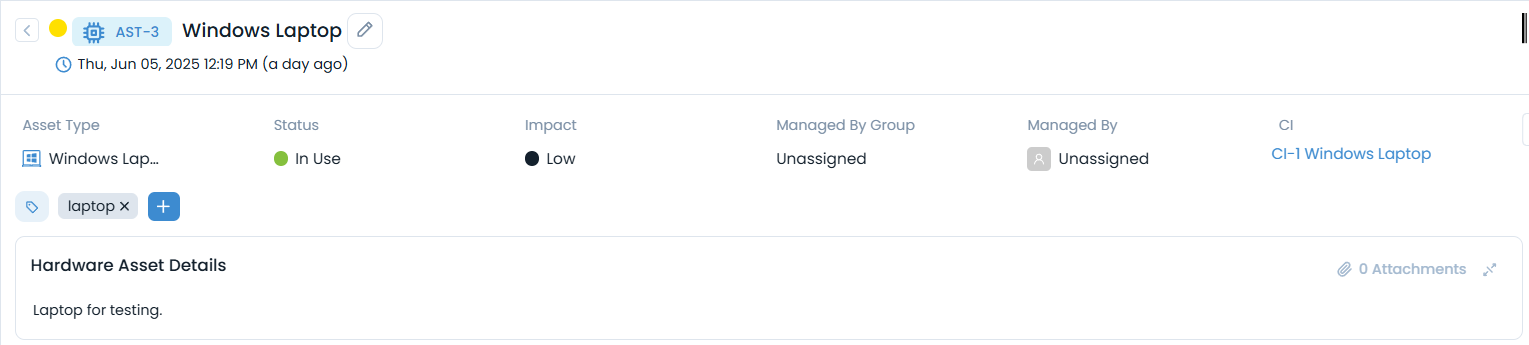
Asset Basic Details
You can view the details like:
- Asset ID
- Asset Name
- Asset Creation Date and Time
- Classifiers
- Hardware Asset Details
- Attachments
Classifiers of Asset These properties tell you the current statistics of the asset and help you to classify them under different labels. When someone works on an asset, the person updates the labels accordingly. For example: If the "status" is closed, it means you have nothing to do with the asset.
| Classifier | Description |
|---|---|
| Asset Type | Specifies the category or type of the asset. In this case, it is classified as a Windows Laptop. This helps group assets by type for better organization and reporting. |
| Status | Indicates the current usage state of the asset. Here, the asset is marked as In Use, showing that it's actively assigned or operational. |
| Impact | Represents the business impact level of the asset. In the screenshot, it is set to Low, implying minimal disruption if the asset fails. |
| Managed By Group | Displays the support or ownership group responsible for managing the asset. Currently, it is Unassigned, meaning no group has been designated. |
| Managed By | Identifies the specific individual responsible for the asset. It is Unassigned in this case. |
| CI (Configuration Item) | Links the asset to a corresponding Configuration Item in the CMDB. This relationship ensures traceability between physical assets and their logical representations. The linked CI here is CI-1 Windows Laptop. |
| Add Tags | Add the custom tags to quickly find the assets based on it. Also, system adds some default tags when based on certain labels and actions. |
A. Associated Actions for Asset
You can create or update different actions and activities as a part of communication, collaboration, and resolution in the asset using the below tabs:
- Properties
- Hardware
- SNMP Custom Properties
- Baseline
- Software
- Virtual Machine
This displays the hardware, mobile device (for mobile assets), computer, and SNMP properties and custom fields of the asset. You can also add the same manually.
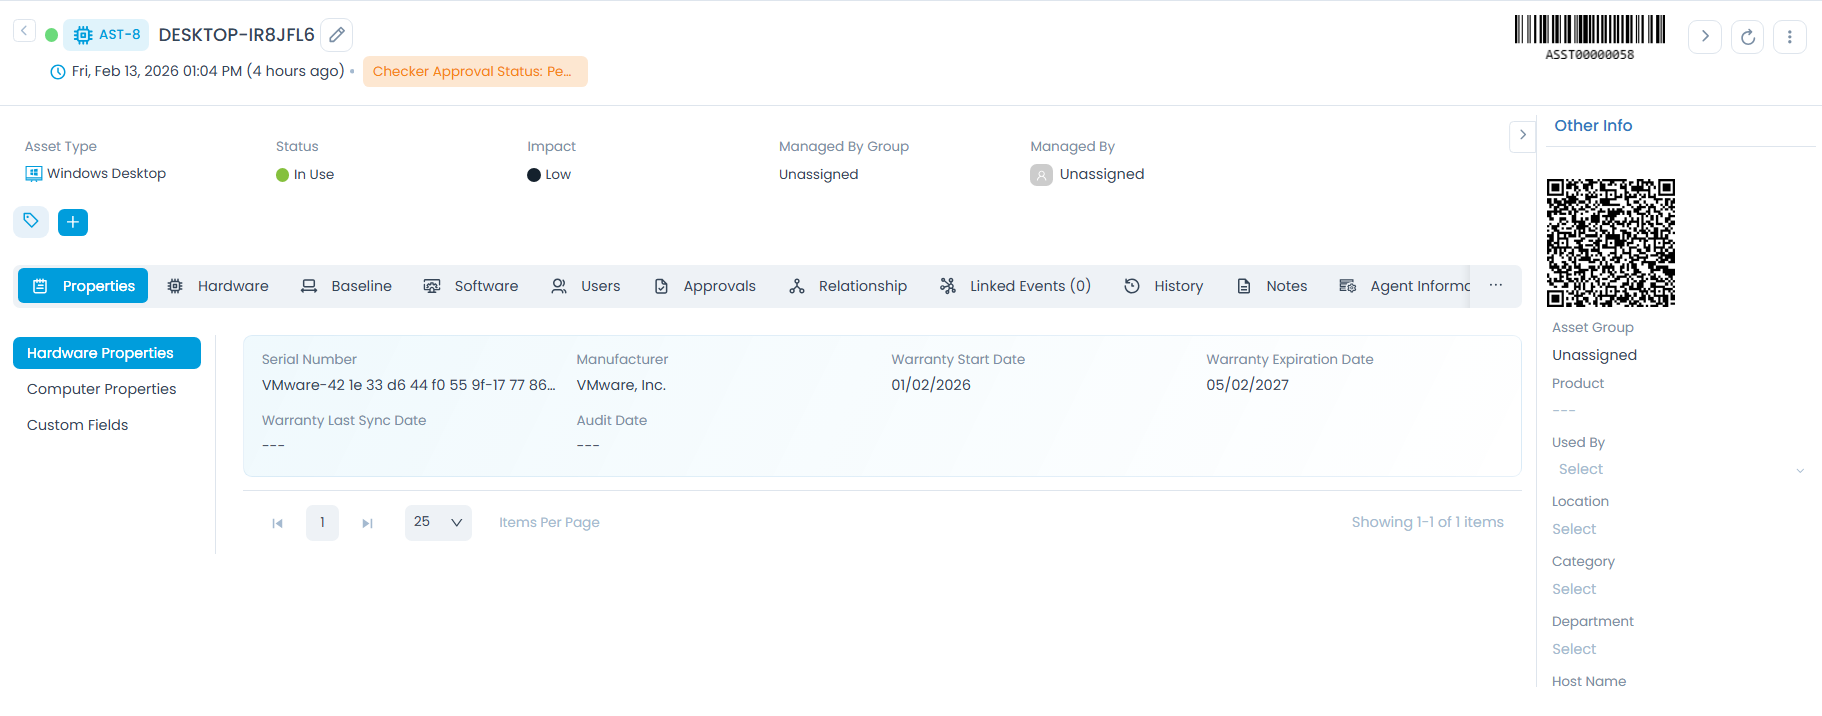
- Hardware Properties: It displays the serial number, manufacturer of the asset and Warranty Details. the warranty details for DELL assets are fetched based on the Warranty Sync configuration.

- Computer Properties: It displays all the configuration details of the computer asset.

- SNMP Properties: Displays the default SNMP details about the asset like System OID, System Up Time, Firmware, Firmware Version, Port, Manufacturer, and Contact Name. To view the additional details, refer to the SNMP Custom Properties tab.
This tab is available only for SNMP Devices.

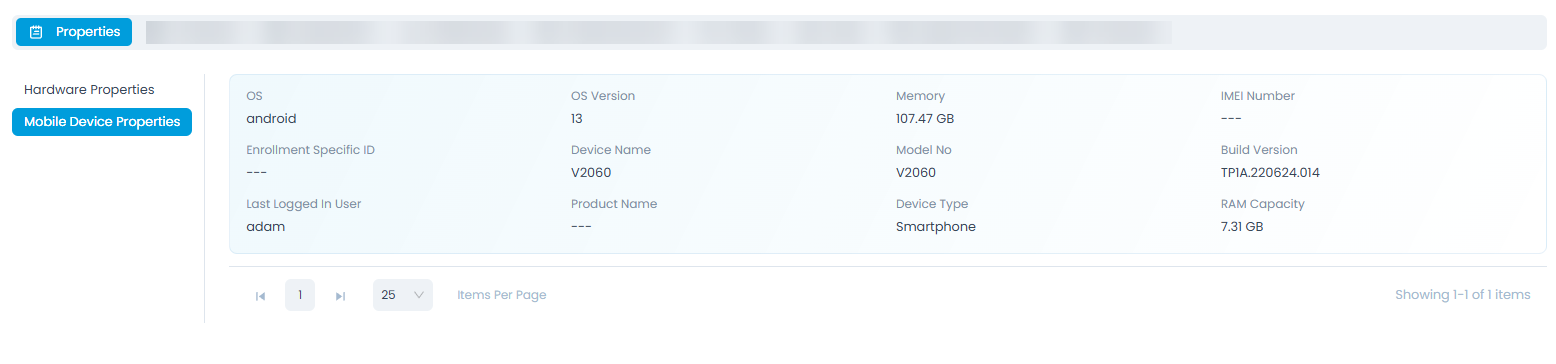
- Mobile Device Properties: Displays the details of the mobile device asset like OS, OS Version, Memory, IMEI Number, Enrollment Specific ID, Device Name, Mobile No, Build Version, Last Logged In User, Product Name, Device Type, and RAM Capacity.
This tab is available only for mobile devices.
- Custom Fields: Displays the additional details about the asset.

This displays all the hardware properties of the asset. You can also manage these details manually. However, if required you can restrict its modification using the Asset custom Rules. The properties include basic as well as memory classifications with their version, memory, disk availability, etc.

This displays the additional scalar and tabular properties of the SNMP device added from the Admin section.
This tab is available only for SNMP devices.
- Scalar Property:

- Tabular Property:

This displays the baseline associated with the asset and the variances detected.
This tab appears only if a baseline is created from the Manage Baselines
- Summary: This displays the summary of the baseline added and the variance detected.

Here, you can perform the following actions:
- Add a baseline. You can add only one baseline for an asset. Once added, the button gets disabled.
- View the details and manage the baseline.
- View the Variance Detected.
- Approve and assign the variance to a request, service, or change ticket.
- Reject and create a change request based on the variance.
Adding a BaselineTo add a baseline,
1. Click the Add Baseline (+) button. A popup appears displaying a list of created baselines. The baselines are created from the Manage Baselines page.
2. Select the baseline.
3. Click Add.

Once, the baseline is added, Run Variance Detection asset action to identify the variances and it will appear in the Variance section.
- Baseline History: Displays an audit log of actions performed on applied baselines. From this section, you can:
- Compare two baselines.
- View the request ticket details if assigned.
- View the attributes of the baseline using the Eye icon.

- Variance History: Displays the list of variances detected along with their details.

This displays a list of software added to the asset. You can view and manage all the software properties of the added asset. The properties include the version, manufacturer, installation date, location, size, License Key, License Type, OS Compatibility and Uninstall Command. You can input the details manually also. However, if required you can restrict its manual updation by using the Asset custom Rules.

Here, you can do the following:
- Search the required software.
- Add new software.
- View the software details.
- Edit the software details.
- Delete the software.
To add software,
1. Click the Add Software button and a popup appears.
2. Select the software to be added from the list.
3. Click Add Software button and the selected items appear in the software list.

4. To change the details, click the Edit icon, and a popup appears. Once the changes are done, click Update as shown in the below.
When the Quiet Uninstall command is present, preference will be given to this over the Uninstall command.

This displays the CPU and Memory Allocation details of the virtual machines that are related to the HyperV machine. This machine is discovered by creating credentials from the Credentials page. Then using this credential in the Network Scan and running it.
This tab is available only for HyperV assets.

B. Associated Actions for Asset
- Users
- Approvals
- Relationships
- Linked Events
- History
This tab allows you to view and manage users of the asset. You can also add the users by clicking the Add User (+) button, filling in the details, and clicking the Add button. Once added, if required you can restrict the updation of user details using the Asset custom Rules.


This displays a list of approvals. You can ignore the approval if no longer needed, remind the approver to take an action on it, or delete the approver's approval if not required, re-request the approver for approval if it is referred back due to reasons like missing/incorrect details, need additional info in the approval, etc.

You can also add comments if required using the Add/View Comments icon. If there are multiple comments, you can search and sort them in ascending or descending order.

- The Approvals tab is visible only when there is a pending approval for the Hardware asset.
- In case of delete approval,
- If there is a single approver for the process and the approver is deleted, no approval would be required.
- If there are multiple stages of approval and an approver is removed, the approval of that user will no longer be required and will skip to the next level/approver .
- If the deleted approver happens to be the final approver, the previous level approver would now be treated as final.
- Once the user takes the act of approval or rejection, the Delete option for Approval will not be visible.
- Ignore and Delete options for approvals will only be visible if the user has the Ignore Approval and Delete Approval role permissions respectively.
Once the approver approves or rejects the approval request, it will also be updated here. In case, the approver finds some details missing or needs additional info before approval, the approval request is referred back, and its status will also get updated from Pending to Referred Back as shown below.

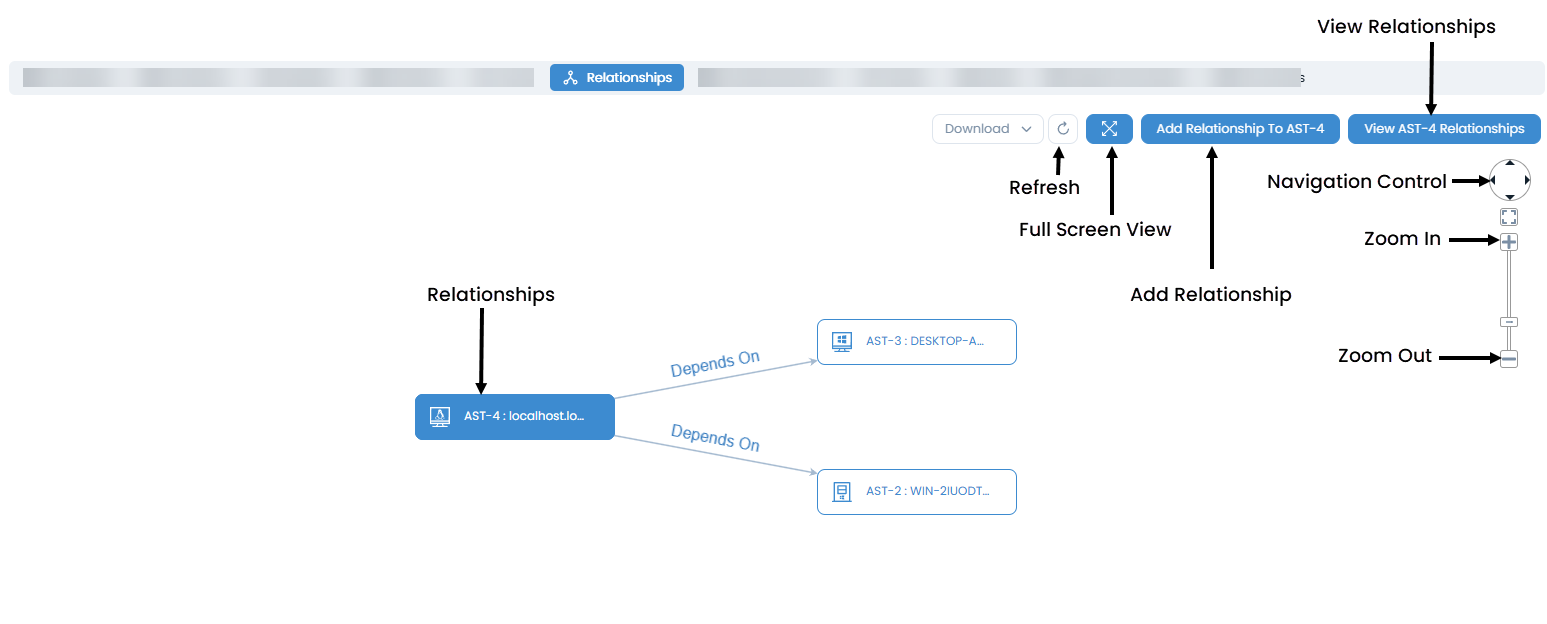
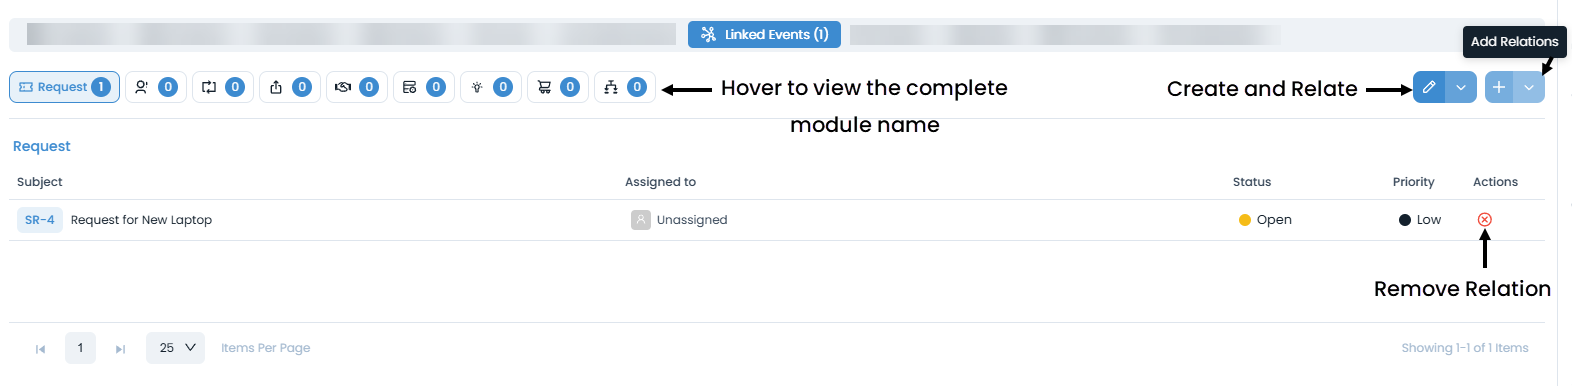
This tab allows you to view and manage the relationships of this particular asset with other assets. When a consumable asset is allocated to any hardware asset, a "Uses" type relationship is automatically created and displayed here. You can also download the list of relations in Excel, CSV, and PDF formats, with the option to password-protect Excel and PDF files for security. The relationships are represented pictorially for better understanding and visuals, as shown below.
When a relationship is established via a previous allocation, deleting that allocation does not remove the relationship. This ensures that duplicate relationships are not created.
Here, you can click the Refresh button to get the latest relationship data without reloading the entire page. You can also set the auto-refresh interval from the System Preferences. Also, you can add and view a list of relationships by clicking the View Relationships button.
To add a relationship,
1. Select the Relationship Type as Direct or Inverse.
2. Select the Relation.
3. Select the Target Type.
4. Select the targets from the list.
5. Click Add as shown in the below-left figure.


The relationship list displays both Direct and Inverse relationships separately, allowing you to clearly distinguish between assets directly related to this asset and those connected through an inverse relationship.
Additionally, you can view the list of active Requests, Problem, and Change tickets associated with the asset by clicking the red-highlighted triangle as shown below.

This allows you to view links, create, or relate the existing asset to various Requests, Problems, Changes, Releases, Contracts, CIs, Knowledge, Purchases, and Projects. Here, the count of the linked entities will also be shown.
You can view and search the Audit Trail, Scan History, Change Logs, WOL History, Movement History, Repair History, and Asset Utilization History for the asset. Also, you can download the entries in PDF, Excel, and CSV formats. Further, you can password-protect the PDF and Excel files.

In case of Asset Utilization History,
- The time range filter is applied to the "Last Updated Date" field.
- To fetch data, the parameter Turn on fast startup from Control Panel > Hardware and Sound > Power Options > System Settings should be disabled. If enabled, the data for that particular duration may not be captured.


Here, the "Up Time Duration" is calculated based on the difference between the "From Time" and "To Time" fields. In contrast, the "Down Time Duration" is calculated based on the difference between the "To Time" (when the machine was shutdown) and the "From Time" (when the machine was started again).
C. Associated Actions for Asset
- Notes
- Agent Information
- Remote Desktop Recordings
- Financials
- Geolocation
You can add notes for future reference using the plus (+) icon.

You can view the agent details through which the asset is added.
This tab appears only if the asset is added via Motadata ServiceOps Agent.

You can view, download, and play the recordings of the remote desktop sessions. The recordings can be played in a different player. Also, you can click the Refresh button to get the latest recordings.
This tab appears only if the recordings of the RDP session exist for this asset.

This displays the costing and depreciation details of the asset.
- If the asset's Acquisition Date and Current Date are on or before the 15th, the Current Book Value will display the value for the current month.
- If the asset's Acquisition Date and Current Date are after the 15th, the Current Book Value will display the value for the next month, as per the depreciation table.

Cost: Displays the cost details of the asset. You can also add, edit, and delete the cost.
To add cost,
1. Click the Add Cost button and a popup appears.

2. Enter the following details:
a. Cost Factor: Select the factor of cost. The options are: Purchase, Operational, Disposal, Others, Upgrade, and Repair.
b. Date: Select the date.
c. Amount: Enter the amount.
d. Description: Enter the description of the cost incurred.
3. Once done, click Add, and the cost gets added to the list.
Depreciation Details: Displays the depreciation details of the asset, including a summary overview of the configured values. Here, you can configure the depreciation method and amount to be used. Also, you can download the details and store them for future use in PDF, Excel, and CSV formats. Further, you can also password-protect the PDF and Excel files to secure data. The Download button will appear only when the depreciation data is available.
The value of every purchased asset reduces gradually. Calculating the depreciation of such assets is vital while creating the financial report. ServiceOps provides 4 methods to calculate asset depreciation. You can configure these at two levels: Product Level and Asset Level.
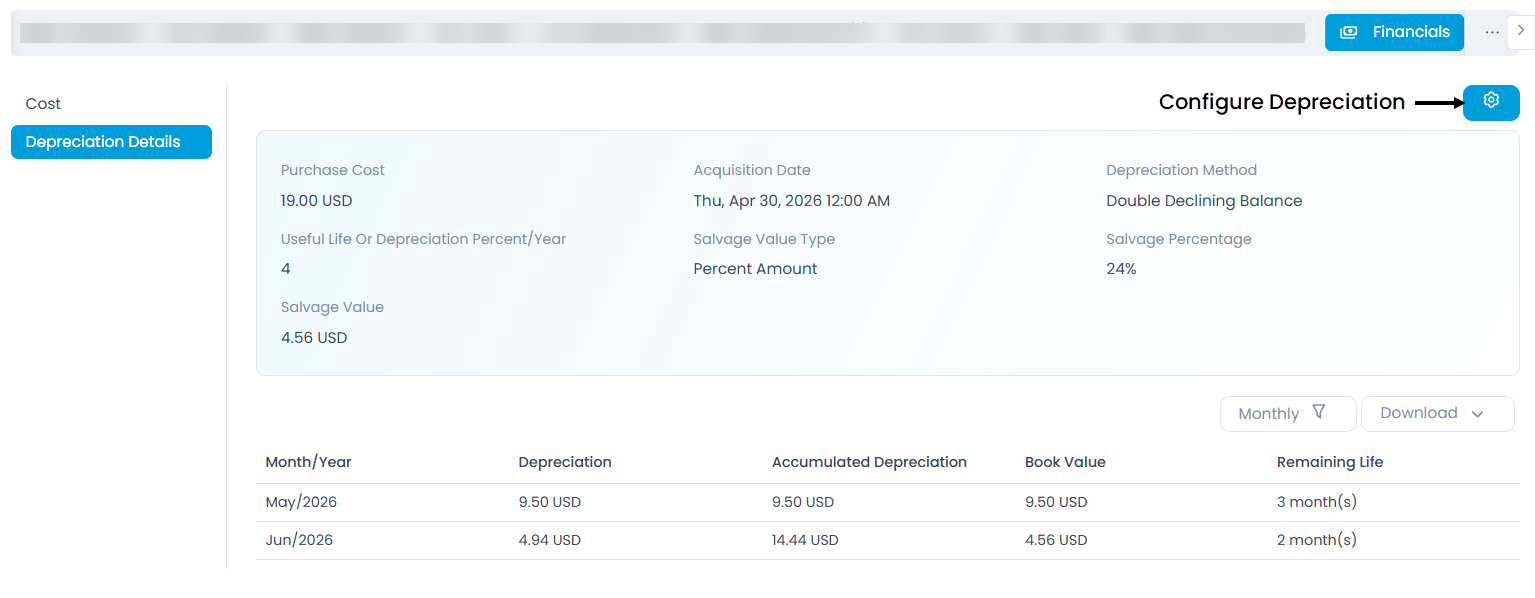
To configure depreciation:
1. Click the Configure Depreciation button and a popup appears.

2. Select the appropriate Depreciation Deviation. The options are:
- Product Level: If selected, the configuration will apply to all the assets associated with the product. You can configure depreciation on products from the Product Catalog page.
- Asset Level: If selected, the configuration will be applicable for individual assets.
- Do Not Deprecate: If selected, the depreciation will not be calculated.
3. Select the Depreciation Method that you want to use for calculation. The options are: Straight Line, Declining Balance, Sum of the Years Digit, and Double Declining Balance. This is available if the Asset Level option is selected.
4. Select the Depreciation Type. The options are:
- Useful Life: The duration during which the asset is considered useful. If selected, enter the number of months till which the asset is considered useful and configure the Salvage Value.
- Depreciation Percentage: Enter the depreciation percent/year to be considered and configure the Salvage Value type and value .
5. Select the Salvage Value Type. The options are:
- Fixed Amount: Enter the salvage value as a fixed currency amount. This is the default behavior.
- Percent Amount: Enter a percentage of the asset's purchase cost. The system automatically calculates the salvage amount, and the currency is inherited from the purchase cost.
6. Once done, click Update. The change is recorded as an Operation Audit entry.
On upgrade, any existing depreciation configuration automatically defaults to Fixed Amount, ensuring no disruption to current depreciation calculations.
This tab enables you to locate the assets on the map, configure the Geolocation preference, and view the Geolocation history.
- This tab appears only if the Geolocation feature is enabled from the Geolocation Preference page.
- It appears only for Windows Laptops, Windows Desktops, Windows Servers, and Hyper V asset types that are discovered using an Agent.
- Restart the Discovery Agent service in the below cases:
- When "Enable Geolocation" is changed.
- When "Geolocation Preference" is changed.
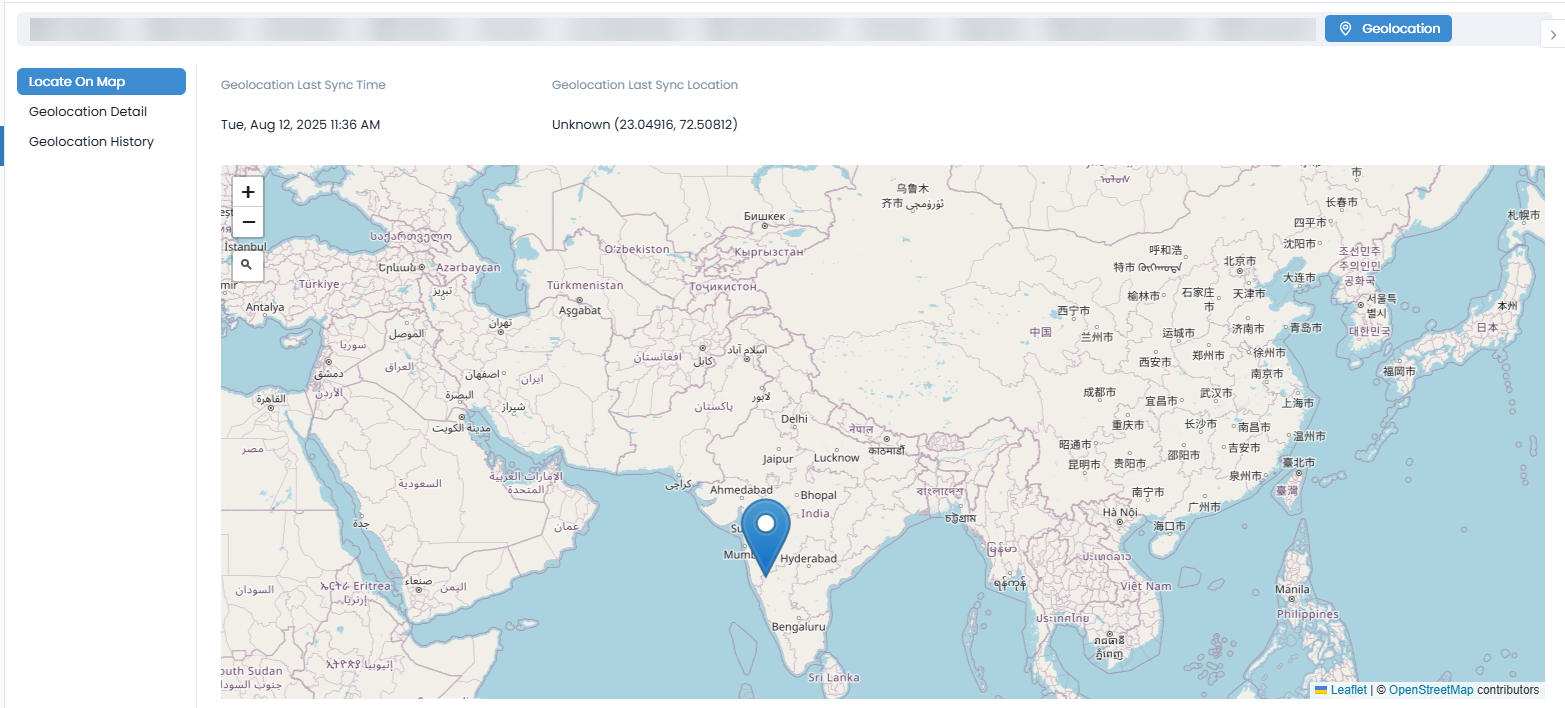
Locate on Map: Displays the location of the asset on the minimized map. It also displays the following details:
- Geolocation Last Sync Time: Displays the time when the last geolocation of the asset was fetched.
- Geolocation Last Sync Location: Displays the last live location of the asset.
The asset's location will be displayed on the map, as per the below mentioned priorities.
- If Geolocation is enabled and Geolocation Preference is Live Location, then priority will be as below:
- Latest live geolocation
- the location name will be displayed as per the set default coordinates of Asset
- Associated Location's coordinates
- No location will be displayed
- If Geolocation is enabled and Geolocation Preference is Default Location, then priority will be as below:
- The location name will be displayed as per the set default coordinates of Asset
- Associated Location's coordinates
- No location will be displayed.
- o If Geolocation is disabled for the asset, the System will display the Asset’s associated Location coordinates on the Map.
Geolocation Detail: Here, you can configure the geolocation preference based on which the location details will be fetched and displayed on the map in Locate on Map section.
- Enable Geolocation: Enable Geolocation for the asset. If enabled, the following fields will appear for configuration. By default it is disabled. Once enabled, you need to restart the Agent service to fetch the geolocation data.
- Geolocation Preference: Set the preference as Default or Live. Based on this the location of the asset will be displayed on the map.
- Default Asset Coordinates: Enter the default asset latitude and longitude. You can also set the coordinates using the Locate on Map icon as shown below. Once selected, its coordinates will appear in the respective fields.

Once done, click Update, and you will be redirected to the Locate On Map tab, where the asset's location will appear.
Geolocation History: You can view the geolocation history of the asset based on the preference set from Geolocation Preference i.e. Time-based, or Distance-based, or both. You can search the logs based on the selected date range and also download them in PDF, Excel, and CSV format. Also, you can password-protect the PDF and Excel file if required for security.
If Internet connectivity is not available in the Agent, Unknown will be displayed in the history instead of location name.

Other Information
The other information shows additional details about the asset.

QR Code: Shows the QR code of the asset.
Asset Group: Shows the group in which the asset belongs. You can edit if required.
Product: Shows the product of the asset. You can edit if required.
Used By: Shows the name of the person to whom the asset is assigned. You can edit if required. Once the asset is assigned, a confirmation email is sent to the user for assignment. For more details, refer to the Asset Confirmation page. For mobile device assets, this field is automatically populated with the user who last logged in from that mobile device. For other assets, you can also set the field based on the logon name if the Asset Preference "Consider Last Logged In User on Asset as Used By" is enabled from the System Preference page. When this preference is enabled, the behavior will be as follows:
- If the "Used By" field already contains a user whose logon name matches the last logged-in user, the "Used By" field will remain unchanged.
- If no users are assigned to the "Used By" field, and there is a user with a matching logon name, the "Used By" field will be updated to that user.
- If the "Used By" field contains multiple users and one of them has a logon name matching the last logged-in user, the "Used By" field will remain unchanged.
- If the "Used By" field does not contain any user with a logon name matching the last logged-in user, the "Used By" field will be updated to the last logged-in user, and any other users will be removed.
- If the "Used By" field contains a single user whose logon name does not match the last logged-in user, that user will be removed and updated to the last logged-in user.
Location: Shows the location of the asset. You can edit if required.
Category: Shows the category assigned to the asset. You can edit if required.
Department: Shows the department of the asset. You can edit if required.
Company: Shows the company associated with the hardware asset. This field is available only if the Managed Services Provider feature is enabled.
Host name: Shows the host name of the asset. i.e name of the added asset host. You can edit if required.
Domain Name: Shows the domain name. You can edit if required.
UUID: Shows the UUID (Universally Unique Identifier) number of the CI. It acts as a unique identification parameter if selected in the Asset Preference while performing agentless discovery.
IP Address: Shows the unique IP address of the asset. You can edit if required.
MAC Address: Shows the unique MAC address of the asset. You can edit if required.
Subnet Mask: Shows the subnet mask of the asset. You can edit if required.
Vendor: Shows the Vendor from where the asset is bought. You can change it if required.
Asset Condition: Shows the condition of the asset. The options are: None, Faulty, Good, and Non Repairable.
Movement Status: Displays the status of the asset movement. The values are:
- Out Movement: This appears when the faulty asset is sent to repair,
- In Repair: This appears when the "Send to Repair" request for the asset is completed.
- In Movement: This appears when the asset is in movement due to Asset Transfer request.
Under Change Control: Shows whether a baseline is applied to the asset. If a baseline is applied, the value changes to Yes. If no baseline is assigned, the value will be No, which is the default.
Business Service: Shows the service associated with the respective asset. You can edit the value.
Origin: Shows from where the asset originated. It can be Discovery, Manual, Agent, CSV Import, Excel Import, Purchase, SCCM, or Poller.
Acquisition Date: Shows the date when the asset was created or purchased or acquired. For example, if the asset was created on Mon Jan 05, 2026 11:39 AM, the acquisition date and time will be displayed as Mon Jan 05, 2026 11:39 AM.
Assignment Date: Shows the date of the Assignment, when the asset is handed over to any user. This is to be updated manually by the user.
Last Barcode / QR Code Scan By: Displays the user who last scanned the barcode/QR code.
Last Barcode / QR Code Scan Date: Displays the date and time when the barcode/QR code was last scanned. For example, if the barcode/QR code is scanned on Mon Jan 05, 2026 11:39 AM, the date and time will be displayed as Mon Jan 05, 2026 11:39 AM.
Created Date: Shows the date and time when the asset was created. For example, if the asset was created on Mon Jan 05, 2026 11:39 AM, the created date and time will be displayed as Mon Jan 05, 2026 11:39 AM.
Last Updated Date: Shows the date and time when the asset detail (say Used By field is updated) was last updated. For example, if the asset detail (say Used By field is updated) was last updated on Mon Jan 05, 2026 11:39 AM, the last updated date and time will be displayed as Mon Jan 05, 2026 11:39 AM.
Created By: The user who created the asset. If the asset was created by a user with the logon name "John Doe", the created by will be displayed as John Doe. And if it is automatically created, the created by will be displayed as System.
Last Updated By: The user who last updated the asset. If the asset was last updated by a user with the logon name "John Doe", the last updated by will be displayed as John Doe. And if it is automatically updated, the last updated by will be displayed as System.