Software Asset Details Page
On the Software Asset Details page you can view the complete details of the asset and perform the desired activity.
To view the details page, On the Software Assets list page, click on the subject of the asset whose details you want to view, and the below page appears.
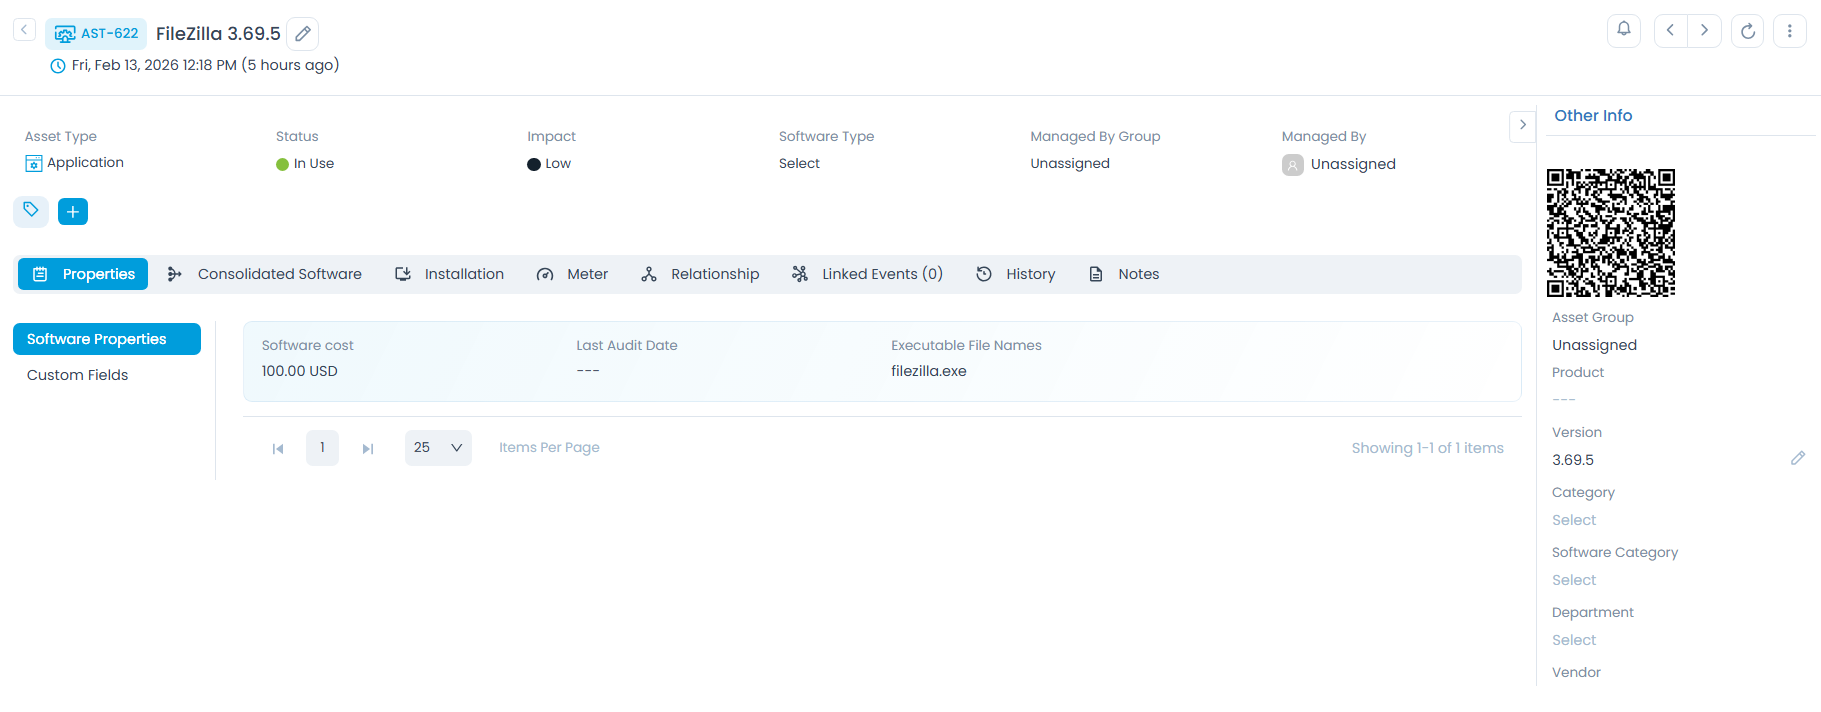
Classifiers of Asset
These properties tell you the current statistics of the asset and help you classify them under different labels. When someone works on an asset, they update the labels accordingly. For e.g. if the 'status' is closed, it means you do not need to do anything on the asset.

| Parameter | Description |
|---|---|
| Asset Type | This label classifies the name of the asset type. |
| Status | This label classifies the asset based on the status. The default options are: In stock, In use, Missing, and Retired. |
| Impact | This label classifies the asset based on the impact factor. The default values are: Low, On Users, On Department, and On Business. |
| Software Type | This label classifies the asset based on the software type. The options are: Unidentified, Shareware, Prohibited, Freeware, Managed, and Excluded. |
| Managed By Group | This label displays the group which manages the particular asset. |
| Managed by | This label displays the name of the person who is to manage the asset. |
| Add Tags | You can add the custom tags to quickly find the assets based on it. Also, system adds some default tags when based on certain labels and actions. |
A. Associated Actions for Asset
You can create or update different actions and activities as a part of relations, notes, and history in the asset using the below tabs:
- Properties
- Consolidated Software
- Installation
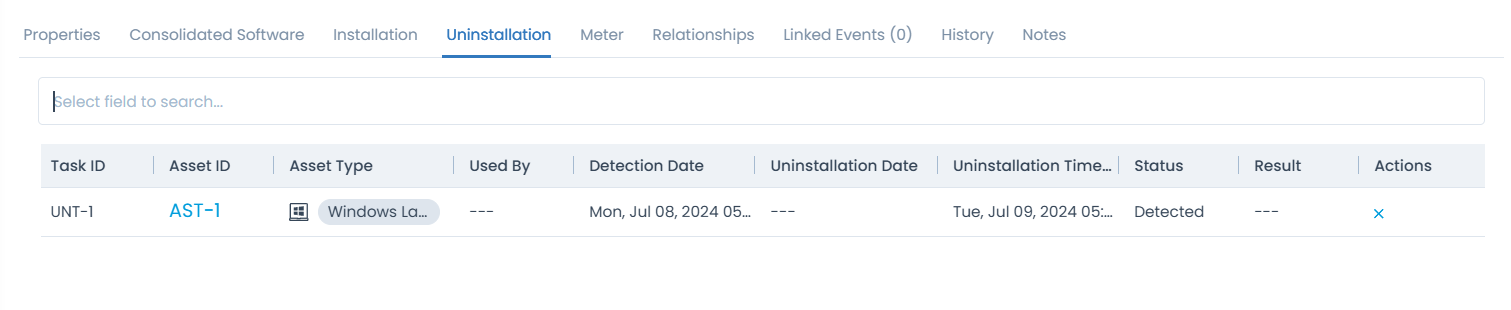
- Uninstallation
- Meter
This shows all the software specifications of the asset. It includes the Cost, Last Audit Date, and Executable File Names. You can also edit the properties by clicking the Edit icon.


This shows a list of common software that are consolidated from the Software Asset list page. It will show the list of common configurations. This can be configured using the bulk update action. For more details, refer Updating Asset page.
From here, you can view the details page of the consolidated software as well as remove any software using the Unconsolidate icon.
When detected software with the same name and version already exists in the Consolidated Software List, it is linked to the existing asset instead of creating a duplicate.

This shows a list of assets in which the particular selected software asset is installed. Specifically in any hardware asset. Also, you can search for the required asset by selecting the field or entering a keyword.

This shows a list of assets which are to be uninstalled from the machine. The assets whose auto uninstallation policy has been created will appear here. Also, you can search for the required asset based on the desired field.
This tab appears only if the asset is to be uninstalled from the machine.
Meter is a convenient tool to track the utilization of a software application across machines in an organization. Using Meter, CMDB can track two usage statistics of a Software Asset using an Agent. A user has to enable the meter individually for Software Assets that one wants to track. Currently, Meter tracks the following information of a Software Asset:
- Total time the Software Application was used. Also referred to as Total Usage Duration.
- Time elapsed since the application was last open. Also referred to as Last Used.
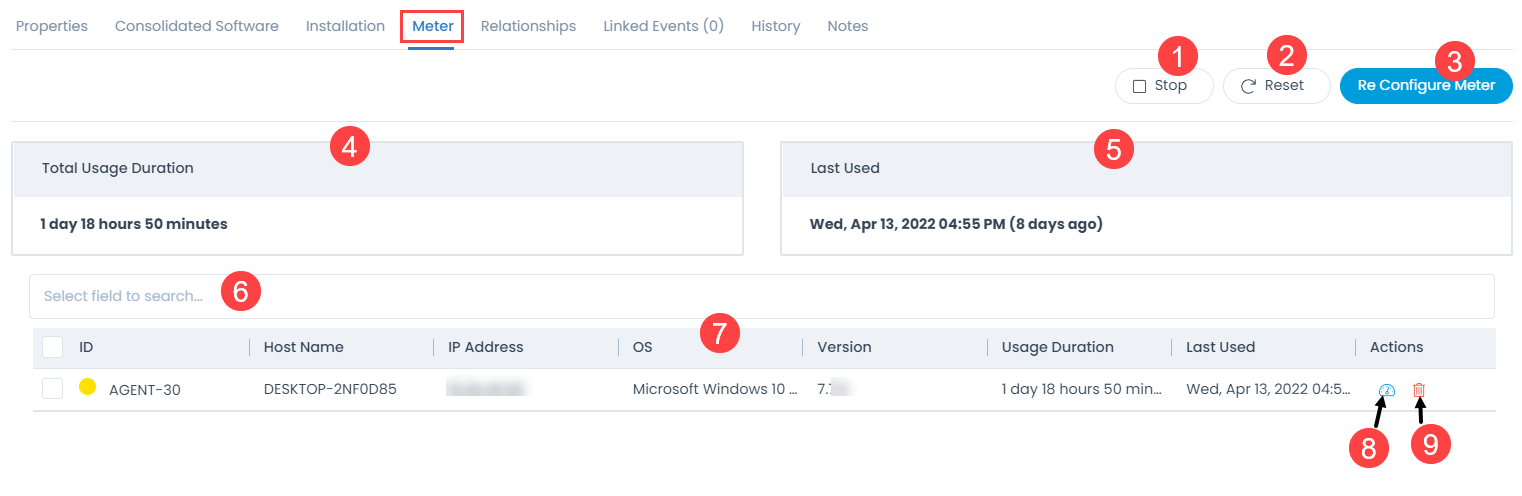
From here, you can do the following tasks:
- Start/Stop the meter for the agents configured in this software asset.
- Reset the meter.
- Configure/Reconfigure the meter in agents.
- View the total usage duration of the software.
- View the date and time when the software asset was last used.
- Search the required agent using the Search field.
- View a list of agents configured along with their details in the grid.
- View the Meter Info as shown below.
- Remove the meter from an agent if required. Once clicked, a confirmation message appears. Click Yes to continue or No to stop the process.

To configure/re configure a meter,
- In the Properties tab, set the .exe file of the respective software to be metered.
- Click the Configure/Re Configure Meter button and a popup appears.
- Select the desired agents. By default, all the agents are visible. You can also filter or search for the required agent.
- Click Update. The meter gets configured and appears in the grid. Once configured, click Start and the software usage begins to be monitored. Usually, the utilization data appears minimum after 120 minutes or more as per the Meter Data Cycle set in the Admin > Organization > System Preference > Agent Preference tab.

B. Associated Actions for Asset
- Relationships
- Linked Events
- History
- Notes
- EOSL Insight
You can view and manage the relation of this particular asset with other assets. The relation is represented pictorially for better understanding and visuals.
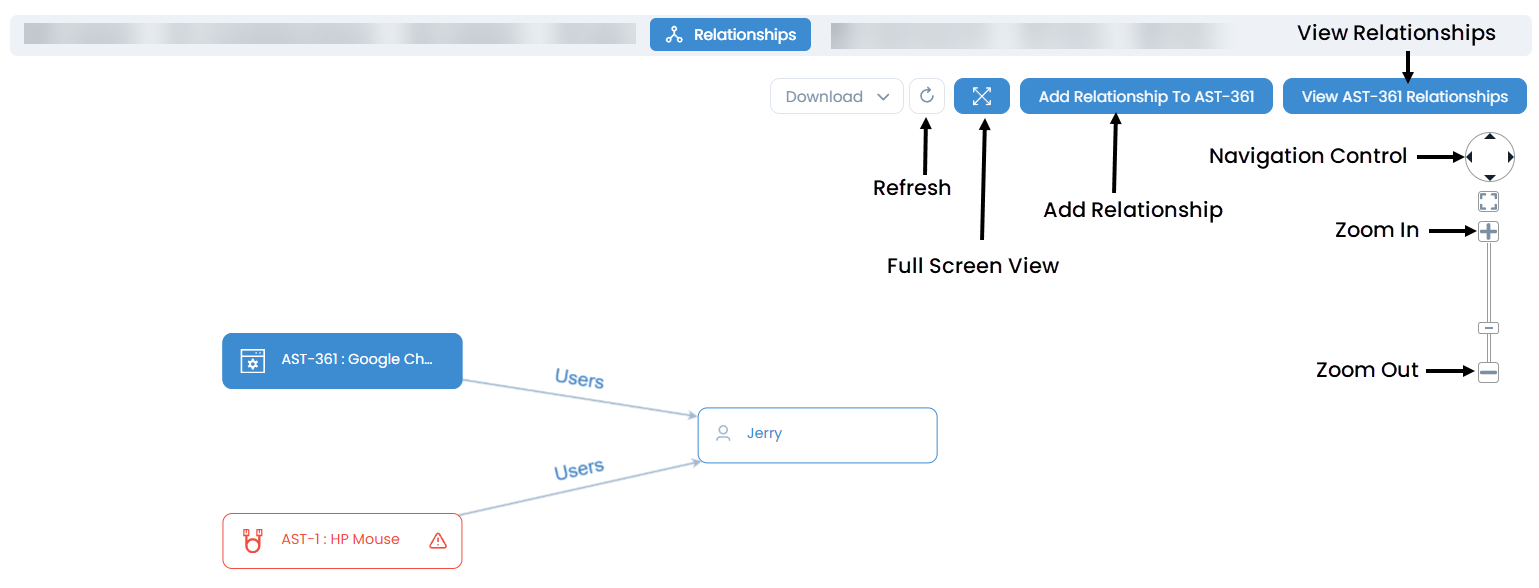
From here, you can do the following:
- View the Relationships tab in full screen.
- Add Relationships. For more details, refer Hardware Asset Details Page.
- View the added relationships.
- Navigate to right, left, up, and down using the Navigation Control.
- Zoom In
- Zoom Out
- Move the relationship diagram by clicking near the figure, dragging and dropping at the desired location.
You can view the link, create, or relate the existing asset to various Request, Problem, Change, Release, Contract, CI, Knowledge, and Project. Here, the count of the linked entities will also be shown.
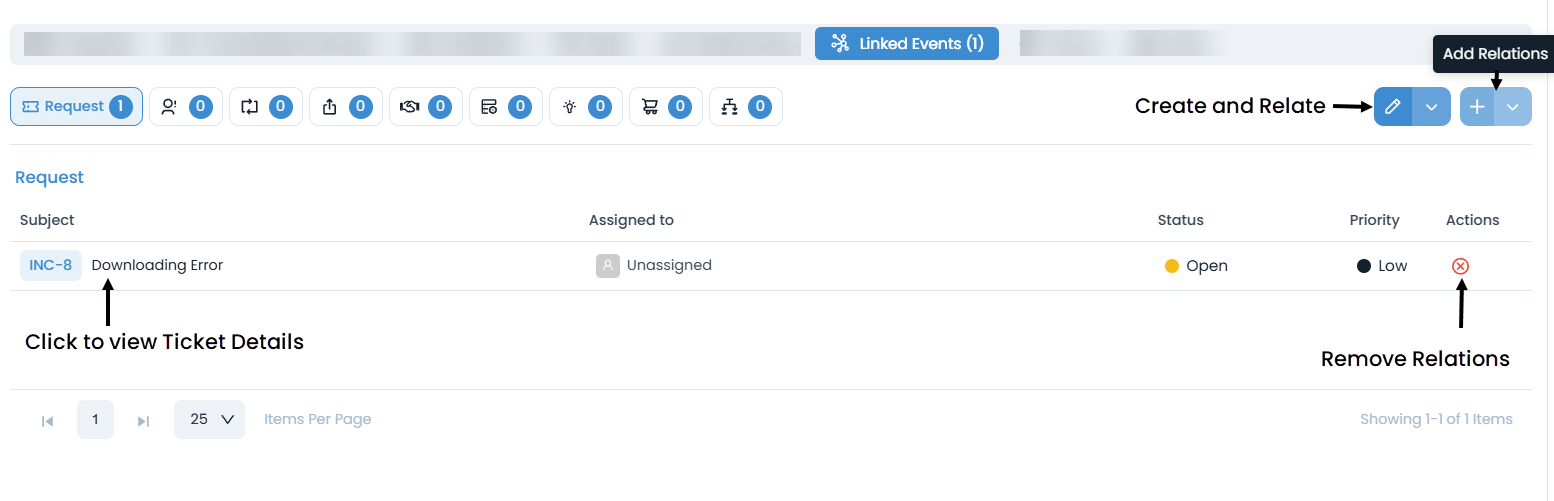
From here, you can do the following:
- View a list of tickets linked with this asset in the table.
- Create and Relate Incidents, Request Service, Problem, Change, and Release tickets with this software asset.
- Add Relations.
- View the ticket details if required.
- Unlink the ticket and **remove** it from the list.
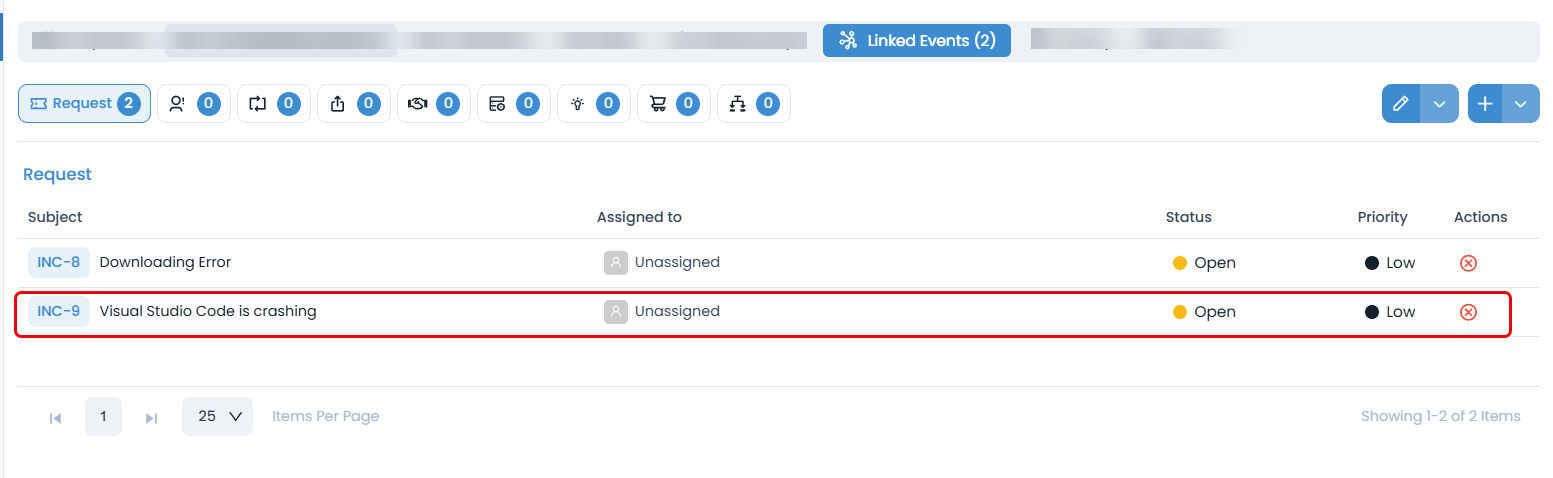
Creating and Relating a Request
To create and relate a request,
- Click the Create and Relation button. A popup appears.
- Fill in the details.
- Click Create and Relate. The ticket gets created and appears in the table as shown below.

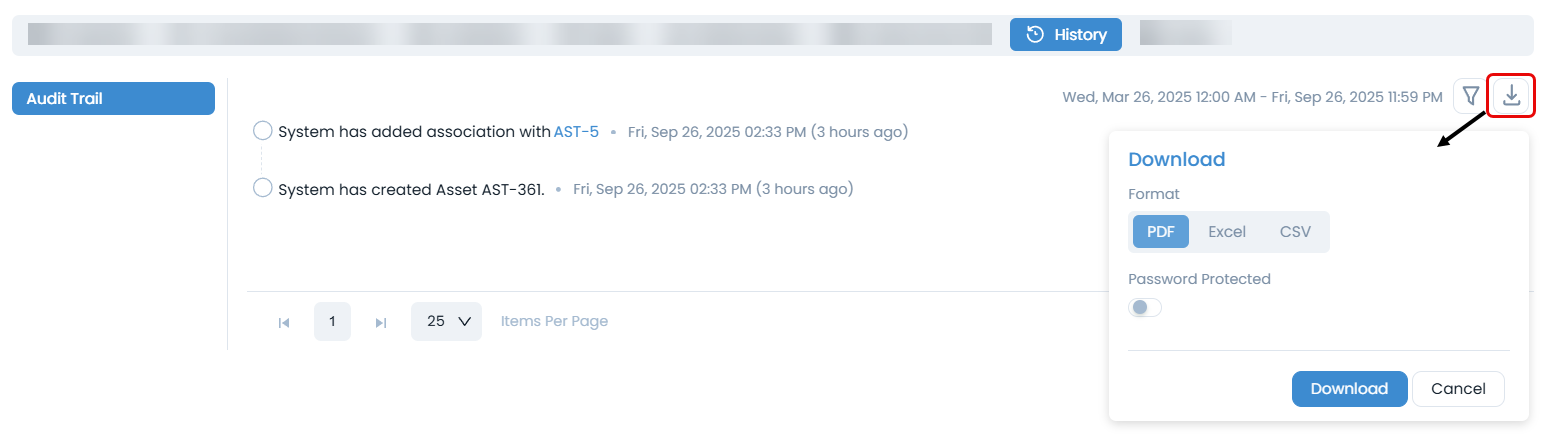
You can view, manage, and download the audit logs of the asset. You can search the logs based on the selected date range. Also, you can download the records in PDF, Excel, and CSV formats. Additionally, you can password-protect the PDF and Excel files to enhance security.
You can add notes for future reference. You can also edit or delete the irrelevant note. You can add a note, by clicking the Add Note button, entering the name and description, and clicking Add.

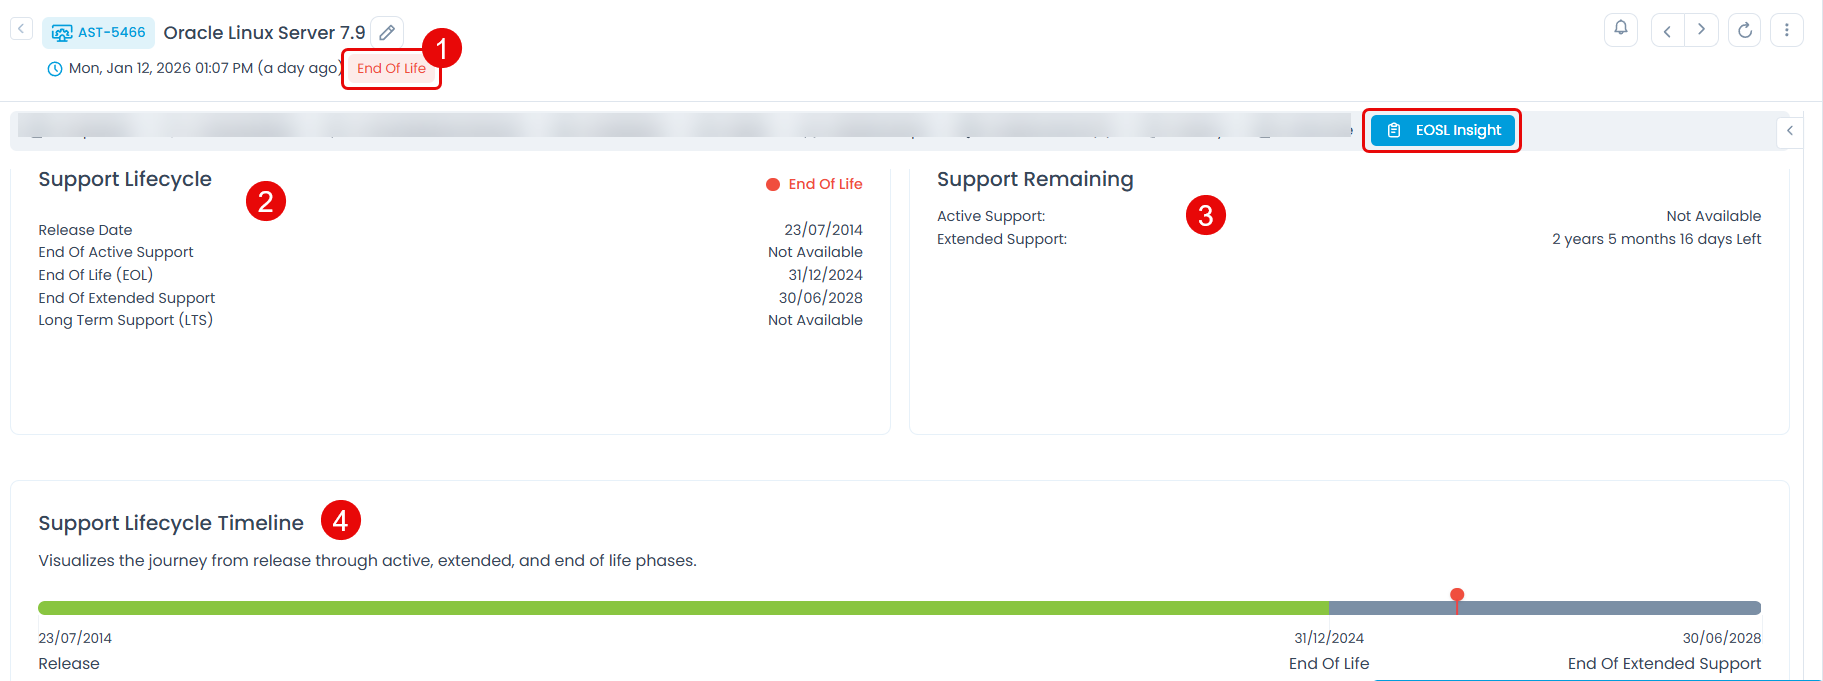
The EOSL Insight tab provides a comprehensive view of the software's lifecycle and support status, allowing technicians to plan for upgrades and identify assets running on unsupported versions.
This tab is available only for those software assets which are included in the "endoflife.date" database. For more details, refer EOSL Sync Setting.
The tab is divided into the following sections:
Support Status Tag: Based on the calculated lifecycle stage, the system automatically applies a non-editable System Tag to the software asset (visible in the top-left corner of the asset header).
- Possible Statuses and Examples:
- Active Support: Appears when the asset is within its standard support period.
- For Example: Current Date is July 13, 2025, and EOAS is January 17, 2026.
- Extended Support: Appears when the active support has ended but the extended support period is still active.
- For Example: Current Date is March 15, 2027, EOAS was January 17, 2026, and EOES is January 17, 2028.
- End Of Life: Appears when the software reaches the vendor's primary end-of-support date.
- For Example: Current Date is May 20, 2028, and the EOL date has passed.
- Discontinued: Appears once all support phases, including extended support, have been passed.
- For Example: Current Date is February 10, 2029, and all lifecycle milestones have been reached.
- Active Support: Appears when the asset is within its standard support period.
- Possible Statuses and Examples:
Support Lifecycle: Displays critical dates in the software's journey.
- Release Date: The date when the software version was officially released.
- End of Active Support (EOAS): The date when standard support and regular updates conclude.
- End of Life (EOL): The date when the software is no longer supported by the vendor.
- End of Extended Support (EOES): The date when the additional or paid support period ends.
- Long Term Support (LTS): Indicates if the software version is a designated long-term support release.
Support Remaining: Provides a real-time countdown of the time left until support milestones are reached.
- Active Support: Remaining duration until standard support ends.
- Extended Support: Remaining duration until the end of the extended support period.
- Example Format:
02 Years 05 Months 16 Days left. If a date is missing, it displays as Not Available.
Support Lifecycle Timeline: A visual roadmap that illustrates the transition between lifecycle phases.
- Milestones: Includes Release Date, EOAS, EOES, and EOL.
- Visual Indicator: A current date marker shows exactly where the asset stands in its journey (e.g., between End of Life and End of Extended Support).
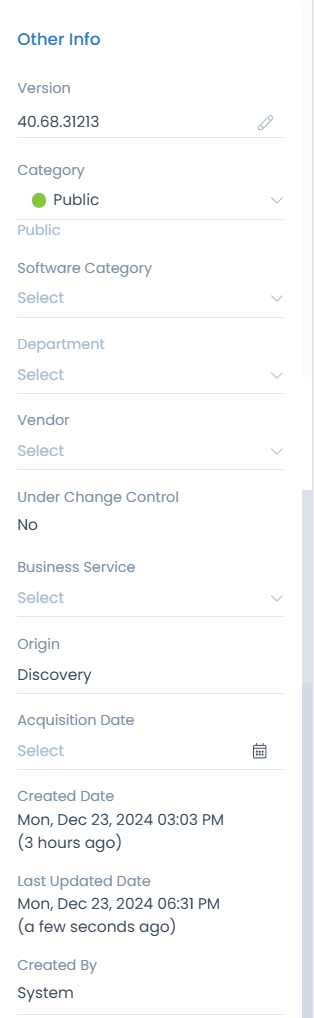
Other Information
The other information shows additional details about the asset.
- QR Code: Shows the QR code of the asset.
- Asset Group: This label displays the Group in which the asset belongs. You can also change it and search for the desired group to associate.
- Product: This label classifies the asset based on the product.
- Version: Shows the current version of the software.
- Category: Shows the category assigned to the software. You can edit if required.
- Software Category: It shows the category of the asset. For more details, click Software Categories.
- Department: It shows the department of the asset assigned. Also, you can view the hierarchy of the department field below it. For example, if the department is "IT Department, IT Team 1, IT Team 2", the hierarchy will be displayed as "IT Department > IT Team 1 > IT Team 2".
- Company: Shows the company associated with the software asset. This field is available only if the Managed Services Provider feature is enabled.
- Vendor: Shows the Vendor from where the asset is bought.
- Under Change Control: Shows whether the asset is under change control. If a baseline is applied, the value changes to Yes. If no baseline is assigned, the value will be No, which is the default.
- Business Service: Shows the associated service with the respective asset.
- Origin: Shows from where the asset is originated. It can be Discovery, Manually, Agent, or CSV Import.
- Acquisition Date: Shows the date when the asset was created or purchased or acquired. For example, if the asset was created on Mon Jan 05, 2026 11:39 AM, the acquisition date and time will be displayed as Mon Jan 05, 2026 11:39 AM.
- Created Date: Shows the date and time when the asset was created. For example, if the asset was created on Mon Jan 05, 2026 11:39 AM, the created date and time will be displayed as Mon Jan 05, 2026 11:39 AM.
- Last Updated Date: Shows the date and time when the asset detail (say Impact field is updated) was last updated. For example, if the asset detail (say Cost field is updated) was last updated on Mon Jan 05, 2026 11:39 AM, the last updated date and time will be displayed as Mon Jan 05, 2026 11:39 AM.
- Created By: The user who created the asset. If the asset was created by a user with the logon name "John Doe", the created by will be displayed as John Doe. And if it is automatically created, the created by will be displayed as System.
- Last Updated By: The user who last updated the asset. If the asset was last updated by a user with the logon name "John Doe", the last updated by will be displayed as John Doe. And if it is automatically updated, the last updated by will be displayed as System.