Consumable Asset Details Page
On the Consumable Asset Details page you can view the complete details of the asset and perform the desired activity.
To view the details page,
On the Consumable Assets list page, click on the Asset ID whose details you want to view, and the below page appears.
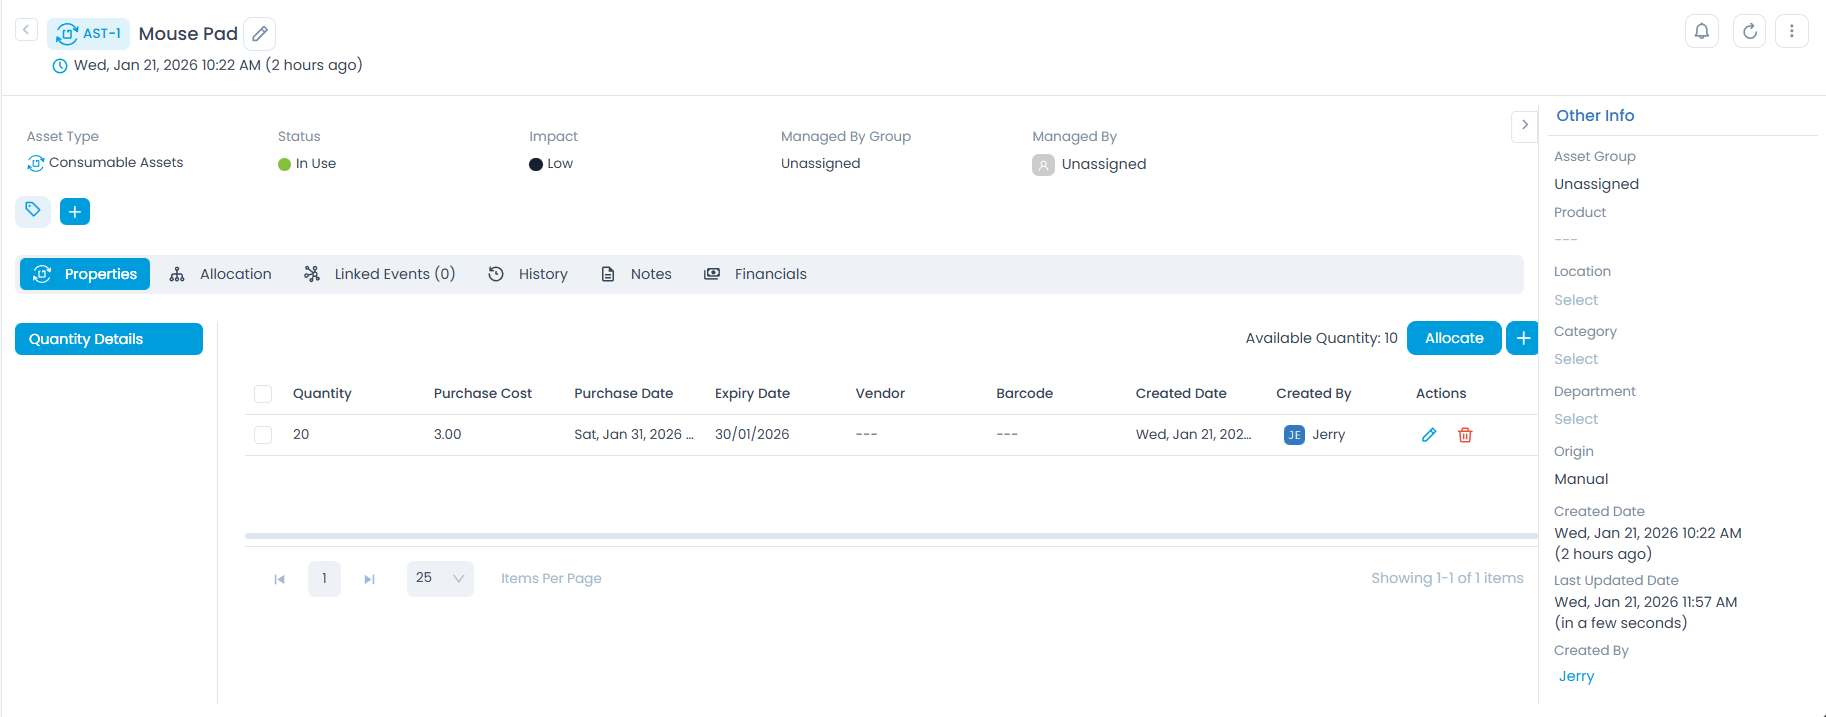
Classifiers of Asset
These properties tell you the current statistics of the asset and help you classify them under different labels. When someone works on an asset, they update the labels accordingly. For example: If the "status" is closed, it means you do not need to do anything on the asset.

| Parameter | Description |
|---|---|
| Asset Type | It classifies the name of the asset type. |
| Status | This label classifies the asset based on the status. |
| Impact | This label classifies the asset based on the impact factor. The default values are: Low, On Users, On Department, and On Business. |
| Managed By Group | It displays the group which manages the particular asset. |
| Managed By | It displays the name of the person who is to manage the asset. |
| Add Tags | You can add the custom tags to quickly find the assets based on it. Also, the system adds some default tags when based on certain labels and actions. |
Associated Actions for Asset
You can create/edit different actions and activities as a part of properties, allocation, history, notes, and financials in the asset using the below tabs. The available types of actions are:
- Properties
- Allocation
- Linked Events
- History
- Notes
- Financials
This displays the quantity details of the asset. You can also add the same manually.
Quantity Details: It displays the quantity details of the consumable assets. Also, you can allocate or add quantity using the respective buttons.

To add quantity,
Click the Add Quantity button and a popup appears.

Enter the below details:
Parameters Description Quantity Enter the quantity of assets that can be allocated. Purchase Cost Enter the cost of assets. Purchase Date Select the date of purchase. Expiry Date Select the expiry date of the total assets. Vendor Select the vendor from whom the assets are purchased. You can add them from the Vendor Catalog page. Barcode Enter the barcode for assets. Description Enter a brief description about the quantity of assets. Attachments Attach the relevant files. Once done, click Add, and the quantity will get added. Now you can allocate this to the desired technicians using the Allocate button. Once clicked the following popup appears.

Enter the below details:
| Parameters | Description |
|---|---|
| Status | Displays the status of the asset configured from Asset Status page. |
| Quantity | Enter the quantity of assets to be allocated. |
| Allocate To | Select the use to whom the asset is to be allocated. |
| Location | Select the location of the asset. |
| Department | Select the department to be associated with the asset. |
| Target Type | Select the target type of the asset. The options are: Hardware Asset and Non-IT Asset. Once selected, select the respective assets from the popup that appears. You can select only one asset at a time. Here, Non-IT Asset is selected. |
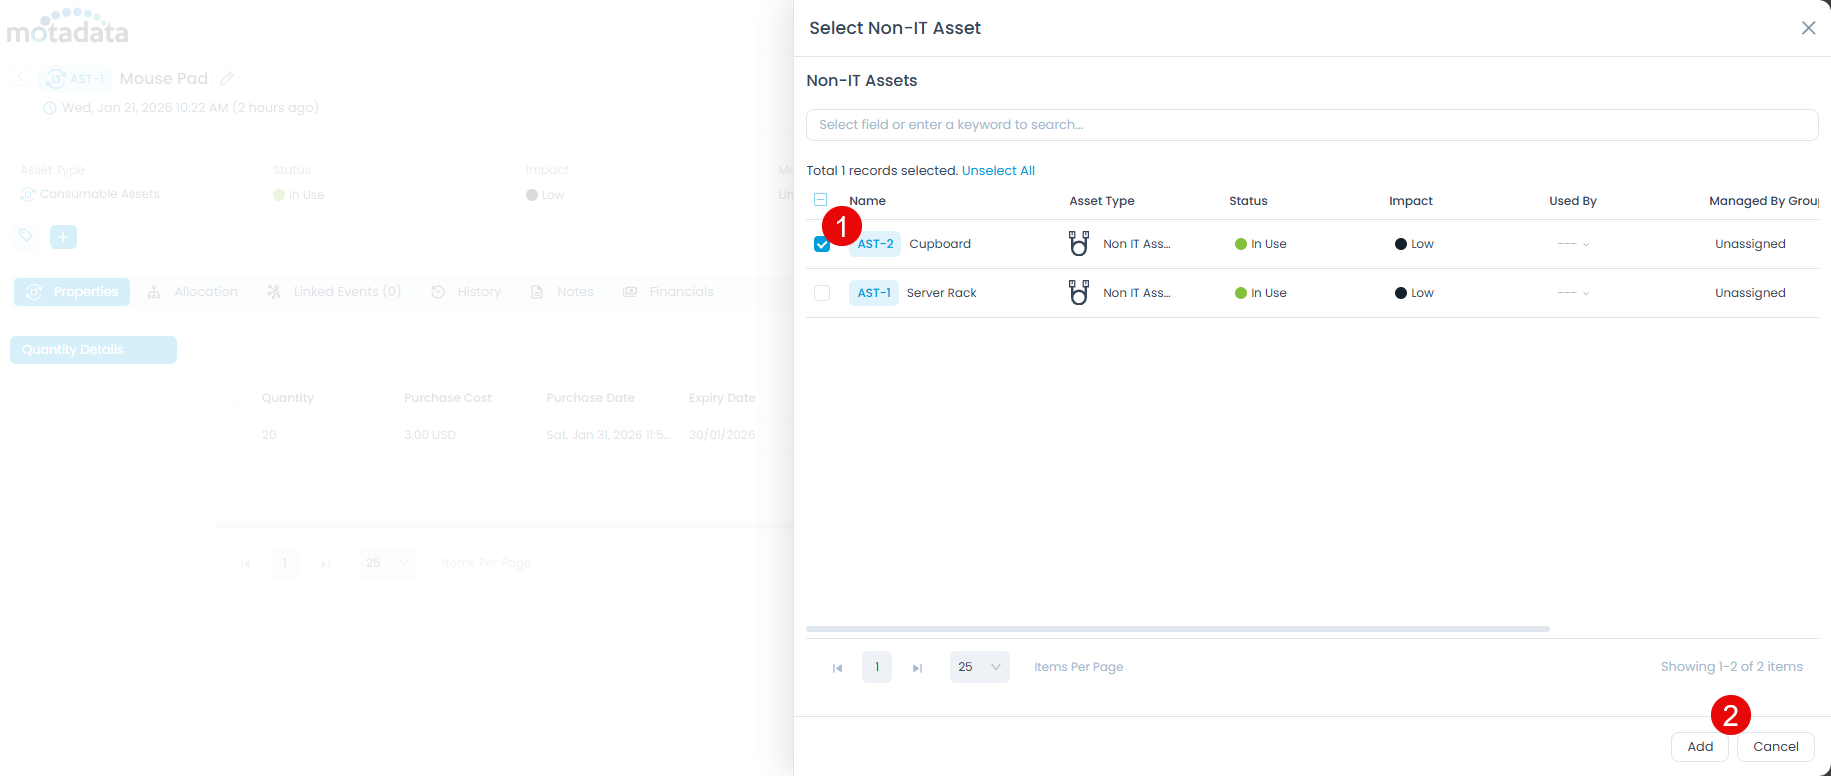
| Asset | Displays the asset selected in the Target Type field. If required, you can change the asset later by selecting another option from the pop-up window. |
| Description | Enter a brief description about the quantity of assets to be allocated. |
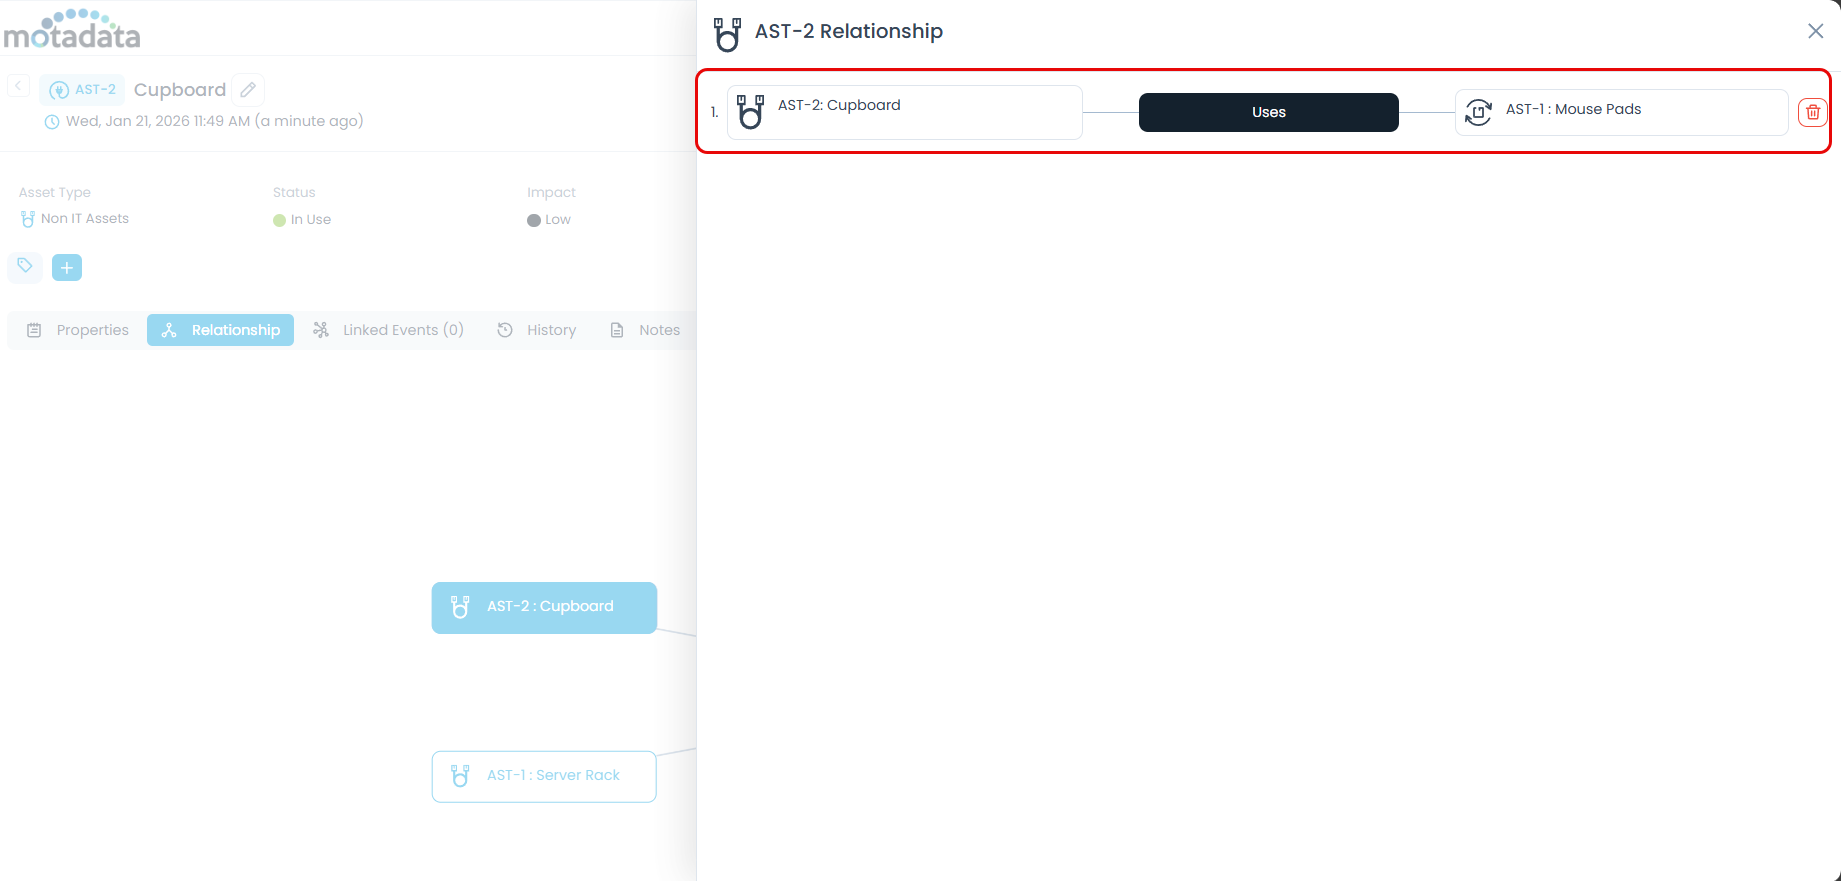
Once done, click Save and the quantity will get allocated to the selected user/department/location/asset. Also, a relationship will be created between the consumable asset and the selected asset. You can view the relationship in the Relationships tab of the Hardware/Non-IT Asset Details page.
If the allocation is deleted from here, the relationship already created between the consumable asset and the selected asset will not be deleted.
This displays a list of all the allocated quantities as shown below.

From here also, you can allocate quantities using the Allocate button. For more details, refer to the Allocate Quantity Details section of the Properties tab.
This allows you to view and relate the existing consumable asset to various Contracts. Here, the count of the linked contracts will also be shown.


You can view and search the Audit Trail for the details of the asset.

You can add notes for future reference.
This displays the costing details of the asset.

Cost: Displays the cost of the asset. You can also add, edit, and delete the cost. To add cost,
1. Click the Add Cost button and a popup appears.

2. Enter the following details:
| Parameters | Description |
|---|---|
| Cost Factor | Select the factor of cost. The options are: Purchase, Operational, Disposal, and Others. |
| Date | Select the date. |
| Amount | Enter the amount. |
| Description | Enter the description of the cost incurred. |
3. Once done, click Add, and the cost gets added to the list.
Notification Settings
This is used to send an email notification when the remaining quantity is less than or equal to the minimum quantity. For example: If the total quantity is 100 and the minimum quantity set is 10%, then the notification will be sent when the remaining quantity is less than or equal to 25.

- Enabled: Enable to receive notifications related to this consumable asset.
- Minimum Quantity: Specify the minimum quantity of assets in units or percentage. Only integer value is allowed. You can enter value from 0 to the maximum limit entered in the quantity field. Once set, click Update, and the notification will be sent accordingly.
Other Information
This section displays additional details about the asset.

- Asset Group: Displays the asset group to which the asset belongs.
- Product: Shows the product associated with the asset.
- Location: Shows the location of the asset. You can edit if required. Also, you can view the hierarchy of the location field below it. For example, if the location is "Building 1, Floor 1, Room 1", the hierarchy will be displayed as "Building 1 > Floor 1 > Room 1".
- Category: Displays the category of the asset.
- Department: Shows the department of the asset. You can edit if required. Also, you can view the hierarchy of the department field below it. For example, if the department is "IT Department, IT Team 1, IT Team 2", the hierarchy will be displayed as "IT Department > IT Team 1 > IT Team 2".
- Origin: Shows from where the asset is originated or created. It can be Discovery, Manually, Agent, or CSV Import.
- Created Date: Shows the date and time when the asset was created. For example, if the asset was created on Mon Jan 05, 2026 11:39 AM, the created date and time will be displayed as Mon Jan 05, 2026 11:39 AM.
- Last Updated Date: Shows the date and time when the asset detail was last updated. For example, if the Location field was last updated on Mon Jan 05, 2026 11:39 AM, the last updated date and time will be displayed as Mon Jan 05, 2026 11:39 AM.
- Created By: The user who created the asset. If the asset was created by a user with the logon name "John Doe", the "created by" will be displayed as John Doe. And, if it is automatically created, the created by will be displayed as System.
- Last Updated By: The user who last updated the asset detail. If the asset detail (say Location field is updated) was last updated by a user with the logon name "John Doe", the "last updated by" will be displayed as John Doe. And, if it is automatically updated, the last updated by will be displayed as System.