Viewing My Assigned Items
Access and view your assigned Changes, Assets, and Configuration Items (CIs) to stay informed about your IT resources and responsibilities.
The Support Portal provides easy access to view all the items assigned to you, including changes you're involved with, assets you're using, and configuration items under your management. This centralized view helps you stay organized and informed about your IT resources and responsibilities.
ServiceOps tracks four main types of items that can be assigned to you:
- Changes
- Assets
- Configuration Items (CIs)
- My Tasks
Changes are modifications to IT services, systems, or infrastructure that may affect your work environment. You might be assigned to changes as:
- Requester: You initiated the change request
- Approver: You need to approve the change before it proceeds
- Affected User: The change will impact your work or systems
Assets are physical or virtual IT resources assigned to you for use:
- Hardware Assets: Computers, laptops, monitors, printers, etc.
- Non-IT Assets: Office furniture, equipment, etc.
Configuration Items are logical representations of IT components that support business services:
- Hardware CIs: Servers, network devices, workstations
- Software CIs: Applications, databases, operating systems
- Service CIs: Business services, applications, systems
My Tasks are project-related activities assigned to you, enhancing visibility and task management.
- Purpose: Stay informed about responsibilities within active projects.
- Access Control: Available if Project Management license is active.
- User Benefit: Manage deadlines, monitor updates, and contribute efficiently.
The items you can view depend on your role and permissions. Contact your administrator if you need access to specific item types.
Access Methods
- From Home Page
- From Main Menu
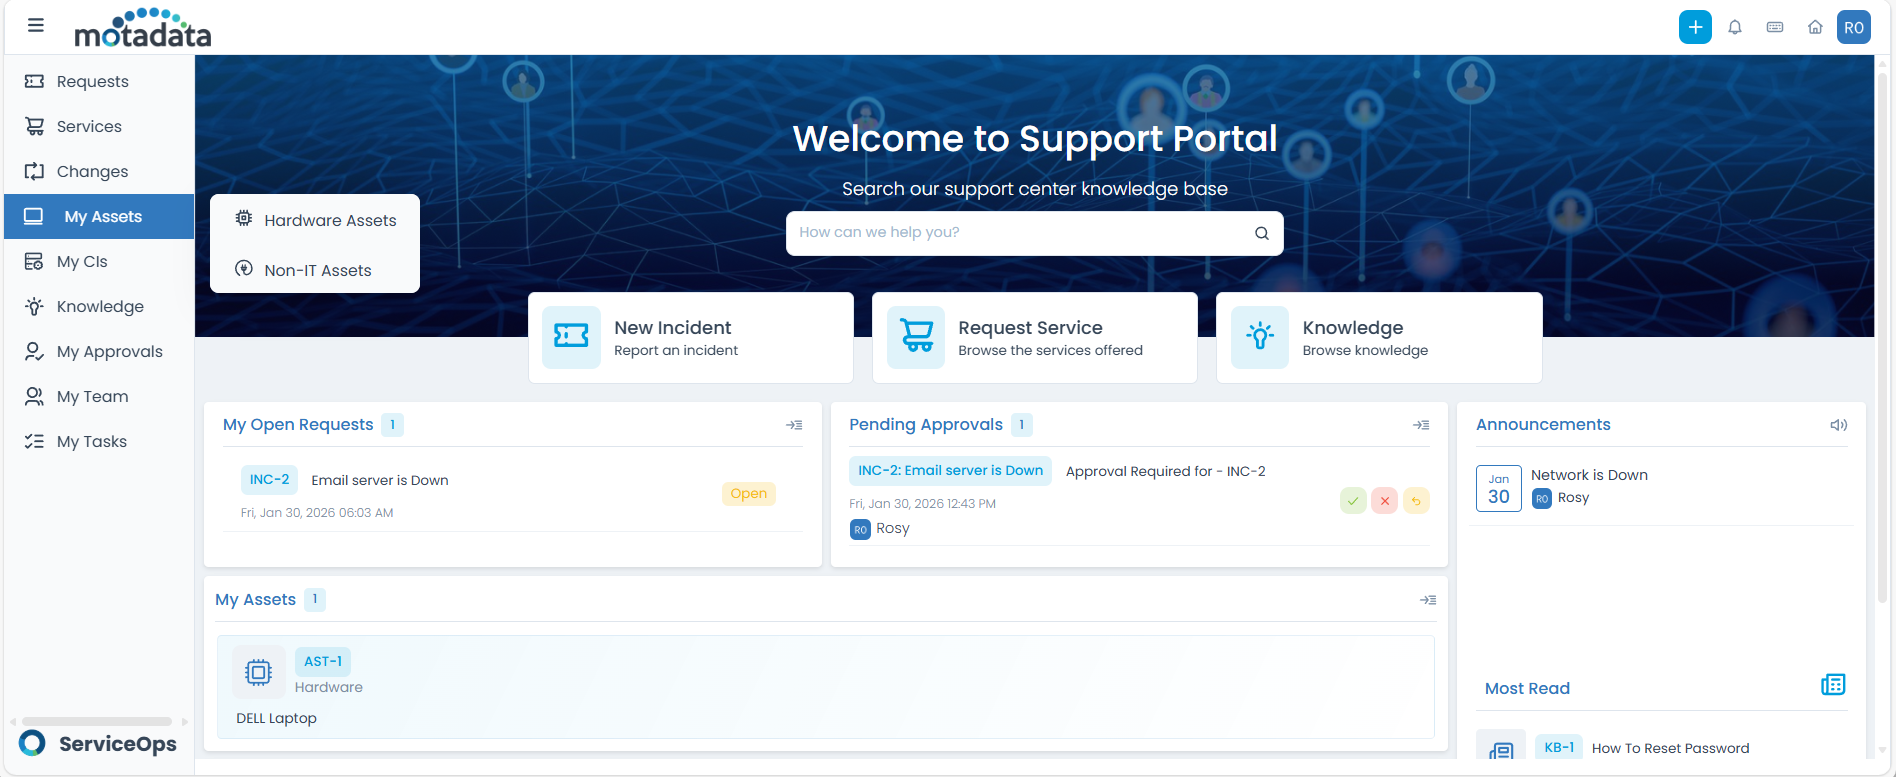
The Support Portal home page provides quick access to your assigned items:
Log in to the Support Portal.
Navigate to the home page.
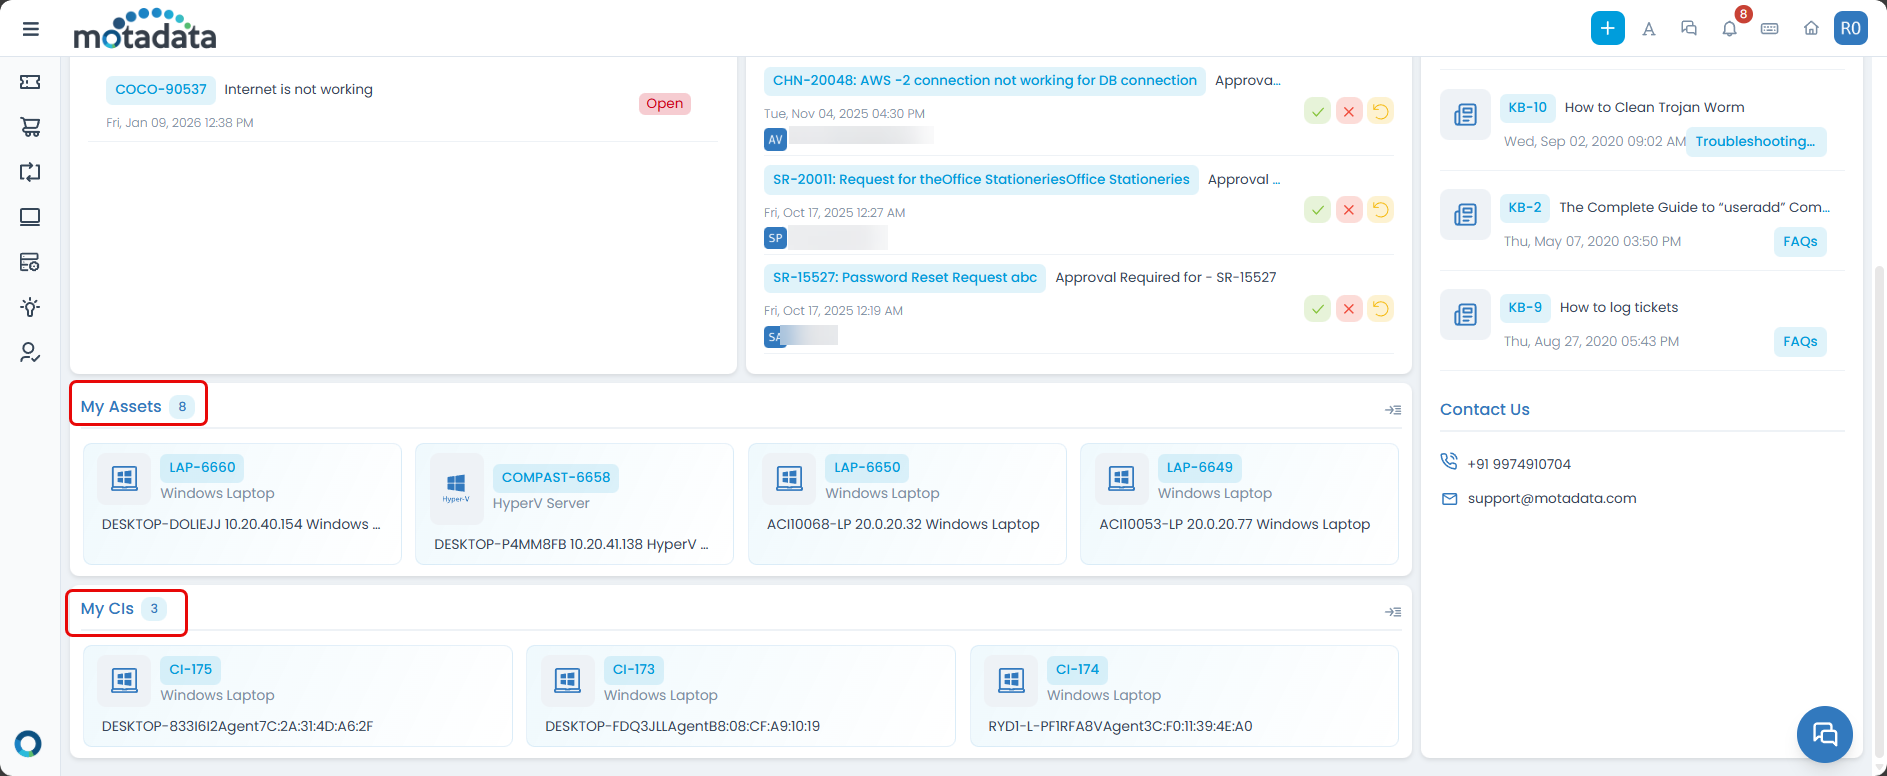
- Look for the following sections:
- My Assets: Quick view of your assigned assets
- My CIs: Quick view of your assigned configuration items
- My Tasks: Quick view of your assigned project tasks
Use the arrow icons next to each section title to view the complete list of your assigned items.
You can also access your resources through the main navigation:
- Click the menu toggle in the header.
- Select the appropriate section:
- My Changes for change requests
- My Assets for hardware and software assets
- My CIs for configuration items
- My Tasks for project-related tasks
Viewing My Changes
To view the list of Changes assigned to you:
Navigate to My Changes from the home page or main menu.
View the list of Changes assigned to you.
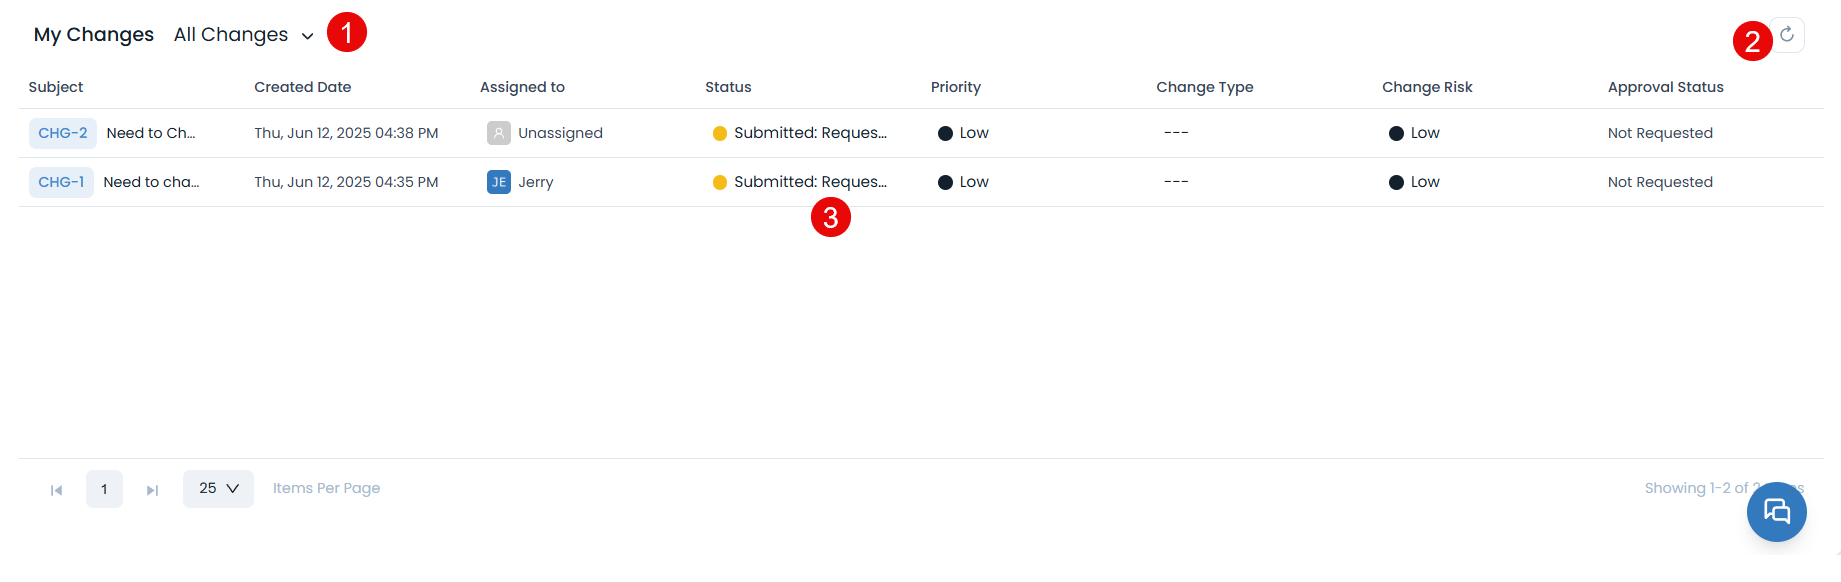
The page provides the following features:
- Filter: You can filter the changes list by clicking the desired option (All Open Changes, All Emergency Changes, All Changes). For example: If ‘All Open Changes’ is selected, the grid displays all the changes with open status.
- Refresh: Update the list to see the latest changes
- Grid: The grid displays the details of the changes.
Viewing My Assets
To view the list of Hardware and Non-IT Assets assigned to you:
Navigate to My Assets from the home page or main menu
View the list of Hardware and Non-IT Assets assigned to you. For example, a user John is logged and he uses a Windows Laptop, thus the assets belonging to him will appear in the list along with the details.
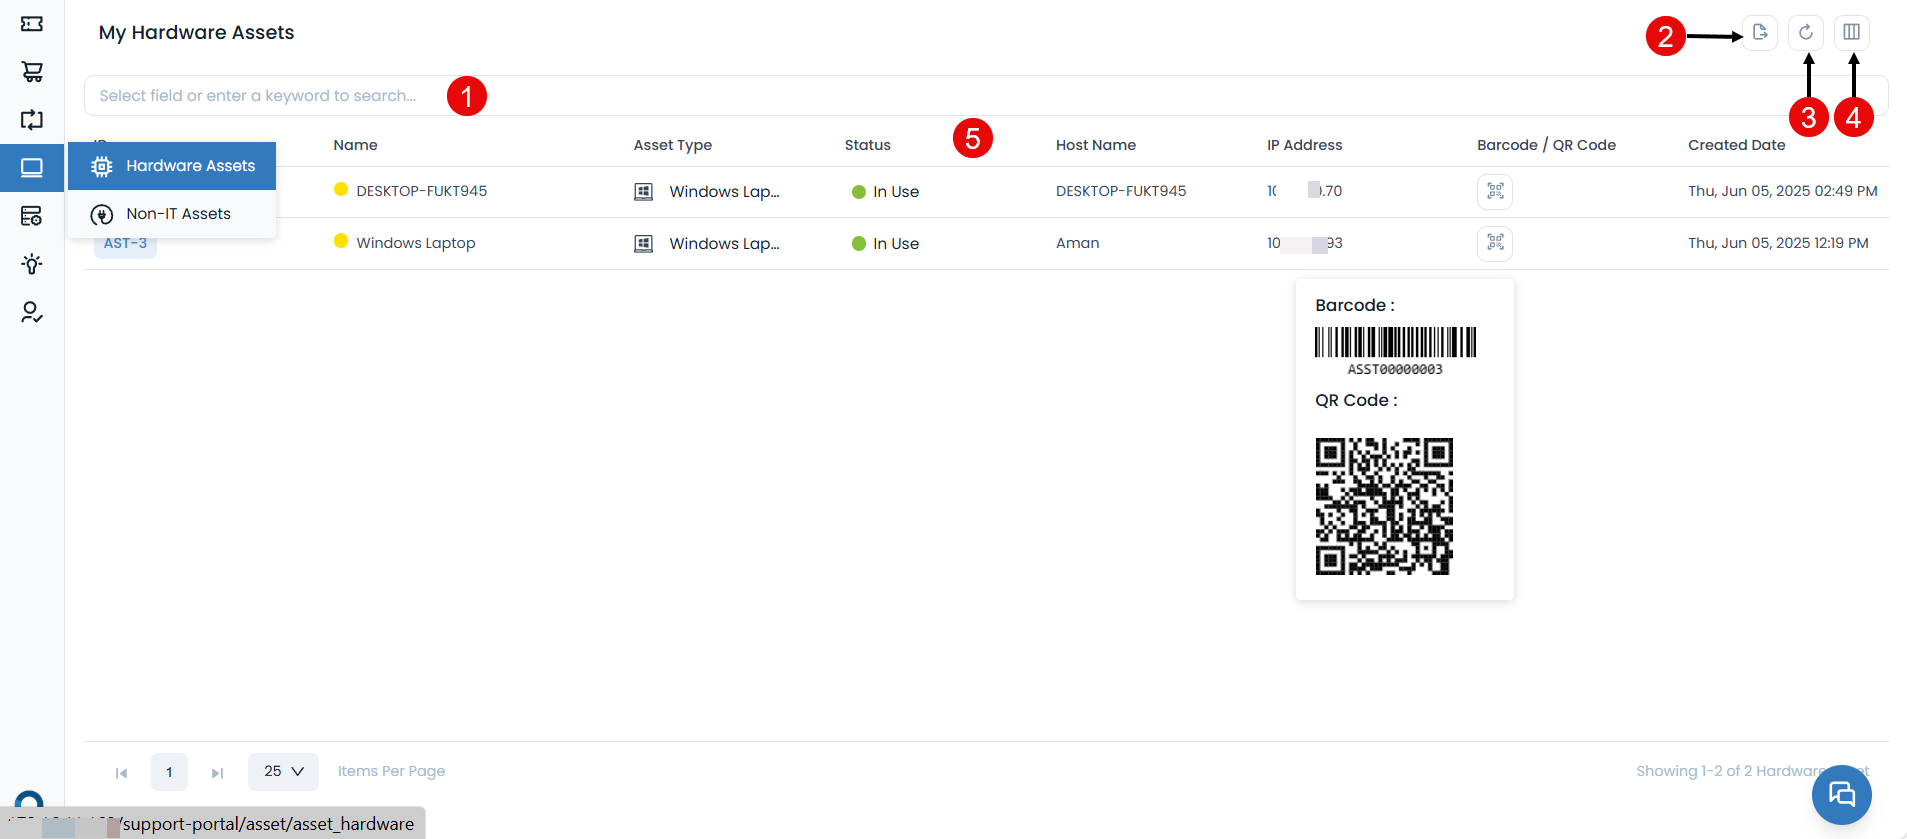
The page provides the following features:
Search Bar: Find specific assets using keywords or criteria
Export: You can export the assets list in CSV or Excel format. To do so,
- Click the Export button.
- Select the format and fields that you want to export.
- Once done click Export, the assets list file will be exported via email.

Refresh: Update the list to see the latest changes
Column Selection: Customize which information to display
Grid: The grid displays the details of the assets as per the columns selected using the Column Selection icon.
As an end user, you can view asset details but cannot modify them. Contact your IT team for any changes needed.
Viewing Configuration Items
To view the list of Configuration Items assigned to you:
Navigate to My CIs from the home page or main menu
View the list of Configuration Items assigned to you.
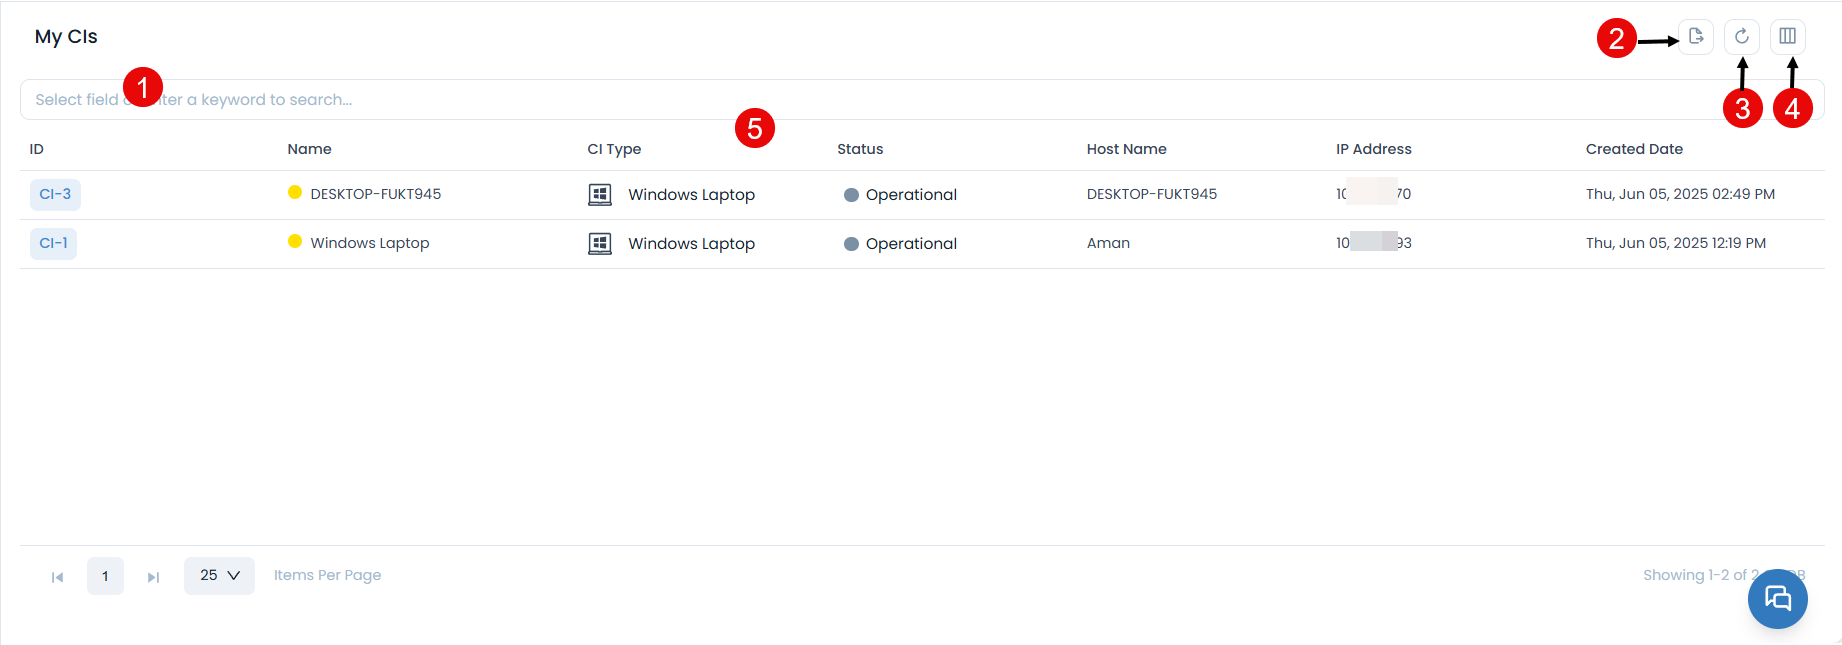
The page provides the following features:
Search Bar: Find specific CIs using keywords or criteria
Export: You can export the CIs list in CSV or Excel format. To do so,
- Click the Export button.
- Select the format and fields that you want to export.
- Once done click Export, the CIs list file will be exported via email.

Refresh: Update the list to see the latest changes
Column Selection: Customize which information to display
Grid: The grid displays the details of the CIs as per the columns selected using the Column Selection icon.
As an end user, you can view CI details but cannot modify them. Contact your IT team for any changes needed.
Viewing My Tasks
The My Tasks menu enhances visibility and task management for requesters involved in project-related activities. This feature allows requesters to conveniently view and track the progress of their assigned project tasks directly from the Support Portal interface.
This menu is designed to improve collaboration and productivity by providing easy access to task-level information without requiring access to the main Project Management module.
Key Highlights:
- Purpose: The My Tasks menu helps requesters stay informed about their responsibilities within active projects.
- Access Control: This feature is available only if the Project Management license is active for the requester.
- User Benefit: By enabling task visibility, requesters can manage deadlines more effectively, monitor task updates, and contribute efficiently to project goals.
To view the list of Tasks assigned to you:
Navigate to My Tasks from the home page or main menu.
View the list of Tasks assigned to you.
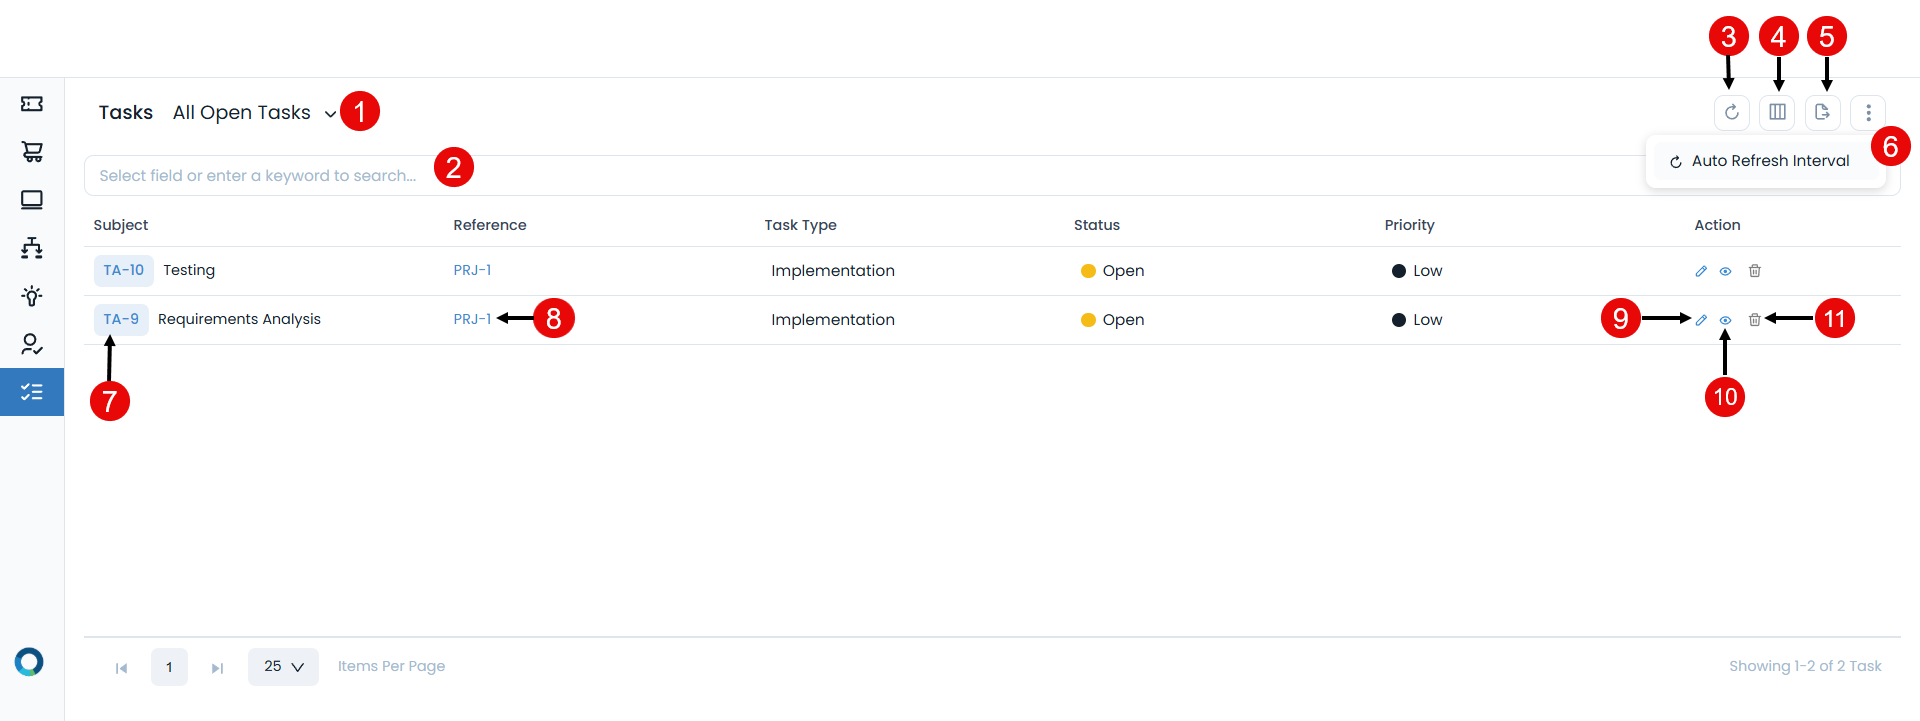
The page provides the following features:
Filter: You can filter the tasks list by clicking the desired option. For example: If ‘All Open Tasks’ is selected, the grid displays all the tasks with open status.
Search: You can look for a specific task by searching them. The search is a faceted search and allows you to find with specific criteria. You can find more details in the search section.
Refresh: You can refresh the task list. This is useful when multiple people are working on the task and contents are updated frequently.
Column Selection: The column selection icon allows you to personalize the columns of the list page. When you change the columns of the list page, the changes do not affect other people.
Export: You can export the task list in CSV or Excel format. To do so,

- Click the Export button.
- Select the format and fields that you want to export.
- Once done click Export, the tasks list file will be exported via email.
More Options: You can click and select the below option:
- Auto Refresh Interval: Apart from the manual refresh, you can set the time interval, after which the Technician Portal page will get refreshed automatically. Thus, you don't need to click the refresh button repeatedly. It applies to the Request, Problem, Change, Release, Asset (Hardware, Software, Non-IT, Consumable), and My Task modules. Once selected, set the time interval after which the page will get refreshed everytime, and click Update. The timer will be visible on the screen.
View Details Page: You can click the Subject to view the Task Details page.
View the Reference details: You can click the ID of the project reference which is associated to the task to view its details. Example: If any project is associated with the task, its ID will be displayed here. Clicking on the reference ID will display its details.
Edit: You can edit the details of the task.
View Task: You can view as well as update the details of the project task by clicking on the eye icon.
Delete: You cannot delete the tasks as they are associated with the projects.
Grid: You can view the details of the project tasks. Also, you can update certain details from here like Task Type, Status, and Priority.
Best Practices
- Regular Review
- Communication
- Check Weekly: Review your assigned resources regularly
- Update Information: Report any issues or changes to your IT team
- Verify Status: Ensure resource status reflects current reality
- Report Issues: Contact IT support for problems with assigned resources
- Request Changes: Submit requests for resource modifications
- Provide Feedback: Share feedback about resource performance
Troubleshooting
Common Issues and Solutions
| Problem | Solution |
|---|---|
| Cannot View Assigned Resources | Check permissions, refresh page, clear cache, check URL |
| Missing Resource Information | Check column settings, verify permissions, contact IT support |
| Export Issues | Check file permissions, try different format, reduce data size |
Getting Help
If you need assistance with viewing or managing your assigned resources:
Check the Knowledge Base - Search for articles about resource management
Contact IT Support - Reach out to your IT team for assistance
Use Chat Support - Get immediate help through the chat feature
Review Help Documentation - Access the help section if available
Next Steps
Now that you understand how to view your assigned resources, explore these related topics: