Managing Requests
Create, track, and manage your support requests efficiently to get the help you need when you need it.
The Support Portal provides comprehensive tools for managing your requests throughout their lifecycle. Whether you're reporting an incident, requesting a service, or tracking the progress of your existing requests, the portal offers an intuitive interface to stay connected with your IT support team.
Request Types
ServiceOps handles two main types of requests, each serving different purposes:
- Incident Requests
- Service Requests
Incident requests are created when there's a failure or degradation of a service that affects your work. These are typically urgent situations that need immediate attention.
Scenarios:
- Your email server is down, preventing you from sending or receiving important communications. (Urgent, impacts work)
- You cannot log in to a critical business application. (Prevents productivity)
Service requests are for normal operational requirements, such as requesting new equipment, software, or services. These follow standard processes and are not typically urgent.
Scenarios:
- You need to install new software that is essential for a project starting next week. (Planned, facilitates work)
- You require a new keyboard and mouse for your workstation. (Standard request for equipment)
Creating Requests
This section outlines the different methods for submitting both incident and service requests within the Support Portal. Follow these steps to ensure your requests are accurately logged and directed to the appropriate teams for resolution.
- Creating Incident Requests
- Creating Service Requests
Incident requests are typically for unexpected issues impacting services. You can create them using the following methods:
Incident requests can only be created if the necessary permissions are granted by your administrator.
Method 1: Without Login (Guest Access)
This method allows you to submit an incident request without logging into the portal.
- Click the New Incident button on the home page.
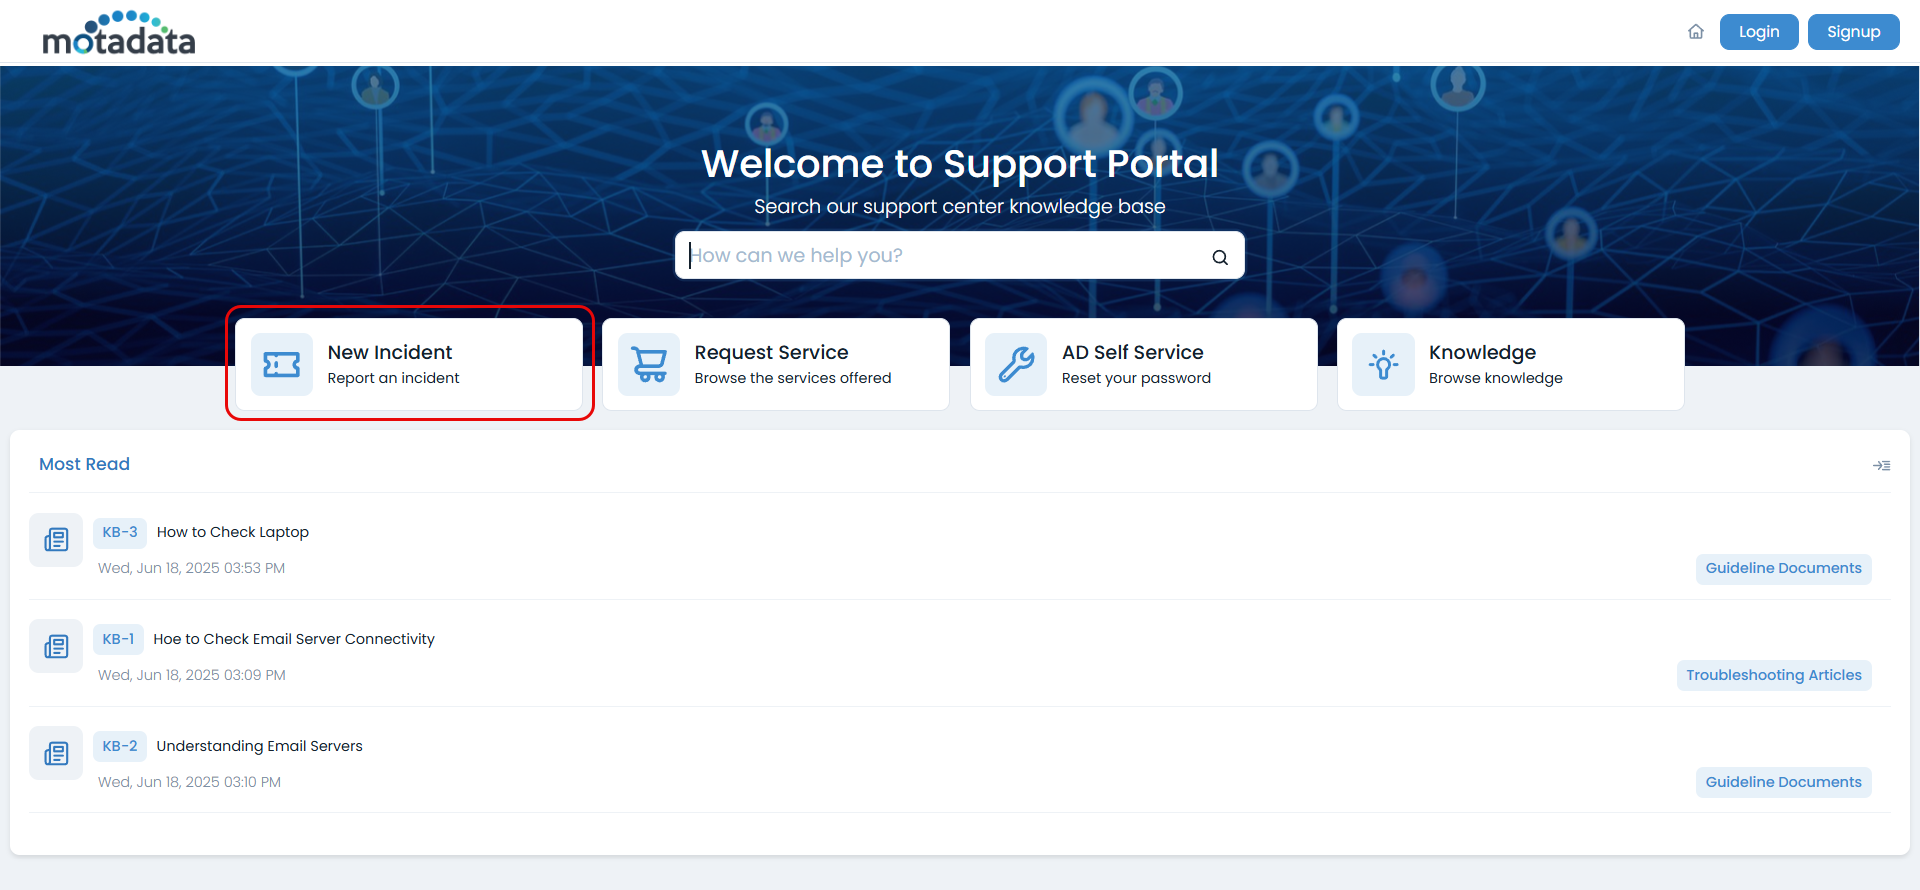
- Fill in the required details:
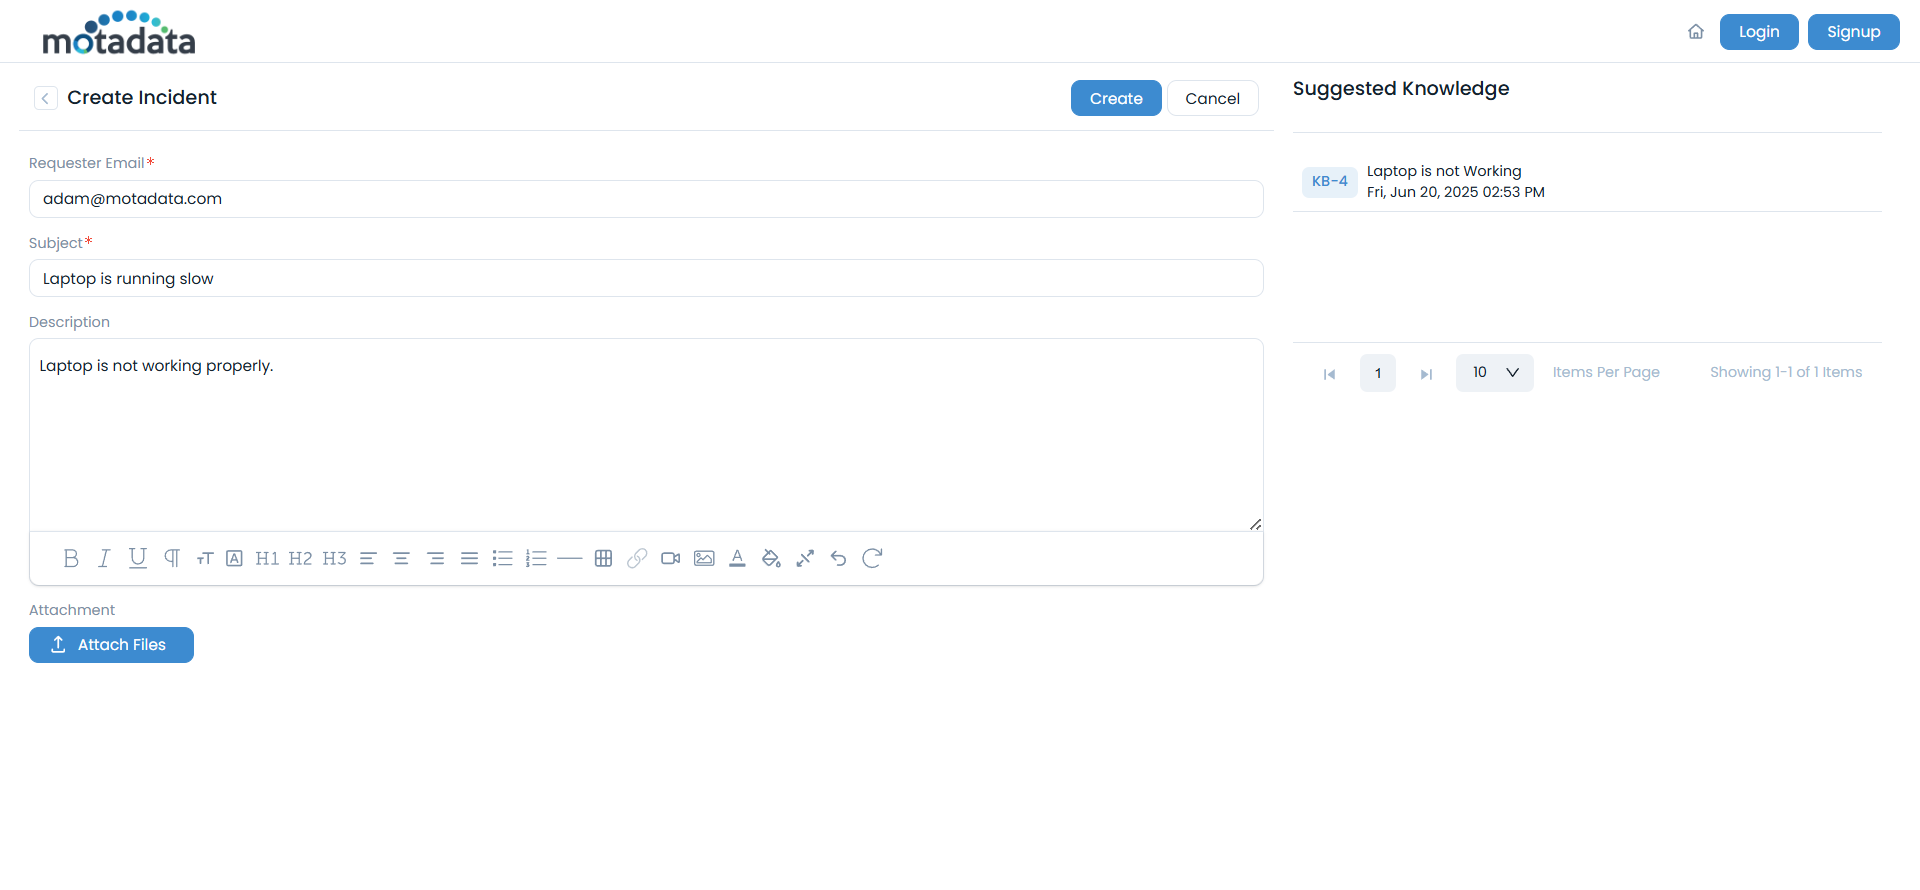
- Requester Email: Your email address for notifications
- Subject: Brief description of the issue
- Description: Detailed explanation of the problem
The fields in the Request Form may vary based on the administrator's configuration.
- Click Create to submit the request
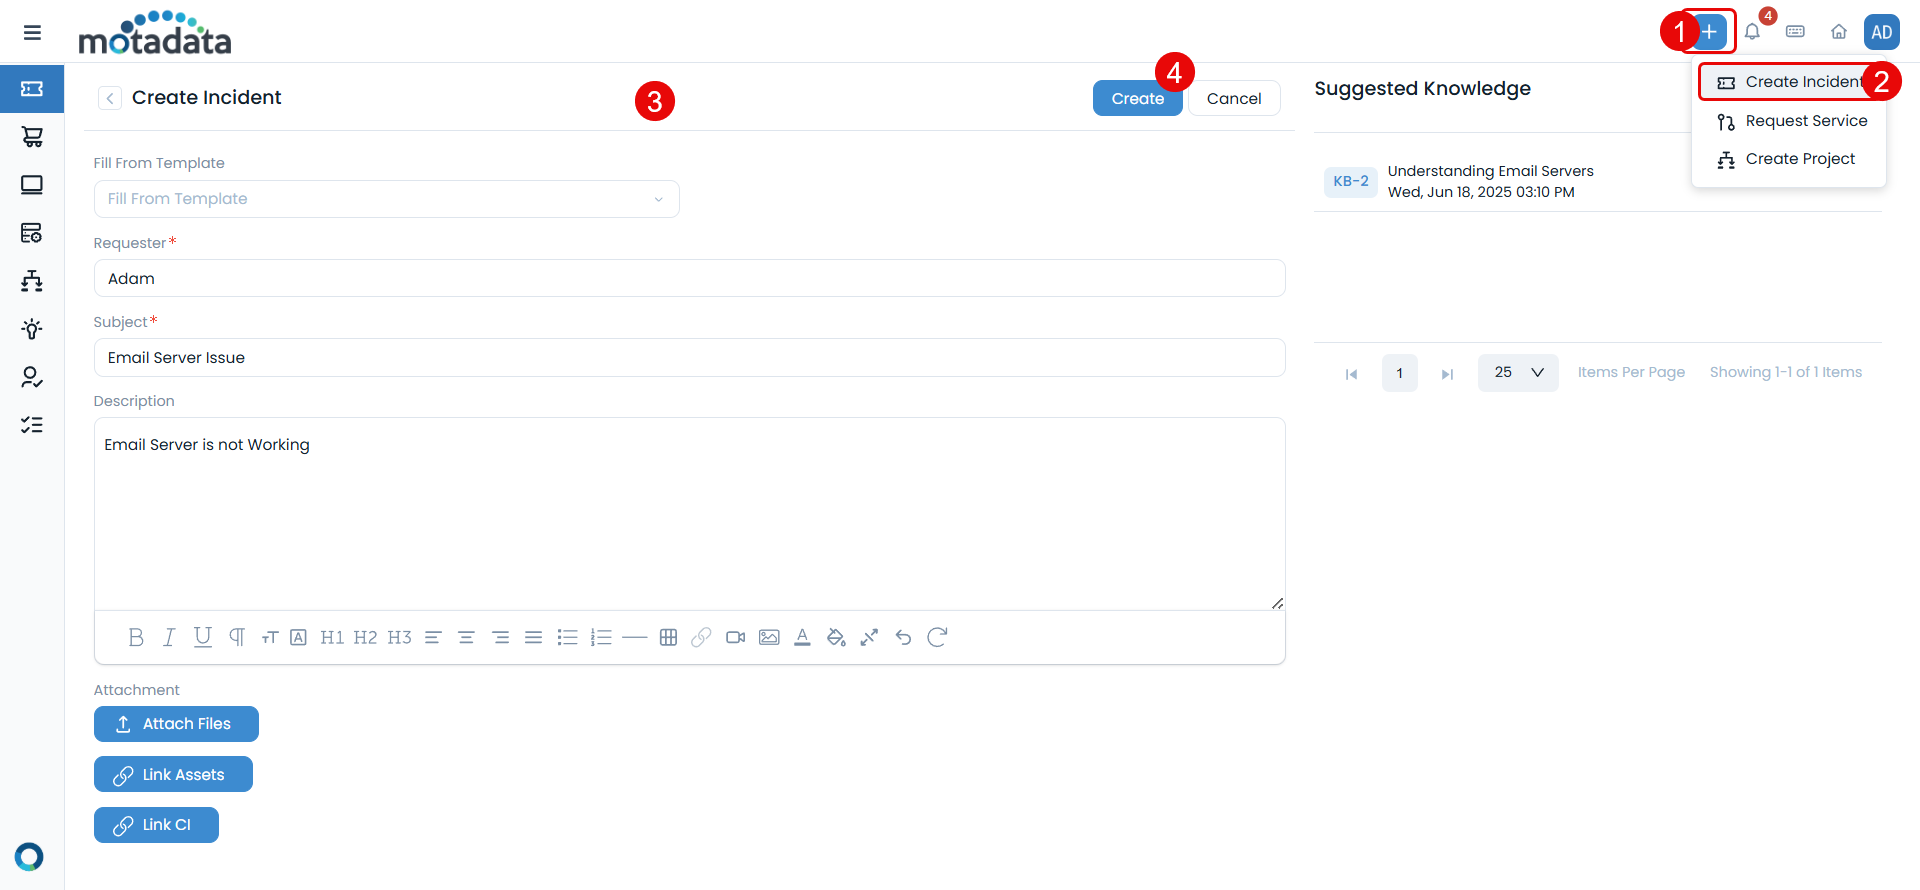
Method 2: After Login
This method requires you to log in to the portal to submit an incident request.
Click the + button in the header
Select Create Incident from the dropdown
Fill in the required details.
Service requests are for planned operational needs, such as requesting new equipment or software. Here's how to submit them:
Service requests can only be created if the necessary permissions are granted by your administrator.
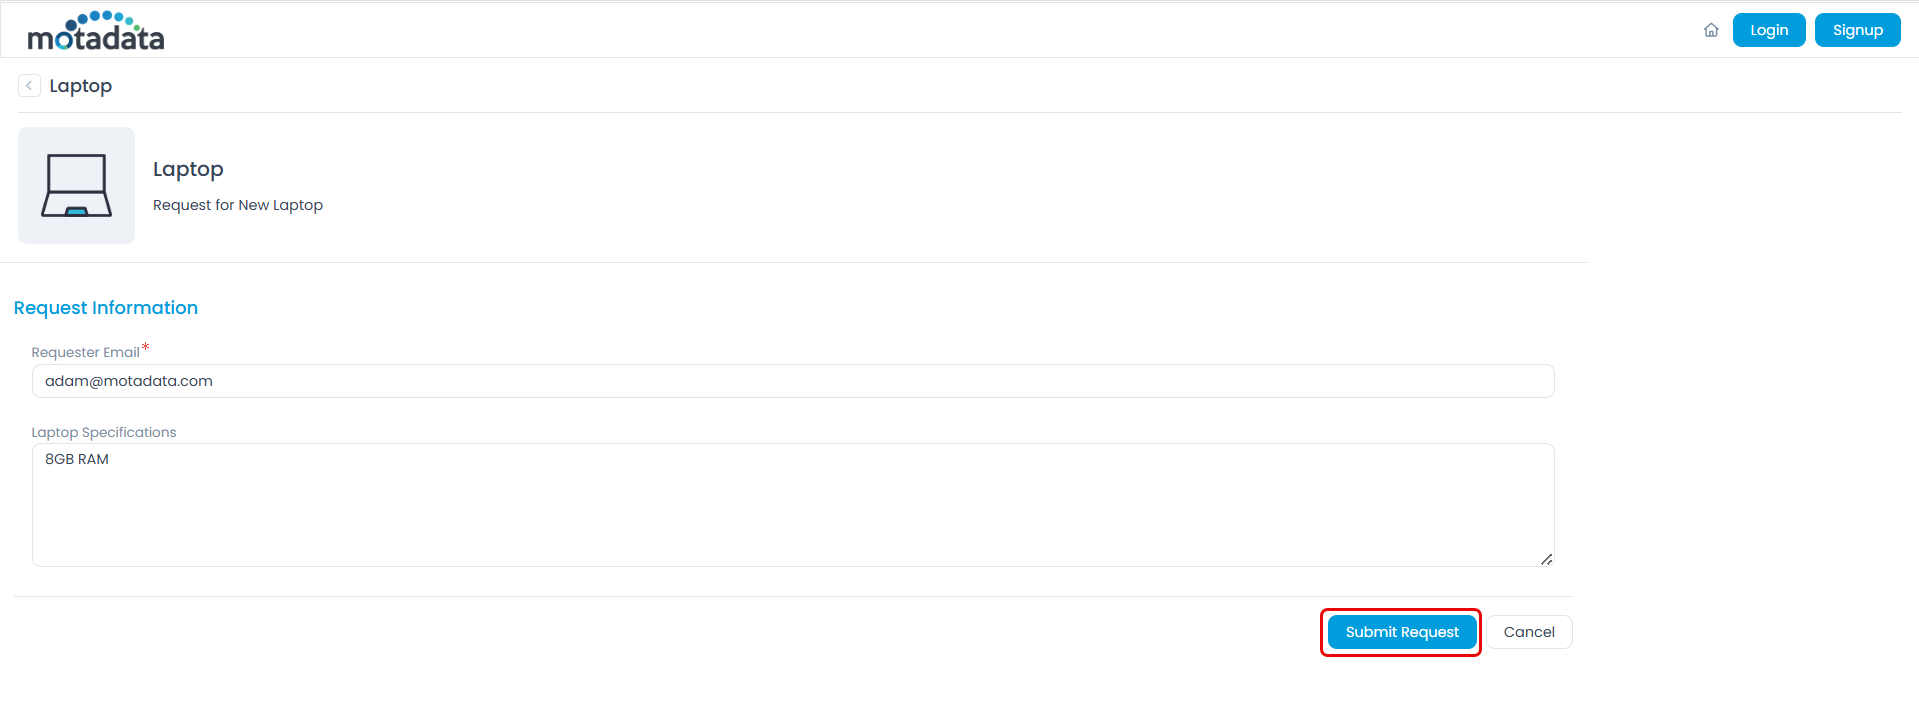
Method 1: Without Login (Guest Access)
This method allows you to submit a service request without logging into the portal.
- Click the Request Service button on the home page.
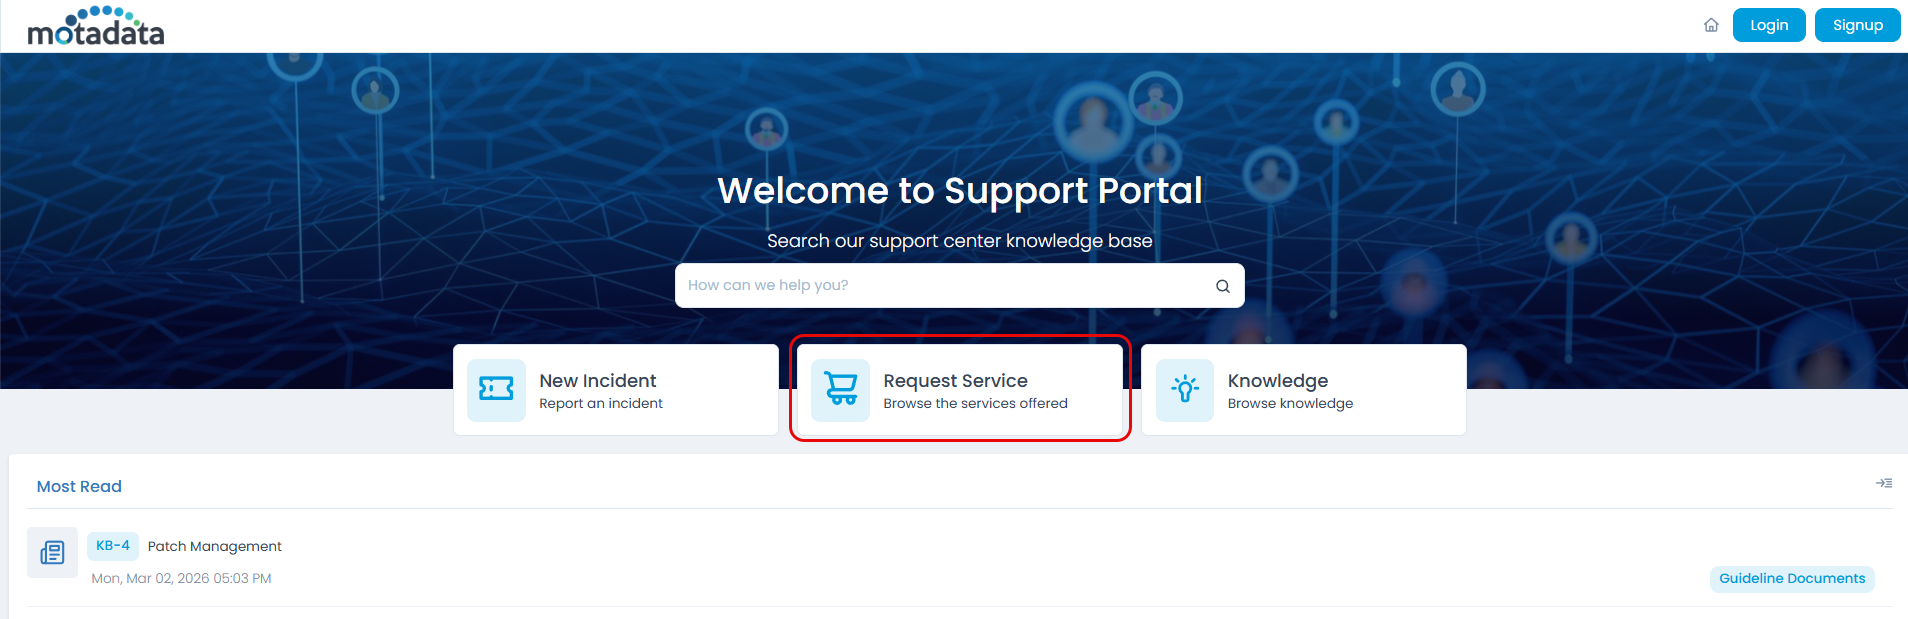
- Choose the appropriate Service Category and Service.
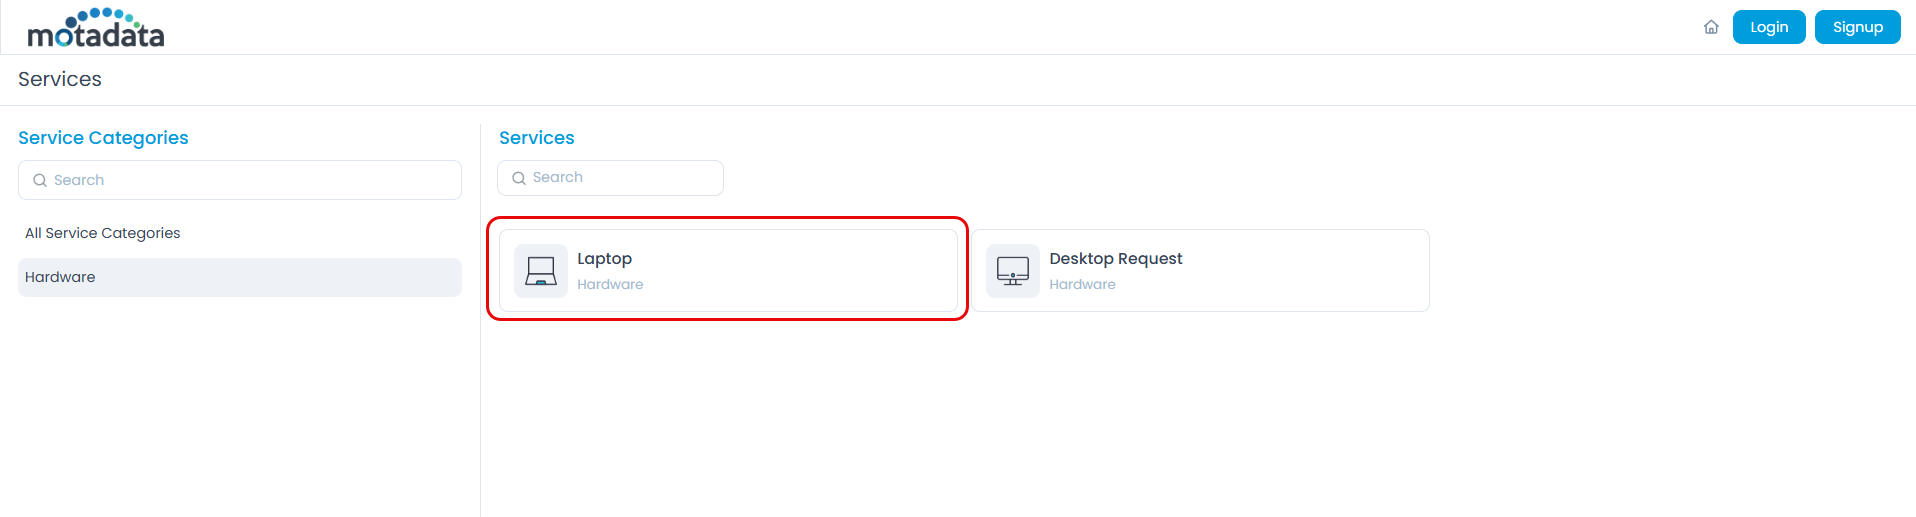
- Fill in the required information specific to the service and click Submit Request.
Method 2: After Login
This method requires you to log in to the portal to submit a service request.
Click the + button
Select Request Service. Here, you can also mark frequently used services as favorites by clicking the star icon. These will appear on your Support Portal home page for quick access.
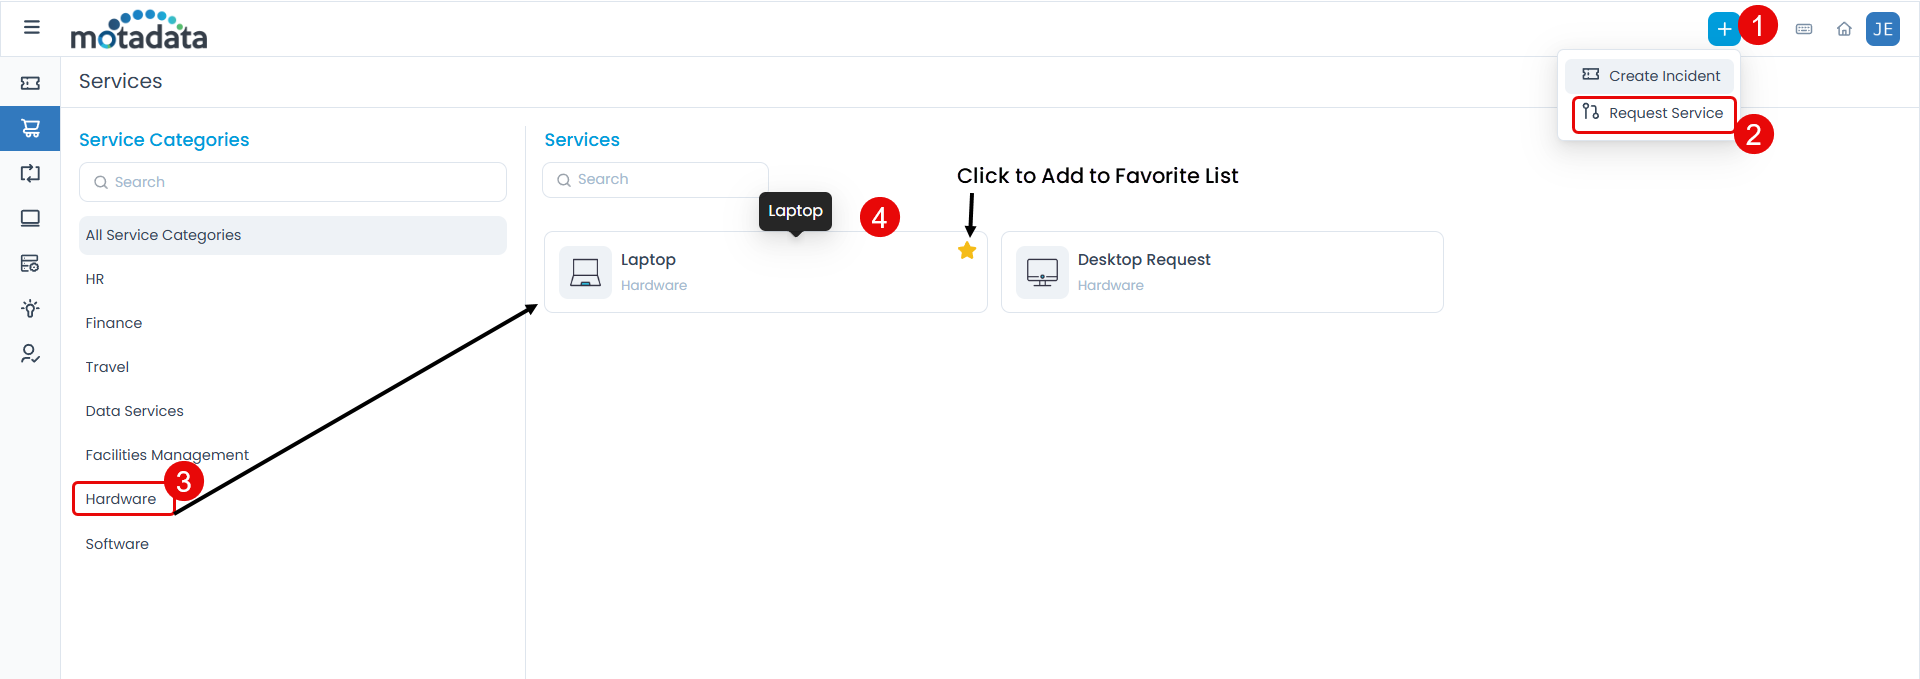
- Choose the appropriate Service Category and Service
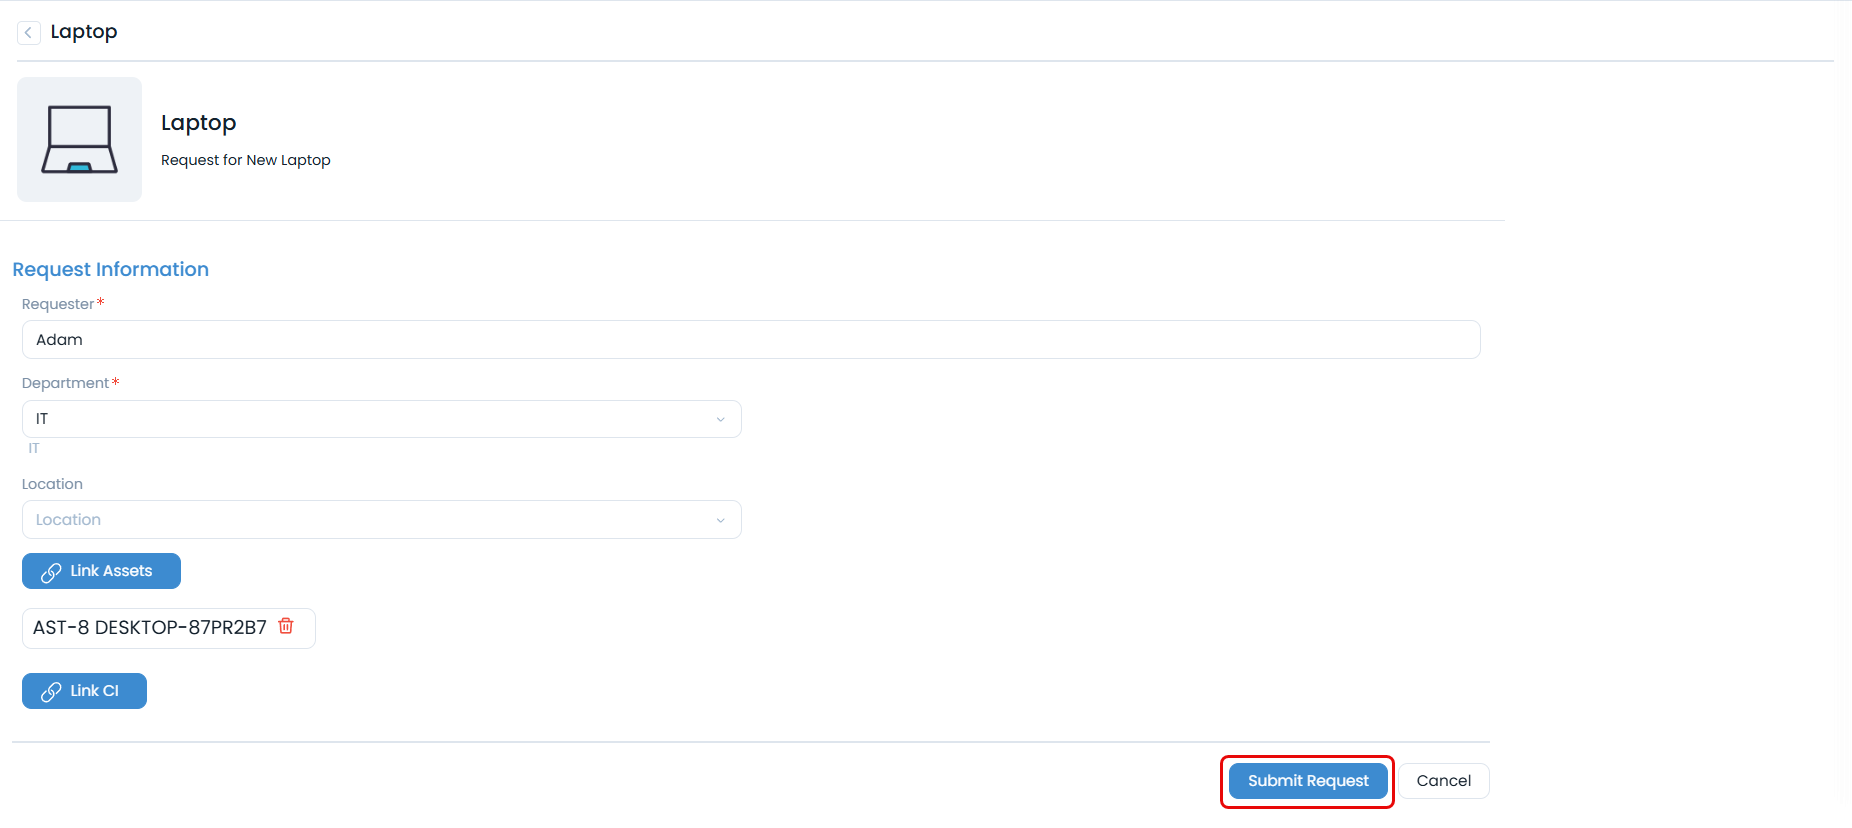
Fill in the required information specific to the service
Click Submit Request
Managing Requests
Viewing Your Requests
Access your requests through the My Open Requests section on the home page or navigate to the dedicated requests list page.

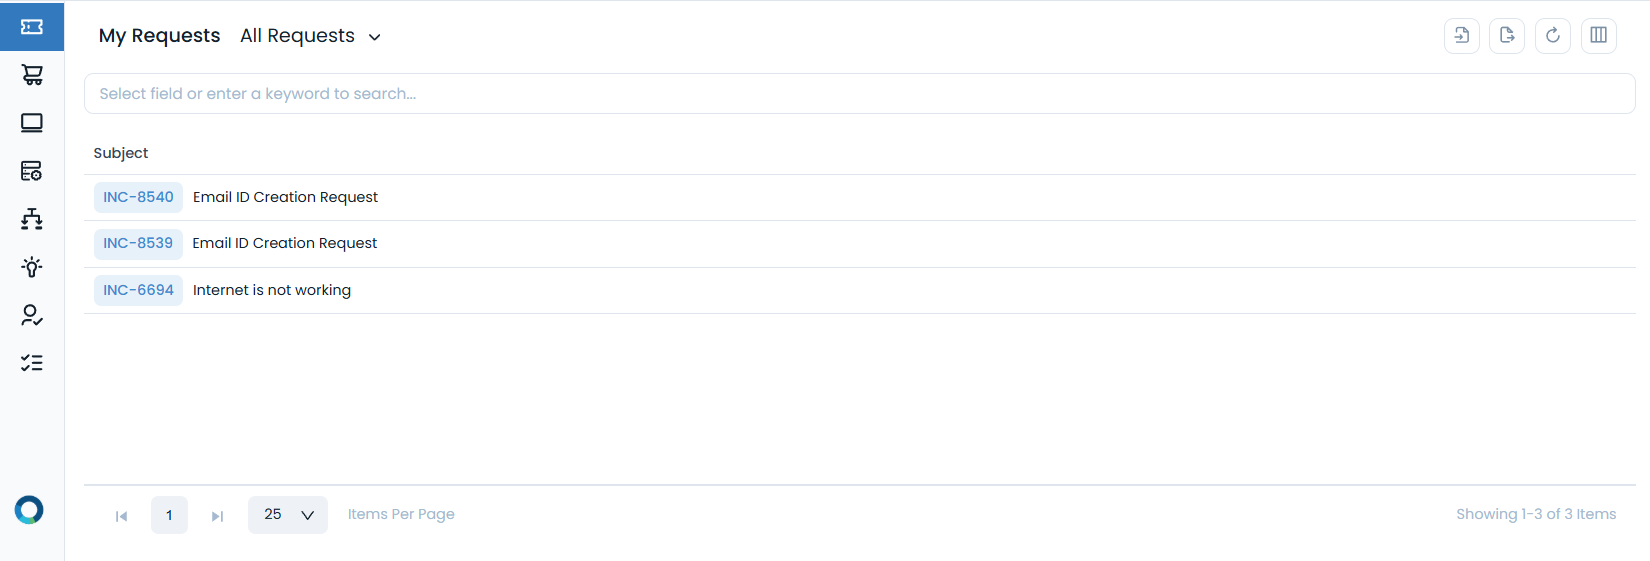
The requests list provides several management options:
- Filtering & Searching
- Request Actions
- Filter Options: View All Requests, Open Requests, Closed Requests, etc.
- Search Functionality: Find specific requests using keywords or criteria
- Column Selection: Customize which information columns to display
From the requests list, you can:
- View Details: Click on the subject to open the full request details.
- Open in New Tab: Use the arrow icon for detailed view.
- Import: Import a list of incident requests in bulk.
- Export: Download your requests list in CSV or Excel format.
- Refresh: Update the list to see the latest changes.
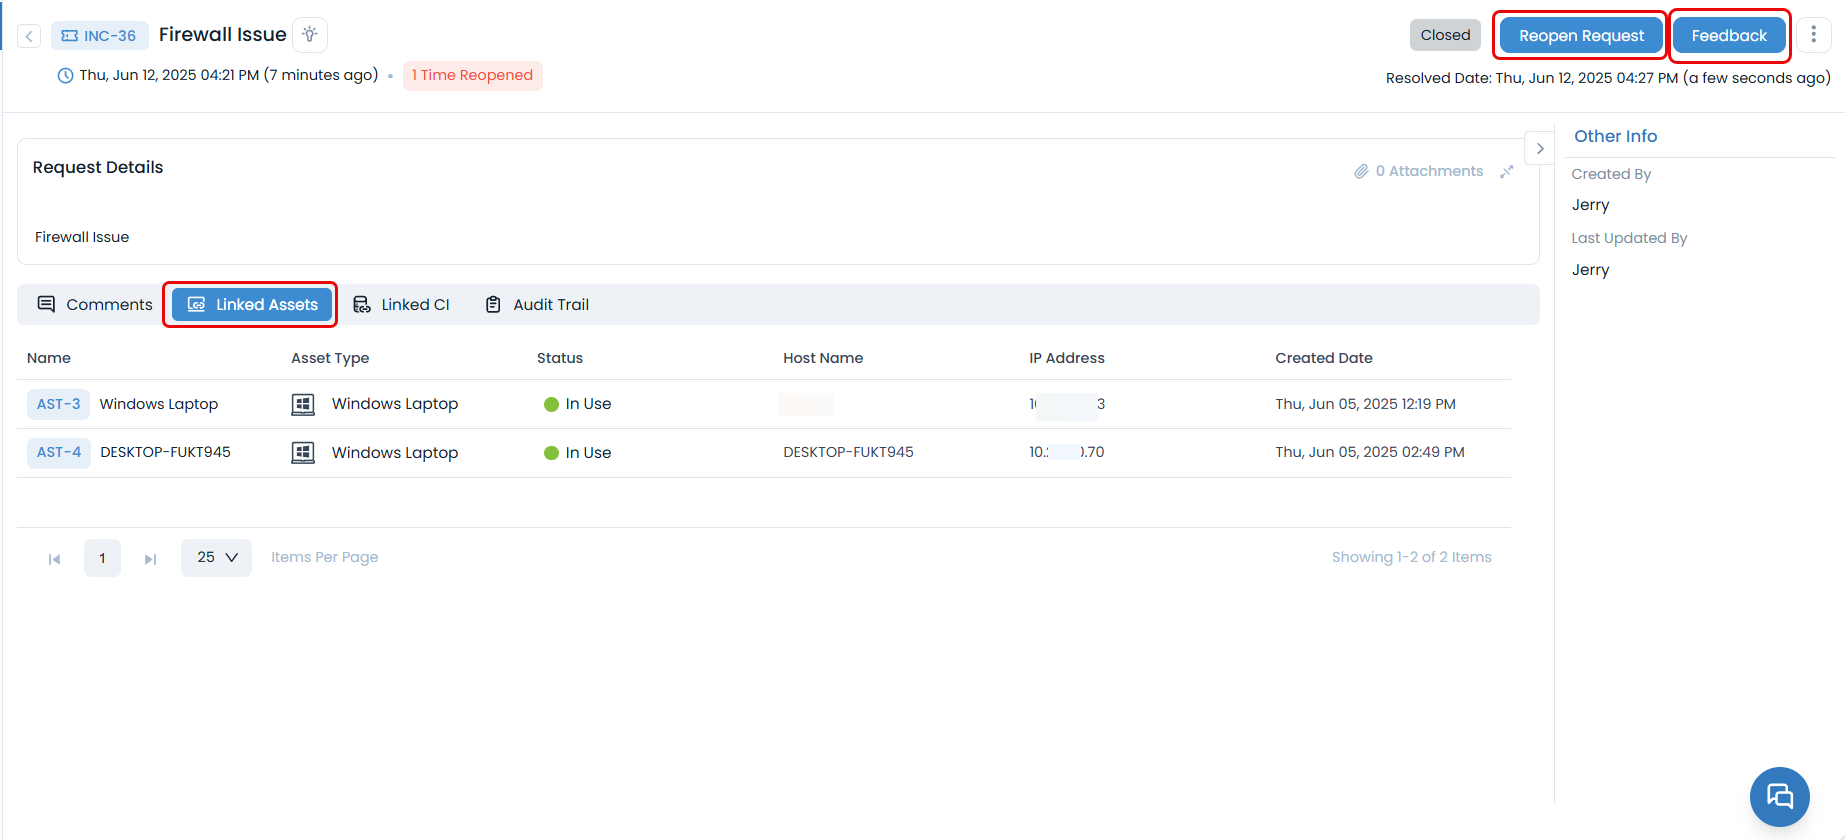
Request Details Page
When you open a request, you'll see comprehensive information and management options:
Request Information
| Field | Description |
|---|---|
| Status | Current state of your request (Open, In Progress, Resolved, etc.) |
| Created Date and Time | When the request was submitted |
| Due by | Expected resolution date |
| Created by | Name of the requester who created the request |
| Last Updated by | Name of the requester who last updated the request |
Available Actions
- Communication
- Request Management
- Related Information
- Documentation
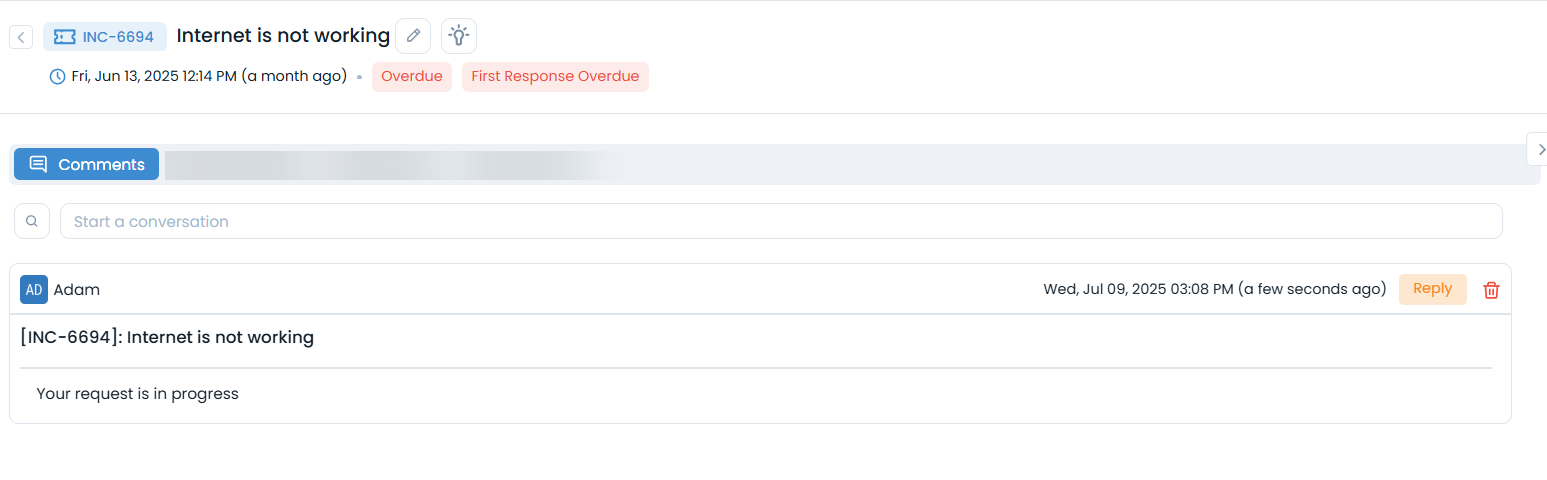
- Add Comments: Provide additional information or ask questions
- View Conversation History: See all communications about the request in the Comments tab.
- Close Request: Mark as resolved when your issue is fixed.
- Re-Open Request: Reopen if the issue persists or wasn't fully resolved.
- Provide Feedback: Rate the resolution quality and service.
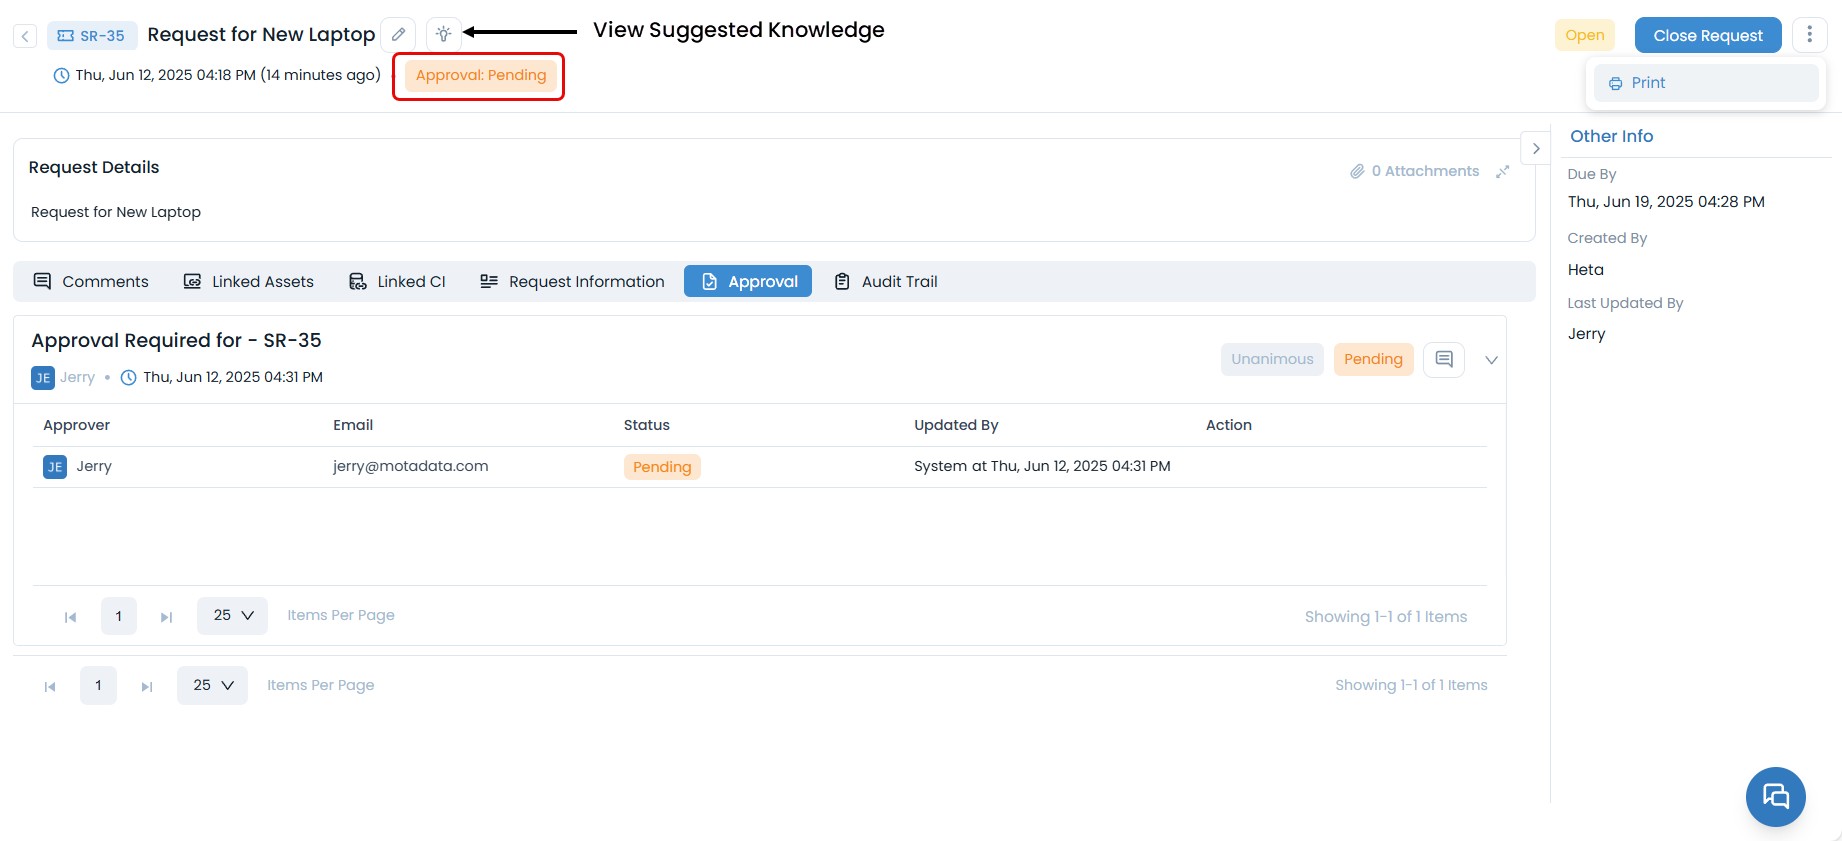
- View Suggested Knowledge: Access helpful articles related to your issue
- Link Assets: Associate hardware or software with your request. (Available only if the Link Asset permission is granted from the Support Portal Settings and the respective Service Catalog.)

- Link CIs: Connect to configuration items if applicable. (Available only if the Link CI permission is granted from the Support Portal Settings and the respective Service Catalog.)
- View Audit Trail: See a complete history of all request activities.
- Print Details: Generate a PDF report of your request
- Export Audit Trail: Download detailed logs in various formats
Some features like linking assets, approvals, or viewing audit trails depend on permissions granted by your administrator.
Request Status Tracking
Understanding request statuses helps you know where your request stands in the resolution process:
Common Status Values
| Status | Description |
|---|---|
| Open | Request has been created and is awaiting assignment |
| In Progress | A technician is actively working on your request |
| On Hold | Request is temporarily paused (waiting for information, approval, etc.) |
| Resolved | Issue has been fixed, waiting for your confirmation |
| Closed | Request is complete and closed |
Status Updates
You'll receive notifications when your request status changes. You can also:
- Check the status directly in the Support Portal.
- View status history in the request details.
- Receive email notifications for status changes.
Approvals and Feedback
- Request Approvals
- Providing Feedback
Some requests may require approval before processing:
The approval tab is visible only if its setting is enabled from the Admin Technician Portal.
- Approval Status: Displays the status of the request.
- Approval Details: View the details of the approval like who is the approver, status, view comments, etc.
- Add Comments: Provide additional context for approvers if required.

After your request is resolved, you can provide feedback:
- Rate the Resolution: How well was your issue addressed?
- Service Quality: Rate the overall service experience
- Comments: Provide detailed feedback for improvement
Best Practices
- Creating Effective Requests
- Following Up on Requests
- Managing Multiple Requests
- Be Specific: Provide clear, detailed descriptions of your issue
- Include Context: Mention what you were doing when the problem occurred
- Attach Evidence: Include screenshots, error messages, or relevant files
- Set Realistic Urgency: Don't mark everything as high priority
- Check Status Regularly: Monitor your request progress
- Respond Promptly: Reply to technician questions quickly
- Provide Updates: Share new information that might help resolution
- Close Appropriately: Confirm resolution before closing requests
- Use Filters: Organize requests by status or type
- Export Lists: Download request summaries for tracking
- Set Reminders: Use the portal's notification features
- Link Related Requests: Connect related issues when appropriate
Troubleshooting
Common Issues
| Problem | Solution |
|---|---|
| Cannot Create Request | Check if you have the required permissions |
| Form Not Loading | Try refreshing the page or clearing browser cache |
| Attachment Errors | Ensure files are within size limits and in supported formats |
| Cannot View Request | Verify you have access to the specific request |
| Status Not Updating | Refresh the page or check notification settings |
Mobile Access
You can manage your requests through the mobile app as well:

| Feature | Description |
|---|---|
| Create Requests | Submit incidents and service requests on the go |
| Track Progress | Monitor request status and updates |
| Add Comments | Communicate with technicians from your mobile device |
| Receive Notifications | Get real-time updates about your requests |
The mobile app provides a streamlined experience for basic request management while the full web portal offers advanced features.
Getting Help
If you encounter issues or have questions while managing your requests, several resources are available to assist you. Follow these steps to find the support you need quickly and efficiently.
1. Search the Knowledge Base
Before reaching out for help, check our comprehensive Knowledge Base. It contains articles, guides, and FAQs that may already have the solution to your problem.
- How to Access: Navigate to the Knowledge section in the main portal menu.
- What to Search For: Use keywords related to your issue, such as "create request," "request status," or "attachment error."
For more details, see Accessing Knowledge Resources.
2. Consult the Help Documentation
This guide and other related documents contain detailed information about using the support portal. Review the relevant sections to understand the features and processes better.
- Key Topics to Review:
3. Use Live Chat Support
For immediate assistance, our Live Chat is the quickest way to connect with a support technician.
- Availability: Look for the chat icon at the bottom-right corner of the portal.
- When to Use: Ideal for urgent issues or questions that need a quick answer.
- Providing Information: Be ready to provide your request ID (if you have one) and a clear description of the problem.
Learn more about using Chat Support.
4. Contact Your Administrator
If you are experiencing issues related to your account, permissions, or access, your system administrator is the best point of contact. They can help with:
- Permission Errors: If you cannot create a request or access certain features.
- Account Issues: Problems with logging in or your user profile.
- Configuration Questions: If you are unsure about department or group settings.