LDAP Configurations
Motadata allows you to upload a list of Requesters through an LDAP request. LDAP is a protocol that the enterprises use to access a distributed directory of their employees. The email clients and other contact search programs mostly use this LDAP.
Motadata establishes a connection with the distributed directory information system using the provided information, and it makes queries using the LDAP protocol. It fetches the employee details from the server into the Motadata ServiceOps.
The system updates the LDAP user's email address if it matches the existing logon name, specifically when only the email address is changed.
To view the LDAP Configurations page, navigate to the Admin > Users > LDAP Configurations and the page appears.

The page provides the following features:
- Self Service Settings: You can configure the self service settings.
- Create LDAP Configurations: You can create the LDAP configuration.
- Grid: Displays the details of the LDAP configurations.
- Schedule Enabled: You can enable or disable the schedule.
- Show History: You can view the LDAP history.
- Import Users: You can import the LDAP users into ServiceOps.
- Create Schedule: You can create a schedule based on which the LDAP users will get synchronized.
- Edit: You can edit the configurations.
- Delete: You can delete the configuration if required.
Create LDAP Configurations
To configure LDAP,
- The ports required are: LDAP - 389 and LDAPS - 636
- To implement LDAPS configuration in a High Availability architecture, it must be installed on both machines, i.e., the Master and the Slave.
- Click the Create LDAP Configurations button and the popup appears.

- In the Configuration tab, enter the following details:
| Parameter | Description |
|---|---|
| Name | Enter name of the LDAP configuration. |
| URL | Enter the URL of the LDAP server which begins with ldap:// followed by the IP Address and Port Number. For Example: ldap://111.111.0.11:920 |
| Base DN | A DN is a sequence of relative Distinguished Names connected by commas. It is the point from where a server will start looking for users in the Active Directory. You can add multiple Base DNs using +Add Base DN button. For Example: If the server has an origin as Motadata with the server Flotomate, the Base DN will be as "DC=flotomate,DC=motadata". |
| User ID | Enter the user ID of the LDAP user. |
| Password | Enter the password. |
| Group Base | Enter the group base using which you can import the users of a particular group. |
| Emails | Enter a unique email address for each user you want to notify upon completion of the LDAP process. |
| Server Type | Select the type of server you want to configure. The options are: - Microsoft AD: Select this when integrating with Microsoft Active Directory. This is typically used in enterprise environments to manage users and authentication through Microsoft's domain services. - Open LDAP: OpenLDAP is an open-source implementation of the Lightweight Directory Access Protocol (LDAP), which is a protocol used to access and manage directory information over a network. It is used for authentication and fetching user details from the AD directory. ServiceOps currently handles OpenLDAP integration without pagination support. |
| Block missing users | The missing users in the Active Directory (AD) will be blocked in ServiceOps based on the below scenarios: 1. When checked, if the users are removed from AD, the users will be blocked. Moreover, the users will be automatically unblocked in ServiceOps when the same user is found to be enabled in AD during the next sync. 2. When unchecked, if the users are removed from AD, the users will be archived. 3. When unchecked and the missing users are already blocked in ServiceOps, on the next sync the users will remain blocked only. By default, this field is enabled. |
| Integration Connector | Select the integration connector using which you can connect ServiceOps SaaS to Active Directory (AD) within the client's network for user authentication and login without exposing AD to the public network. Note: By default, the dropdown will remain blank after an upgrade. |
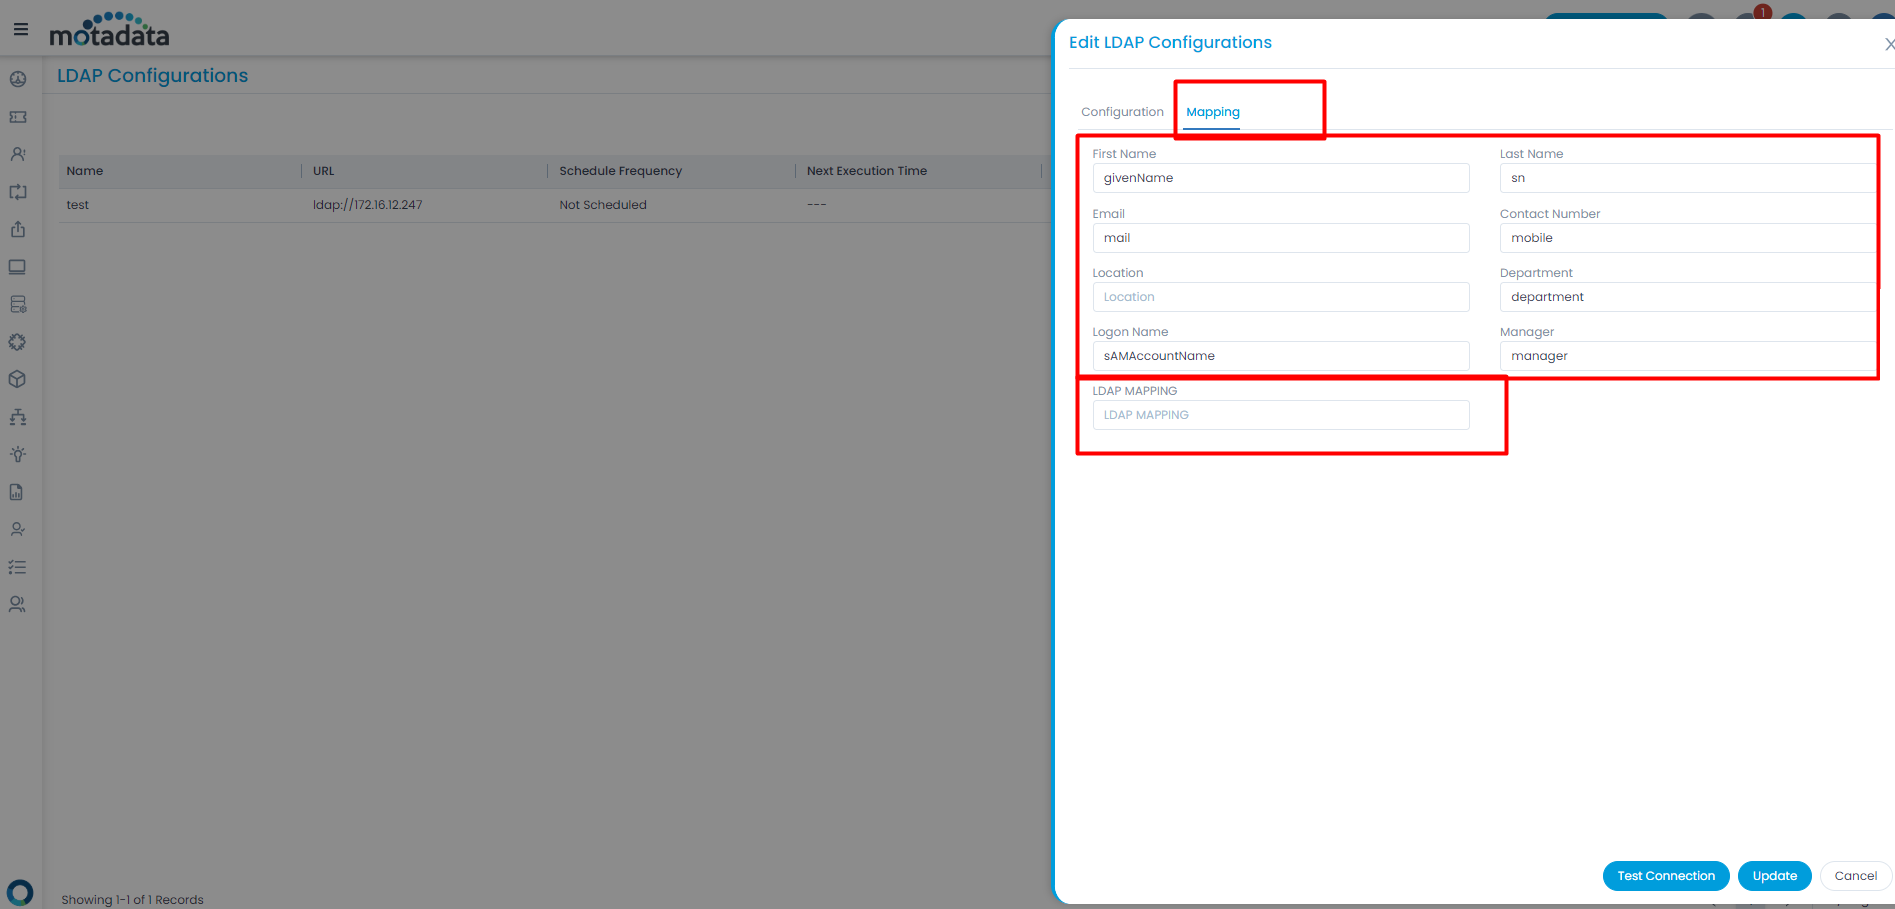
- In the Mapping tab, map the attributes with the server name. The attributes must be taken from the LDAP Server Attribute Editor.
You can map the following details:
- First Name
- Last Name
- Contact Number
- Location
- Department
- Logon Name
- Manager
Apart from these system fields, you can map the 'Text Input' type custom field as well.
All mapping fields should be same as the server, or the connection will not be established.
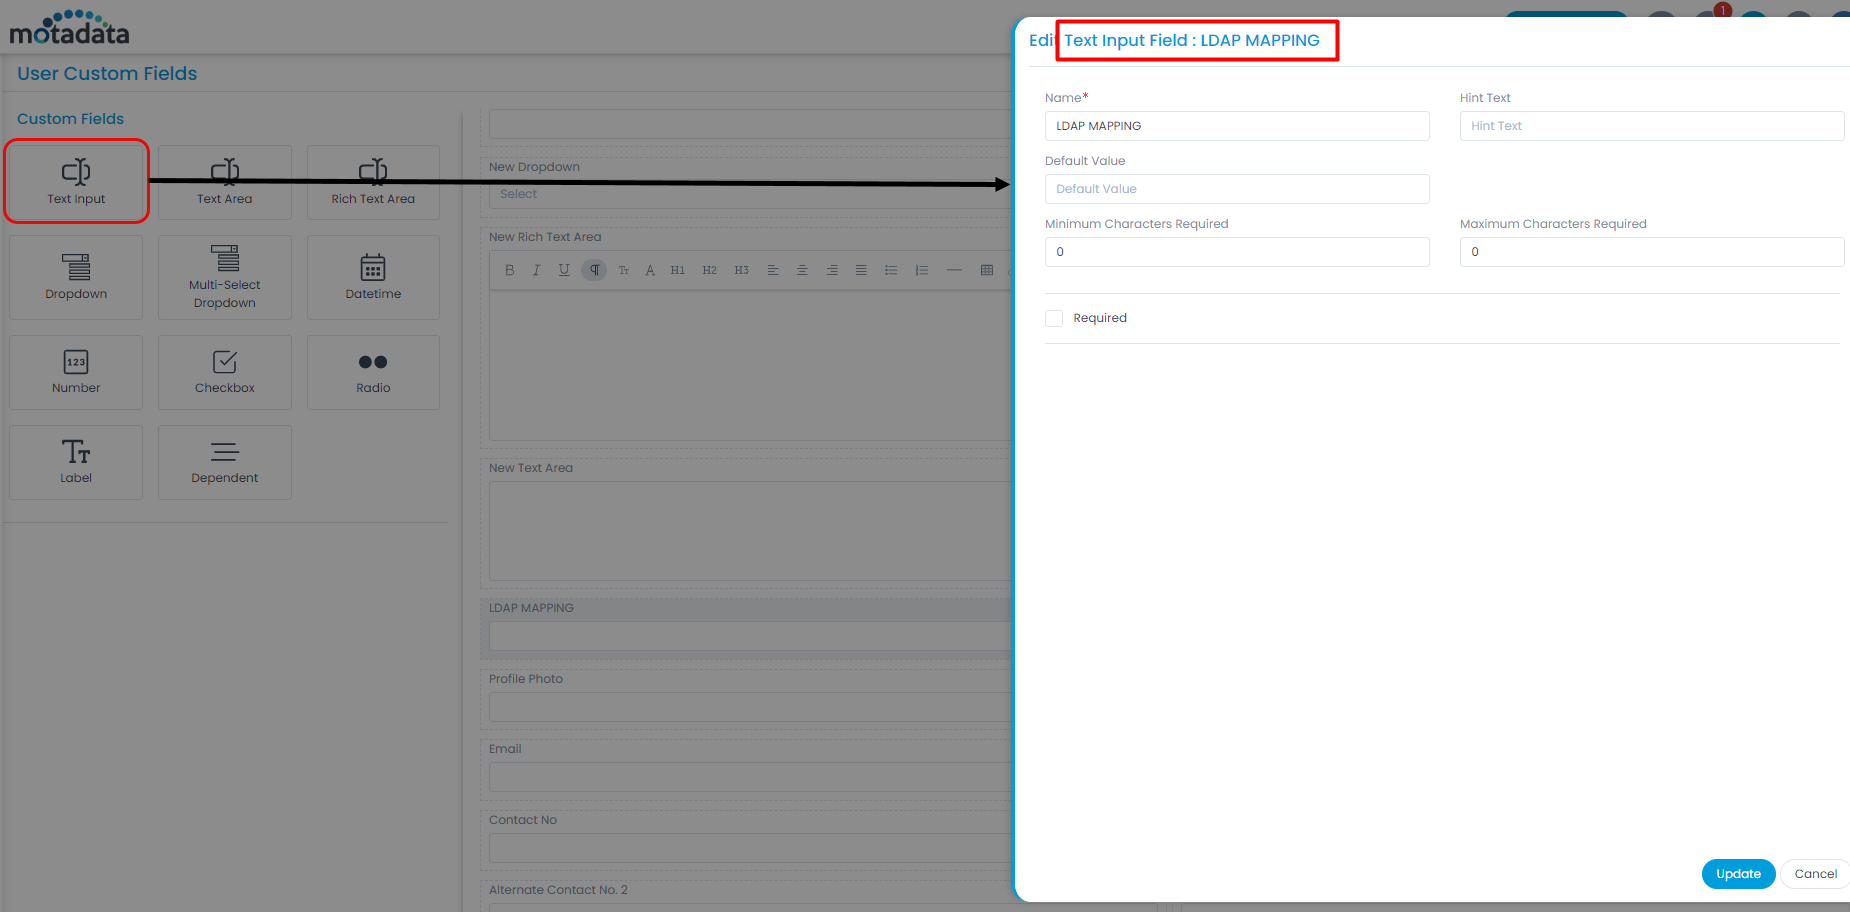
For example, if a custom field "LDAP MAPPING" is to be mapped, follow the below procedure:
Add a custom field of Text Input (LDAP MAPPING) type as shown below.
In the LDAP Configurations page, create LDAP Configuration, fill in the details in the Configuration tab.
In the Mapping tab, in the newly added custom field you need to enter the attribute from the LDAP server.
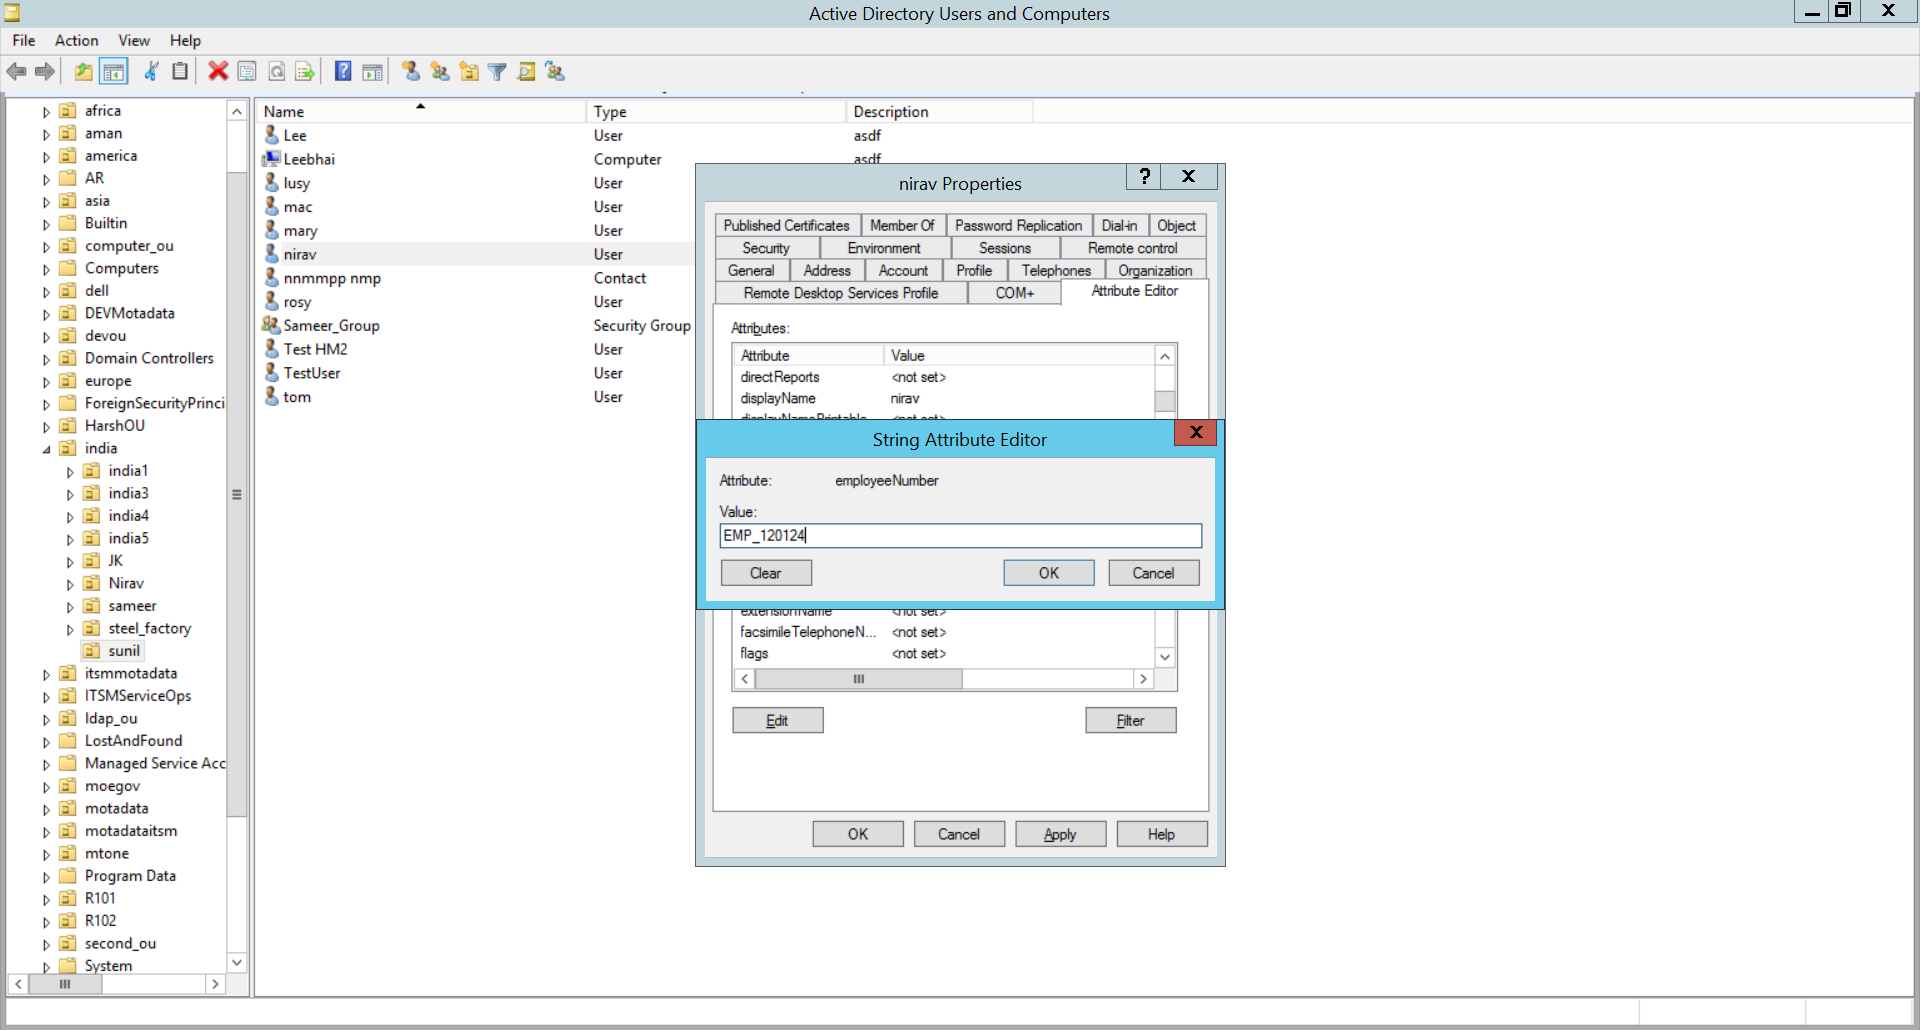
To get the attribute, open the LDAP server, select the user whose data you want to sync, right click it, and open Properties > Attribute Editor.
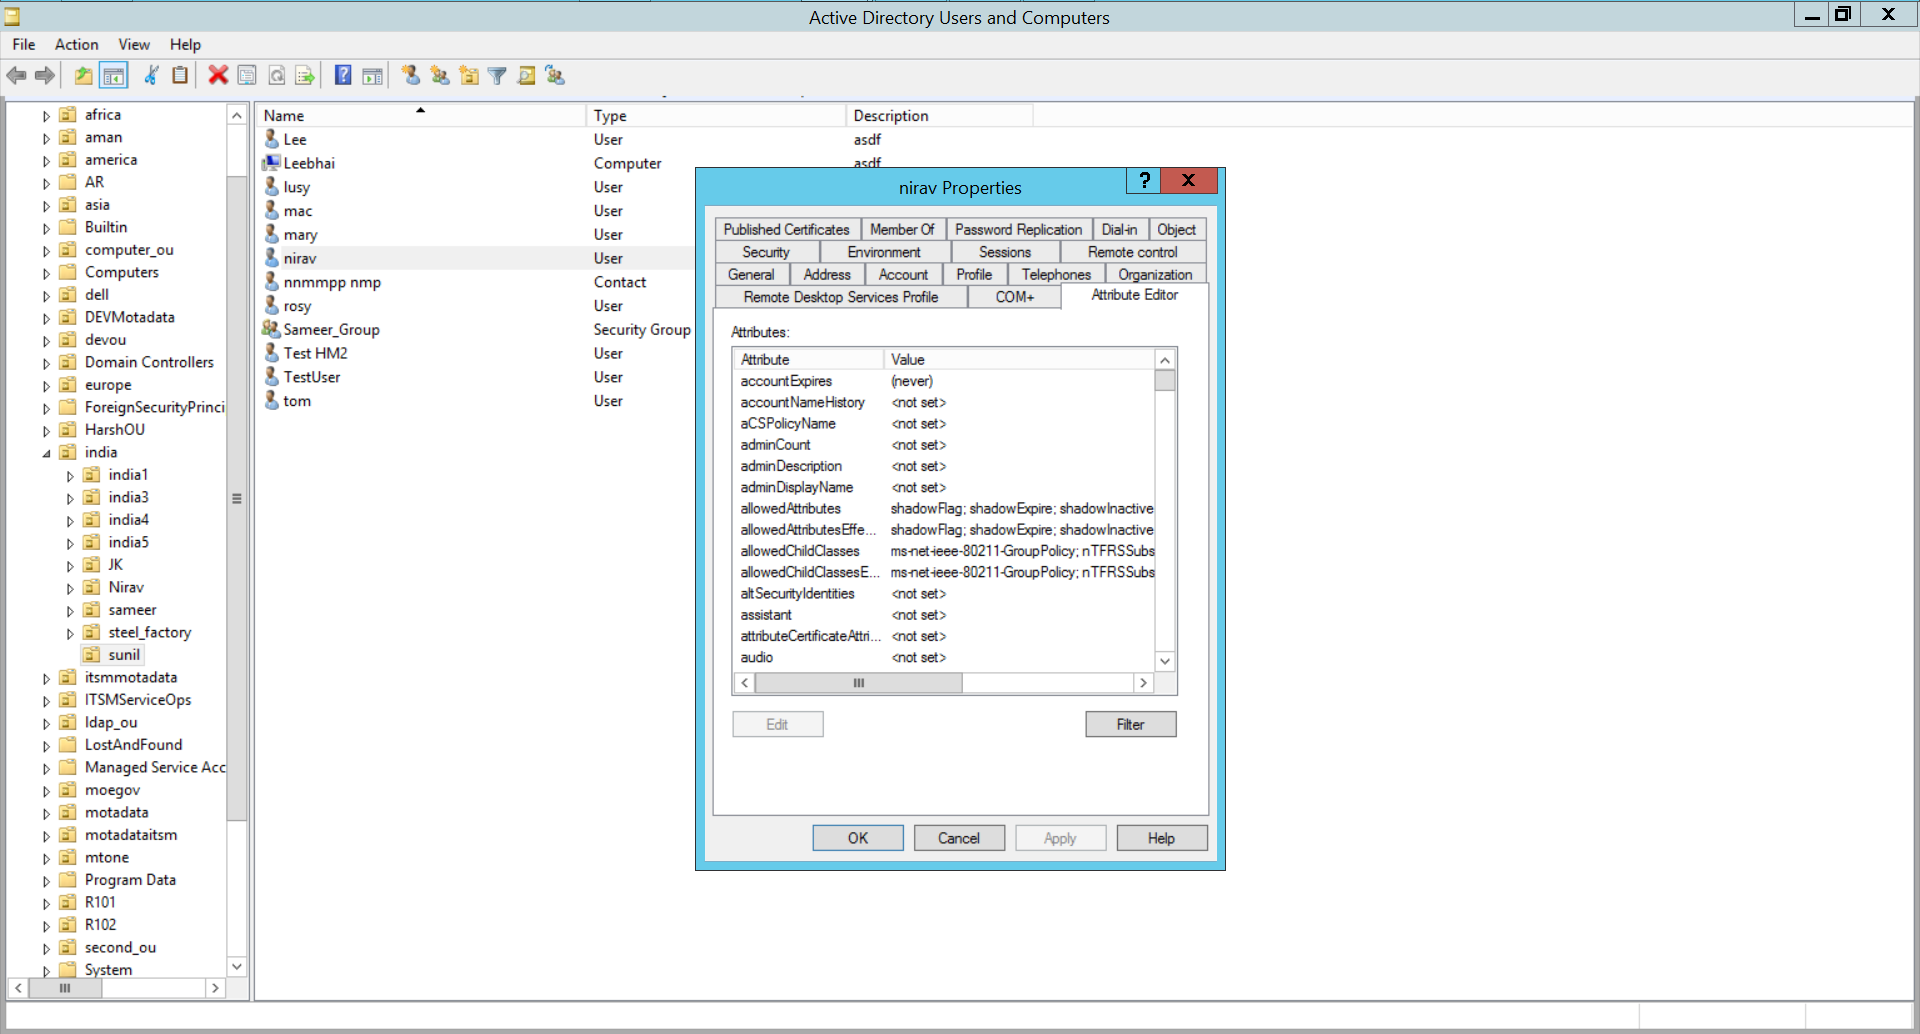
Here, all the supported attributes are listed. You can select anyone and set its value. Here, employeeNumber is used.
Now, add this attribute in the ServiceOps LDAP MAPPING field as shown below.

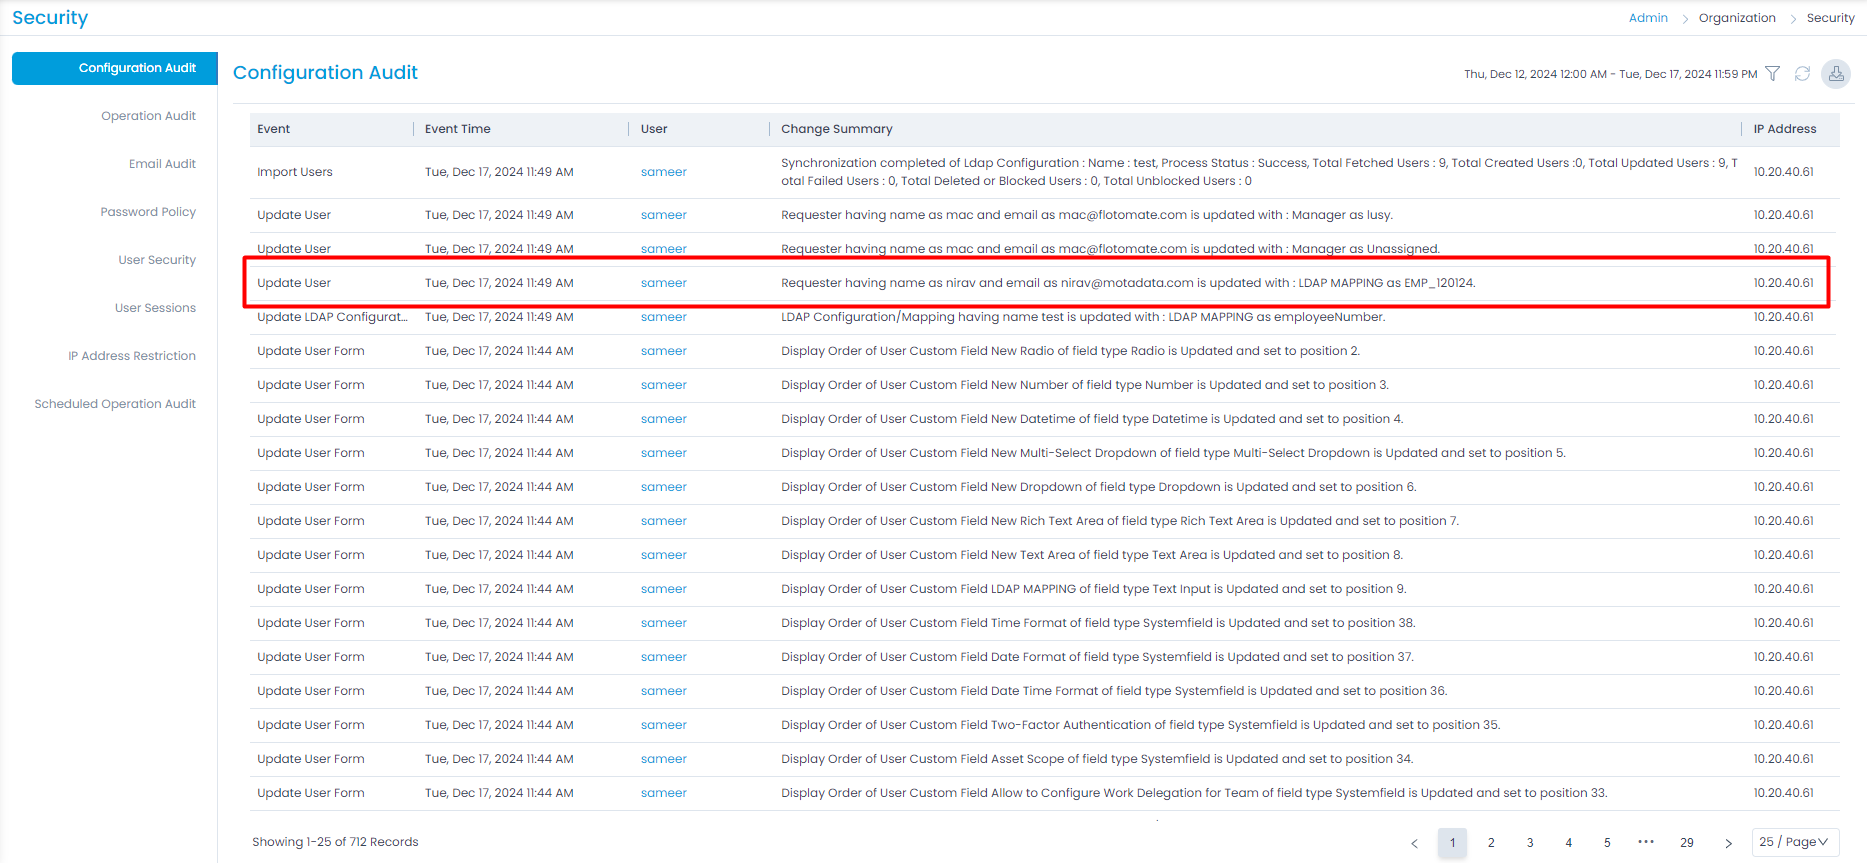
Also, its audit will be displayed in the Admin > Organization > Security > Configuration Audit page as shown below.
- Once all the details are filled, click Test Connection to verify the connectivity between the LDAP Server and ServiceOps.
- Click Create to save the LDAP server. The credentials required for the LDAP configuration are of the LDAP Admin. In case, the credentials are not available then a new user can be created in their Active Directory.
Show History
Click the Show History icon in the Actions column to view the LDAP history and a popup appears. It displays the details like created date, total fetched users, total created users, total failed users, total deleted users, and total updated users.
Total Failed Users
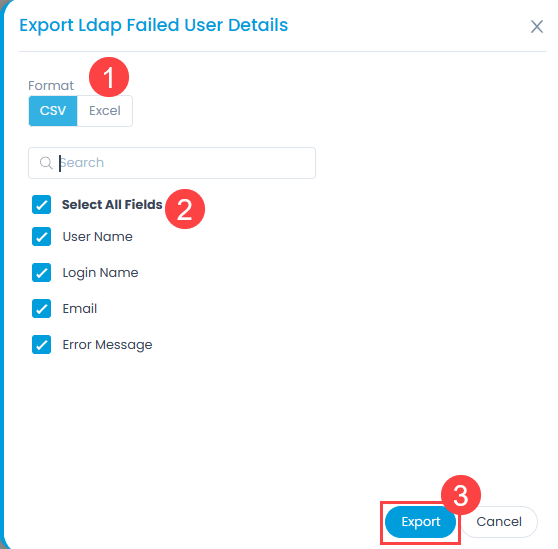
You can also click on the Total Failed Users link to view the reason of failure for the LDAP users not imported as shown below.


Here, you can export the list by clicking the Export icon, selecting the format, fields, and clicking the Export button. The list can be exported in CSV and Excel format. If Excel is selected, you can password-protect the file if required.
Total Created Users
You can click on the Total Created Users link to view the created LDAP users as shown below.

Here, you can export the list by clicking the Export icon, selecting the format, fields, and clicking the Export button. The list can be exported in CSV and Excel format. If Excel is selected, you can password-protect the file if required.

Total Unblocked Users
You can view the total count of unblocked users in the LDAP History. This count is also included in the email notifications.


Import Users
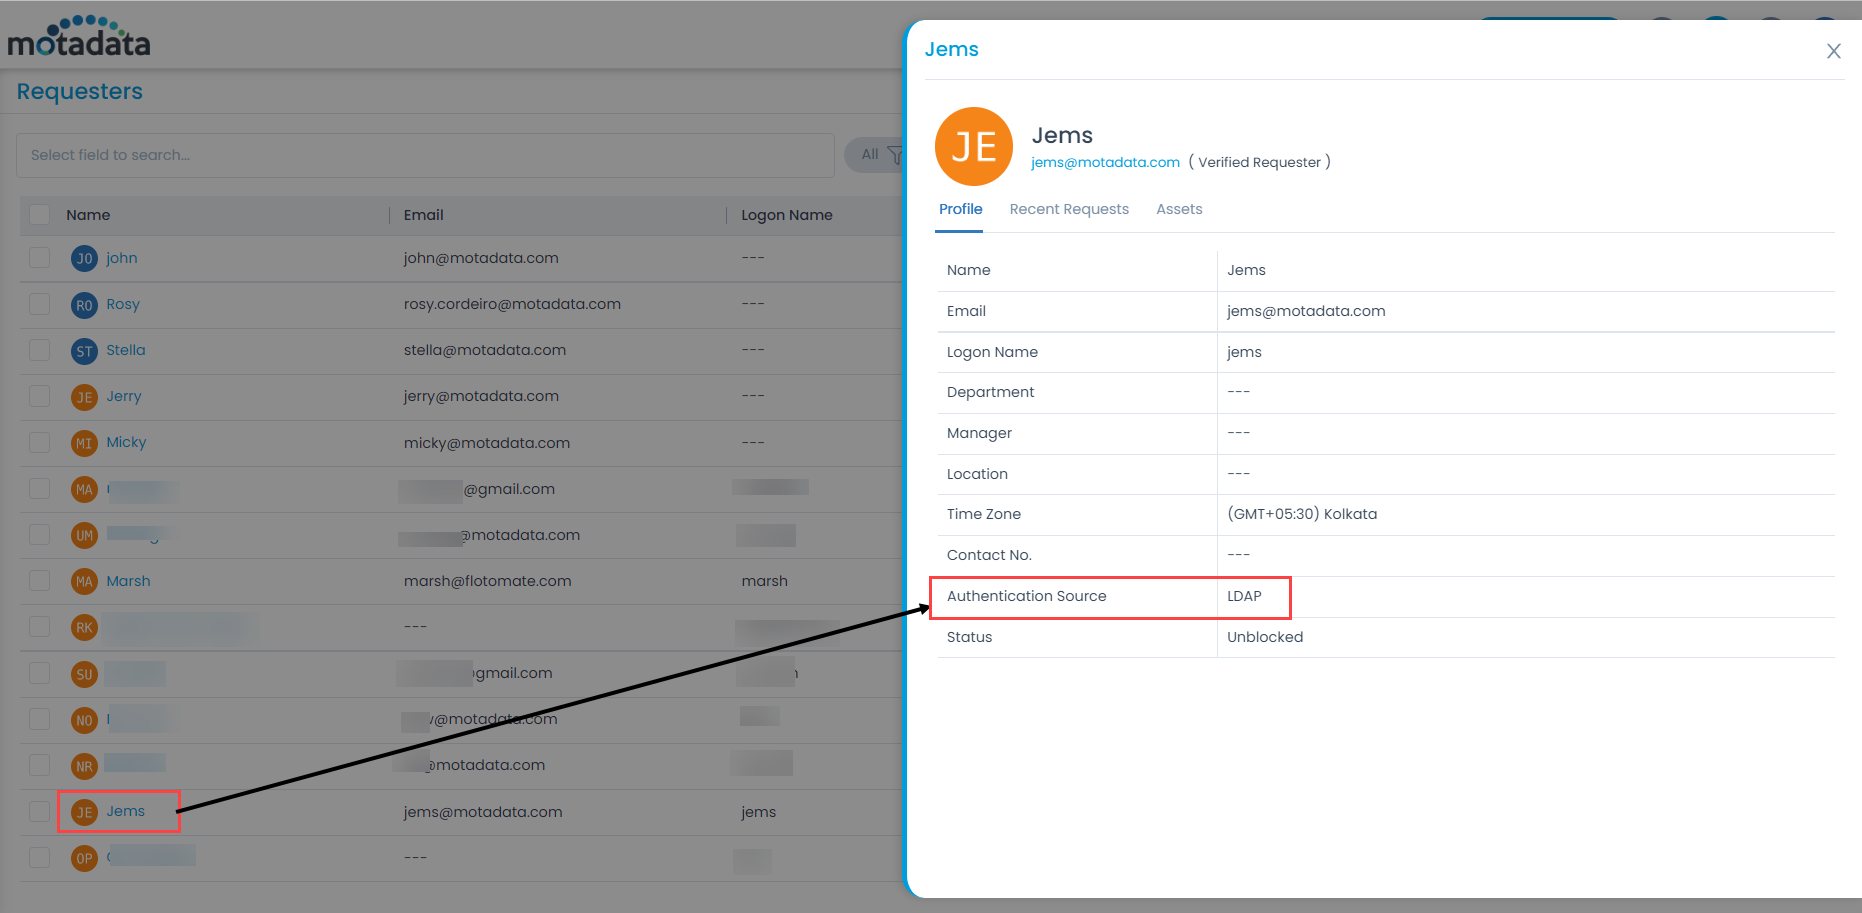
Click the Import Users icon in the Actions column to import the users from the LDAP server to ServiceOps. Once clicked, the imported users get added as requesters in the ServiceOps as shown below.
Create Schedule
Scheduling allows you to periodically import employee details from the server. This feature helps you to keep the Requesters list up to date. Data related to the Tenant Super Admin user will be excluded from the LDAP sync. Excluding the Super Admin user allows you to access the system in cases where the LDAP credentials get changed, or the LDAP server becomes unreachable.
To create a schedule,
- From the list page, click the Create Schedule icon in the Actions column.
- In the Schedule for LDAP popup, click Create Schedule.
- Select the Schedule Type. The options are:
- Once: If selected the schedule will run only once as per the start date selected in the Start At field.
- Hourly: If selected the schedule will run hourly as per the Start At and Interval.
- Daily: If selected the schedule will run daily as per the Start At and Time selected. The Start At field depicts the date and time when the schedule should start.
- Weekly: If selected the schedule will run weekly as per the Start At, Day, and Time selected. The Start At field depicts the date when the schedule should start. Day depicts the day on which the schedule should run.
- Monthly: If selected the schedule will run once in a month as per the Start At, Date, Time, and Month(s) selected. The Start At field depicts the date when the schedule should start. Date is the date of the month on which the schedule should run.
- Once done, click Save to save the schedule.

Once the schedule is created, you can also edit or delete it if required as shown below.
