Digital Signature
Digital Signature allows organizations to send documents for secure electronic signing directly from ServiceOps without printing, scanning, or manually sharing files. It helps technicians collect approvals, acknowledgements, and legally accepted signatures for business processes such as Service Requests, Changes, Contracts, and Purchases. The complete signing process is tracked within the record, allowing users to monitor signer progress, send reminders, and access the final signed document from a single place. This simplifies document management, reduces manual effort, and helps complete processes faster.
What Is a Digital Signature?
A Digital Signature is a secure way to electronically sign a document while verifying the identity of the signer and protecting the document from unauthorized changes after it is signed. Unlike the standard approval process, which is used to approve or reject a record within ServiceOps, Digital Signature is used when a signed document is required. It enables organizations to collect legally accepted signatures on documents such as employee onboarding forms, policy acknowledgements, asset handover documents, contracts, or purchase agreements while maintaining a secure and traceable signing history.
What You Can Do
Digital Signature integrates with every major record type in ServiceOps so technicians can collect approvals without switching tools.
- Send signature requests on requests, service requests, changes, purchase orders, and contracts directly from the record's detail page.
- Track signing status in real time.
- Collect signatures from signers who don't have a DocuSign account.
- Build reusable templates that pre-fill record data automatically.
- Maintain a complete audit trail for compliance and audit reviews.
When to Use Digital Signatures
Use Digital Signatures whenever a process requires a formal, verifiable signature instead of a standard approval. They are commonly used for documents that require identity verification, compliance, or an auditable record.
| Business Area | Common Use Cases |
|---|---|
| Service Catalog and HR | Employee offer letters, policy acknowledgments, non-disclosure agreements, asset handover forms, relieving and experience letters, leaving certificates |
| IT Services | Acceptable Use Policy, software license agreements, access authorization forms, asset issuance and return documents |
| Change Management | High-risk change authorization, CAB approval documents, implementation sign-off forms |
| Procurement | Purchase orders, vendor agreements, quotation approvals, procurement authorization forms |
| Contract Management | Customer contracts, vendor contracts, renewals, service agreements |
How to Set Up Digital Signature
Setting up Digital Signature requires two admin configurations. Add a Signature Provider to connect your DocuSign account credentials. Then create at least one Signature Template to define the document layout and signer details. Once both are active, technicians with the right role permissions can send signature requests from any supported record.
Prerequisites
All items below must be in place before you open Add Provider. Saving a provider without the DocuSign credentials or without granting OAuth consent will result in a connection failure.
- Internet connectivity is required in ServiceOps server.
- Admin access to ServiceOps
- A DocuSign account (developer or production) with admin permissions
- DocuSign Integration Key, User ID, API Account ID, and RSA Private Key ready to paste. See Configure DocuSign for Digital Signature for steps to obtain these values.
- The Manage Providers and Manage Templates permissions enabled on your role. See Roles.
- Technician roles that will send, view, or delete signature requests must have Request Signatures, View Signatures, and Delete Signatures enabled. Configure these under Admin > Users > Roles before technicians can use the feature.
How It Works
ServiceOps authenticates with DocuSign on behalf of a service account using a secure server-to-server connection. When a technician sends a signature request, ServiceOps builds a document from the selected template. It populates the document with record details and routes it to the signer's email address. The signer opens the DocuSign link in the email and completes their signature without needing a DocuSign account. DocuSign then sends a webhook notification back to ServiceOps, and the record's Signature section updates automatically with the current signing status.
The following diagram shows the end-to-end flow.
For on-premise ServiceOps installations, the DocuSign webhook requires your server to be reachable over public HTTPS on port 443. Configure your firewall to allow outbound connections to *.docusign.com and *.docusign.net. If your server sits behind a reverse proxy, ensure the proxy forwards the /api/docusign/webhook path and preserves the original request headers. Without this, DocuSign cannot deliver signing events and signature status will not update on records.
Signature Provider
The Signature Provider tab lists all configured digital signature providers. Each provider connects ServiceOps to an external signature platform account.
Navigate to Admin > Organization > Digital Signature to open this page.
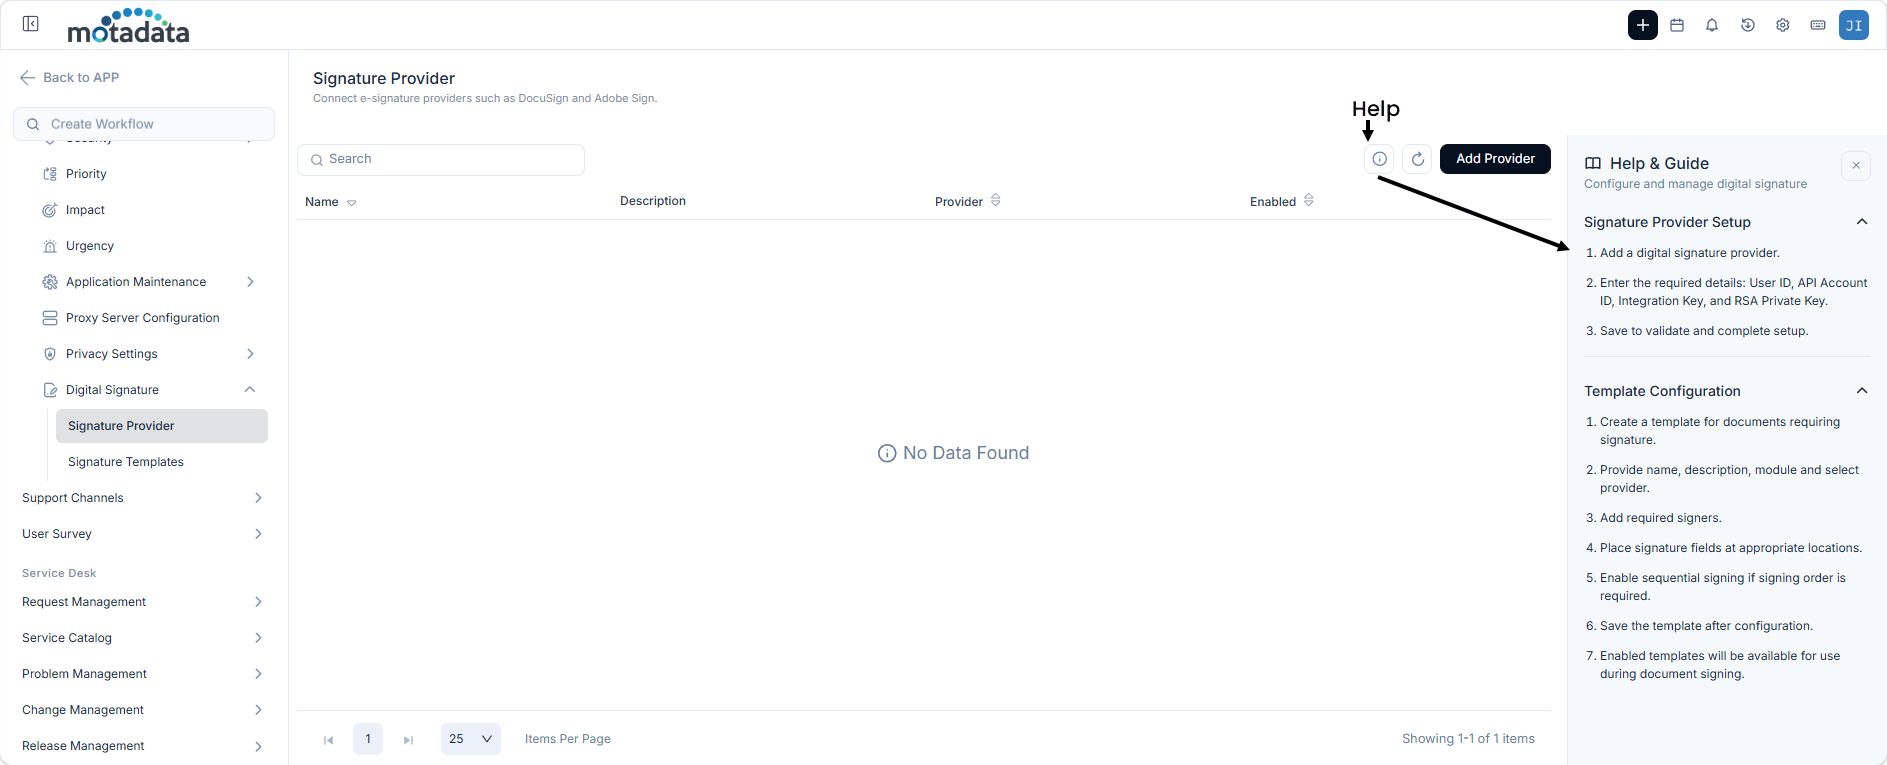
The page has the following controls:
- Search: Filter providers by name.
- Refresh: Reload the provider list to reflect any recent changes.
- Add Provider: Open the provider configuration form to add a new signature provider.
- Help: Open the contextual help panel for guidance on configuring a signature provider.
The provider list displays the following columns:
| Column | Description |
|---|---|
| Name | Display name for the provider. |
| Description | Optional notes about this provider configuration. |
| Provider | Signature platform used. Currently DocuSign is the only supported provider. |
| Enabled | Toggle to activate or deactivate the provider without deleting it. A green toggle means the provider is active. |
| Action | Edit the provider configuration (pencil icon) or delete the provider (trash icon). |
Add a Signature Provider
Click Add Provider to open the provider configuration form.
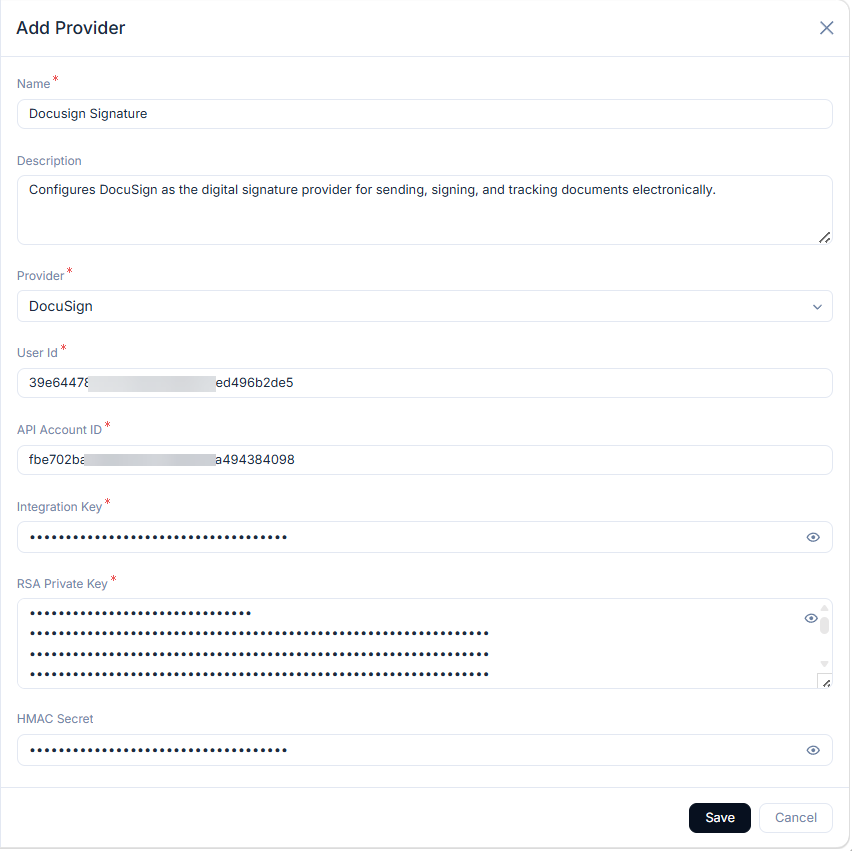
Fill in the following fields:
- Name: Enter a display name for this provider. Required.
- Description: Enter an optional description for internal reference. Default: blank.
- Provider: Select DocuSign. DocuSign is currently supported for digital signature. Required.
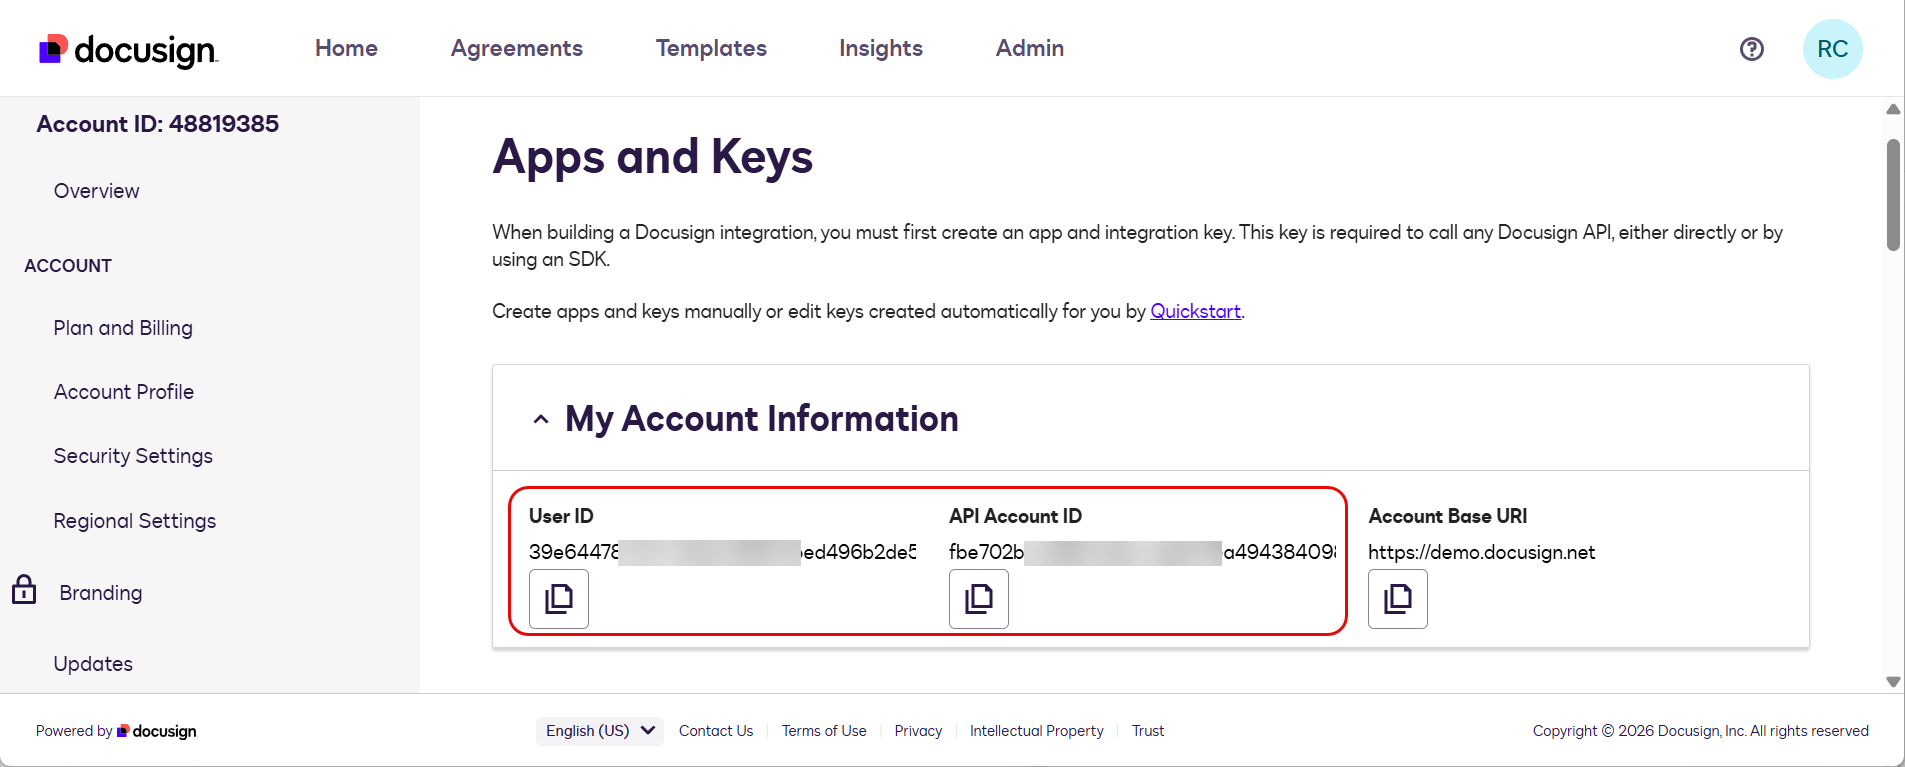
- User Id: Enter the GUID of the DocuSign user account. Copy this from the My Account Information section on the Apps and Keys page in DocuSign Admin. Required.
- API Account ID: Enter the GUID of the DocuSign account. Copy this from the same My Account Information section alongside the User ID. Required.
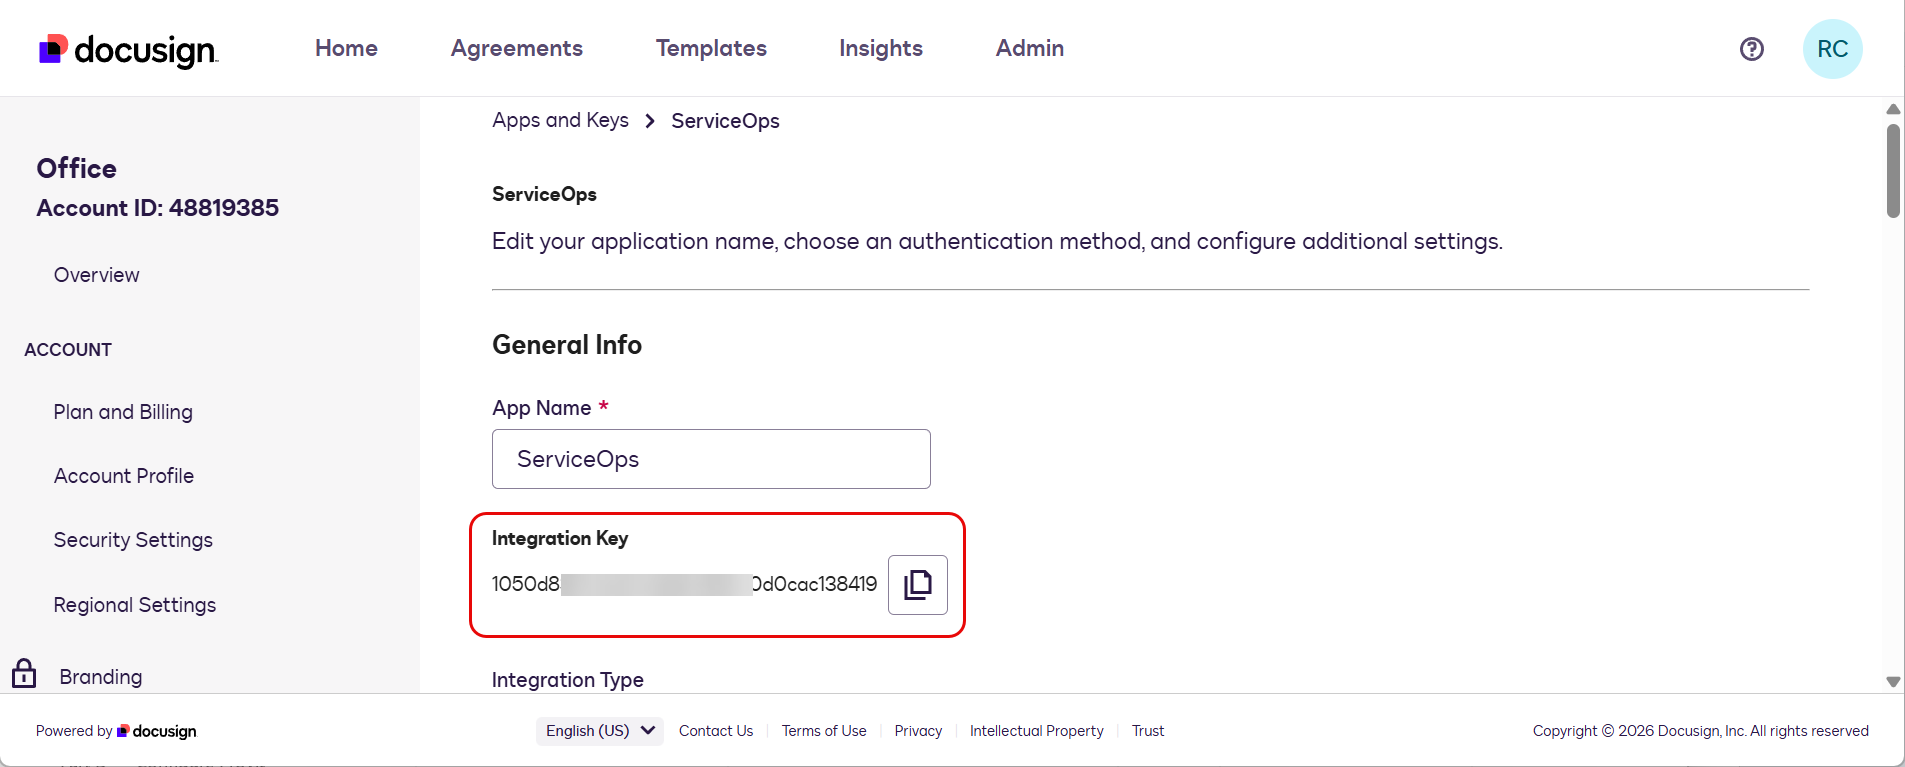
- Integration Key: Enter the Integration Key generated when you created the DocuSign app. Copy this from Admin > Apps and Keys > [your app] > General Info in DocuSign. Required.
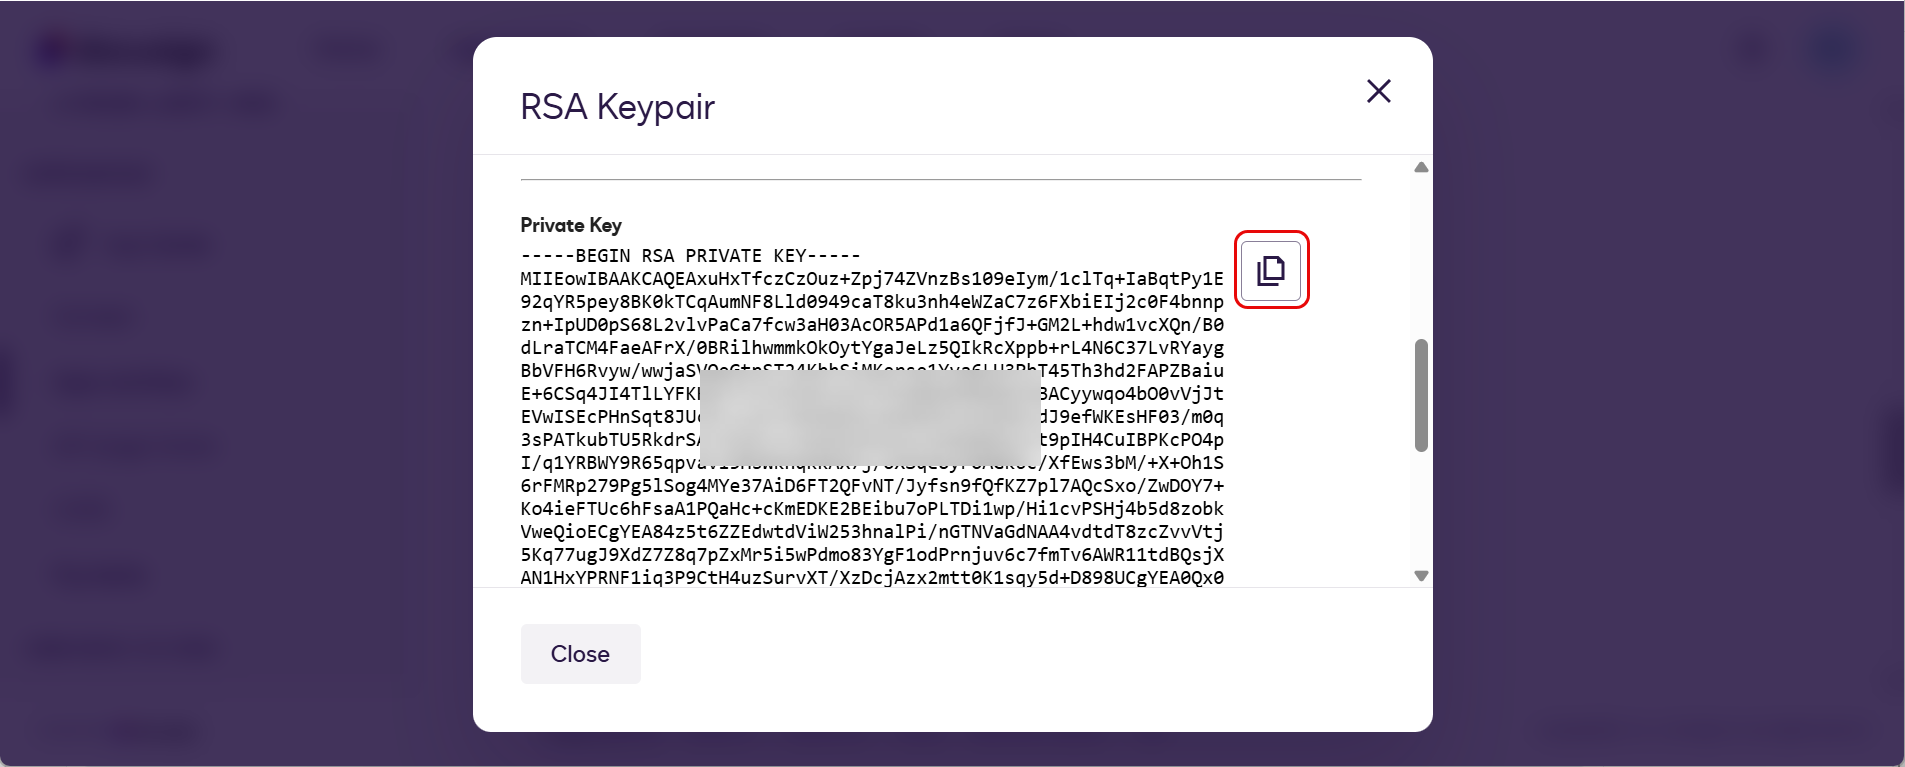
- RSA Private Key: Paste the RSA private key in PEM format generated in your DocuSign app. Include the
-----BEGIN RSA PRIVATE KEY-----and-----END RSA PRIVATE KEY-----header and footer lines with all line breaks intact. Required.
HMAC Secret: HMAC adds a SHA-256 signature to each DocuSign webhook payload so ServiceOps can verify the payload was not tampered with in transit. Whether you need it depends on your setup:
- OAuth Bearer only (ServiceOps default): Leave this field blank. HMAC is not required.
- Extra security for production: In DocuSign Connect, enable Include HMAC Signature, copy the generated secret, and paste it here.
- ServiceOps build requires HMAC: Fill this field. HMAC is mandatory if your ServiceOps developer has configured the webhook path to expect it.
Confirm with your ServiceOps developer whether HMAC verification is expected before enabling it. Default: blank. Optional.
Paste the RSA Private Key exactly as copied from DocuSign, with all line breaks intact. Flattening it into a single line causes a connection failure when saving the provider.
Click Save. Then set the Enabled toggle to ON to activate the provider. By default, it is disabled.
The RSA Private Key is stored encrypted and cannot be retrieved after saving. Copy the key to a secure location before clicking Save. If you lose the key, generate a new RSA keypair in DocuSign and update the provider.
Signature Templates
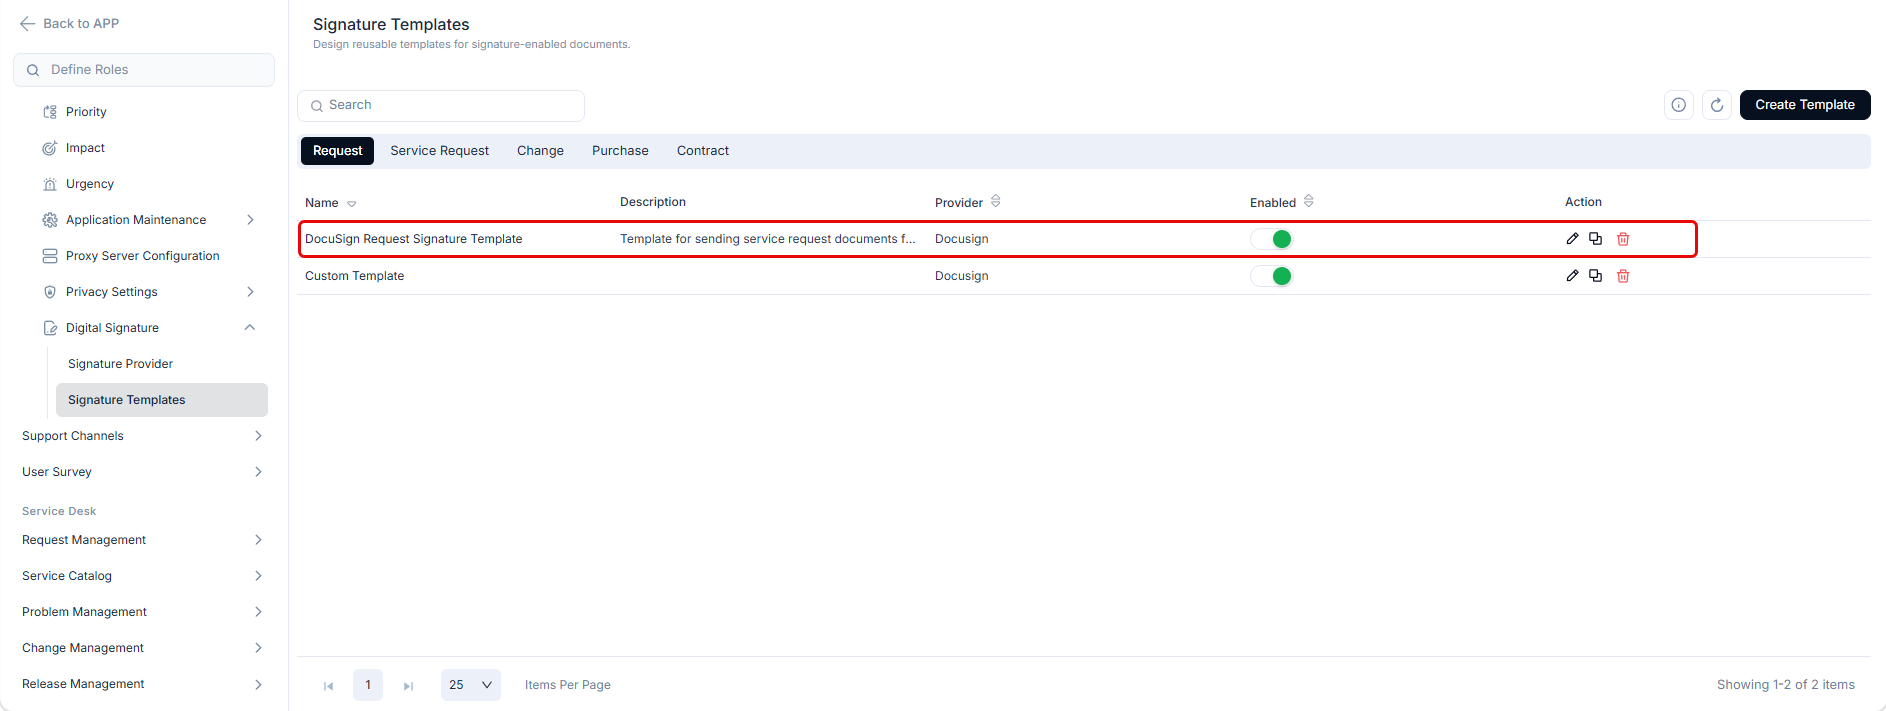
The Signature Templates tab lists all templates available for each module. A template defines the document body, signer details, and signature field placement used when a technician sends a signature request.
Click the Signature Templates tab to open this page.
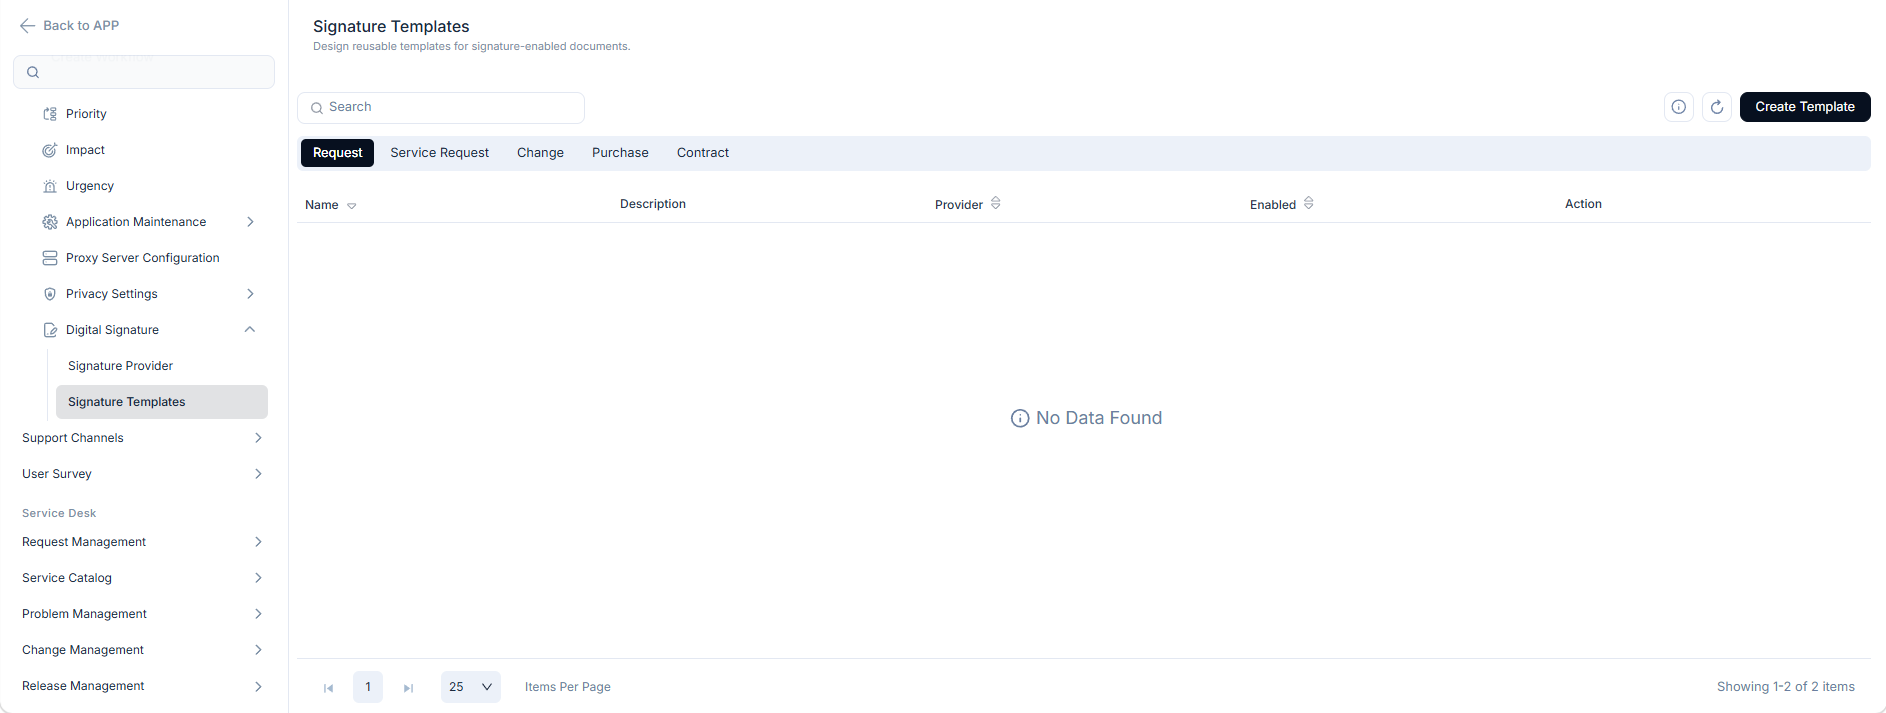
The page has the following controls:
- Search: Filter templates by name.
- Refresh: Reload the template list to reflect any recent changes.
- Module filter tabs: Show templates for a specific module. Select Request, Service Request, Change, Purchase, or Contract to filter the list. Only templates assigned to the selected module appear.
- Create Template: Open the two-step template wizard to add a new template.
- Help: Open the contextual help panel for guidance on creating and managing signature templates.
The template list displays the following columns:
| Column | Description |
|---|---|
| Name | Template name shown in the signature request dialog when a technician sends a request. |
| Description | Optional description of the template's purpose. |
| Provider | Signature provider this template uses. |
| Enabled | Toggle to activate or deactivate the template. A green toggle means the template is active and appears in the signature request dialog. |
| Action | Edit the template (pencil icon), duplicate it (copy icon), or delete it (trash icon). |
Create a Signature Template
Click Create Template to open the two-step template wizard.
Step 1: Template Details
Enter the basic information for the template.
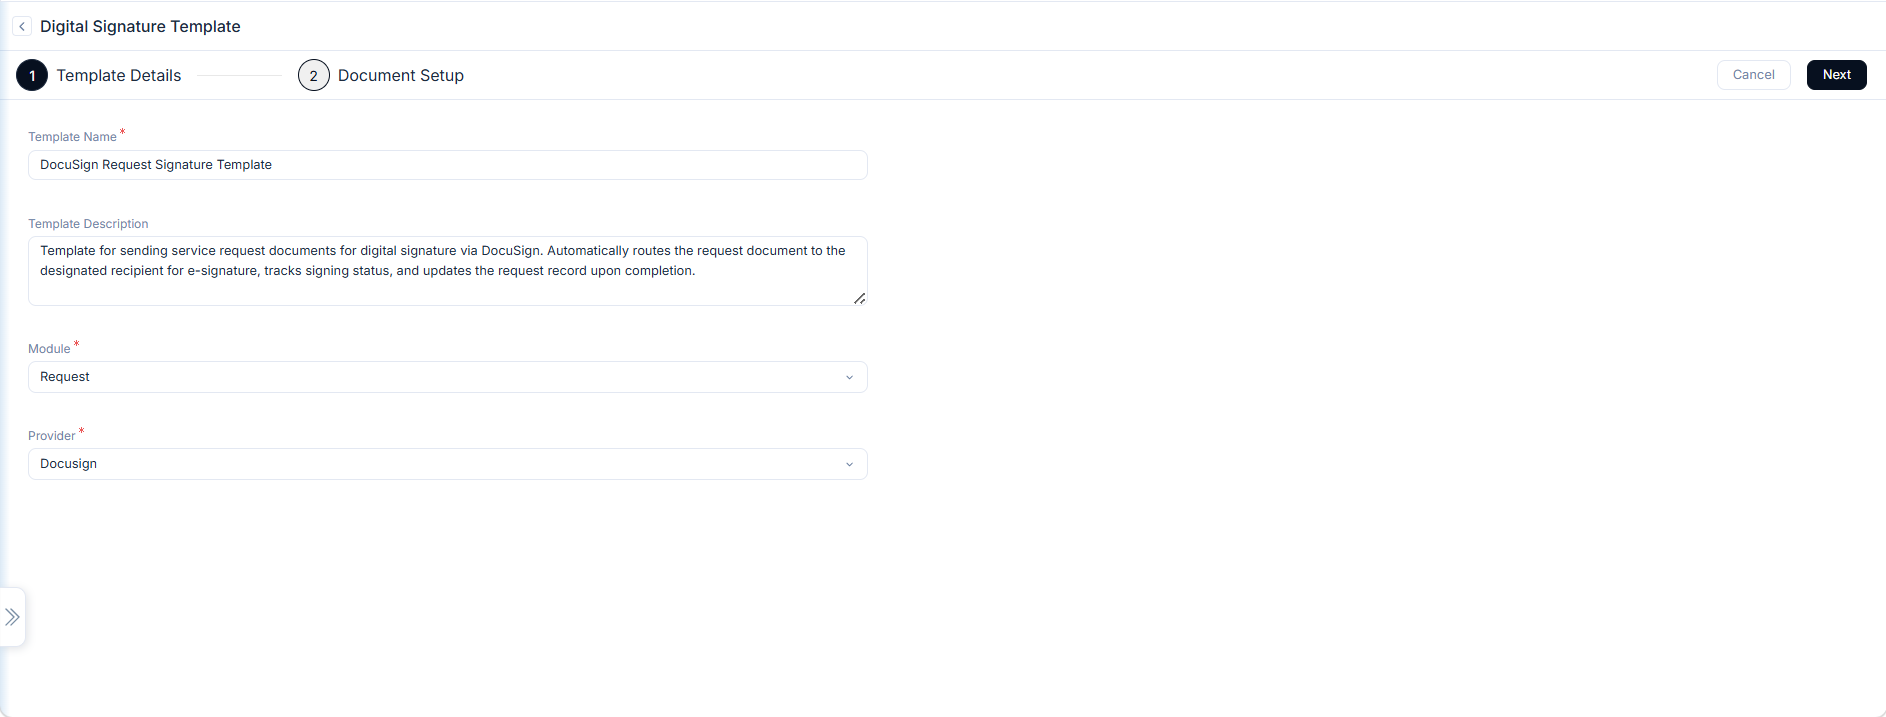
Fill in the following fields:
- Template Name: Enter the name shown in the template selector when a technician sends a signature request. Required.
- Template Description: Enter an optional description of the template's purpose.
- Module: Select the module this template applies to: Request, Service Request, Change, Purchase, or Contract. The template appears only in signature request dialogs for its assigned module. Required.
- Provider: Select the signature provider to use with this template. Only active providers appear in this list. Required.
A template can only be assigned to one module at a time. If you need the same document layout across multiple modules, duplicate the template and change the Module setting on each copy.
Click Next to proceed to Document Setup. Click Cancel to discard and return to the template list.
Step 2: Document Setup
Design the document content and define who must sign it.
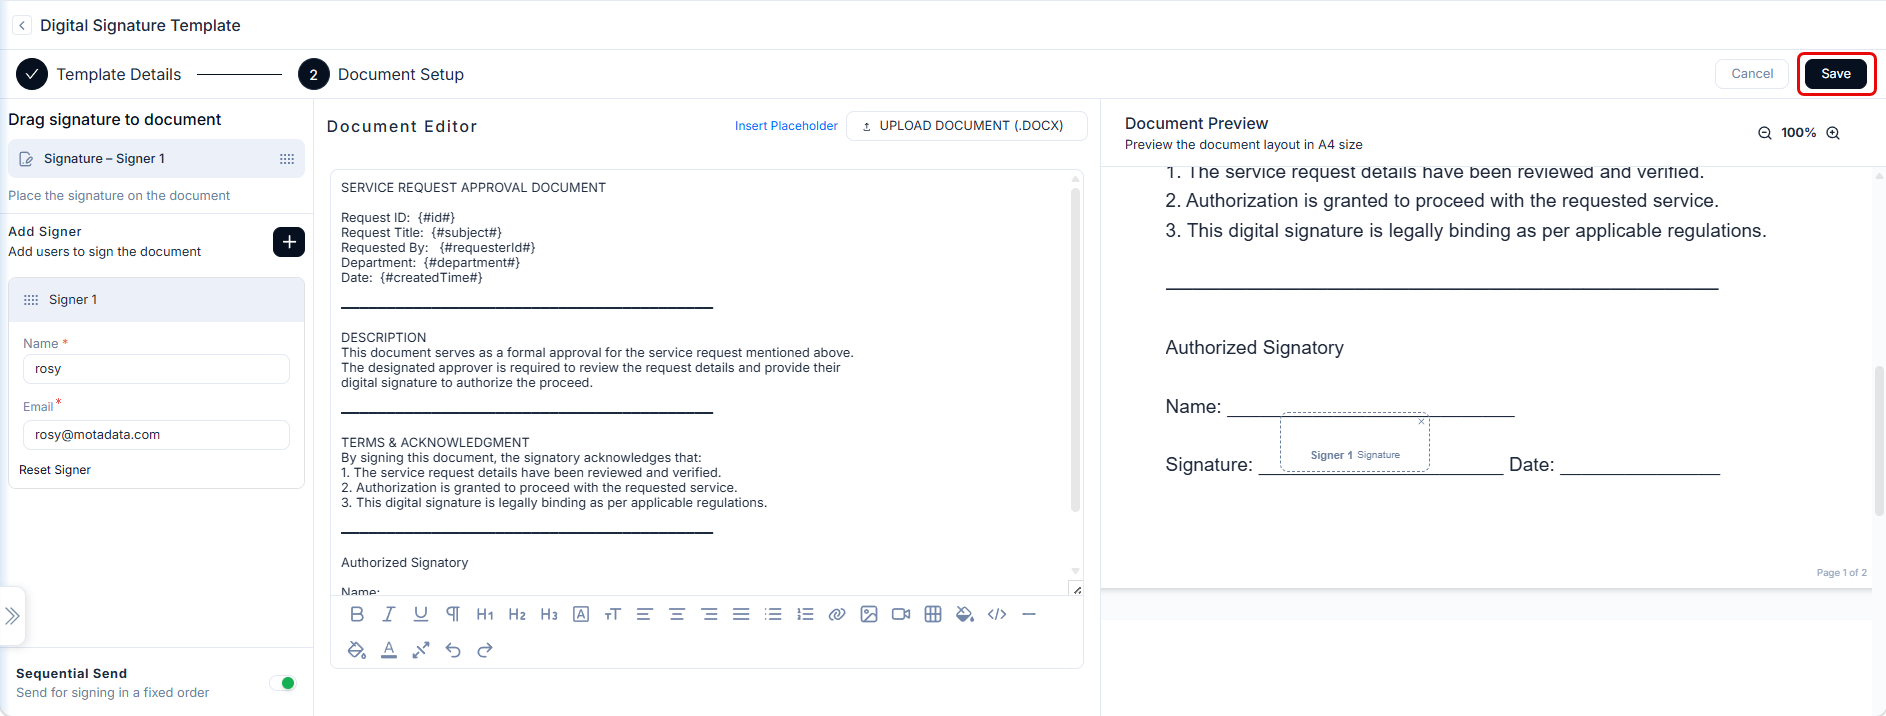
The page has three panels:
Left panel: Signature and Signers
Signature - Signer 1: Drag this element and drop it onto the Document Preview to position where the signer's signature will appear on the document.
Add Signer: Click the + button to add a signer. Enter the signer's Name (required) and Email (required). Add multiple signers if the document requires more than one signature. Signers receive the request by email only. In-person or face-to-face signing is not supported.
Set Signer: Click the Set Signer button next to any added signer to open the Set Signer to panel. Only one signer can be selected at a time. Select any one of the following options:
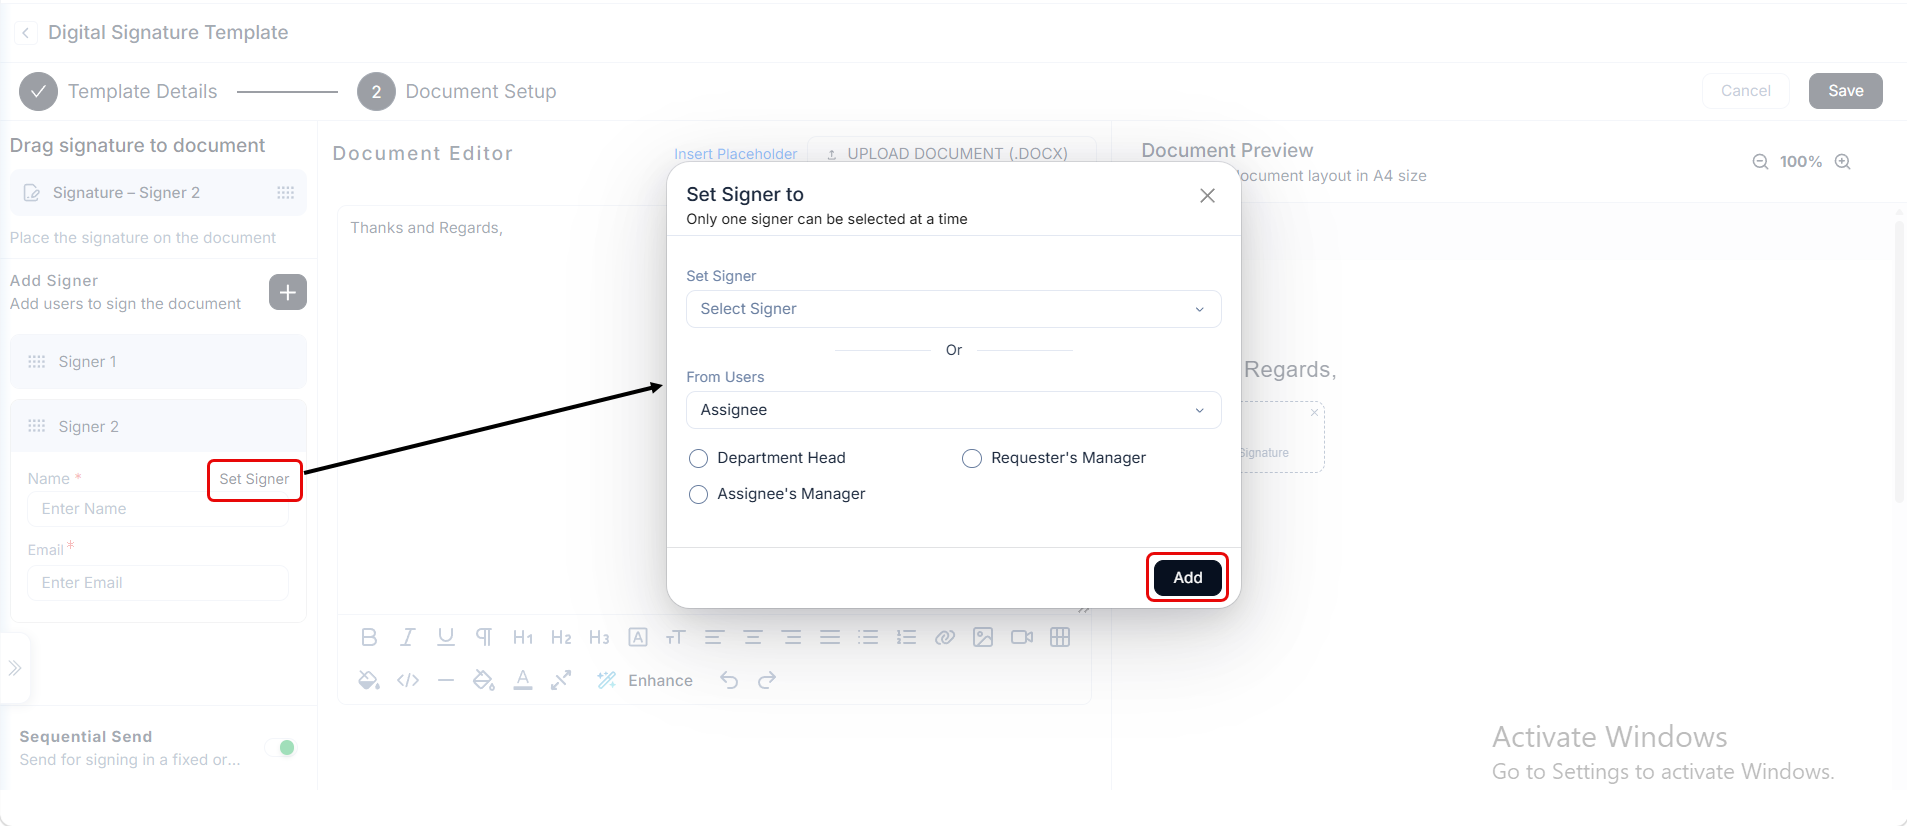
- Set Signer: Select a specific named individual from the dropdown.
- From Users: Select a role i.e. Assignee or Requester. ServiceOps resolves the selected role to the actual user when the signature request is sent.
- Department Head: Set the signer as the Department Head of the requester.
- Requester's Manager: Set the signer as the requester's direct manager.
- Assignee's Manager: Set the signer as the assignee's direct manager.
Click Add to confirm the selection.
Sequential Send: When enabled, DocuSign sends the document to each signer in order. The next signer receives the document after the previous signer completes their signature. Default: disabled.
Center: Document Editor
- Add Placeholder tab: Insert dynamic placeholders such as requester name, record ID, or department. ServiceOps fills these in automatically when a technician sends a signature request.
- Upload Document (DOCX) tab: Upload a Word document to use as the template body instead of writing content in the editor.
Right: Document Preview
Shows a live A4 preview of the document as you build it. Drop the Signature element from the left panel onto this panel to place the signature field at the correct position in the document.
Click Save to create the template.
Using Workflows with Digital Signatures
ServiceOps workflows can trigger signature requests automatically, so technicians don't need to send them manually. This is useful for workflows with a predictable approval step, such as sending a CAB sign-off request every time a change reaches the Pending Approval state.
To set this up, create a workflow in Admin > Automation > Workflow that targets the relevant module (for example, Change). Set the trigger to a state change or field update, then add a Request Signature action and select the template to use. When the workflow fires, ServiceOps sends the signature request without any manual action from the technician.
The signature provider must be active and the selected template must be enabled before the workflow can send requests. If either is inactive when the workflow fires, the action fails silently.
See Workflows for full configuration steps.
Monitoring Signature Status in Dashboards and Reports
Technicians and admins can track signature progress across requests using the Signature Status field as a condition in both KPI widgets on dashboards and filters in Summary Reports.
The following status values are available:
| Status | What It Means |
|---|---|
| In Progress | A signature request has been sent and is awaiting one or more signers. |
| Completed | All signers have signed the document. |
| Not Requested | No signature request has been sent for this record. |
Signature Details in Summary Reports
Admins and technicians can include signature data in Summary Reports by adding Signer Detail and Signature Detail as columns when creating or editing a report.
Navigate to Reports > Create Report, set Type to Summary, and click Select Columns under the Columns section. Add the following columns:
Signer Detail: Shows one row per signer on the signature request, with the following sub-fields:
| Sub-field | What It Shows |
|---|---|
| Signer | Email address of the signer. |
| Signer Status | Current signing status for this individual signer, for example Signed or Sent. |
| Signed By | Email address of the person who completed the signature. |
| Signer Signed Time | Date and time the signer completed the signature. |
Signature Detail: Shows one row per signature request on the record, with the following sub-fields:
| Sub-field | What It Shows |
|---|---|
| Template | Name of the signature template used for this request. |
| Digital Signature Status | Overall status of the signature request, for example Completed or In Progress. |
| Created By | Name of the technician who sent the signature request. |
| Created Time | Date and time the signature request was created. |
Use these columns to audit signing activity, track outstanding signatures across records, and export signer data for compliance or handover reporting.
Next Steps
Once you have added a provider and created at least one template, technicians can start sending signature requests from any record detail page. Share the following guides with your team:
- Send a signature request on a request or service request: covers incidents and service requests
- Send a signature request on a change: covers change records
- Send a signature request on a purchase order: covers purchase orders
- Send a signature request on a contract: covers contracts
To control who can send, view, and delete signature requests, update your role permissions under Roles and enable Request Signatures, View Signatures, and Delete Signatures for the relevant roles.
Example
An HR team uses ServiceOps to handle new employee onboarding through a service catalog item. Before the IT team provisions access and equipment, HR requires the new hire to sign an Acceptable Use Policy. Here is how an admin sets it up:
- Navigate to Admin > Organization > Digital Signature and click Add Provider. Enter the DocuSign credentials and click Save.
- Click the Signature Templates tab and click Create Template.
- In Step 1, enter a template name such as "Onboarding: Acceptable Use Policy", set Module to Request, and select the DocuSign provider. Click Next.
- In Step 2, write the policy document body in the Document Editor. Include the employee's name and start date as dynamic fields pulled from the service request.
- Under Add Signer, enter the new hire's name and email address.
- Drag the Signature element from the left panel and drop it onto the Document Preview where the new hire must sign.
- Click Save.
When HR submits the onboarding service request, the assigned technician opens the record, clicks More Actions, selects Request Signature, picks this template, and clicks Send. The new hire receives a DocuSign email with the policy pre-filled and signs from any device without needing a DocuSign account. The signed document attaches to the service request automatically, giving HR a verifiable record before IT provisioning begins.
Troubleshooting
Common issues when configuring the Digital Signature provider and templates.
Provider shows "Cannot connect to service" after saving
Cause: Either DocuSign has not granted access consent for the configured User ID, or the RSA Private Key was pasted without line breaks.
Fix: Complete the consent grant step by opening the DocuSign OAuth authorization URL in a browser and clicking Allow. Then re-open the provider form, repaste the RSA Private Key with all line breaks intact, and click Save. See Configure DocuSign for Digital Signature for the exact steps.
Signature status stays "Sent" and never updates on the record
Cause: The DocuSign Connect webhook cannot reach your ServiceOps server, so signing events are never delivered.
Fix: Verify that your ServiceOps server is publicly reachable over HTTPS on port 443. Check the Connect Logs in DocuSign Admin and confirm the webhook URL (https://<your-serviceops-url>/api/docusign/webhook) returns HTTP 200. If it returns 404, correct the URL in your DocuSign Connect configuration.
Template does not appear in the Request Signature dialog
Cause: The template's Module does not match the current record type, or the template is disabled.
Fix: Open the template and confirm the Module matches the record type you are working in (for example, set it to Request for incidents). Confirm the Enabled toggle is ON.
Provider saves successfully but signing requests fail with "Cannot authenticate"
Cause: The DocuSign OAuth consent was not granted for the configured User ID, or the consent has expired. DocuSign requires explicit consent before ServiceOps can act on behalf of the user account.
Fix: Open the DocuSign OAuth authorization URL in a browser while logged in as the DocuSign admin user and click Allow. See Configure DocuSign for Digital Signature for the exact consent URL and steps. If consent was previously granted, it may have expired: repeat the consent step to re-authorize.
Webhook events fail with HTTP 401 after enabling HMAC verification
Cause: The HMAC secret entered in ServiceOps does not match the secret configured in DocuSign Connect, so ServiceOps rejects incoming webhook payloads as unauthorized.
Fix: Open the provider form in ServiceOps and re-enter the HMAC Secret exactly as it appears in your DocuSign Connect configuration. Copy the value directly from DocuSign to avoid transcription errors. Save the provider and test by sending a new signature request.