How to Configure DocuSign for Digital Signature in ServiceOps
Connect DocuSign to ServiceOps so technicians can send documents for e-signature directly from any request, change, purchase order, or contract record.
Prerequisites
- Admin access to ServiceOps
- A DocuSign account: use a free developer account at
https://developers.docusign.com/for testing, or a production account athttps://account.docusign.comfor live use - ServiceOps server reachable over public HTTPS (port 443 open for outbound connections to
*.docusign.com) - The Manage Providers and Manage Templates permissions on your ServiceOps role. See Roles.
DocuSign uses separate environments for development/testing and production. Complete these steps in the same environment you intend to use. Credentials from the developer environment do not work in production.
Part A: Configure DocuSign
Complete the following steps in the DocuSign portal to create an app, generate credentials, and grant access consent.
Step 1: Log in to DocuSign
Go to https://account-d.docusign.com (developer) or https://account.docusign.com (production) and log in.
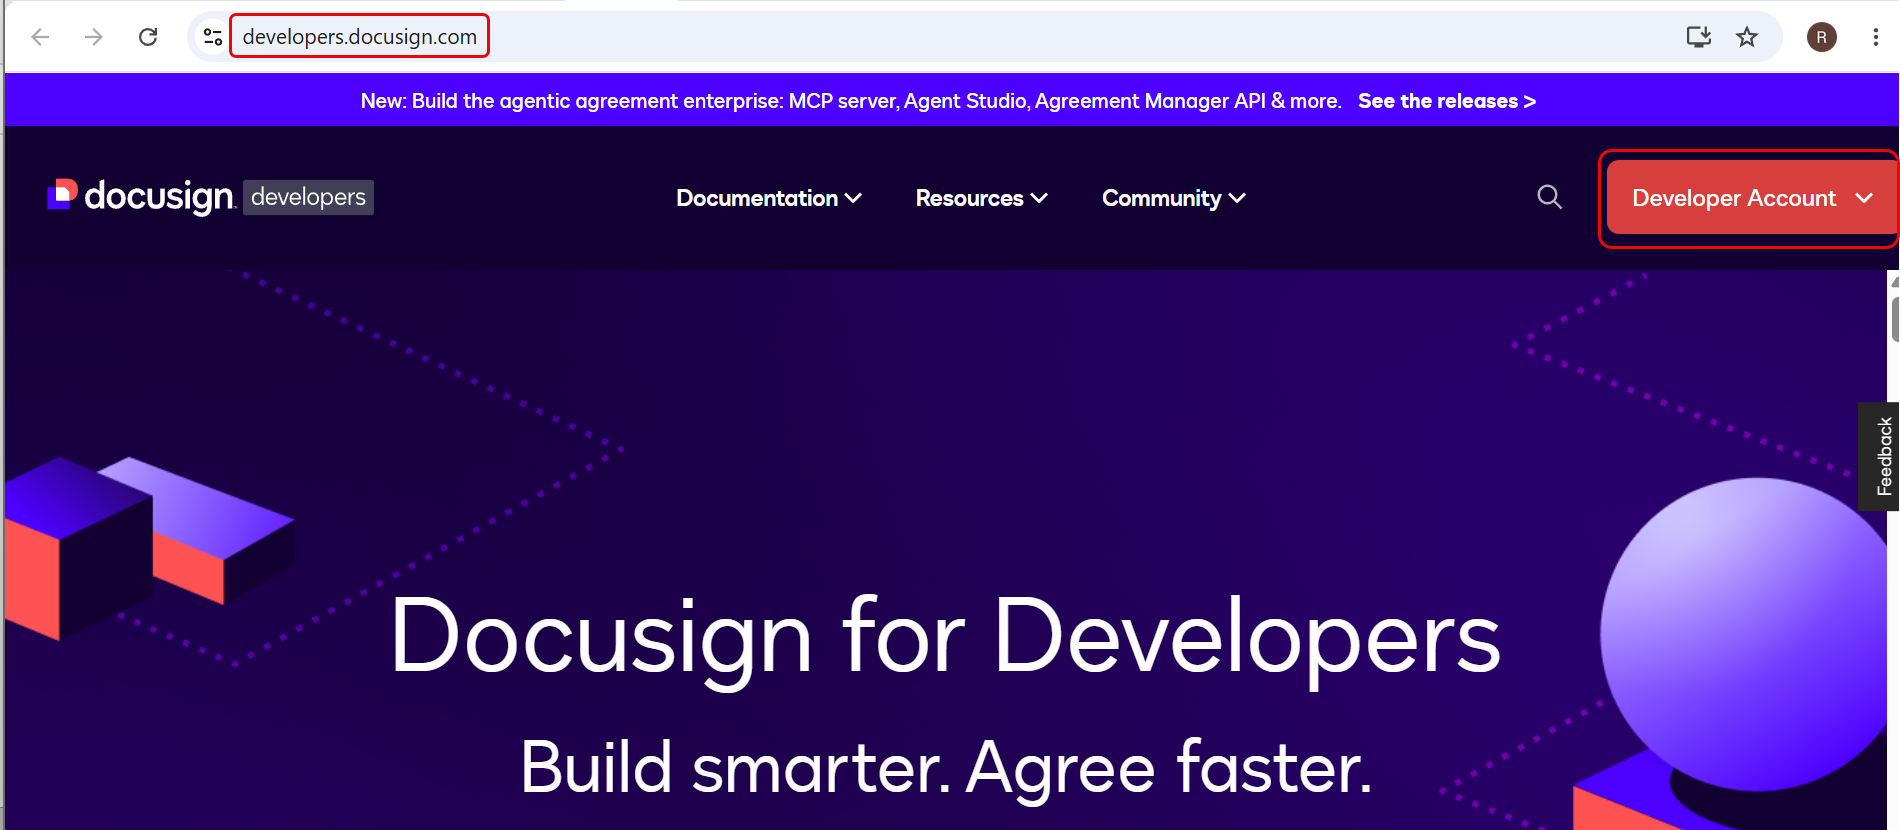
If you do not have a DocuSign account yet, go to https://developers.docusign.com/, click Developer Account > Create account, and complete the registration form.
Fill in the registration form with the following details:
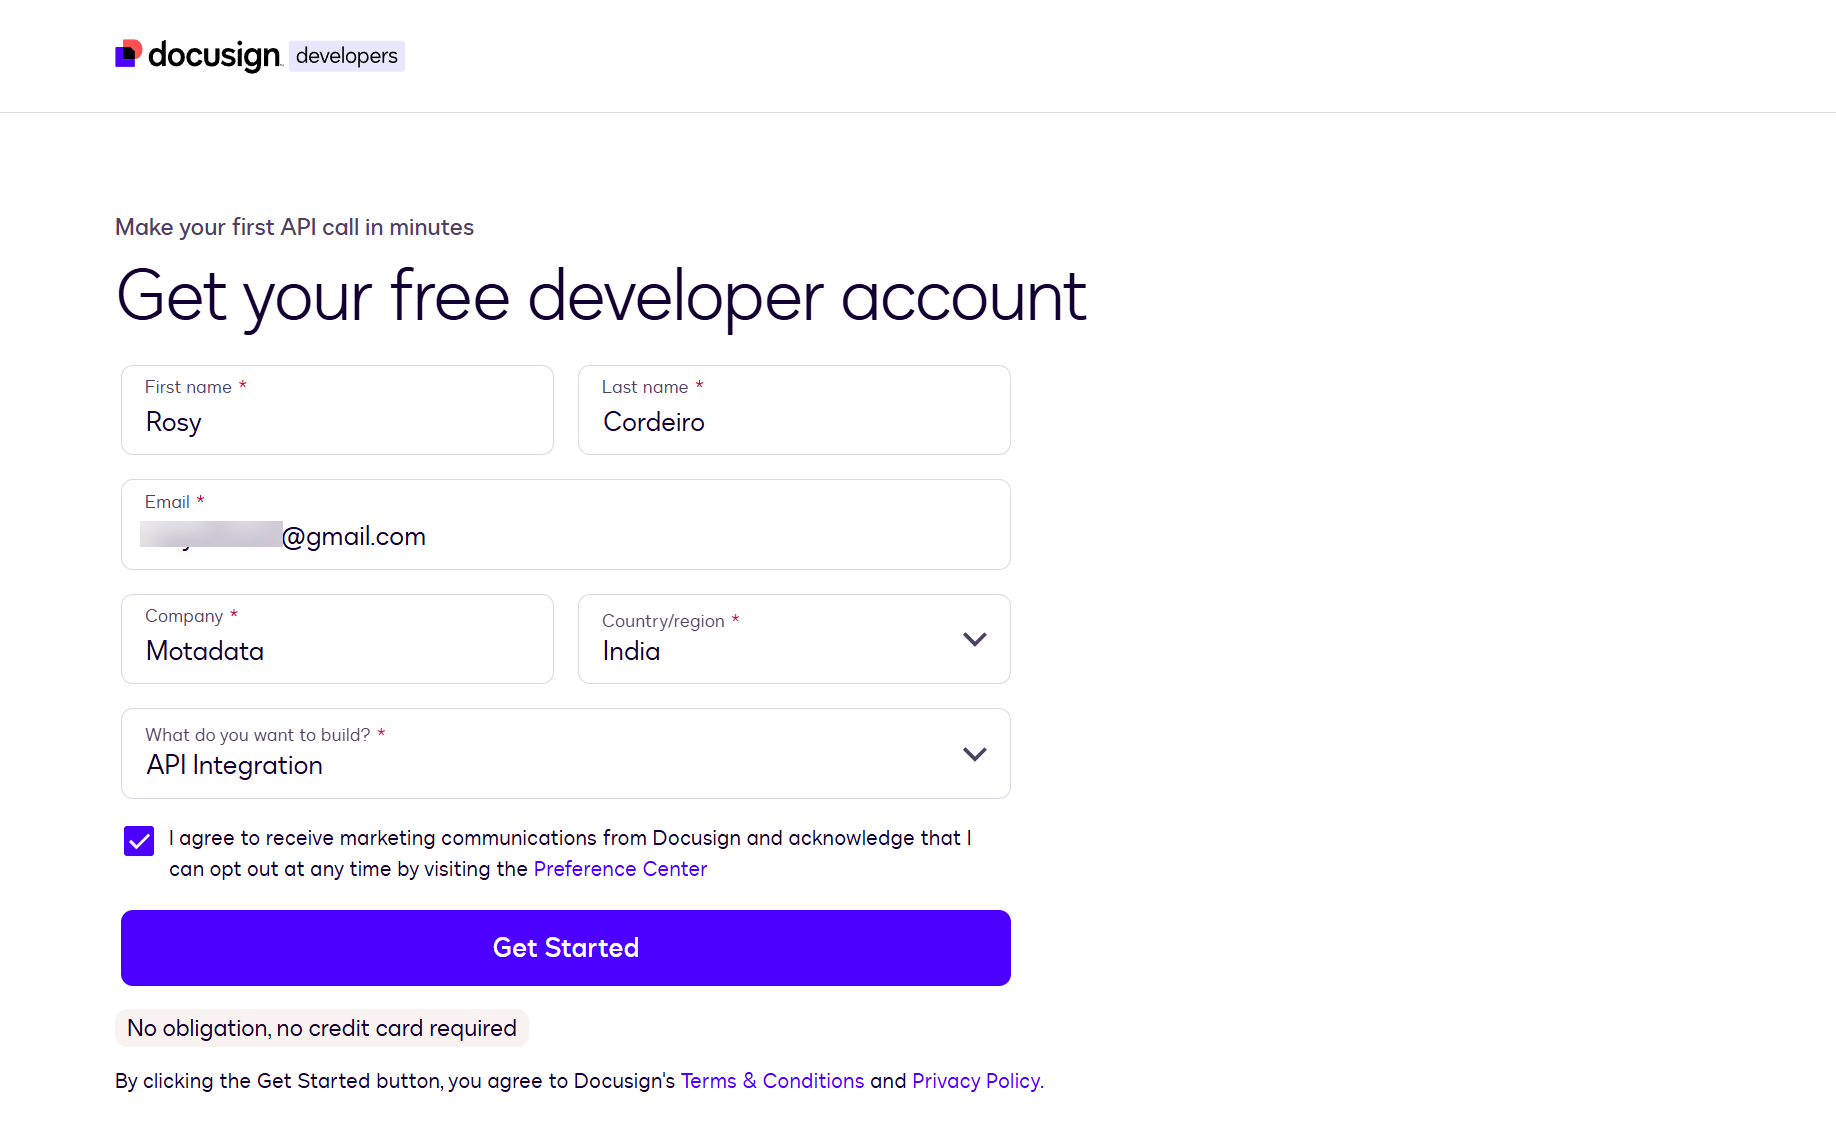
- First name: Enter your first name. Required.
- Last name: Enter your last name. Required.
- Email: Enter your work email address. Required.
- Company: Enter your company name. Required.
- Country/region: Select your country from the dropdown. Required.
- What do you want to build?: Select API Integration from the dropdown. Required.
- Agree: Check the box to agree to receive communications from DocuSign.
- Click Get Started.
After submitting the form, DocuSign asks you to select your role.
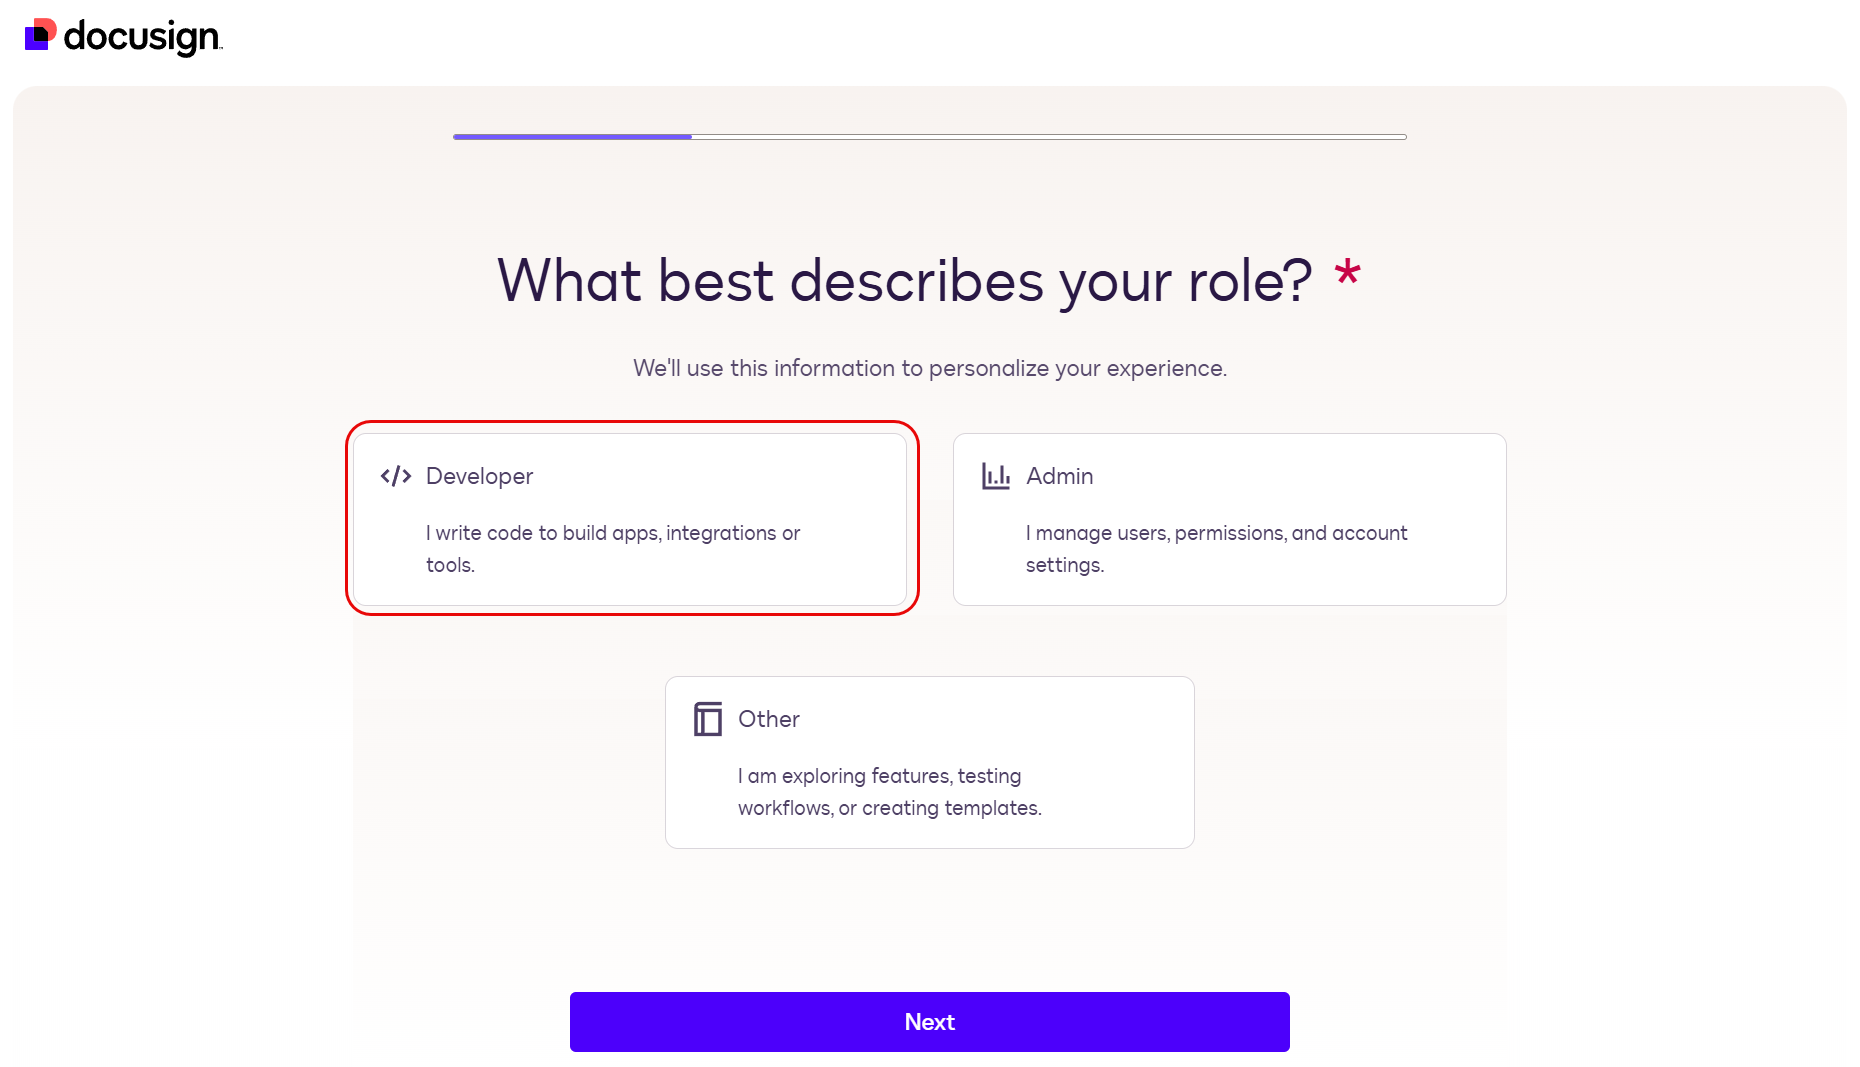
Select Developer and click Next.
DocuSign then asks you to select your industry.
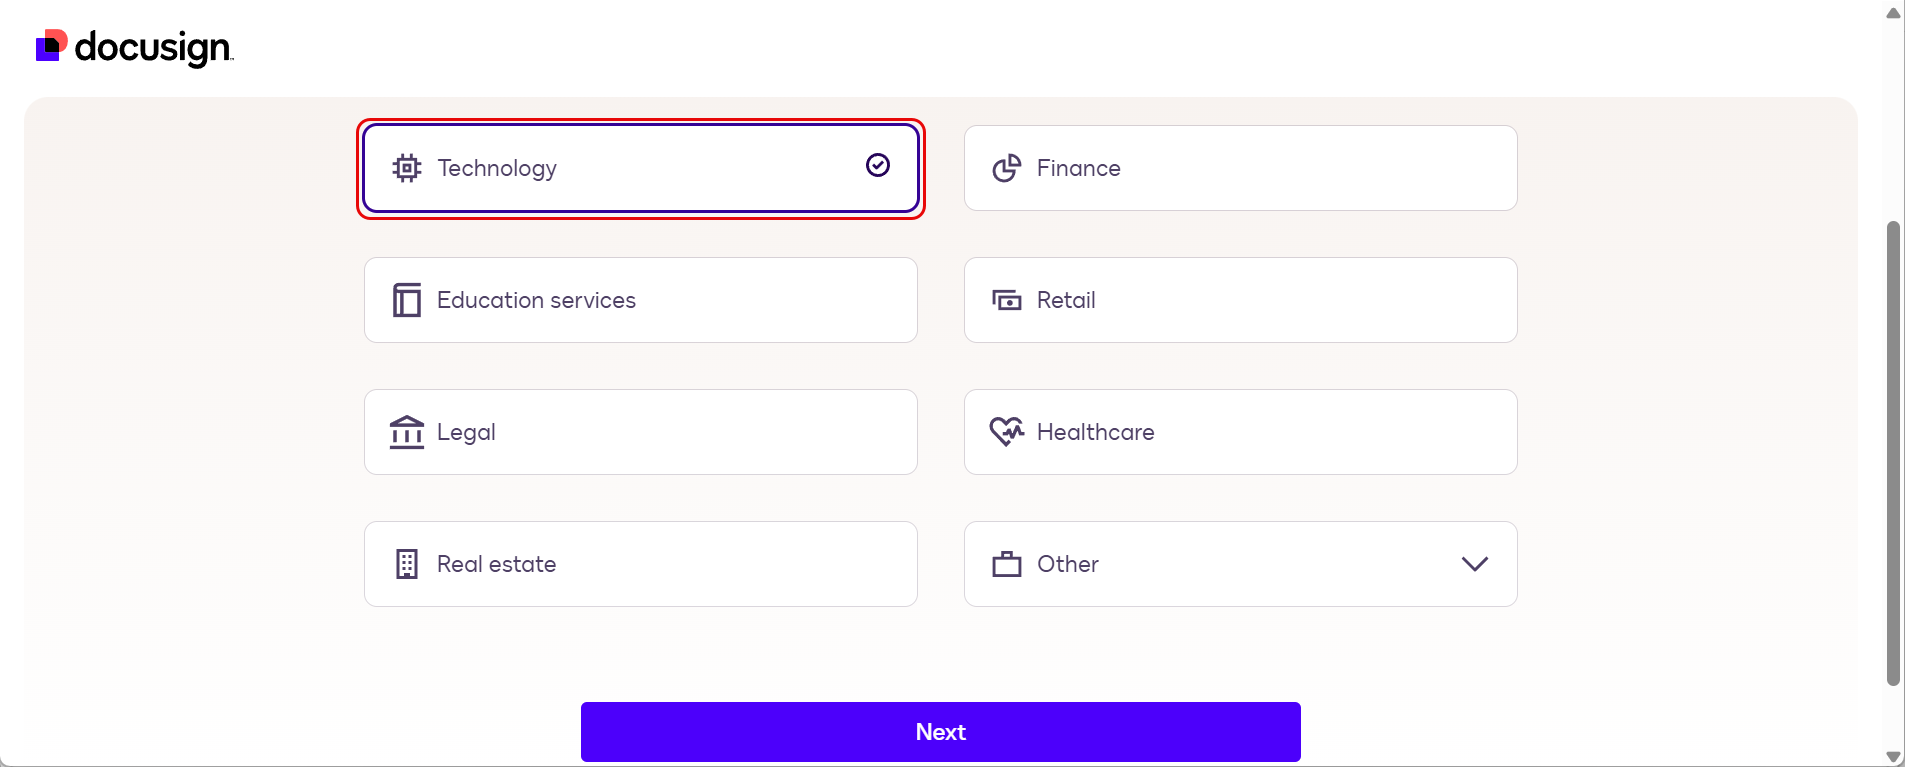
Select Technology and click Next.
DocuSign then asks what you want to build.
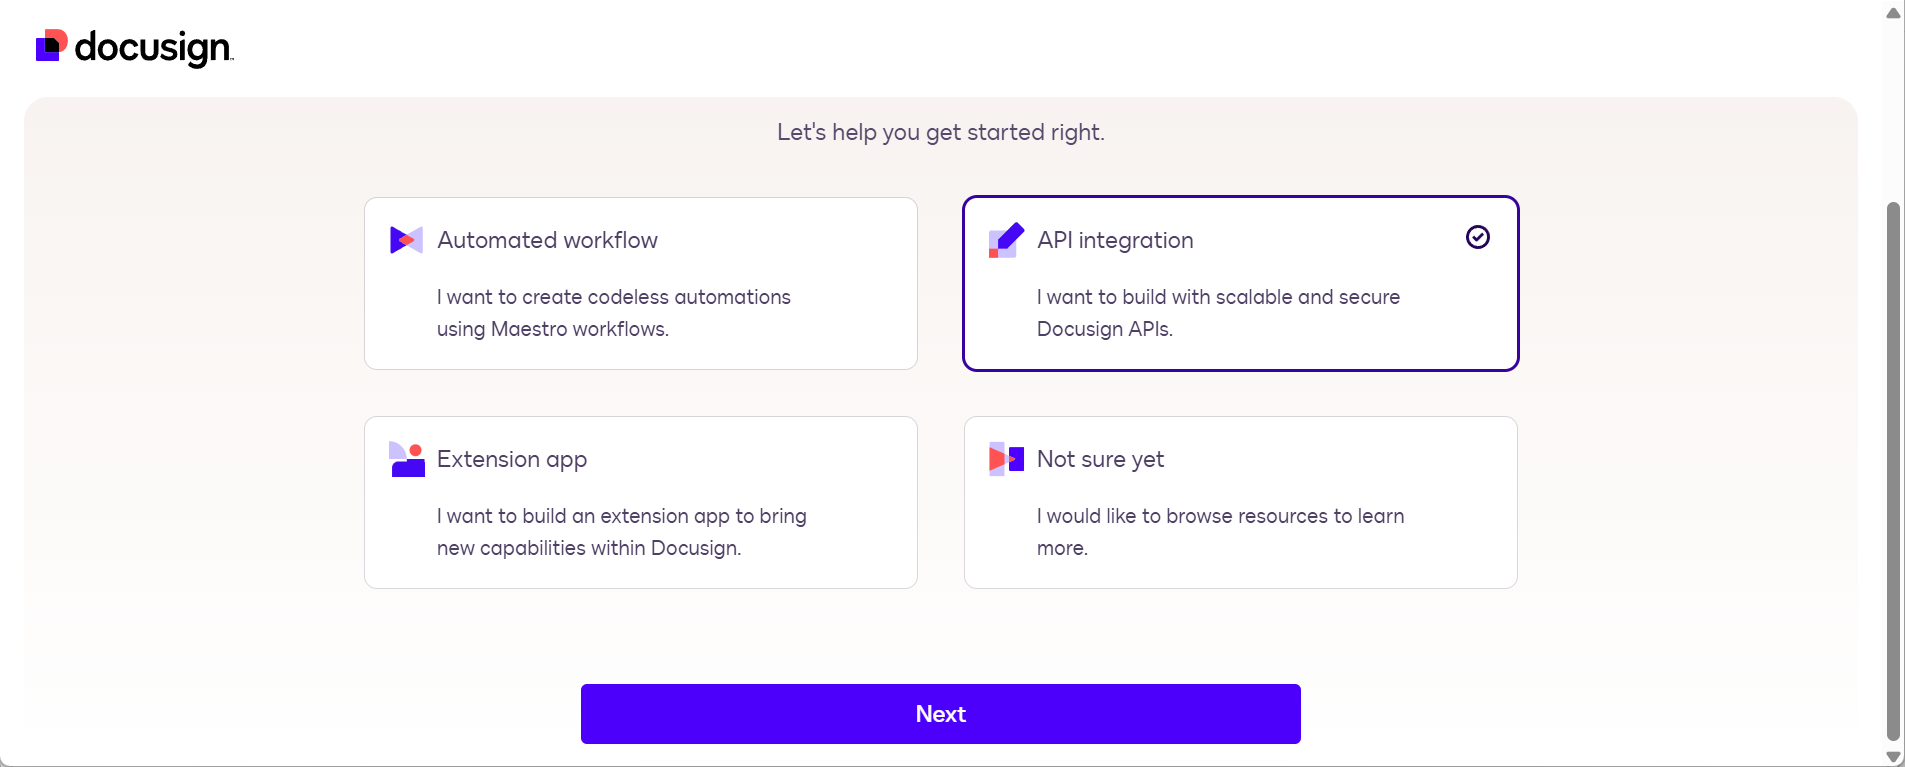
Select API integration and click Next.
DocuSign then asks who you are building this for.
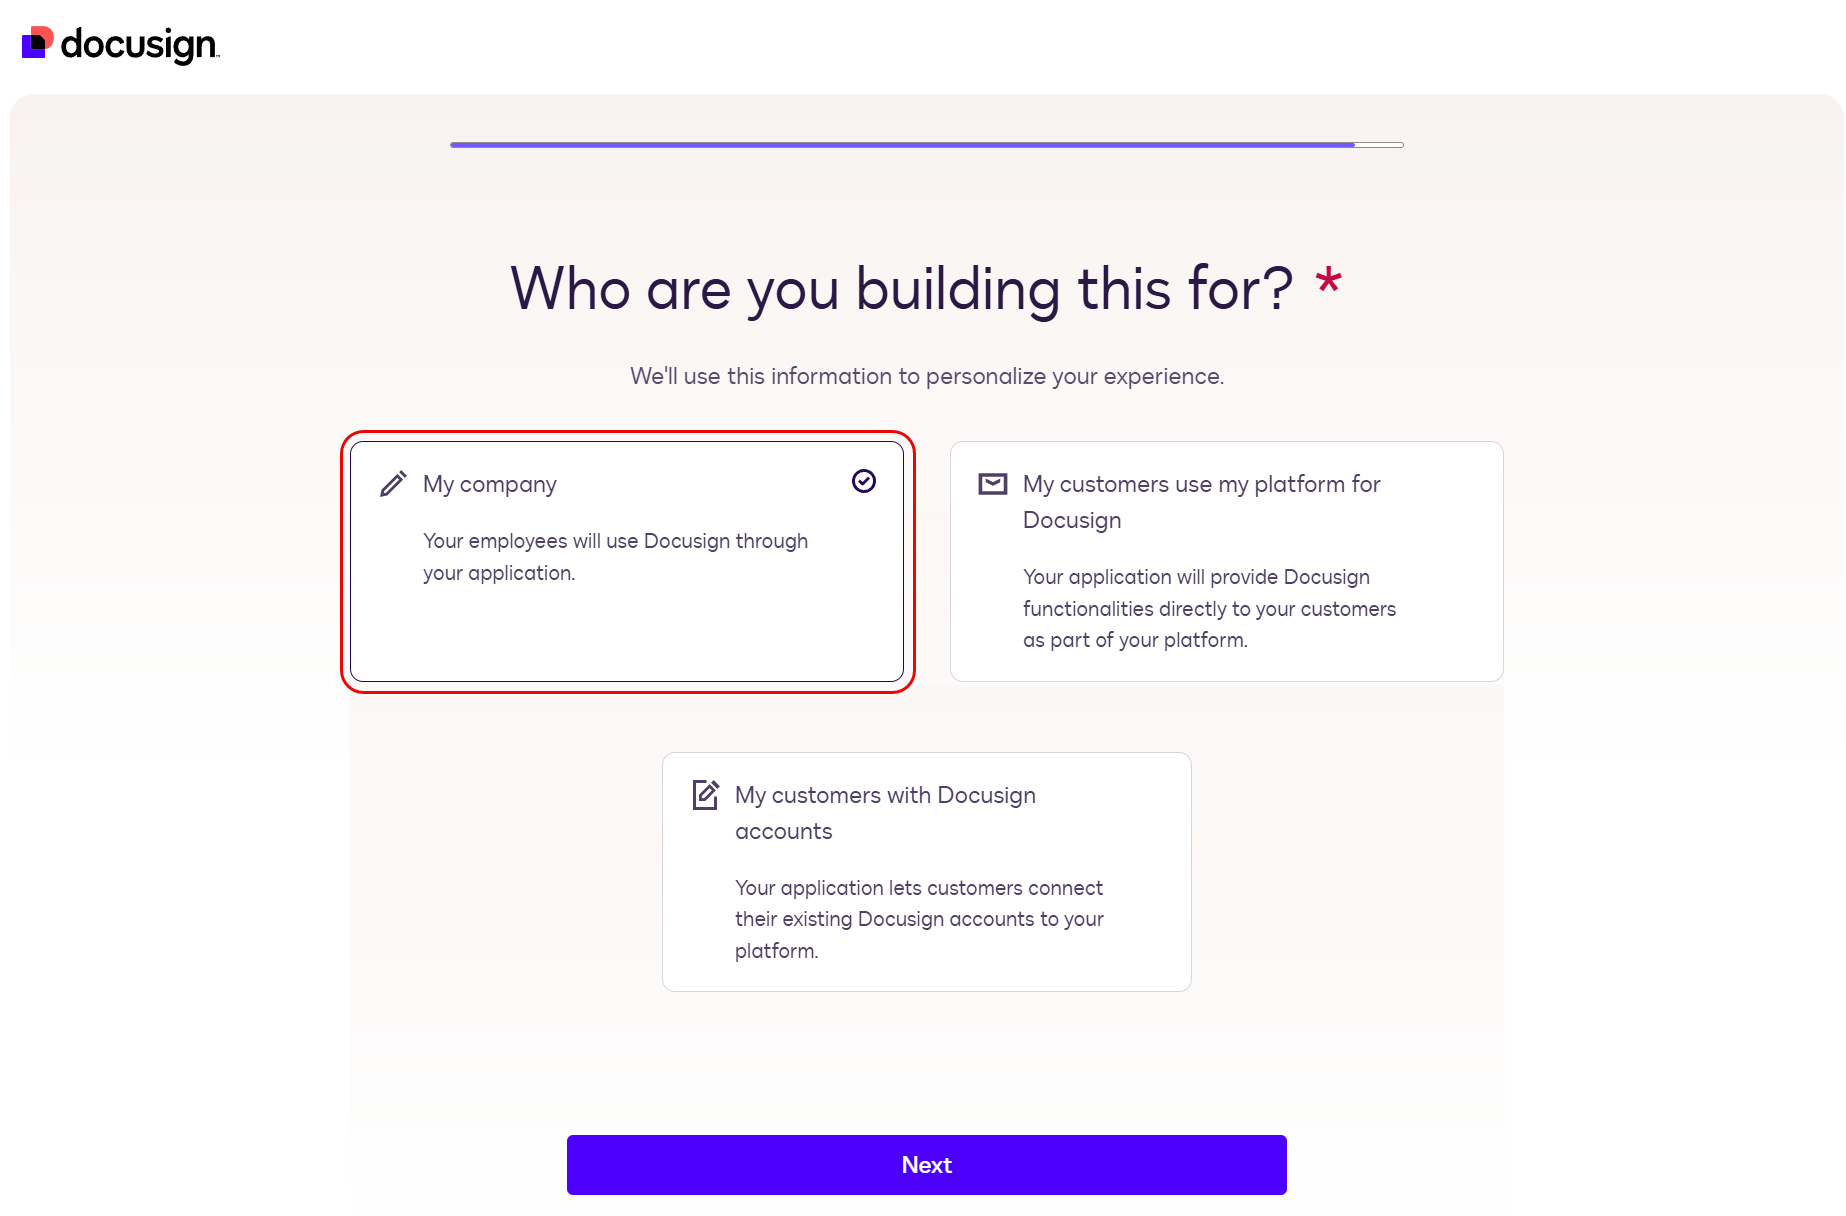
Select My company and click Next. DocuSign completes account setup and takes you to your developer dashboard.
Step 2: Create an Integration Key
An Integration Key identifies ServiceOps as an authorized application in DocuSign.
- Click your avatar (top-right corner) and select Settings.
- In the left navigation, under Integrations, click Apps and Keys.
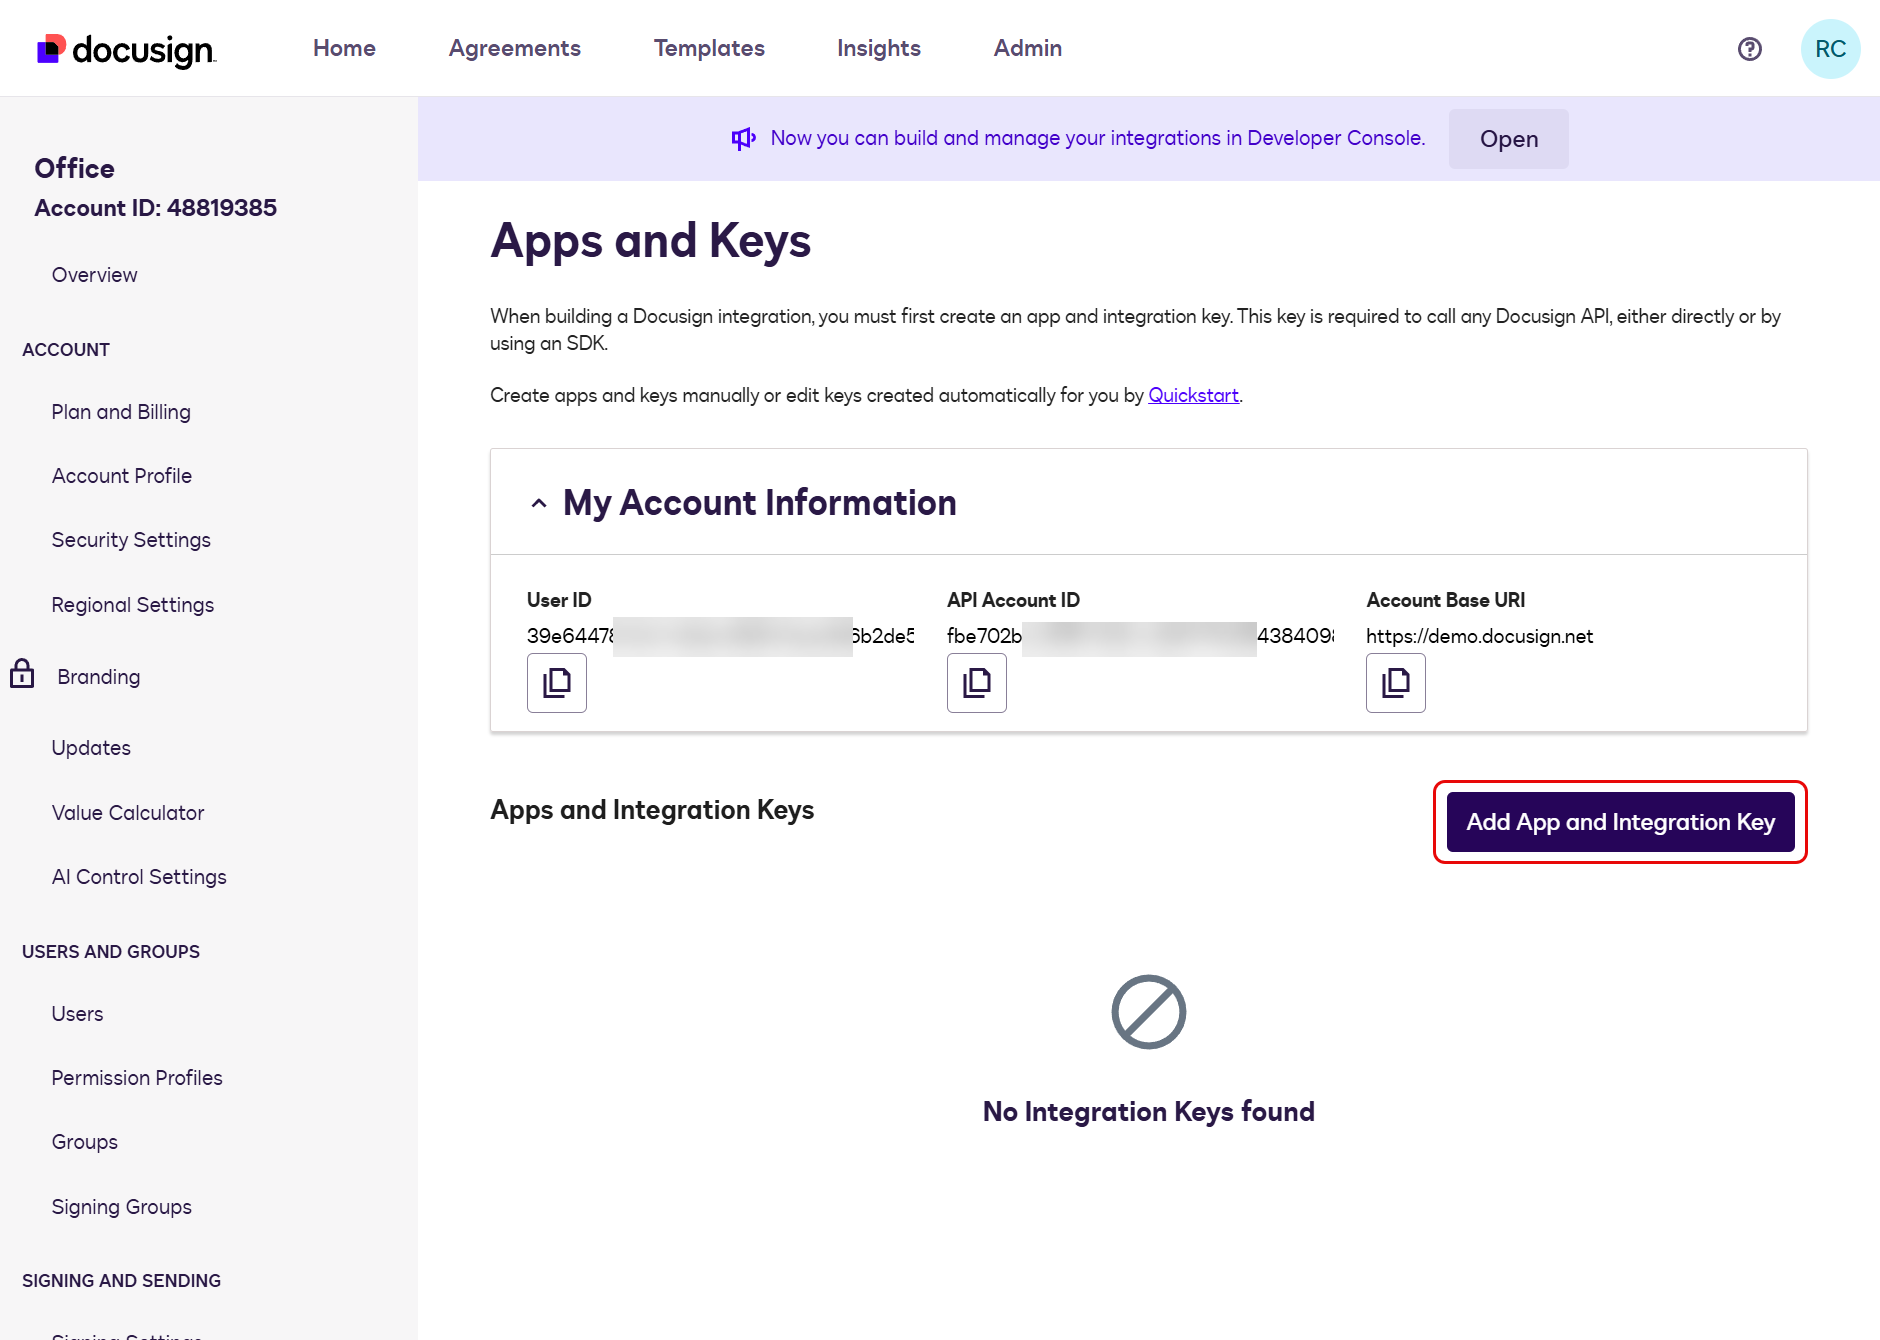
- Click Add App and Integration Key.
- Enter
ServiceOpsas the App Name. - Click Create App.
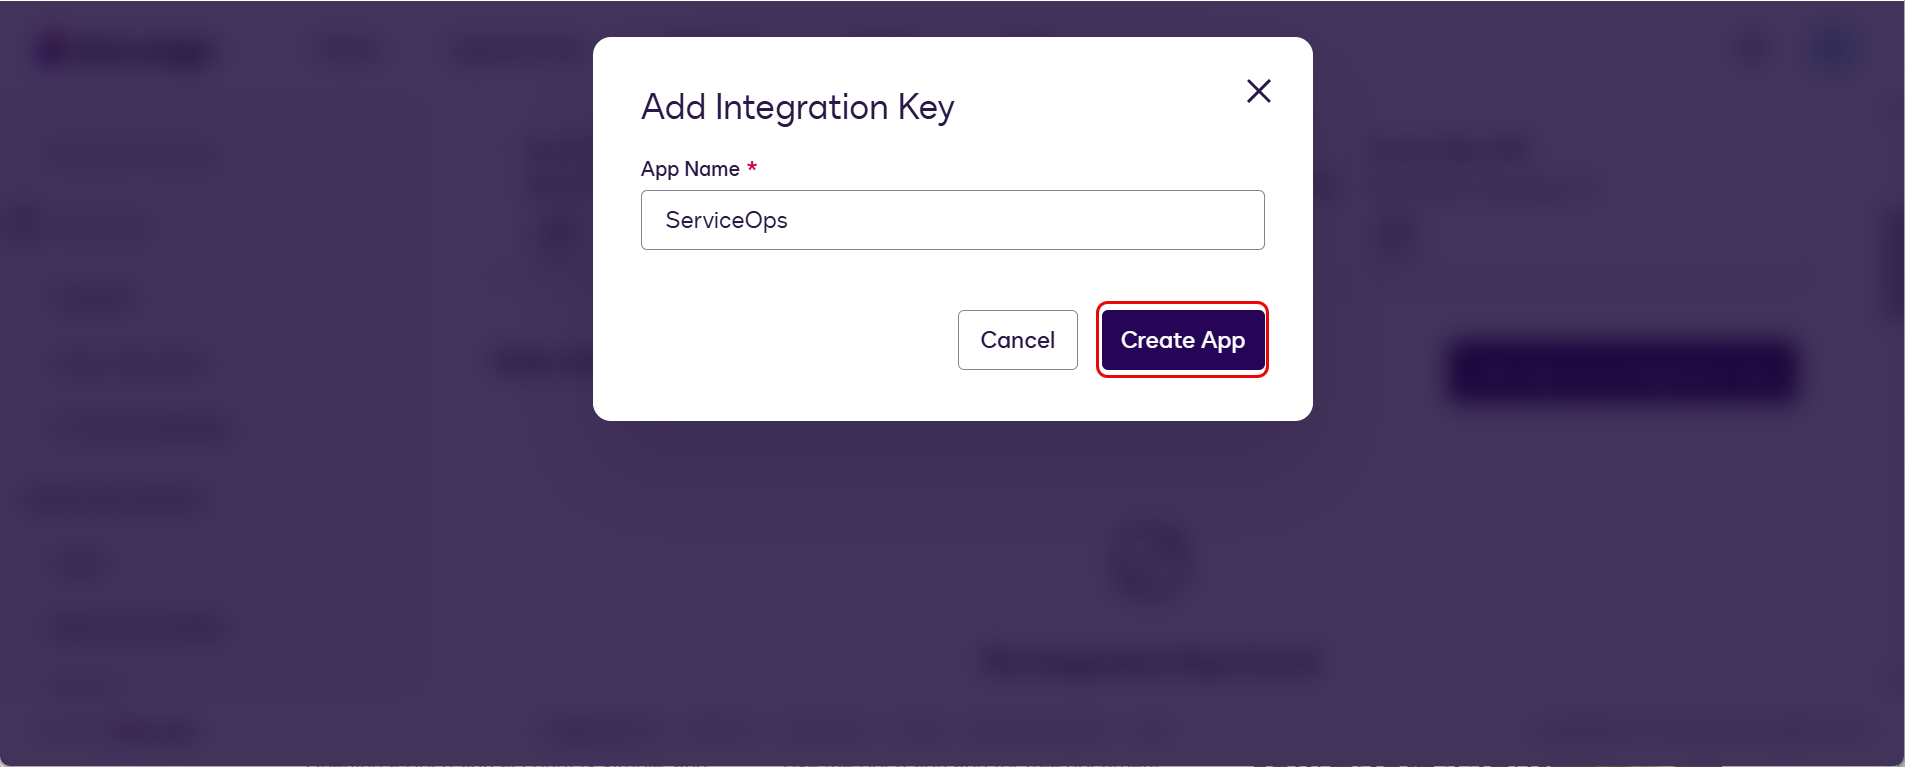
- The Integration Key (a GUID) is generated and displayed.
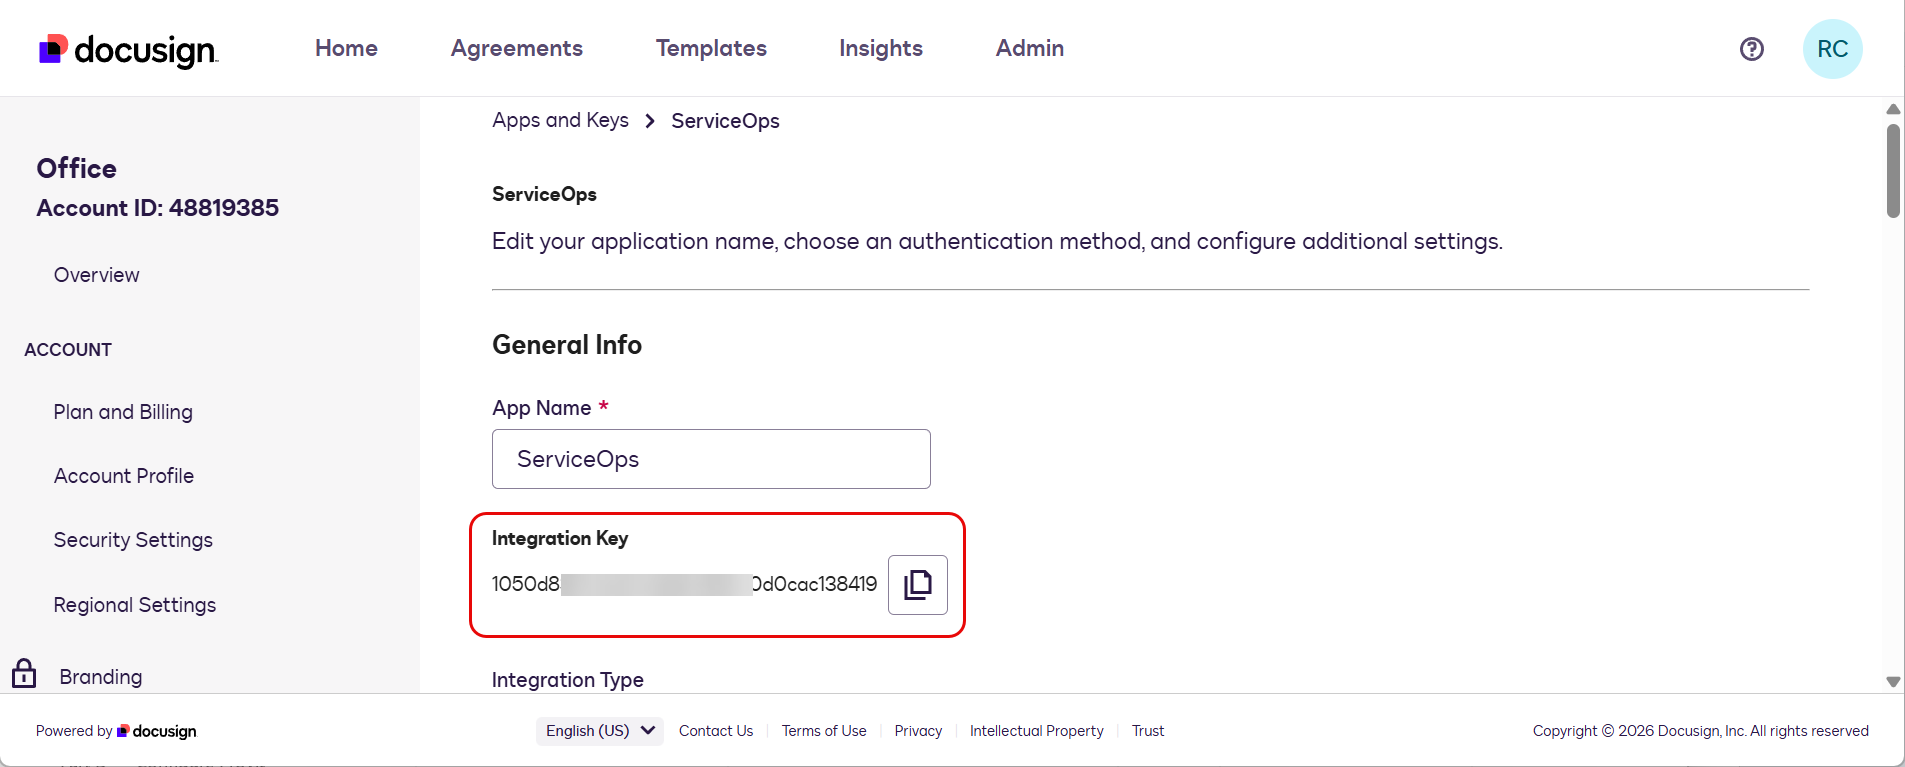
- Copy and save the Integration Key. You will need it in Part D.
Step 3: Enable Server Authentication and Generate an RSA Keypair
ServiceOps uses server-to-server authentication to connect with DocuSign securely.
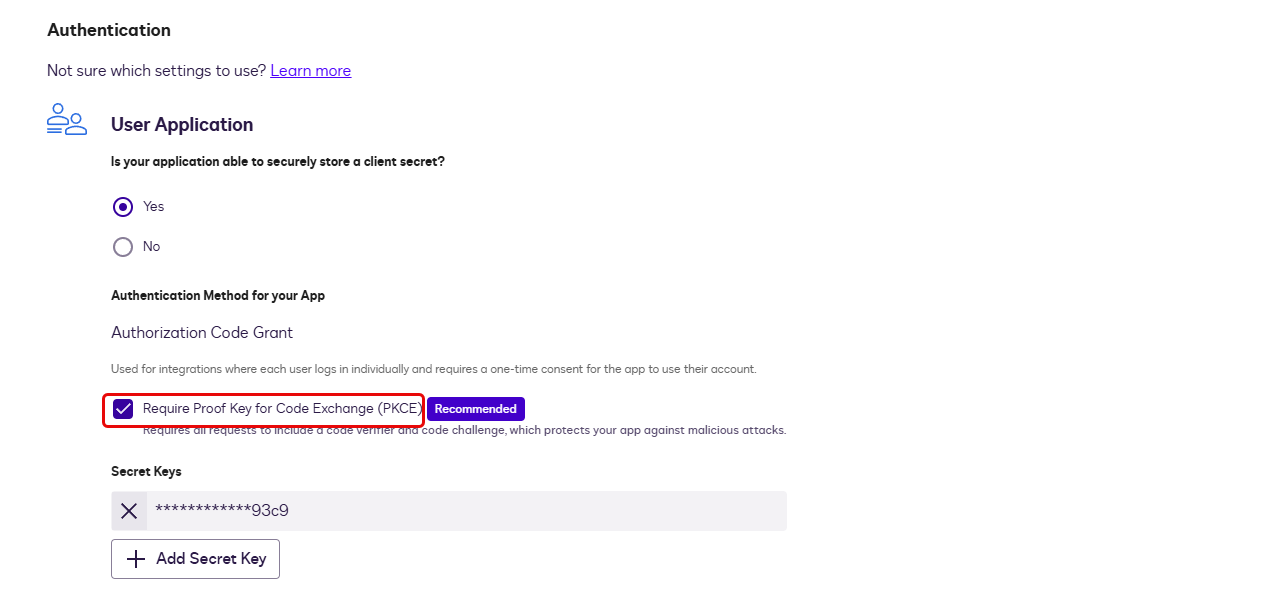
- On the apps page, under Authentication, enable Authorization Code Grant.
- Under Service Integration, click Generate RSA.
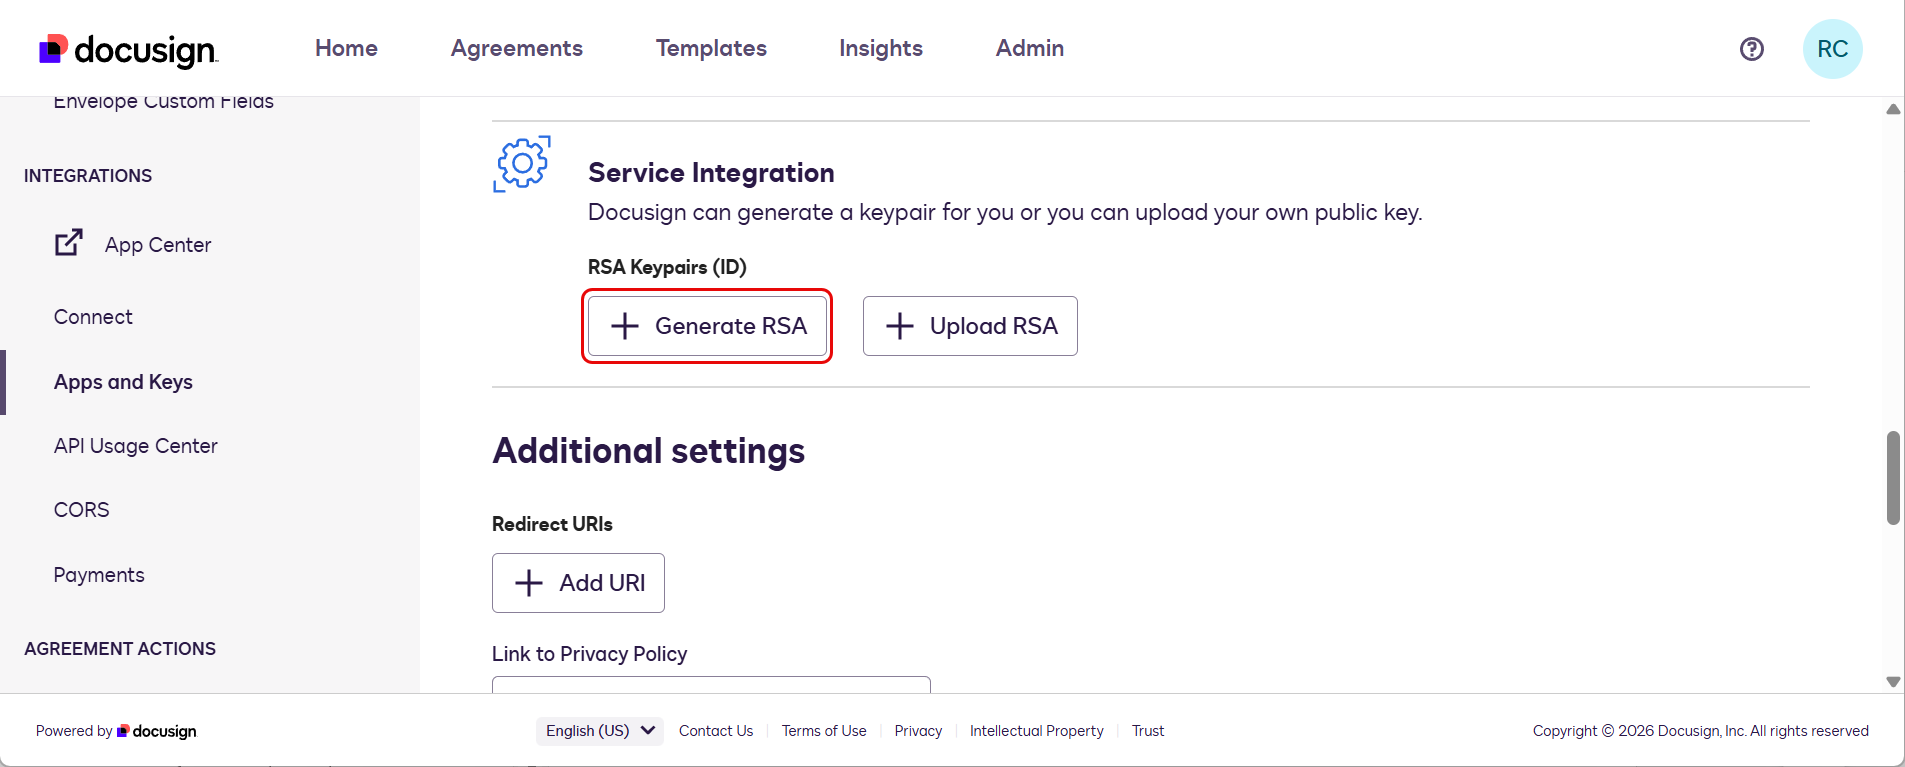
DocuSign generates a keypair and shows the private key.
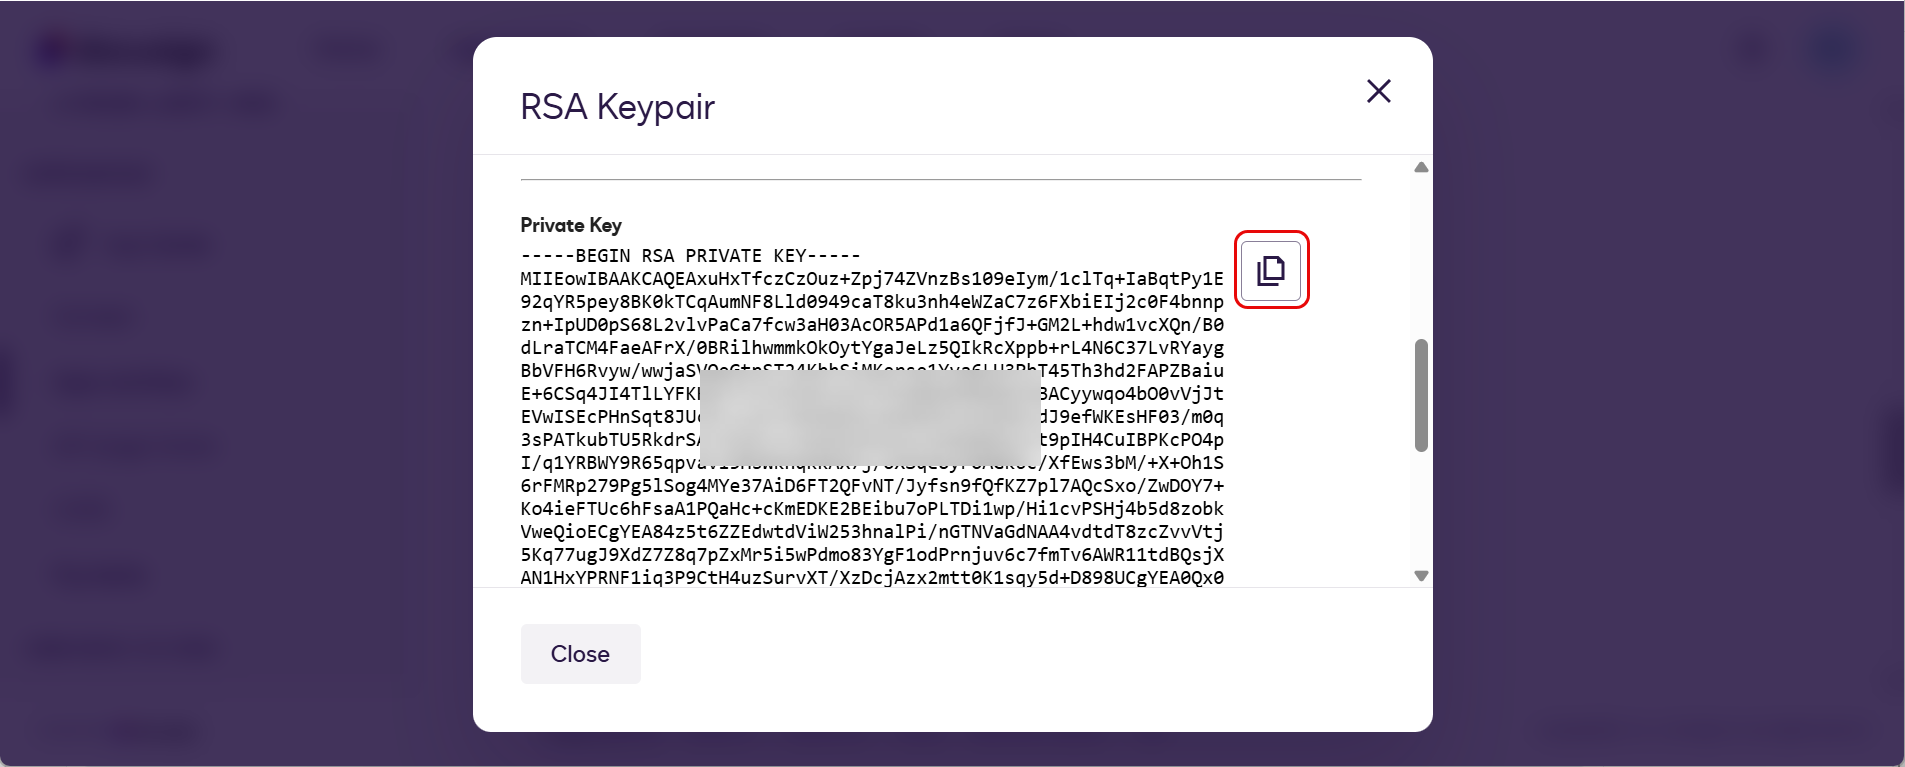
Copy the entire private key, including the -----BEGIN RSA PRIVATE KEY----- and -----END RSA PRIVATE KEY----- lines and all content between them. Save it securely. You will need it in Part D.
DocuSign shows the RSA private key only once at generation time. If you leave this page without copying it, you must delete the keypair and generate a new one.
Step 4: Add a Redirect URI
- On the app settings page, scroll to Additional Settings.
- Under Redirect URIs, click Add URI.
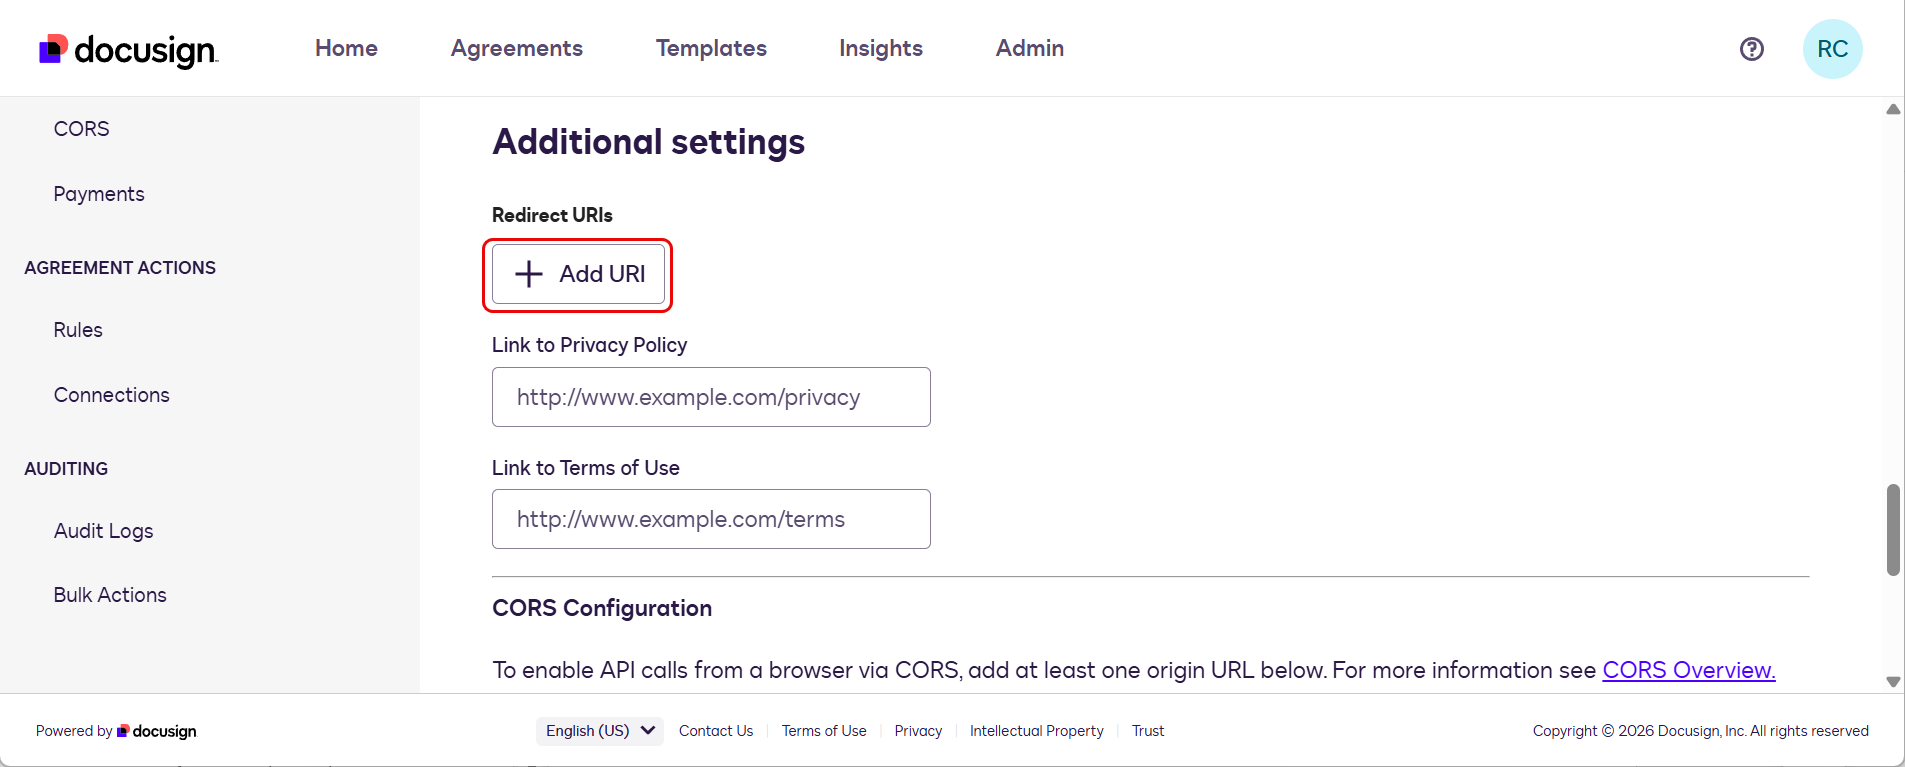
- Enter your ServiceOps public URL in this format:
https://<your-serviceops-url>/oauth/callback
For example: https://serviceops.example.com/oauth/callback
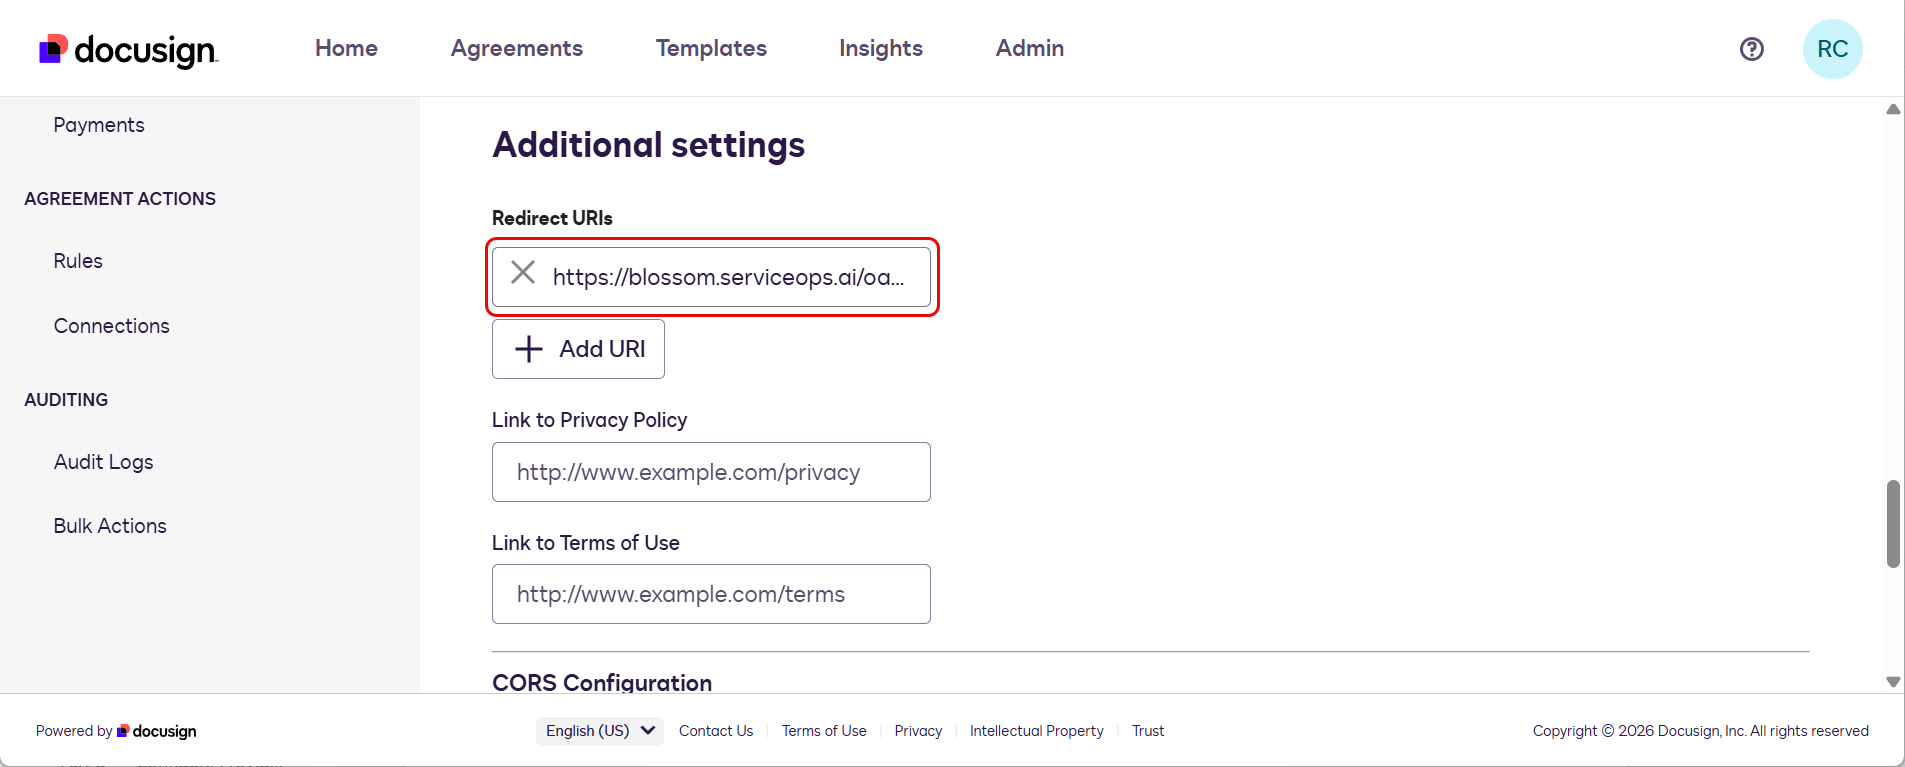
- Click Save to complete the configuration.
Step 5: Copy User ID and API Account ID
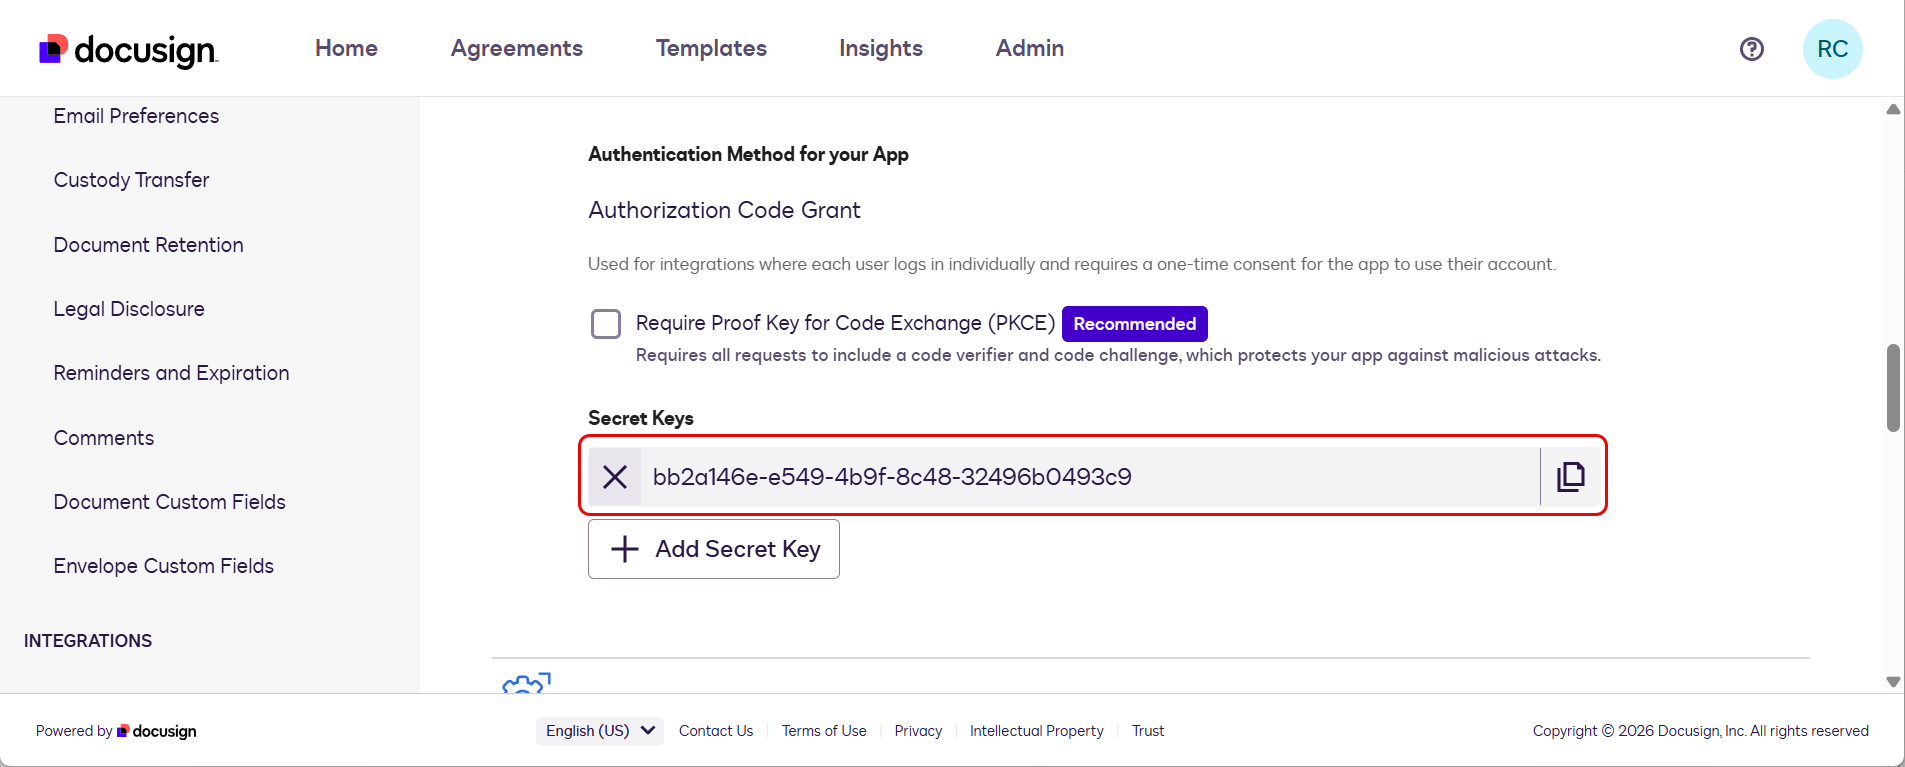
- In the left panel, under Integrations click Apps and Keys. The following page appears.
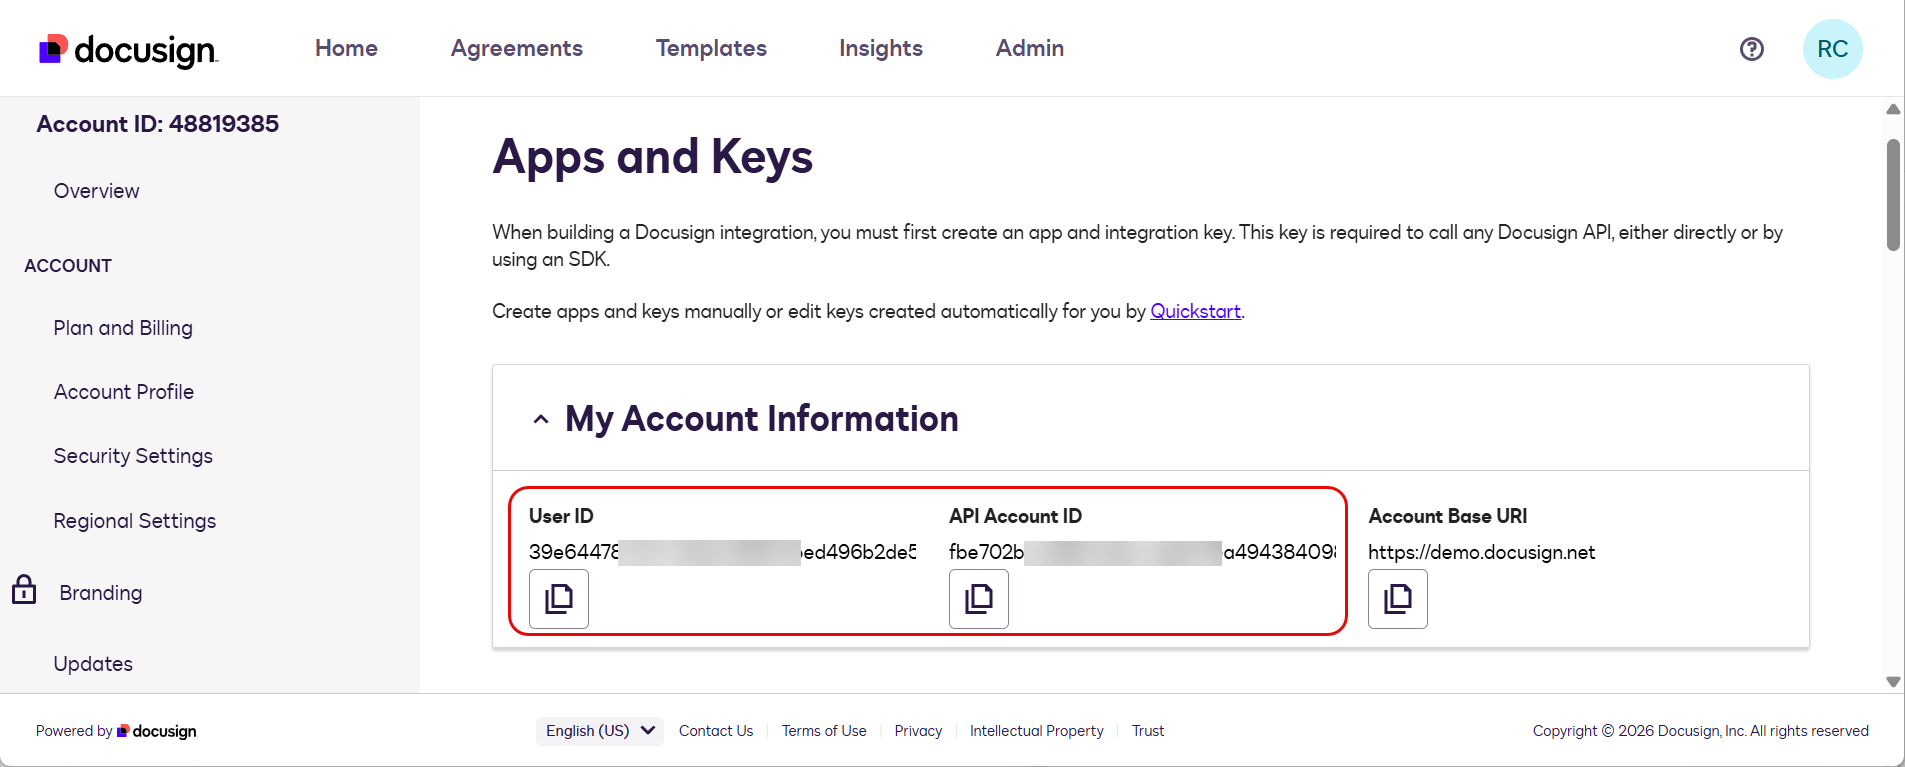
Copy your User ID (GUID) and API Account ID (GUID).
Save both values. You will need them in Part D.
Step 6: Grant Access Consent
Before ServiceOps can connect to DocuSign, you must explicitly grant access consent.
- Construct the consent URL by replacing the placeholders:
https://account-d.docusign.com/oauth/auth?response_type=code&scope=signature%20impersonation&client_id=<YOUR_INTEGRATION_KEY>&redirect_uri=https%3A%2F%2F<YOUR_SERVICEOPS_URL>%2Foauth%2Fcallback
- Open the URL in a browser while logged in as the User ID from Step 5.
- Click Allow (or Accept) on the consent screen.
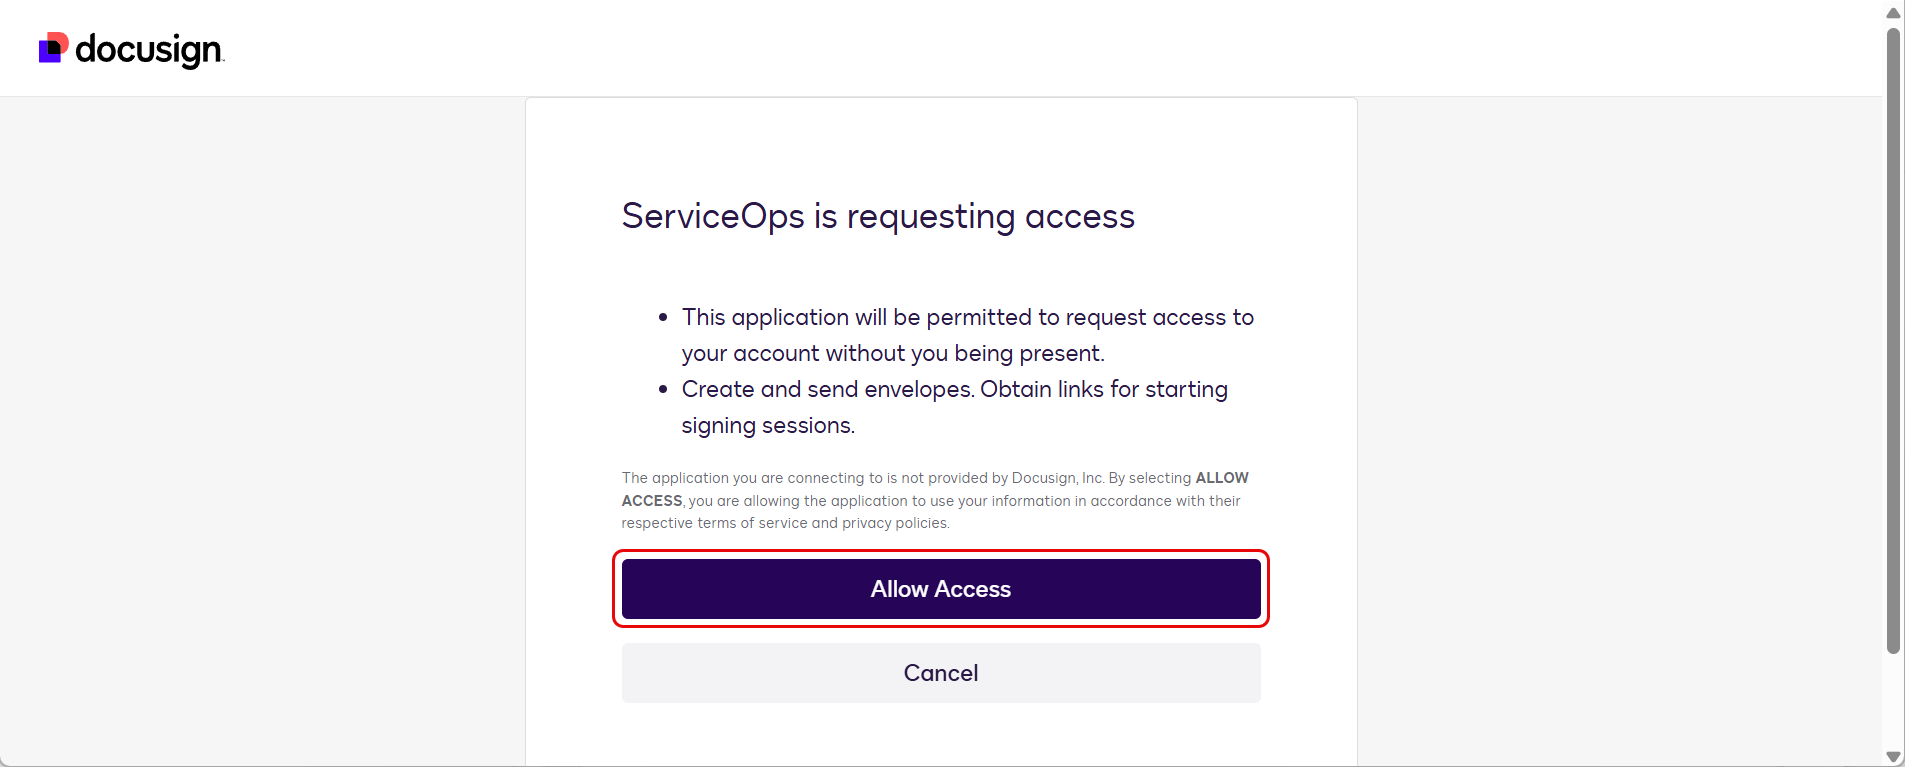
The browser redirects to /oauth/callback?code=.... This redirect confirms DocuSign granted consent. The page itself may show loading, which is normal at this stage.
Part B: Get ServiceOps OAuth Credentials
Retrieve the OAuth credentials ServiceOps generates so DocuSign can authenticate webhook callbacks.
Step 7: Retrieve Client ID and Client Secret
ServiceOps generates OAuth credentials for DocuSign to use when calling back with webhook events.
- Log in to ServiceOps as Admin.
- Navigate to Admin > Automation > Integrations > REST Integration.
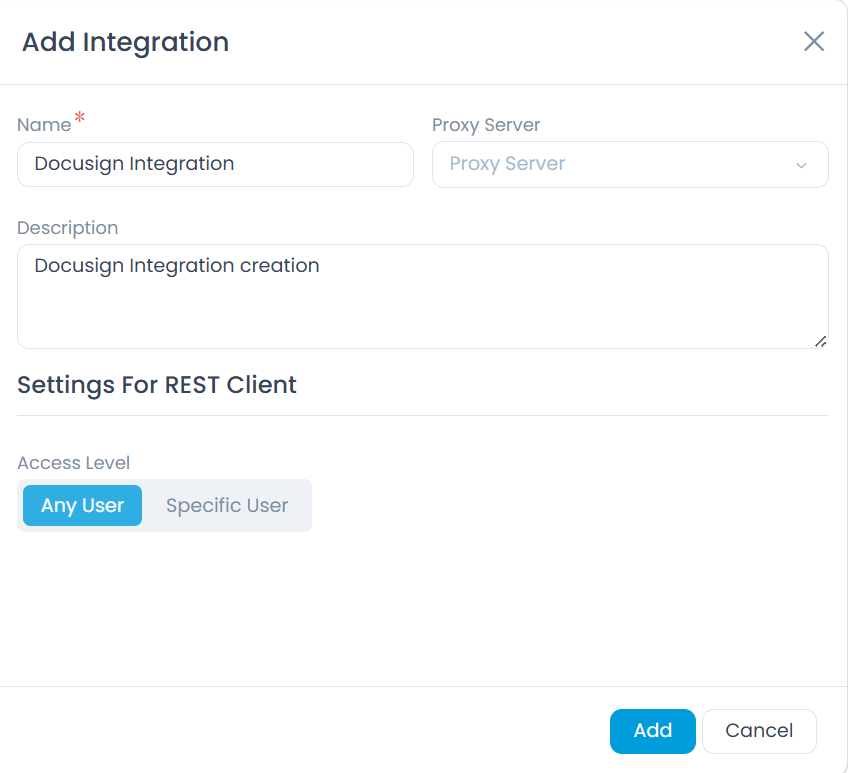
- Copy the Client ID and Client Secret values.
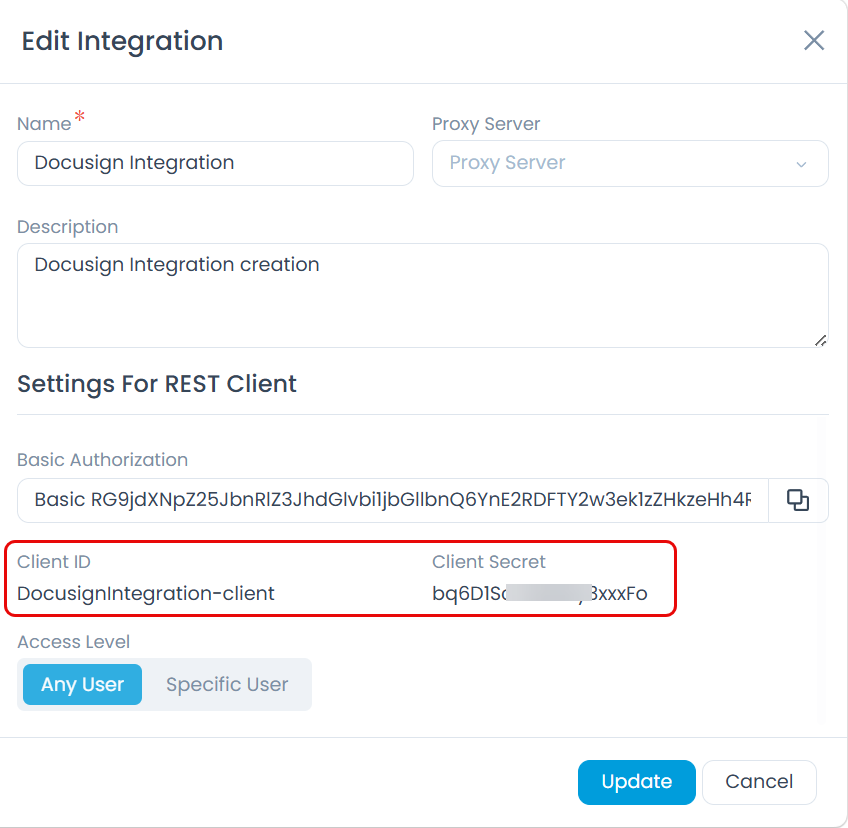
Save both values. You will need them in Part C.
Part C: Configure DocuSign Connect Webhooks
DocuSign Connect (webhooks) lets DocuSign notify ServiceOps when a signer acts on a signature request.
Step 8: Configure OAuth 2.0 in DocuSign Connect
- In DocuSign Admin, go to Integrations > Connect (Webhooks).
- Click the OAuth 2.0 tab.
- Enable the Enable OAuth toggle.
- Click Add Account Configuration and select Custom.
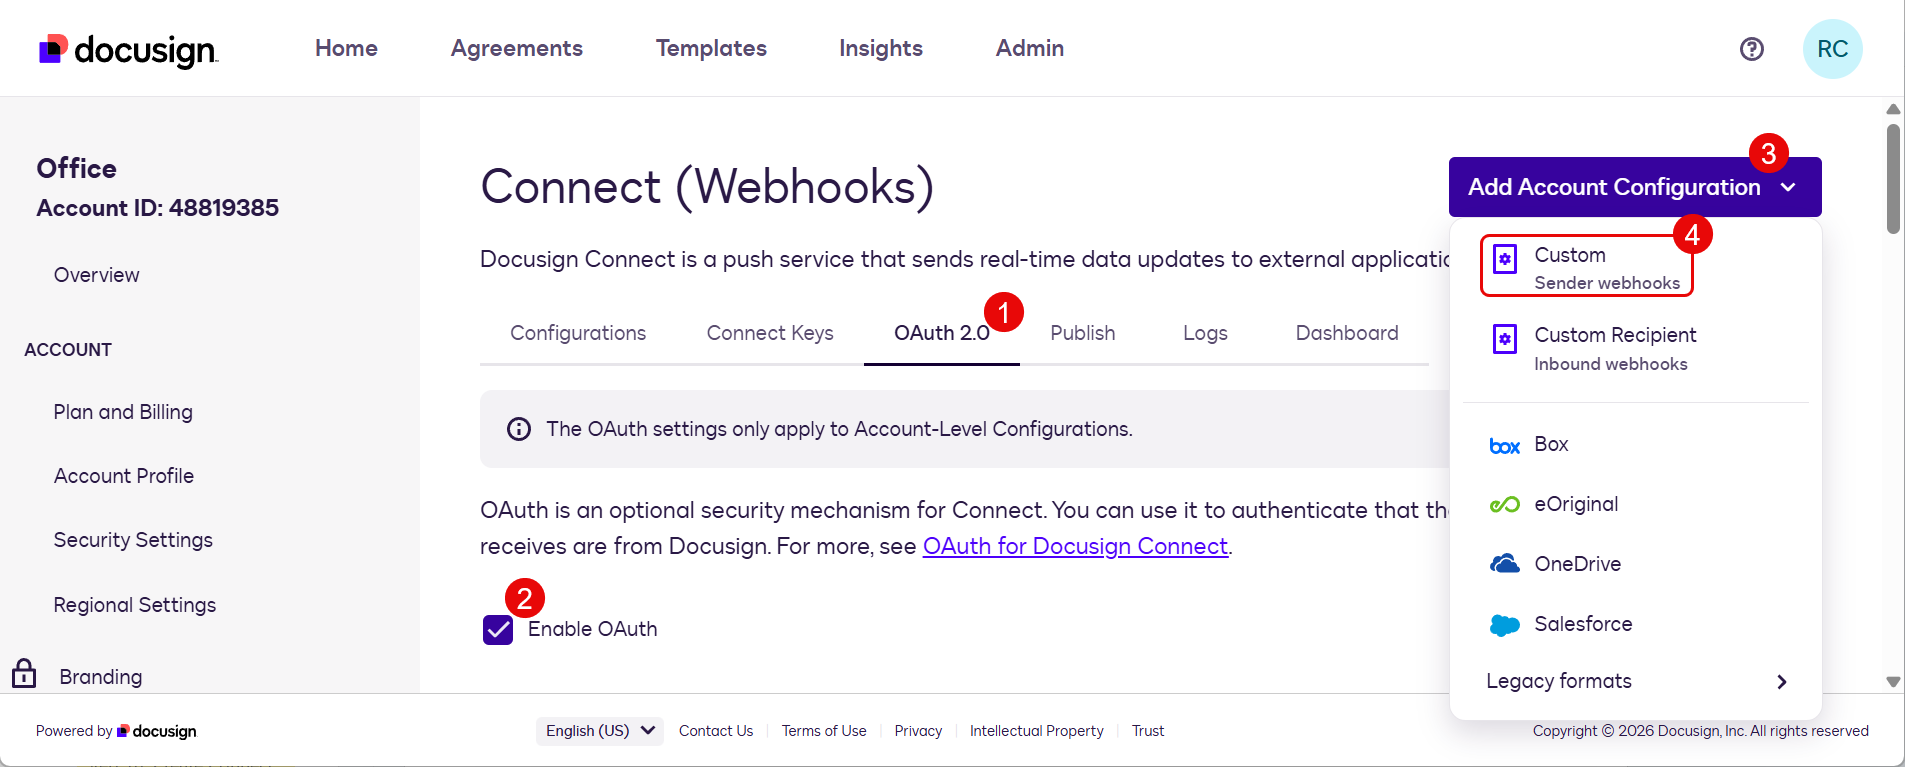
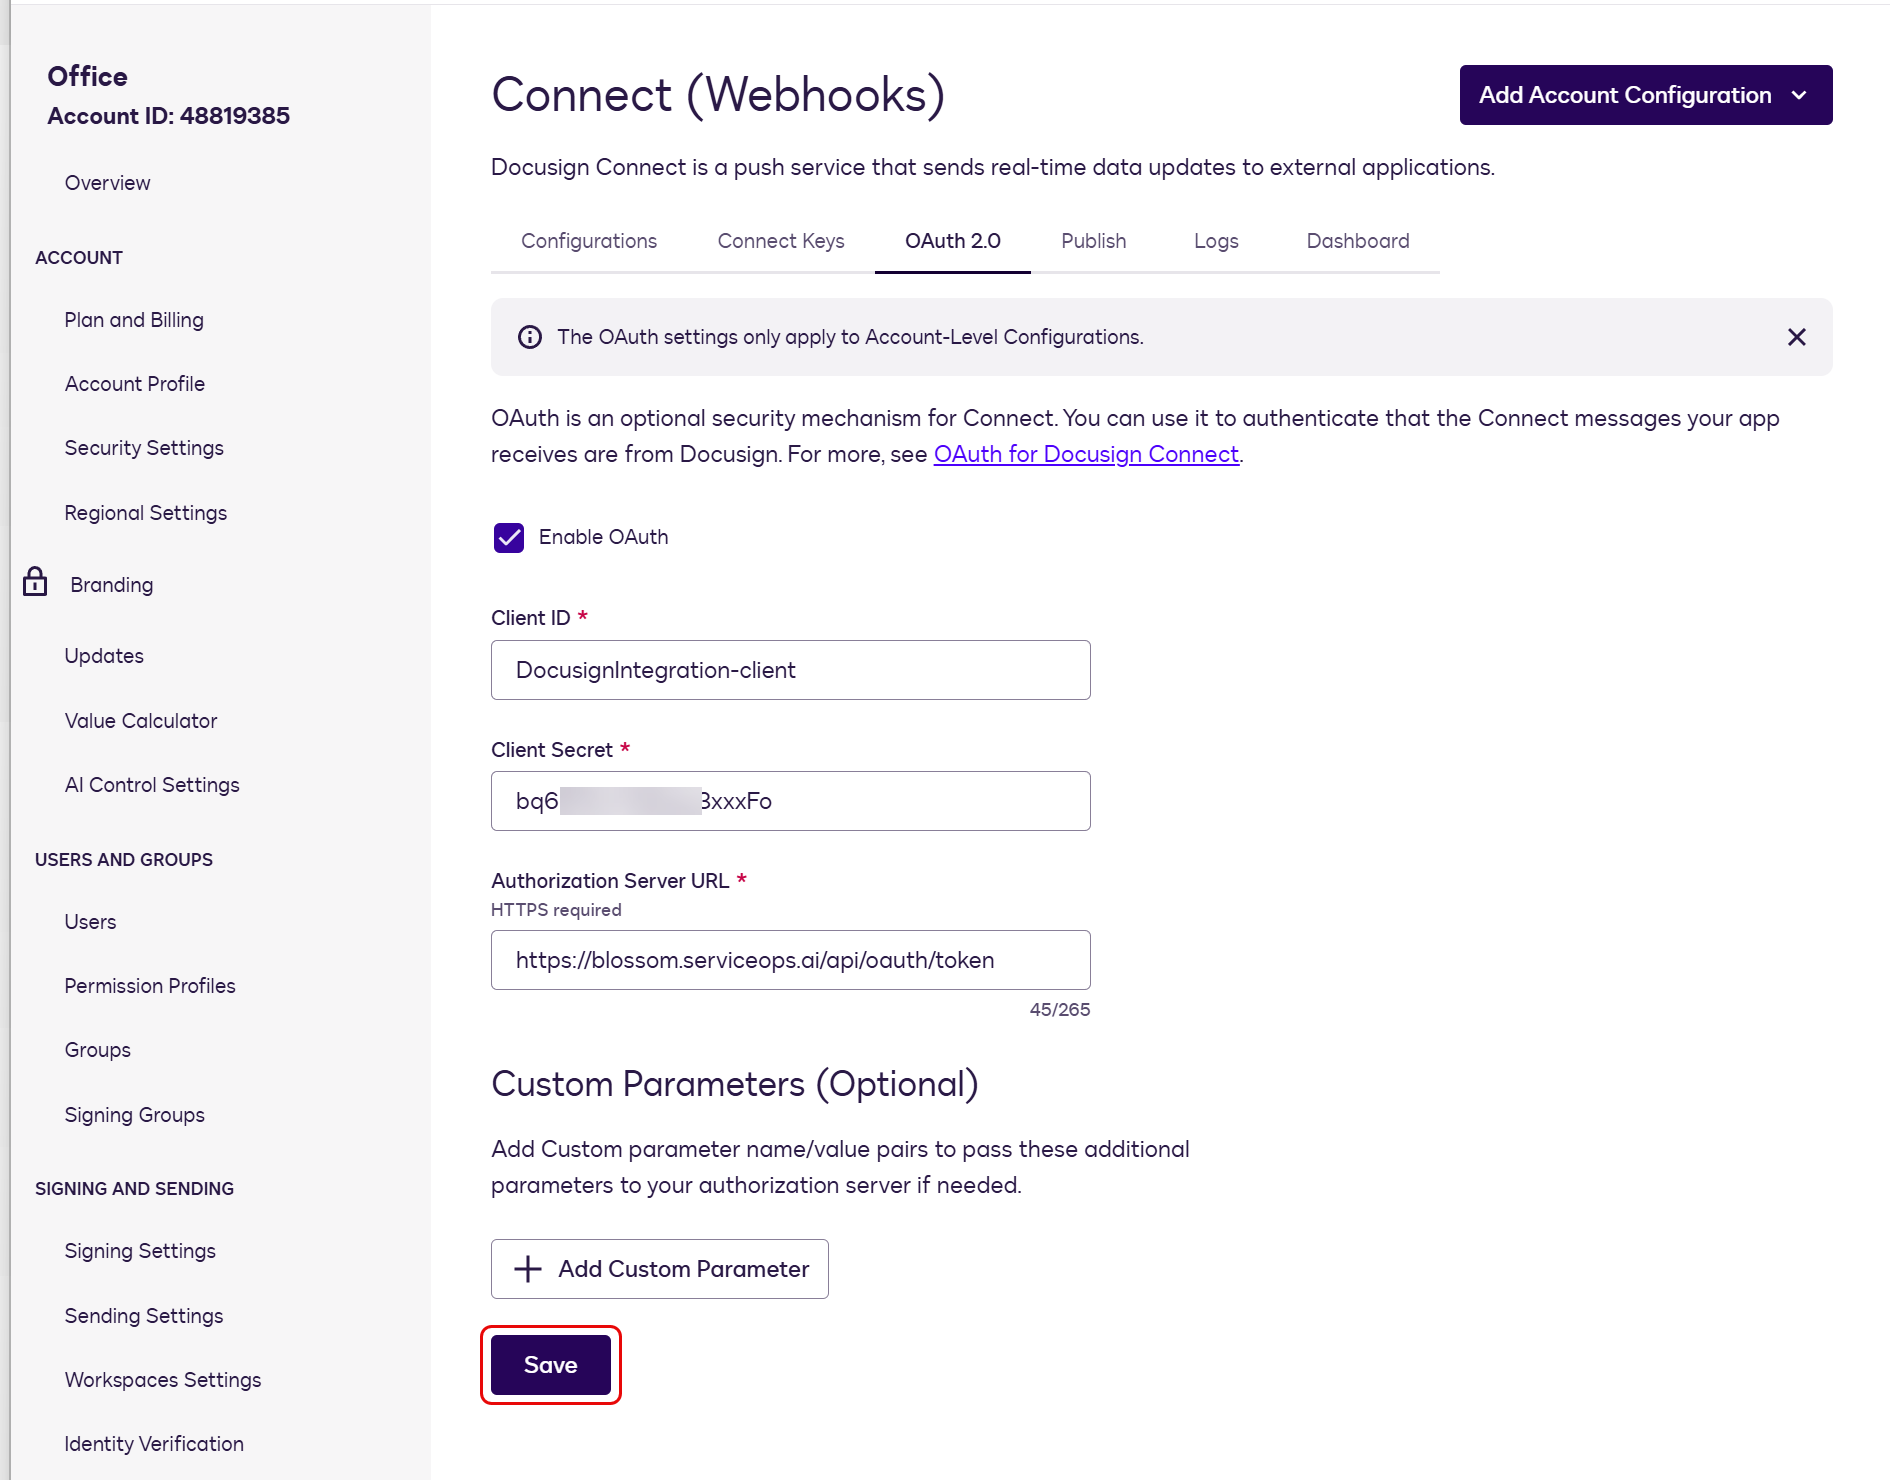
- Fill in the fields:
- Client ID: Paste the Client ID from Step 7.
- Client Secret: Paste the Client Secret from Step 7.
- Authorization Server URL: Enter
https://<your-serviceops-url>/api/oauth/token. For example:https://serviceops.example.com/api/oauth/token
- Click Save.
Step 9: Verify the Token Endpoint
Confirm that DocuSign can reach the ServiceOps OAuth token endpoint.
Run the following command from a terminal, replacing the placeholder with your ServiceOps URL:
curl -i https://<your-serviceops-url>/api/oauth/token
For example: curl -i https://serviceops.example.com/api/oauth/token
A successful response looks like this:
HTTP/1.1 200 OK
...
{"access_token":"...","token_type":"Bearer"}
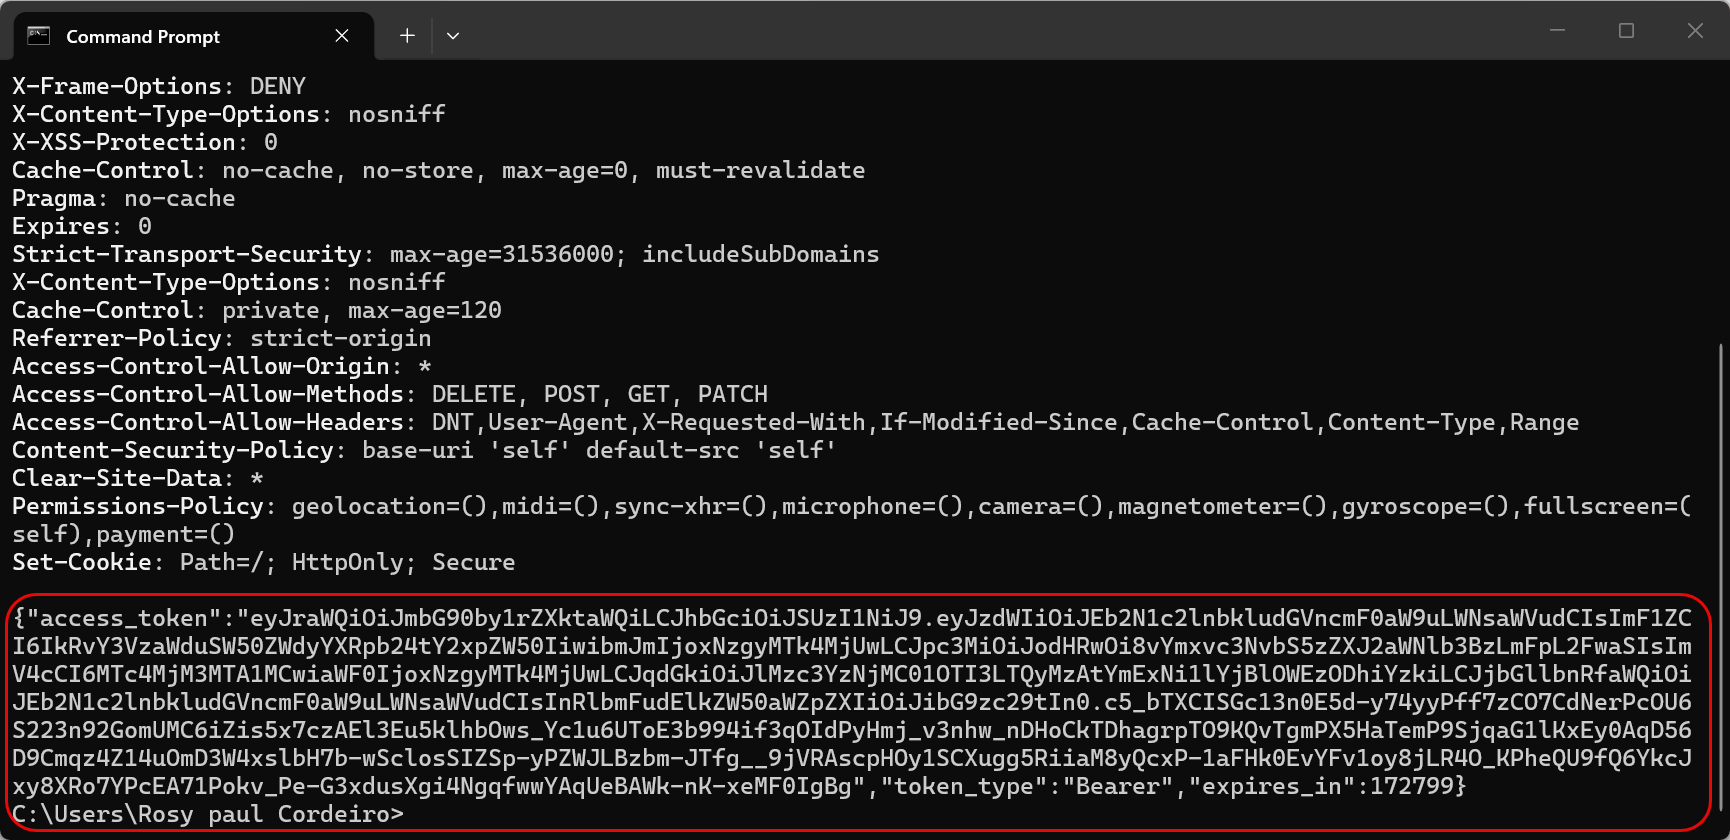
If you receive HTTP 404, check that the URL is correct. If you receive HTTP 401, confirm OAuth is enabled in Step 8.
Step 10: Create the Connect Configuration
- In DocuSign Admin, go to Integrations > Connect (Webhooks) > Configurations tab.
- Click Add Account Configuration and Custom.
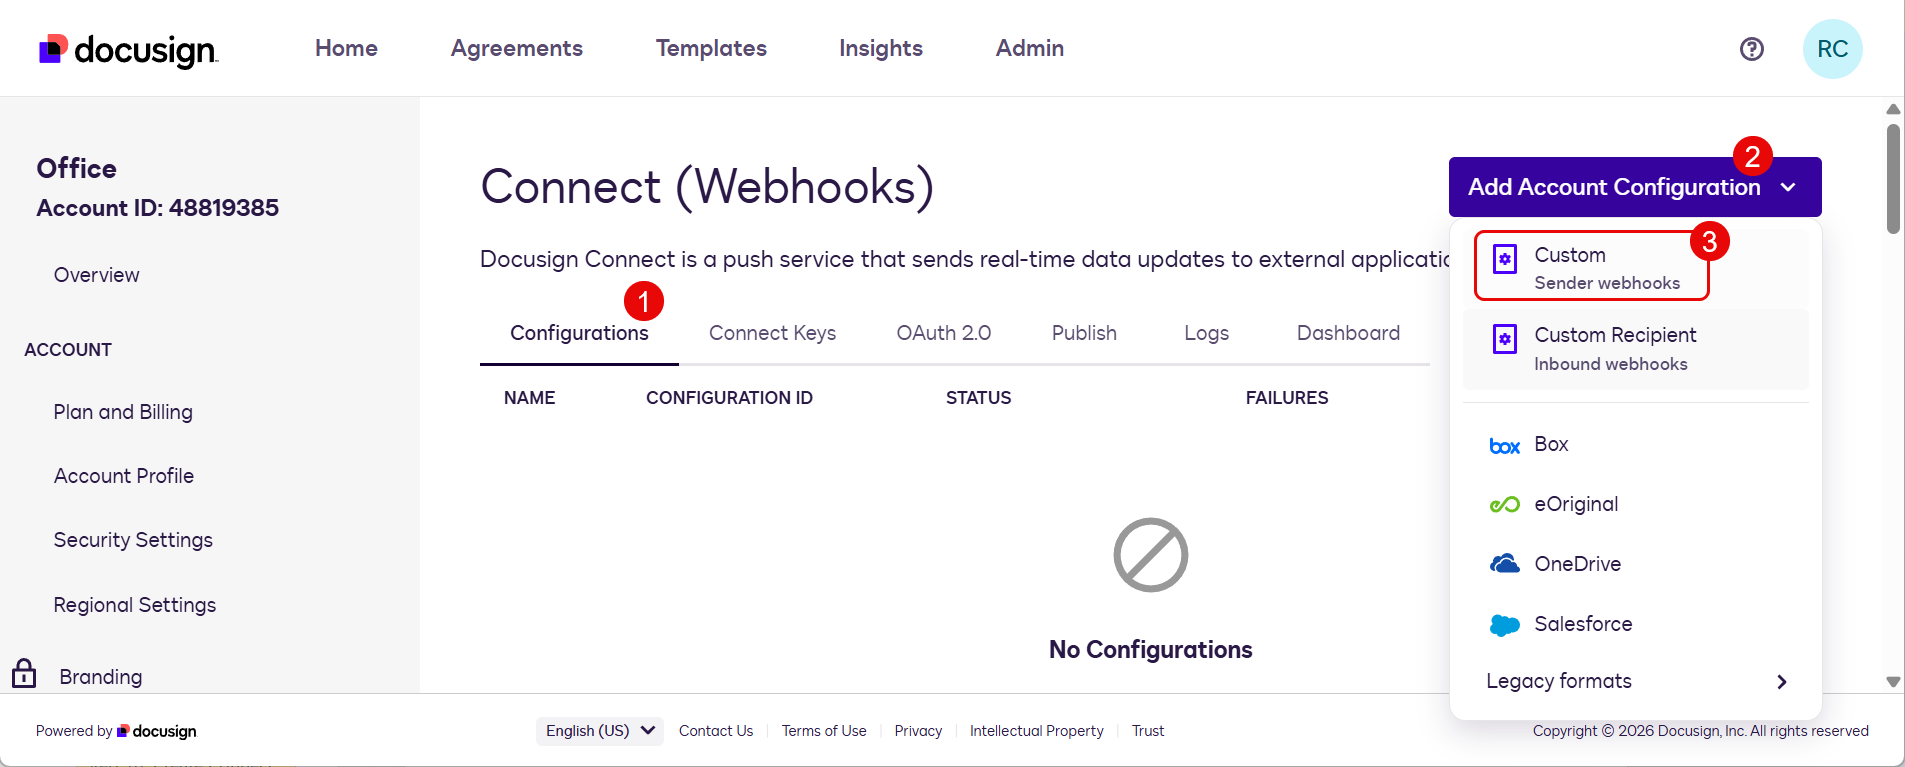
- Fill in the configuration fields:
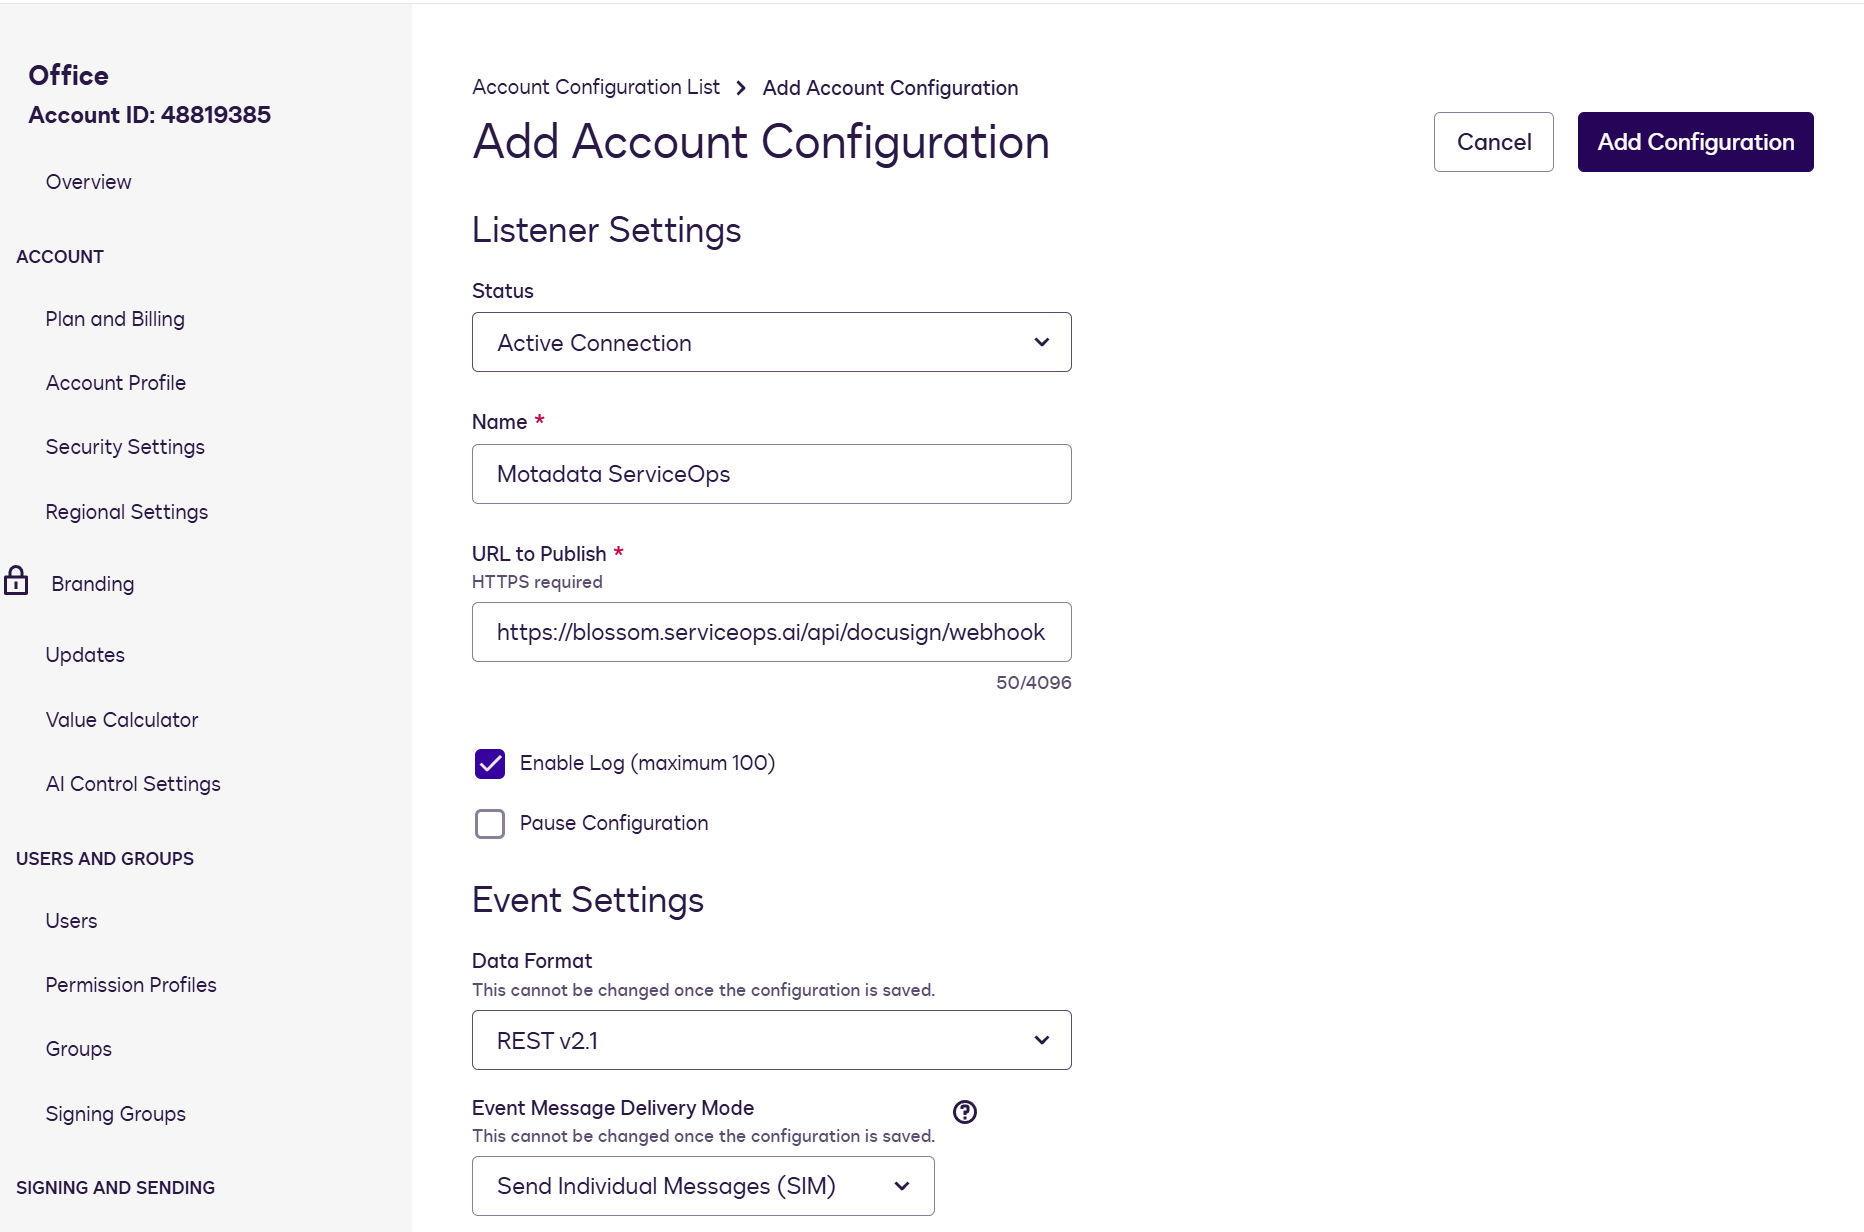
Listener Settings
| Field | Value |
|---|---|
| Status | Active Connection |
| Name | Motadata ServiceOps |
| URL to Publish | https://<your-serviceops-url>/api/docusign/webhook, for example: https://serviceops.example.com/api/docusign/webhook |
| Enable Log (maximum 100) | ON |
Event Settings
| Field | Value |
|---|---|
| Data Format | REST v2.1 |
| Event Message Delivery Mode | Send Individual Messages (SIM) |
- Under Envelope and Recipients, enable the following options:
- Envelope Sent
- Envelope Delivered
- Envelope Signed/Completed
- Envelope Declined
- Envelope Voided
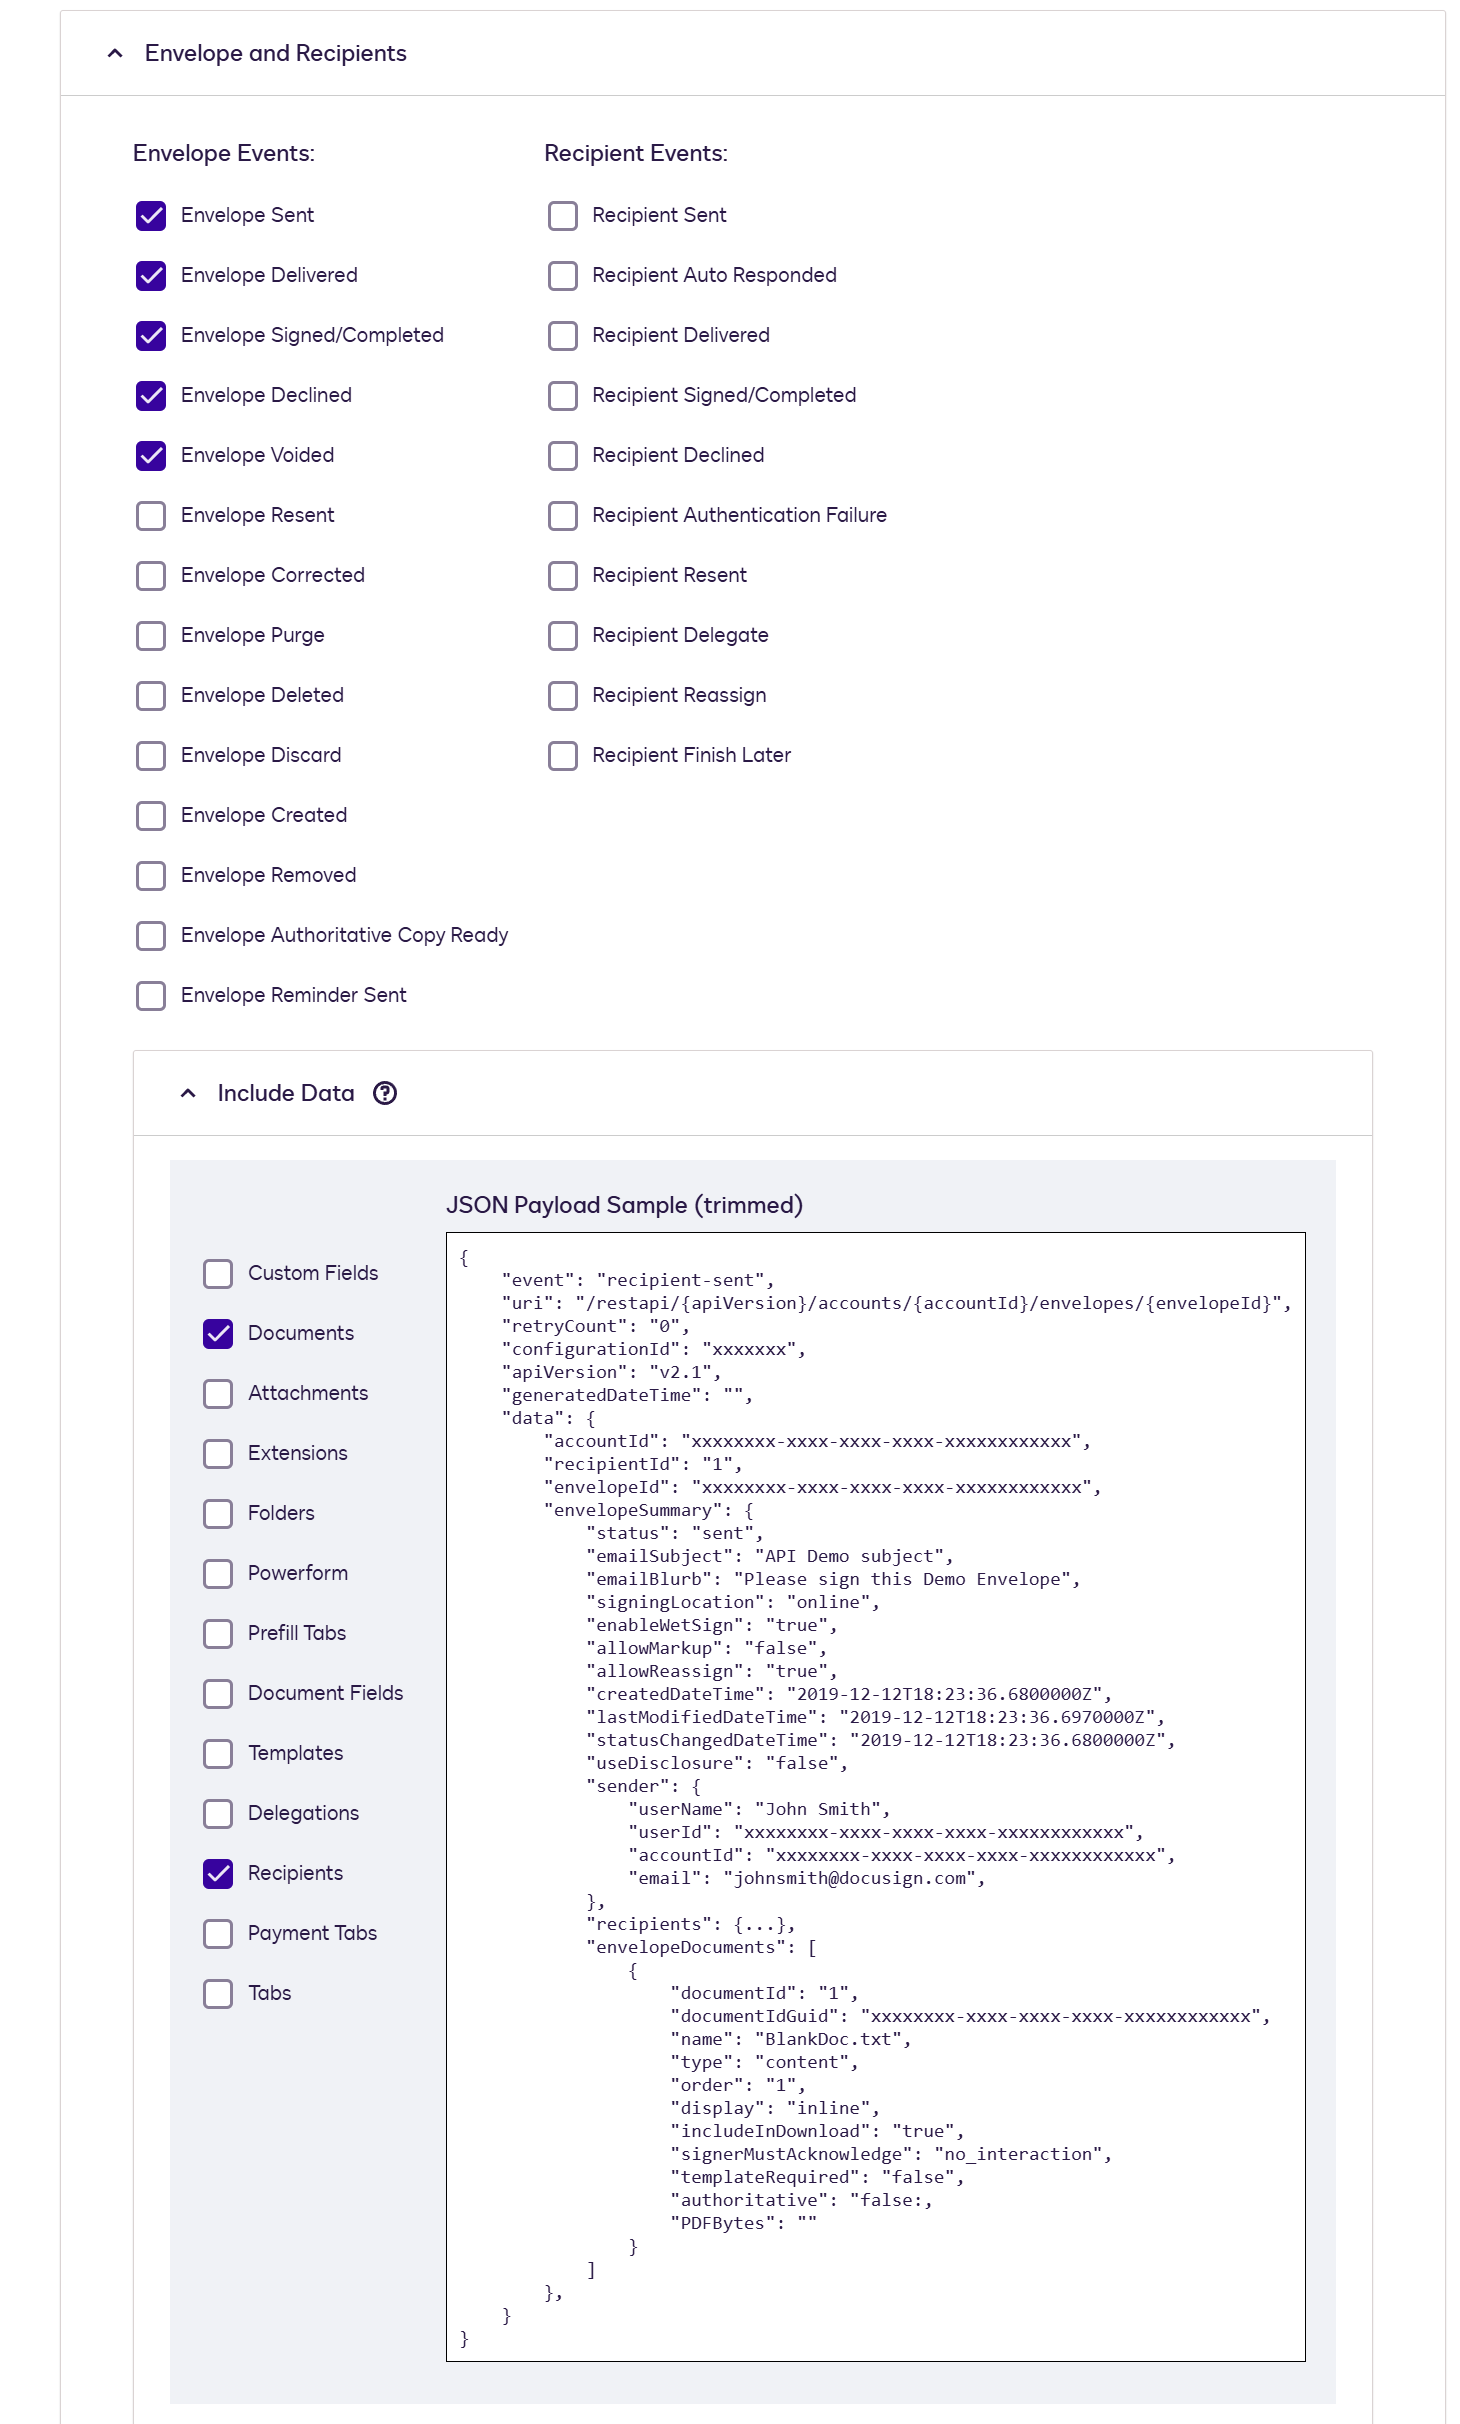
Under Include Data, select: Documents, and Recipients.
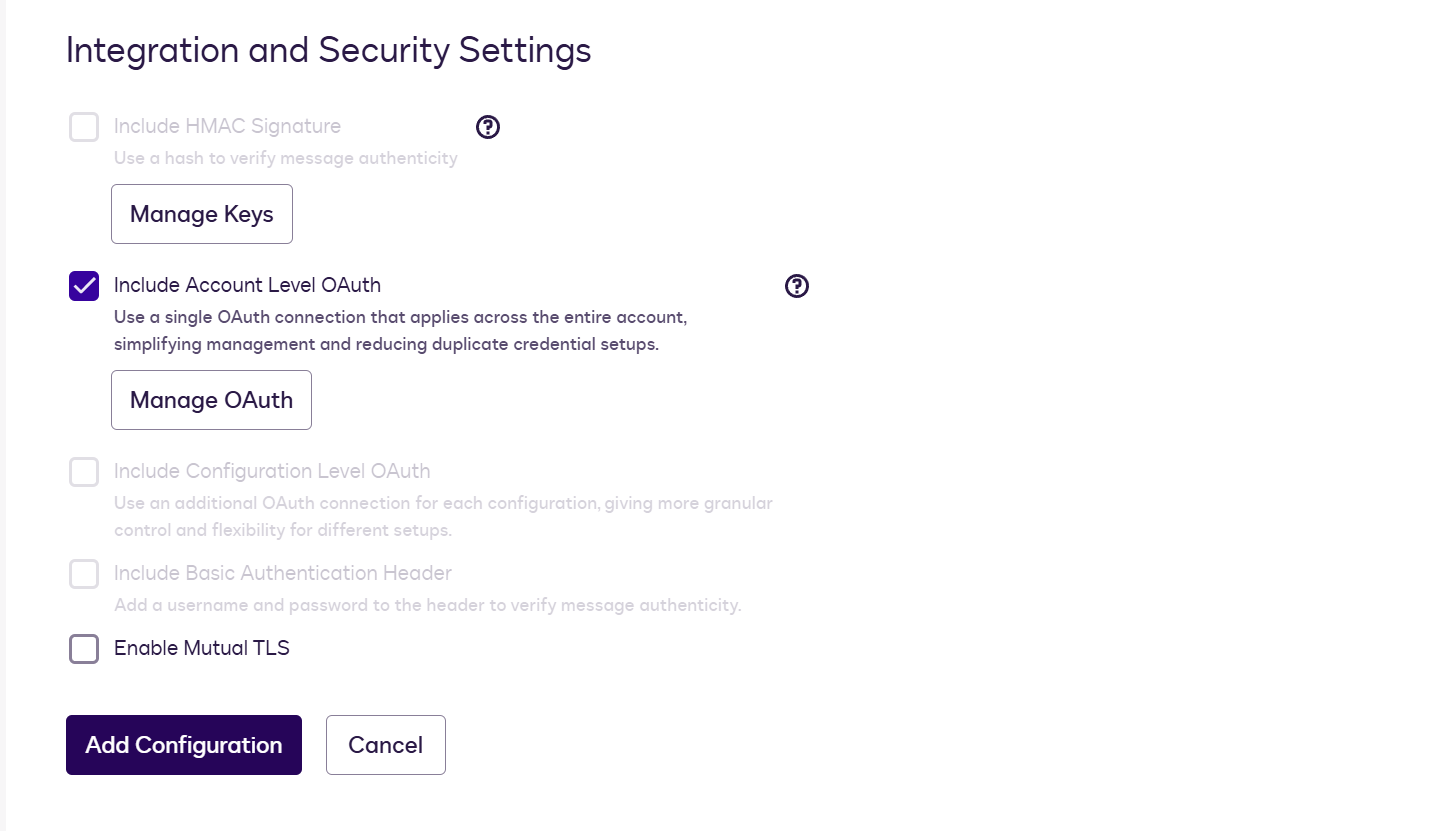
Under Security Settings, enable Include Account Level OAuth. This is required for ServiceOps to authenticate incoming webhook calls.
Optionally, enable Include HMAC Signature for an extra SHA-256 verification layer. When enabled, DocuSign signs each webhook payload with a secret key, and ServiceOps verifies the signature before processing it. This prevents forged webhook calls from updating records. Enable this for production deployments. If you enable it, copy the HMAC secret key shown - you will need it in Part D.
- Click Save.
Part D: Add the Provider in ServiceOps
Enter the DocuSign credentials into ServiceOps to activate the digital signature provider.
Step 11: Add the Digital Signature Provider
- In ServiceOps, navigate to Admin > Organization > Digital Signature.
- Click the Signature Provider tab.
- Click Add Provider.
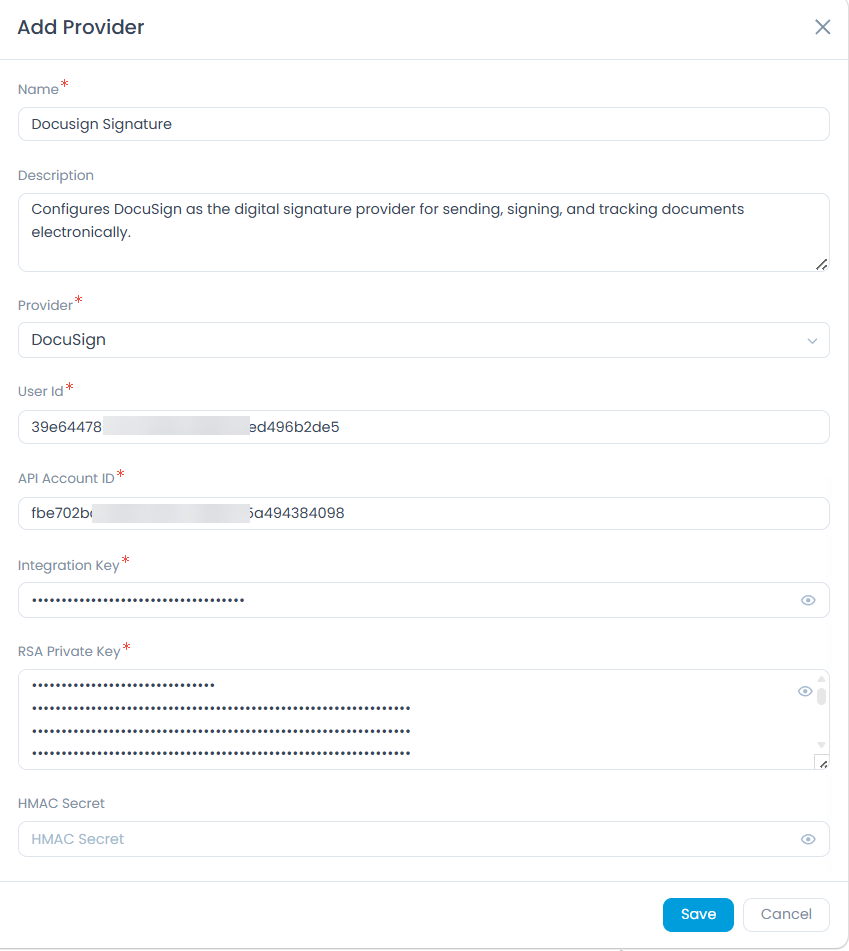
- Fill in the fields:
| Field | Value |
|---|---|
| Name | A display name, for example DocuSign |
| Description | Optional |
| Provider | DocuSign |
| User Id | GUID from Step 5 |
| API Account ID | GUID from Step 5 |
| Integration Key | GUID from Step 2 |
| RSA Private Key | Full PEM private key from Step 3, with all line breaks intact |
| HMAC Secret | HMAC secret from Step 10 (only if you enabled HMAC) |
- Set the Enabled toggle to ON.
- Click Save.
ServiceOps validates the credentials by connecting to DocuSign. If the save succeeds, the provider is active.
Part E: Test the Integration
Step 12: Send a Test Signature Request
- Open any request (incident) in ServiceOps.
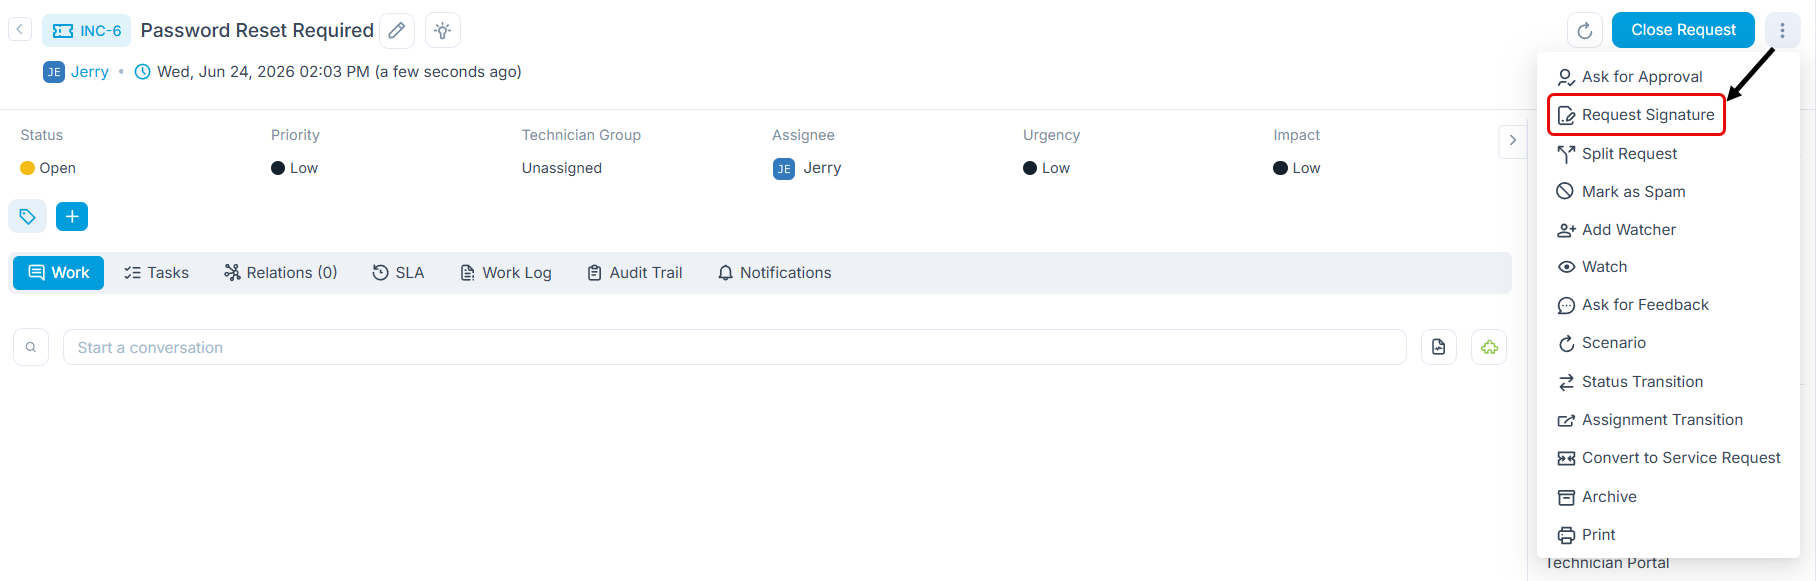
- Click the More Actions icon (vertical three dots) at the top-right.
- Select Request Signature.
- Choose a template (you must create one first under Admin > Organization > Digital Signature > Signature Templates).
- Enter a signer name and email you can access.
- Click Send.
Step 13: Sign the Document
The signer completes the following steps entirely in their browser. No DocuSign account required.
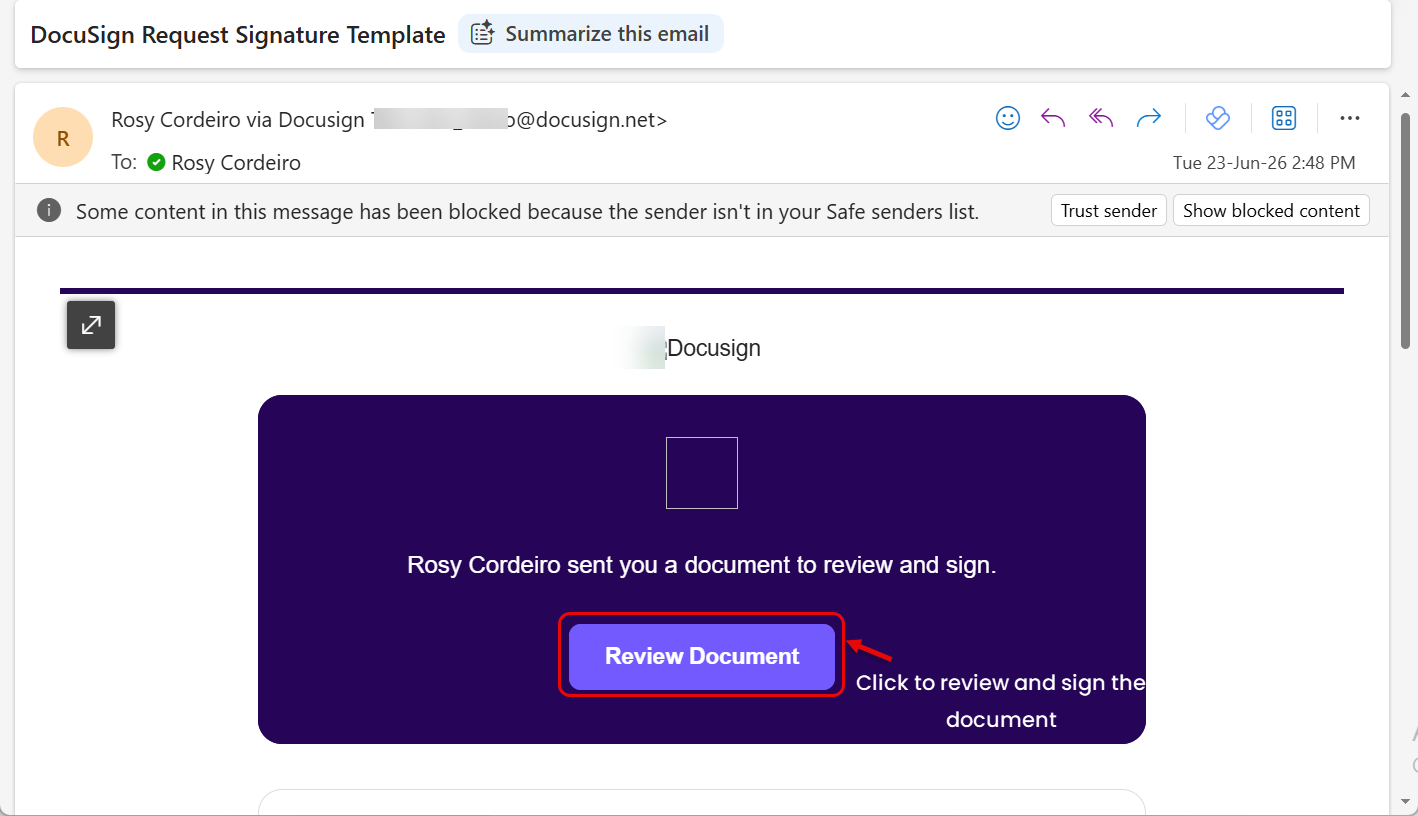
- Check the signer's email inbox for a DocuSign message. Click Review Document.
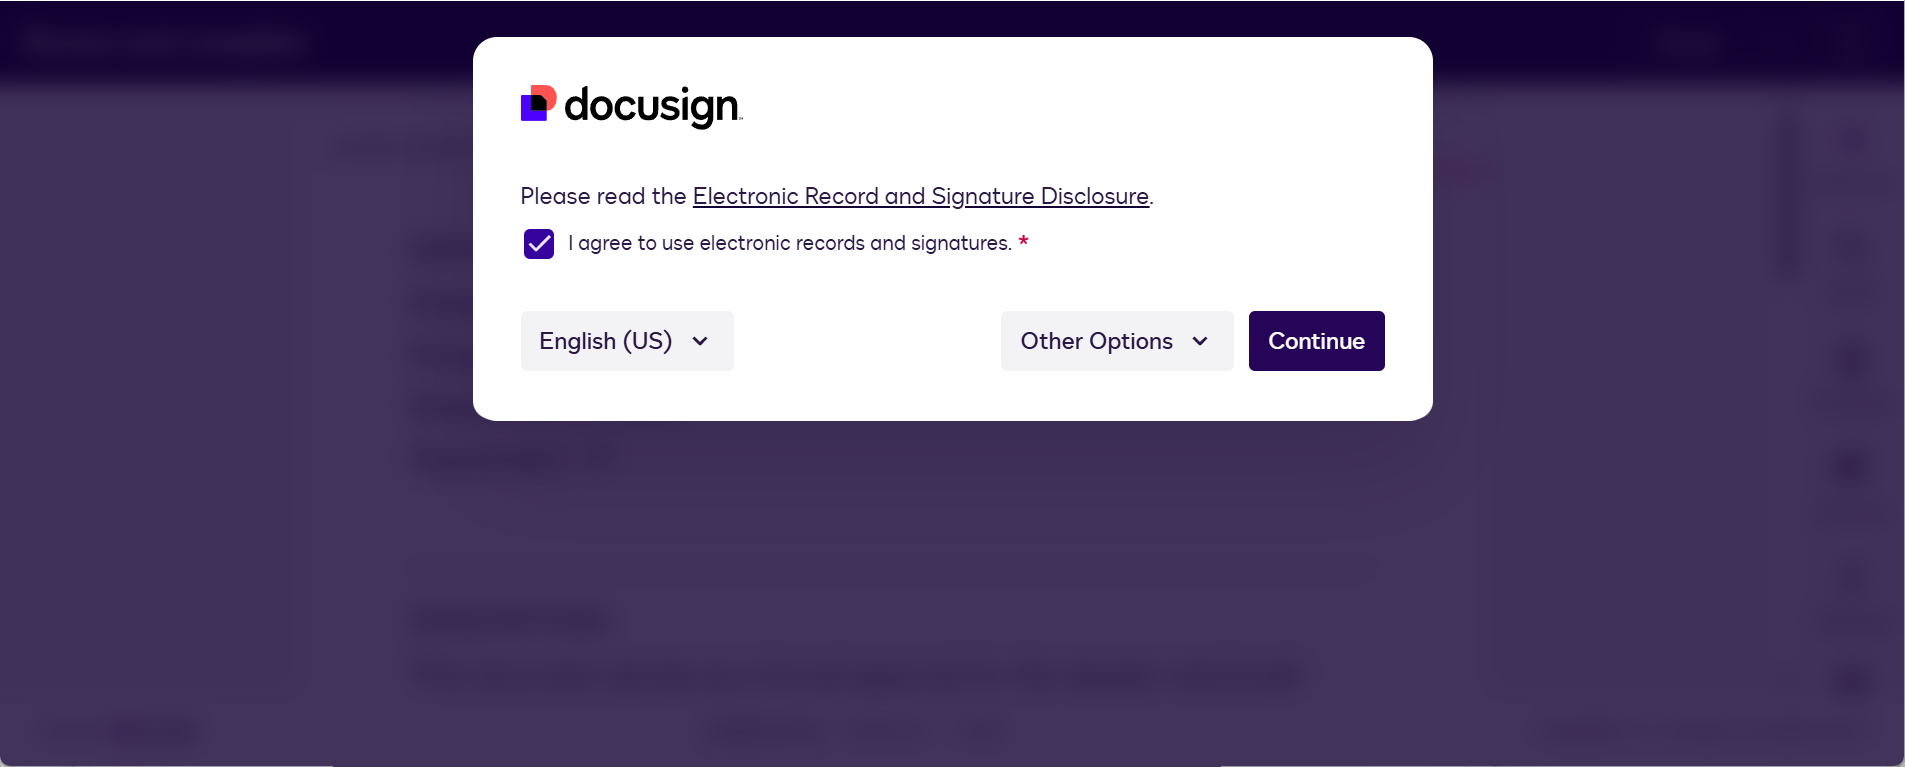
- DocuSign displays the Electronic Record and Signature Disclosure. Check the I agree to use electronic records and signatures box and click Continue.
- The document opens in the DocuSign viewer. Click Start on the left panel to jump to the first required field.
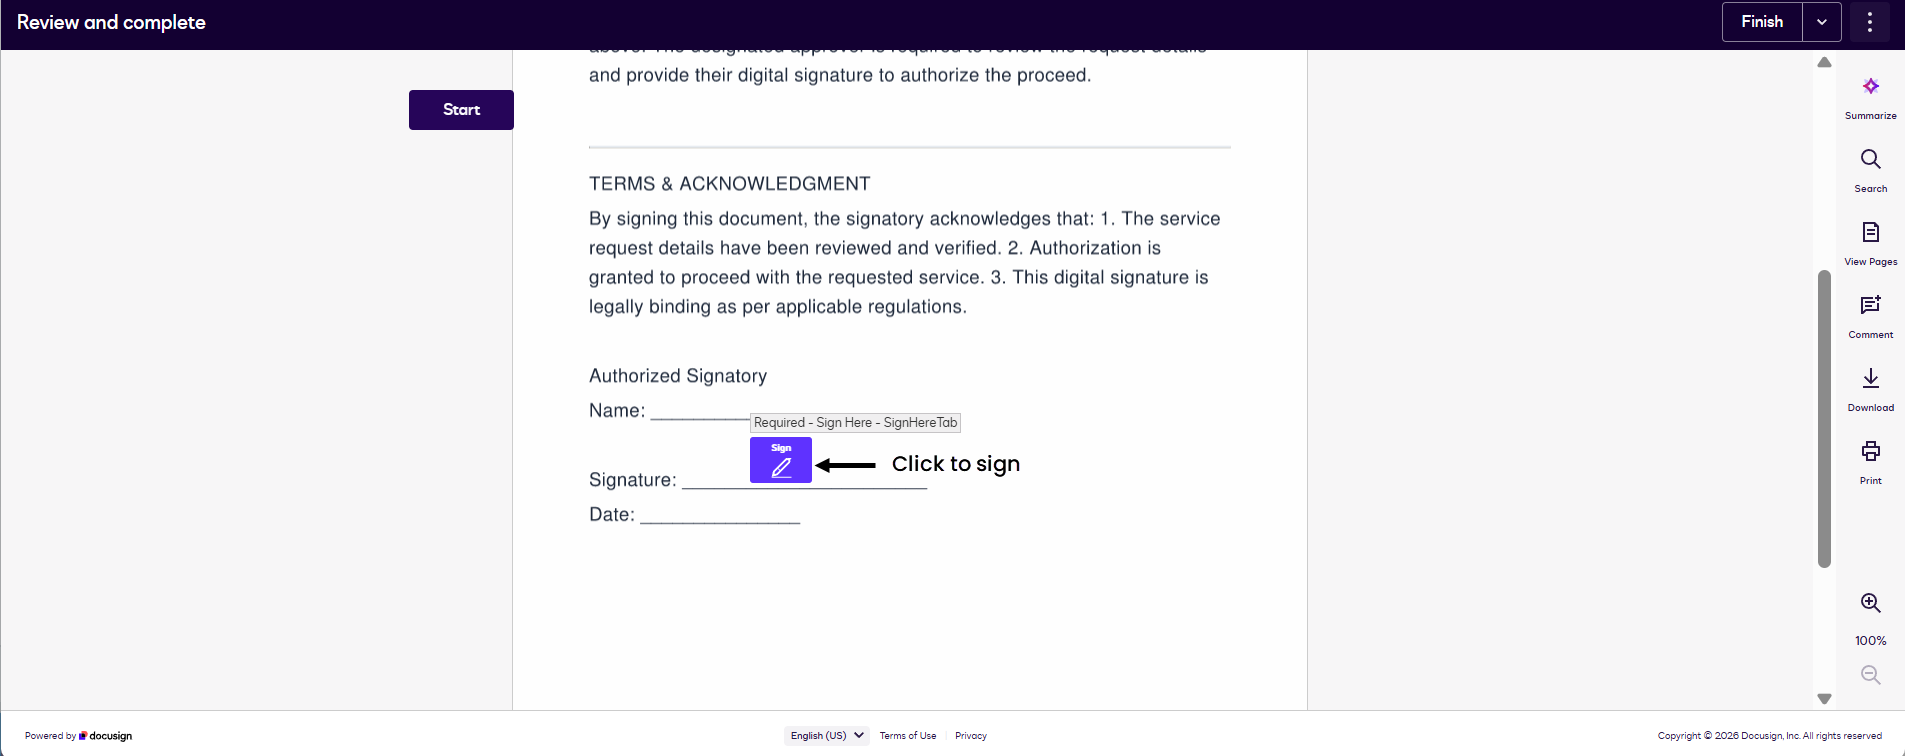
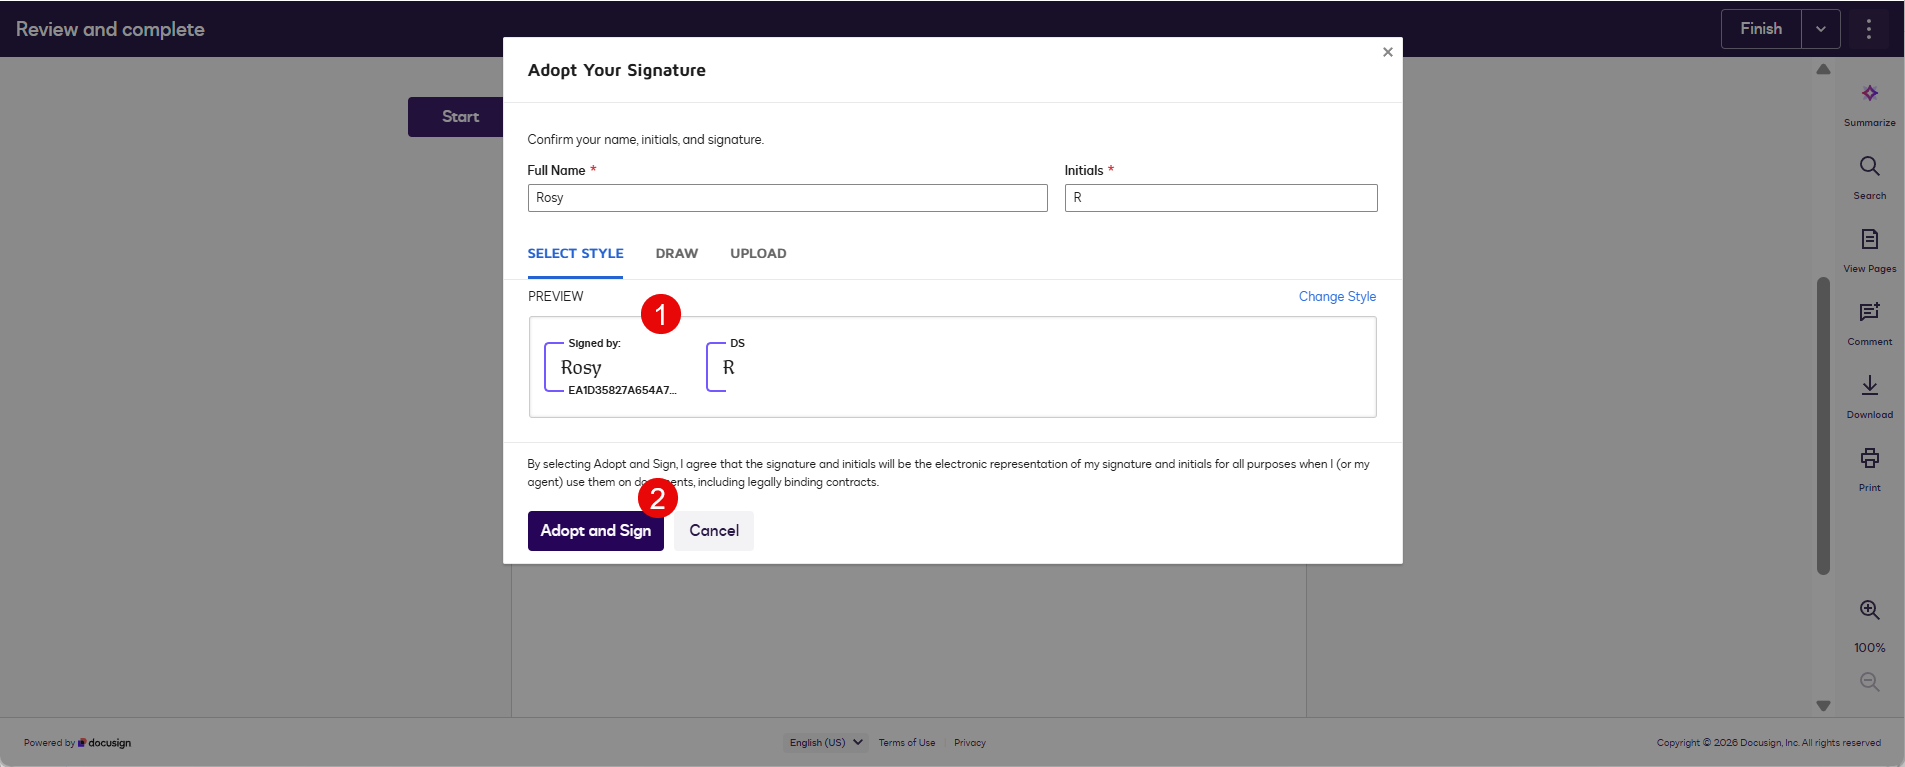
- Click the Sign button on the signature field. The Adopt Your Signature dialog opens. Confirm your full name and initials, choose a signature style, and click Adopt and Sign.
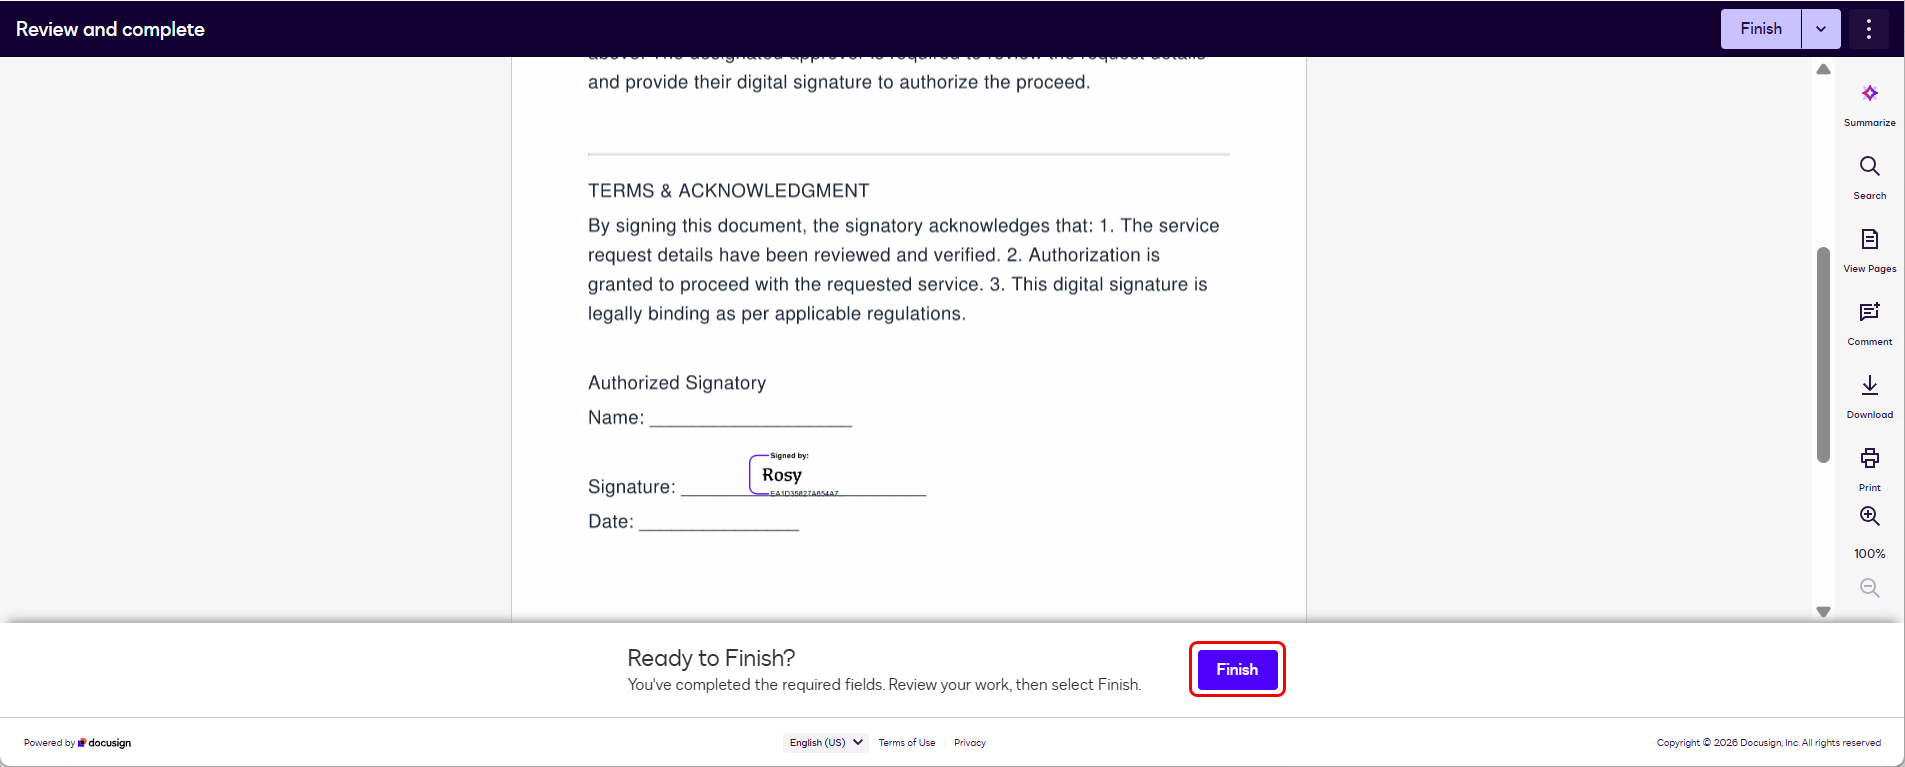
- The signature appears on the document. A Ready to Finish? bar appears at the bottom. Click Finish.
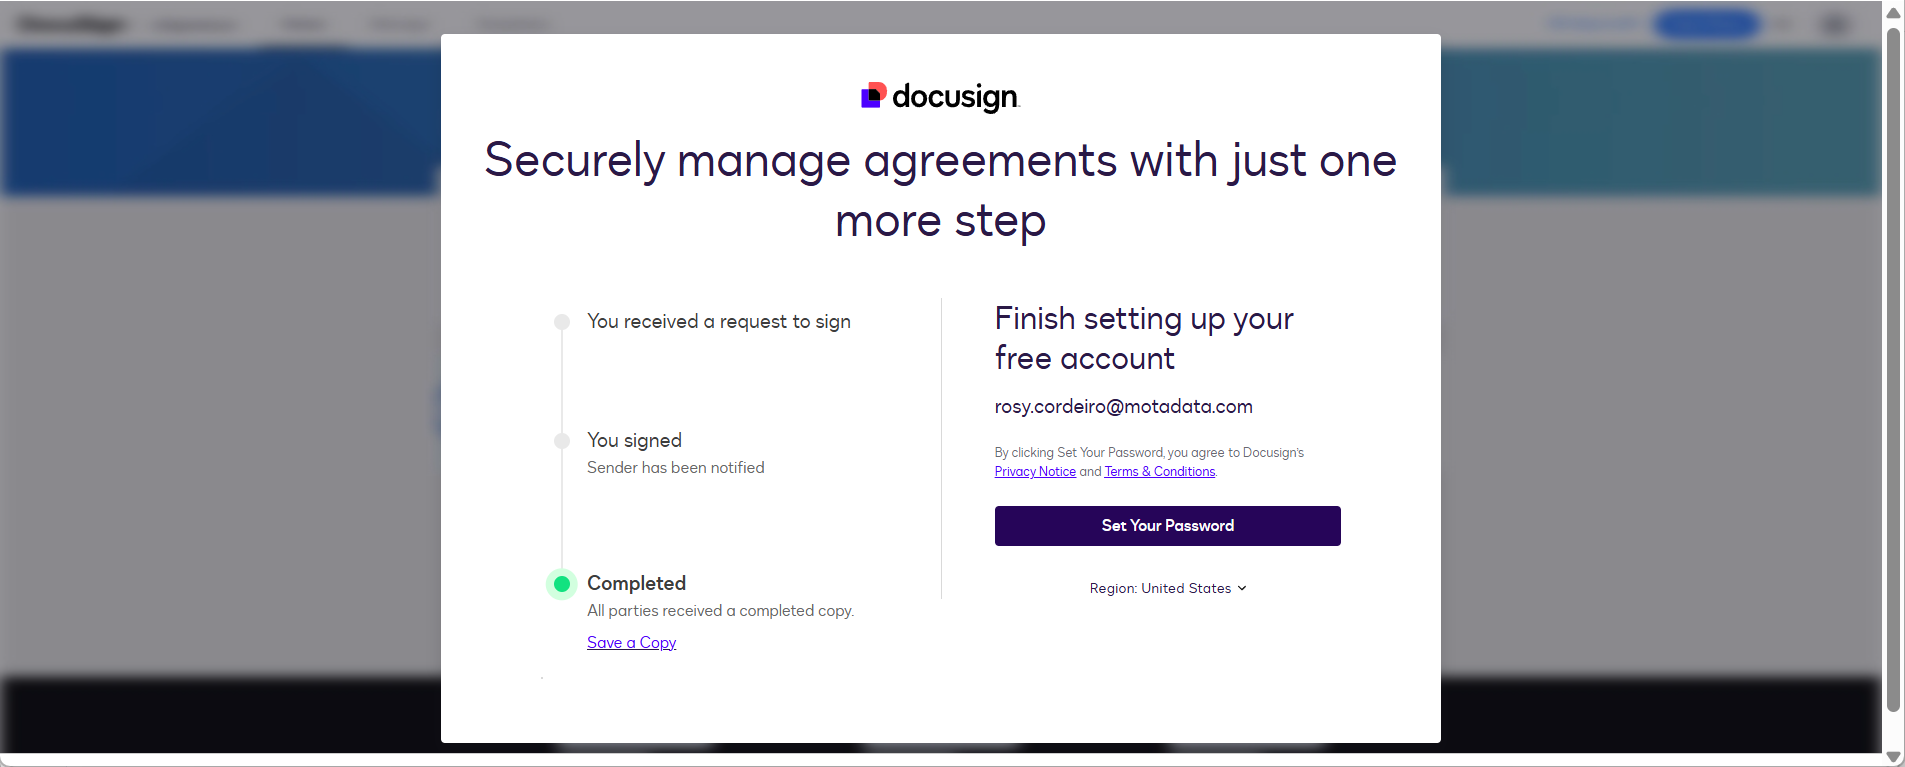
- DocuSign confirms completion. The screen shows the signing summary: received, signed, and completed. All parties receive a copy automatically.
Step 14: Verify Status in ServiceOps
Return to the request in ServiceOps and open the Signature tab. Confirm:
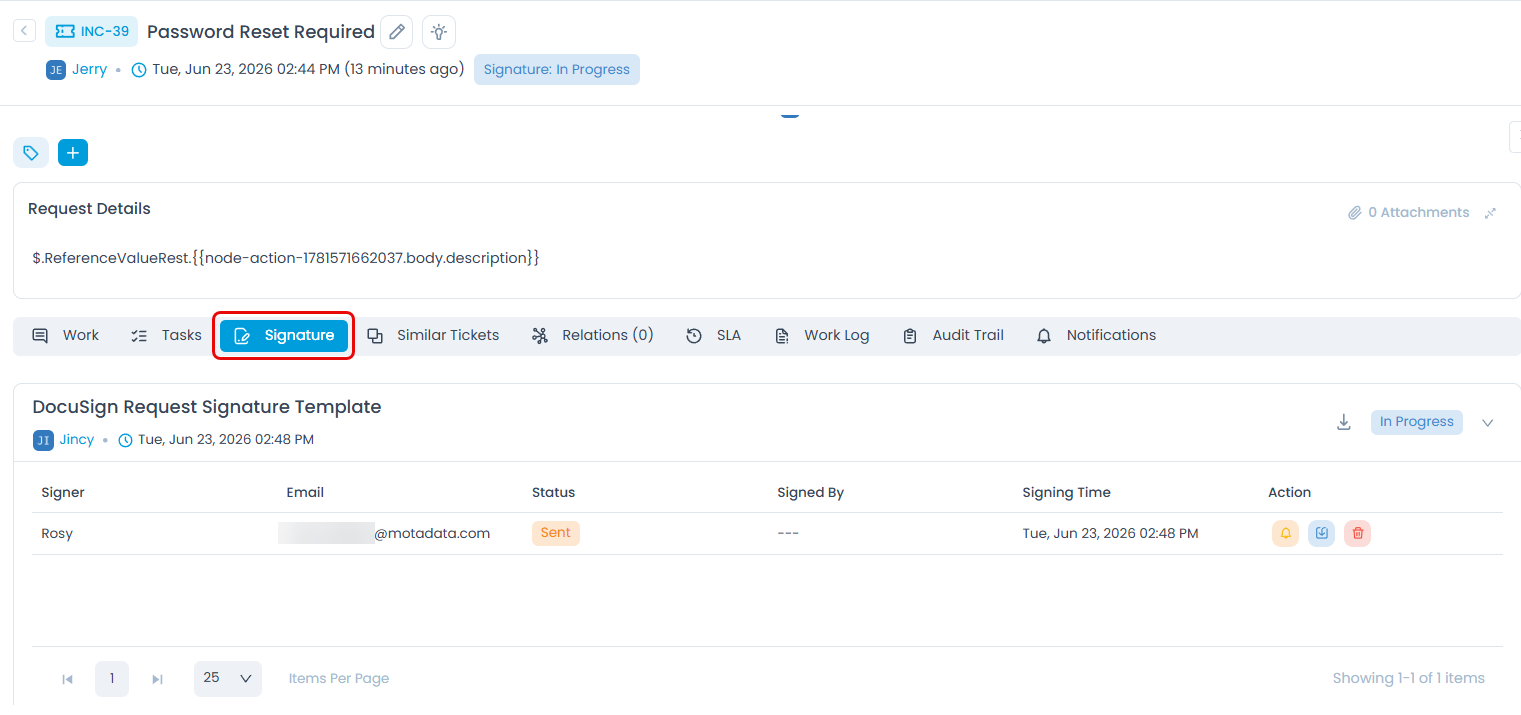
- Status shows Signed
- Signer name and signing timestamp appear
- A download icon is available to retrieve the signed PDF and certificate of completion
Step 15: Verify Connect Logs in DocuSign
In DocuSign Admin, go to Integrations > Connect (Webhooks), open your configuration, and click Logs. Confirm that all signing events show 200 OK or Success.
If you see failures, check that the webhook URL is correct and that ServiceOps is reachable over public HTTPS.
Best Practices
- Use a dedicated DocuSign service account (not a personal account) as the User ID. This prevents disruption if the personal account owner leaves.
- Store the RSA private key and HMAC secret in a password manager or secrets vault.
- Enable log entries in DocuSign Connect to make troubleshooting easier.
- Test in the DocuSign developer environment before switching to production credentials.
- Create module-specific templates with descriptive names so technicians can identify the right template for each use case.
Troubleshooting
Common issues during DocuSign configuration.
"Cannot connect to service" when saving the provider in ServiceOps
Cause: Access consent has not been granted for the User ID (Step 6), or the RSA Private Key was pasted without line breaks.
Fix: Re-open the consent URL from Step 6 in a browser logged in as the correct User ID and click Allow. Then re-open the provider form and repaste the RSA Private Key with all line breaks intact.
Connect logs show HTTP 401 on webhook calls
Cause: OAuth is not enabled in DocuSign Connect, or the Client ID and Client Secret do not match ServiceOps.
Fix: Return to Step 8, confirm Enable OAuth is ON, and verify the Client ID and Client Secret match what ServiceOps shows under Admin > Automation > Integrations > REST Integration.
Connect logs show HTTP 404 on webhook calls
Cause: The webhook URL in DocuSign Connect is incorrect.
Fix: Confirm the URL in the Connect configuration is https://<your-serviceops-url>/api/docusign/webhook with no trailing slash and the correct domain.
"consent_required" error when saving the provider
Cause: The consent grant in Step 6 was done in a different DocuSign environment than the credentials (developer vs. production).
Fix: Confirm you are using the correct DocuSign base URL for your environment and repeat Step 6 in the same environment as your Integration Key.
"no_valid_keys_or_signatures" error when saving the provider
Cause: The RSA keypair in DocuSign was regenerated after the private key was saved in ServiceOps, so they no longer match.
Fix: Generate a new RSA keypair in DocuSign (Step 3), copy the new private key, and update the provider form in ServiceOps.
Next Steps
- Create signature templates so technicians can send requests
- Configure role permissions to control which technicians can send and manage signatures
- Send a signature request on a request or service request
- Send a signature request on a change
- Send a signature request on a purchase order
- Send a signature request on a contract