Configuring Microsoft Azure for Microsoft Graph API
This guide sets up Microsoft Azure to let ServiceOps read and send email through your Exchange Online mailbox using the modern Microsoft Graph API, replacing the legacy Exchange Web Services (EWS) connection.
Microsoft Graph API is a unified REST API that provides access to Microsoft 365 data, including Exchange Online mailboxes. ServiceOps uses it to read incoming emails and convert them into tickets, and to send outgoing email notifications, when the MAPI protocol and Microsoft Graph API connection type are selected.
How This Works
Microsoft is retiring Exchange Web Services (EWS) for Exchange Online on October 1, 2026. Microsoft Graph API is the replacement. Complete this setup before that date to avoid disruption to email-to-ticket conversion and outgoing email delivery.
ServiceOps offers two ways to connect a mailbox using Microsoft Graph API. Choose the one that fits your environment:
| Option | Email Provider Setting | Best For |
|---|---|---|
| Sign in with Microsoft | Select Sign in with Microsoft. | Fastest setup. Uses ServiceOps's pre-registered Azure enterprise application, so no manual Azure App Registration is required. Recommended for most Microsoft 365 / Exchange Online environments. |
| Manual Azure App Registration | Select Other/Custom Server. | Environments that require a dedicated, organization-owned Azure app (for example, to restrict access to a single mailbox, or where IT policy requires all integrations to use a self-managed App Registration). |
Pick one option below and follow it through to the end. You do not need to complete both.
Option A: Sign in with Microsoft (Recommended)
This option skips Azure App Registration entirely. ServiceOps uses its own pre-registered Azure enterprise application, and you simply authorize it against your mailbox with a Microsoft sign-in prompt.
Prerequisites
Before starting, confirm the following:
- The URL
https://email-app.serviceops.ai/is accessible from your network. - Internet connectivity is available from the machine you're configuring ServiceOps on.
- MAPI is enabled on the email account you plan to connect.
- Application consent is enabled for the signing-in user and the group they belong to. If application consent is controlled by an administrator in your tenant, complete the steps in Configuring Admin Consent first, or have your Azure admin approve the consent request when prompted.
Steps
Navigate to Admin > Support Channel > Emails > Incoming Email Servers (or Outgoing Email Servers) and click Add Incoming Email Server (or Add Outgoing Email Servers).
Fill in the Basic Information section (Name, Email Address, and for Incoming Email Servers, Technician Group and Category).
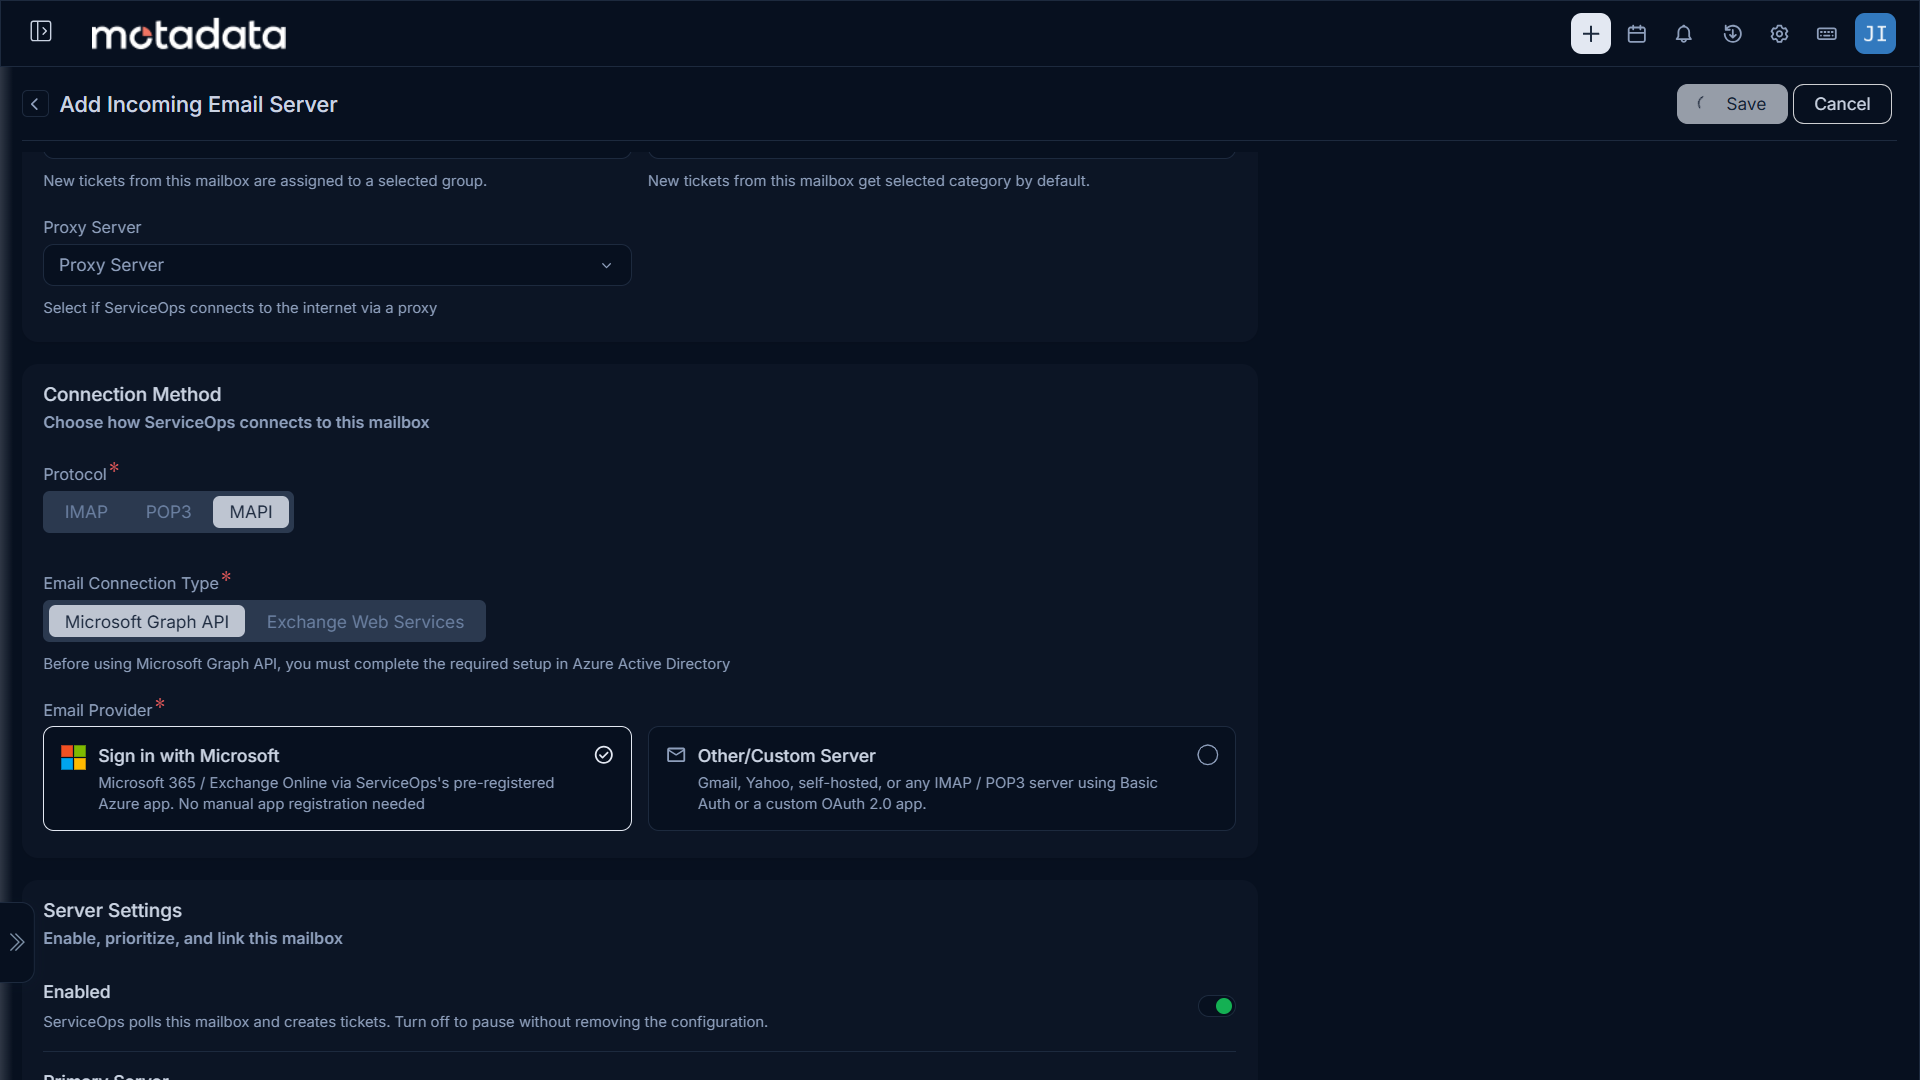
In the Connection Method section, set Protocol to MAPI and Email Connection Type to Microsoft Graph API.
Under Email Provider, select Sign in with Microsoft. The Server, Port, Security Type, and Email Auth Type fields are hidden and handled automatically. You don't need to fill these in.
Click Sign in with Microsoft.
Select or sign in to the Microsoft account for the mailbox you want to connect.

Review the requested permissions and click Accept to grant consent. If your organization requires an administrator to approve app consent, this step may instead show a request awaiting admin approval. See Configuring Admin Consent.

Once consent is granted, continue to the Server Settings section to finish configuring the server (Enabled, Primary Server, Real Time Scanning for Incoming; Reply-To Email, Enabled, Primary Server for Outgoing).
Optionally configure Email Filters.
Click Save, then click Test Connection from the server list page to verify the setup.
Because this option uses ServiceOps's own registered app, you don't need an Azure Global Administrator or access to the Azure portal to complete it, only the Microsoft sign-in and consent prompts shown above.
Option B: Manual Azure App Registration
Use this option if your organization requires its own dedicated Azure App Registration instead of ServiceOps's pre-registered app, for example, to restrict the integration to a single mailbox via an Application Access Policy.
Setup requires two steps completed in order:
- Azure setup (this section): Register an app in Azure, add Graph API permissions, and restrict mailbox access. This step requires an Azure Global Administrator.
- ServiceOps configuration: Return to ServiceOps and configure your Incoming Email Server, Outgoing Email Server, or both, selecting Microsoft Graph API as the connection type, Other/Custom Server as the Email Provider, and pasting the credentials from Step 1.
If the person configuring ServiceOps is not the Azure Global Administrator, share this guide with your Azure admin. Ask them to complete Step 1 and provide you with the Application (client) ID, Directory (tenant) ID, and Client Secret before you configure ServiceOps.
Prerequisites
Before starting, confirm the following:
- You have Azure Global Administrator rights, or access to someone who does, to register an app and grant admin consent.
- The email account is an Exchange Online or Office 365 mailbox.
- Your firewall allows outbound HTTPS (port 443) to
login.microsoftonline.comandgraph.microsoft.com.
Step 1: Set Up the Azure App Registration
Complete the following in the Microsoft Azure portal. If you need detailed instructions for any of these steps, refer to Register an application with the Microsoft identity platform.
Go to App registrations and click New registration.
Enter a name (for example,
ServiceOps Graph API) and select Accounts in this organizational directory only. Leave Redirect URI blank.Click Register and copy the Application (client) ID and Directory (tenant) ID from the app overview page.
Go to Manage > Certificates & secrets, click New client secret, and copy the Value immediately after creation. It won't be shown again.
Go to Manage > API Permissions, click Add a permission > Microsoft Graph > Application permissions, and add the permissions for the servers you plan to configure:
Permission Purpose Required For Mail.ReadLets ServiceOps read emails in the mailbox. Incoming Email Server Mail.ReadBasic.AllLets ServiceOps read basic mail properties. Incoming Email Server Mail.SendLets ServiceOps send emails from the mailbox. Outgoing Email Server Configuring Both Incoming and OutgoingIf you are configuring both an Incoming and an Outgoing Email Server against the same mailbox, add all three permissions to the same App Registration. You can then reuse the same Application (client) ID and Client Secret for both servers in Step 2.
Click Grant admin consent for {your organization} and confirm all permissions show a green checkmark.
Admin Rights RequiredThe Grant admin consent button is visible only to Azure Global Administrators. Refer to Grant Tenant-wide admin consent to an application for details.
Restrict the app to access only the specific mailbox used in ServiceOps. Run the following in Exchange Online PowerShell, or follow the full guide at Limiting application permissions to specific Exchange Online mailboxes:
New-ApplicationAccessPolicy `
  -AppId "<Application (client) ID>" `
  -PolicyScopeGroupId "<mailbox email address>" `
  -AccessRight RestrictAccess `
  -Description "Restrict ServiceOps Graph API access to one mailbox"
Step 2: Configure the Email Server in ServiceOps
Using the credentials from Step 1, configure an Incoming Email Server, an Outgoing Email Server, or both, depending on which permissions you added.
For Incoming Email Servers
Navigate to Admin > Support Channel > Emails > Incoming Email Servers and click Add Incoming Email Server.
Basic Information
| Parameter | Value |
|---|---|
| Name | Enter a name to identify this mailbox. |
| Email Address | Enter the Exchange Online mailbox address. |
| Technician Group | Select the group assigned to tickets created from this mailbox. |
| Category | Select the category assigned to tickets created from this mailbox. |
| Proxy Server | Select a proxy server if ServiceOps connects to the internet via a proxy. Leave blank otherwise. |
Connection Method
| Parameter | Value |
|---|---|
| Protocol | Select MAPI. |
| Email Connection Type | Select Microsoft Graph API. |
| Email Provider | Select Other/Custom Server. |
Server Connection
| Parameter | Value |
|---|---|
| Server | outlook.office365.com |
Authentication
Enable Authentication and set Authentication Type to OAuth 2.0.
| Parameter | Value |
|---|---|
| Username | Enter the Exchange Online mailbox address. |
| Scope | https://graph.microsoft.com/.default |
| Client ID | Paste the Application (client) ID from Step 1. |
| Client Secret | Paste the client secret from Step 1. |
| Authorization URL | https://login.microsoftonline.com/{Tenant-ID}/oauth2/v2.0/authorize |
| Token URL | https://login.microsoftonline.com/{Tenant-ID}/oauth2/v2.0/token |
| Redirect URL | Optional. Copy the value ServiceOps generates for this field only if your Azure App Registration requires a Redirect URI. |
Replace {Tenant-ID} in the Authorization URL and Token URL with the Directory (tenant) ID from Step 1.
Server Settings
| Parameter | Value |
|---|---|
| Enabled | Toggle on. ServiceOps polls this mailbox and creates tickets. |
| Primary Server | Enable if this is your only incoming server, or to use it as the fallback when other incoming servers fail. At least one server should be set as primary. |
| Real Time Scanning | Enable to create tickets instantly when an email arrives. If disabled, ServiceOps checks the mailbox at scheduled intervals instead. |
| Outgoing Email Server | Select the outgoing server used to send replies and notifications for tickets created from this mailbox. Uses the primary outgoing server if not set. |
Email Filters
Optional. Control which emails create tickets using Filter Type (Allow or Ignore), along with Email Addresses, Domains, and Subject Keywords. If no filters are configured, ServiceOps accepts emails from all senders.
Click Save, then click Test Connection from the server list page to verify the setup.
For Outgoing Email Servers
Navigate to Admin > Support Channel > Emails > Outgoing Email Servers and click Add Outgoing Email Servers.
Basic Information
| Parameter | Value |
|---|---|
| Name | Enter a name to identify this mail server. |
| Email Address | Enter the Exchange Online mailbox address ServiceOps sends emails through. |
| Sender Name | Shown only when Protocol is set to SMTP; not shown for MAPI. |
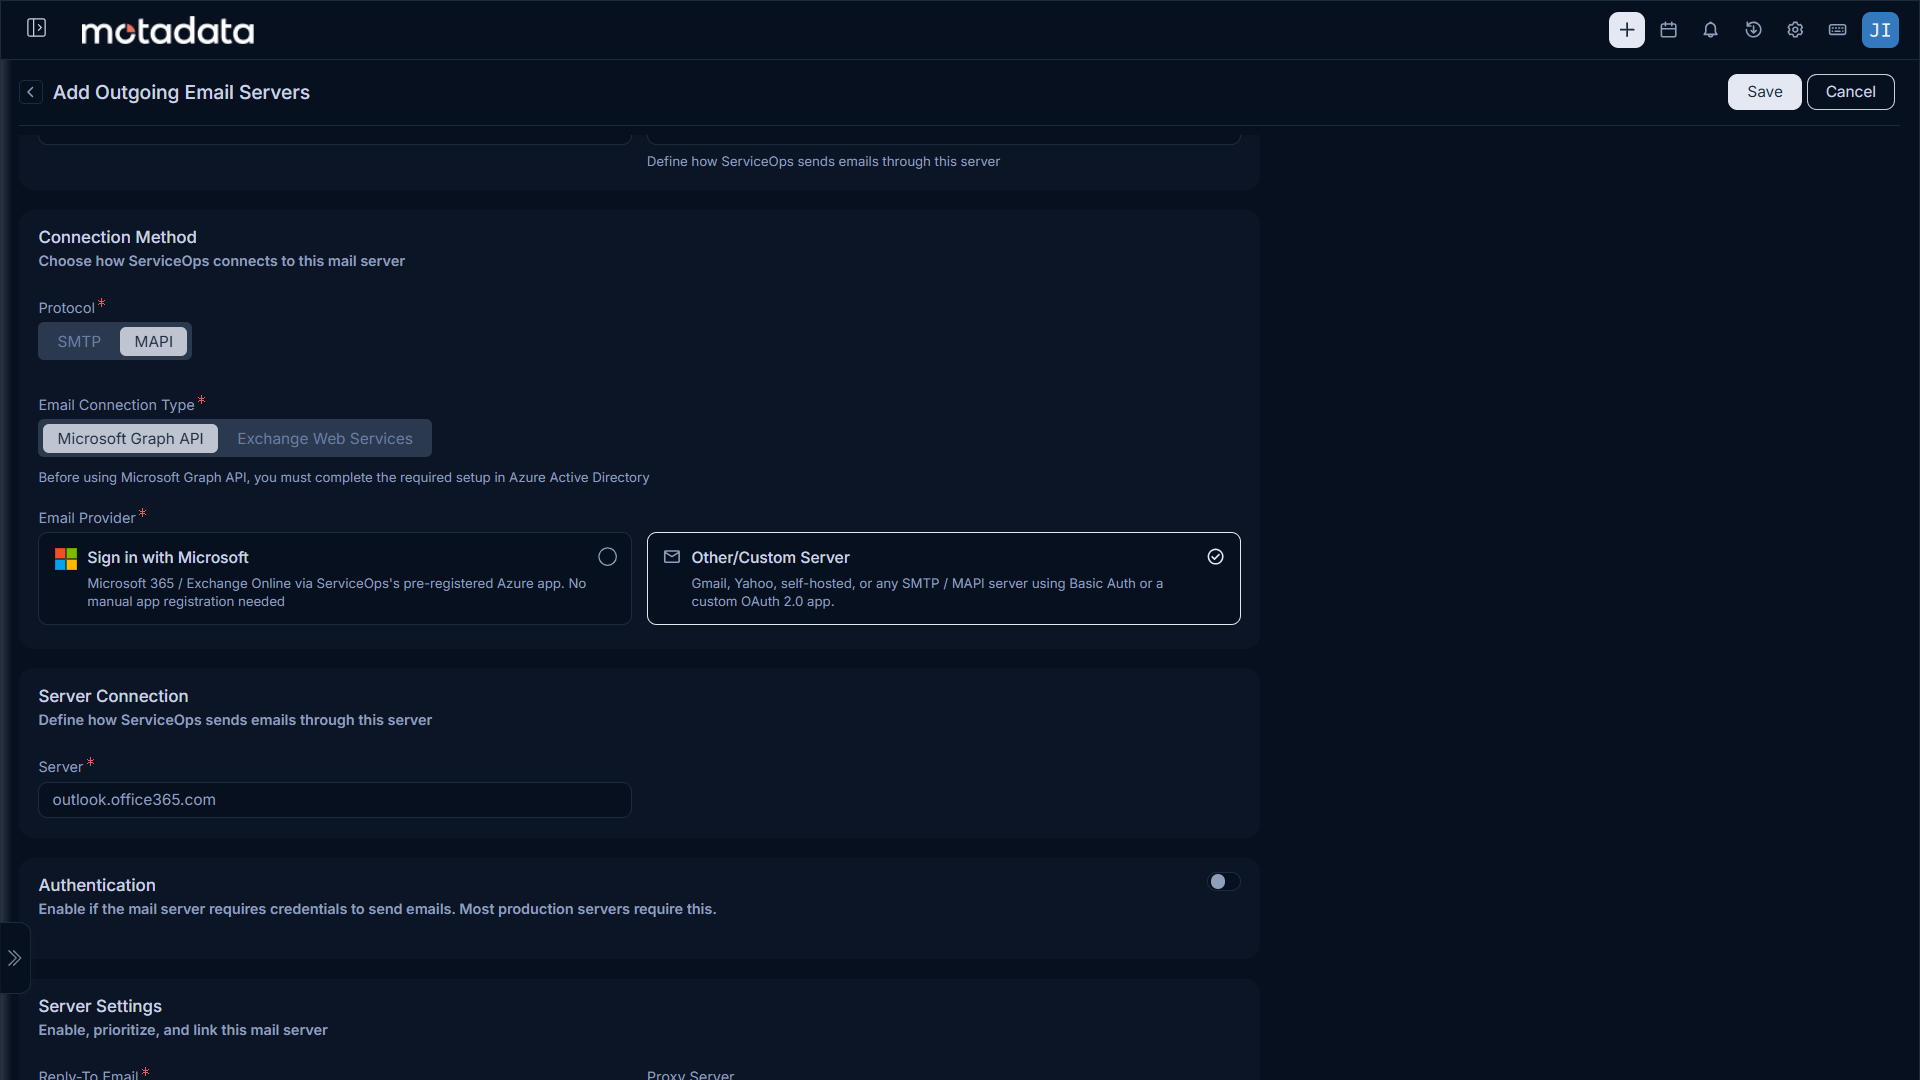
Connection Method
| Parameter | Value |
|---|---|
| Protocol | Select MAPI. |
| Email Connection Type | Select Microsoft Graph API. |
| Email Provider | Select Other/Custom Server. |
Server Connection
| Parameter | Value |
|---|---|
| Server | outlook.office365.com |
Authentication
Enable Authentication and set Authentication Type to OAuth 2.0.
| Parameter | Value |
|---|---|
| Username | Enter the Exchange Online mailbox address ServiceOps sends emails through. |
| Scope | https://graph.microsoft.com/.default |
| Client ID | Paste the Application (client) ID from Step 1. |
| Client Secret | Paste the client secret from Step 1. |
| Authorization URL | https://login.microsoftonline.com/{Tenant-ID}/oauth2/v2.0/authorize |
| Token URL | https://login.microsoftonline.com/{Tenant-ID}/oauth2/v2.0/token |
| Redirect URL | Optional. Copy the value ServiceOps generates for this field only if your Azure App Registration requires a Redirect URI. |
Replace {Tenant-ID} in the Authorization URL and Token URL with the Directory (tenant) ID from Step 1.
Server Settings
| Parameter | Value |
|---|---|
| Reply-To Email | Enter the address recipient replies should be directed to. |
| Proxy Server | Select a proxy server if ServiceOps connects to the internet via a proxy. Leave blank otherwise. |
| Enabled | Toggle on. ServiceOps uses this server to send emails. |
| Primary Server | Enable if this is your only outgoing server, or to use it as the fallback when other outgoing servers fail. At least one server should be set as primary. |
Email Filters
Optional. Control which recipients can receive emails using Filter Type (Allow or Ignore), along with Email Addresses and Domains. If no filters are configured, all recipients are allowed.
Click Save, then click Test Connection from the server list page to verify the setup.
Troubleshooting
Common issues when configuring Microsoft Azure for Microsoft Graph API.
Sign in with Microsoft button doesn't complete, or shows a consent/approval pending message
Cause: Application consent for ServiceOps's pre-registered app is restricted to administrators in your Microsoft 365 tenant.
Fix:
- Ask your Azure admin to review and approve the pending consent request, or complete the steps in Configuring Admin Consent to pre-approve the app for your organization.
- Retry Sign in with Microsoft once consent has been granted.
Test Connection fails after saving the server (Manual Azure App Registration)
Cause: The Azure App Registration is missing required Graph API permissions, or admin consent was not granted.
Fix:
- Open the Azure App Registration and go to Manage > API Permissions.
- For an Incoming Email Server, confirm
Mail.ReadandMail.ReadBasic.Allare listed as Application permissions with a green checkmark. For an Outgoing Email Server, confirmMail.Sendis listed with a green checkmark. - If the checkmark is missing, click Grant admin consent again.
- Return to ServiceOps and click Test Connection.
Authentication fails with "invalid_client" or "unauthorized_client" error (Manual Azure App Registration)
Cause: The Client ID or Client Secret in ServiceOps does not match the Azure App Registration, or the secret has expired.
Fix:
- Confirm the Application (client) ID in Azure matches the Client ID in ServiceOps.
- Go to Manage > Certificates & secrets in Azure and check whether the secret has expired. Generate a new one if it has.
- Update the Client Secret in the ServiceOps server configuration and save.
- Click Test Connection to verify.
Emails are not converting into tickets after a successful Test Connection (Incoming)
Cause: The Application Access Policy may not include the correct mailbox (Manual Azure App Registration only), or Email to Ticket is disabled in ServiceOps.
Fix:
- If using a Manual Azure App Registration, confirm the
New-ApplicationAccessPolicycommand in Step 1 used the correct mailbox email address. - Navigate to Admin > Support Channel > Emails > Email Preference and confirm Email to Ticket is enabled.
- Check Admin > Organization > Security > Operation Audit for Email Audit rejection reasons.
Test Connection succeeds but outgoing emails are not delivered (Outgoing)
Cause: The Mail.Send permission may be missing (Manual Azure App Registration), or the sending mailbox does not match the mailbox restricted by the Application Access Policy.
Fix:
- Confirm
Mail.Sendis listed as an Application permission with a green checkmark in Azure. - If using a Manual Azure App Registration, confirm the
New-ApplicationAccessPolicycommand in Step 1 used the same mailbox address configured as the Email Address on the Outgoing Email Server. - Check Admin > Organization > Security > Operation Audit for Email Audit delivery failures.
Scope field error when saving the server (Manual Azure App Registration)
Cause: An incorrect scope value was entered. Graph API application permissions require a specific scope format.
Fix: Set the Scope field to exactly https://graph.microsoft.com/.default. Do not use EWS or IMAP scope values here.