Asset Discovery
Asset Discovery is the feature that discovers the assets in the network for asset management. It supports both On-Premise and SaaS-based platforms. Using Asset Management, the admin maintains the records of all the hardware or software assigned to each employee.
Here, Motadata ServiceOps helps in maintaining as well as discovering all the possessed asset records in just one application. In addition, it adds with the asset’s number and exact names. Thus, Asset Discovery helps to find all the assets of each single network or single location using various features such as network scan, domain scan, and SCCM scan. Moreover, adding multiple Credentials for successful network connection will ultimately show the discovery of the assets after the scan.
Supported OS Version List
Linux OS Version List
- Ubuntu 16.04 (For All Desktop and Server versions)
- Ubuntu 18.04 (For All Desktop and Server versions)
- Ubuntu 20.04, 20.10 (For All Desktop and Server versions)
- Ubuntu 21.04 (For All Desktop and Server versions)
- Ubuntu 22.04 ( Jammy ) (For All Desktop and Server versions)
- Ubuntu 22.10 ( Kinetic ) (For All Desktop and Server versions)
- Ubuntu 23.04 (Lunar Lobster)
- CentOS 7
- CentOS 8
- CentOS 8 Stream
- Redhat Core
- RedHat OS v6
- RedHat Server v7
- RedHat Server v8
- Mint OS 18/19/20
- openSUSE 15.3/15.4/15.5
- SUSE Enterprise
- Debian 8/9/10/11
- Oracle Linux 7/8/9
- Fedora Os
- SunOs
- VMware
- VMware Photon
- Solaris
- IBM AIX
- IBM VIO
Mac OS Version List
- macOS ("10.15", "10.16", "12", "13", "14")
Windows Server OS List:
- Windows Server 2008
- Windows Server 2012
- Windows Server 2016
- Windows Server 2019
- Windows Server 2022
Assets can be discovered in two ways:
- Using Discovery Service: This is used in the On-premise ServiceOps application for discovering the assets (Agentless and Agent-based). To discover the agent-based assets, Motadata ServiceOps agent is required to be installed in the target machines. To install the agent, refer to the Agent Installation Guide. To discover the agentless assets, use the features like Network Scan, Domain Scan, Cloud Network, and SCCM Scan.
Prerequisites for Asset Discovery:
To perform Agentless Asset Discovery, run the below commands using the Powershell application with Run as Administrator rights:
set-WSManQuickConfig -Force
enable-PSRemoting -SkipNetworkProfileCheck -Force
set-Item -Force WSMan:\localhost\Client\TrustedHosts -Value {ServiceOps IP or hostname/Poller IP}
set-Item -Force WSMan:\localhost\Service\AllowUnencrypted -value 'true'
set-Item -Force WSMan:\localhost\Service\Auth\Basic -value 'true'
set-Item -Force WSMan:\localhost\Service\MaxConnections -value '100'
set-Item -Force WSMan:\localhost\Service\MaxConcurrentOperationsPerUser -value '4294967295'
set-Item -Force WSMan:\localhost\Service\MaxConcurrentOperations -value '4294967295'
set-Item -Force WSMan:\localhost\Shell\MaxMemoryPerShellMB -value '1024'
set-Item -Force WSMan:\localhost\Shell\MaxProcessesPerShell -value '2147483647'
set-Item -Force WSMan:\localhost\Shell\MaxConcurrentUsers -value '100'
set-Item -Force WSMan:\localhost\Shell\MaxShellsPerUser -value '2147483647'
set-Item -Force WSMan:\localhost\MaxEnvelopeSizeKb -value '8192'
net stop winrm
net start winrm
| Command | Description |
|---|---|
| set-WSManQuickConfig -Force | This command configures the WinRM service to enable remote management. The `-Force` parameter is used to automatically configure WinRM without prompting for confirmation. |
| enable-PSRemoting -SkipNetworkProfileCheck -Force | This command enables PowerShell remoting, which allows remote management of Windows computers using PowerShell commands. The -SkipNetworkProfileCheck parameter allows remoting in public networks. The '-Force' parameter enables remoting without prompting for confirmation. |
| set-Item -Force WSMan:\localhost\Client\TrustedHosts -Value (ServiceOps IP or hostname/Poller IP) | This command sets the list of trusted hosts for WinRM client. You need to replace (ServiceOps IP or hostname/Poller IP) with the IP address or hostname of the ServiceOps system or the Poller system, whichever system you want to trust for remote management. |
| set-Item -Force WSMan:\localhost\Service\AllowUnencrypted -value 'true' | This command allows unencrypted WinRM connections. Note: For secure remote communication, an improvement is planned in the road map, where SSL certificate support for encrypted data transfer will be provided. |
| set-Item -Force WSMan:\localhost\Service\Auth\Basic -value 'true' | This command enables basic authentication for WinRM connections, providing a simple authentication mechanism for remote management. |
In case the Powershell application is disabled, fulfill the below prerequisites:
UAC should be allowed. The user can allow this in two ways:
Manually by going to the path “Computer\HKEY_LOCAL_MACHINE\SOFTWARE\Microsoft\Windows\CurrentVersion\Policies\System” and setting the value of “LocalAccountTokenFilterPolicy” parameter as “1”.
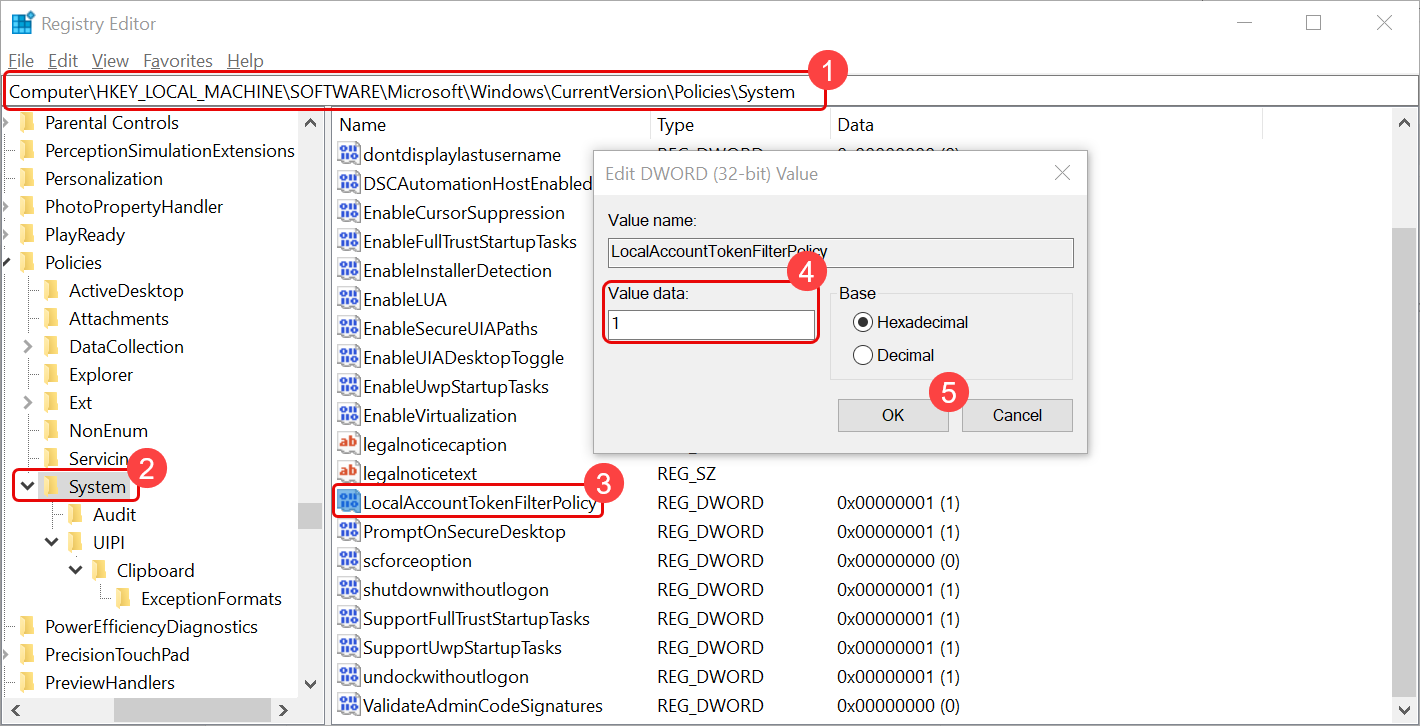
Once done, reboot the machine.
Directly executing the below command in the Command Prompt using Run As Administrator rights.
HKLM\SOFTWARE\Microsoft\Windows\CurrentVersion\Policies\system /v LocalAccountTokenFilterPolicy /t REG_DWORD /d 1 /f
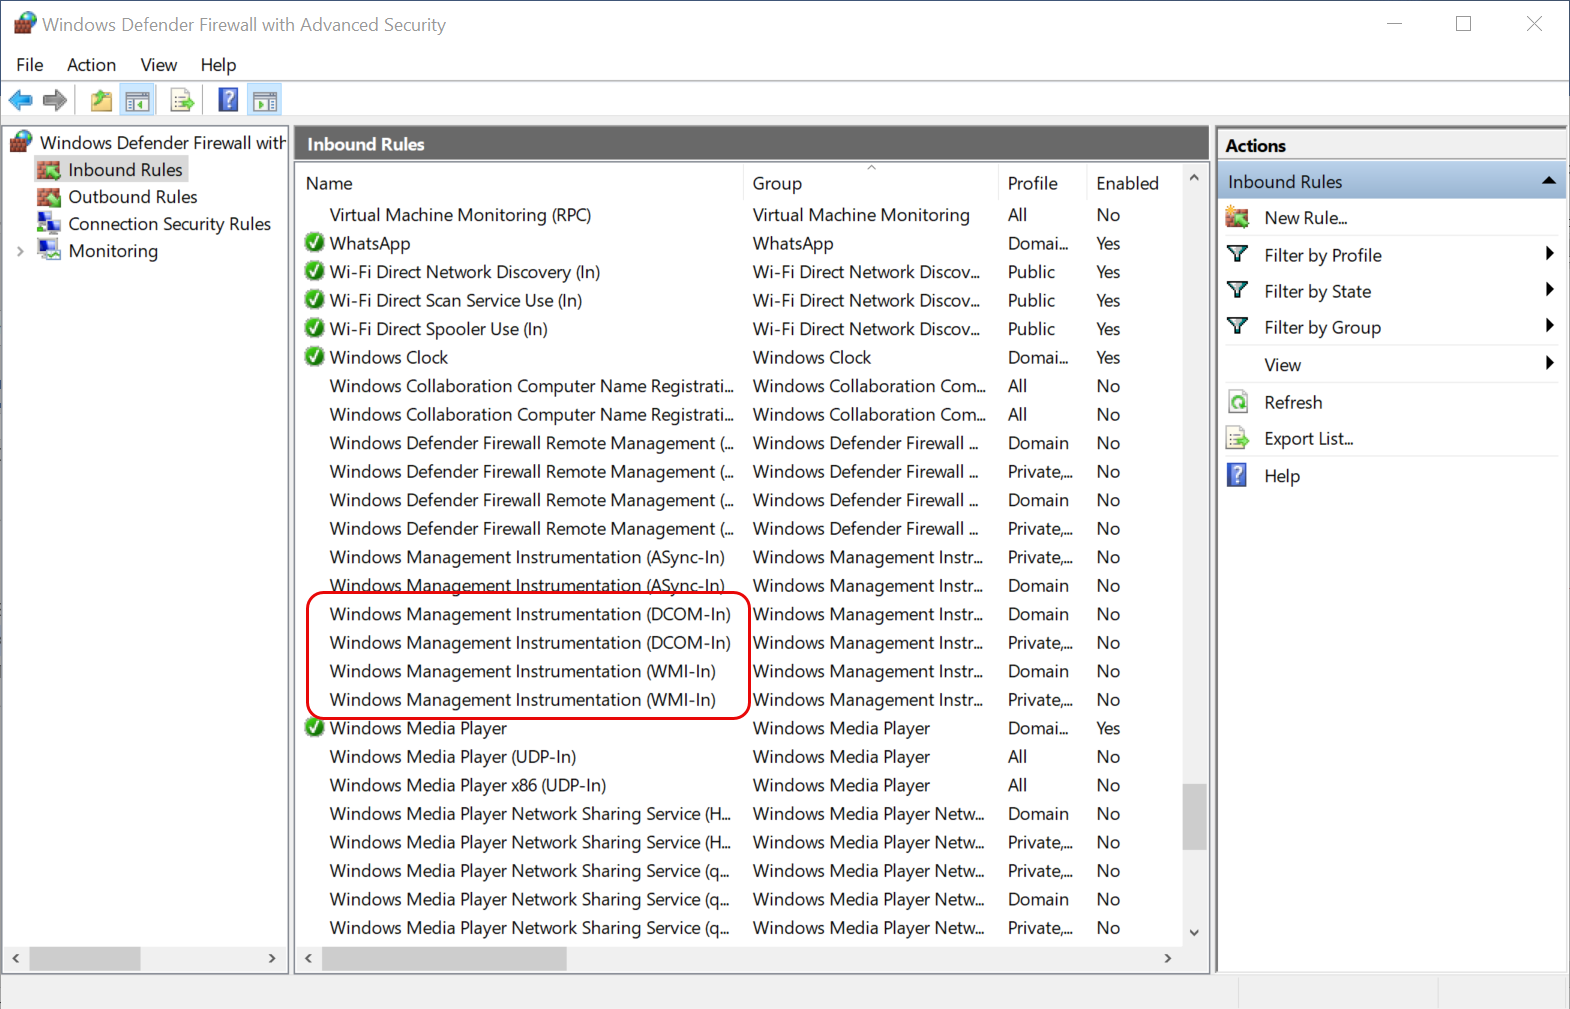
If the Firewall is ON, allow the below Inbound Rules:
- Windows Management Instrumentation (DCOM-In) (Private, Public)
- Windows Management Instrumentation (DCOM-In) (Domain)
- Windows Management Instrumentation (WMI-In) (Private, Public)
- Windows Management Instrumentation (WMI-In) (Domain)
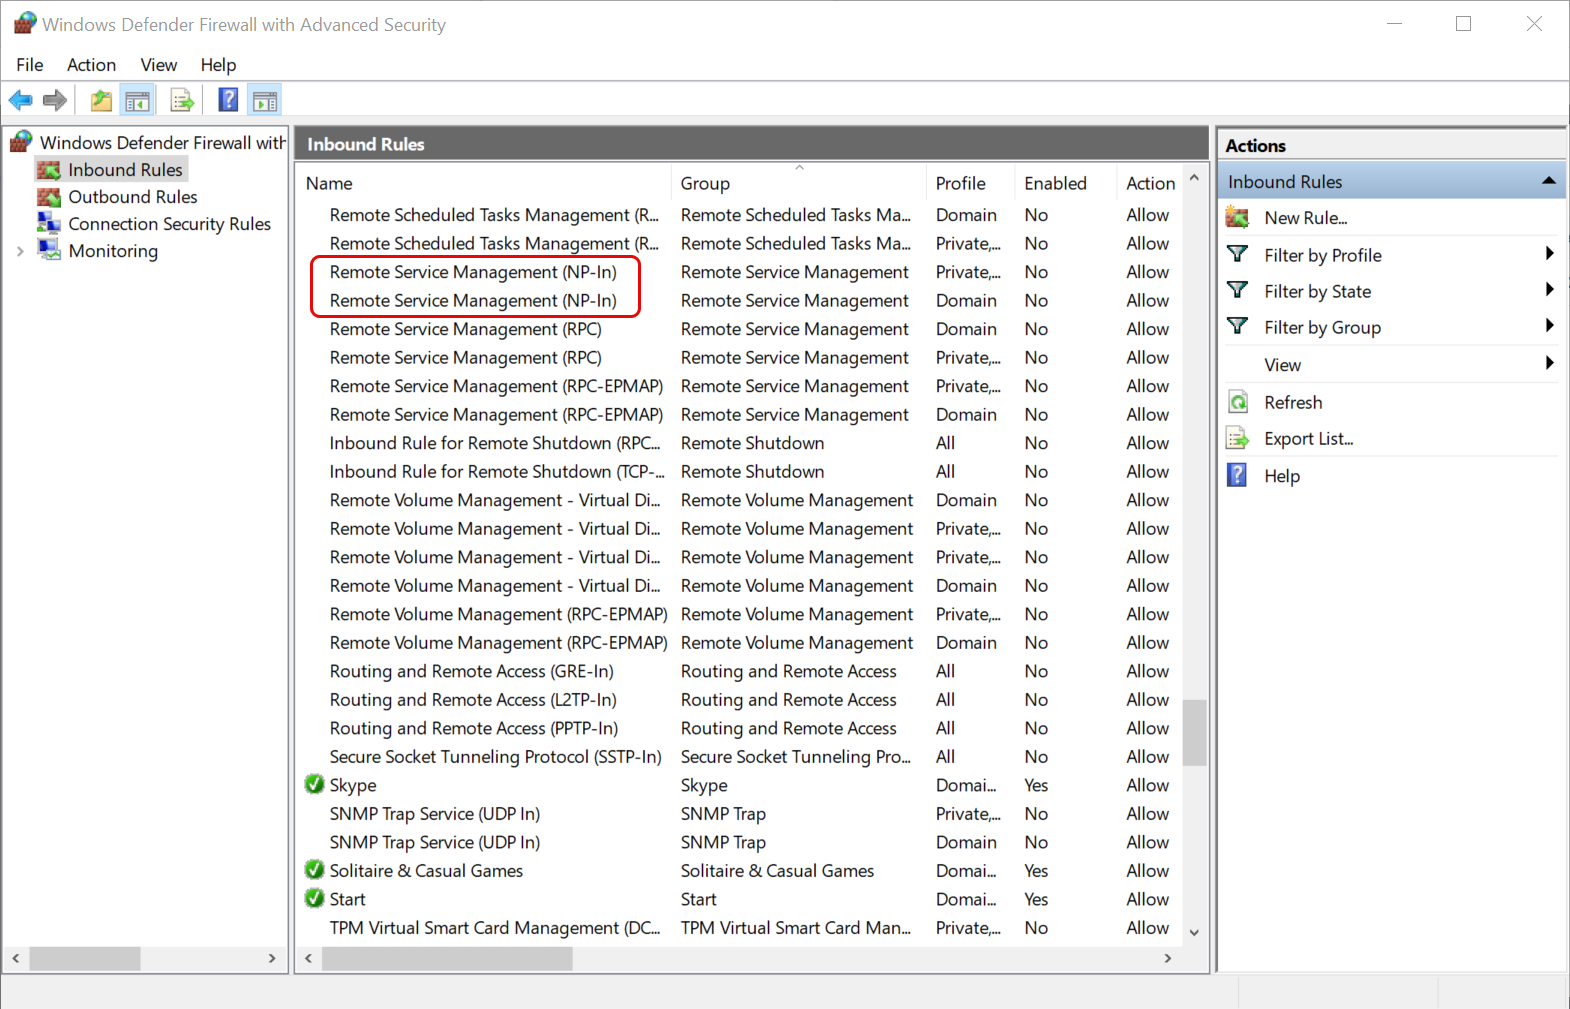
- If the Firewall is ON, allow the below Inbound Rules:
- Remote Service Management (NP-In) (Private, Public)
- Remote Service Management (NP-In) (Domain)
To check whether the server can communicate with the Agent, use the below command:
python3 /opt/flotomate/main-server/config/impacket/examples/wmiexec.py {user_name}:{password}@{ip} "wmic os get Name"Using Discovery Poller Service: This is used in the SaaS-based as well as On-Premise ServiceOps application. It discovers the assets in the local network behind the firewall and also remote offices. To achieve this, the Poller service is required to be installed in the network in which the assets are available. To install the Poller Service, refer to the Poller Service Installation Guide.
To view the Asset Discovery page, navigate to Admin > Asset Management > Asset Discovery.
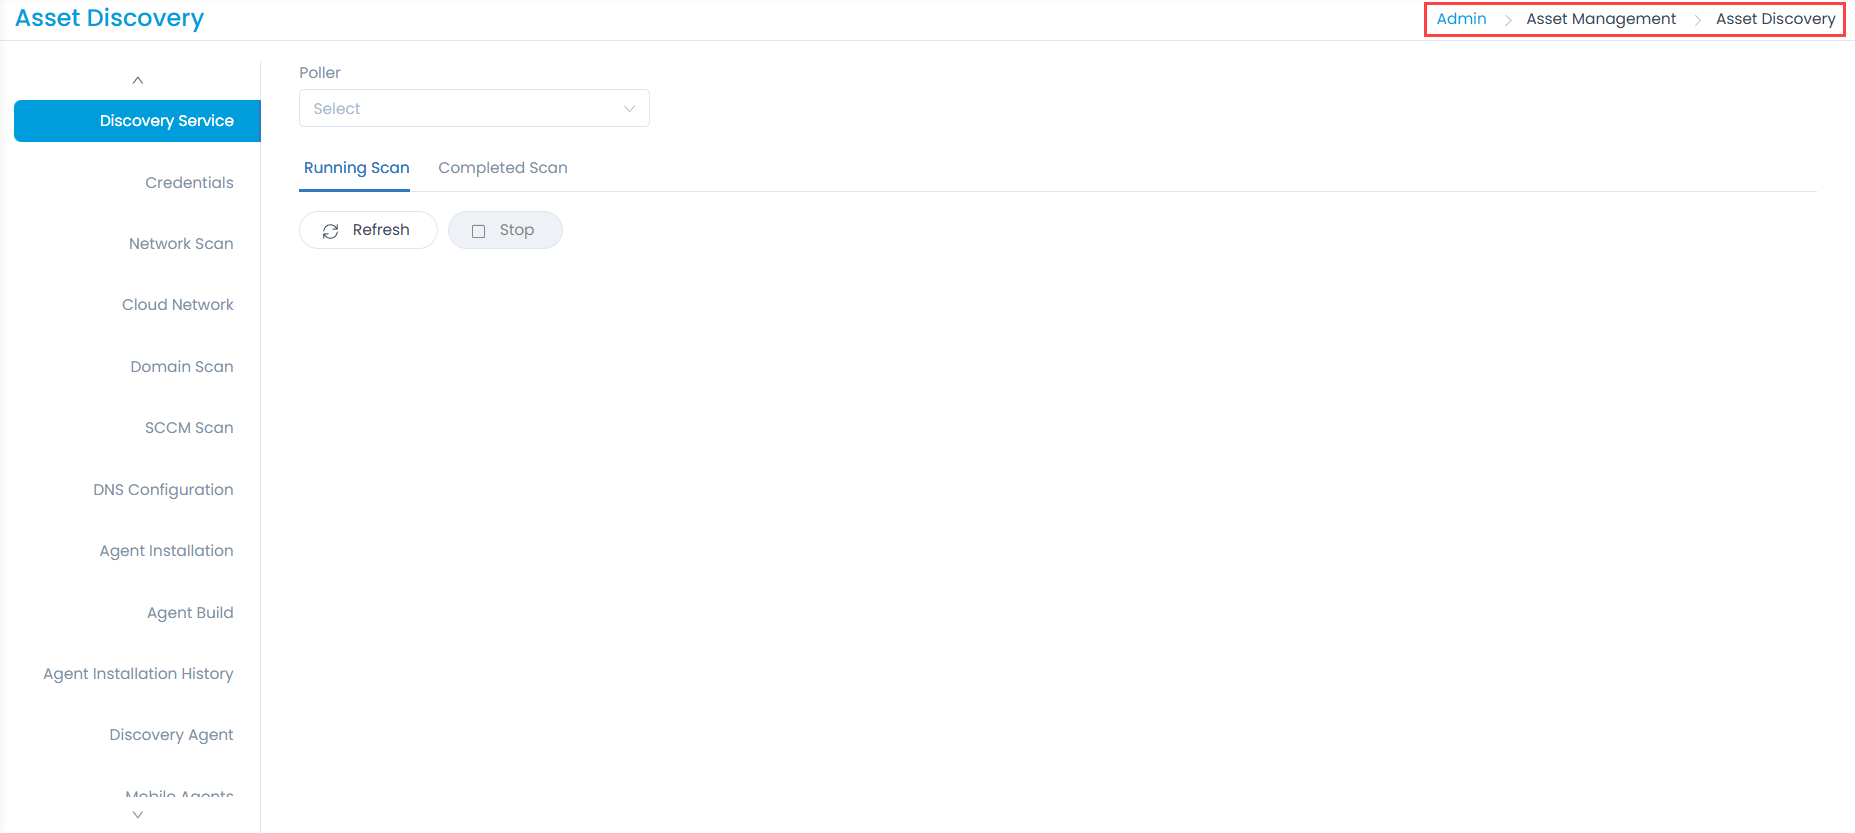
Discovery Service
This page shows the list of all assets discovered either by using the poller service or without it. When a scan is manually performed or scheduled, all the assets list down here in numbers.
It displays three tabs: Pending Scan, Running Scan and Completed Scan.
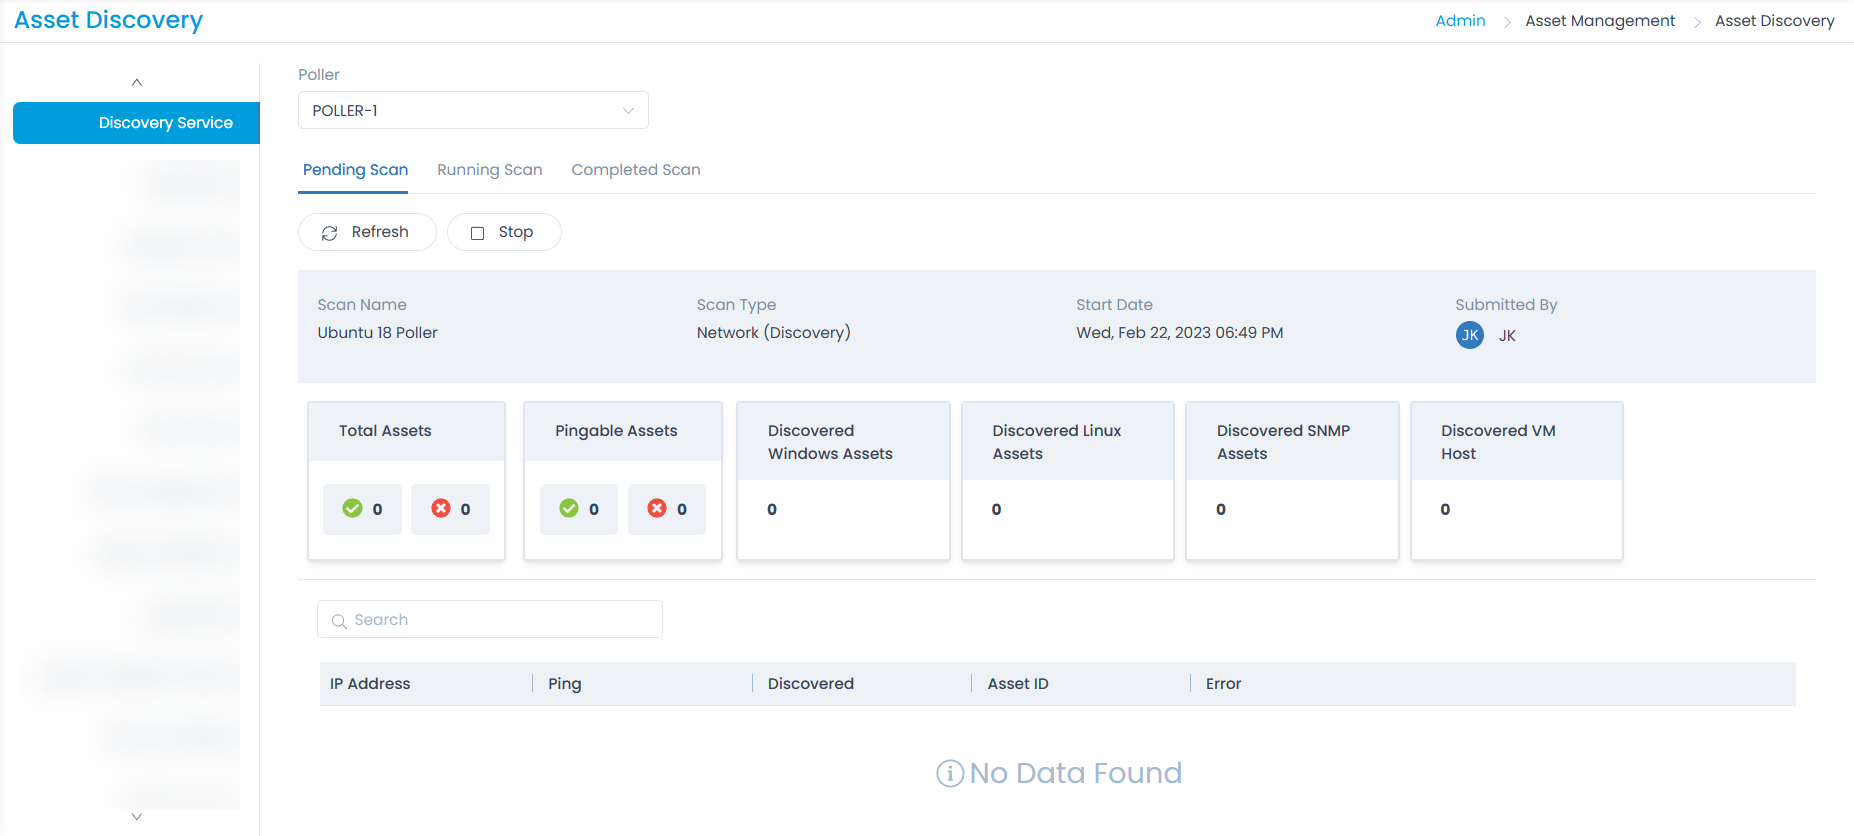
Pending Scan
This tab displays the scan that is in pending state. Once it starts running, it will be moved to the Running Scan tab.
This tab is available only if Poller service is selected.
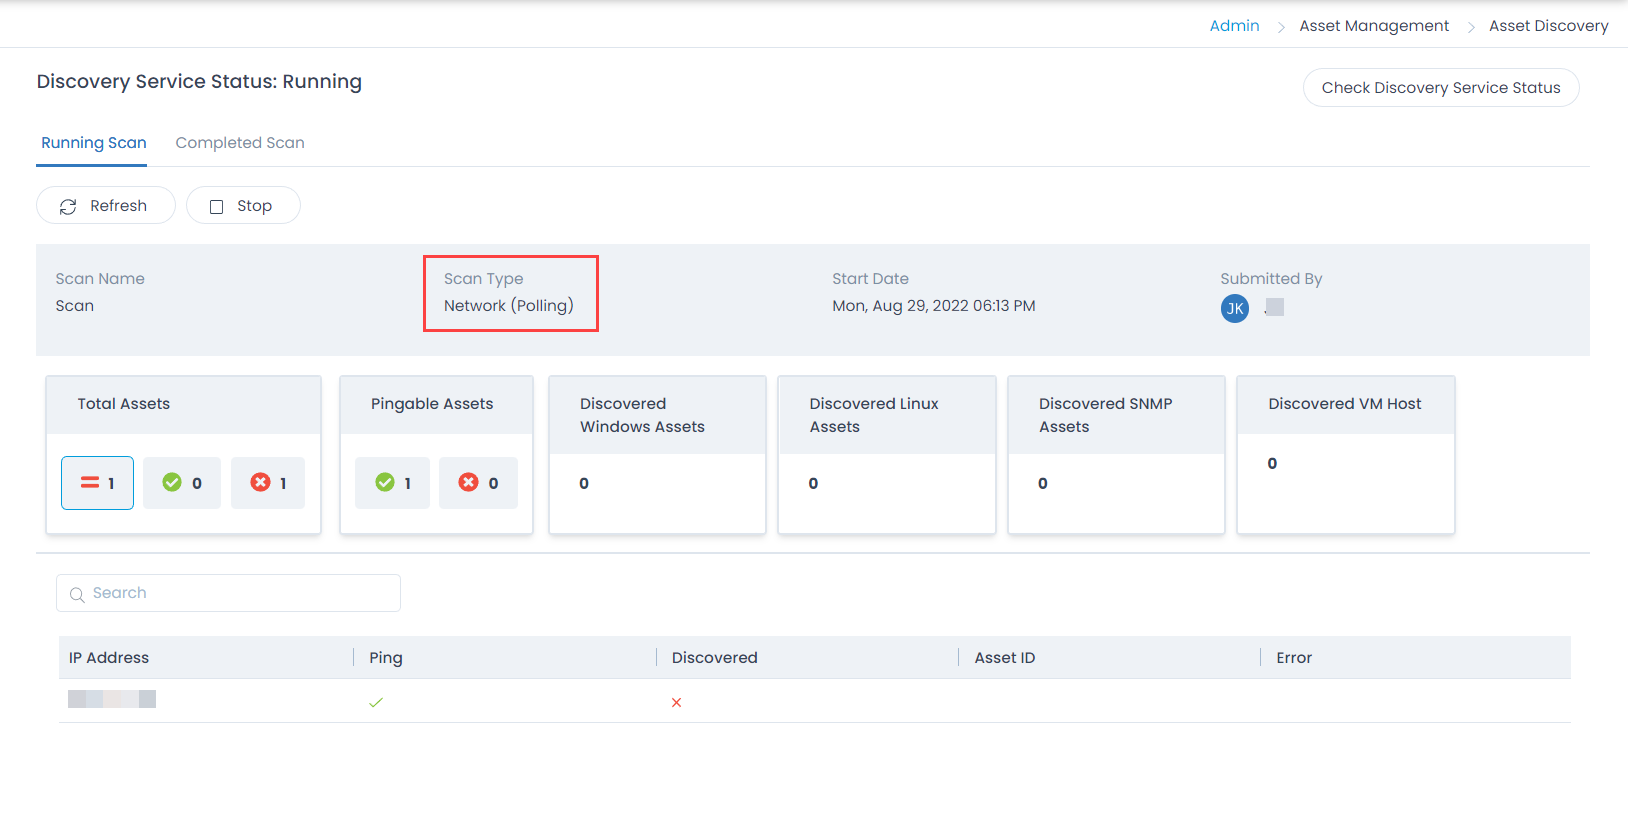
Running Scan This tab displays the scan currently running along with the details as shown below.
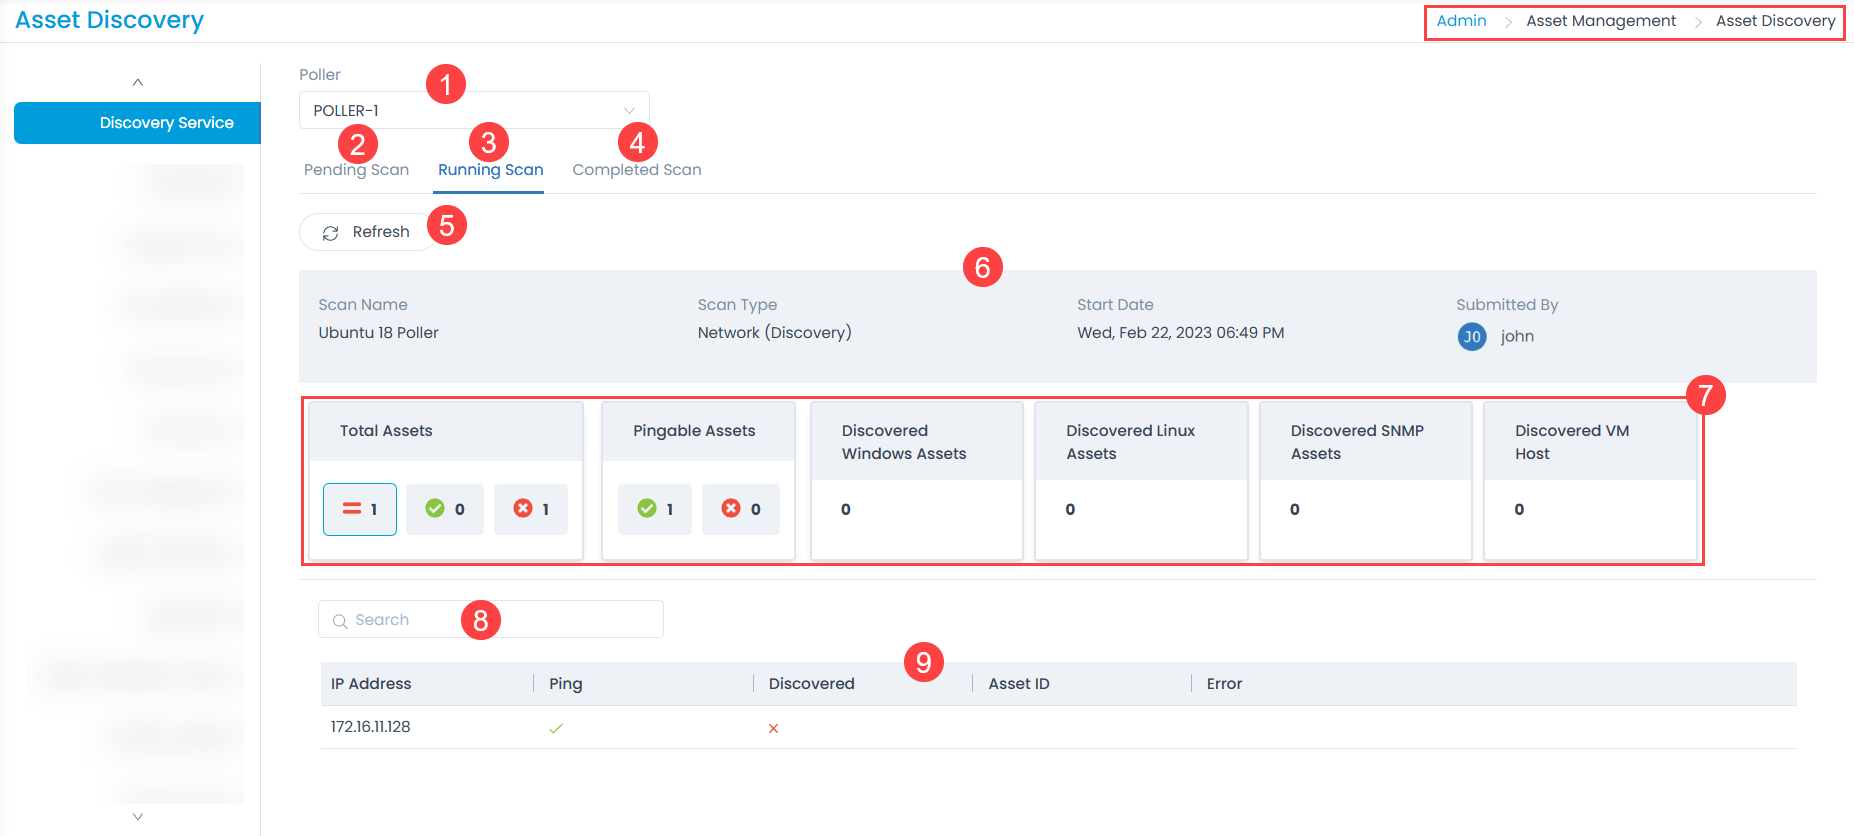
- Poller: Select the poller service for which you want to view the scan details.
- Pending Scan: Displays the pending scan. It is available only while performing scan based on a particular poller service.
- Running Scan: Displays the Ongoing Scan services, where the status gets updated as long as the scan keeps on running.
- Completed Scan: Displays the completed scan results with the number of assets that are discovered or not discovered.
- Refresh: You can refresh the page for continuous update of assets discovered.
- Scan Details: Displays the details of the scan which includes the network’s name, type of scan, Start date/time, and User.
- Discovery Details: Displays bifurcation of the assets such as Total Assets, Pingable assets, Discovered Assets, and Not Discovered assets.
- Search: You can search the required IP Address from a list of assets discovered.
- IP Address List: Displays a list of IP Addresses that are pingable and discovered along with their asset IDs.
Completed Scan
This tab displays the details of the scan that is completed.
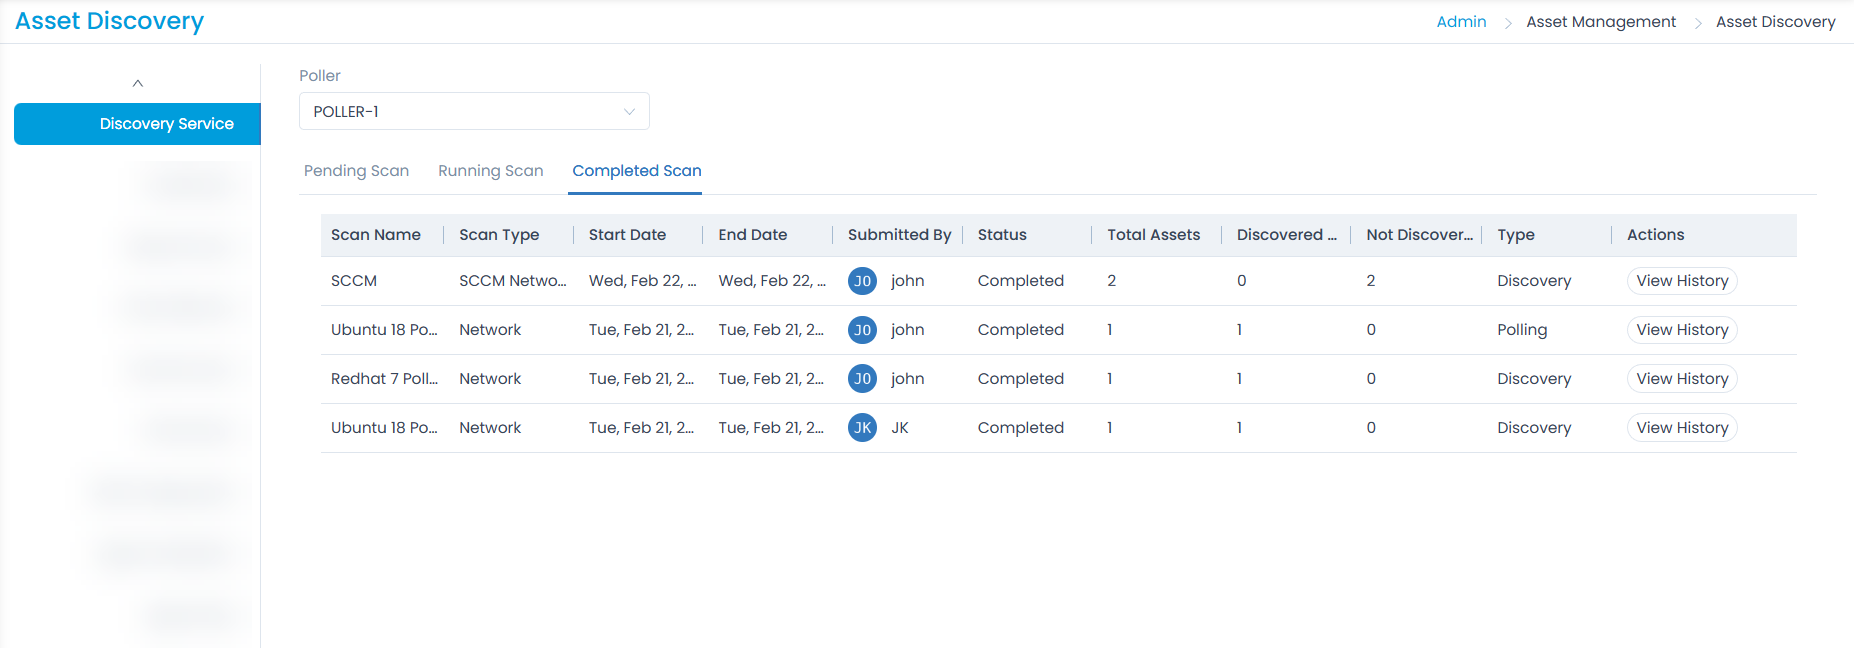
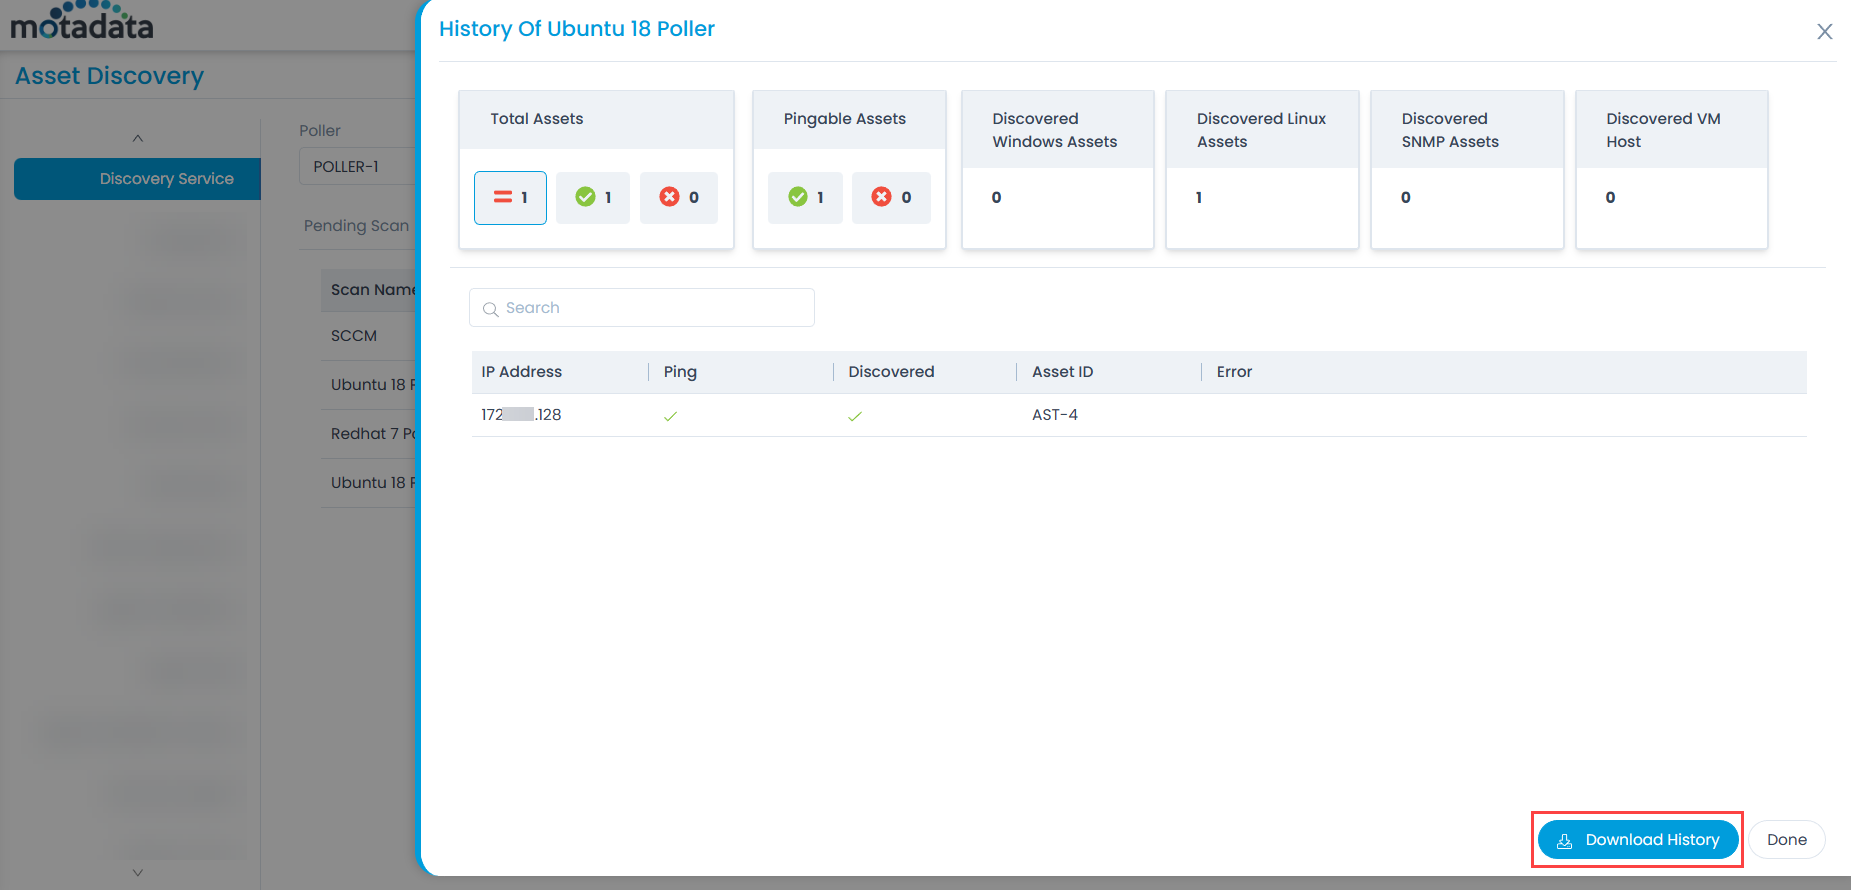
You can also view the history of the scan by clicking the View History button. The popup displays the Success and Failed count of the assets discovered by clicking on the count of the respective block. It displays the total assets, pingable, and not pingable assets, discovered Windows, Linux, SNMP, and VM Host assets respectively.
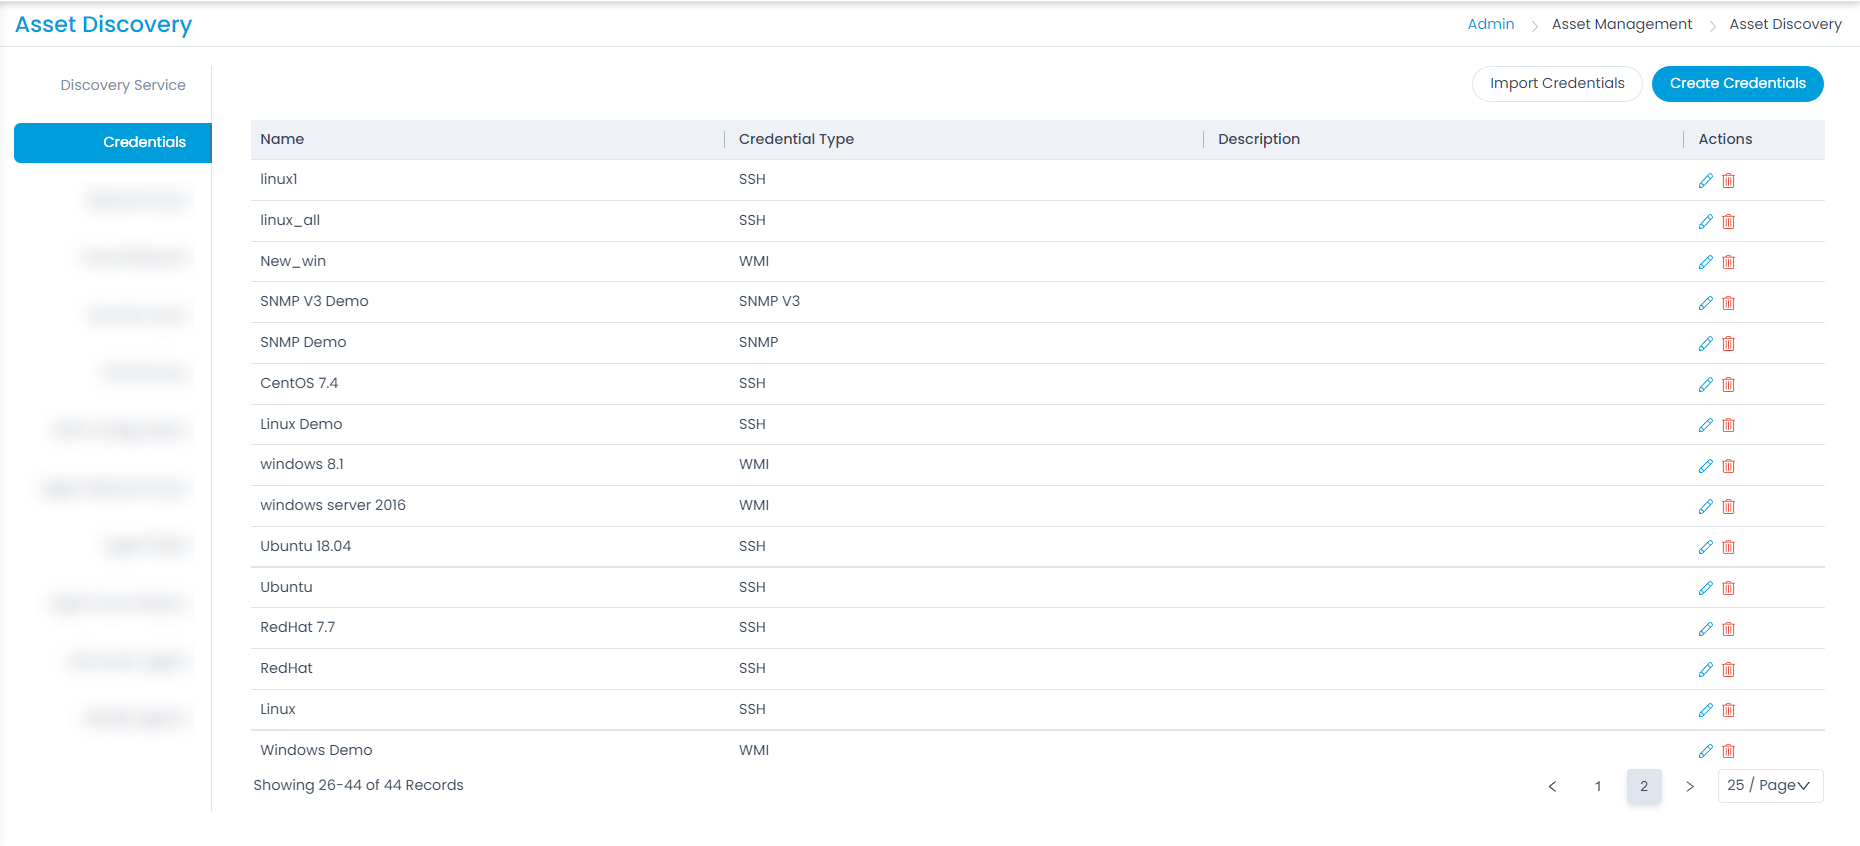
Credentials
Motadata ServiceOps provides an interface to upload all your credentials, so our product can authenticate for an authorized access to a network. A repository stores all the Credentials, also known as a library where you can manage (add, edit and delete) them.
- Managing credentials require administrative rights.
- If the Credentials are incorrect, authentication fails, and the asset discovery fails too.
Adding Credential
To create credentials, click the Create Credentials button and a popup appears where you need to fill the details.

The details are:
- Name: Enter the name of the credential.
- Credential Type: Select the type of credentials. The options are: WMI, SSH, SNMP, SNMP V3, VMWARE, AWS, AZURE. Based on the option selected, enter the username and password details of the machines that you want to discover. For example, if Azure is selected, enter the Azure Subscription ID, Client Secret, Client ID, and Tenant ID details.
- Once you are done, click Save. You can also click the Test Connection button to check the connectivity. Later, you can also edit or delete the credentials if not required.
The Test Connection button is unavailable in the SaaS application.
You can create multiple credentials required for the future asset discoveries also.
Troubleshooting
In case you face any issue in discovering the asset via WMI/winRM, verify the ports and Firewall settings:
Check whether the below ports are open on the target server:
If winRM (HTTP): 5985
If winRM (HTTPS): 5986
If WMI: 135
On the target server, check the status of the port by using the below command:
netstat -ano | findstr <port_number>
Check whether the Firewall is not blocking connections from Poller/ServiceOps server to the target.
On the Poller/ServiceOps server run the below command:
telnet <ip> <port>
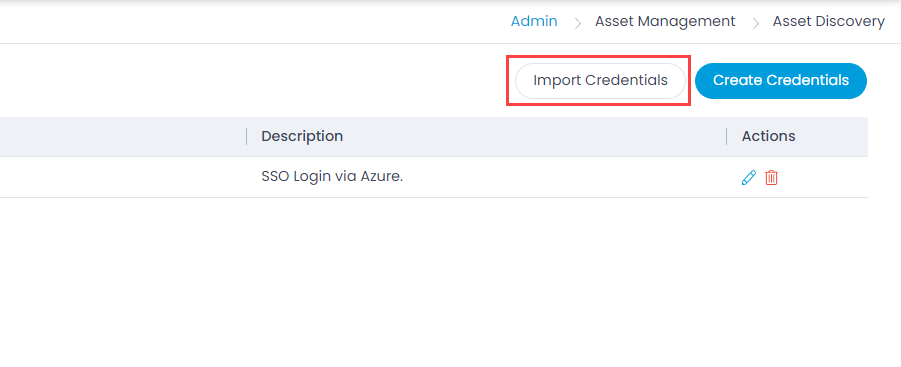
Import Credentials
This option allows you to import the credentials in bulk. To do so,
- Click the Import Credentials button. The Credential Batches page appears.
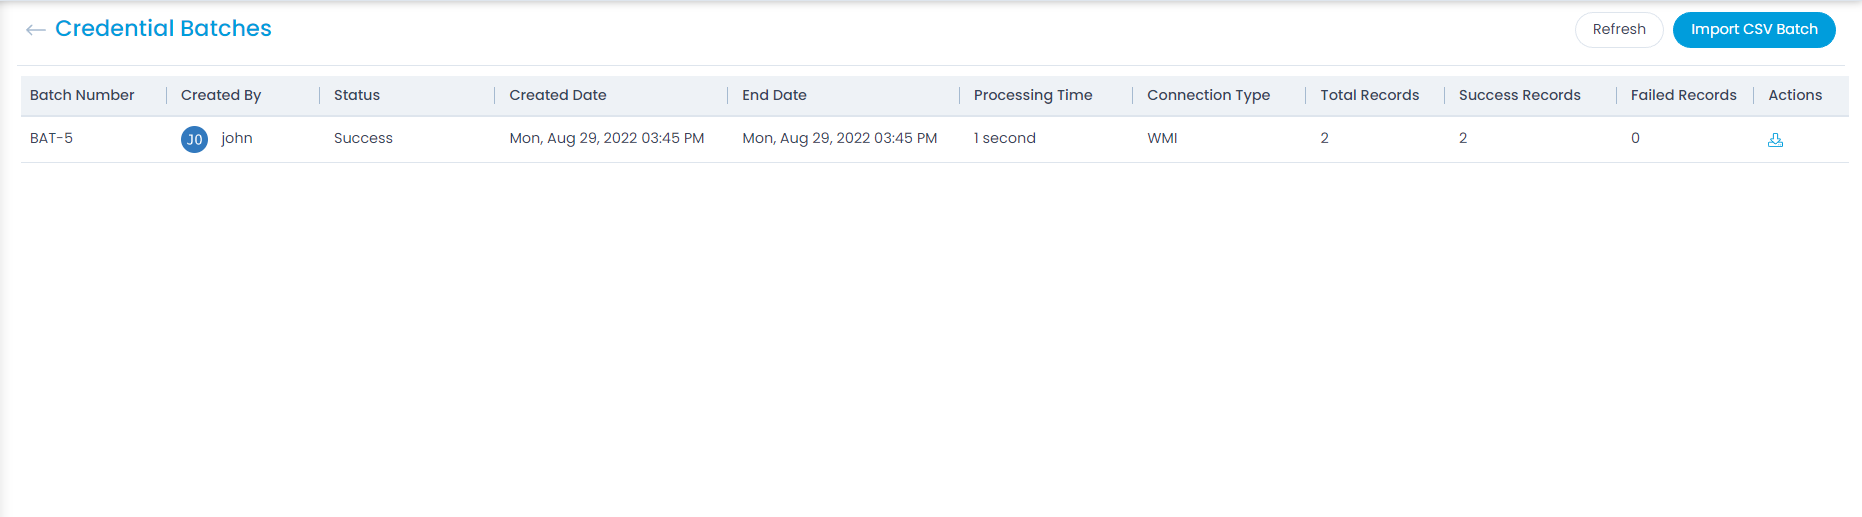
- Click the Import CSV Batch button.
- Select the .csv file if you already have it filled with the respective fields. If not, select the new .csv file using Click Here and fill the respective details. Once the file is uploaded, click Next.

- Map the fields as per the requirement. By default it is mapped, only in case of removal or change of some parameters mapping is necessary, and click Save Batch.

- The Credential Batches page appears. It displays the status of the import along with the details like processing time, total records, success records, failed records, etc. as shown below. Once successful, the imported credentials will appear in the list page.
Network Scan
Network Scan allows scanning of the whole network specified along with the credentials authentication and successful connections.
Here, you can view, add, as well as import IP Networks. Also, you can create a schedule, discover a new asset, poll existing asset, and add Asset in Stage. To import IP Networks, follow the same steps as Import Credentials.
To create a Network Scan, Click the Create Network Scan button and a popup appears.

Enter the below details:
| Parameter | Description |
|---|---|
| Name | Enter the name of the network scan. |
| IP Range Type | Select the type of IP Range. The options are: - Entire Network: All the IPs in the whole network will be scanned for the discovery. If selected, enter the IP Range Start. - Specific IP Range: Select if assets from a specific IP Range is to be scanned. If selected, enter the IP Range Start and IP Range End for discovery. - Specific set of IPs: Select if you want to scan only specific IP Addresses for asset discovery. If selected, enter the IP Addresses. Also, you can import the IP addresses via a CSV file using the Import IP Addresses link. |
| Location | Select the location of the network from the dropdown. |
| Department | Select the department. |
| Exclude IPs | Enter the list of IPs you want the network to skip while running the scan. You can also import the IP Addresses via a CSV file using the Import Exclude IPs link. |
| Protocol Type | Select the type of protocol for the network. The options are: Static and DHCP. If DHCP is selected, DNS configuration is required for Domain Scan. |
| Description | Enter the description of the network scan. |
| Credentials | Select the credentials of the machines that you want to discover. You can also create new credentials using the Create Credentials link. |
| Poller | Select the poller for which you want to create the network scan. |
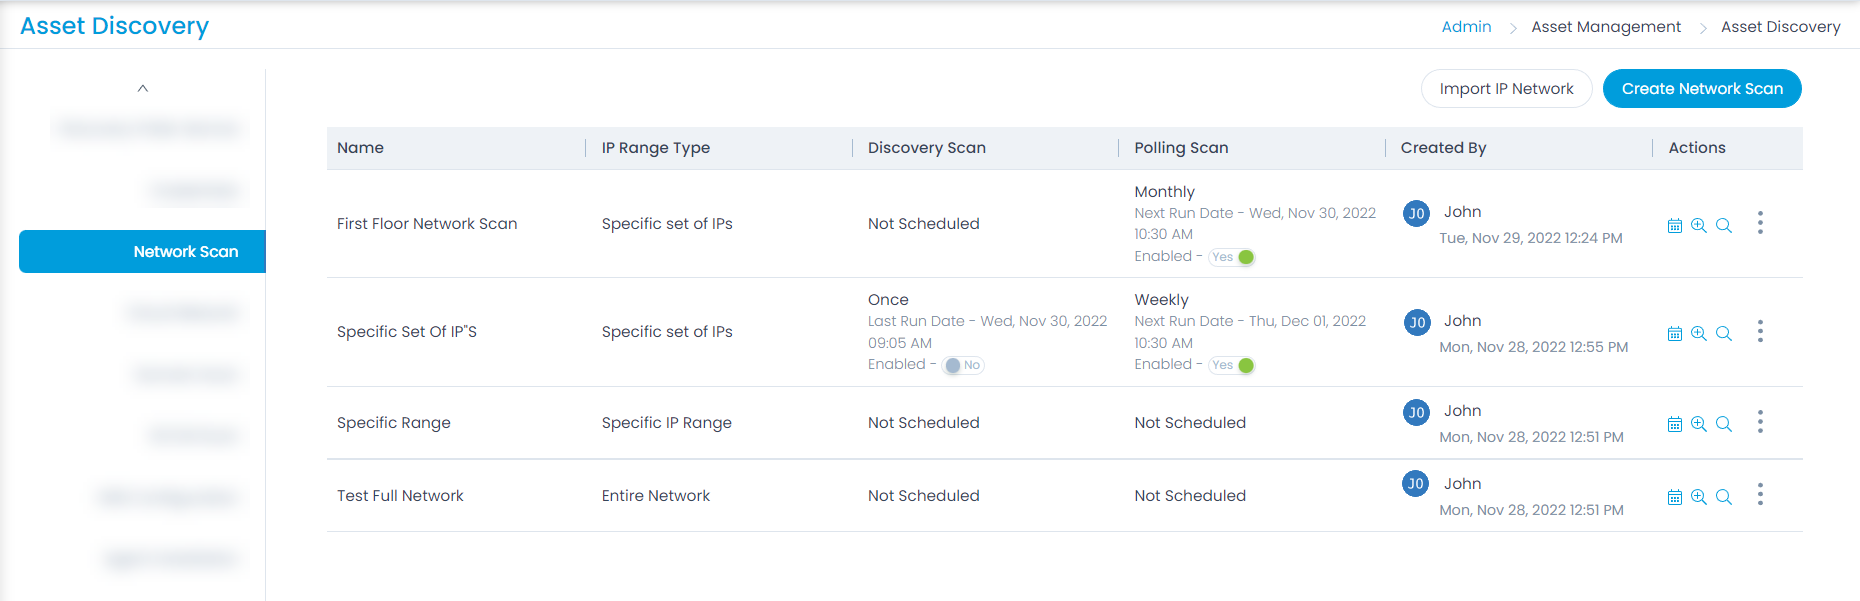
Once all the details are filled, click Save. The created network will appear on the list page as shown below.
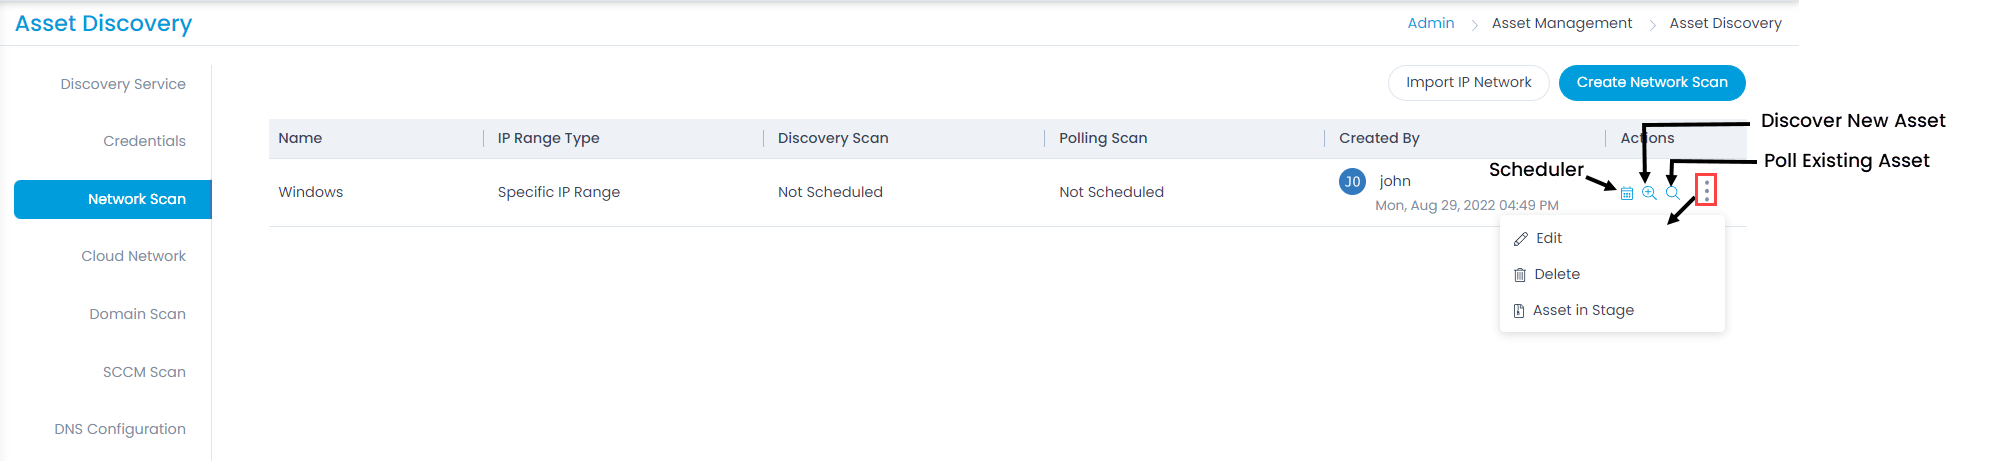
Here, you can do the following:
- Schedule the network scan.
- Discover New Asset
- Poll Existing Asset
- Edit the network scan.
- Delete the network scan if not required.
- You can add the Assets in Stage to CMDB by selecting the option, the asset type, assets and then clicking the Add to CMDB button.

Schedule Network Scan and Polling Scan
Scheduling the discovery scan helps to overcome the similar activity of adding assets every time when a new asset is added. For every created network, the Scheduler option is given besides the created network as shown in the above figure.
Select the Scheduler option and a popup appears. It displays two tabs: Discover Scan Schedule and Polling Scan Schedule.
In the Discover Scan Schedule, click Create Discovery Schedule button and the options appear.


Enter the below details:
- Schedule Type: Select the type of schedule. The options are:
- Once: The schedule will run only once on the selected start date.
- Daily: The schedule will run daily starting from the selected start date and time.
- Weekly: The schedule will run once a week as per the selected day and time. Also, provide the start date from which the schedule will be applicable.
- Monthly: The schedule will run once a month as per the selected date, time, and month. Also, provide the start date from which the schedule will be applicable.
- Interval: Set the interval in hours or days within which the schedule should run. Also, provide the start date from which the schedule will be applicable.
- Automatically add Assets in CMDB?: Select Yes if you want to add the discovered assets automatically in CMDB.
- Email: You can add the email id’s for notification email of network scan results after completion.
- Once done, click Save. Similarly, you can configure the polling scan schedule.

Discover New Asset
Incase of addition of asset in a particular network, you can just click the Discover New Asset option, which will scan the network and discover newly added assets. You can also add the newly scanned assets automatically in CMDB if required or in stage.
Poll Existing Asset
You can poll the existing assets in the network using the Poll Existing Asset option which will update the added information while discovering.
When the polling completes, the discovery page will display the discovery through Polling as shown below:
Cloud Network
This allows to import and create a network scan to discover the cloud assets. The configurations are similar to network scan.
Here, you can view, add, as well as import cloud networks. Also, you can create a schedule, discover a new asset, poll existing asset, and add Asset in Stage. To import Cloud Networks, follow the same steps as Import Credentials.
To create a Cloud Network, click the Create Network Scan button, and a popup appears.

Enter the below details:
| Parameter | Description |
|---|---|
| Name | Enter the name of the cloud network scan. |
| Cloud Type | Select the type of cloud. The options are: - AWS - Azure |
| Description | Enter the description of the cloud network scan. |
| Credentials | Select the credentials to be used from the dropdown. You can also create new credentials using the Create Credentials link. |
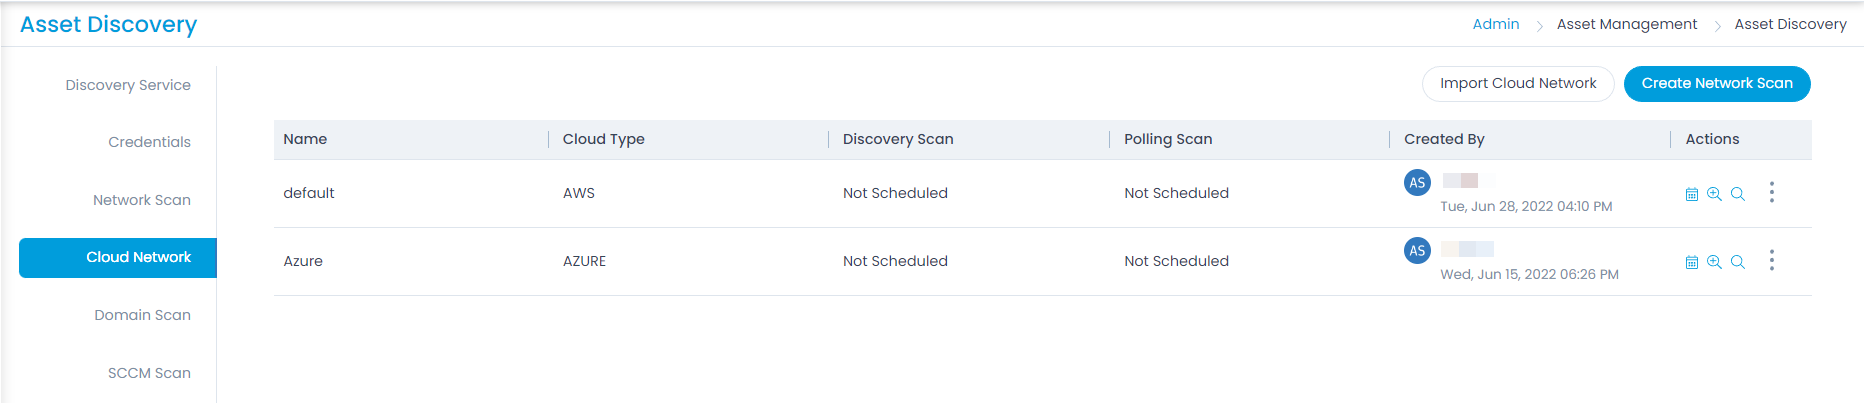
Once all the details are filled, click Save. The created network will appear on the list page. Here, you can do the following:
- Schedule the cloud network scan. For more details, refer to the section Network Scan.
- Discover New Asset. For more details, refer to the section Network Scan.
- Poll Existing Asset. For more details, refer to the section Network Scan.
- Edit the cloud network scan.
- Delete the cloud network scan if not required.
- You can add the Assets in Stage to CMDB by selecting the option, the asset type, assets and then clicking the Add to CMDB button. For more details, refer to the section Network Scan.
Domain Scan
Discovery can be done via scanning. Apart from network scan, you can perform the discovery via domain scan too.
DNS configuration is required for Domain Scan.
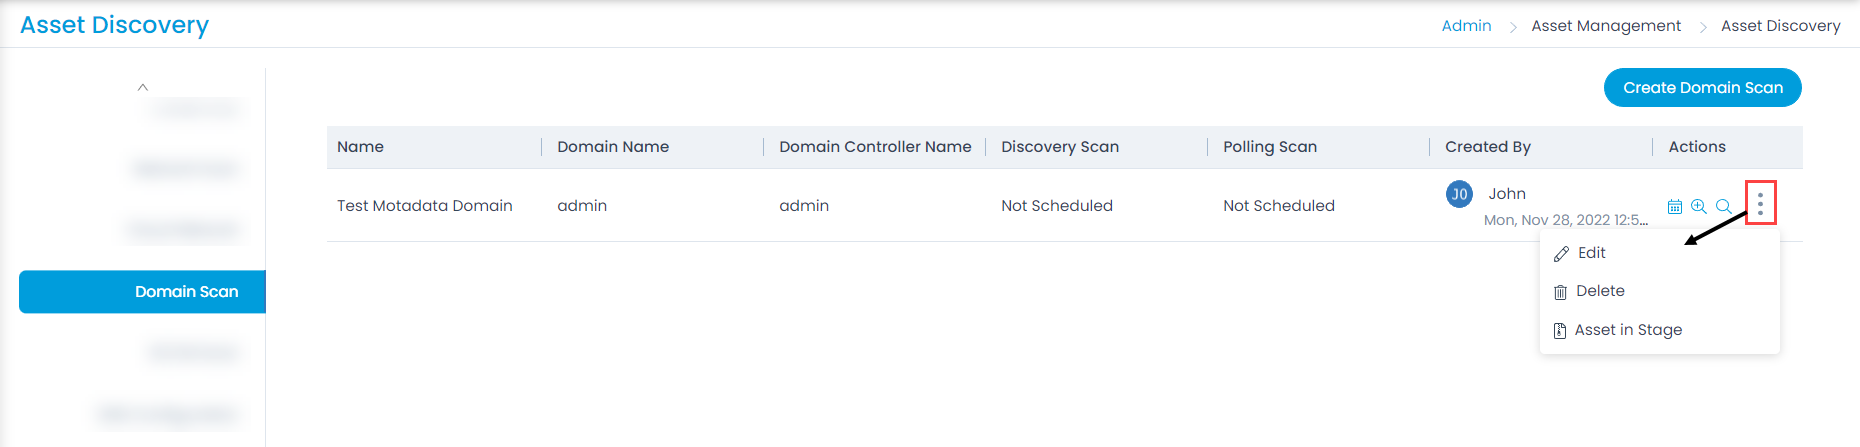
The list page displays the Name and Domain Name details. Also it displays the created date, time, and name of the creator.
To create a new domain Scan, click Create Domain Scan on the top-right corner of the page, and a popup appears.

Enter the below details:
| Parameter | Description |
|---|---|
| Name | Enter the name of the domain scan. |
| Domain Controller Name | Enter the name of the controller of the organization’s domain. |
| Domain Name | Enter the domain name of the organization. For example: Acne.com |
| OU | Enter the Organizational Unit name of the domain. For example: OU=motadata |
| Username | Enter the username. |
| Password | Enter the password for successful domain connection. |
| Map Location from LDAP | Enable if you want to map the location of the domain from the LDAP server. If enabled, specify the LDAP Location Field. If the entered location is not present you can also create it by enabling the Create Location option. |
| Location | Select the location of the domain from the dropdown. |
| Map Department from LDAP | Enable if you want to map the department of the domain from the LDAP server. If enabled, specify the LDAP Department Field. If the entered Department is not present you can also create it by enabling the Create Department option. |
| Department | Select the department belonging to the domain. |
| Map Used By from LDAP | Enable if you want to map the user of the domain from the LDAP server. If enabled, specify the LDAP Used By Field. If the entered user is not present you can also create it by enabling the Create Used By option. |
| Used By | Select the user from the dropdown. |
| Description | Enter a brief description about the domain scan. |
| Exclude IPs | Enter the list of IPs you want the network to skip while running the scan. |
| Poller | Select the poller for which you want to create the domain scan. |
Once all the details are filled, click Save. The created domain scan will appear on the list page. You can also click the Test Connection button to check if its successful and authenticating.
The Test Connection button is unavailable in the SaaS application.
On the list page, you can do the following:
- Schedule the domain scan. For more details, refer to the section Network Scan.
- Discover New Asset. For more details, refer to the section Network Scan.
- Poll Existing Asset. For more details, refer to the section Network Scan.
- Edit the domain scan.
- Delete the domain scan if not required.
- You can add the Assets in Stage to CMDB by selecting the option, the asset type, assets, and then clicking the Add to CMDB button. For more details, refer to the section Network Scan.
SCCM Scan
Motadata uses Microsoft System Centre Configuration Manager (SCCM) to manage desktops and Windows-based applications where you can integrate with SCCM and fetch the SCCM-scanned asset data. The integration leverages SCCM’s scan capabilities users to avoid installing two agents to fetch asset details. You can also use SCCM for asset discovery and also simultaneously update the asset data.
The assets fetched from the the SCCM database will have the source as SCCM and resource id generated by the SCCM server.
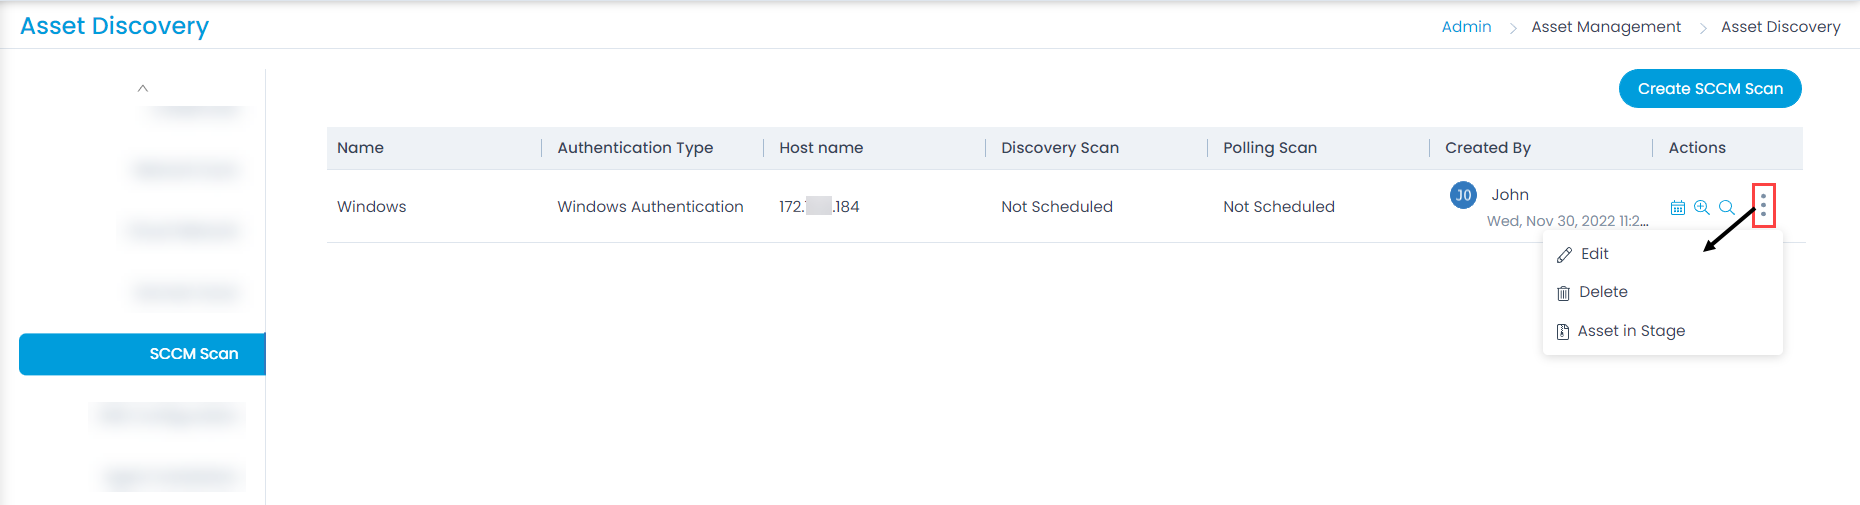
The list page displays the Name, Authentication Type, and Host Name details. Also it displays the created date, time, and name of the creator.
To create a new SCCM Scan, click Create SCCM Scan on the top-right corner of the page, and a popup appears.

Enter the below details:
| Parameter | Description |
|---|---|
| Name | Enter the name of the SCCM scan. |
| Authentication Type | Select the type of authentication. The options are: - SQL Server Authentication - Windows Authentication |
| Username | Enter the username. |
| Password | Enter the password for successful domain connection. |
| Database Name | Enter the name of the database that you want to scan. |
| Port | Enter the port number. |
| Host Name | Enter the host name for connection. |
| Domain Name | Enter the domain name of the organization. It is mandatory for Windows type of Authentication. |
| Description | Enter a brief description about the SCCM scan. |
| Location | Select the location of the SCCM from the dropdown. |
| Department | Select the department belonging to the SCCM. |
| Poller | Select the poller for which you want to create the SCCM scan. |
Once all the details are filled, click Save. The created SCCM scan will appear on the list page. You can also click the Test Connection button to check if its successful and authenticating.
The Test Connection button is unavailable in the SaaS application.
On the list page, you can do the following:
- Schedule the SCCM scan. For more details, refer to the section Network Scan.
- Discover New Asset. For more details, refer to the section Network Scan.
- Poll Existing Asset. For more details, refer to the section Network Scan.
- Edit the SCCM scan.
- Delete the SCCM scan if not required.
- You can add the Assets in Stage to CMDB by selecting the option, the asset type, assets and then clicking the Add to CMDB button. For more details, refer to the section Network Scan.
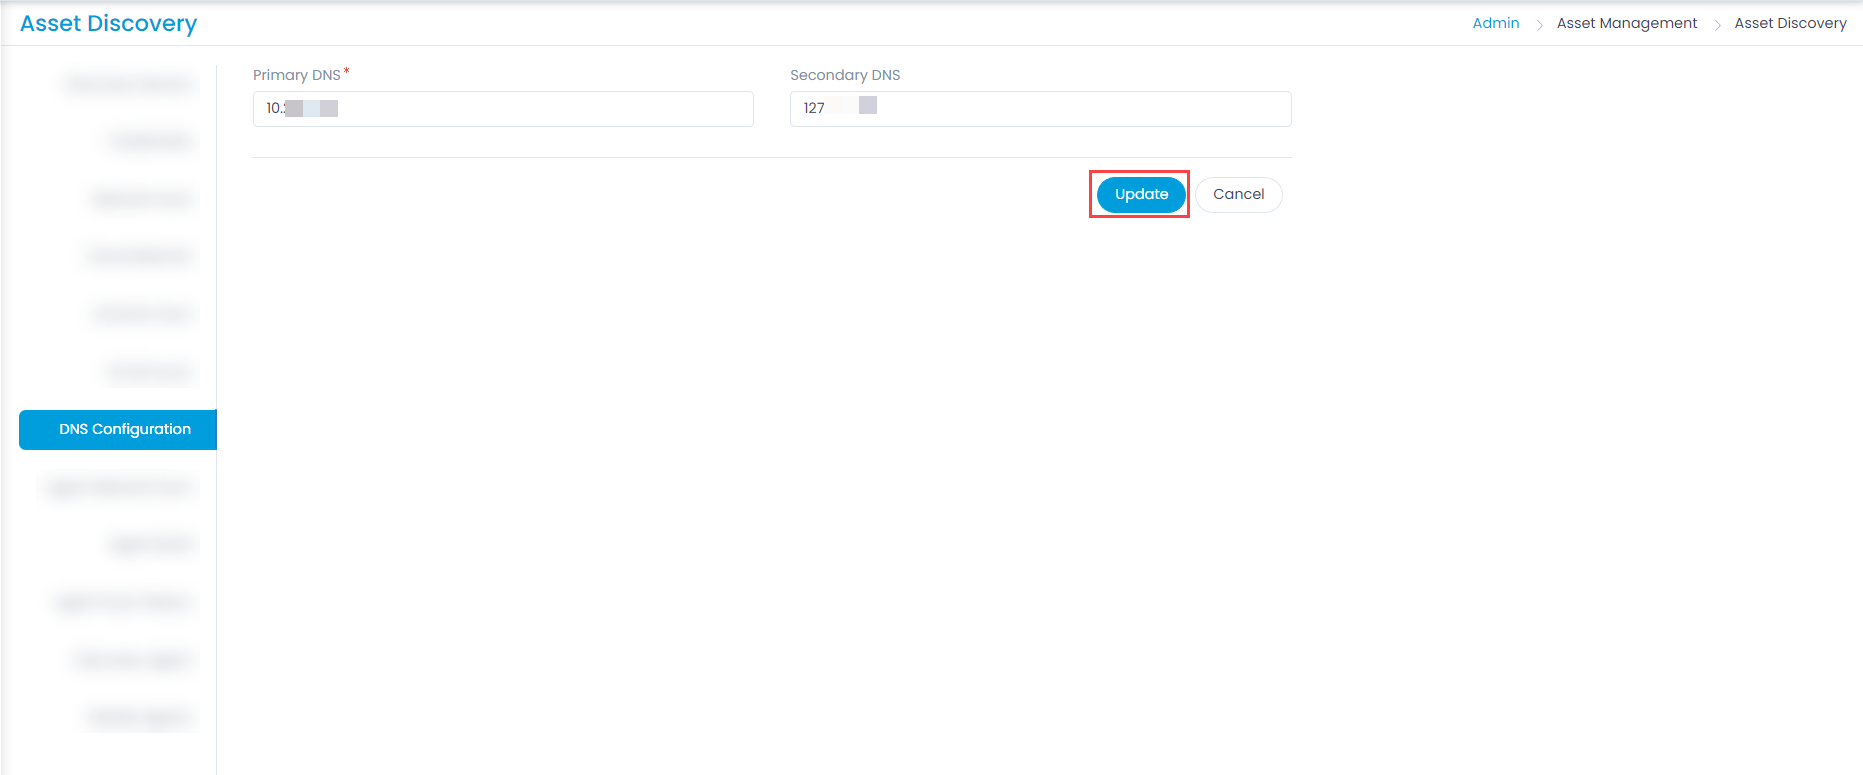
DNS Configuration
You can configure the DNS server of the application network by adding the Primary and Secondary DNS.
Agent Installation
This allows you to install an agent in multiple machines that fall in the configured network, using the discovery or poller service. Once the machines are discovered you can install or uninstall the agent from them.
Before you install or uninstall the agent using poller, check the following:
- Poller is registered with the main server. You can check this from Admin > Asset Management > Asset Discovery > Discovery Poller.
- Ensure that the required build file is uploaded in the Admin > Asset Management > Asset Discovery > Agent Build.
- Ensure that the required config type: VNC, Remotely, and RDP, is enabled from Admin > Asset Management > RDP Configurations.
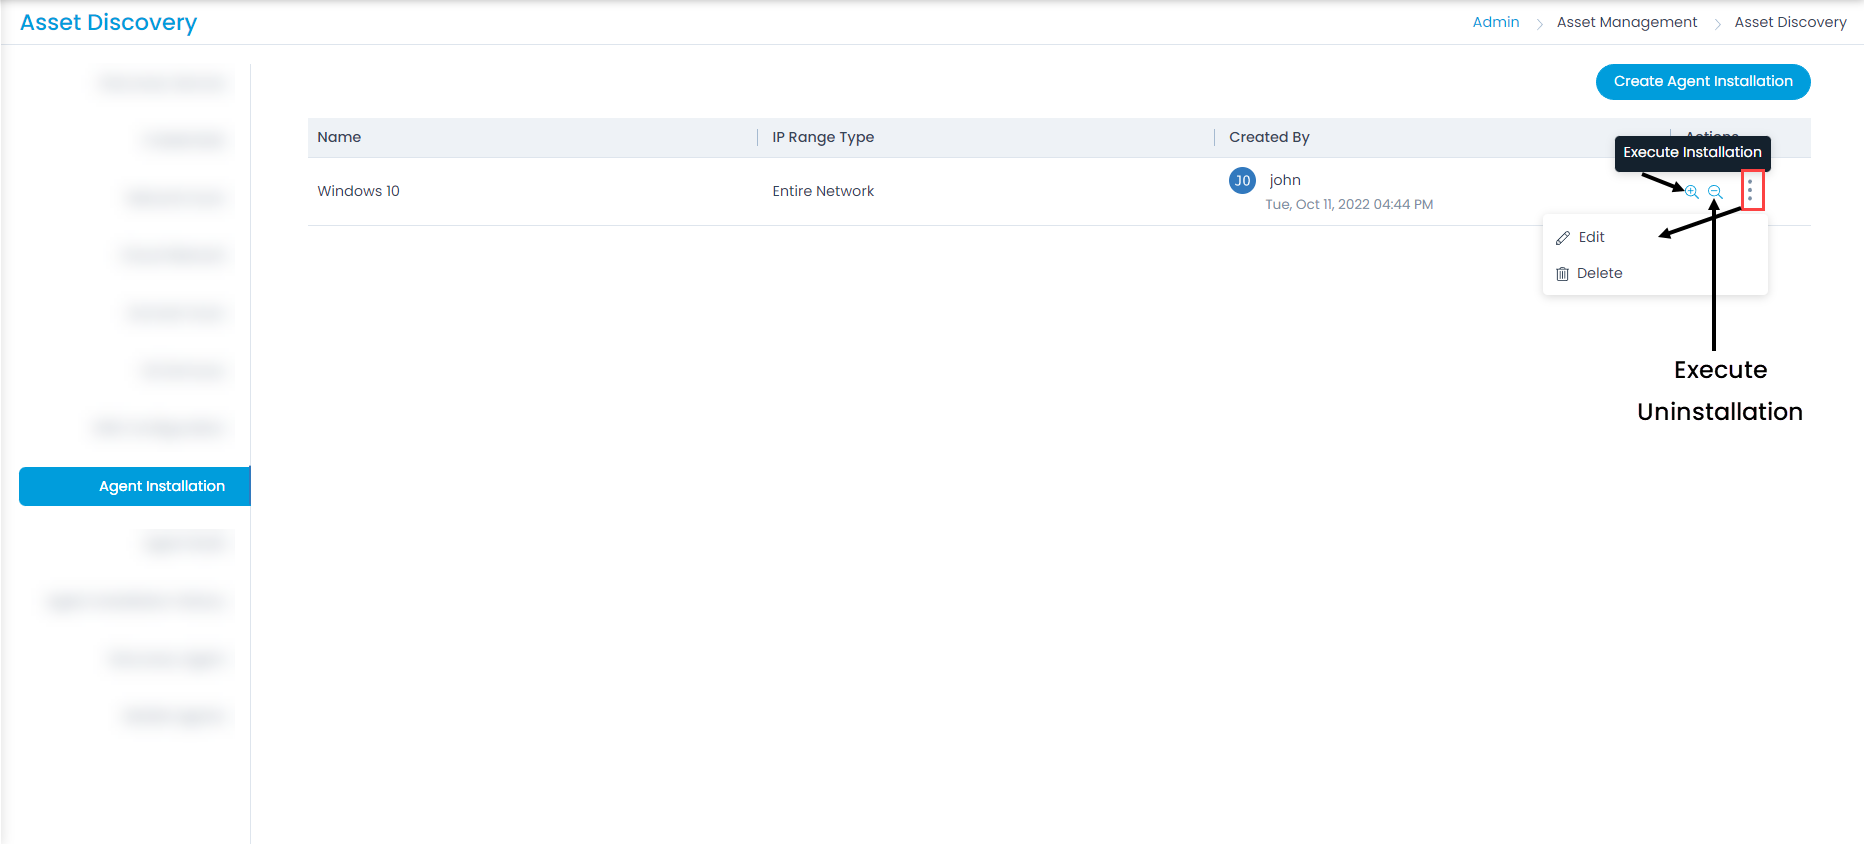
To create an agent scan, click Create Agent Installation, and a popup appears.


Enter the below details:
| Parameter | Description |
|---|---|
| Name | Enter the name of the network scan. |
| Fetch from Domain | Enable to discover the agents from the domain. If enabled, enter the domain details. For more details, refer to the link Domain Scan. If disabled enter the below details. Note: The poller service will execute for all the computers that fall within the configured domain network. Hence, you cannot select specific Computers of the network. |
| Poller | Select the poller for which you want to create the scan. This can be set at the time of configuration only. |
| Agent Type | Select the type of agent. The options are: - Discovery - VNC - Discovery with Remotely - RDP - Discovery with RDP |
| Scan Type | Select the type of IP Range. The options are: - Entire Network: All the IPs in the whole network will be scanned for the discovery. If selected, enter the IP Range Start. - Specific IP Range: Select if assets from a specific IP Range is to be scanned. If selected, enter the IP Range Start and IP Range End for discovery. Also, you can enter certain IP addresses to skip the scan in the Exclude IPs field. If required, you can import a list of IP Addresses to exclude from scanning using the Import Exclude IPs link. - Specific set of IPs: Select if you want to scan only specific IP Addresses for asset discovery. If selected, enter the IP Addresses. You can also import the IP Addresses in bulk using the Import IP Addresses link. |
| Description | Enter the description about the agent network scan. |
| Credentials | Select the credentials to be used from the dropdown. You can also create new credentials using the Adding Credential link. |
Once all the details are filled, click Save. The created network will appear on the list page. Now, you can do the following:
- Execute Installation: You can install the agent in machines based on the configured domain or network.
- Execute Uninstallation: You can uninstall the agent from machines based on the configured domain or network.
- Edit: You can edit the scan.
- Delete: You can delete the scan if not required.
Agent Build
It displays the list of various platforms with their architecture. Here, you can upload the agent and perform zero-touch Agent package installation in the remote machine. This list shows the various agent builds with their updated status.
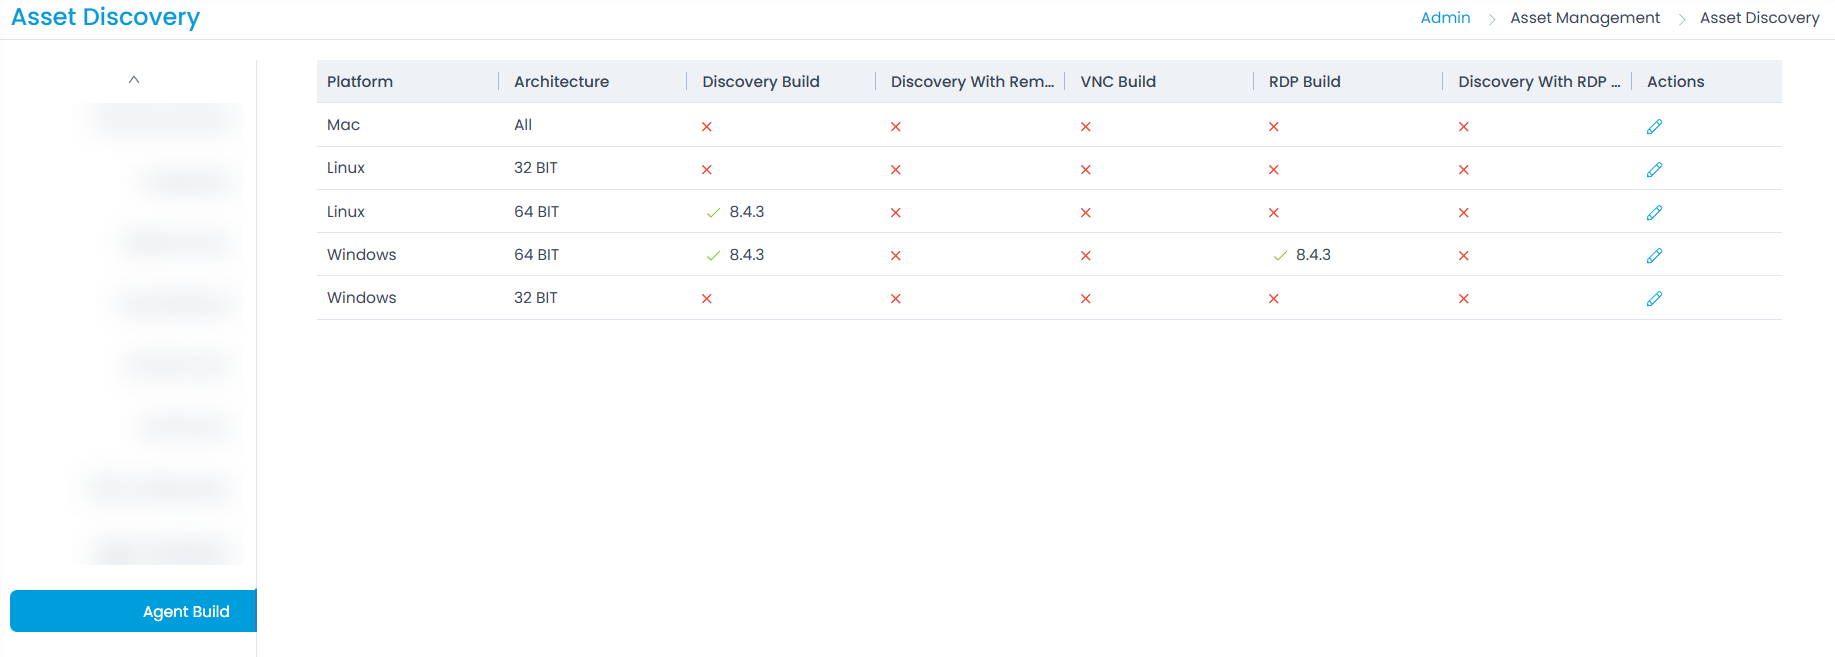
Here, you can edit, and upload the builds using the Edit Icon.
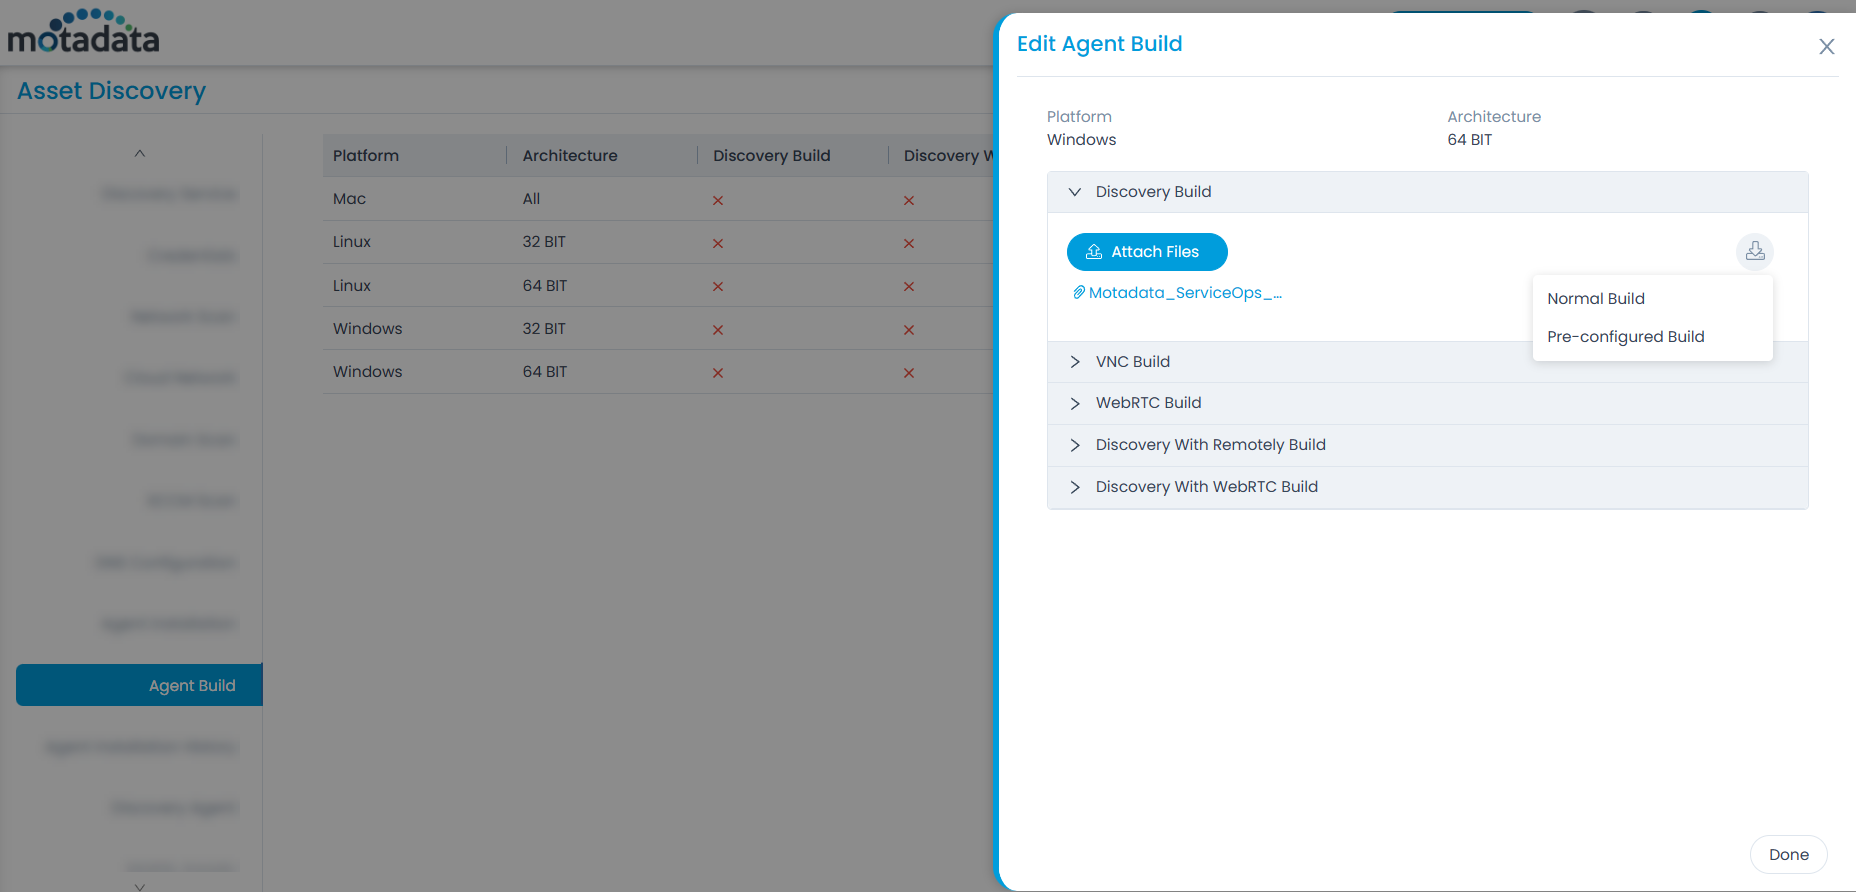
To perform the zero-touch Agent package installation in the remote machine,
- Upload the Agent. Once done, the Download icon appears as shown above.
- Click on it and the following two options will be available:
- Normal Build: This will download only the Agent build.
- Pre-configured Build: This will download a zip file containing the Agent and install.bat/install.sh file. The install.bat file is for Windows and install.sh is for Linux and mac machines.
- Move the install file to the respective machine and run it with Administrator rights.
- The Agent will get directly installed in the remote machine without following the Agent installation steps.
Agent Installation History
This tab enables you to view the complete scan history of the agents.
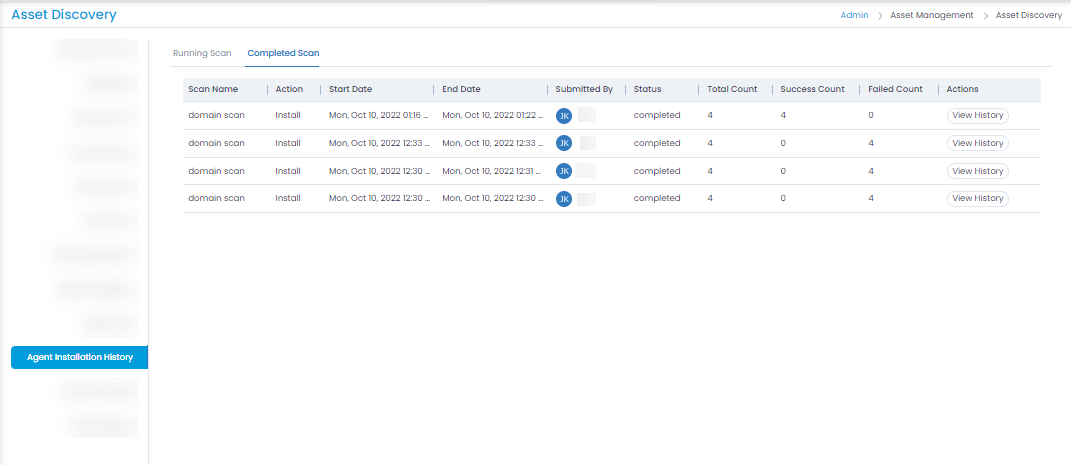
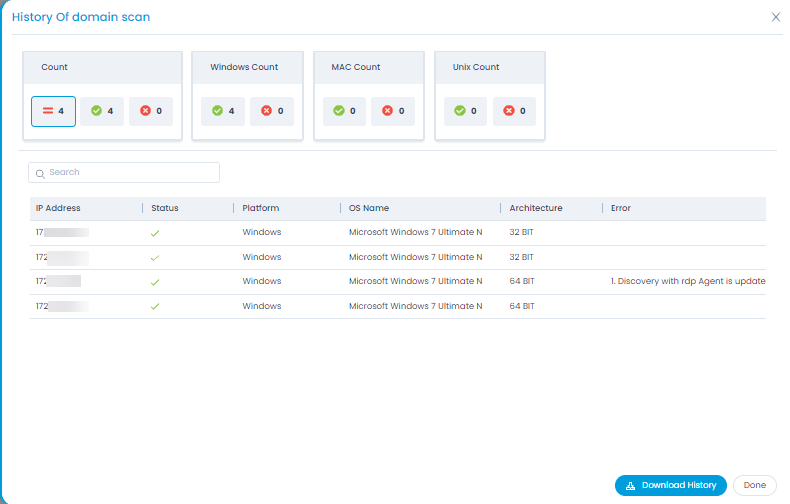
Here, you can click the View History button to view the history of individual scan as shown below. It displays the total count along with its bifurcation. You can also download the scan report in PDF format using the Download History button.
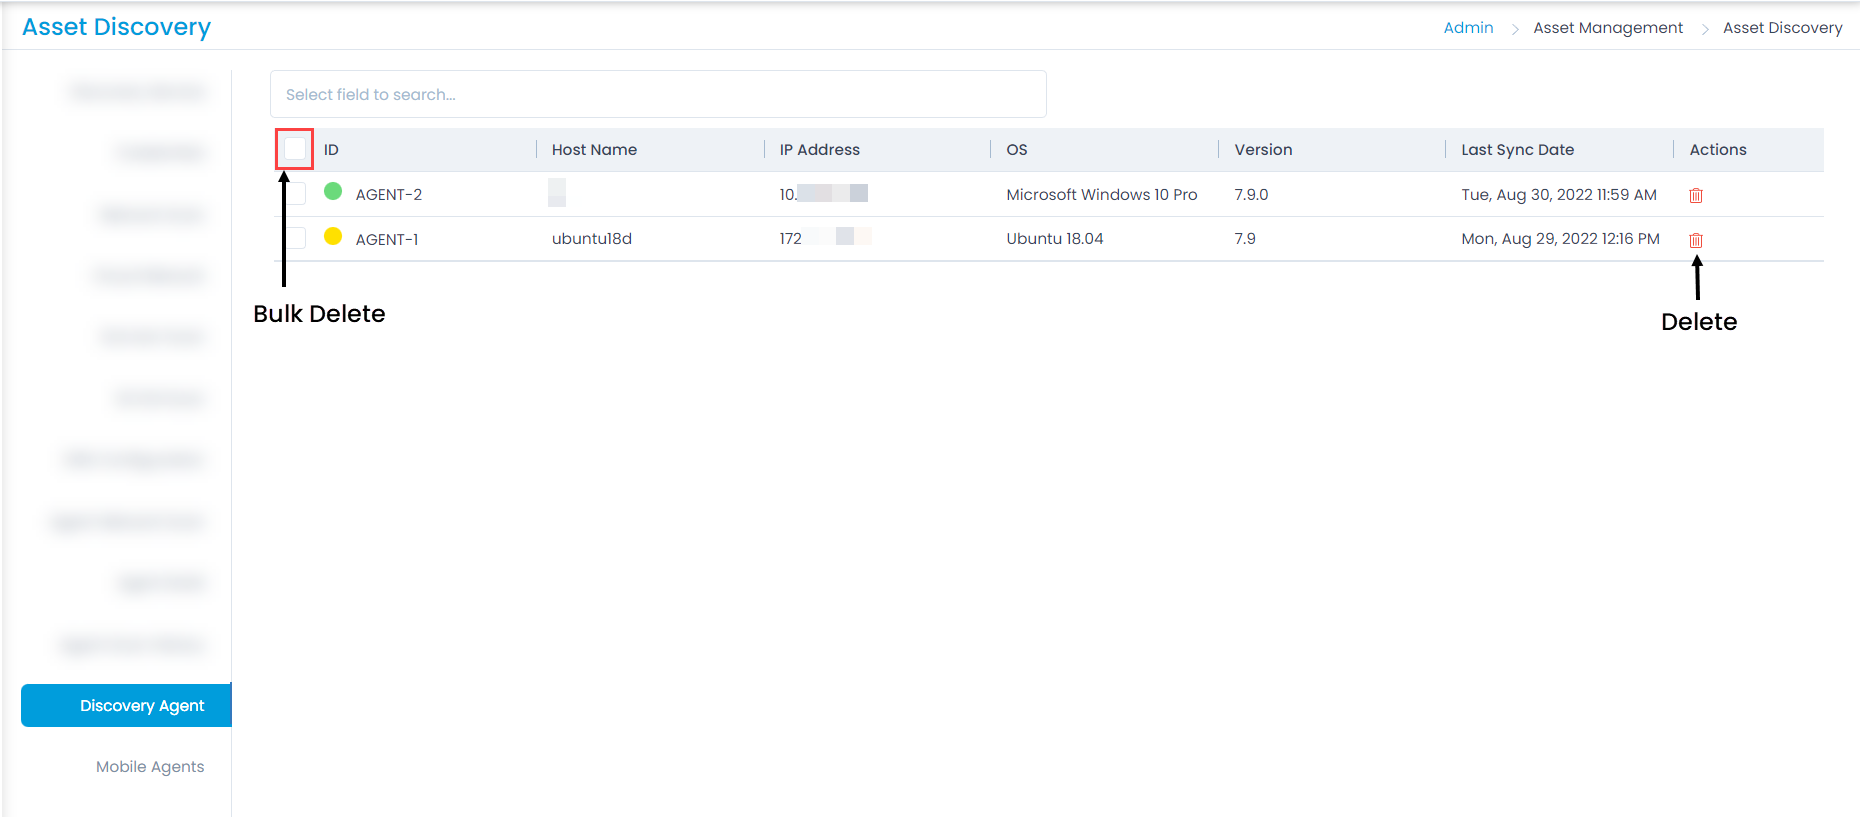
Discovery Agent
This tab displays the list of the agents which are installed for scanning the network. Thus, the discovery of assets is scanned and fetched by these agents. You can have multiple agents too.
Once the agents are discovered, you can delete them from here if required.

Mobile Agents
This tab displays the discovered mobile agents.
Once discovered, you can delete them from here if required. Also, you can configure the settings for mobile discovery.

- Mobile Discovery: Enable if you want to discover the mobile devices.
- Discovery Cycle: Set the discovery cycle to run as per the set time in minutes. The default value is 30 minutes. For Example: If 30 minutes is set the the discovery cycle will run after every 30 minutes.
- Refresh Cycle: Set the time in minutes to refresh the cycle. The default value is 5 minutes.
- Scan this QR Code for Mobile Discovery: You need to scan the QR code to discover your mobile.
Once done, click Update.
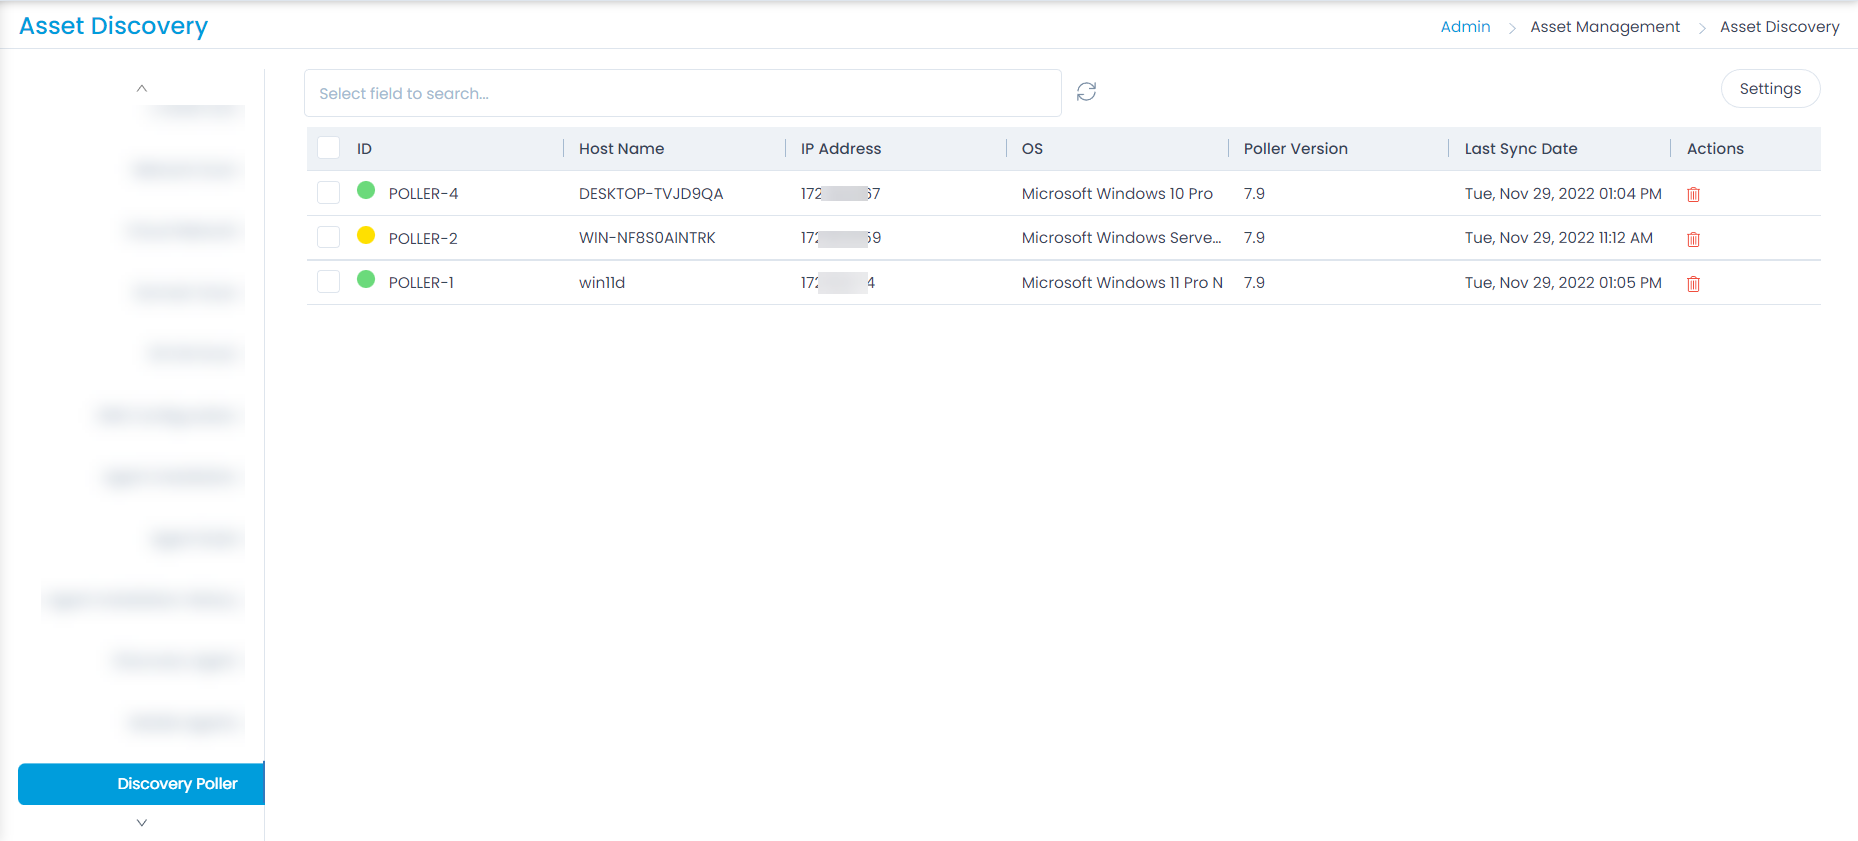
Discovery Poller
This tab displays the list of pollers which are installed for scanning the network. Thus, the discovery of assets is scanned and fetched by these pollers. You can have multiple pollers too.
Once the pollers are discovered, you can delete them from here if required. You can also set its Refresh Cycle in minutes using the Settings button. The default value is 5 minutes.
This tab is available only for SaaS application.