Discovery and Agents
Effectively manage and monitor your IT assets by understanding how to deploy, configure, and troubleshoot discovery agents and pollers.
This guide covers managing discovery agents and pollers, crucial for asset identification and data collection in your ITSM environment. It details installation, build management, historical tracking, and credential profile configuration. This content is vital for IT Admins and Implementation Consultants, and helpful for IT Staff/Technicians and Support Engineers.
Key Sections:
- Agent Installation: Learn various methods for deploying agents across your network.
- Agent Build: Manage and upload agent build files for different platforms.
- Agent Installation History: Review the history of agent deployments and their statuses.
- Agent: Manage installed discovery agents, including archiving and logging.
- Mobile Agents: Configure and manage discovery for mobile devices.
- Discovery Poller: Deploy and manage pollers for network scanning and agent upgrades.
- Agent Credential Profile: Secure agent-server communication with credential profiles.
- Agent Audit: Monitor all agent-related activities and changes.
Agent Installation
Motadata ServiceOps offers flexible options for deploying agents to discover and manage assets across your network. Agents can be installed directly from the ServiceOps portal, or via bulk methods using GPO or a dedicated utility.
Agent Installation Options:
This tab allows you to install an agent in multiple machines that fall in the configured network, using the poller service.
Agent Installation via Poller
This method facilitates agent deployment across your network using a configured Poller service.
Ensure the following prerequisites are met before installing or uninstalling agents using a poller:
- The Poller is registered with the main server. Verify this by navigating to Admin > Discovery and Agents > Agent > Discovery Poller.
- The required agent build file is uploaded in Admin > Discovery and Agents > Agent > Agent Build.
To create a new agent installation scan:
Click Create Agent Installation. A popup window will appear.


Enter the following details in the popup:
Name: A descriptive name for the network scan.
Fetch from Domain: Enable this option to discover agents from a specified domain.
- If enabled, provide the domain details like Domain Controller Name, Domain Name, OU, Username, and Password.
- If disabled, proceed to enter network details manually.
Domain Network Scans- When Fetch from Domain is enabled, the poller service will execute for all computers within the configured domain network. You cannot select specific computers for the scan.
- Domain configuration is required to be done from the Domain Scan page.
Poller: Select the poller responsible for executing this scan. The poller is responsible for executing the scan and sending the results to the main server. These pollers are available in the Discovery Poller page.
Agent Credential Profile: Select the appropriate credential profile for the scan. These credentials are used to authenticate the agent with the poller service and can be created from the Agent Credential Profile page.
Communication Type: Select the type of agent-server communication using which the assets should be discovered. The options are:
Direct Communication: Select when the agent is installed in a network where the server is directly reachable.
Poller Communication: Select when the agent is installed in a network where the server is not directly reachable. If selected enter the Poller URL.
Syntax: protocol://ip-address:port-number
Example: http://10.20.40.131:8080
noteThe port number should be accessible from both the target and the server side machines. For example, if the port number is 8080, it should be accessible from both the target and the server side machines.
- For HTTP protocol, enter the IP address of the machine in which the poller agent is installed.
- For HTTPS protocol, add the host entry in the "C:\Windows\System32\drivers\etc" path on all machines where the agent needs to be installed, including the poller machine. Additionally, add the SSL certificate and key in the poller agent.
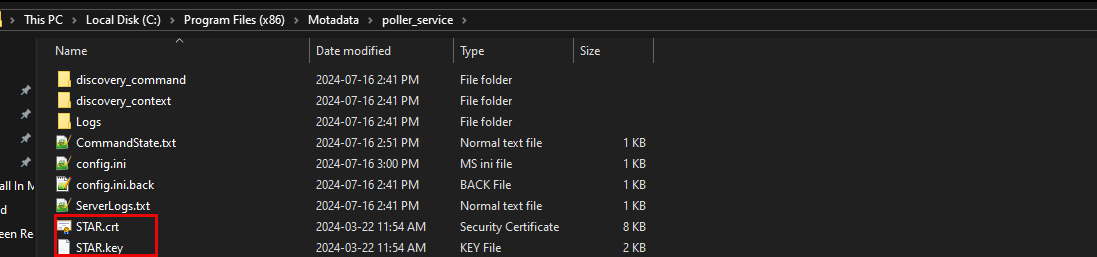
Once done, navigate to the "C:\Program Files (x86)\Motadata\poller_service" location, and open the appsettings.json file as shown below.
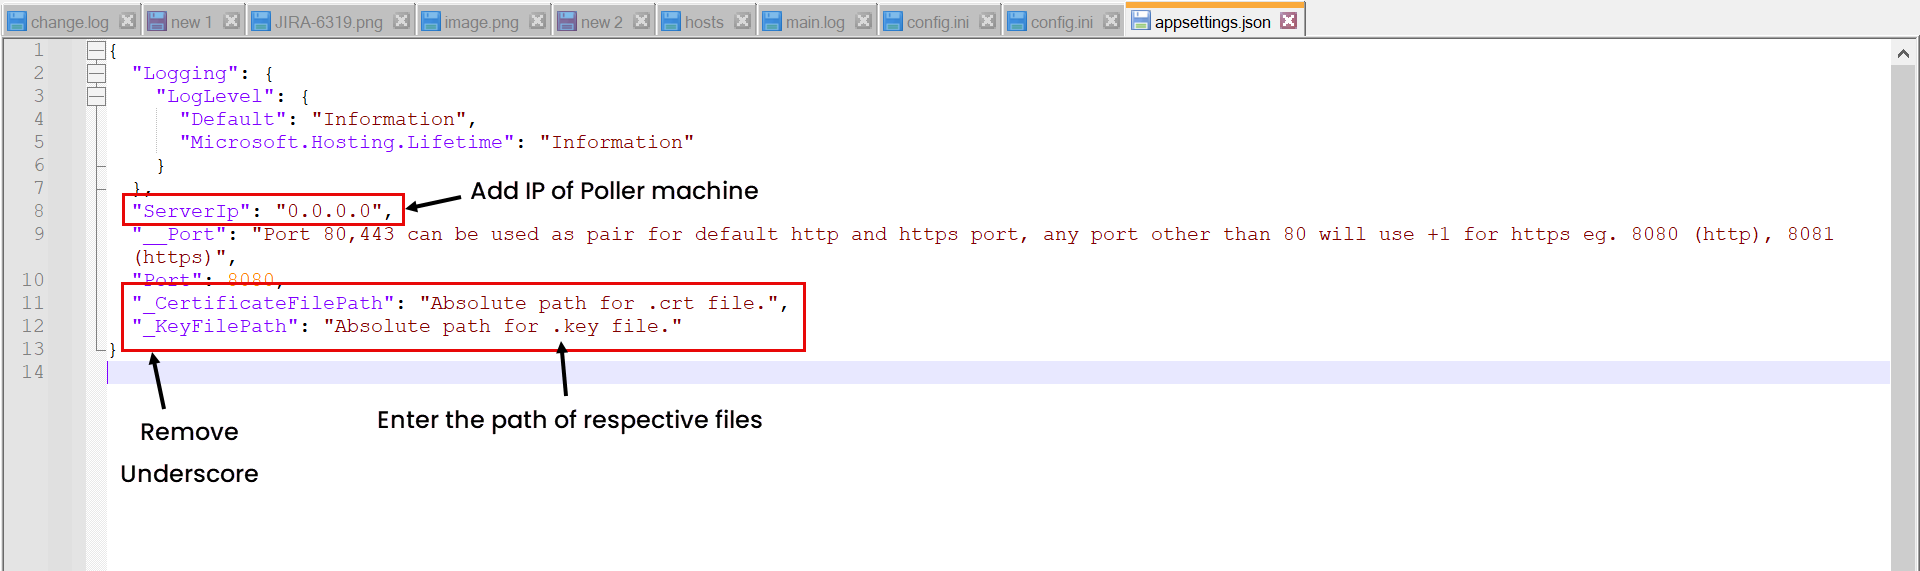
Now, remove the underscore from CertificateFilePath and KeyFilePath parameters and replace their values with the location of both the files as shown below.
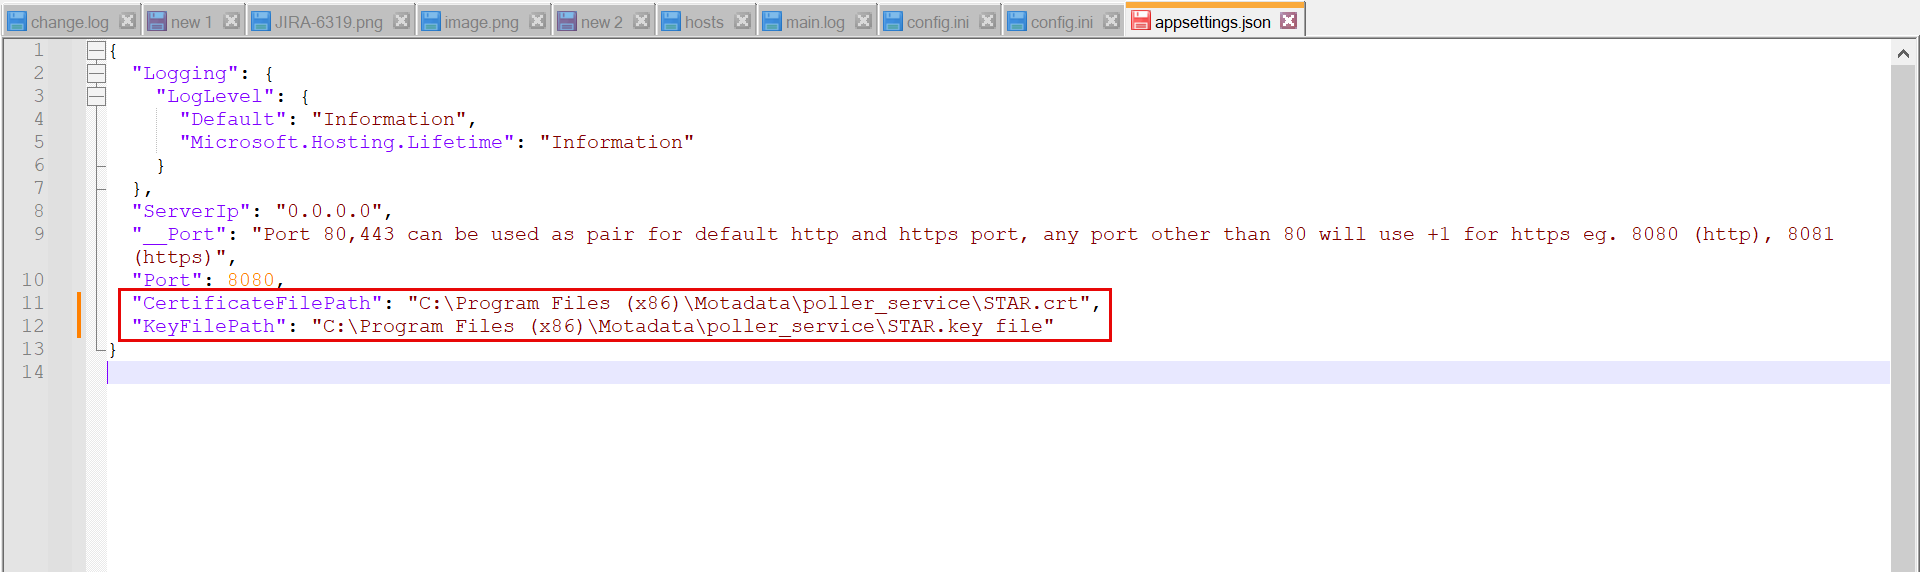
Next, restart the poller service or wait for next scan cycle.
Scan Type: Select the method for defining the IP range for discovery:
- Entire Network: When selected, the system scans all IP addresses within the entire network derived from the provided IP Range Start. For example, if
192.168.1.1is specified, the system automatically identifies the associated subnet and scans all devices within that subnet. - Specific IP Range: When selected, the system scans only the devices whose IP addresses fall within the specified range. For example, if
192.168.1.10is entered as the IP Range Start and192.168.1.50as the IP Range End, only assets within this range are discovered and scanned. Any IP addresses added through Exclude IPs are skipped during the scan. - Specific set of IPs: When selected, the system scans only the exact IP addresses you specify. For example, you can manually enter IPs such as
192.168.1.100,192.168.1.101, or use Import IP Addresses to upload a list in bulk. No other IP addresses outside this list are scanned.
- Entire Network: When selected, the system scans all IP addresses within the entire network derived from the provided IP Range Start. For example, if
Exclude IPs: Enter the list of IPs you want the network to skip while running the scan. You can also import the IP Addresses via a CSV/Excel file using the Import Exclude IPs link. This is available only when the Scan Type is Entire Network or Specific IP Range.
Description: A brief description of the agent network scan.
Credentials: Select existing credentials from the dropdown, or create new ones using the Create Credentials link.
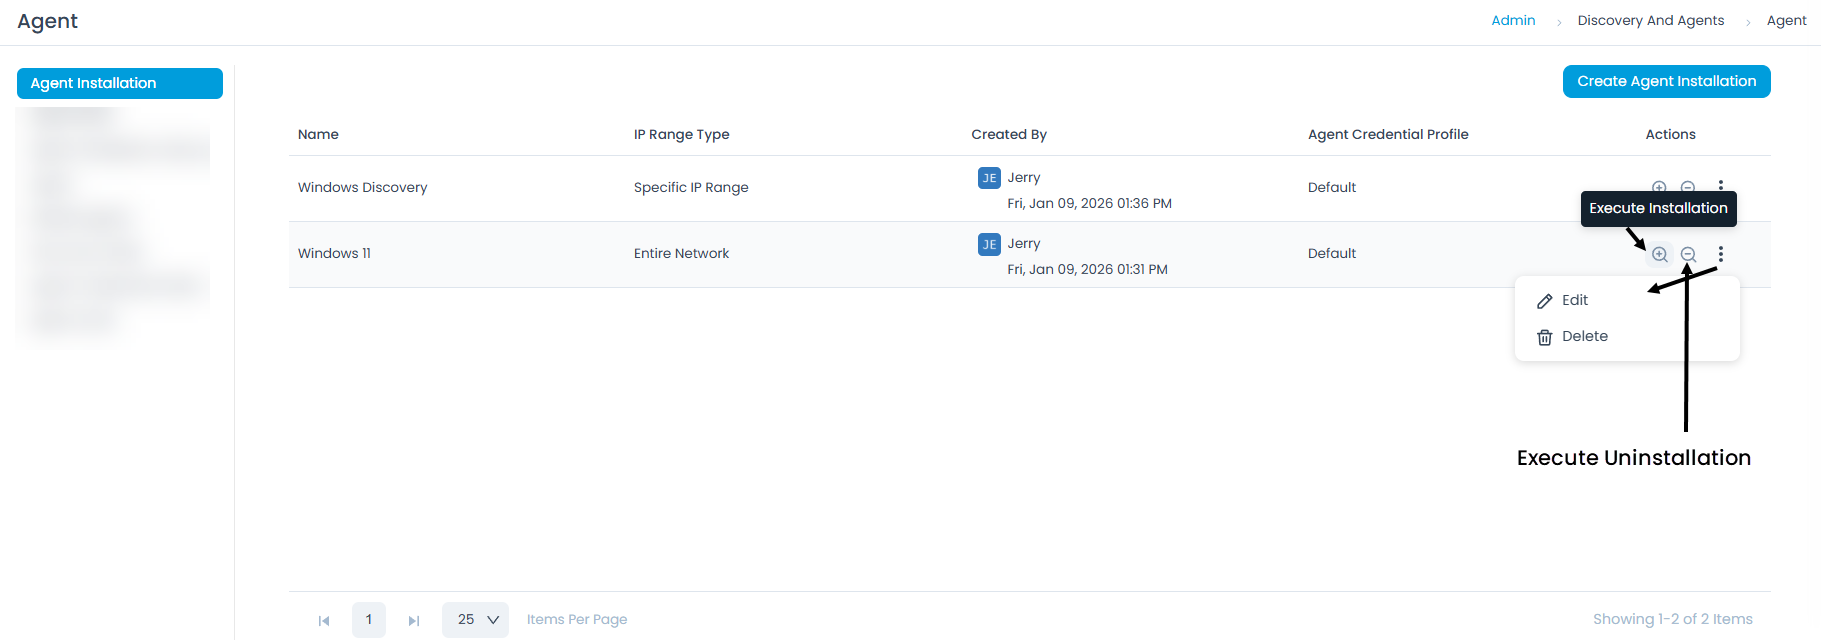
Once all the details are filled, click Save. The created agent scan will appear on the list page. Now, you can perform any of the actions mentioned below.
- Execute Installation: Initiate agent installation on machines based on the configured domain or network.
- Execute Uninstallation: Uninstall agents from machines based on the configured domain or network.
- Edit: Modify the existing agent scan configuration.
- Delete: Remove the agent scan if it is no longer required.
Agent Build
The Agent Build section displays a list of available agent builds for various platforms and architectures. Here, you can upload, manage, and facilitate zero-touch agent package installation on remote machines.
- Verify
impacketavailability in the main server at/opt/flotomate/main-server/config/. - Windows Discovery and RDP agent auto-upgrade is supported from v8.4.504 onwards.
- Linux and Mac agent auto-upgrade is supported from v8.4.3 onwards.

Managing Agent Builds
You can Edit and Upload agent builds using the Edit Icon.
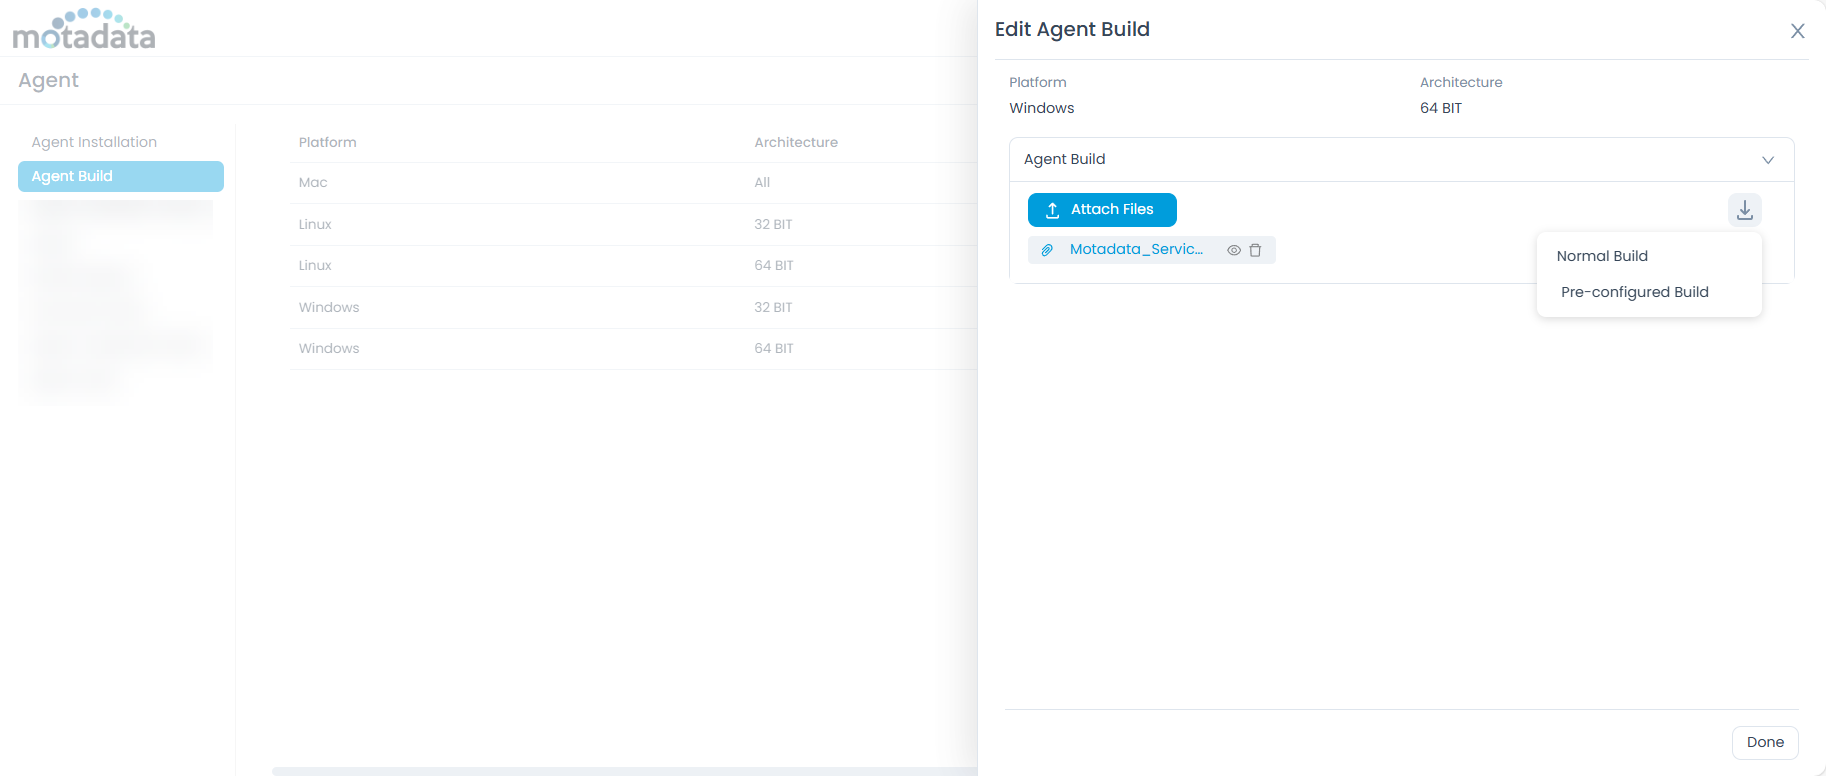
To perform zero-touch agent package installation on a remote machine:
Upload the Agent: After uploading, a Download icon will appear.
Download Agent Build: Click the Download icon to reveal two options:
- Normal Build: Downloads only the agent build file.
- Pre-configured Build: Select this option to download an agent build with pre-configured settings.
- If the Agent Credential Profile is set as Optional:
- With Activation Code: Downloads the agent build with an activation code embedded.
- With Credential Profile: Allows you to select a specific Credential Profile to embed.

- If the Agent Credential Profile is set as Enforced:
- Select Agent Credential Profile: Requires you to select an existing Credential Profile.

- Select Agent Credential Profile: Requires you to select an existing Credential Profile.
- If the Agent Credential Profile is set as Optional:
Credential Profile Enforcement- If the Agent Credential Profile is set to Enforced, uploading an agent build older than version 8.5.1 will result in an error. To upload older builds, the profile must be set to Optional.
- An error will also occur during installation if Enforced is enabled and an older agent build is already present.
The downloaded zip file will contain the activation code or the agent credentials profile (as per the selected option) along with the
install.bat(for Windows) orinstall.sh(for Linux and Mac) installation script.Deploy the Agent: Move the downloaded install file to the target machine and run it with administrator rights.
The agent will be installed directly, bypassing manual installation steps.
Agent Installation History
The Agent Installation History tab provides a complete scan history of all agent deployments.
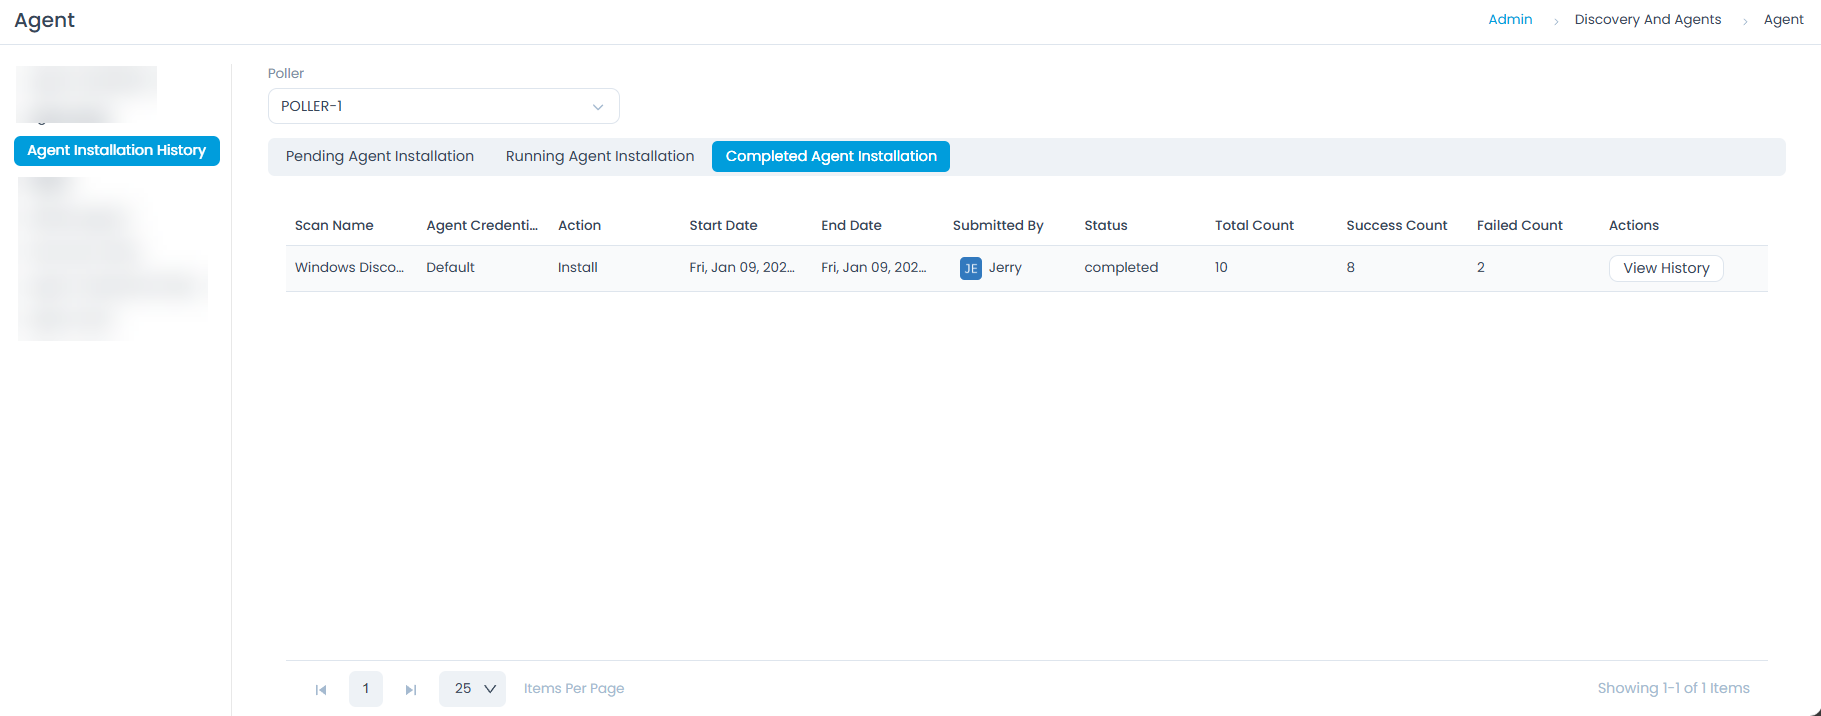
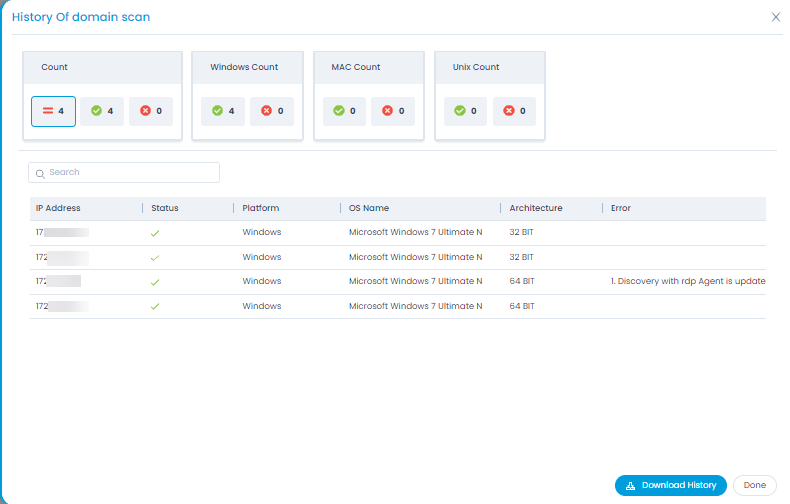
- Click the View History button next to an individual scan to see its detailed history, including total counts and bifurcation.
- Download the scan report in PDF format using the Download History button.
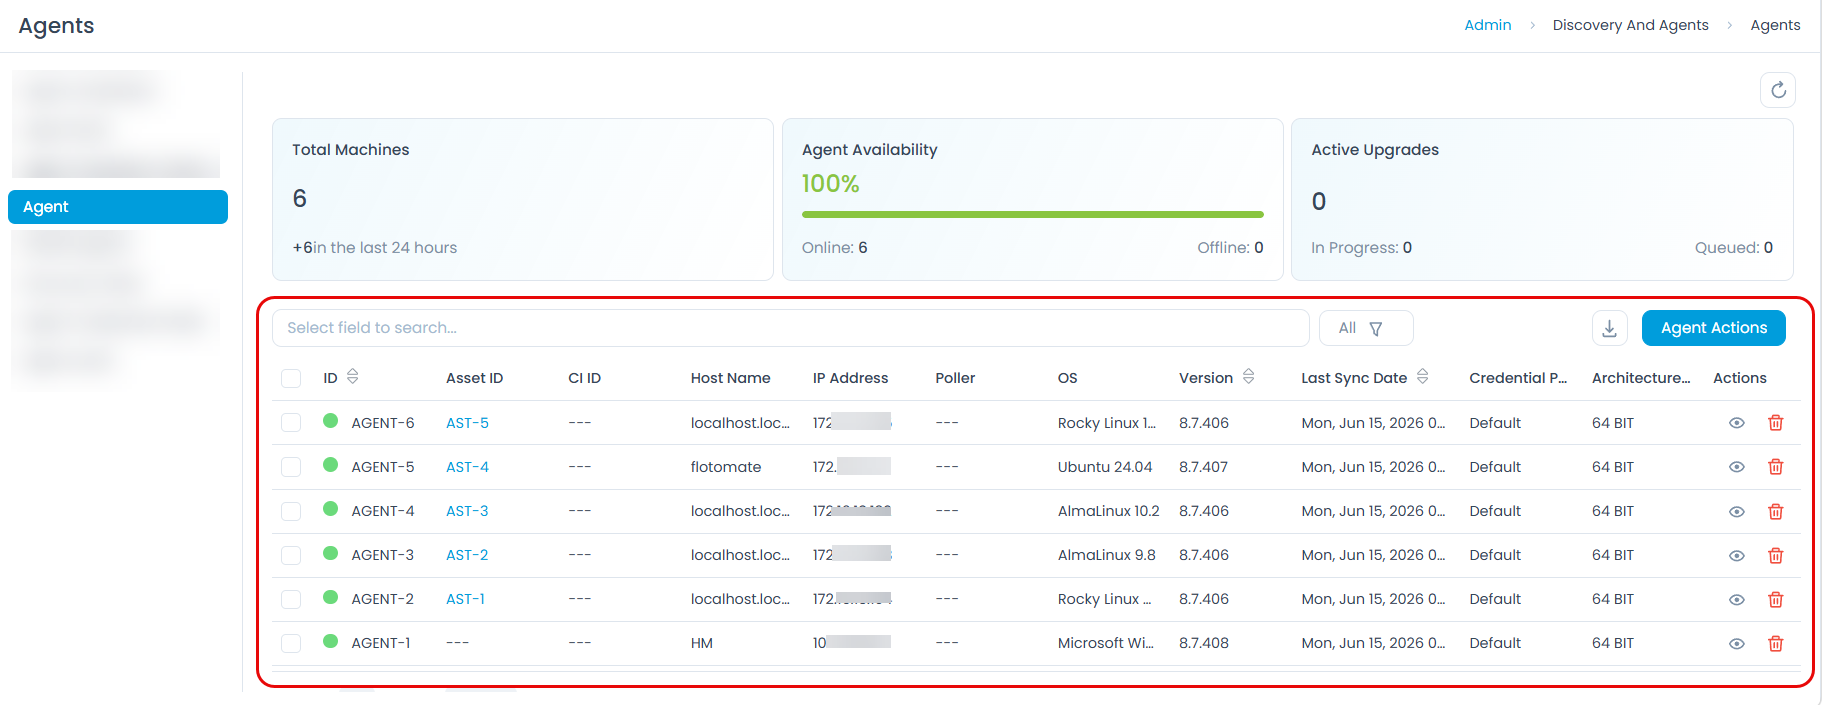
Agents
The Agents tab provides a comprehensive overview of all deployed agents within your IT environment, including Discovery and RDP agents. This section allows you to efficiently monitor agent availability, manage their configurations, and perform remote actions.
Key Performance Indicators (KPIs)
At the top of the Agents tab, you'll find several KPIs that offer a quick assessment of your agent fleet:
- Total Machines: Displays the total number of machines with agents installed. This includes a count of newly installed agents in the last 24 hours.
- Agent Availability: Shows the percentage of agents currently online, along with a breakdown of online and offline agent counts.
- Active Upgrades: Indicates the number of agent upgrades in progress or queued.
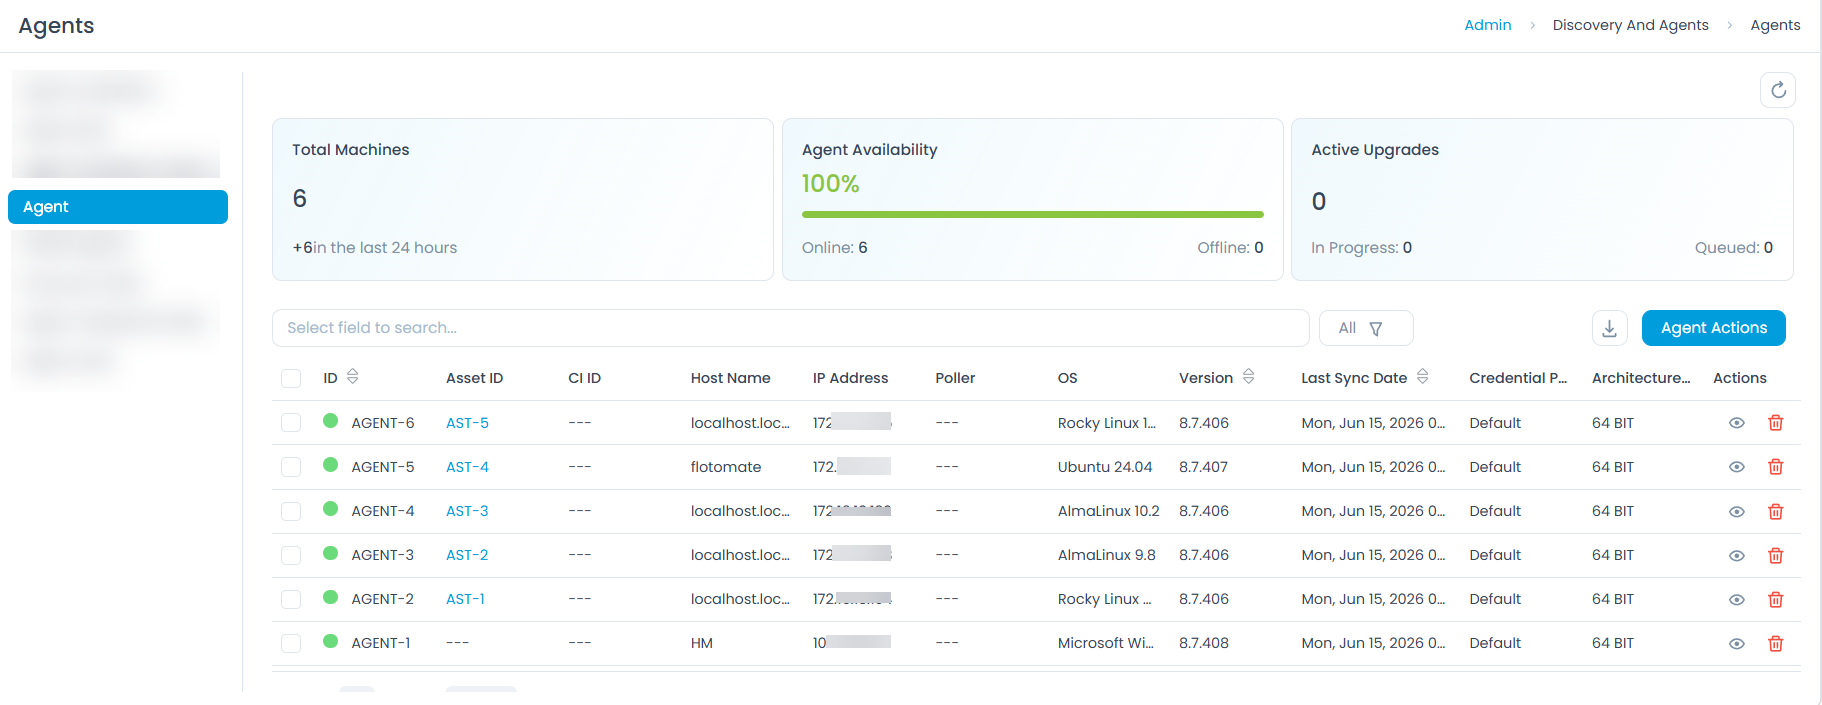
Managing Agents
The main table on the Agents tab lists all discovered agents with detailed information.
You can use the following features to manage the agent list:
Search: Use the Search bar to find specific agents by various criteria (ID, Activation Status, Host Name, IP Address, Poller, Credential Profile, Platform, OS Name, Version, Architecture, and Last Sync Date).
Filter: You can filter the agents list by clicking the desired option. The following filters are available:
Filter Records Displayed All Displays all active discovery and RDP agents that have not been archived. Archived Displays agents that have been archived. Archived agents are removed from the active list but retained in the system and can be restored if needed. Refresh: Click the refresh icon (circular arrow) to update the agent list and KPIs with the latest information.
Download: Click the Download icon to export the agent list in Excel or CSV format. When downloading as Excel, you can optionally set a password to protect the file.
The table displays the following columns for each agent:
| Column | Description |
|---|---|
| ID | Unique identifier for the agent. |
| Asset ID | The ID of the asset associated with the agent (e.g., AST-1). |
| CI ID | The ID of the Configuration Item (CI) linked to the agent, if applicable. |
| Host Name | The hostname of the machine where the agent is installed. |
| IP Address | The IP address of the machine. |
| Poller | The associated poller service (if any). |
| OS | The operating system of the machine. |
| Version | The installed agent version. |
| Last Sync Date | The timestamp of the last successful communication with the agent. For example, if the agent was last online on 10th January 2026 at 10:00 AM, the last sync date will be 10th January 2026 at 10:00 AM. |
| Credential Profile | The credential profile used by the agent for secure communication. |
| Architecture | The system architecture (e.g., 64 BIT). |
| Actions | Click the eye icon to view detailed information about a specific agent, including its task history and logs. Click the trash can icon to remove the agent from the system. |
Agent Details
Clicking the eye icon next to any agent in the list opens a panel, providing a comprehensive view of that agent's information, including its basic details, request logs, and task history.

Agent Basic Information
At the top of the panel, you'll find the following basic details about the agent:
- IP Address: The IP address of the machine where the agent is installed.
- OS: The operating system of the machine (e.g.,
Microsoft Windows 11 Pro N). - Version: The installed agent version (e.g.,
8.7.400). - Credential Profile: The credential profile used by the agent for secure communication (e.g.,
Default). - Last Sync Date: The timestamp of the last successful communication with the agent (e.g.,
Fri, Jan 09, 2026 03:19 PM). - Architecture: The system architecture (e.g.,
64 BIT).
Request Log
The Request Log tab provides a history of all requests made to the agent. Once requested, the request status will be updated to Yet to receive and then to Success if successful. If the request fails, the status will be updated to Failed. You can also initiate a new request by clicking the Request button.

| Column | Description |
|---|---|
| Requested Time | The time the request was initiated. |
| Updated Time | The last time the request status was updated. |
| Request Status | The current status of the request (e.g., Yet to Receive). |
| Action | Download the agent logs in .zip format. |
Task History
The Task History tab displays a comprehensive record of all tasks executed by the agent. The actions include Upgrade Agent and Update Credential Profile.
You can use the Search bar to search for specific tasks by ID, Parent ID, Type, Status, and Last Updated Date.

| Column | Description |
|---|---|
| ID | Unique identifier for the task. |
| Parent Id | The ID of the parent task, if applicable. |
| Type | The type of task (e.g., Upgrade Agent, Update Credential Profile). |
| Status | The current status of the task (e.g., Yet to Receive, Success, Failed, and Cancelled). |
| Last Updated Date | The date and time when the task status was last updated. |
| Result | The outcome or result of the task execution. |
Agent Actions
This section allows IT Administrators to initiate remote tasks for selected agents, enabling controlled configuration changes and upgrades.
Creating a New Agent Action Task
Click the Agent Actions button and a popup window will appear.
Click the Add button to add a new action task and the below page will appear.
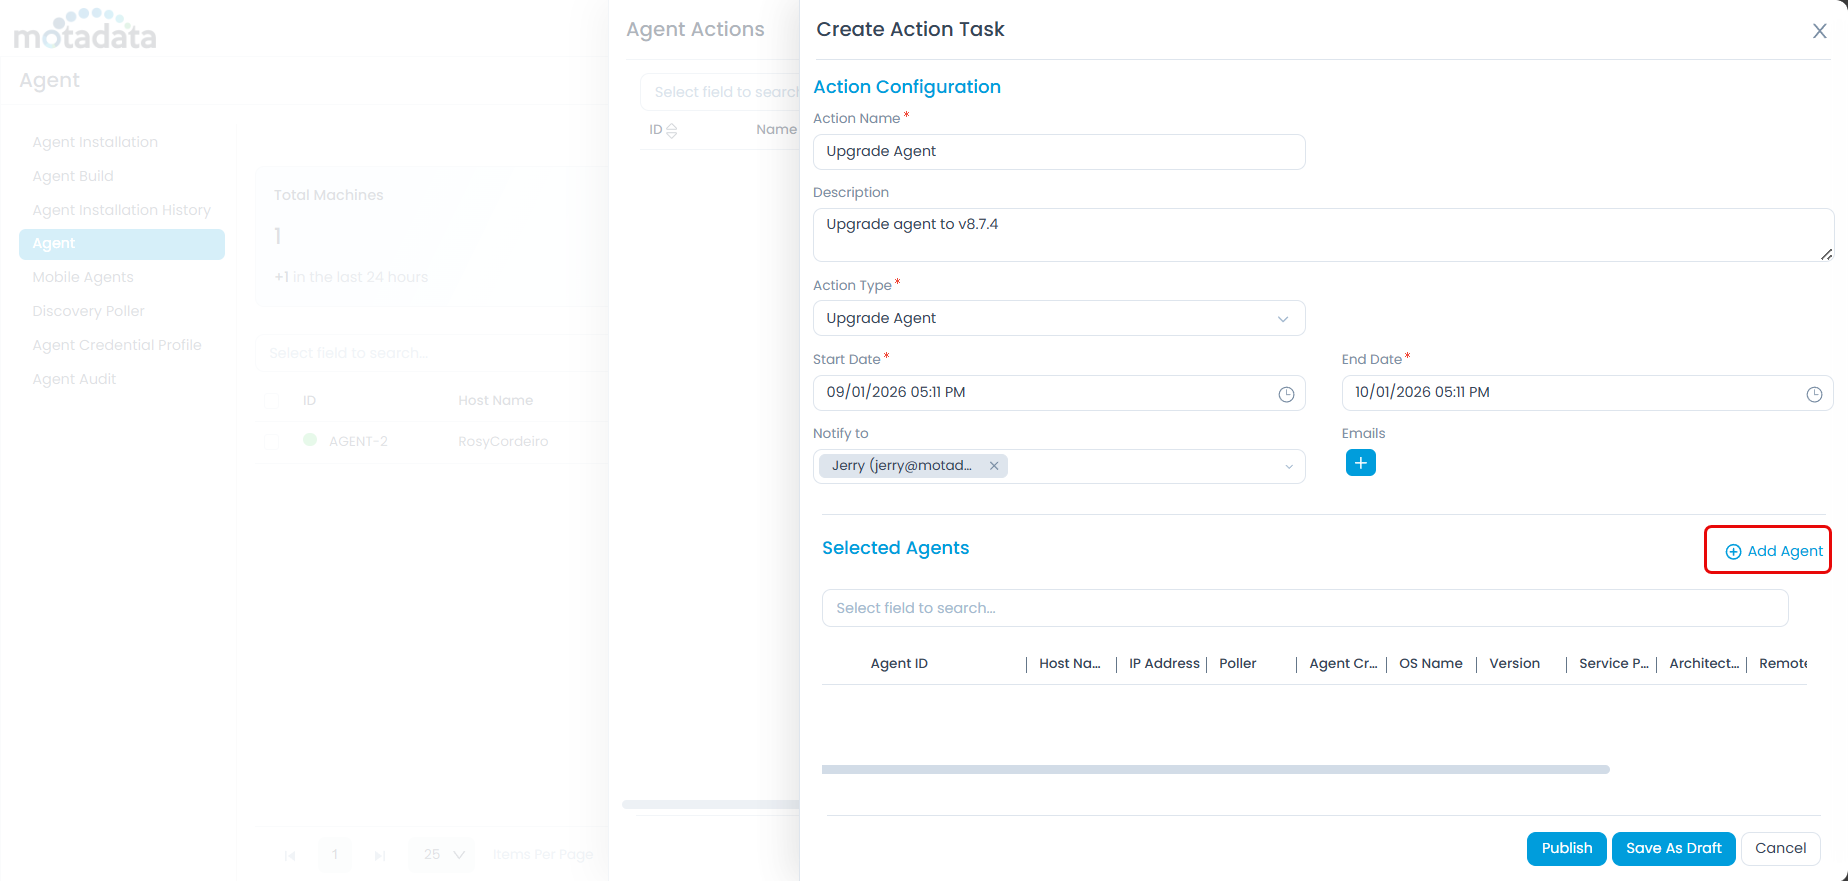
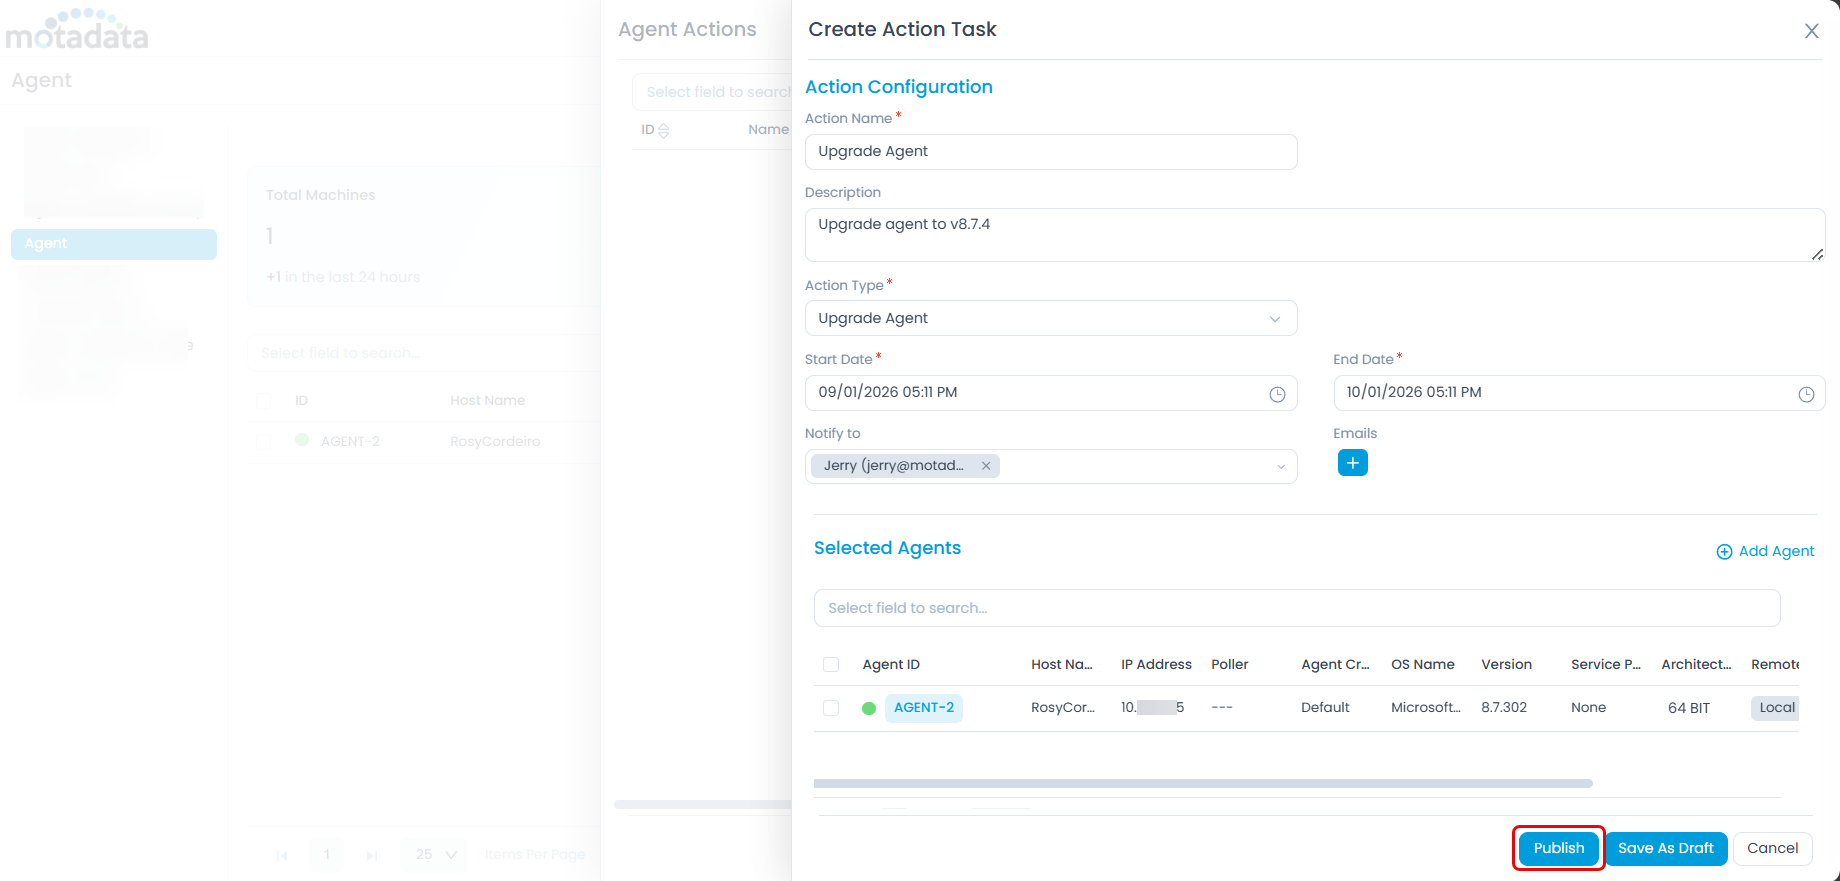
Enter the following details:
Action Name: A descriptive name for the action.
Description: A brief description of the action.
Action Type: Choose an Action Type:
Upgrade Agent: Select this to upgrade the agent to a newer version in bulk. Only agents with a lower version than the available build in the Agent Build tab and no in-progress upgrade tasks will be listed. For example, if the available build is 8.7.400, only agents with a version less than 8.7.400 will be listed. This helps to roll out upgrades gradually and avoid server load issues.
Update Credential Profile: Select this to assign or update credentials across multiple agents automatically in a single go. Use when switching from activation codes or updating credentials in bulk. For example, if you want to update the credential profile of 20 agents, you can select the Update Credential Profile action type and select the credential profile from the dropdown.
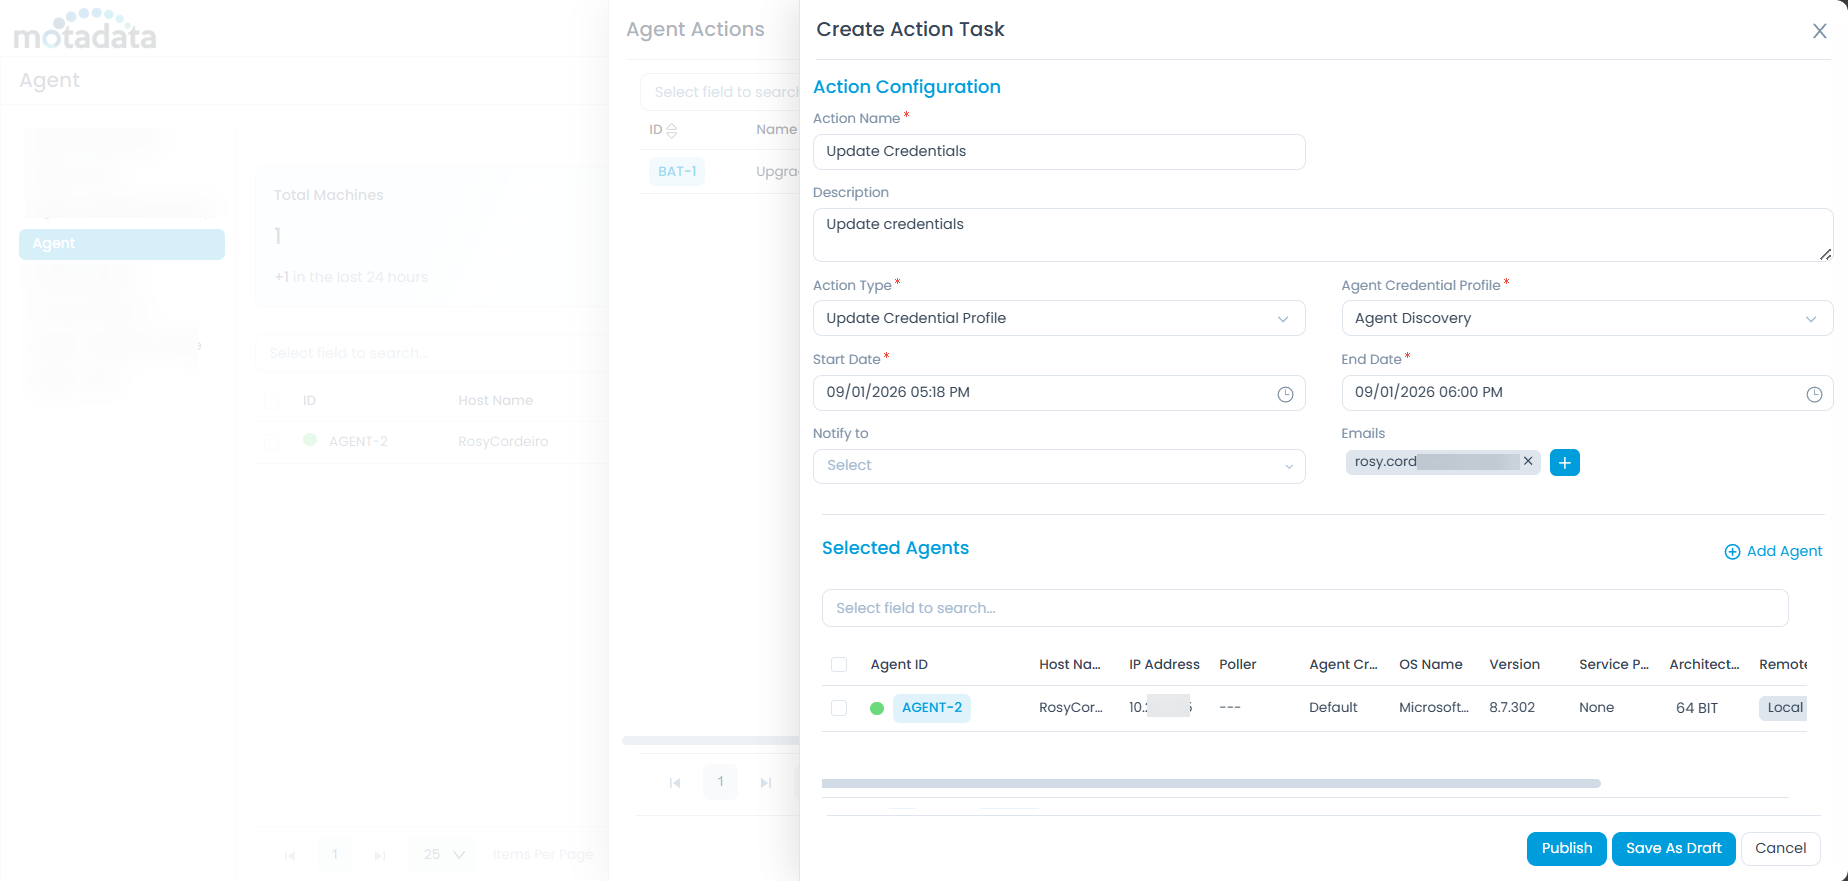 note
noteIf the Action Type is changed, the agents list will be cleared and the new agents list will be displayed based on the new action type.
Start Date: Select the date and time when the task should start.
End Date: Select the date and time when the task should end.
Notify To: Select the technicians or enter external email addresses in the Emails field to receive notifications upon task completion or expiry.
Click the Add Agents button and select the agents from the list as shown below.
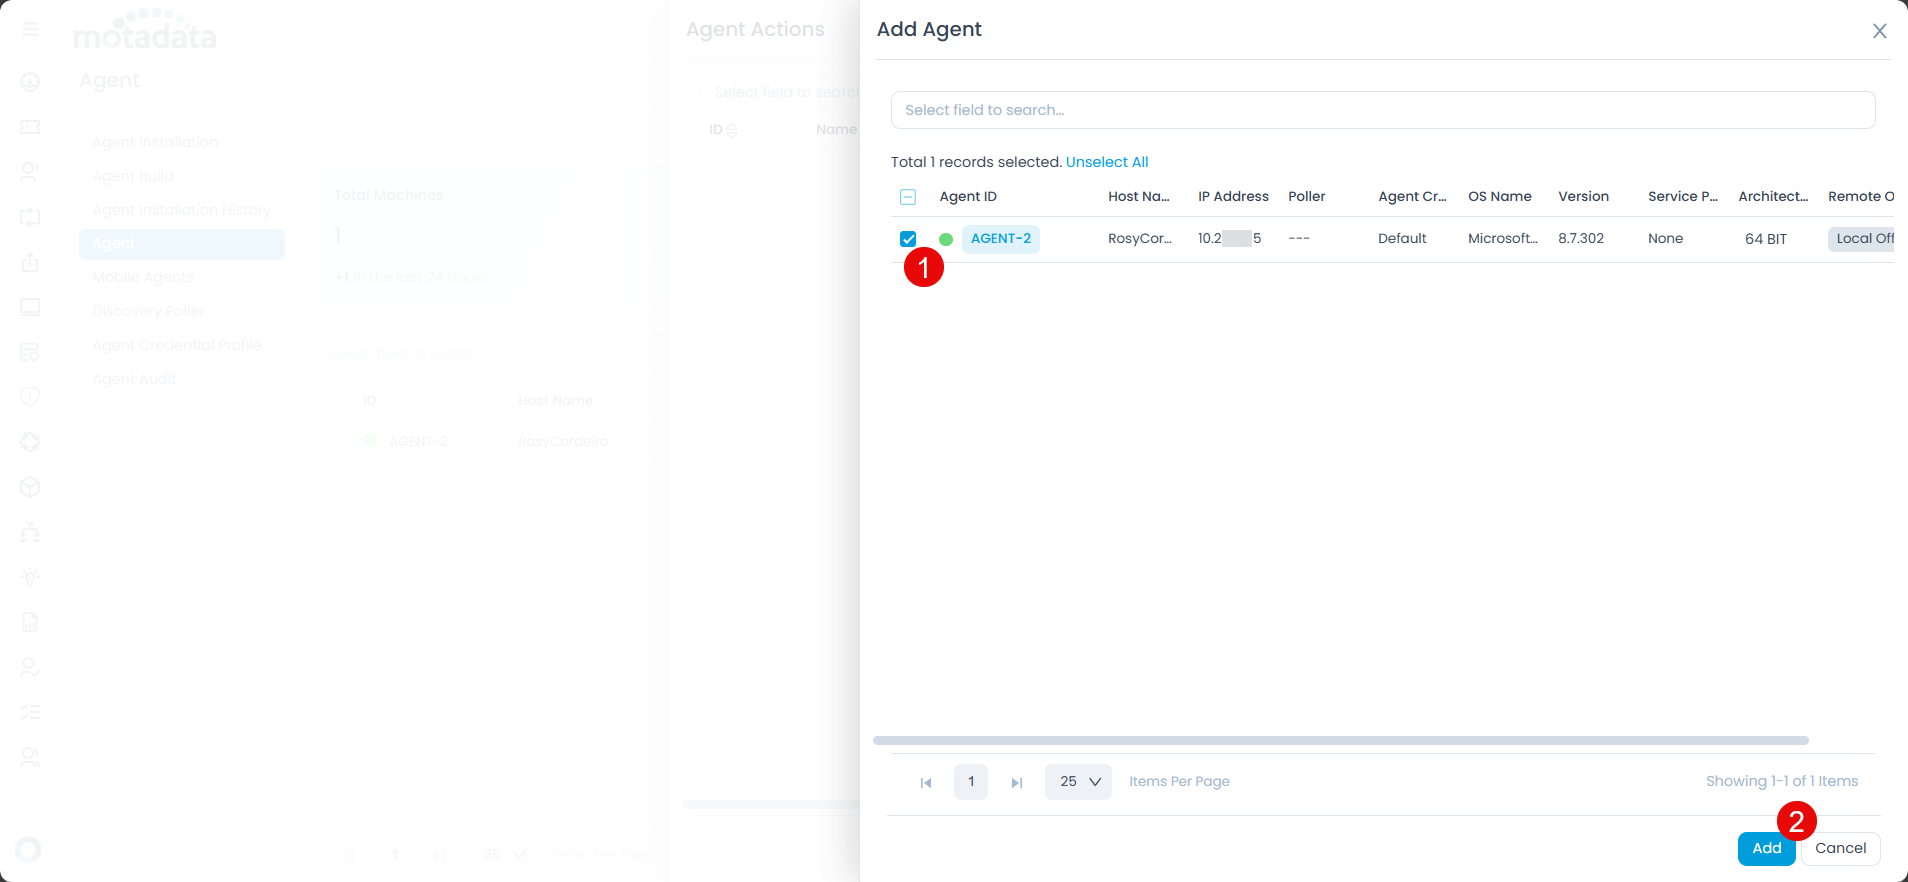
The agents will appear in the list. Next, click Publish to initiate the task or click Save as Draft button to save the task for a later use.
The task will be listed in the Agent Actions list page as shown below.
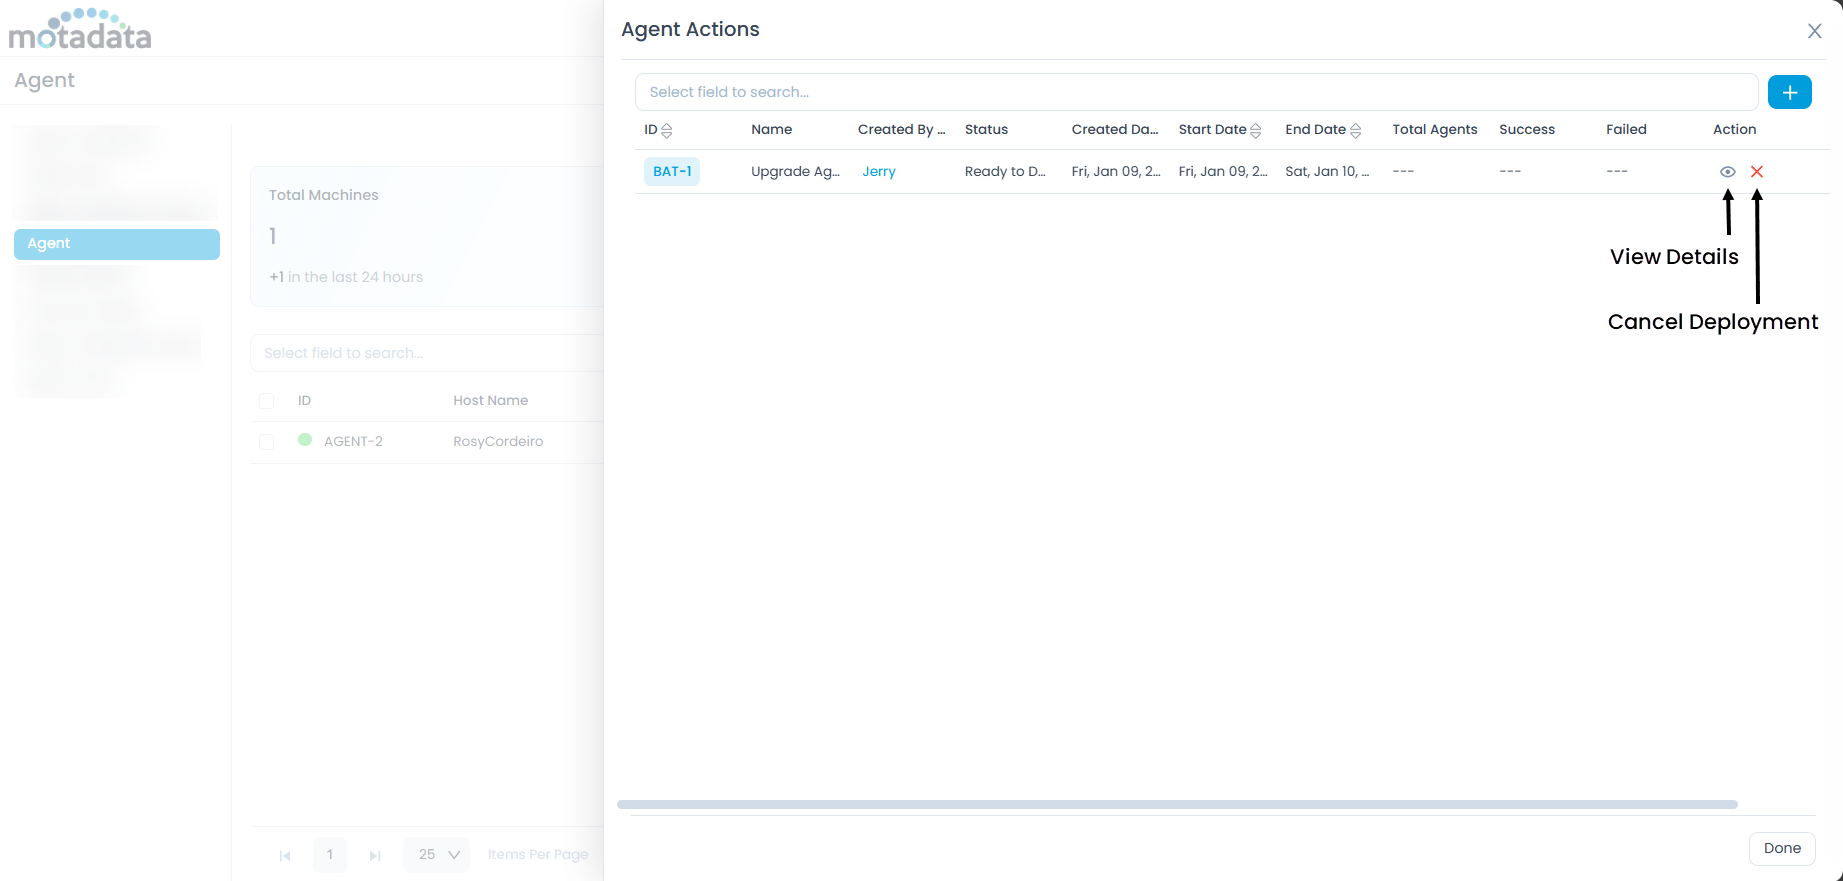
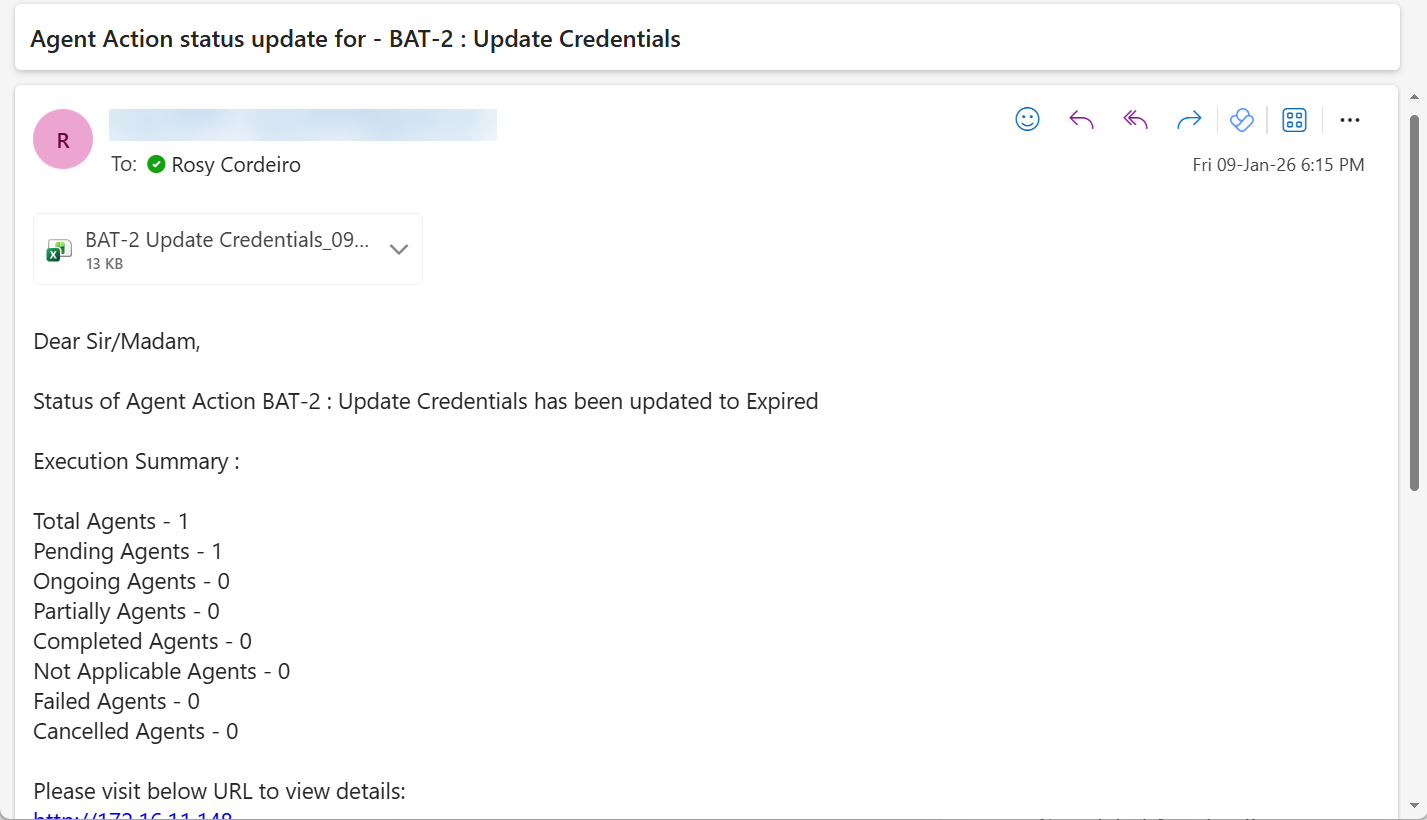
Here, you can view the task status and also cancel the deployment if required. Moreover, on the completion or expiry of deployment, a notification will be sent to the configured email addresses as shown in the below sample email.
Mobile Agents
The Mobile Agents tab displays a list of discovered mobile devices. From this section, you can manage mobile agents and configure mobile discovery settings.
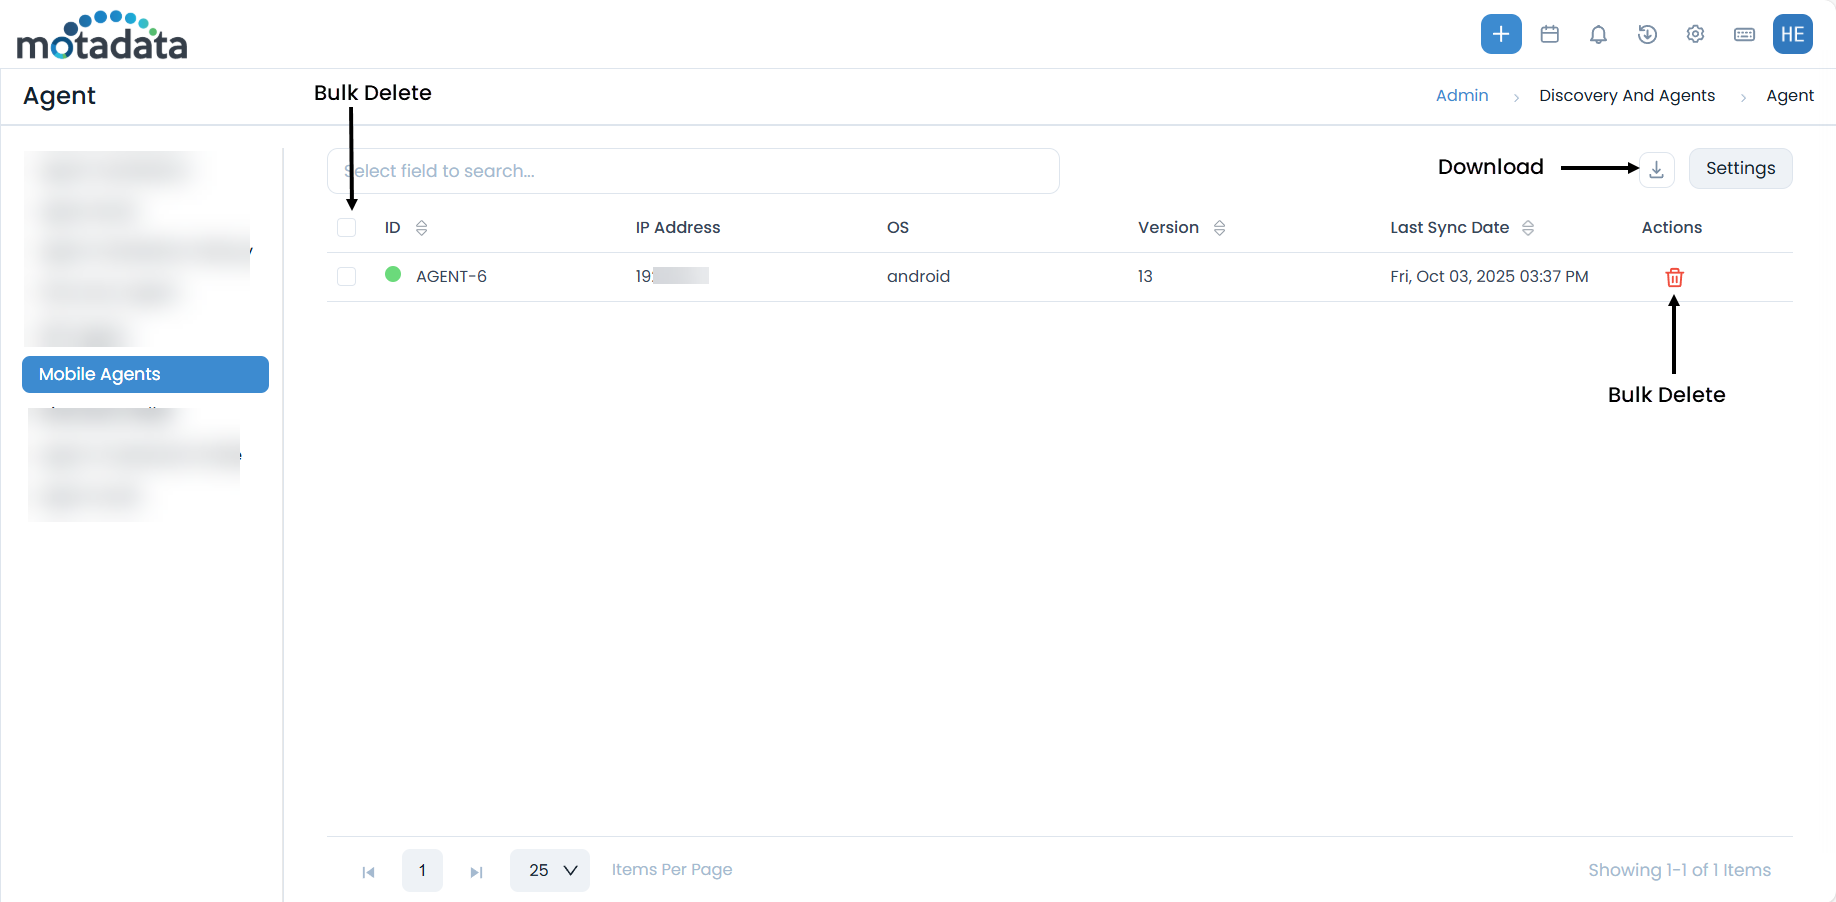
The following options are available on the Mobile Agents page:
- Download: Click the Download icon to export the mobile agent list in Excel or CSV format. When downloading as Excel, you can optionally set a password to protect the file.
- Settings: Configure mobile discovery settings. See Mobile Discovery Settings below.
Mobile Discovery Settings
Click the Settings icon to configure mobile discovery:
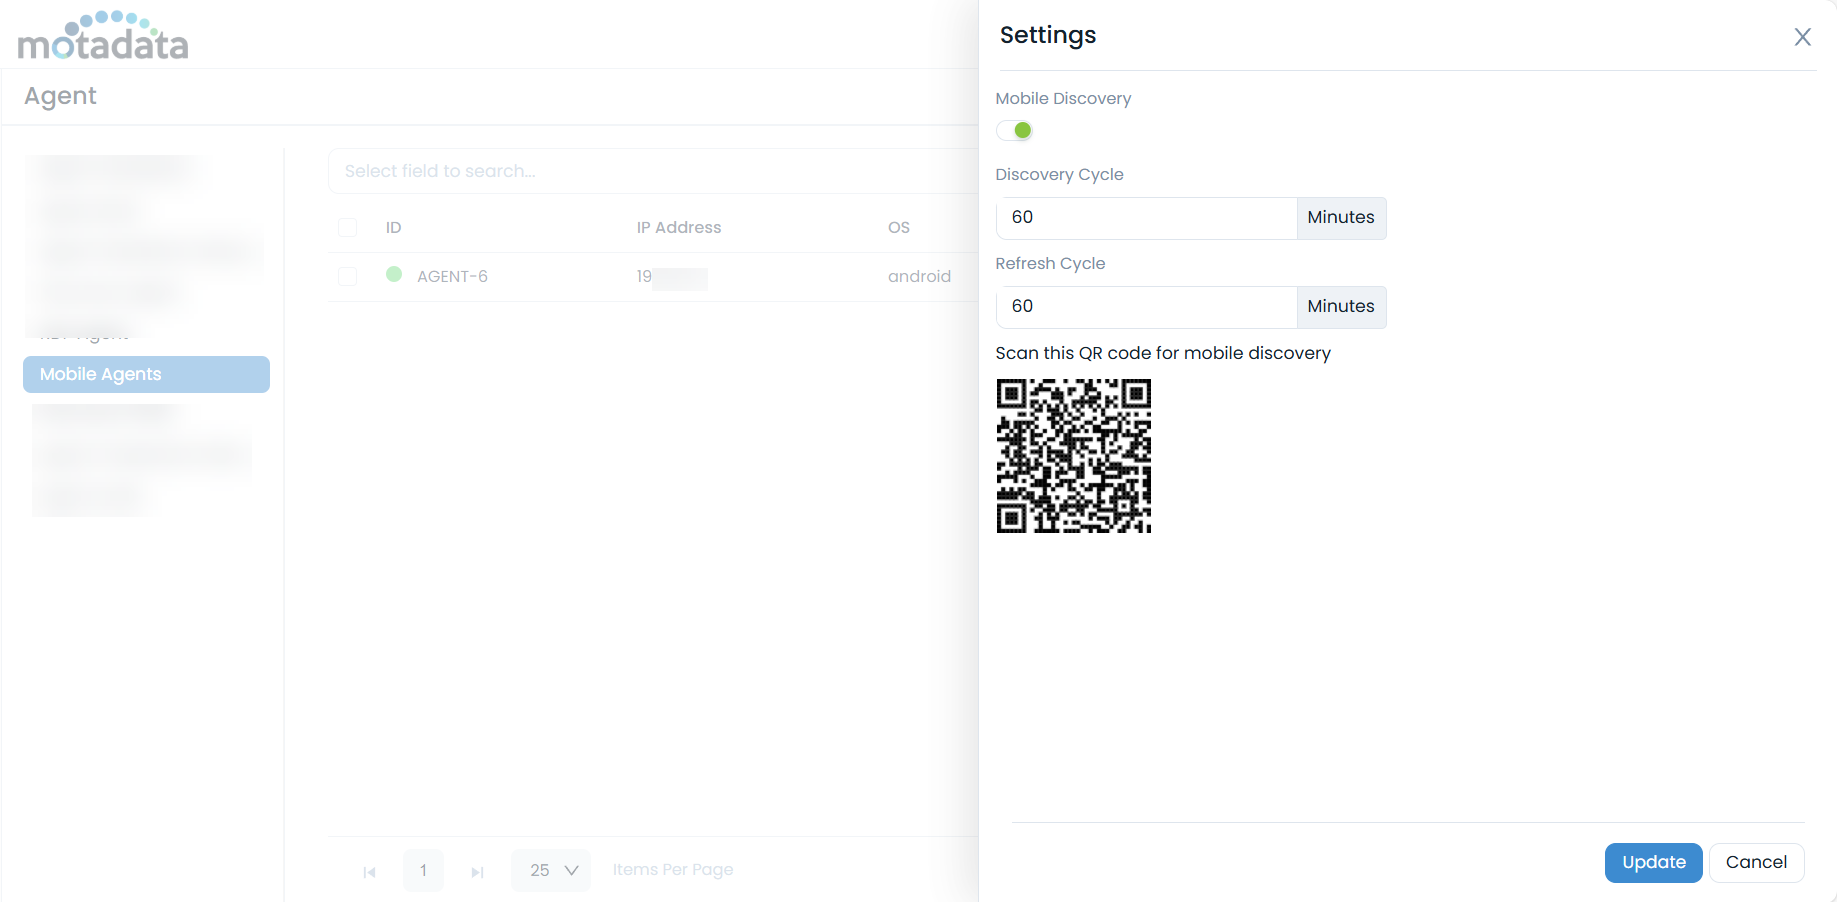
- Mobile Discovery: Enable this option to allow the discovery of mobile devices.
- Discovery Cycle: Set the frequency (in minutes) for the discovery cycle to run. The default is 30 minutes.
- Refresh Cycle: Set the refresh interval (in minutes) for the discovery cycle. The default is 5 minutes.
- Scan this QR Code for Mobile Discovery: Scan the displayed QR code from the mobile device you wish to discover.
Click Update to save your mobile discovery settings.
Discovery Poller
The Discovery Poller tab lists all installed pollers responsible for network scanning and asset discovery. You can manage multiple pollers and perform bulk upgrades from this section.
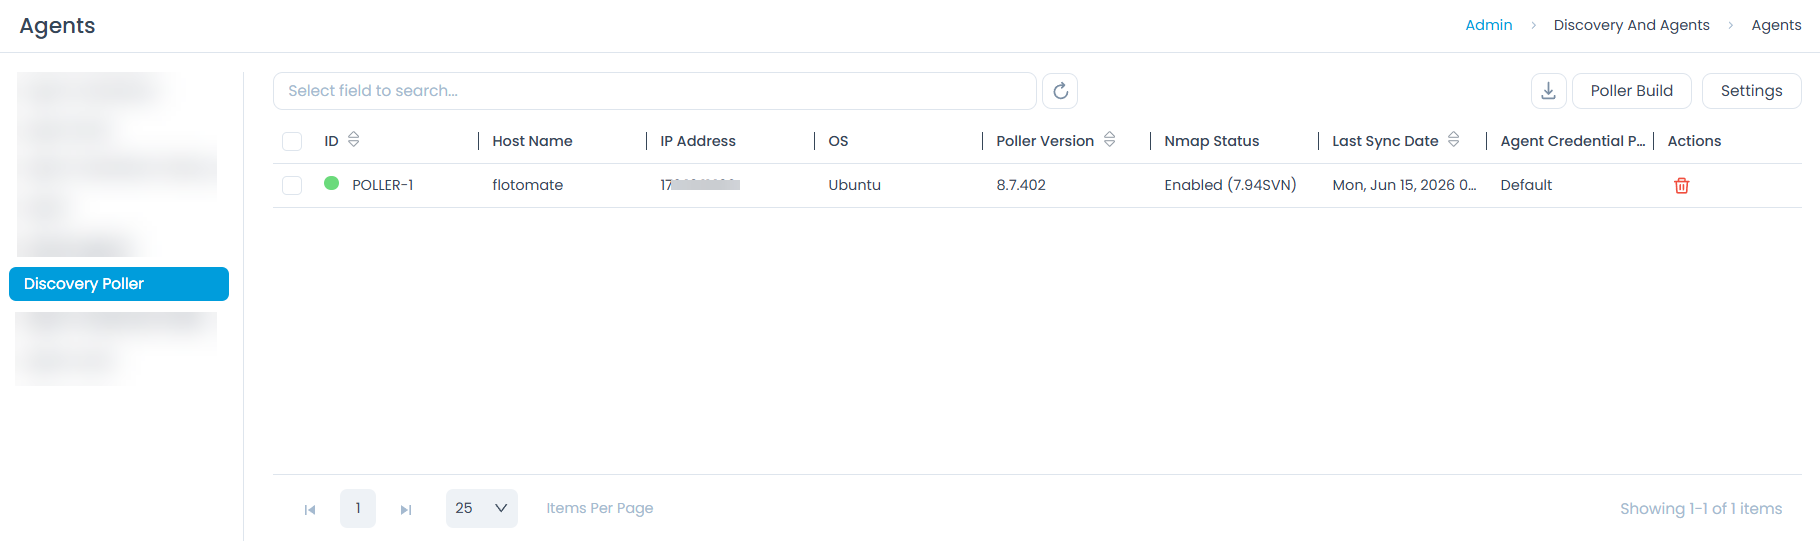
Poller Features
- Download: Click the Download icon to export the poller list in Excel or CSV format. When downloading as Excel, you can optionally set a password to protect the file.
- Poller Build: Upload new poller builds to upgrade poller versions.
- Settings: Configure the poller's Refresh Cycle (in minutes). The default value is 5 minutes.
- Bulk Actions: Perform the following actions on multiple pollers:
- Delete: Select and delete multiple pollers.
- Upgrade: Upgrade the version of multiple pollers simultaneously.
Poller Build (Bulk Upgrade)
This functionality enables you to manually upgrade poller agents on multiple systems in bulk.
This functionality is applicable from v8.6.1 onwards.
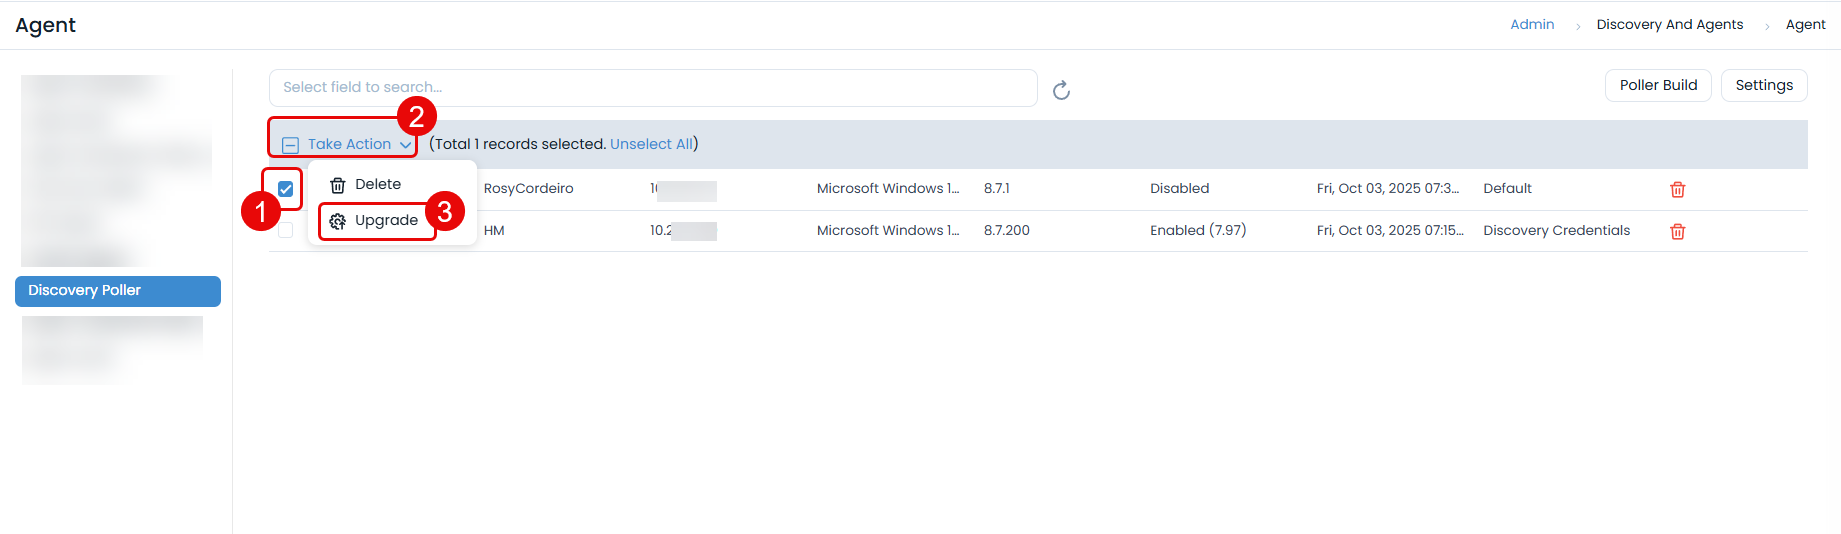
To upgrade poller agents in bulk:
Click the Poller Build button. A popup window will appear.
Click Attach Files and upload the required poller build file.

Select the pollers from the grid that you wish to upgrade.
Click Take Action and select Upgrade.
- A confirmation message will appear. Click Yes to continue or No to stop the process.
Poller Upgrade History
Once the bulk upgrade process initiates, you can view the history of the poller agent installations in the History tab of the Poller Build section.
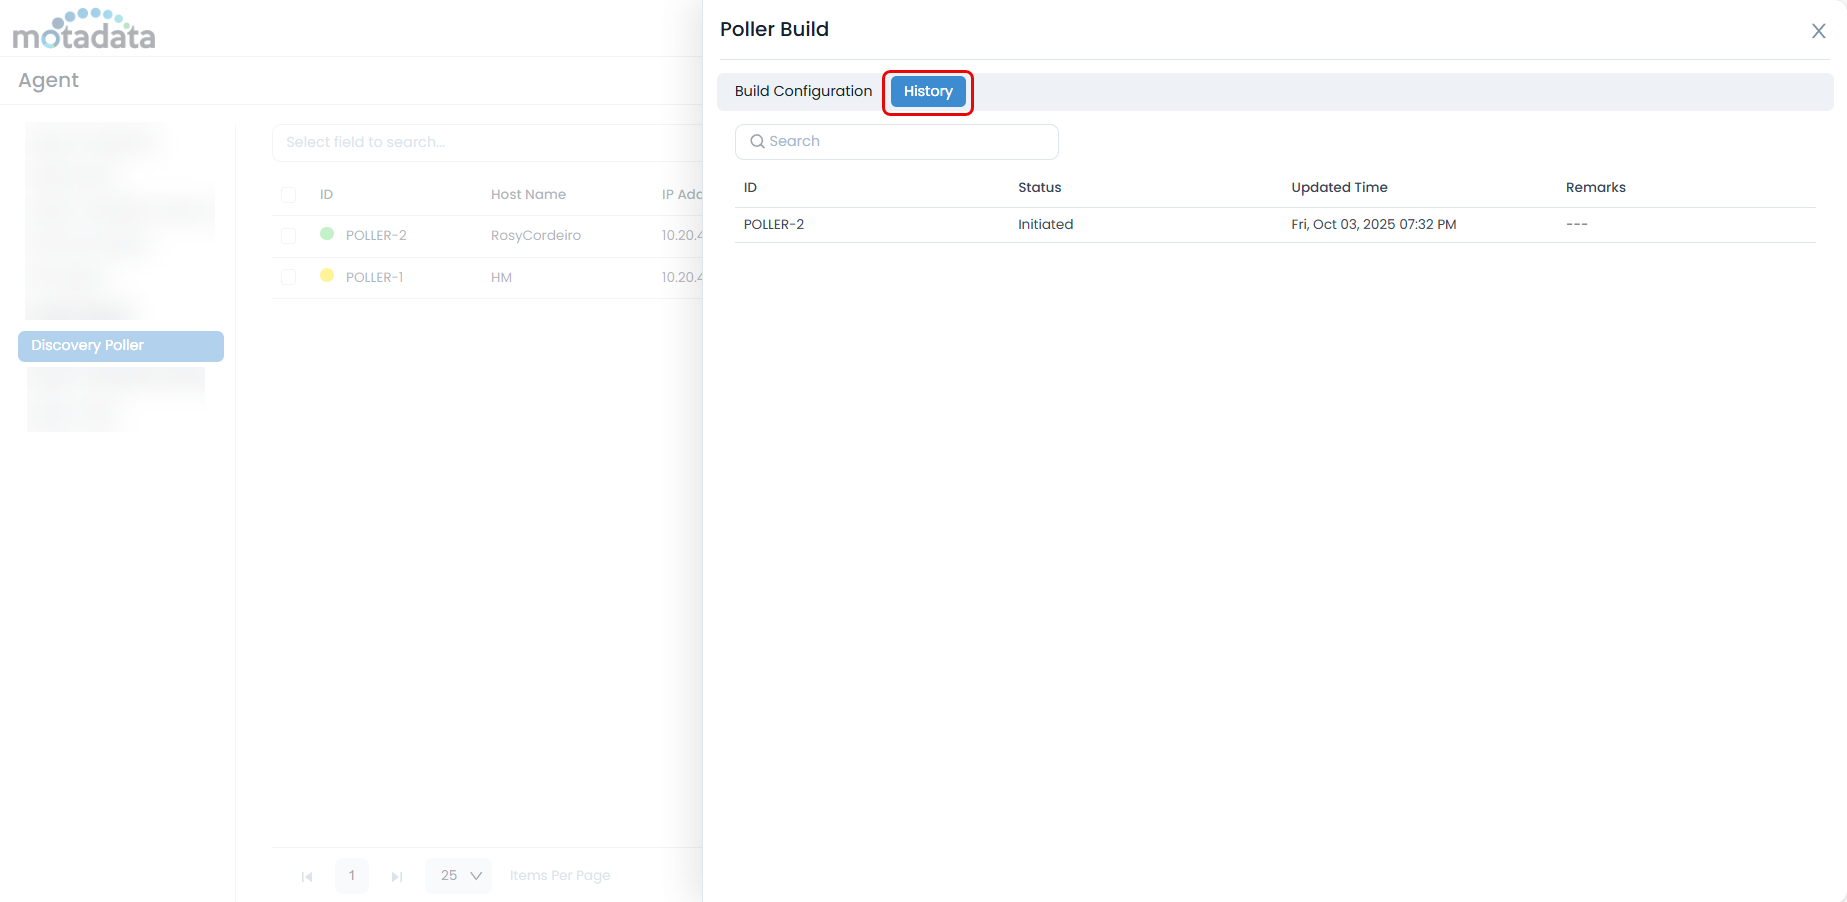
The history table displays the following details:
- ID: The Poller ID.
- Status: The status of the poller build process:
- Requested: The poller upgrade has been requested from ServiceOps to the target machine.
- Initiated: The end machine has started the poller upgrade process.
- Success: The poller version on the end machine has been successfully upgraded to the uploaded build.
- Failed: The end machine failed to upgrade the poller to the uploaded build.
- Updated Time: The date and time when the poller was last updated.
- Remarks: Displays the result of the upgrade attempt.
Agent Credential Profile
The Agent Credential Profile enhances the security of Agent-ServiceOps application communication by using an authorization key instead of static client credentials or activation codes. This new approach improves security during agent installation (Discovery, RDP, or Poller). Activation code functionality remains for backward compatibility with older agent versions.
This functionality is applicable from v8.5.1 onwards.
Communication Settings on Upgrade
Upon upgrading to a newer version:
If Agent Communication Settings were not previously enabled, you can continue to use both Secure Auth and Activation Code for agent and poller communication.
From v8.6.0 onwards, the Agent Communication Settings have been removed from the UI and are now backend-configurable. During an upgrade, the Credential Profile communication status will be marked as either Enforced or Optional based on its backend value.

Agent Credential Profile Page
To access the Agent Credential Profile page, navigate to Admin > Discovery and Agents > Agents > Agent Credential Profile.
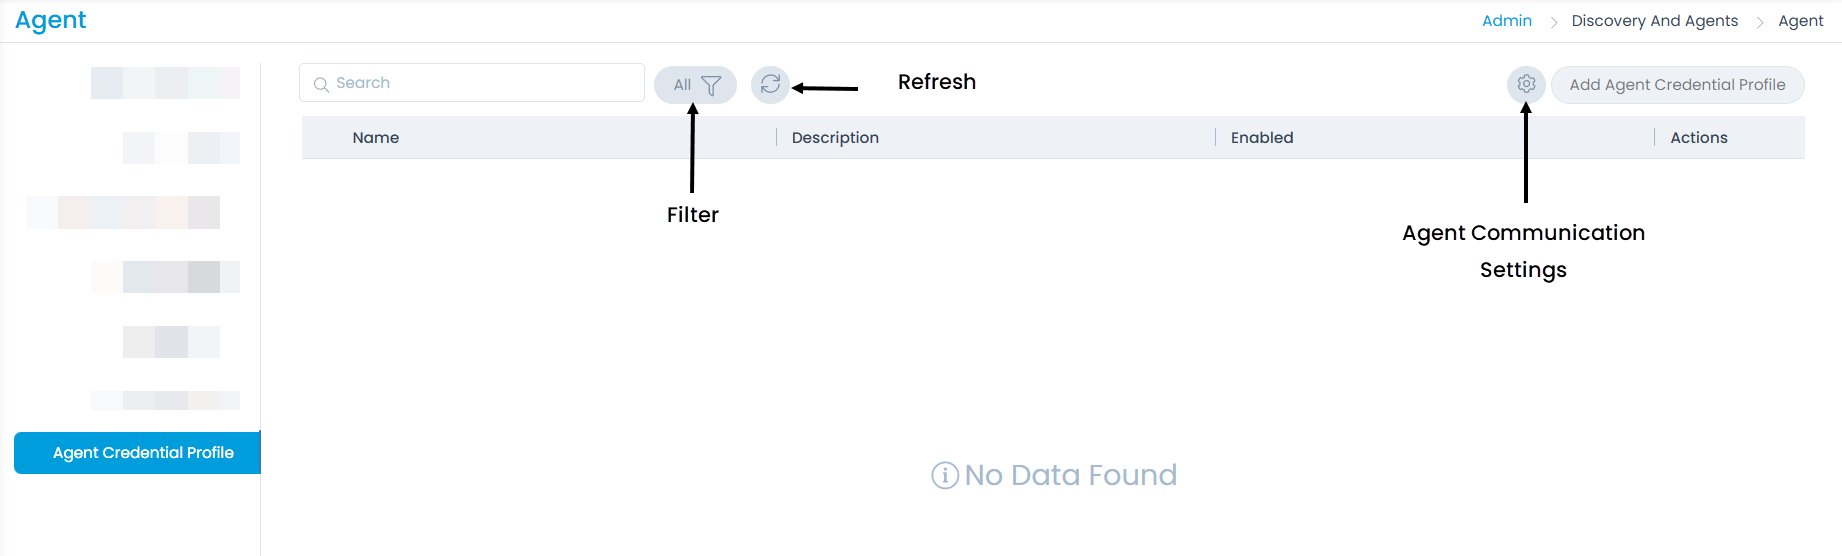
The page offers the following features:
Search: Search for specific credential profiles.
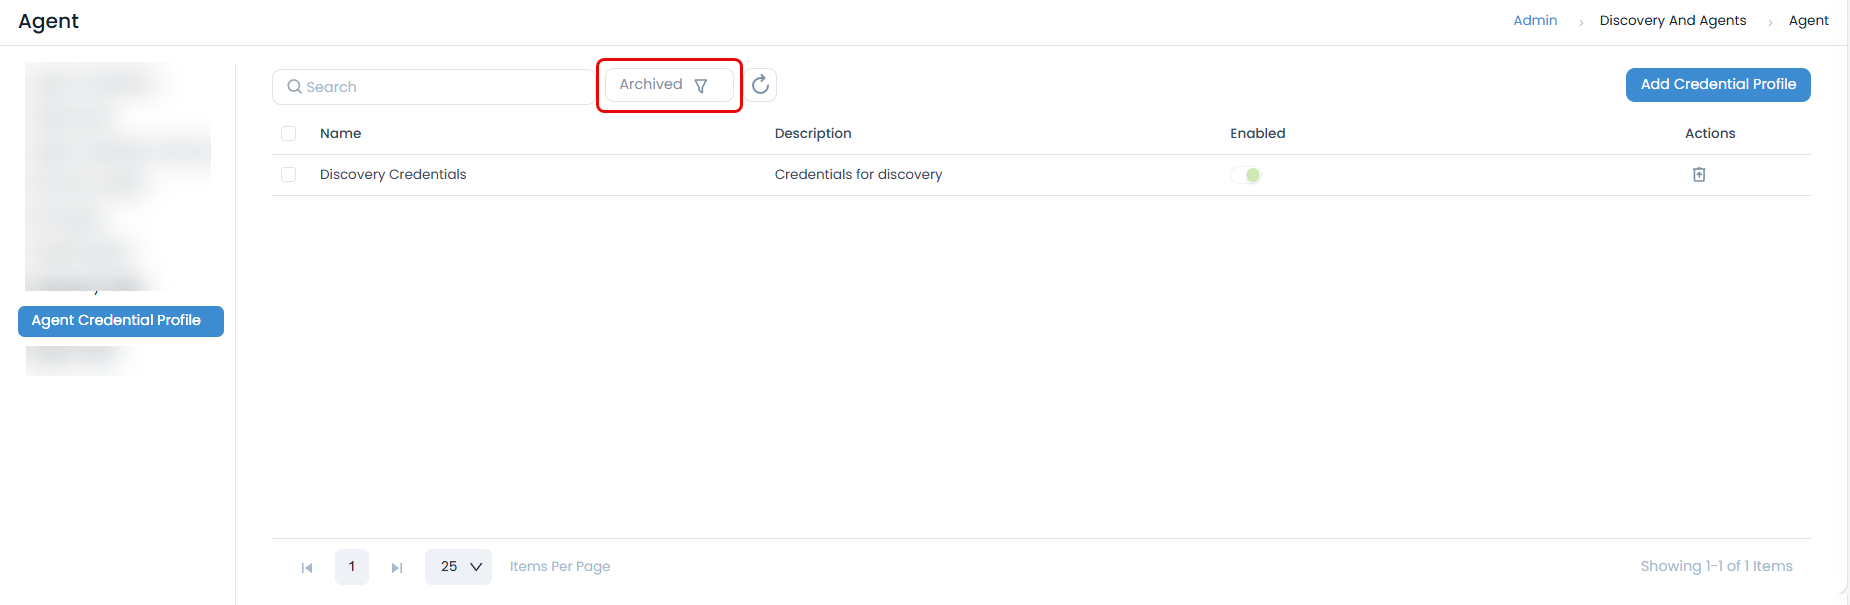
Filter: You can filter the credential profiles by clicking the desired option. The following filters are available:
Filter Records Displayed All Displays all active agent credential profiles that have not been archived, including both enabled and disabled profiles. Enabled Displays only those credential profiles that are currently active and can be used to authorize agent and poller communication with ServiceOps. Disabled Displays only those credential profiles that have been deactivated and cannot be used for agent authorization until re-enabled. Archived Displays credential profiles that have been archived. Once archived, agents using that profile will lose communication with ServiceOps. Archived profiles can be restored or a new profile can be created to re-establish communication. Refresh: Refresh the list to view the latest credential profiles.
Credential Profile Based Communication Status: Displays whether credential profile communication is Enforced or Optional (non-editable).
- Enforced: Only Credential Profiles are accepted for agent and poller communication; Activation Code-only setups are denied.
- Optional: Agents and pollers can use either Credential Profiles or Activation Codes for communication.
Additionally, if communication is marked as Optional during an upgrade, a default Agent Credential Profile will be auto-created to ensure smoother Agent and Poller communication without affecting existing infrastructure. This is not applicable for fresh installations after version 8.5.1.
Adding an Agent Credential Profile
To add a new agent credential profile:
Click the Add Credential Profile button. A popup window will appear.

Enter the Credential Profile Name and a brief Description about the profile.
Click Add. The new profile will appear on the list page.

You can then Edit this profile to retrieve the Secure Auth (Basic Authorization) key required for agent installation.

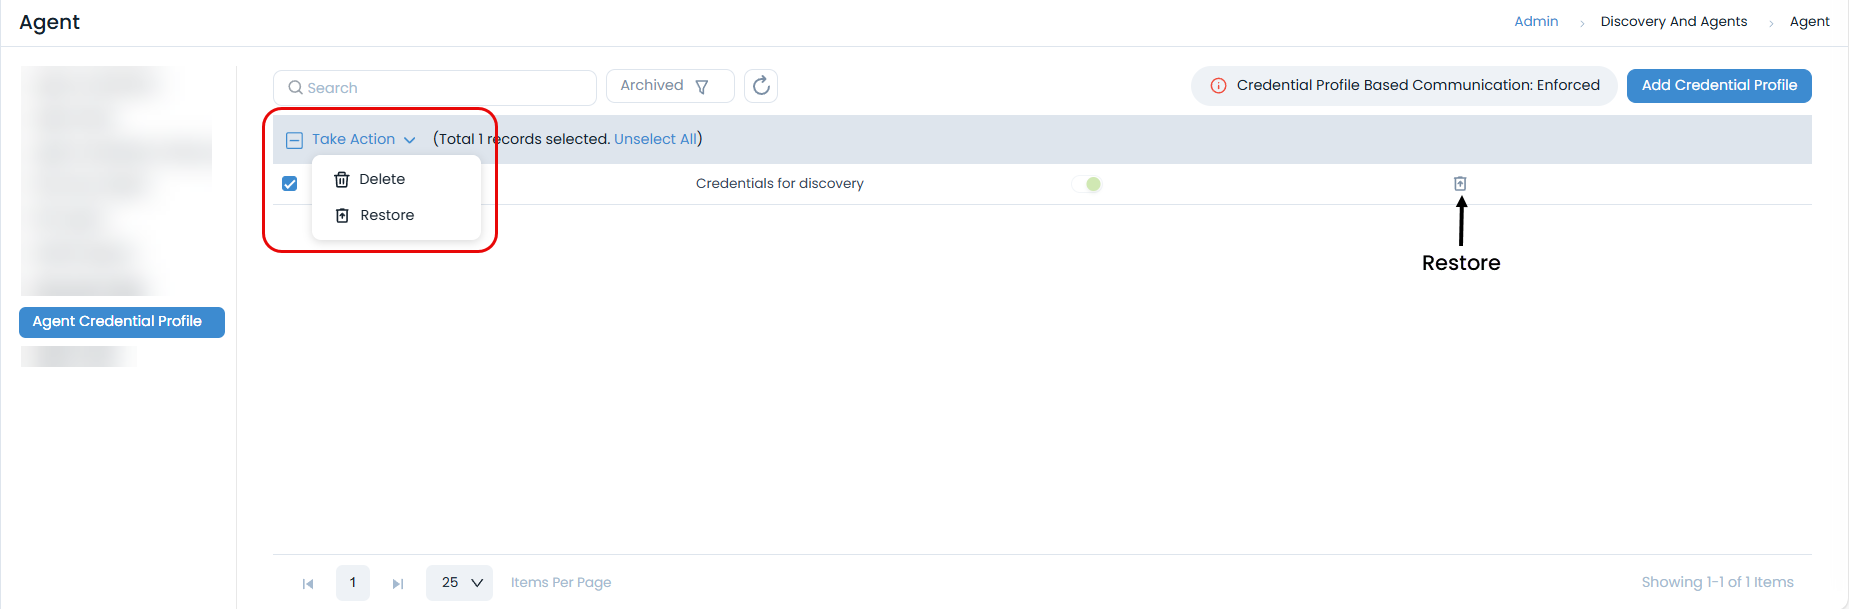
Archiving, Restoring, and Deleting Agent Credential Profiles
You can manage credential profiles through archiving, restoring, and deleting actions:
Archive Profile: Archive profiles individually using the Archive option or in bulk using the Bulk Archive option.
 Communication Interruption
Once a profile is deleted or archived, communication with associated agents will stop. To re-establish communication, you must either restore the agent credential profile or create and use a new one.
View Archived Profiles: Archived profiles are moved to the Archived list.
Delete or Restore: From the archived list, you can permanently delete or restore agent credential profiles using the respective icons.
Agent Audit
The Agent Audit section allows you to view a comprehensive audit trail of all agent-related activities based on a selected time range.
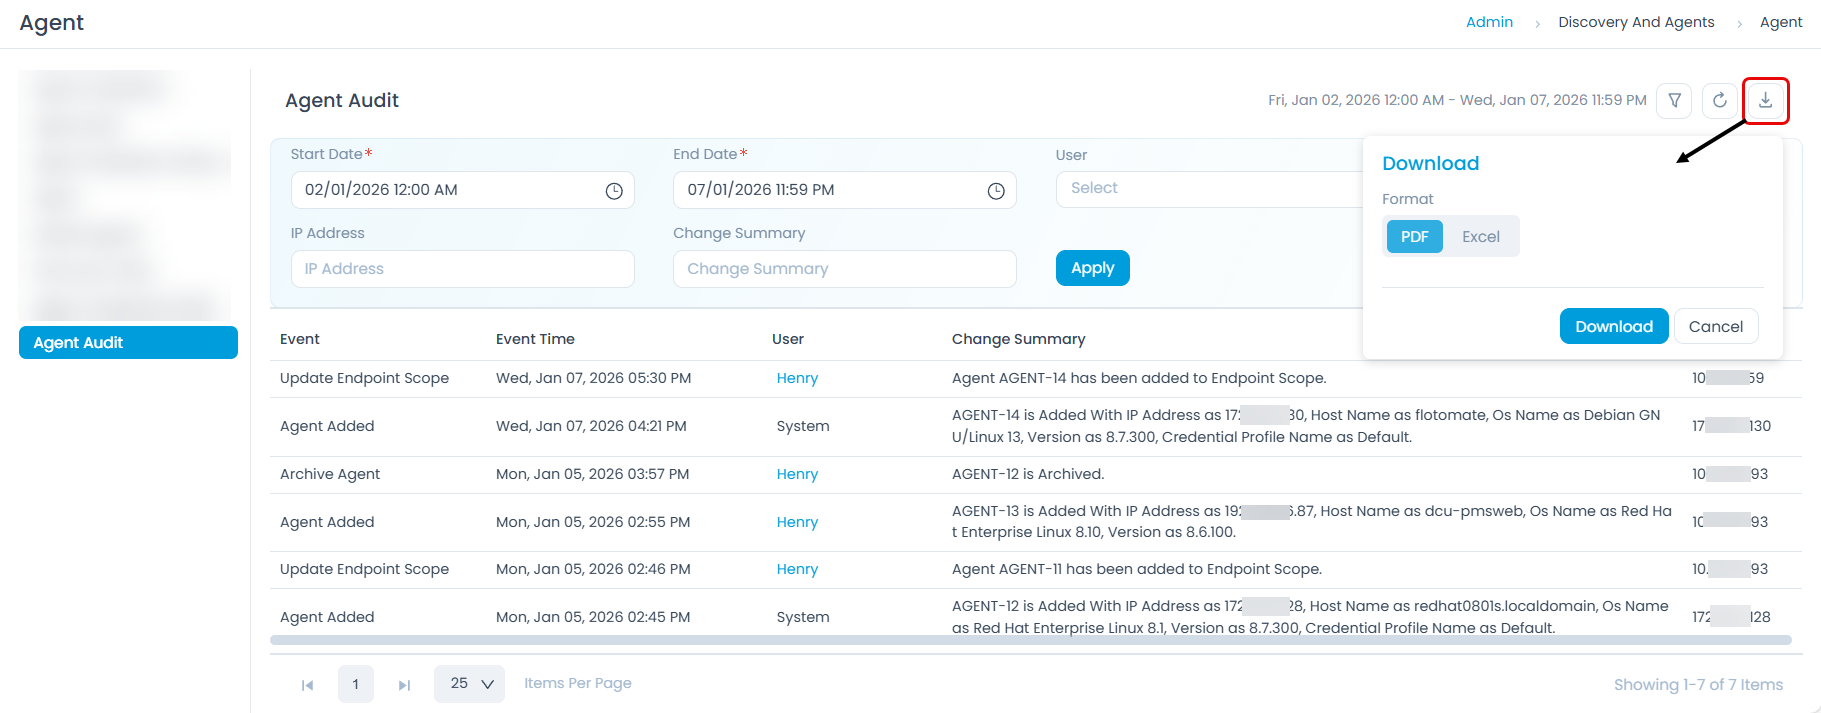
The audit table displays the following columns:
- Event: The type of event that occurred (e.g.,
Discovery Agent Added,Mobile Agent Added,Delete Agent,Archive Agent). - Event Time: The date and time when the event occurred.
- User: The user who performed the action (system user or specific user).
- Change Summary: A summary of changes related to the agent, such as OS Name and Version.
- IP Address: The IP address associated with the agent event.
You can download the audit report in PDF or Excel format by clicking the download icon and selecting your desired format.