Emails
ServiceOps utilizes email for sending and receiving notifications. This functionality is enabled by configuring email servers within the ServiceOps Portal.
Before You Begin
Before configuring email servers in ServiceOps, ensure the following prerequisites are met:
- ServiceOps Email Application Accessibility: The URL
https://email-app.serviceops.ai/must be accessible from your ServiceOps instance. - Internet Connectivity: Ensure that your ServiceOps instance has stable internet connectivity.
- Email Protocol Enablement: The email protocols you plan to use (SMTP, MAPI, POP3, IMAP) must be enabled on your email account. For example, if you intend to use IMAP, ensure it is enabled in your email service provider settings.
- Email Service Provider Information: Have your email server configuration details (e.g., server addresses, port numbers, security types, authentication details) readily available from your email service provider.
- OAuth Configuration Details: If you plan to use OAuth for authentication (for providers like Microsoft Azure or Gmail), ensure you have the Client ID, Client Secret, Authorization URL, Token URL, and Scope details. These can be retrieved from the application created in your respective cloud console (e.g., Azure portal, Google Developers Console).
- Admin Consent for Microsoft (if applicable): If your Microsoft Azure environment has administrator consent enabled for applications, refer to the Configuring Admin Consent section for detailed steps.
Configuring Admin Consent
When integrating third-party applications with Microsoft services, users may encounter a prompt for admin consent. This process is essential for granting specific permissions to applications that require access to sensitive data within Microsoft environments, such as Azure AD or Office 365. By requesting admin consent, users ensure that only administrators with the appropriate privileges can authorize these permissions, safeguarding organizational security and compliance. Understanding how to properly request and manage admin consent is crucial for seamless and secure application integration.
To configure admin consent, follow the below procedure:
- Ensure the email application with which the user can sign-in exists in the Enterprise Applications module. For example, here "ServiceOps-Email-Global-App" application is used.
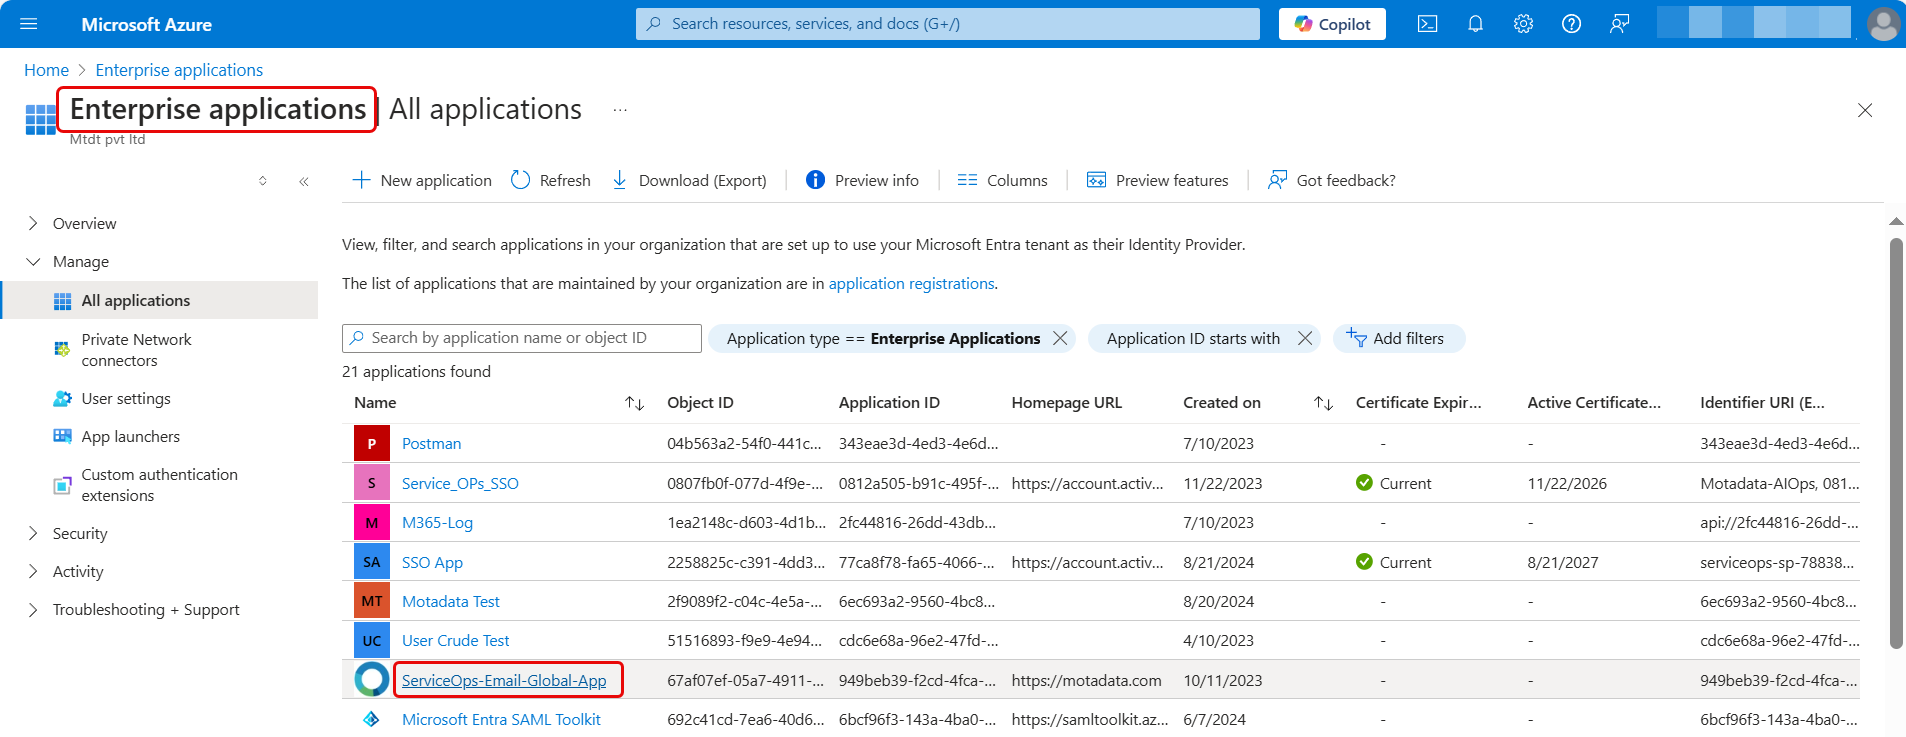
If the "ServiceOps-Email-Global-App" application is not available refer to the step 2.
If the "ServiceOps-Email-Global-App" application is available, verify the Users and groups section. Here, the email user must be available and allowed in this application.
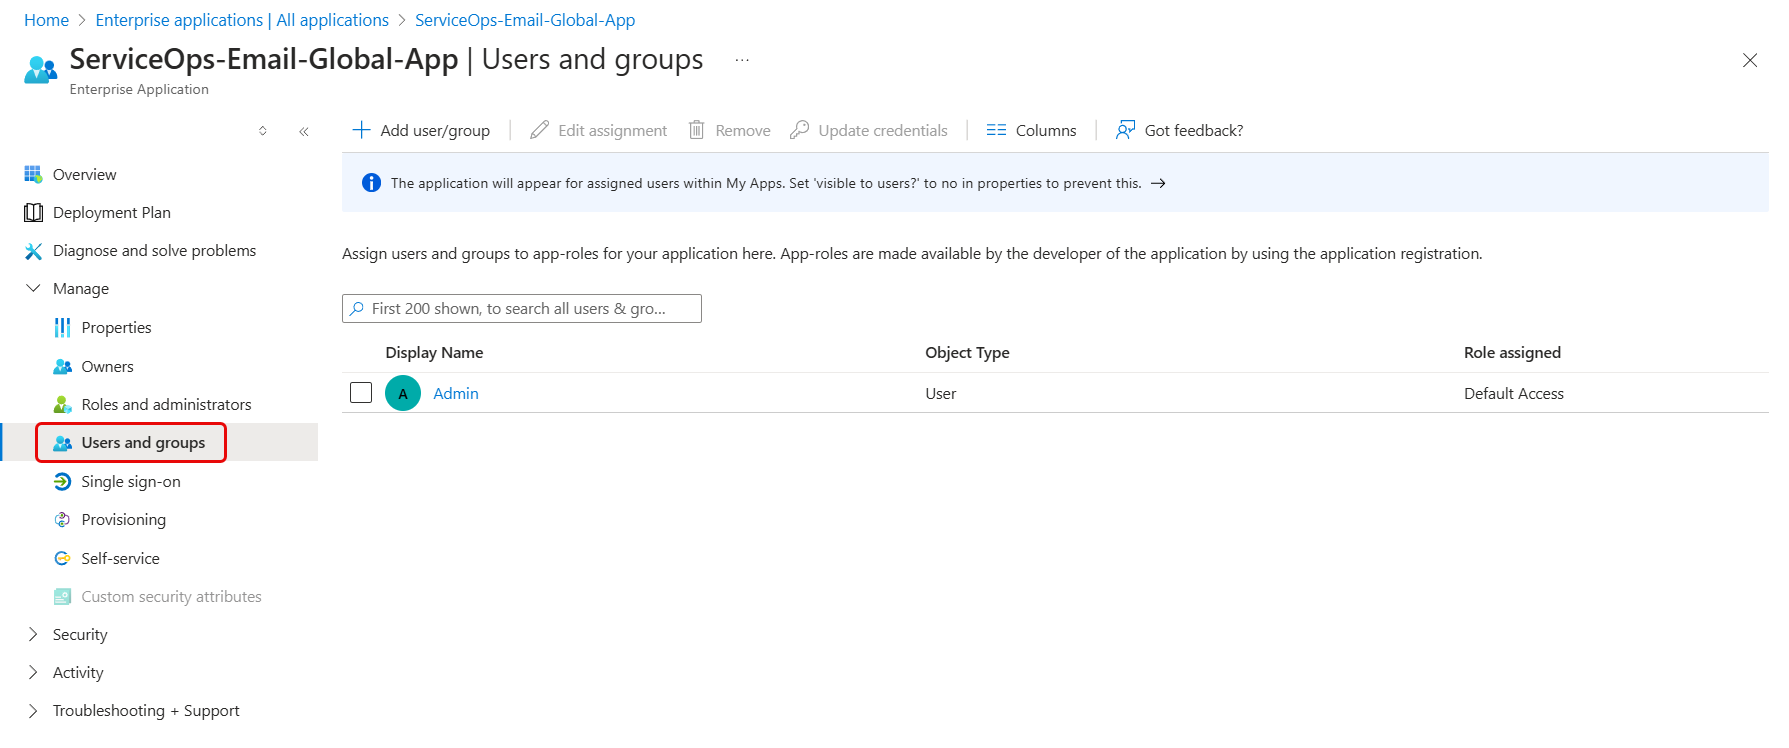
When there is no restriction in any application consent, the below screen is visible.

- When the administrator disables the user consent settings, an administrator's approval is required for all the applications.
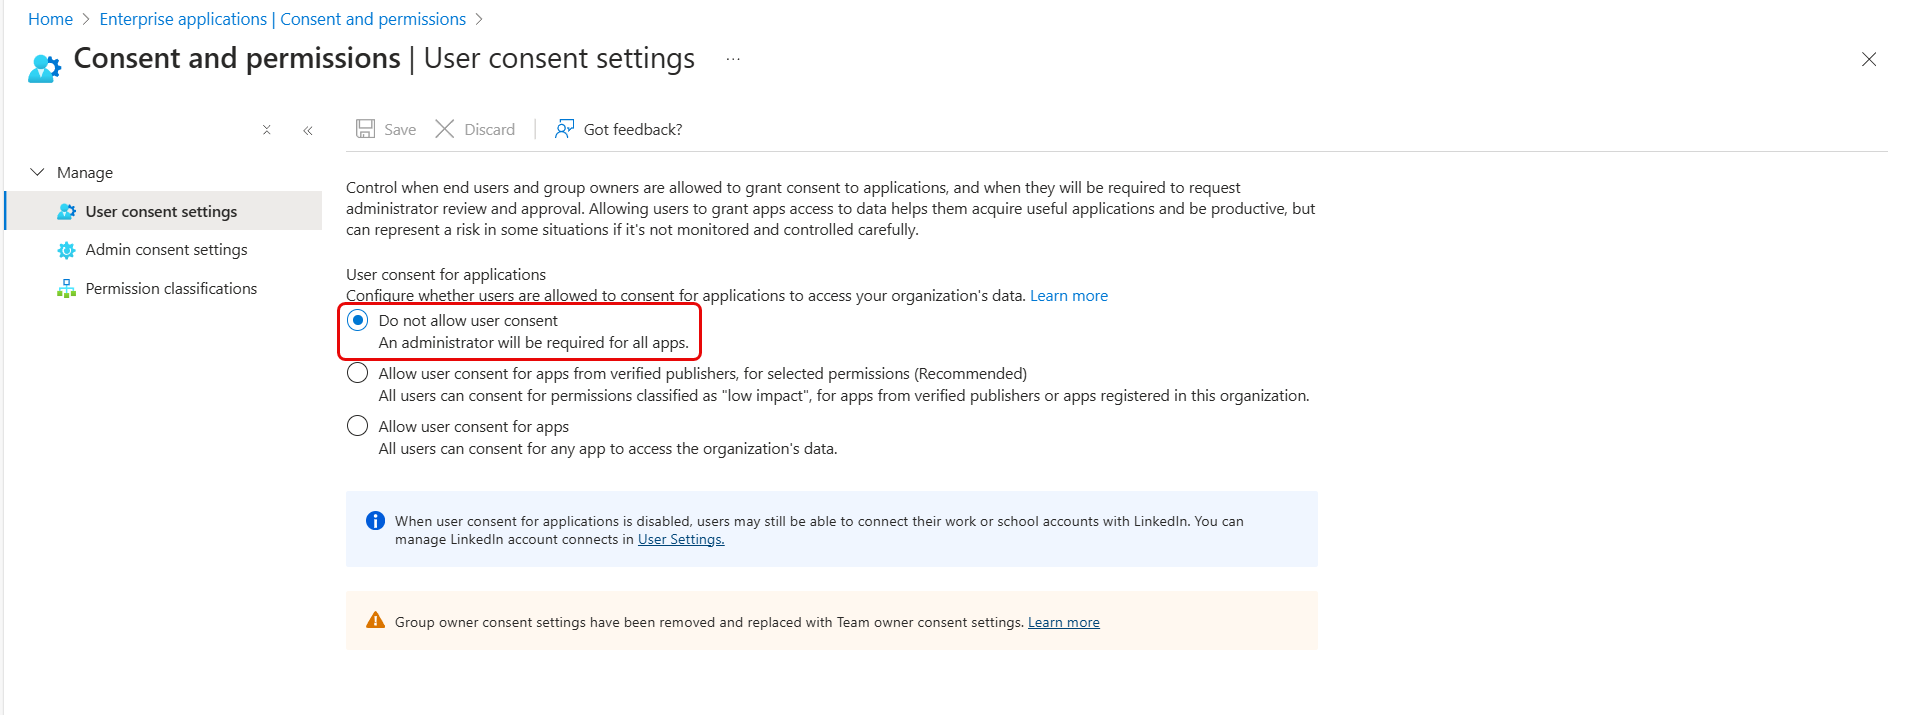
Hence, the below screen will appear on trying to access the email app.
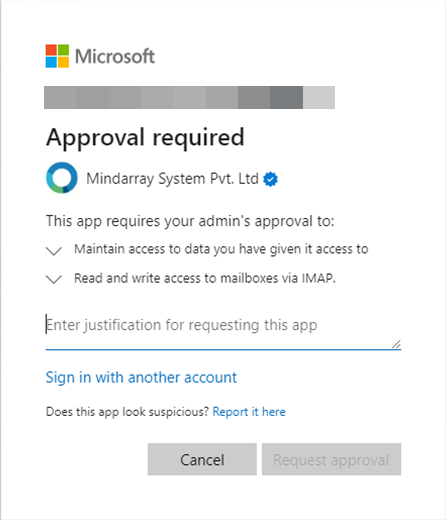
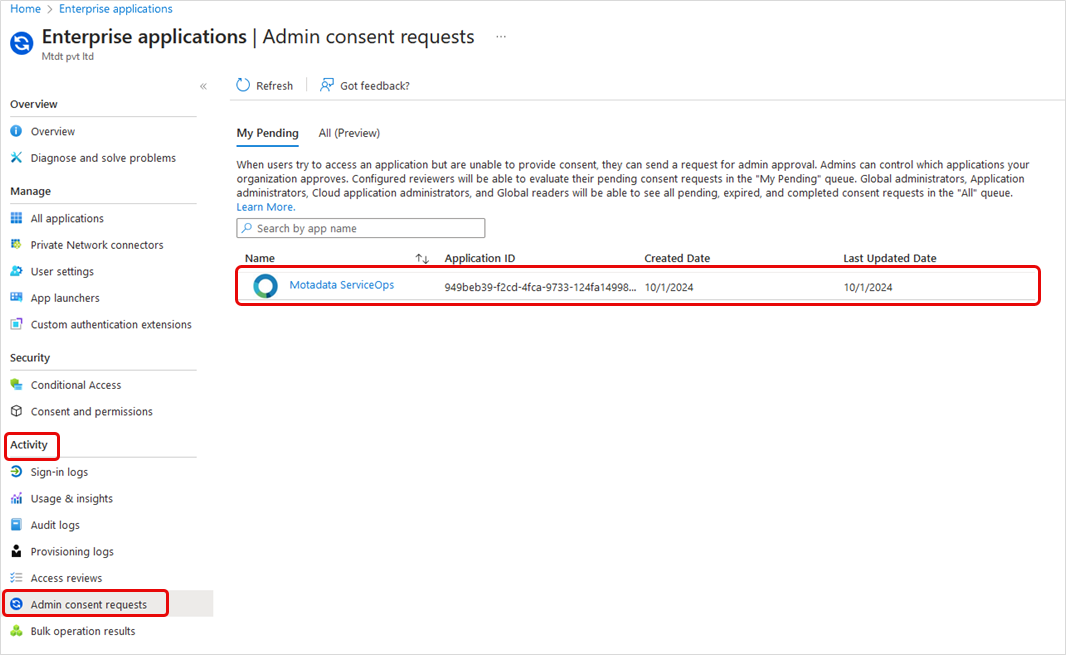
- Enter justification for requesting the app and click on Request approval. The approval request will be added to the Admin consent requests queue as shown below.
- Next, view the application details by clicking the request as shown below.
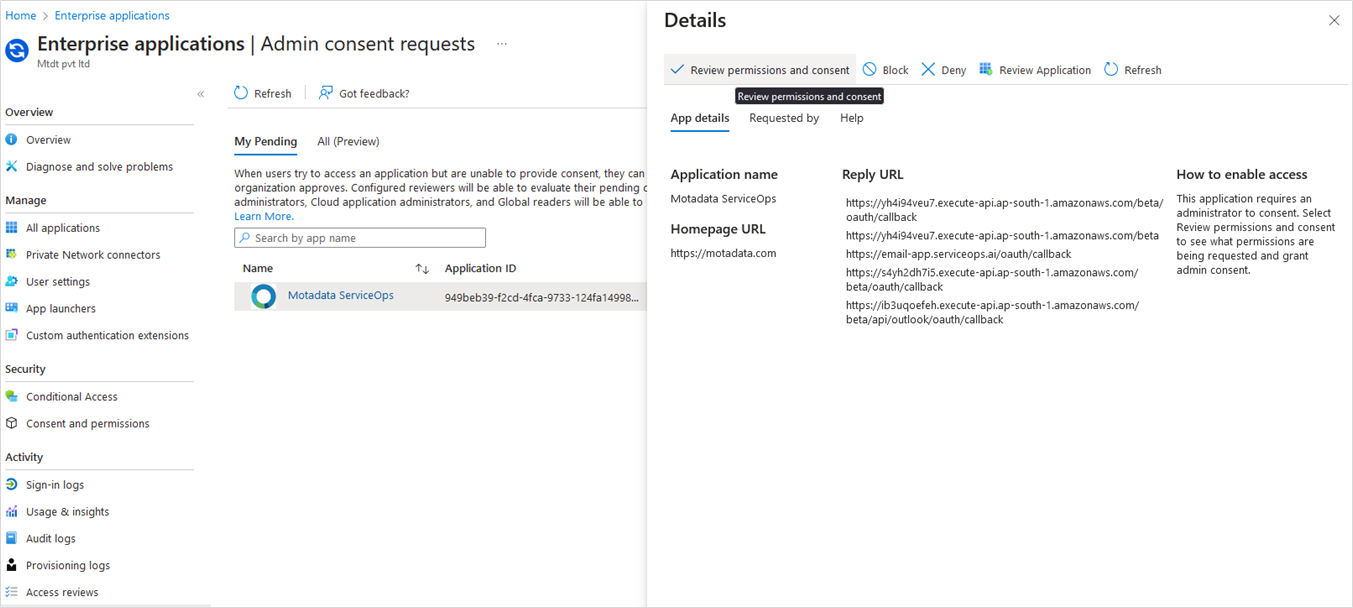
- Next, click the "Review permission and consent" button and the below permission dialog will appear. Here, the admin needs to accept the permission and consent.
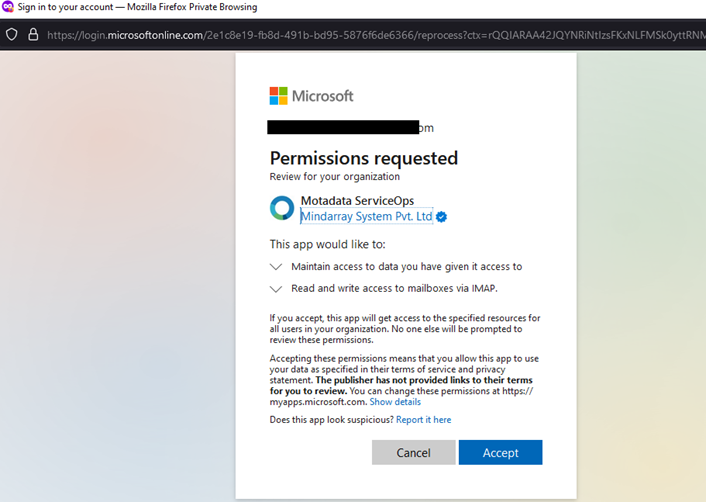
Now, once the admin grants consent for the organization, no future organization user will need to grant permission for this application unless an admin removes consent from the tenant Admin consent requests configuration.
- Once granted, the “ServiceOps-Email-Global-App” will be available in the “Enterprise Applications”. Admin can also refer the provided permission in the "Permissions" section, as well as the user in the "Users and groups" section.
- Now, configure the outgoing or incoming email server in the ServiceOps portal using Sign-in with Microsoft option.
Understanding Email Configuration
Email configuration in ServiceOps enables crucial communication functionalities. The key benefits include:
- Requester Ticket Creation: Allows end-users to create new service requests simply by sending an email to a configured incoming email address.
- Automated Notifications and Announcements: Enables ServiceOps to send automated email notifications (e.g., ticket updates, status changes) and announcements to users.
ServiceOps supports various email protocols, including SMTP, MAPI, POP3, and IMAP, allowing flexibility whether your email solution is self-hosted or cloud-hosted. You can add any email address to the system using these protocols.
To view the Emails sub-menu, navigate to Admin > Support Channel > Emails.

Outgoing Email Servers
This section allows you to configure outgoing email servers and their rules, which the system uses to send email notifications. You can set up multiple outgoing email servers and rules.
After upgrading the ServiceOps version from 8.0 to 8.1, kindly re-configure all the email servers as more parameters are added for configuration.
In ServiceOps, email configuration parameters changed with the upgrade from version 8.0 to 8.1.
- Version 8.0 used Client ID, Client Secret, Tenant ID, and Authorization URL.
- Version 8.1 and later require Client ID, Client Secret, Authorization URL, Token URL, Scope, and Redirect URL
Adding Outgoing Email Server
To add a new server, click the Add Outgoing Email Servers button in the top-right corner of the page. A side pop-up window will appear.
The server configuration information is available with your email service provider.

Enter the following details:
- Name: Enter the name of the email server.
- Email: Enter the email address.
- Protocol: Select the protocol as SMTP or MAPI.
The selected protocol must be enabled on your email account. For example, If IMAP is selected, ensure that it is enabled.
- Sender Name: If SMTP is selected, enter the sender's name.
- Email Provider: Select the provider using which you want to send emails between the two options.
- Sign in with Microsoft
- Other
- Reply-To Email: Enter the email address for replying over the email.
- Proxy server: Select the proxy server to use to establish the email connection.
- Enabled: Toggle the switch to enable or disable the server.
- Primary: Enable if you want to use this server as primary for sending emails.
Setting Up a Microsoft Email Server
Prerequisites:
- The URL https://email-app.serviceops.ai/ should be accessible.
- Internet connectivity should be available.
- The protocol used for connecting to the Email Server must be enabled on your email account. For example, If IMAP is selected, ensure that it is enabled.
- Application consent must be enabled for the user and the group to which the user belongs.
- Click on the Sign in with Microsoft option to use the Microsoft email service.

- Select or sign-in to the Microsoft account you want to use.

- Click Accept and grant the permission required to setup the email. This appears if there is no restriction in any application consent configured in the Microsoft Azure. If the application consent is controlled by the administrator, refer to the topic "Configuring Admin Consent" to configure the admin consent and then move ahead with the email configuration.
- Once done, save the configuration. The details will appear on the email server list. Now, check the connectivity using Test Connection. Once connected, you will receive a confirmation email saying the settings of Microsoft is properly set.
Setting Up Other Email Servers

Enter the following details:
| Parameters | Description |
|---|---|
| Name | Enter the name of the email server. |
| Enter the email address. | |
| Protocol | Select the protocol that the email server supports. The options are: SMTP and MAPI. |
| Sender Name | Enter the name of the sender. |
| Email Provider | Other |
| Server | Enter the address of the server. For SMTP: Azure: smtp.office365.com Gmail: smtp.gmail.com |
| Port | Enter the port number of the email server. For SMTP (TLS): 587, SMTP(SSL): 465 |
| Security Type | Select the type of security that the email server supports. The options are: None, SSL and TLS. |
| Authentication Needed | Enable authentication if the user needs to log in to the server. |
| Email Auth Type | Select the type of authentication that you want to use. Options include: - Basic Auth: Enter your Gmail address in Username and password. Refer to Configuring Gmail for Basic Auth for details. Note: Basic Auth is not supported for Microsoft Outlook. - OAuth: Enter the Client ID, Client Secret, Authorization URL, Token URL, and Scope. These details are retrieved from your application created in the Azure portal or Google Developers Console. Refer to Configuring Microsoft Azure for OAuth or Configuring Gmail for OAuth for more details. |
| Reply-To Email | Enter the email address for replying over the email. |
| Proxy Server | Select the required proxy server. |
| Enabled | Toggle the switch to enable or disable the server. |
| Primary | Enable if you want to use this server as primary for sending emails. |
Once done, click Save to add the Outgoing Email Server. Once the server is configured, you can later check its connection using the Test Connection button from the server list page as shown below.

Configuring Outgoing Email Rules
Outgoing email rules route emails through specific email servers based on predefined conditions. This helps send module-specific notifications and prevents duplicate ticket generation from replies to default email addresses.
To configure the rule,
- Select the module. For example, Request module is selected.

- Click the Add Outgoing Email Rule link.
- Enable it.
- Select the desired Outgoing Email Server from the dropdown. For example, Gmail Server is selected.
- Set one or more conditions based on which the Email server will be selected for sending emails. For example, when the user belongs to the HR Department, Request related emails will be sent via Gmail Server.
- Similarly, you can add more rules in the same module. You can add as many rules as you want and enable/disable them according to your requirement.
- Once done, click Update. Its audit entry will appear in the Configuration Audit tab.
- Also, you can create rules for different modules based on which specific emails will be sent via specific email servers.
Incoming Email Servers
This enables you to configure the Microsoft Email server or your own email server using which the system will receive email notifications. You can have multiple incoming email servers.
After upgrading the ServiceOps version from 8.0 to 8.1, kindly re-configure all the email servers as more parameters are added for configuration.
In ServiceOps version 8.0, the email configuration was based on the Client ID, Client Secret, Tenant ID, and the Authorization URL details. And now in version 8.1 onwards, it is based on the Client ID, Client Secret, Authorization URL, Token URL, Scope, and Redirect URL.
Adding Incoming Email Server
To create a new server, click on the Add Incoming Email Servers button at the top-right corner of the page, and a side popup appears.
The server configuration information is available with your email service provider.


Setting Up a Microsoft Email Server
Specific setup instructions for configuring a Microsoft Email Server for incoming emails will be added here if available in the source content. For now, refer to the general incoming email server setup and OAuth/Basic Auth configuration in the related topics.
Setting Up Other Email Servers
Enter the following details:
| Parameters | Description |
|---|---|
| Name | Enter the name of the email server. |
| Enter the email address. | |
| Protocol | Select the protocol that should be used for email configuration. The options are IMAP and MAPI. Here, MAPI is selected. |
| Technician Group | Select the technician group that should be assigned when a new request is created via the email. |
| Category | Select the category that should be assigned when a new request is created via the email. |
| Proxy Server | Select the desired proxy server. |
| Email Provider | Other |
| Server | Enter the IMAP address of the server. |
| Protocol | Select the protocol that the email server supports. The options are: IMAP, MAPI, and POP3. The protocol used for connecting to the Email Server must be enabled on your email account. For example, If IMAP is selected, ensure that it is enabled. Notes: - To avoid delays in receiving emails via POP3, it is recommended to use the MAPI or IMAP protocol instead. - POP3 supports only Basic Auth type of authentication. |
| Port | Enter the port number of the email server. The numbers are: IMAP: 993, SMTP: 587, and POP: 995. |
| Security Type | Select the type of security that the email server supports. The options are: None, SSL and TLS. |
| Email Auth Type | Select the type of authentication that you want to use. The options are: - Basic Auth: If selected, enter the Gmail address and password details. To know more details about configuring Gmail as an authentication server, refer to the link Configuring Gmail for Basic Auth. Note: Basic Auth is not supported for Microsoft Outlook. - OAuth: If selected, enter the Client ID, Client Secret, Authorization URL, Token URL, and Scope. These details can be retrieved from the application created either in the Azure portal or Google Developers Console. To know more details about configuring the Microsoft Azure as an authentication server, refer to the link Configuring Microsoft Azure for OAuth. To know more details about configuring Gmail as an authentication server, refer to the link Configuring Gmail for OAuth |
| Company | Select the company that should be assigned to the request when created via email. Note: This field is available only if Managed Services Provider feature is enabled. |
| Enabled | Toggle the switch to enable or disable the server. |
| Primary | Enable if you want to use this server as primary for receiving the emails. The system will prioritize this primary email address for communication when the default email is unavailable. For example, if request@motadataservice.com fails, the system uses the primary email address for communication until the default email is restored. |
| Outgoing Email Severs | Enable if you want to set the outgoing email server. If enabled, select the desired Outgoing Email from the dropdown. |
| Real Time Scanning | Enable to scan the emails at real time. If disabled, the system will scan for new emails after every 2 minutes. |
| Filter Type | Select whether to allow or ignore the emails received. |
| Emails | Add the email addresses that should be evaluated based on the filter type selected. |
| Domains | Add the domains that should be evaluated based on the filter type. For example: yahoo.com. |
| Keywords | Add the keywords that should be evaluated based on the filter type. The system will look for keywords in the email subject and body. |
Once done, click Save to add the Incoming Email Server. Once the server is configured, you can later check its connection using the Test Connection button from the server list page as shown below.

Configuring Incoming Email Rules
Incoming email rules provide granular control over email-to-ticket automation, allowing you to route emails through specific processes based on predefined conditions. This flexibility ensures that incoming emails are handled efficiently, automatically creating service requests without manual intervention or complex workflow automation. All configuration changes are tracked in the Configuration Audit Trail for compliance and traceability.
To configure incoming email rules:
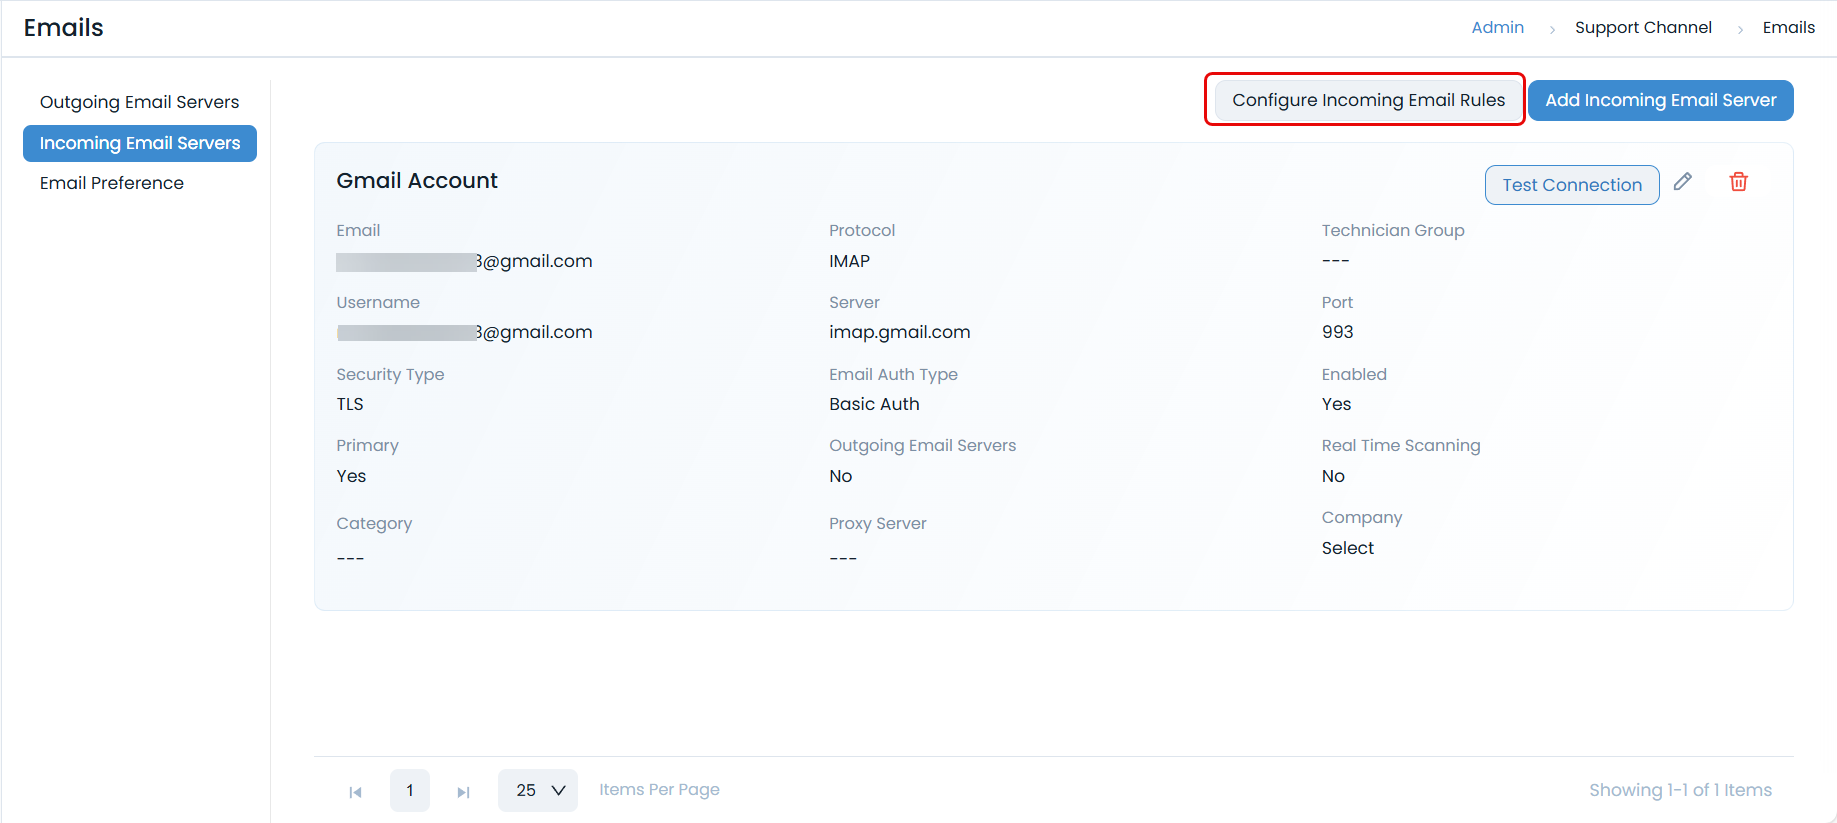
- Click the Configure Incoming Email Rules button. A pop-up window will appear, displaying the rule configuration options.
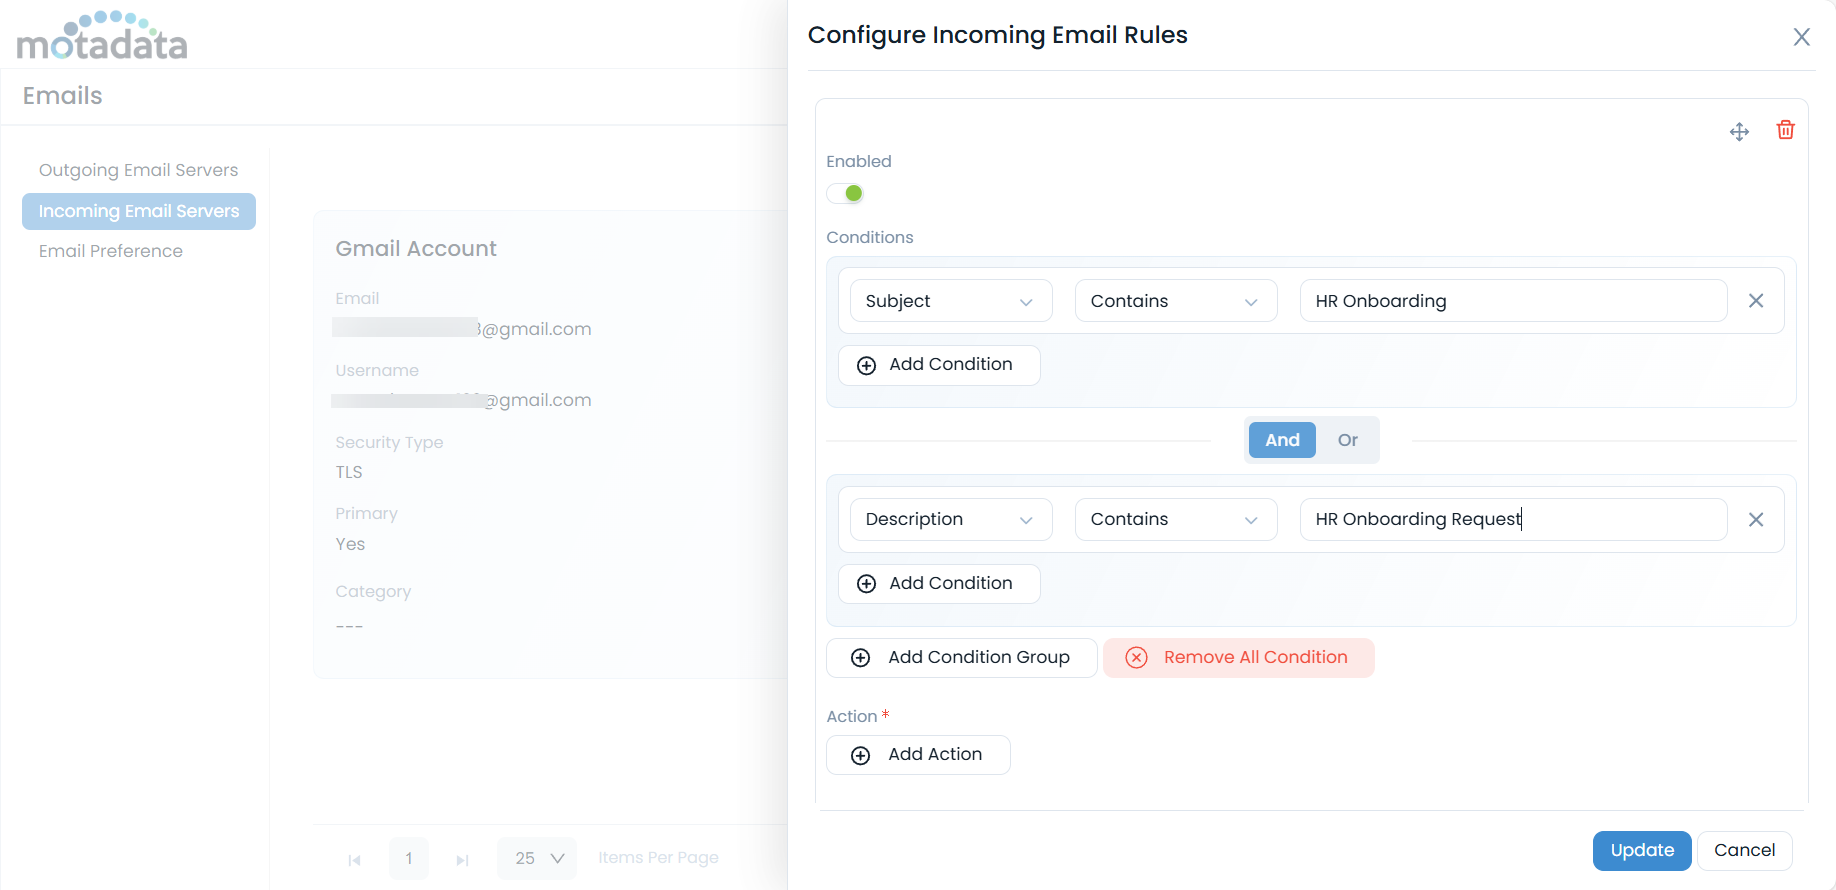
The pop-up consists of the following sections:
- Enabled: Toggle this switch to enable or disable the incoming email rule.
- Conditions: Define the criteria an incoming email must meet for the rule to apply.
- Click Add Condition to add a new rule.
- You can specify conditions based on fields like Subject, Incoming Mailbox (to apply rules only to emails received by a specific configured mailbox), and Description.
- Choose an operator (e.g., Contains, Equals, Starts With) and input the relevant text (e.g., "HR Onboarding", "HR Onboarding Request").
- Use the And or Or toggle to combine multiple conditions, creating complex logical statements.
- Add Condition Group: Use this to group conditions together, allowing for more advanced rule logic (e.g.,
(Condition A AND Condition B) OR (Condition C)). - Remove All Condition: Click to delete all configured conditions.
- Action: Define the automated response when an email matches all specified conditions.
- Click Add Action to specify what should happen. Common actions include:
- Assigning to a Technician Group: Automatically route the created ticket to a specific team.
- Setting a Category: Assign a predefined category to the ticket (e.g., "HR Request", "IT Support").
- Creating a Specific Request Type: Automatically create a Service Request, Incident, or other record types.
- Example: If the conditions match "HR Onboarding", an action could be set to "Create a Service Request" with the category "HR Onboarding".
- Click Add Action to specify what should happen. Common actions include:
Email Preference
This section enables you to set the email configurations. The settings are:

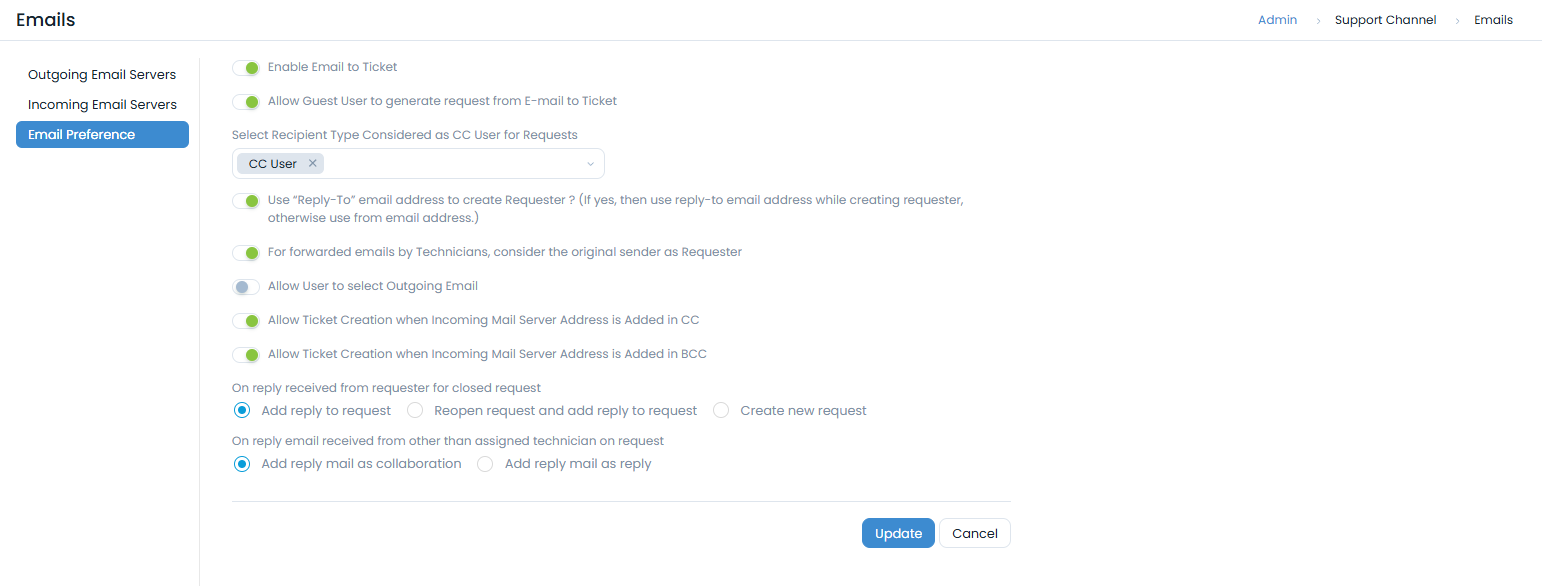
Enable Email to Ticket: Allow users to create a new request by sending an email. Any user (registered/unregistered) can send an email to generate a request. If enabled, a requester can send an email on the email address configured in the Incoming Email Server. The email's subject line will be used as the Request Subject, and its content will become the Request Description. Additionally, this information will be accessible in the Work tab on the Request Details page in both the Technician and Support Portals.
noteWhen the same email is scanned repeatedly (via IMAP in Gmail or Outlook), the system detects previously created tickets using the message ID and ignores duplicates.
Allow Guest User to generate request from E-mail to Ticket: When enabled, guest users can create service requests by sending emails to a configured incoming email address. If disabled, emails from guest users will not create requests, even if sent to a valid incoming email address.
noteFor guest users to successfully create requests via email, the "Allow Guest Requester to report a Request" option must also be enabled in the Support Portal Settings.
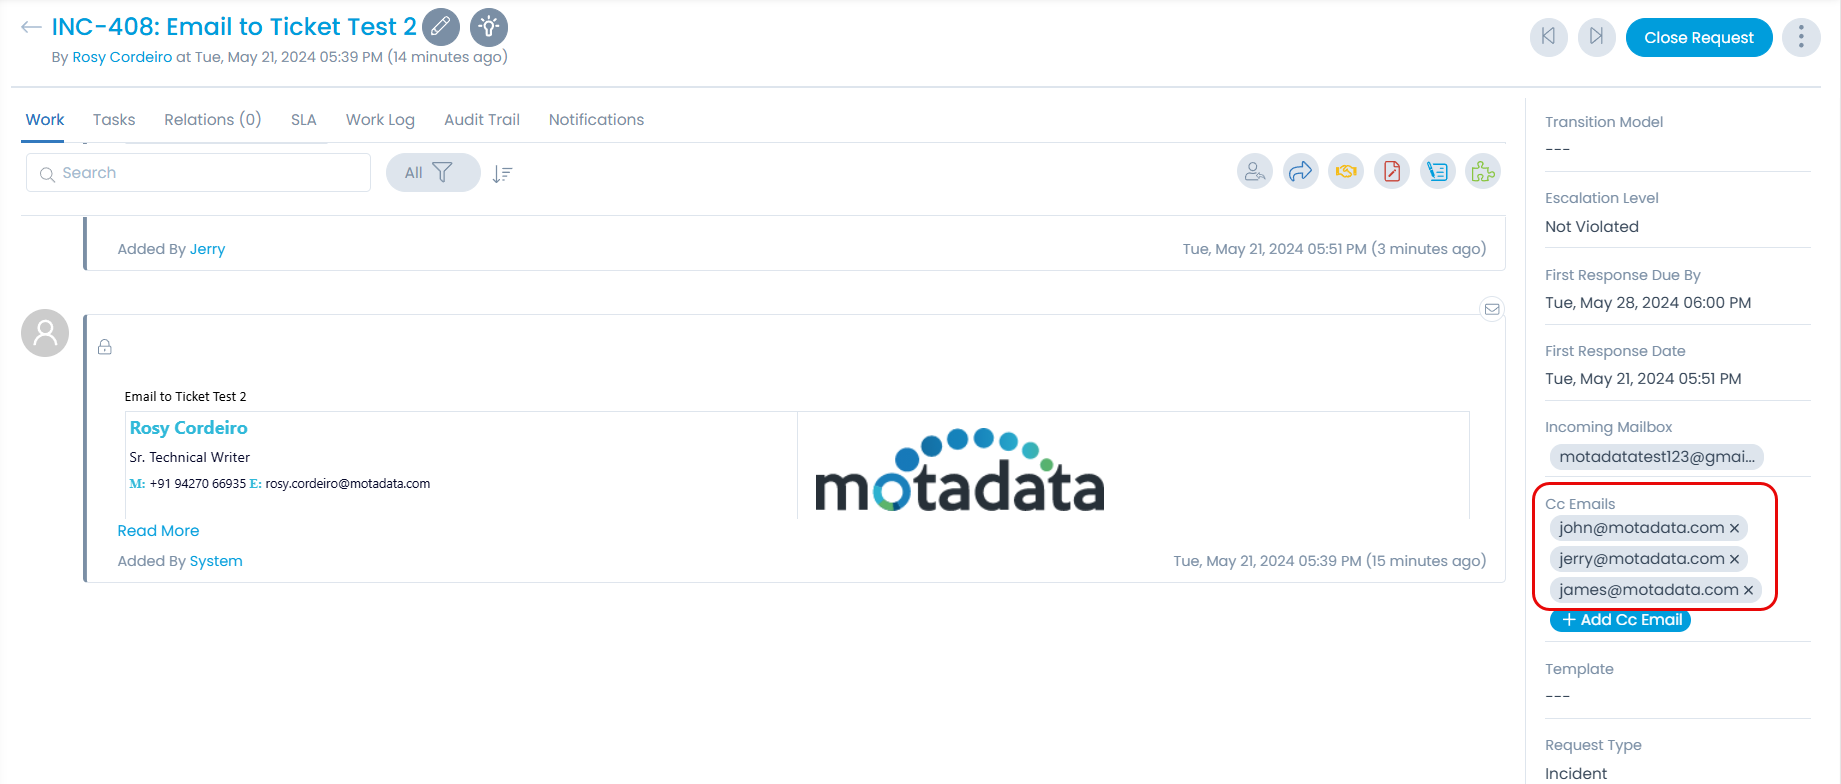
Select Recipient Type Considered as CC User for Requests: Configure whether "To" and "CC" email recipients should be automatically included in the "Cc Emails" field of the Request Details' Other Info section upon ticket creation.
For example, if "To User" and "CC User" options are selected, and while creating a ticket, if jerry@motadata.com is written in the "To" field and in "CC", john@motadata.com and james@motadata.com are mentioned. All three email addresses will be added to the Cc Emails field as shown in the below figure.
The email address configured as an Incoming Email Server will not be considered in the Cc emails.
Use Reply-To email address to create Requester?: If the requester has configured a reply-to email address in the Outgoing Email Server configuration, the system will create the requester account using the Reply-to email address. Else, the system will create the requester using "from" email address.
For forwarded emails by Technicians, consider original sender as Requester: If enabled, when a technician forwards an email to the system, the original sender of that email will be designated as the requester for the newly created ticket.
Allow User to select Outgoing Email: Enable to allow users to select the desired Outgoing Email server for sending emails. If enabled, the Outgoing Email field will appear in the Notification and Work Conversations tab of Incident and Service Request Details page.
Allow Ticket Creation when Incoming Mail Server Address is Added in CC: If enabled, tickets will be created when the system's incoming email address is included in the CC field.
Allow Ticket Creation when Incoming Mail Server Address is Added in BCC: If enabled, tickets will be created when the system's incoming email address is included in the BCC field.
On reply received from requester for closed request
- Add reply to request: Appends the requester's reply to the existing closed request without changing its status.
- Reopen request and add reply to request: If this option is chosen, you must specify a Grace Period in days. If a reply is received within this grace period, the request will be reopened and the reply added. If the grace period has passed, a new request will be created.
- Create new request: If selected, any reply from a requester for a closed ticket will generate an entirely new request.
On reply email received from other than assigned technician on request
- Add reply mail as collaboration: If enabled, email replies from technicians who are not the assigned technician will be added as collaborations on the request.
- Add reply mail as reply: If enabled, email replies from non-assigned technicians will be added as direct replies to the request.
Use Cases
Use Case: Auto-Assign New Laptop Requests Raised via Email
Scenario: When a user sends an email to raise a Service Request for a New Laptop, the system should automatically assign the request to the IT Technician group and update its key attributes during ticket creation.
Objective: To streamline laptop provisioning requests by automatically routing them to the correct team and enriching the ticket with predefined values using a Workflow and an Incoming Email Rule.
Prerequisites for this Use Case:
- Service Catalog: Ensure that a relevant service catalog (e.g., "New Laptop Request") is created and enabled in ServiceOps.
- Technician Group: An IT Technician Group (e.g., "IT Support Team") must be established in ServiceOps. This group will be assigned to the incoming requests.
- Category: A category (e.g., "Hardware") must be present in ServiceOps to classify the incoming requests.
- Workflow: A workflow should be configured to automatically assign the technician, update the location, and set tags based on the incoming email rule.
- Email to Ticket Feature Enabled: Ensure the "Enable Email to Ticket" and "Allow Guest User to generate request from E-mail to Ticket" toggles are switched on in Admin > Support Channel > Emails > Email Preference.
- Dedicated Incoming Email Server: A specific incoming email server (e.g.,
it.support@example.com) must be configured in ServiceOps to receive the laptop request emails.
End-to-End Configuration Steps:
Ensure Email to Ticket is Enabled:
Navigate to Admin > Support Channel > Emails > Email Preference.
Ensure the Enable Email to Ticket toggle is switched on. Also, enable the Allow Guest User to generate request from E-mail to Ticket toggle. This allows ServiceOps to process incoming emails and convert them into tickets.
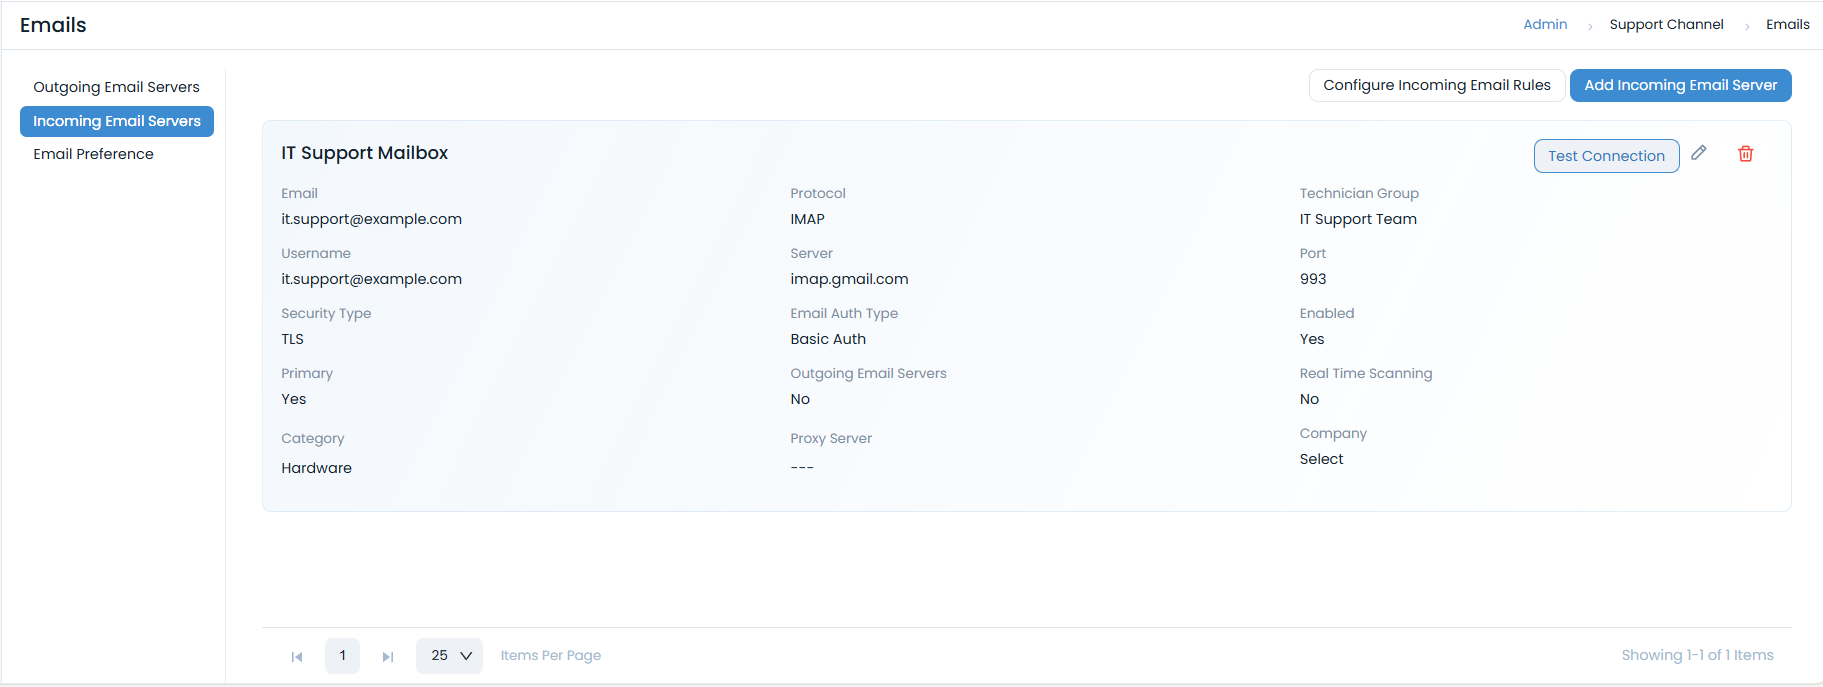
Configure an Incoming Email Server for IT Support:
- Go to Admin > Support Channel > Emails > Incoming Email Servers.
- Click Add Incoming Email Server.
- Name: Enter
IT Support Mailbox. - Email: Enter
it.support@example.com. - Protocol: Select
IMAPorMAPI. - Technician Group: Select
IT Support Team. - Category: Select
Hardware. - Configure Email Provider, Server, Port, Security Type, and Email Auth Type as per your email service provider's details.
- Ensure Enabled and Primary (if this is the main IT mailbox) are toggled on.
- Click Save.
- Verify connectivity using the Test Connection button.
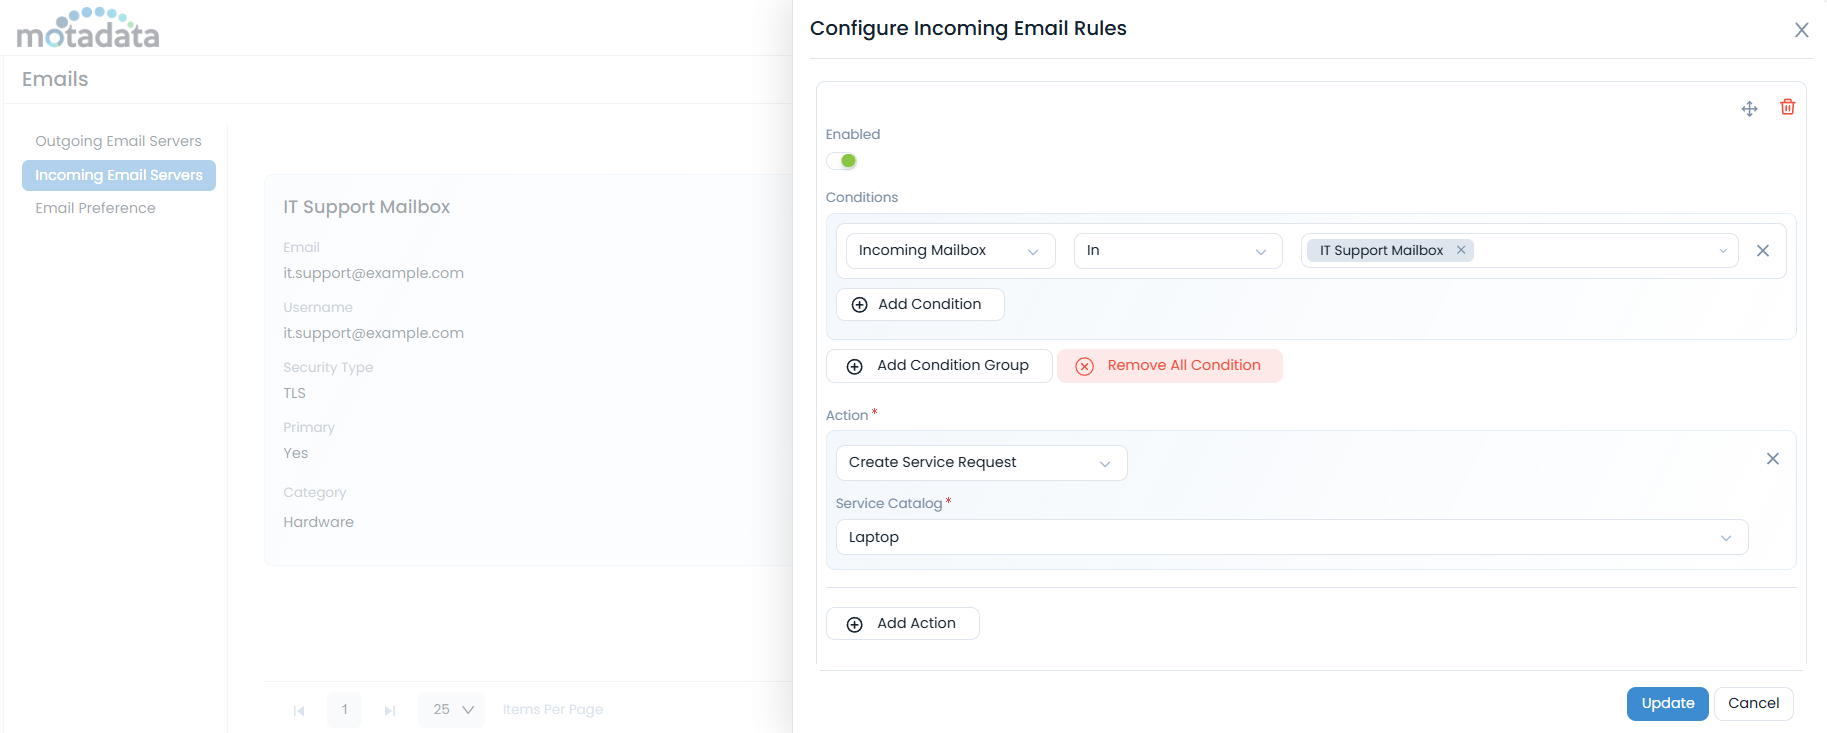
Configure the Incoming Email Rule:
Go to Admin > Support Channel > Emails > Incoming Email Servers.
Click the Configure Incoming Email Rules button.
Enable: Toggle this switch to enable the rule.
Conditions:
- Click Add Condition.
- Field: Select
Incoming Mailbox. - Operator: Select
In. - Value: Enter
IT Support Mailbox.
Action:
- Click Add Action.
- Action Type: Select
Create Service Request. - Service Catalog: Select
Laptop.
Click Update to save the rule.
noteThe Workflow is optional but recommended to automate the additional updates to the request.
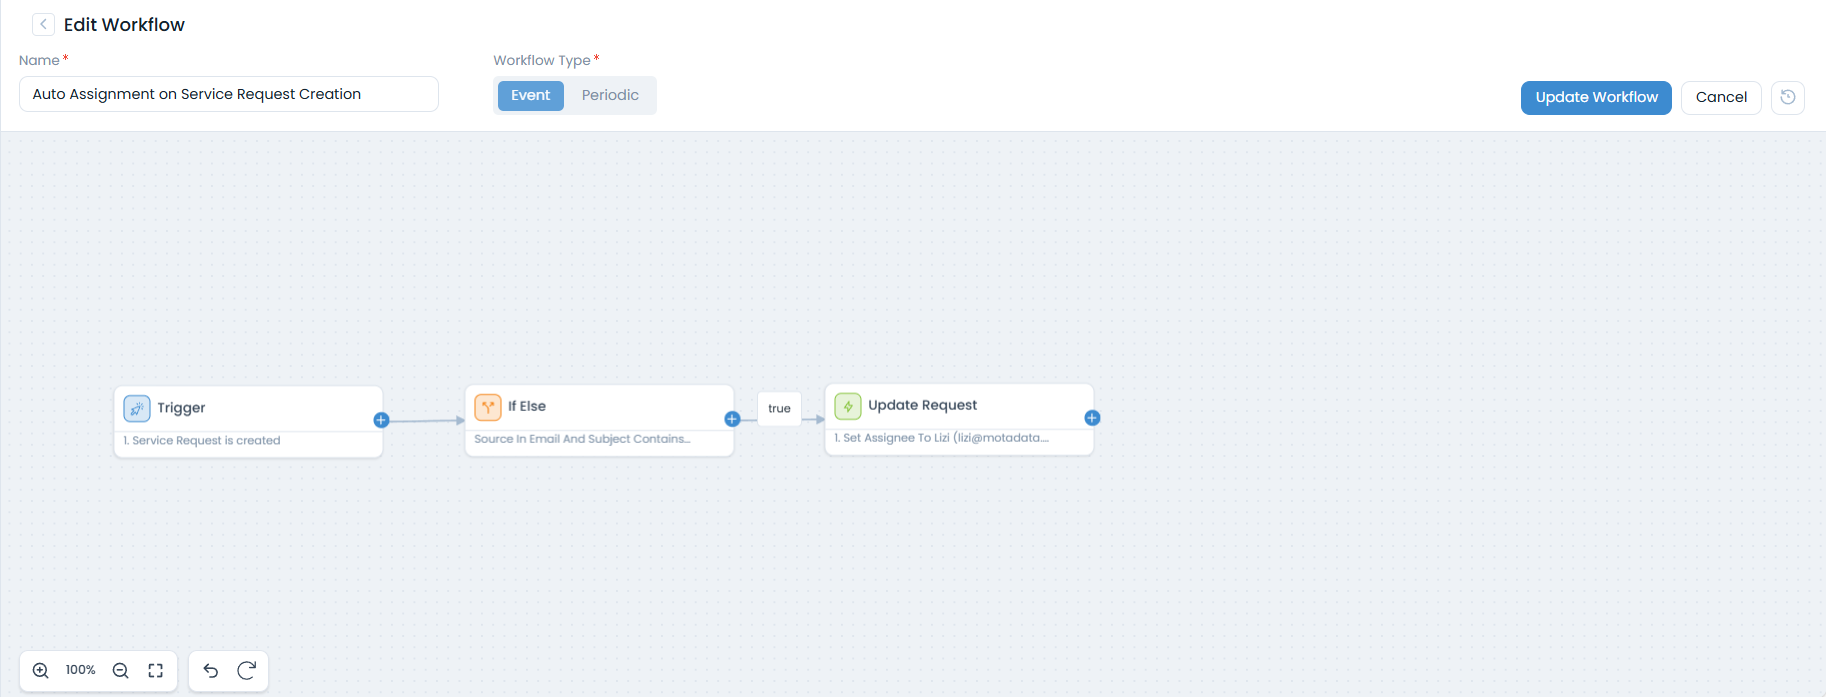
Configure Workflow for Additional Updates (Optional but Recommended):
- Navigate to Admin > Automation > Workflows.
- Create a new workflow or edit an existing one that triggers on "Service Request Creation" with a condition like Source In "Email" and Subject Contains "Request for New Laptop".
- Add Actions within the workflow:
- Assign Technician: Set Assignee to
Lizi. - Update Field: Set Location to
Asia. - Add Tags: Add
Laptop Request.
- Assign Technician: Set Assignee to
- Click Save to activate the workflow.
Save/Cancel: Click Save to save your configured rule or Cancel to discard any changes.
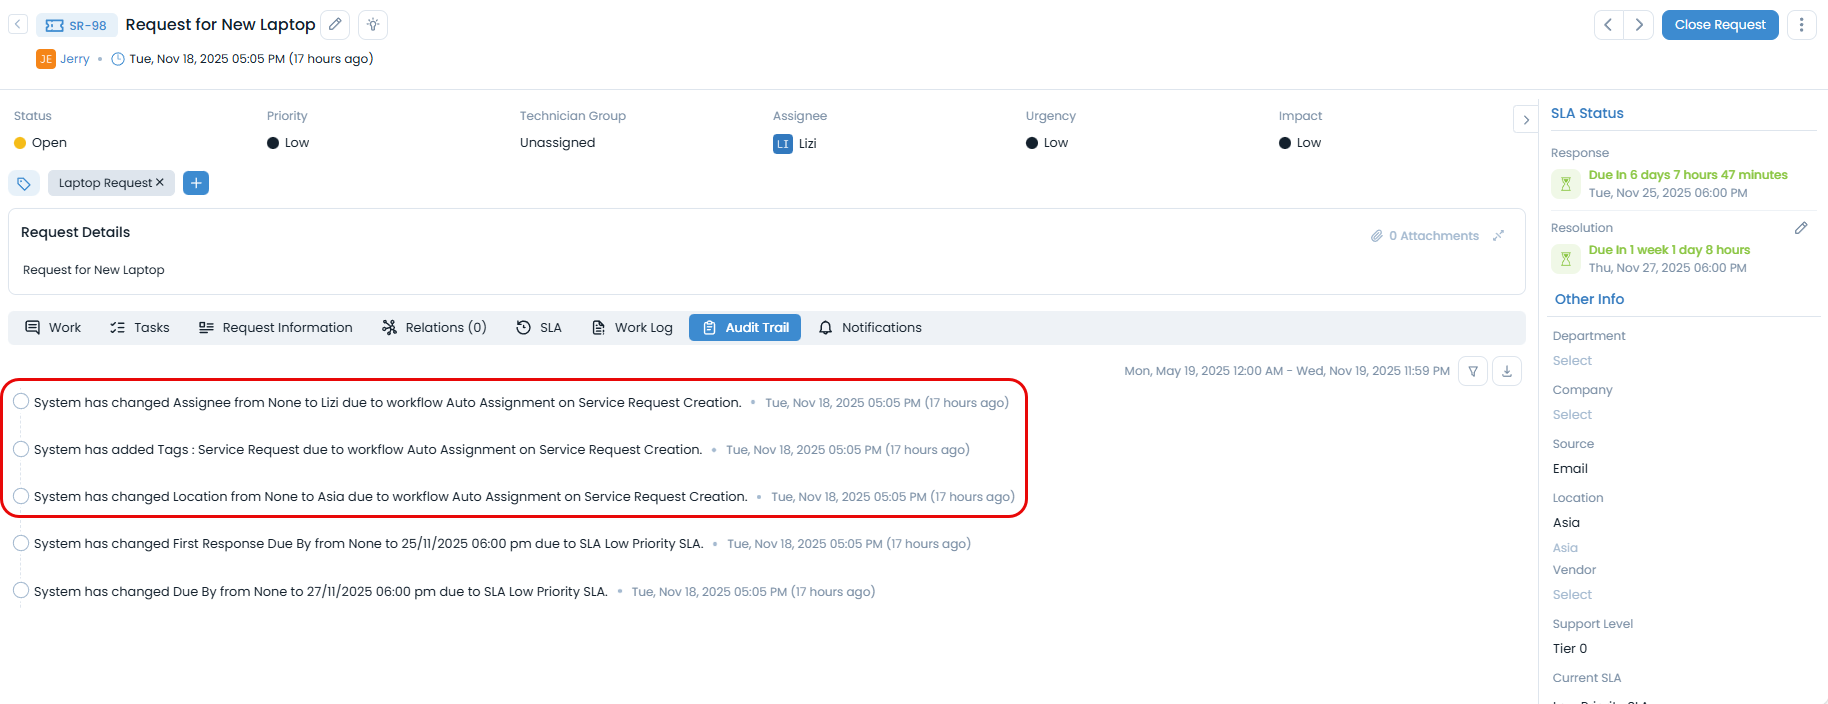
Outcome:
Now, any email sent to it.support@example.com with a subject containing "Request for New Laptop" will automatically:
Create a Service Request in ServiceOps.
Assign the request to the IT Support Team.
Categorize the request as Hardware.
If a workflow is configured, it will also:
- Assign the technician
Lizi. - Update the location to
Asia. - Add the tag
Laptop Request.
- Assign the technician
This automation significantly reduces manual effort in ticket creation and categorization, ensuring faster resolution, reduced manual effort, and improved request handling efficiency.
Use Case: Auto-Assign Incident via Email to Ticket
Scenario: When an end-user sends an email to create a new incident, the system should automatically assign this incident to a technician based on predefined rules. This ensures that incoming email-created incidents are routed for immediate attention without manual intervention.
Objective: To demonstrate how to configure ServiceOps to automatically assign incidents created via email, enhancing response times and streamlining incident management.
Prerequisites for this Use Case:
- Email to Ticket Feature Enabled: Ensure the "Enable Email to Ticket" toggle is switched on in Admin > Support Channel > Emails > Email Preference. Also, enable the Allow Guest User to generate request from E-mail to Ticket toggle. This allows ServiceOps to process incoming emails and convert them into tickets.
- Dedicated Incoming Email Server: A specific incoming email server must be configured in ServiceOps to receive incident emails.
- Technician Group for Assignment: A technician group with technicians configured for auto-assignment (e.g., using round-robin method) must be available.
- Workflow for Auto-Assignment: A workflow needs to be configured to trigger on incident creation from email and set the auto-assignment.
End-to-End Configuration Steps:
Ensure Email to Ticket is Enabled:
Navigate to Admin > Support Channel > Emails > Email Preference.
Ensure the Enable Email to Ticket toggle is switched on. Also, enable the Allow Guest User to generate request from E-mail to Ticket toggle. This allows ServiceOps to process incoming emails and convert them into tickets.
Configure an Incoming Email Server:
- Go to Admin > Support Channel > Emails > Incoming Email Servers.
- Configure an incoming email server (e.g.,
it.incident@example.com) with Technicians GroupNetwork Teamthat will receive the incident reports. Ensure it is enabled and correctly configured to convert emails into requests.
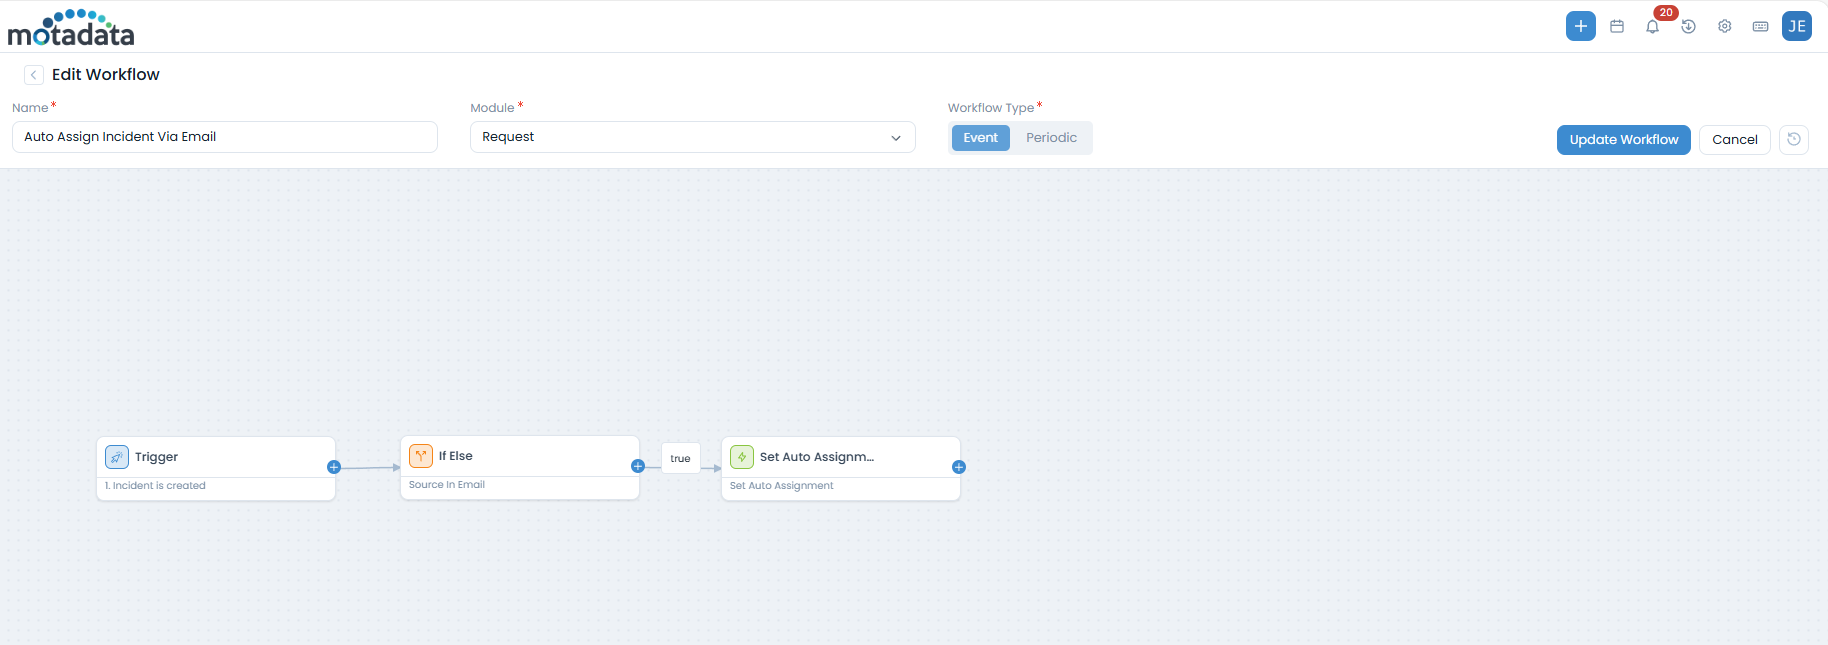
Configure Workflow for Auto-Assignment:
- Navigate to Admin > Automation > Workflows.
- Create a new workflow with the following settings:
- Name:
Auto Assign Incident Via Email - Module:
Request - Workflow Type:
Event - Trigger:
Incident is created - If Else Condition:
- Source In
Email - Subject Contains
Internet is not Working
- Source In
- Action:
Set Auto Assignment Round Robin
- Name:
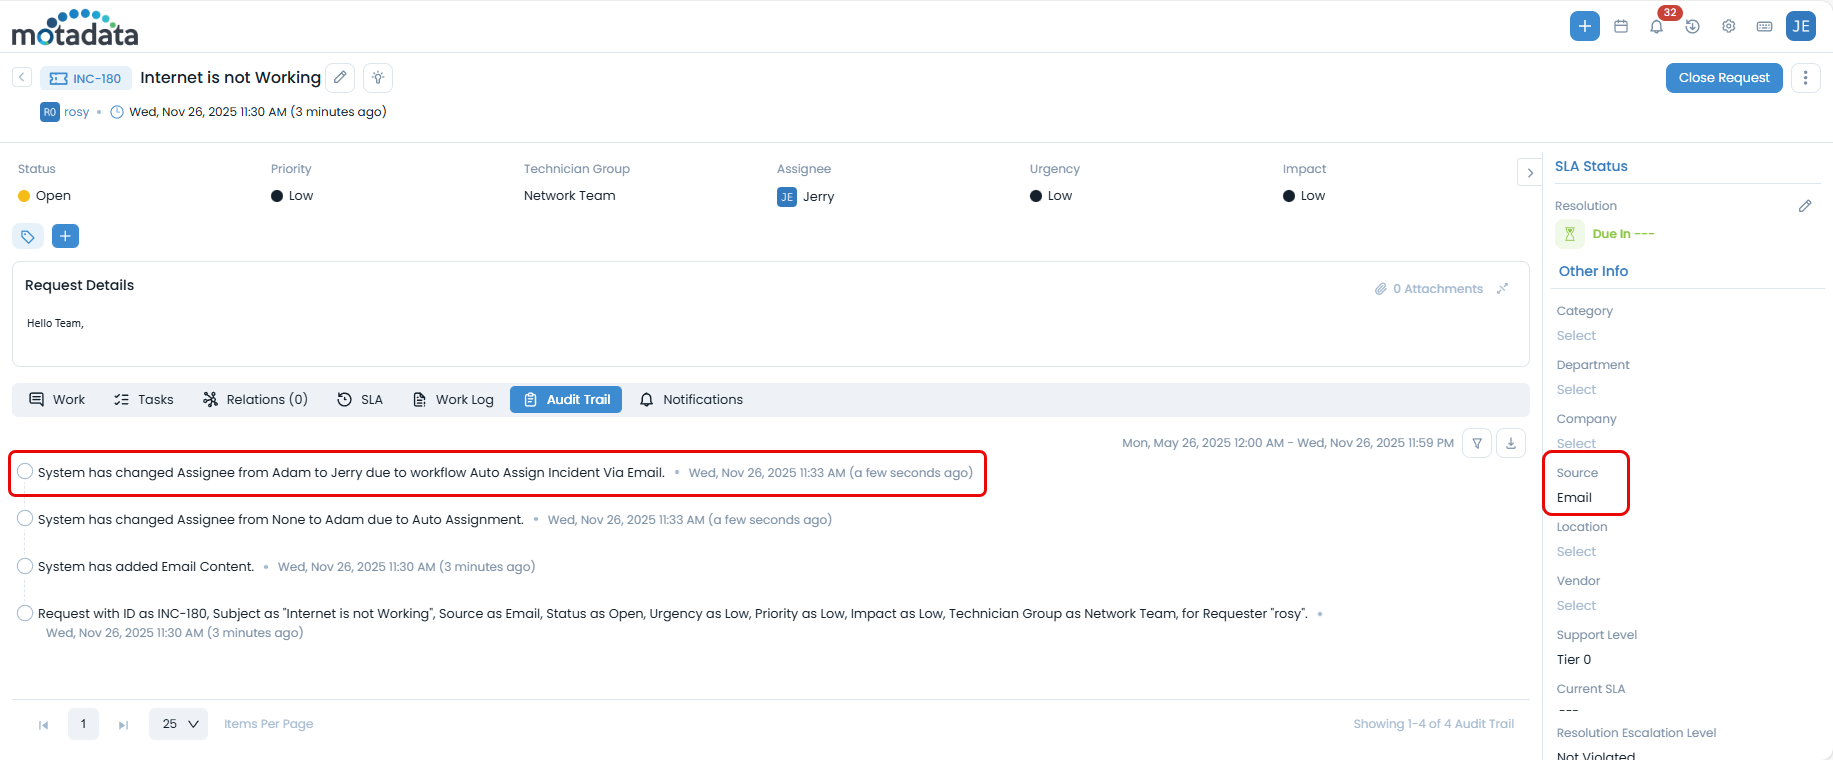
- This workflow ensures that any incident created with "Email" as its source and Subject containing "Internet is not Working" will automatically trigger the assignment process.
Outcome:
When a user sends an email to the configured incoming email address:
A new incident will be created in ServiceOps.
The incident will be automatically assigned to an available technician (e.g.,
Jerry), as demonstrated in the provided image of the 'Request Details' page.You can verify this auto-assignment and the email source by checking the Audit Trail and the Source field in the Other Info section of the Incident Details page.
This automation significantly reduces manual effort in ticket creation and categorization, ensuring faster resolution, reduced manual effort, and improved request handling efficiency.
Related Topics
- Configuring Microsoft Azure for OAuth: Detailed steps for setting up Microsoft Azure as an authentication server using OAuth.
- Configuring Gmail for OAuth: Detailed steps for setting up Gmail as an authentication server using OAuth.
- Configuring Gmail for Basic Auth: Detailed steps for setting up Gmail for basic authentication.
- Proxy Server Configuration: Learn about configuring proxy servers for email connections.
- Support Portal Settings: Information on managing guest requester settings.
- Incident and Service Request Details: Details on the Request Details page, including the Notification and Work Conversations tab.