Requesters
Requesters are the end-users who access the portal to create and seek information regarding their requests. They have access only to the request management, knowledge, and approval management sections. They can also view the changes and assets assigned to them based on the assigned permissions.
List Page
The list page displays all the requesters (including technicians) along with their details. Also, you can perform various operations like convert requester to technician, block requester, import, export, etc.
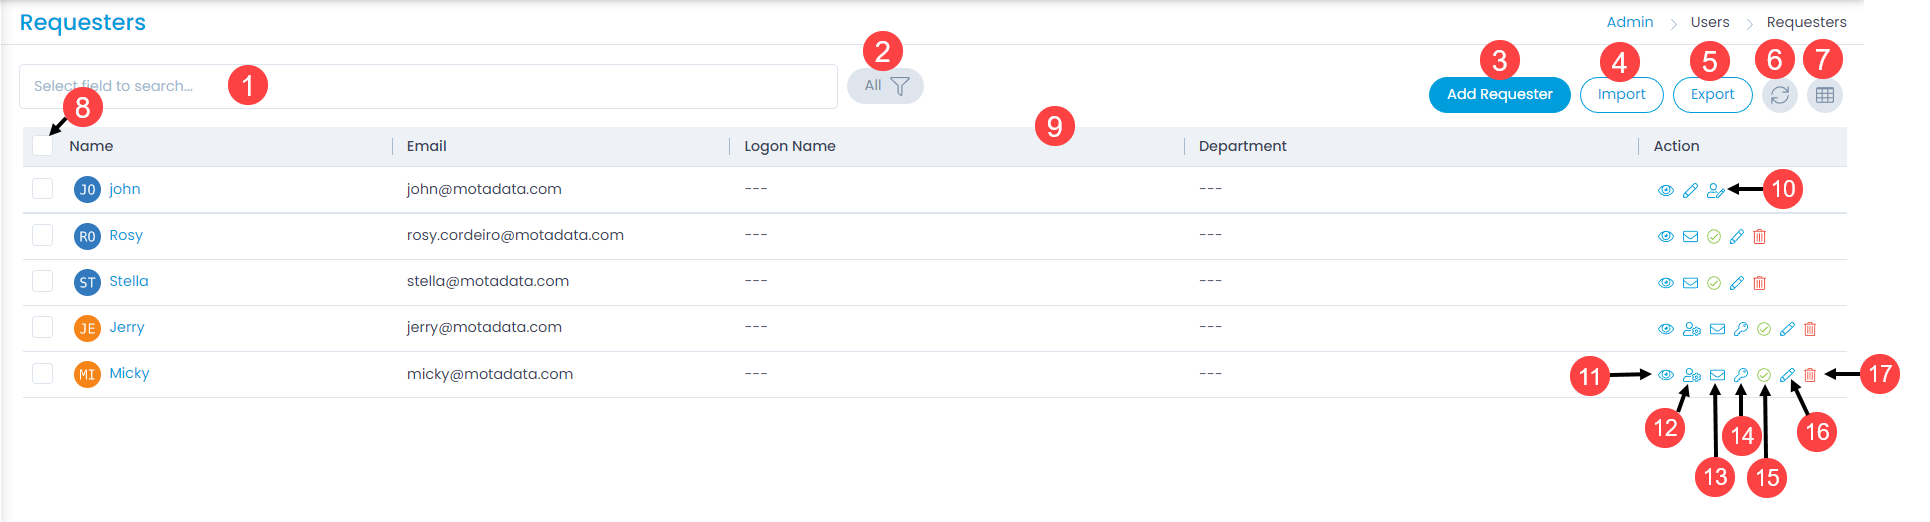
- Search: You can look for a specific requester by searching them. The search is a faceted search and allows you to find with specific criteria. You can find more details in the search section.
- Filter: You can filter the requesters list by selecting the desired option. The options are: All, Verified, Unverified, Archived, Blocked, and Unblocked. If Verified is selected, all the requesters whose email addresses are verified will appear.
- Add Requester: You can add a requester.
- Import: You can import a list of requesters in one go. The steps to import requesters is same as technicians. For more details, refer to the Technicians page.
- Export: You can export a list of requesters in CSV or Excel format. The steps to export requesters is same as technicians. For more details, refer to the Technicians page.
- Refresh: You can refresh the requesters list. This is useful when multiple people are working on the requester page and contents are updated frequently.
- Column Selection: You can select the columns that you want to be visible in the grid. To select the columns, click the Column Selection icon, select the desired columns, and click Apply. The columns will become visible in the grid.
- Bulk Operations: You can convert to technician, archive, block, unblock, restore, or clear the details of multiple requesters in one go. For more details, refer to the Technicians page.
- Grid: You can view the details of the requesters as per the columns selected.
- Edit: You can view and edit the requester details.
- Change Super Admin: You can change the super admin user. For more details, refer to the Technicians page.
- View: You can view the details of the requester by clicking the eye icon as shown below.

- Send an Email to Verify the User: You can send an email to verify the requester user. The email contains the link using which the requester can verify and activate the account.
- Set Password: You can set the password of the requester. To set the password, click the key icon, enter the password, confirm it, and click Update as shown below. Once done, a confirmation message will appear.

- Block Requester: You can block the desired requester in the same way as a technician. For more details, refer to the Technicians page.
- Edit: You can edit the details of the required requester.
- Delete: You can delete the requester if no longer needed.
Add Requester
To add a requester, Click the Add Requester button and the page appears.

Enter the following details:
| Parameter | Description |
|---|---|
| Select Image | You can select an image to set the profile picture of the requester. If not set, it automatically takes the first two letters of the name. You can change the image using the Change link below the square box. |
| Full Name | Enter the full name of the requester. |
| Enter the email address of the requester. | |
| Logon Name | Enter the logon name of the requester. You can use this to login instead of the email address. |
| Contact No. | Enter the contact number of the requester. |
| Alternate Contact No. 1 | Enter the first alternate contact number. |
| Alternate Contact No. 2 | Enter the second alternate contact number. |
| Time Zone | Select the time zone. |
| VIP Requester | Select whether the requester is a VIP person or not. |
| Location | Select the location. To create custom locations, click here. |
| Company | Select the company to which you want to associate the requester. To create companies, click here. Note: This field is available only if Managed Services Provider feature is enabled. |
| Department | Select the department in which the requester belongs. To create custom departments, click here. |
| Manager | Select the manager to which the requester reports. |
| Groups | Select the groups to which the requester belongs. |
| Allow to Login | Enable if you want to allow the requester to login to the portal. This is available for the technicians also displayed in the Requester's list. |
| Verified User | Select whether the requester is a verified user or not. Enable if the requester is verified via email. |
| Allow to Delegate Approval | Enable if you want to allow the technician or requester to delegate the approval to anyone, from the Edit Profile page. If disabled, the technician or requester cannot delegate approval to any user. Also, the Delegate Approval tab in the Edit Profile page will become read only. |
| Allow to Delegate Approval for Team | Enable if you want to allow the technician or requester to delegate approval to others from the My Team menu. If disabled, one cannot delegate the approval of the team member to another technician or requester. However, one can view the currently set delegate approvals of the team members. |
| Identity Provider | Select the provider with whom the requester is associated. To add more in the list, refer to Identity Providers. If the requester belongs to the deleted Identity Provider, it will be displayed as Archived. This field is editable only if the user is added manually, via CSV, or from the LDAP Server. It will be uneditable if the user is imported through SSO. |
| Date Time Format | Select the date time format for the requester. The default value is set from the Account Details page. Once selected the preview will be available below the field. |
| Date Format | Select the date format. Once selected the preview will be available below the field. |
| Time Format | Select the time format. Once selected the preview will be available below the field. |
Once done, click Add and the requester gets created.
Convert to Technician
This option enables you to convert the requesters to technicians in one go.
In the case of the "Named" license, if the limit of Technician Count exceeds as per the License, and the user tries to convert the Requester into Technician, then after Bulk Operations, the remaining Technicians will be created but with disabled "Allow to Login" field.
To convert,
- Select the desired requesters.
- Click on the Take Action dropdown.
- Select the Convert to Technician option. A confirmation message appears. Click Yes to continue or No to stop the process. If Yes is clicked, a confirmation message will appear and the selected requesters will get converted to technicians.