Adding Servers for Monitoring
ObserveOps (formerly known as AIOps) monitors Windows and Linux servers by discovering them through a credential profile and provisioning them as monitors. Once provisioned, ObserveOps continuously collects performance metrics and generates alerts based on what it finds. You can customize Monitor Settings for each monitor, including polling intervals, thresholds, and alert notifications.
Servers Supported
| Server Type |
|---|
| Windows |
| Linux |
| HP-UX |
| IBM-AIX |
| Solaris |
| IBM-AS/400 |
- Windows
- Linux
- Single Server
- Bulk Servers
Adding a Windows Server
Prerequisites
- If the server is part of a domain, use credentials for a user in the domain admin group. For standalone servers, use credentials for a local administrator.
- Allow traffic through firewall ports
5985(HTTP) and5986(HTTPS). Enable ICMP on both ports for ping-based availability checks. - Configure WinRM on the target server before discovery. Log in as the discovery user, open Command Prompt as administrator, and run:
The network connection must be set to Private and the winrm service must be running.
winrm set winrm/config/service/Auth @{Basic="true"}
winrm set winrm/config/service @{AllowUnencrypted="true"}
winrm set winrm/config/winrs @{MaxMemoryPerShellMB="1024"}
winrm set winrm/config/client/Auth @{Basic="true"}
winrm set winrm/config/client @{AllowUnencrypted="true"}
winrm set winrm/config/winrs @{MaxProcessesPerShell="2147483647"}
winrm set winrm/config/winrs @{MaxConcurrentUsers="100"}
winrm set winrm/config/service @{MaxConnections="50"}
winrm set winrm/config/winrs @{MaxShellsPerUser="2147483647"}
winrm set winrm/config/service @{MaxConcurrentOperationsPerUser="4294967295"}
net stop winrm
net start winrm
Adding Bulk Windows Servers
Prerequisites
- If the servers are part of a domain, use credentials for a user in the domain admin group. For standalone servers, use a local administrator account.
- Allow traffic through firewall ports
5985and5986. Enable ICMP for availability checks. - The ObserveOps server must have ping access to all target servers.
Step 1: Create a Batch File
Create a winrmcommands.bat file with the following commands:
@ECHO ON
call winrm quickconfig -q
call winrm set winrm/config/service/Auth @{Basic="true"}
call winrm set winrm/config/service @{AllowUnencrypted="true"}
call winrm set winrm/config/winrs @{MaxMemoryPerShellMB="1024"}
call winrm set winrm/config/client/Auth @{Basic="true"}
call winrm set winrm/config/client @{AllowUnencrypted="true"}
call winrm set winrm/config/winrs @{MaxProcessesPerShell="2147483647"}
call winrm set winrm/config/winrs @{MaxConcurrentUsers="100"}
call winrm set winrm/config/service @{MaxConnections="50"}
call winrm set winrm/config/winrs @{MaxShellsPerUser="2147483647"}
call winrm set winrm/config/service @{MaxConcurrentOperationsPerUser="4294967295"}
call net stop winrm
call sc config winrm start= auto
call net start winrm
call winrm get winrm/config
@ECHO Done
Step 2: Create a Shared Folder
Create a shared folder on the domain server with read and write permissions. Place the winrmcommands.bat file inside it.
Step 3: Verify Folder Access
Check access to the script path from the domain server and a few client machines. Run the following in the Run dialog:
\\<domain IP>\folderpath\winrmcommands.bat
Step 4: Open Group Policy Management
Open Group Policy Management Console by running in the Run dialog:
gpmc.msc
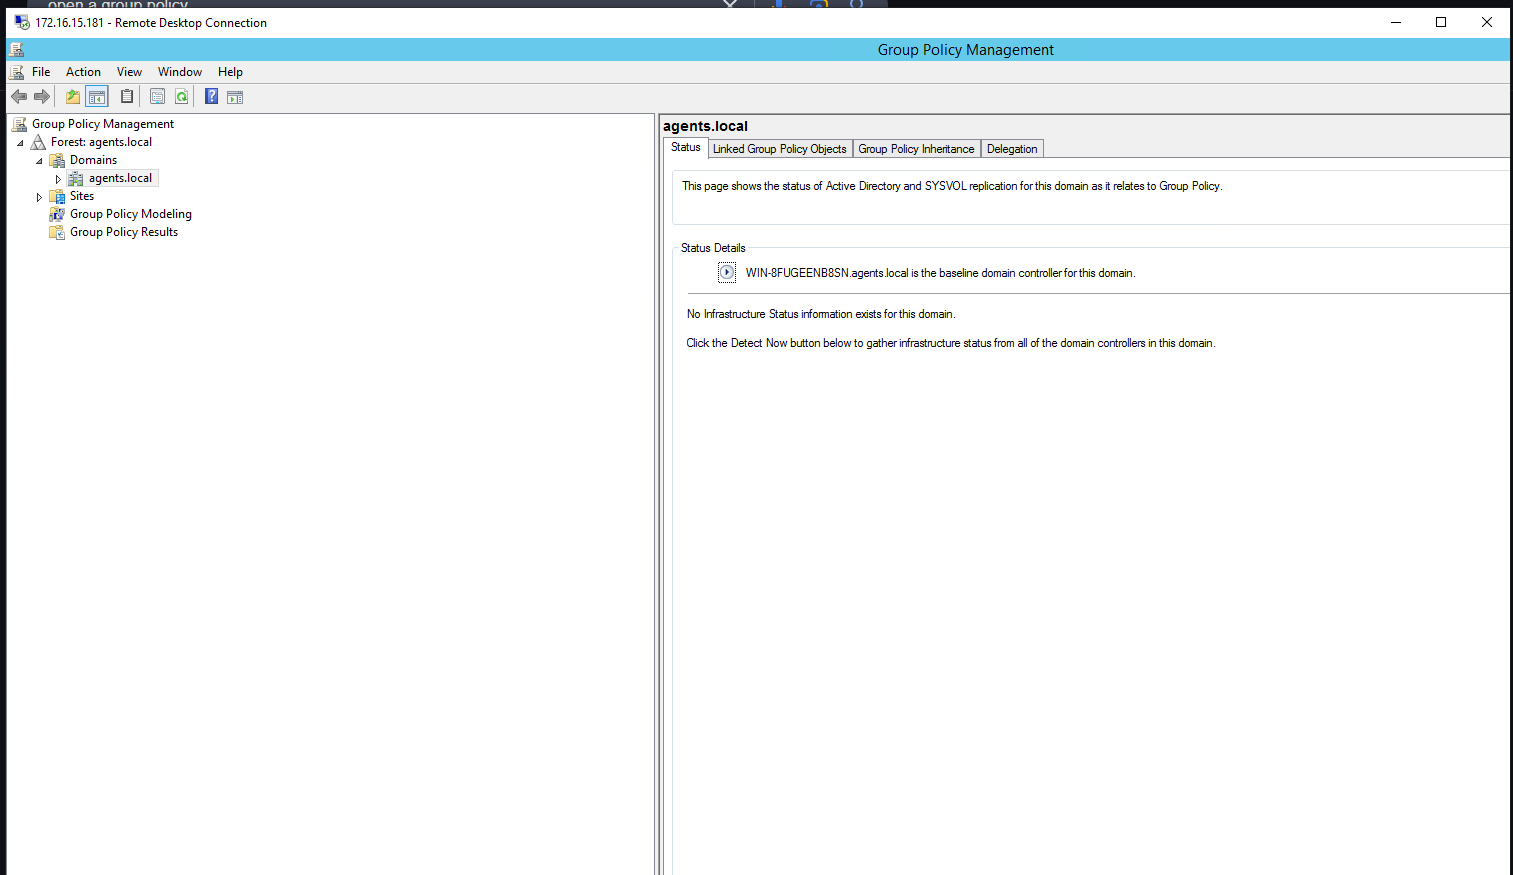
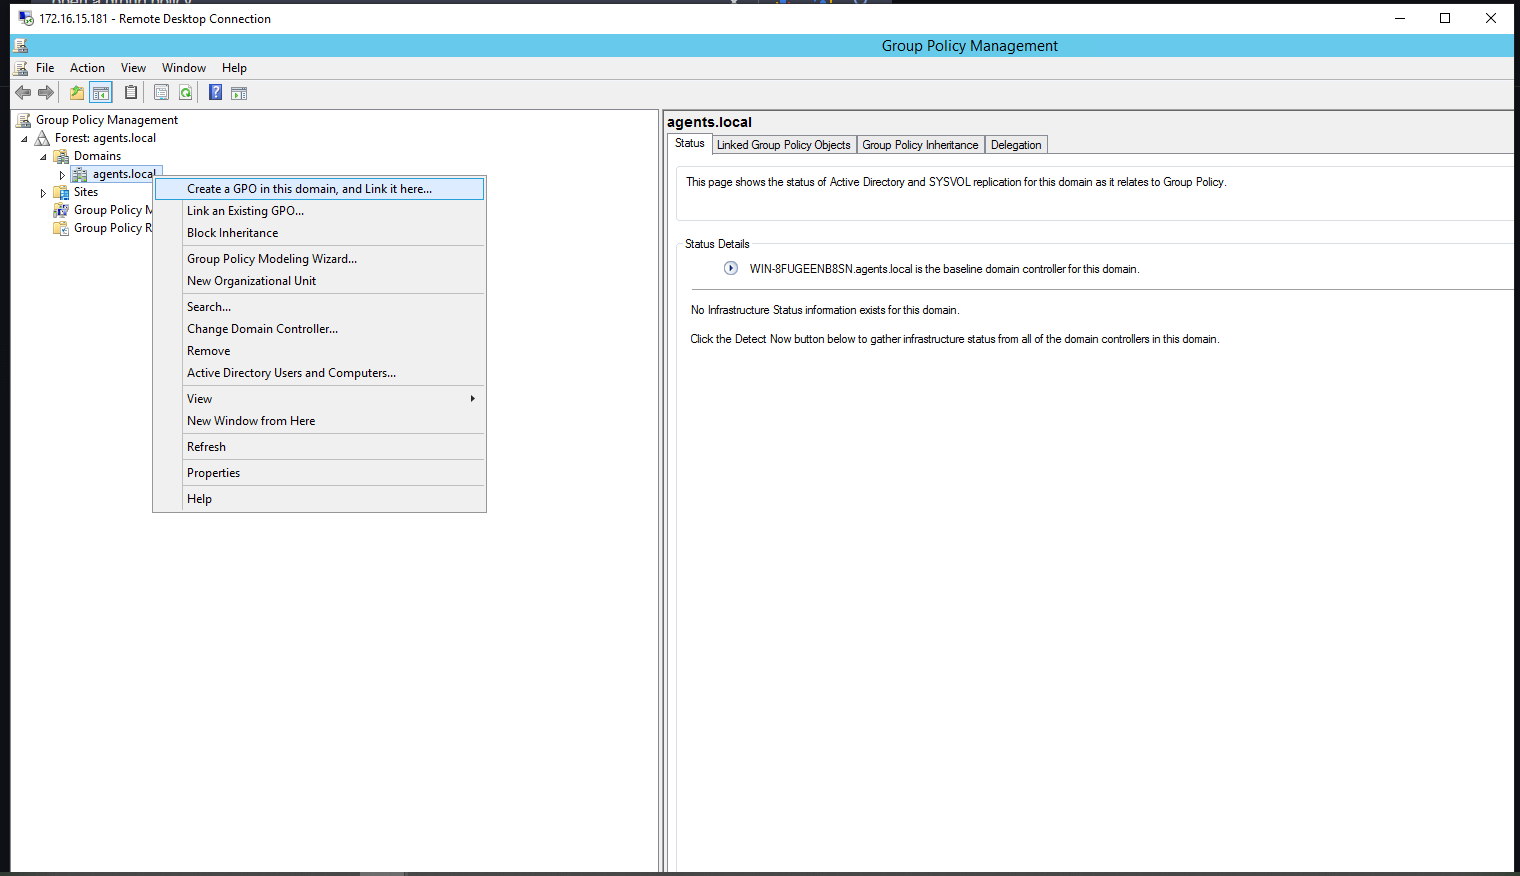
Step 5: Create a New Group Policy
- In Group Policy Management, right-click your domain name.
- Select Create a GPO in this domain and link it here.
Step 6: Name the Group Policy
- Enter
WinRM Configurationas the GPO name. - Select OK to save.
Step 7: Verify the Group Policy
Expand the domain node and confirm that WinRM Configuration appears in the list.
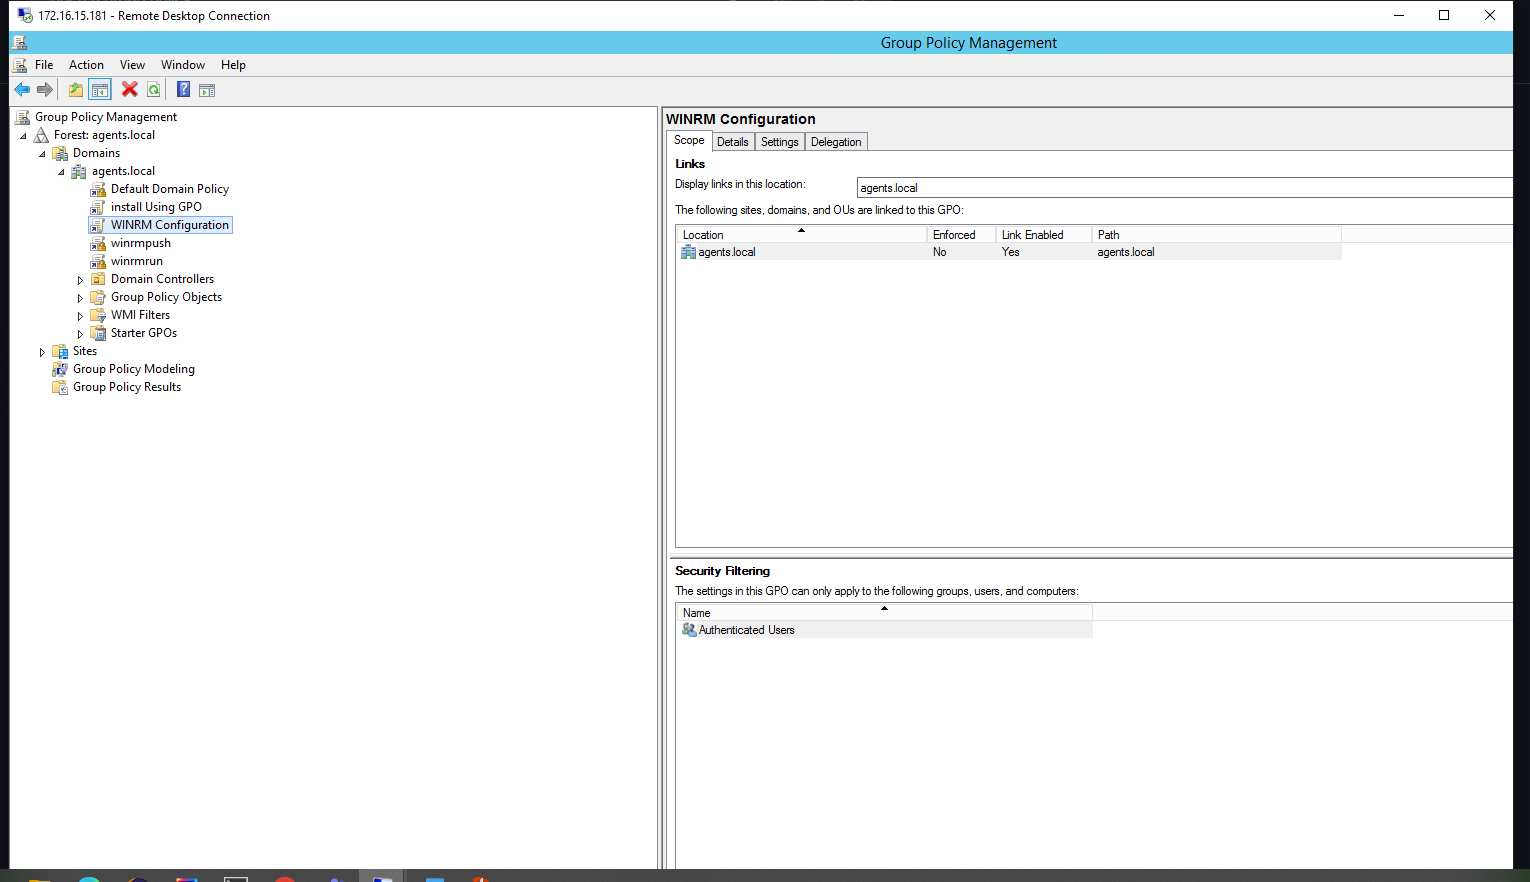
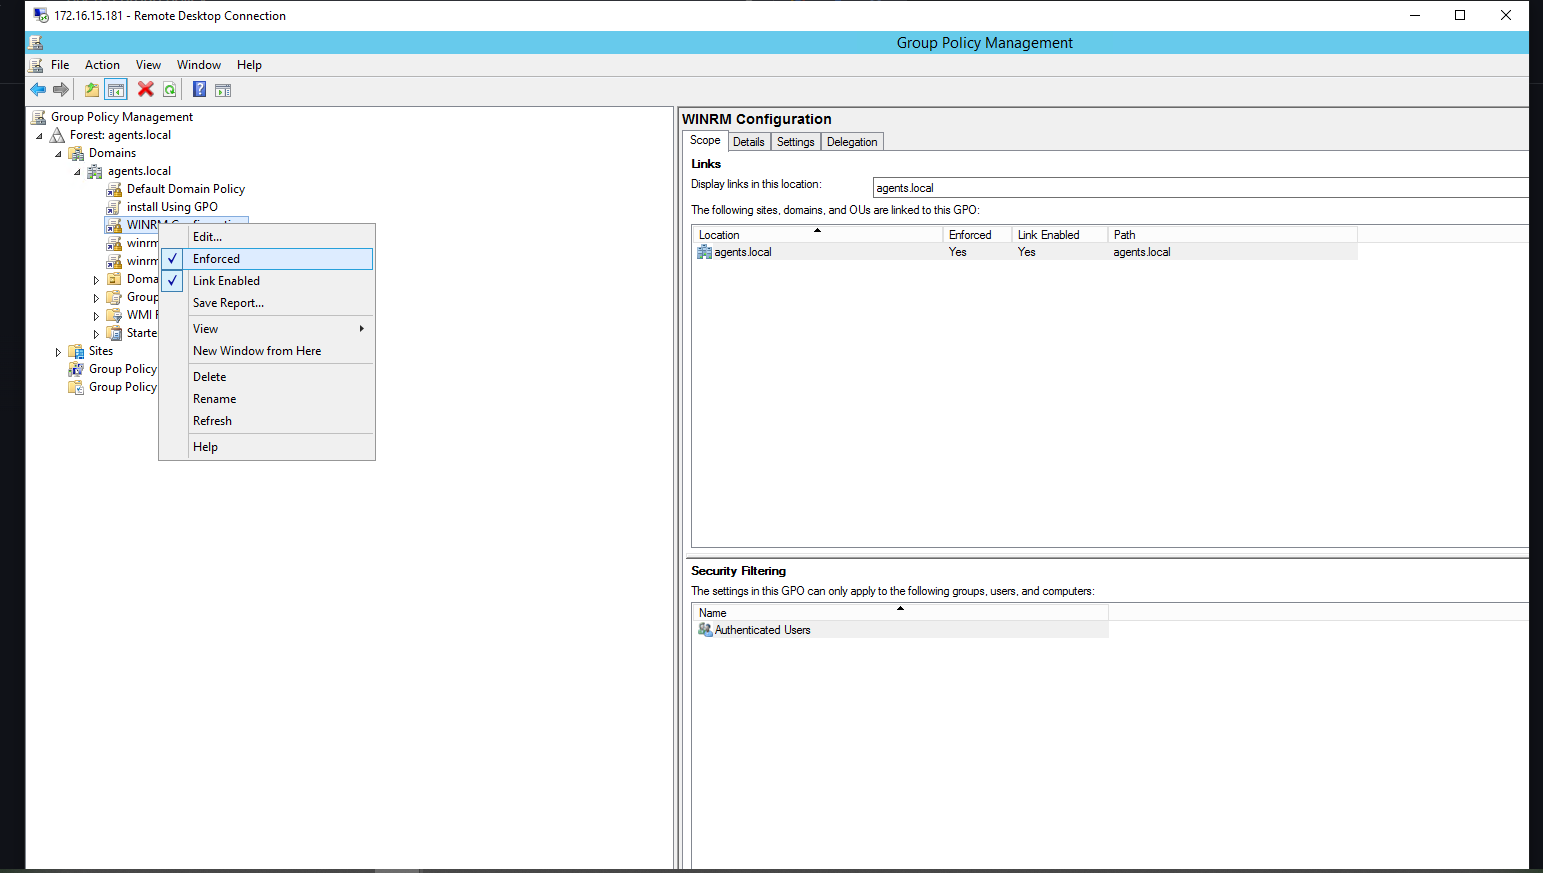
Step 8: Enforce the Group Policy
Right-click WinRM Configuration and select Enforced to apply it across all applicable OUs.
Step 9: Edit the Group Policy
- Right-click
WinRM Configuration. - Select Edit to open the GPO Editor.
Step 10: Navigate to Startup Scripts
In the Group Policy Editor, navigate to:
Computer Configuration > Policies > Windows Settings > Scripts (Startups/Shutdown)
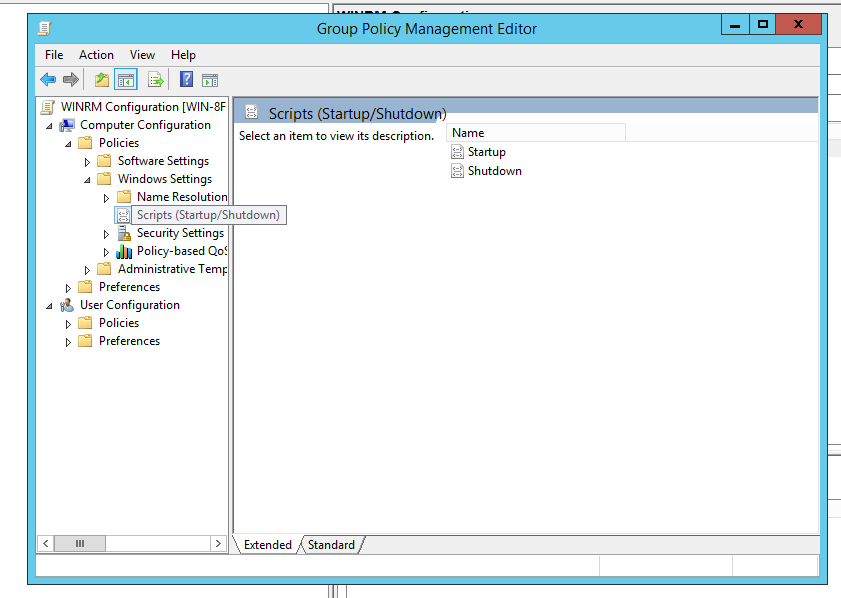
Step 11: Configure the Startup Script
Double-click Startup in the right section to open it.
Step 12: Add Script Details
- Select Add on the Startup Properties window.
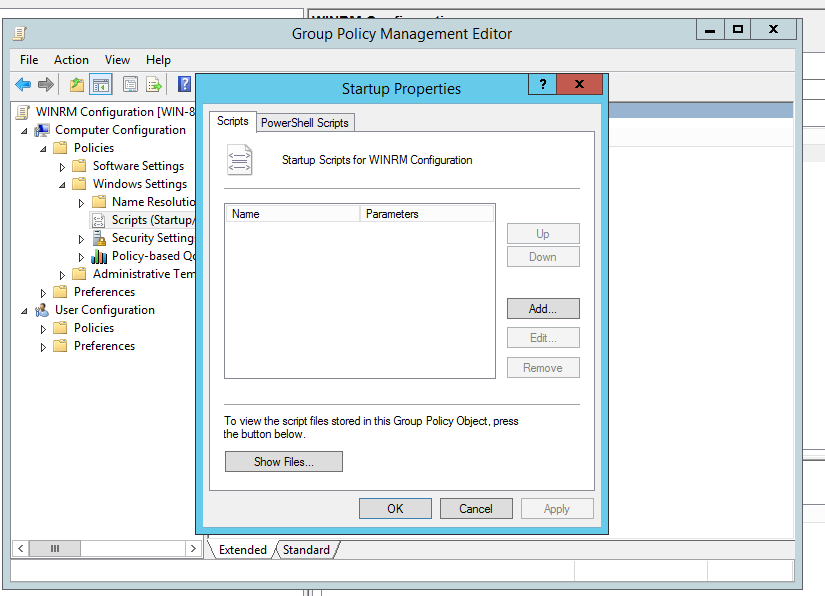
- Select Browse, then locate and select the script path you verified in Step 3.
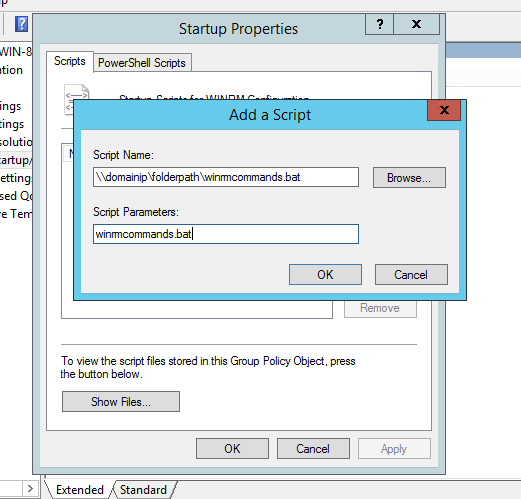
The selected path must match exactly the one you verified in Step 3.
In the Script Parameters field, enter:
winrmcommands.batSelect OK to save.
Step 13: Reboot and Validate
- Reboot one or more domain-joined client machines.
- After reboot, check ObserveOps for device discovery to confirm successful WinRM script execution.
1. Create a Credential Profile
Go to Menu. Select Settings  . Select Discovery Settings
  . Select Credential Profile. The Credential Profile screen opens. Select Create Credential Profile.
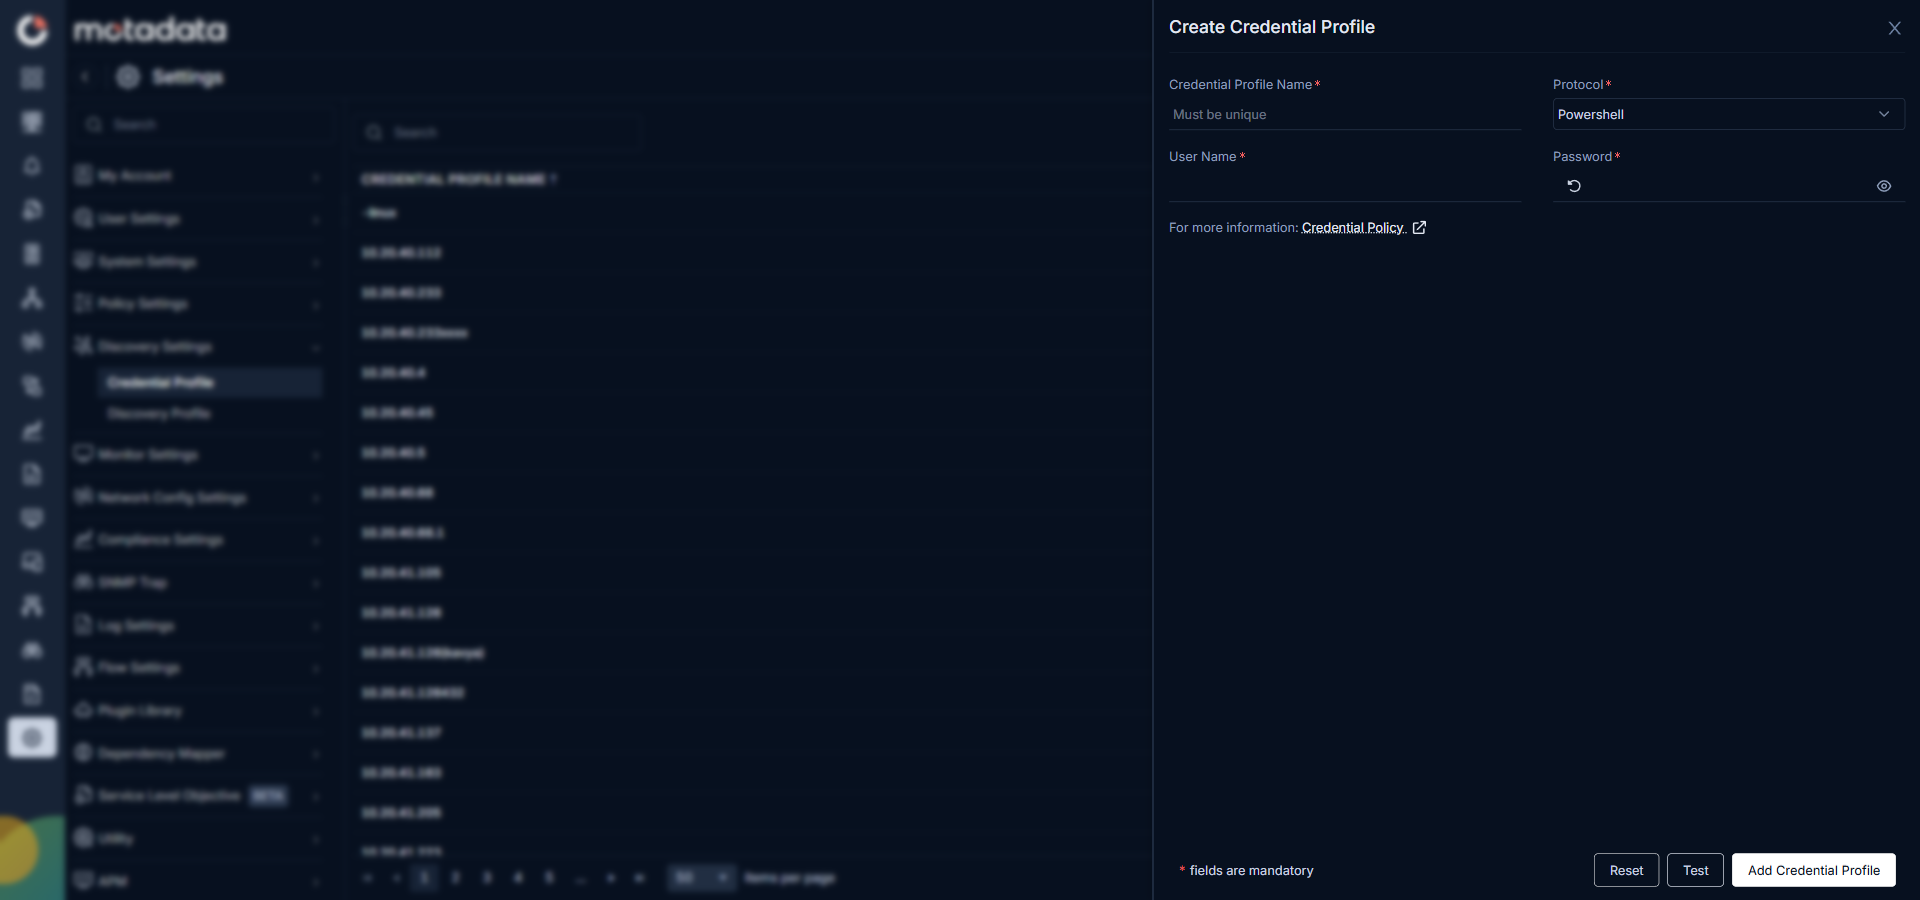
The Create Credential Profile form opens.
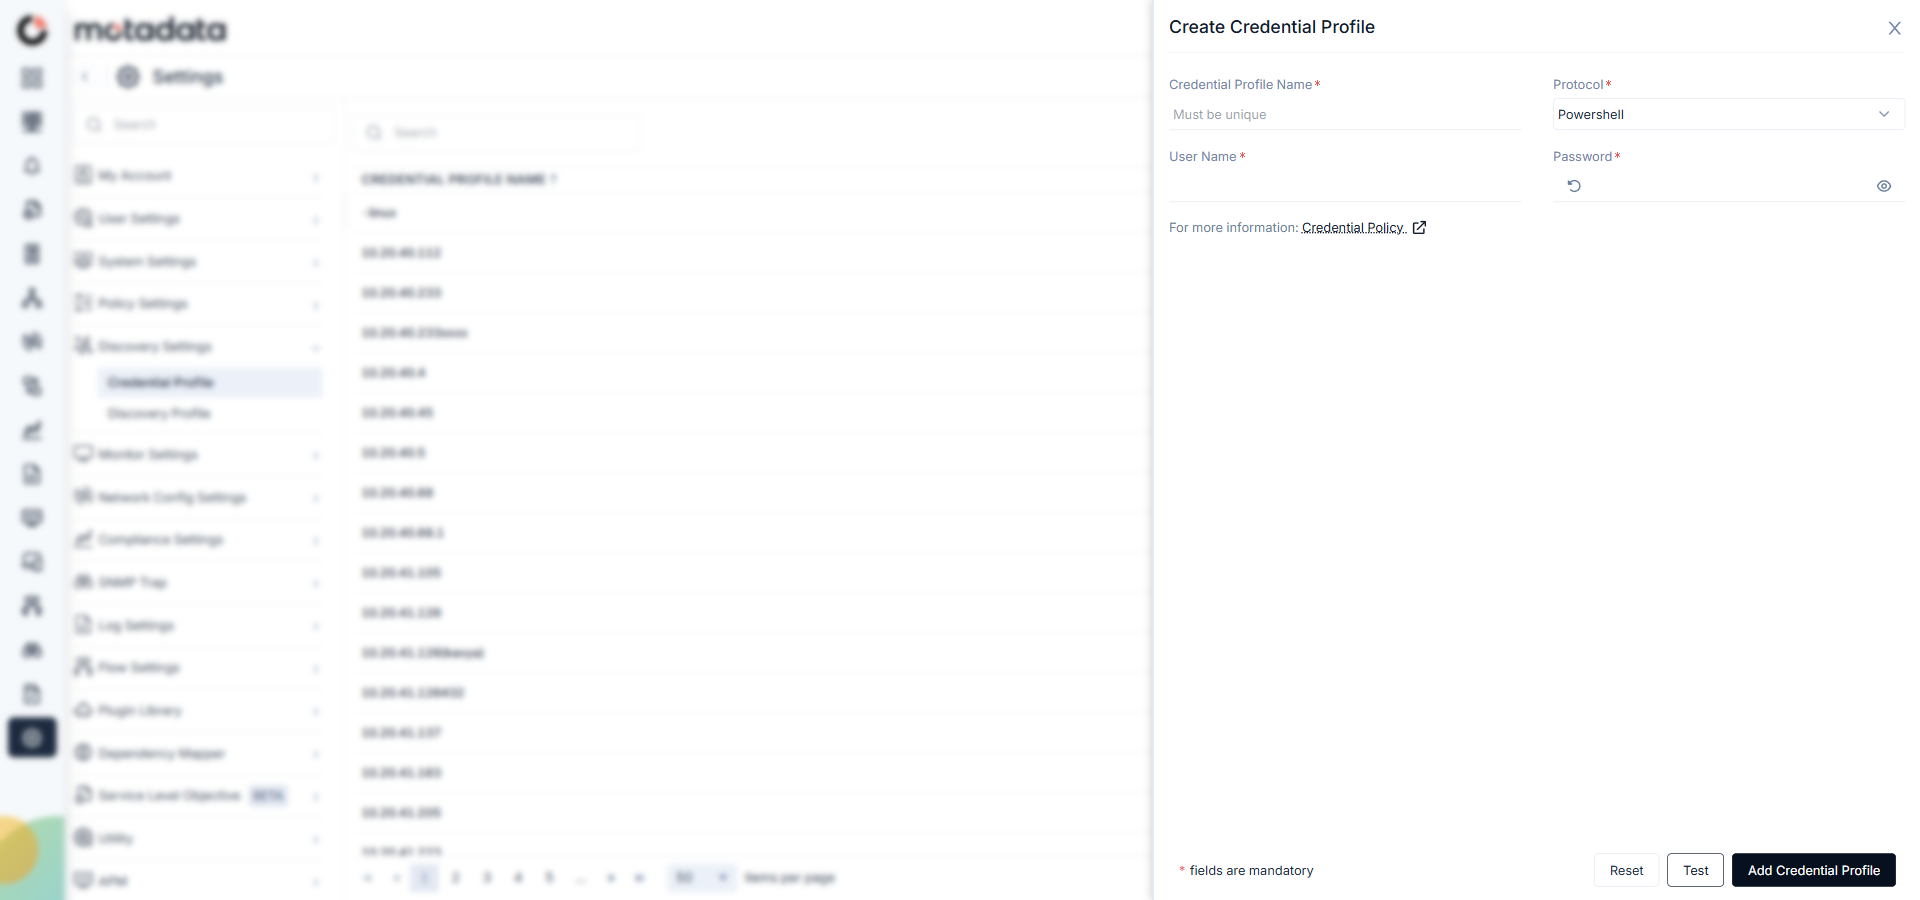
| Field | What to Enter |
|---|---|
| Credential Profile Name | A unique name to identify this profile |
| Protocol | Select Powershell |
| Username | The Windows account username with PowerShell remoting access |
| Password | The password for that account |
Select Test to verify the credentials connect to the target server. Select Reset to clear all fields. Select Add Credential Profile to save.
2. Create a Discovery Profile
Go to Menu. Select Settings . Select Discovery Settings . Select Discovery Profile. The Discovery Profile screen opens. Select Create Discovery Profile.
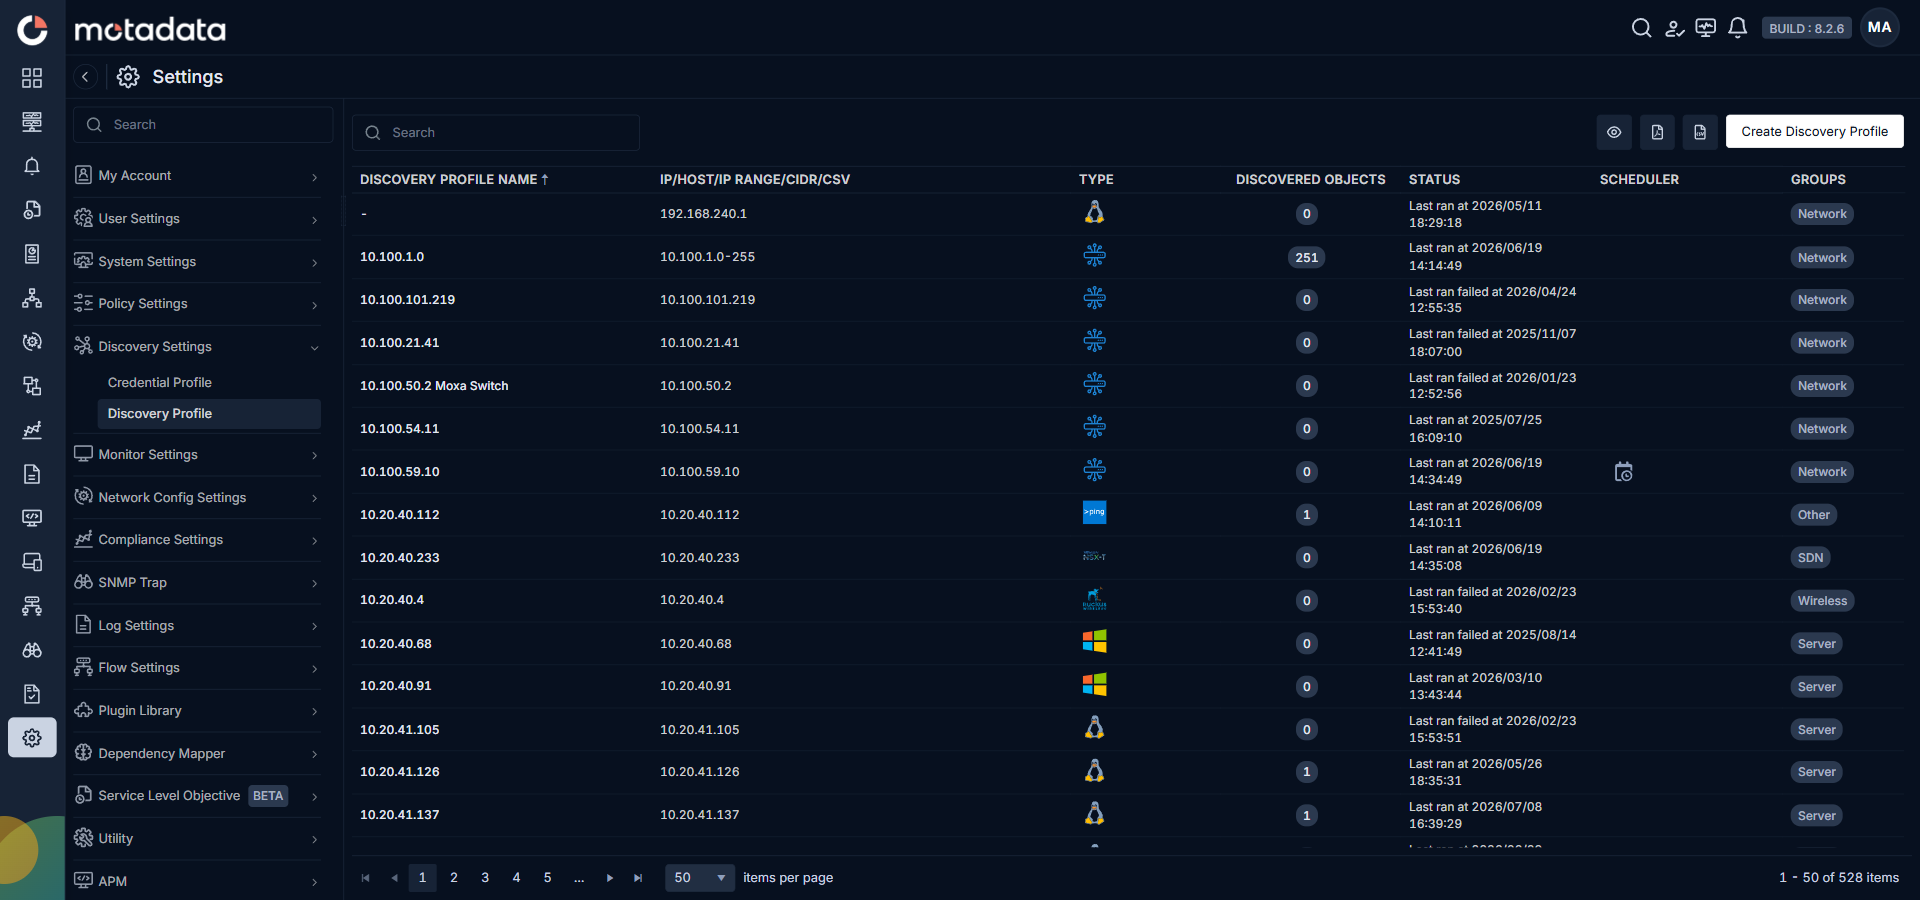
The Create Discovery Profile form opens. Server is selected by default.
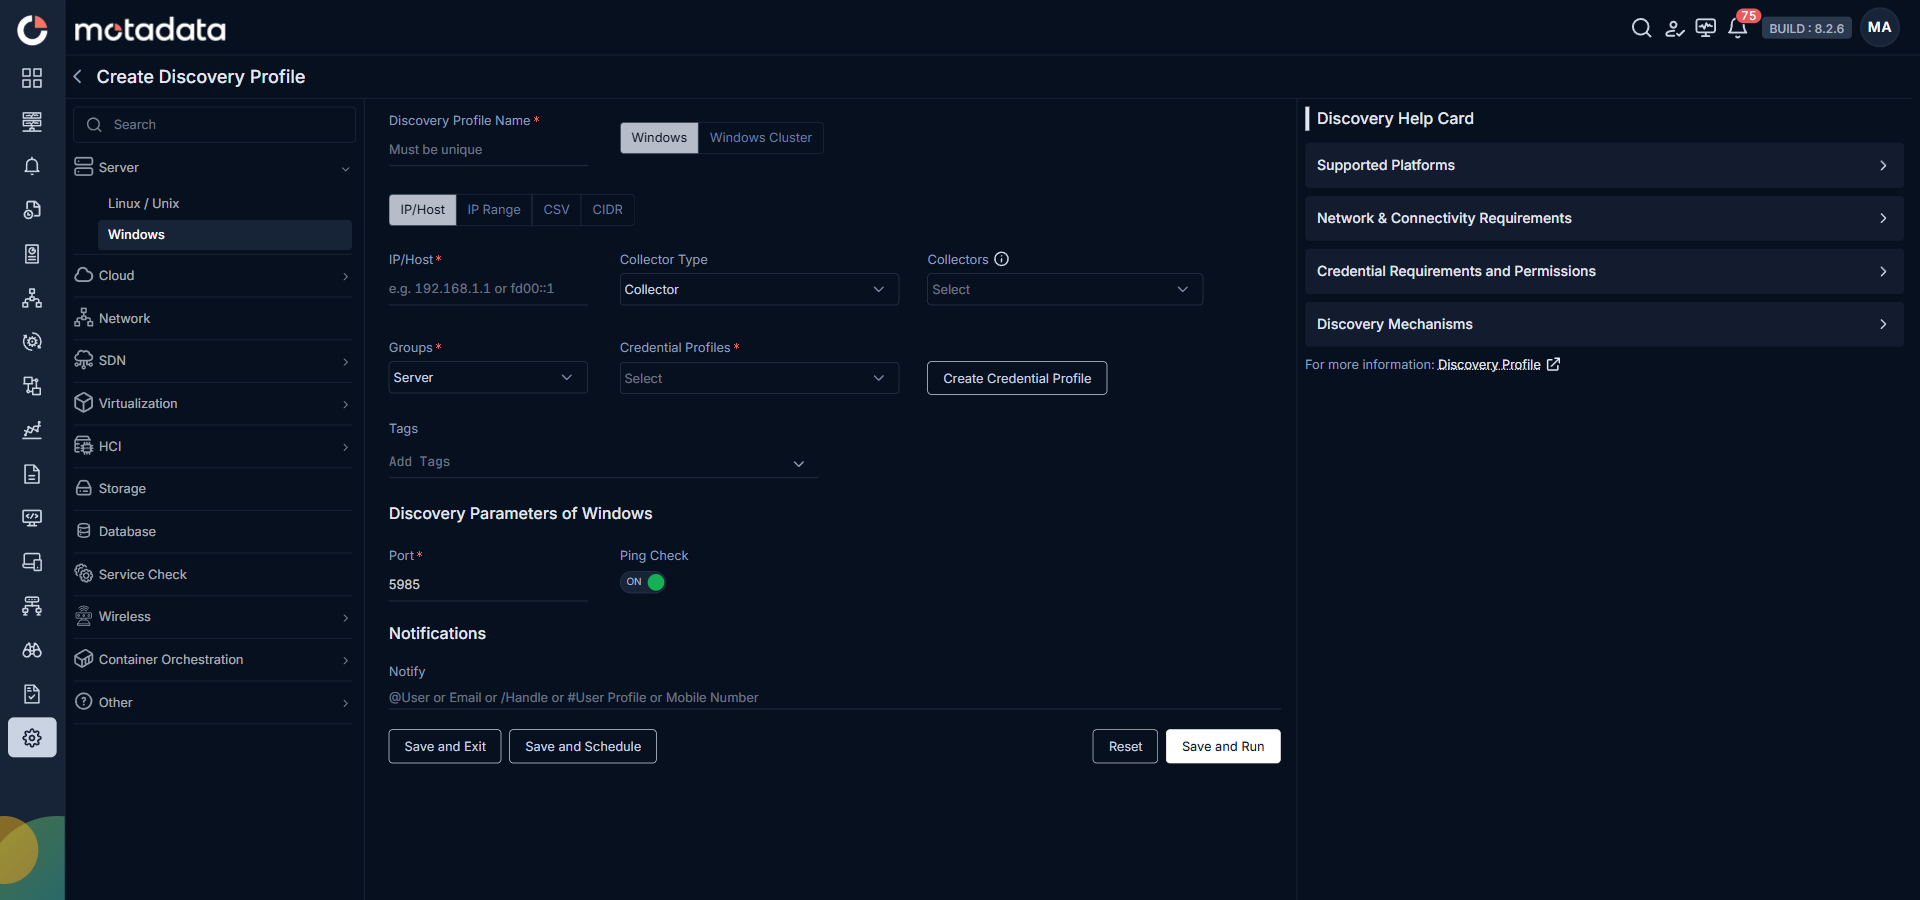
| Field | What to Enter |
|---|---|
| Discovery Profile Name | A unique name to identify this profile |
| Windows / Windows Cluster | Select Windows for a single server. Select Windows Cluster for a cluster. |
| IP / Host / IP Range / CIDR / CSV | The address or address range of your Windows servers |
| Collectors | One or more Collectors for data collection. If you skip this, ObserveOps selects a Collector automatically. |
| Groups | One or more Groups to assign to provisioned monitors |
| Credential Profile | Select the Powershell credential profile you just created |
| Tags | Tags to assign to discovered devices |
| Port | Pre-populated. No change needed. |
| Ping Check | On by default. Toggle off to discover servers that don't respond to ping. |
| Notify | Email addresses, handles, user profiles, or mobile numbers to notify when discovery completes |
Select Collectors based on how you want to distribute the monitoring load.
Select Save and Run to save and start discovery immediately. Select Save and Exit to save without running. Select Save and Schedule to schedule discovery for a specific time.
3. Provision the Discovered Devices as Monitors
After discovery starts, ObserveOps scans the specified addresses.
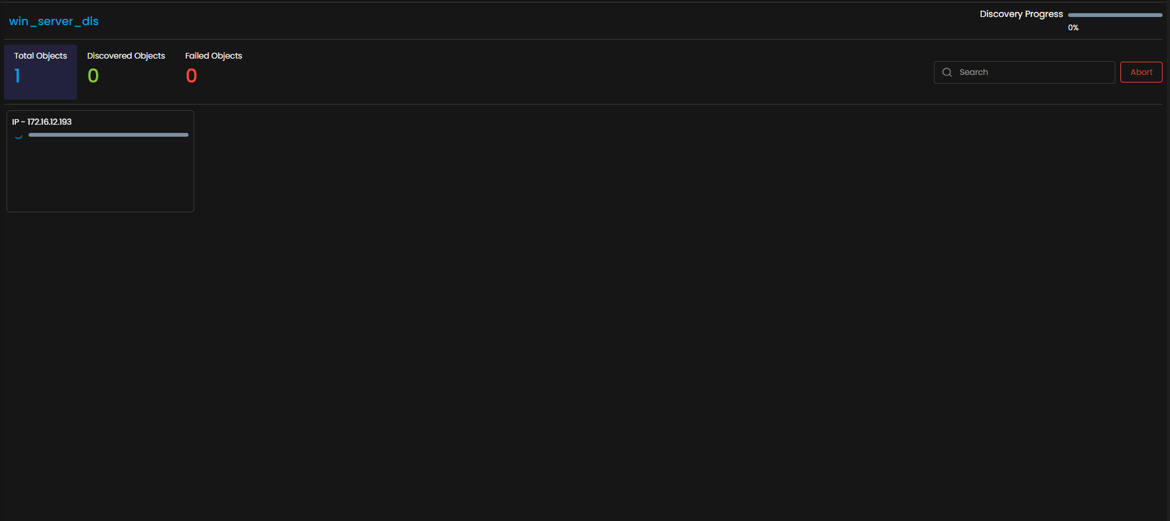
When the run completes, ObserveOps shows all discovered devices. Select the ones you want to add as Monitors.
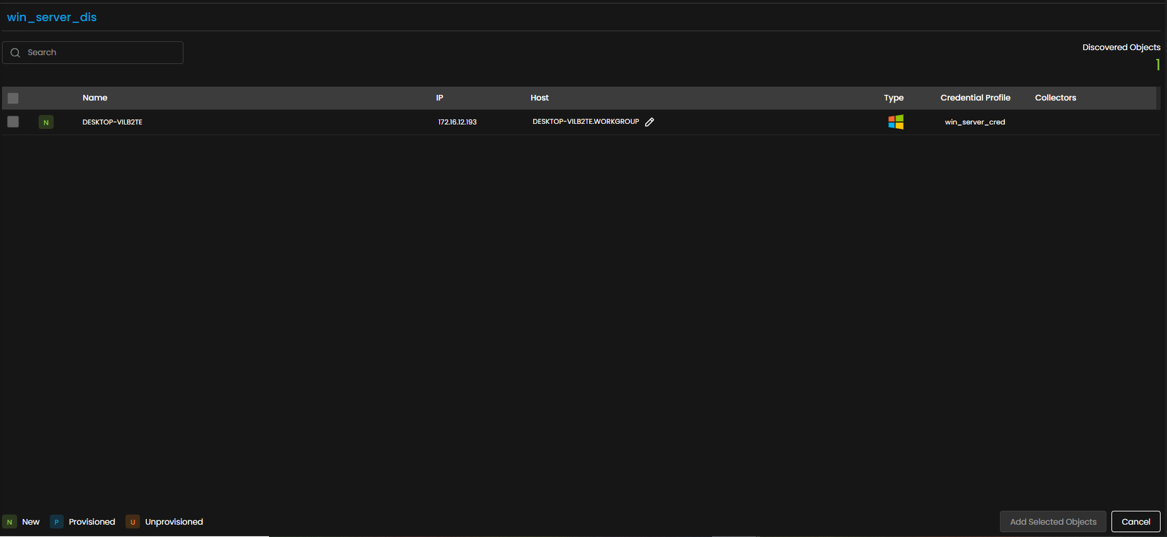
Select Add Selected Objects to provision the selected devices as monitors. ObserveOps now collects metrics from these servers continuously.
To view the monitors, go to Menu. Select Monitor. Select Server & Apps.
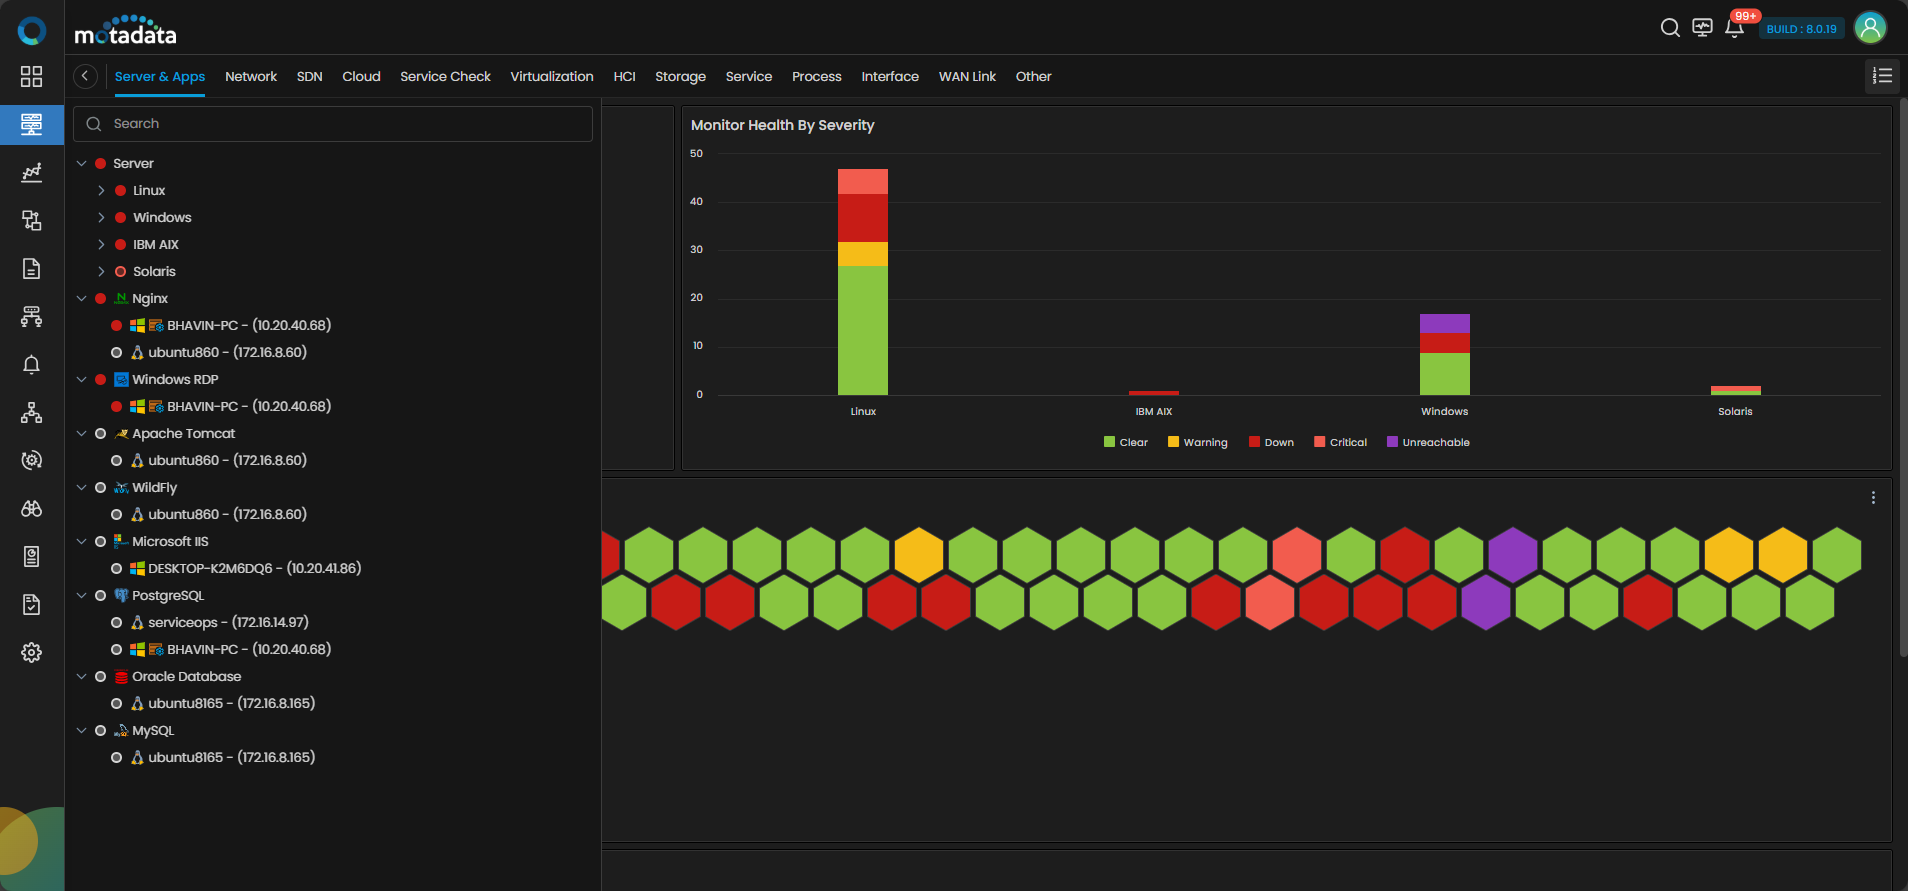
The Windows Server is now added to ObserveOps.
Adding a Linux Server
Prerequisites
SSH must be enabled on the target server. Ensure the SSH service is running and the server accepts incoming connections.
Install the
sysstatpackage on the Linux server. ObserveOps uses it to collect CPU, memory, and process metrics.For RHEL, Fedora, or CentOS:
sudo yum install sysstatFor Ubuntu:
sudo apt-get install sysstat
1. Create a Credential Profile
Go to Menu. Select Settings . Select Discovery Settings . Select Credential Profile. The Credential Profile screen opens. Select Create Credential Profile.
The Create Credential Profile form opens.
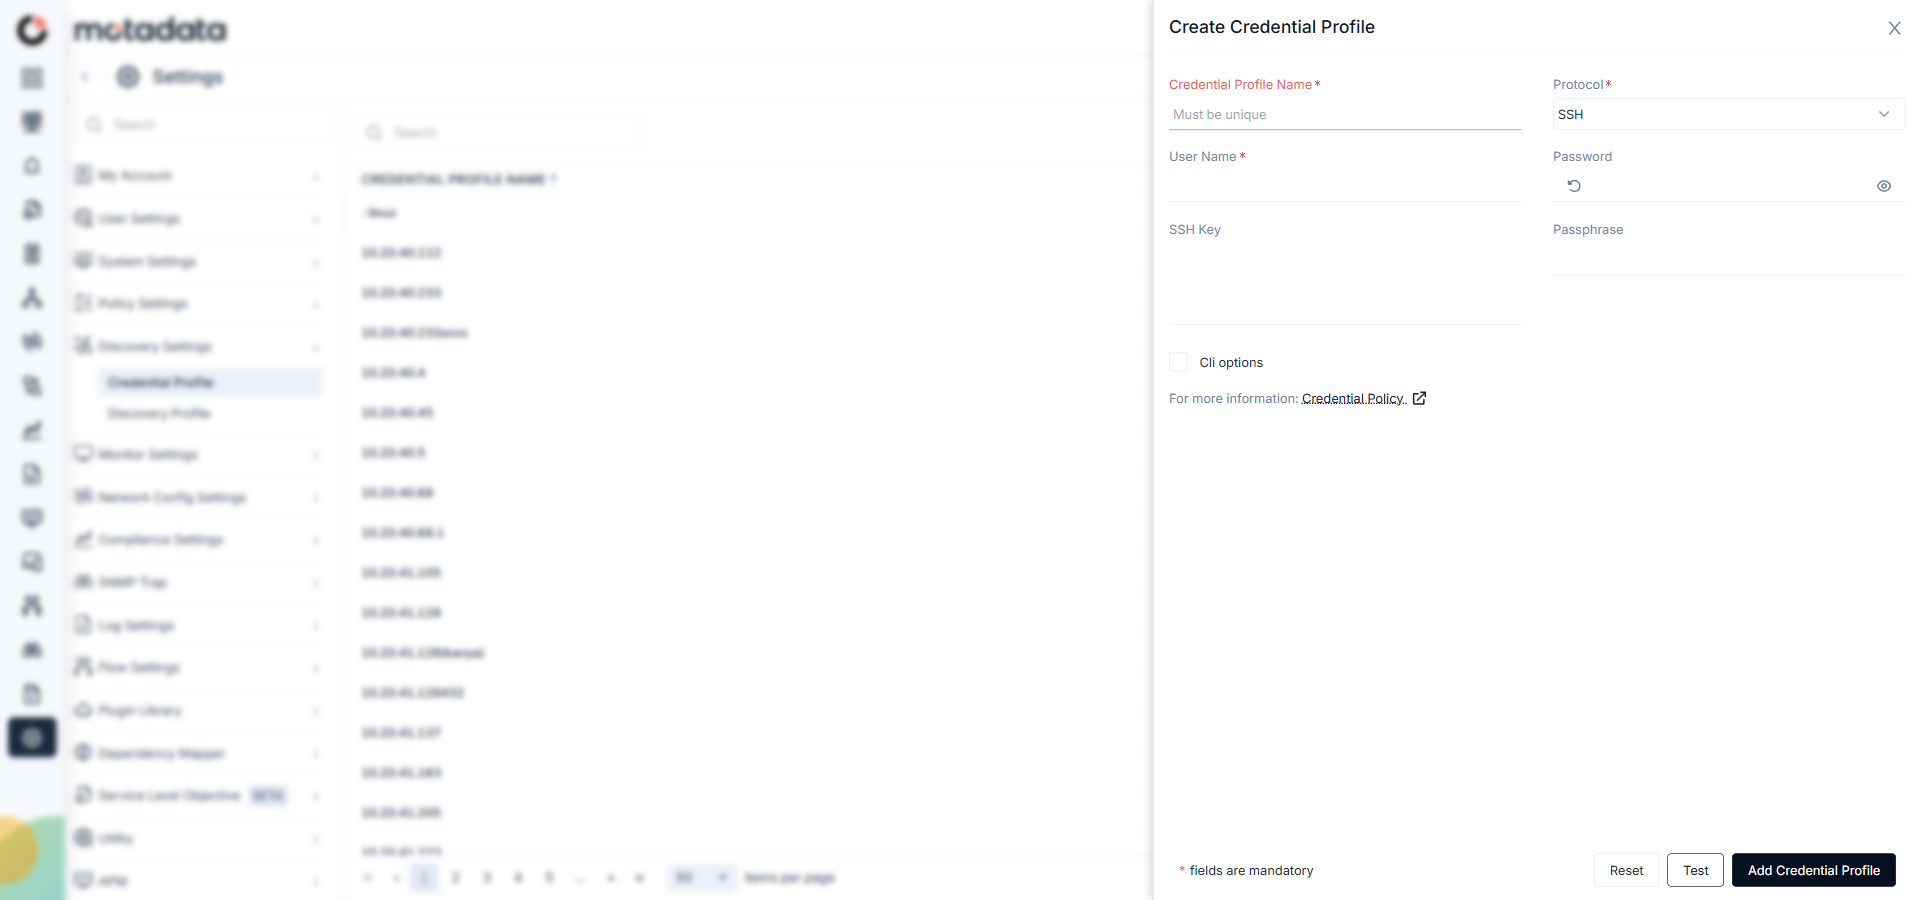
| Field | What to Enter |
|---|---|
| Credential Profile Name | A unique name to identify this profile |
| Protocol | Select SSH |
| Username | The SSH username on the target server |
| Password | The password for that SSH account |
| SSH Key | The private key, if the server uses key-based authentication |
| Passphrase | The passphrase protecting the SSH private key, if one is set |
| CLI Options | Select to enable NCCM fields: Config Transfer Protocol, Enable User Name, Enable Password, Enable Command, Enable Prompt, Config Mode Command, Config Password, and VRF Name |
Select Test to verify the credentials connect to the target server. Select Reset to clear all fields. Select Add Credential Profile to save.
The profile now appears in the Credential Profile list.

2. Create a Discovery Profile
Go to Menu. Select Settings . Select Discovery Settings . Select Discovery Profile. The Discovery Profile screen opens. Select Create Discovery Profile.
The Create Discovery Profile form opens. Server is selected by default.
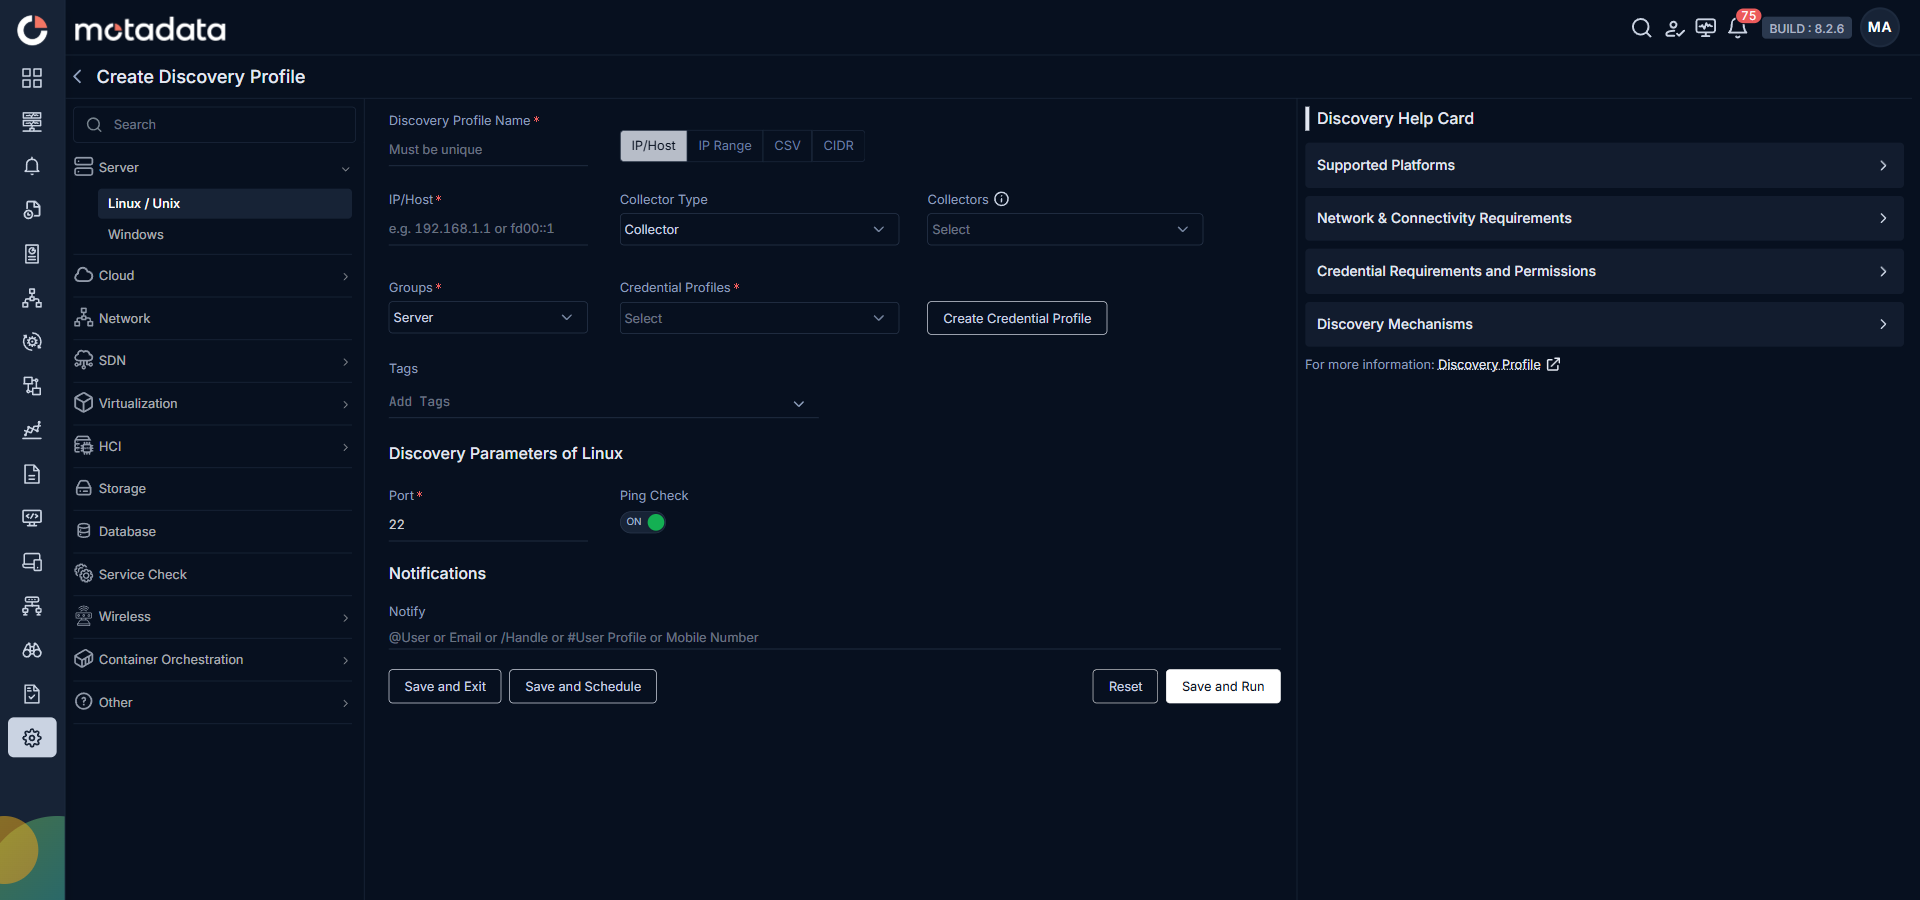
| Field | What to Enter |
|---|---|
| Discovery Profile Name | A unique name to identify this profile |
| IP / Host / IP Range / CIDR / CSV | The address or address range of your Linux servers |
| Collectors | One or more Collectors for data collection. If you skip this, ObserveOps selects a Collector automatically. |
| Groups | One or more Groups to assign to provisioned monitors |
| Credential Profile | Select the SSH credential profile you just created |
| Tags | Tags to assign to discovered devices |
| Port | SSH port. Defaults to 22. |
| Ping Check | On by default. Toggle off to discover servers that don't respond to ping. |
| Notify Team | Email addresses, handles, or user profiles to notify when discovery completes |
Select Collectors based on how you want to distribute the monitoring load.
Select Save and Run to save and start discovery immediately. Select Save and Exit to save without running. Select Save and Schedule to schedule discovery for a specific time.
3. Provision the Discovered Devices as Monitors
After the discovery run completes, ObserveOps updates the Discovered Objects count.

Open the Provisioning screen to see all discovered servers. Select the ones you want to add as Monitors.

Select Add Selected Objects to provision the selected devices as monitors. ObserveOps now collects metrics from these servers continuously.
To view the monitors, go to Menu. Select Monitor. Select Server & Apps.
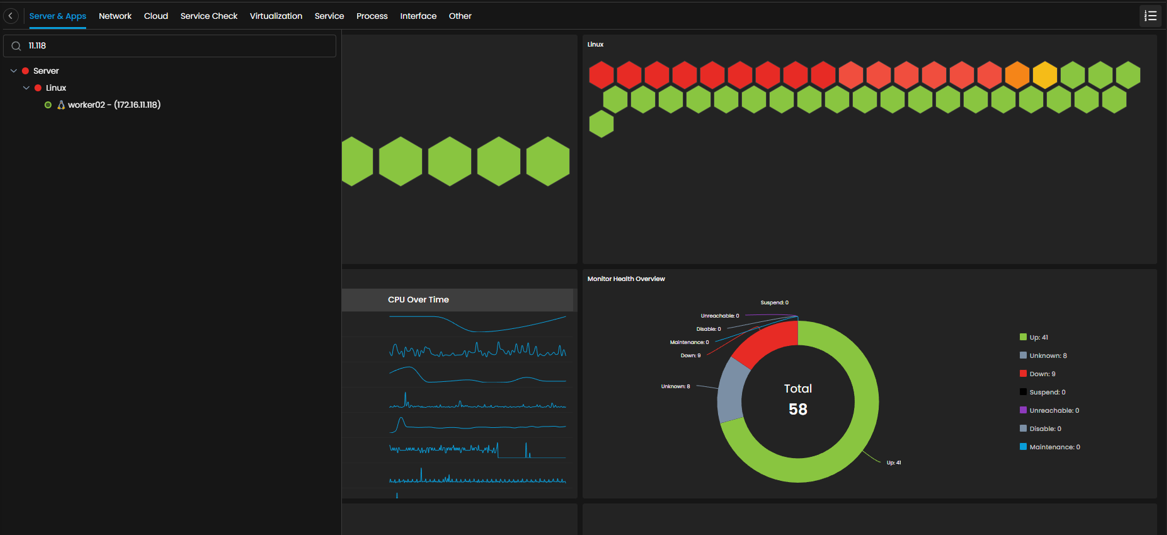
The Linux Server is now added to ObserveOps.