Adding an Asset
You can add a new asset directly into the system whenever required. To add an asset,
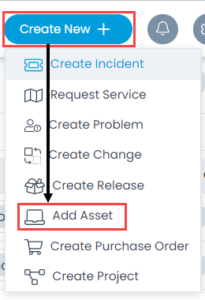
- Click Create New + button and select the Add Asset option. The following page appears.


- Enter the following details:
| Parameter | Description |
|---|---|
| Name | Enter the name of the asset. |
| Asset Type | Select the type of Asset. The options are: Hardware, Software, Non-IT, and Consumable Assets. Once selected, the below fields will appear based on the asset type. A sub-category is also available for all the particular categories of any asset. |
| Product | Select the desired product from the dropdown. Also, you can search your required products. |
| Managed By Group | Select the desired group which will manage the particular asset. |
| Managed By | Select the desired name of the technician who will manage the asset. |
| Department | Select the desired department to which the asset belongs. |
| Location | Select the location of the asset. |
| Asset Group | Select the group to which the asset belongs. |
| Used By | Select the name of the person who is going to use the asset. |
| Acquisition Date | Select the date when the asset is added. |
| Assignment Date | Select the date when the asset is handed over (assigned) to the user. |
| Status | Select the status of the asset. The options are: In Use, In Stock, Missing, and Retired. |
| Impact | Select the impact of the asset. The options are: Low, On Users, On Department, and On Business. |
| Barcode | Enter the barcode number if available or generate if required. This field can be updated later. |
| Tags | Enter the tags for the asset. You can also add tags automatically using a Workflow. |
| Description | Enter a brief description about the asset. |
| Attachments | Attach any required documents or proofs along with the addition of the asset. Once attached, you can preview or even delete it using the respective icons. |
- Once done, click Add. The asset gets added and appears on the Asset List page. An asset starts with a prefix "AST". For example: AST-1.