CI List View
The CI List View page helps the technicians to track and manage all the CIs. It displays a list of CIs along with the options like export, download, refresh, column selection, import, auto refresh interval, and CIs in stage at one place. The CI list appears as per the option selected from the menu. Also, you can filter the list using the default or custom filters.
To view the CI List page:
Click the CI Menu and the below screen appears. By default, it displays all the CIs falling under the parent "Base CI" type. The CIs are displayed based on hierarchy with the Base CI type as the parent node for all the CIs of the organization. Further you can view specific CIs, by selecting the required CI type.
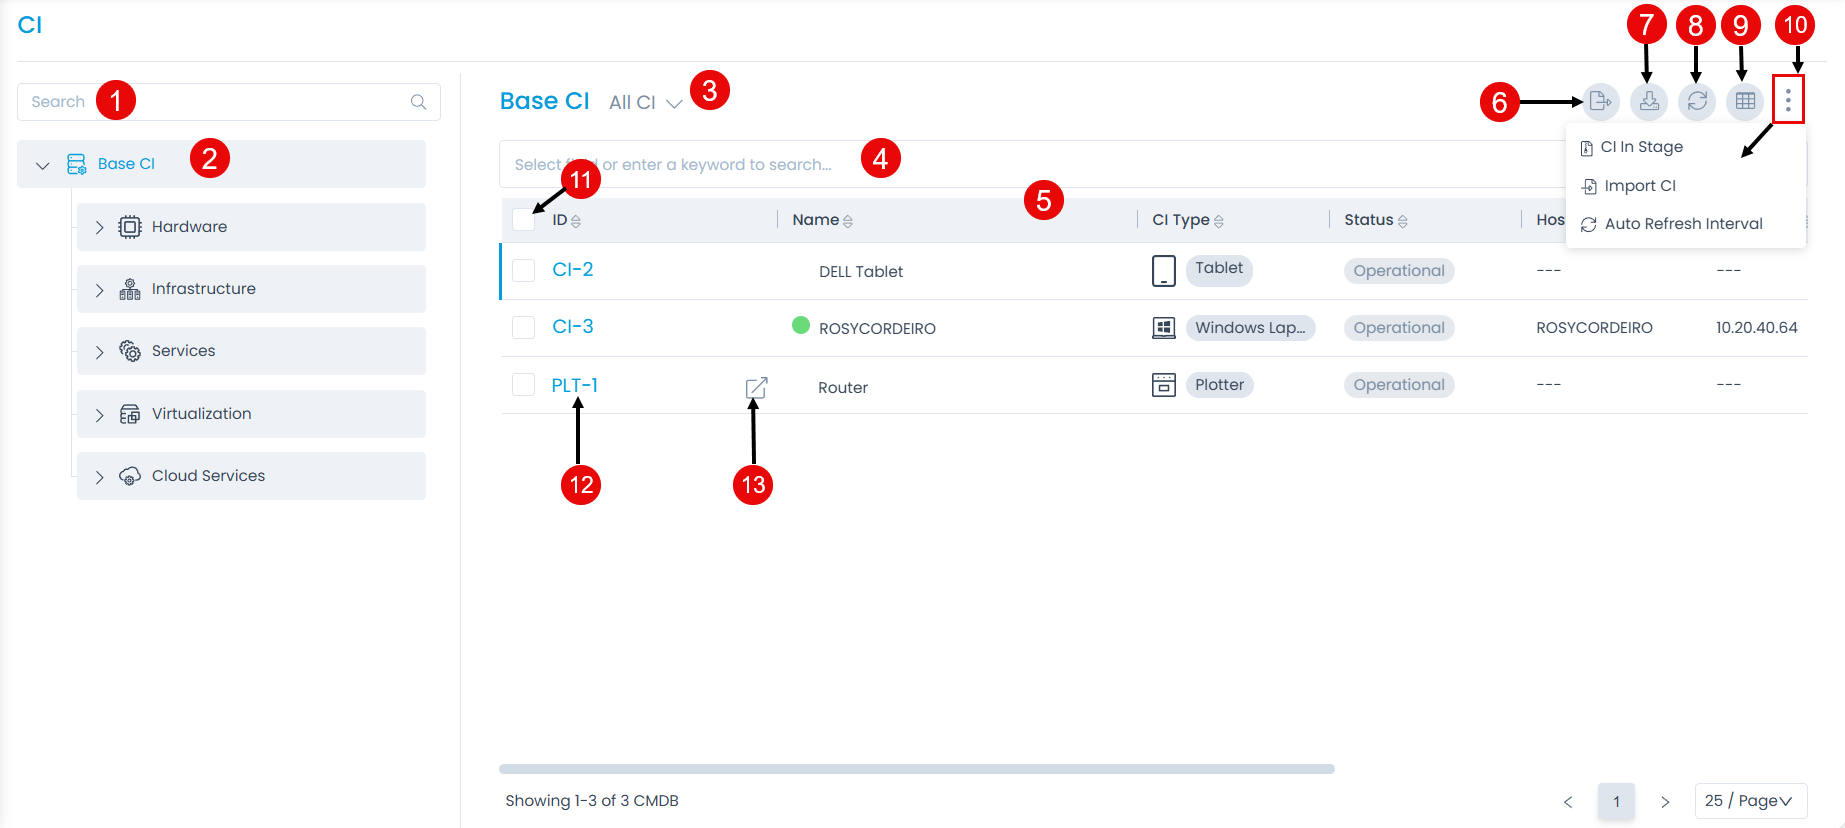
The List Page displays the following features:
CI Type Search: You can search for the required CI type.
CI Type List: You can select the CI type based on which the CIs will appear on the right-hand side. By default Base CI is selected which displays all the CIs of the organization.
Filters: You can filter the CI list by clicking the desired option. The following filters are available:
Filter Records Displayed All CI Displays all active configuration items in the system that have not been archived, regardless of who manages them. All CI Managed By Me Displays only those configuration items that are assigned to or managed by the currently logged-in technician. All Archived CI Displays configuration items that have been archived. Archived CIs are removed from the active list but their records are retained in the system. Search: You can search for the required records or list based on a specific criteria or keyword.
Grid: You can view the details of the CIs. Also, you can change certain details from here.
Export: You can export the CI list.
Download: You can download the CI list in CSV and Excel format. Moreover, you can password-protect the Excel file for added security.
Refresh: You can refresh the list. This is useful when multiple people are working on the CI and contents are updated frequently.
Column Selection: You can personalize the columns of the list page. The unselected columns will remain hidden in the grid.
Options: Click to view the CIs in stage, import the CIs, and set the auto refresh interval.
Bulk Operations: You can perform the required operation on multiple CIs. You can update, move to stage, and archive the CI in one go.
View Details Page: You can click the CI ID to view the CI Details page.
View Details Page in a new tab: You can click the arrow icon next to the ID to view the details page in a new tab.
The Grid
The Grid displays the details as per the columns selected using the Column Selection icon as shown below.

The default details are:
| Parameter | Description |
|---|---|
| ID | ID of the CI. |
| Name | Name of the CI. |
| CI Type | Type of CI. You can also change it by clicking on it and selecting the required option. |
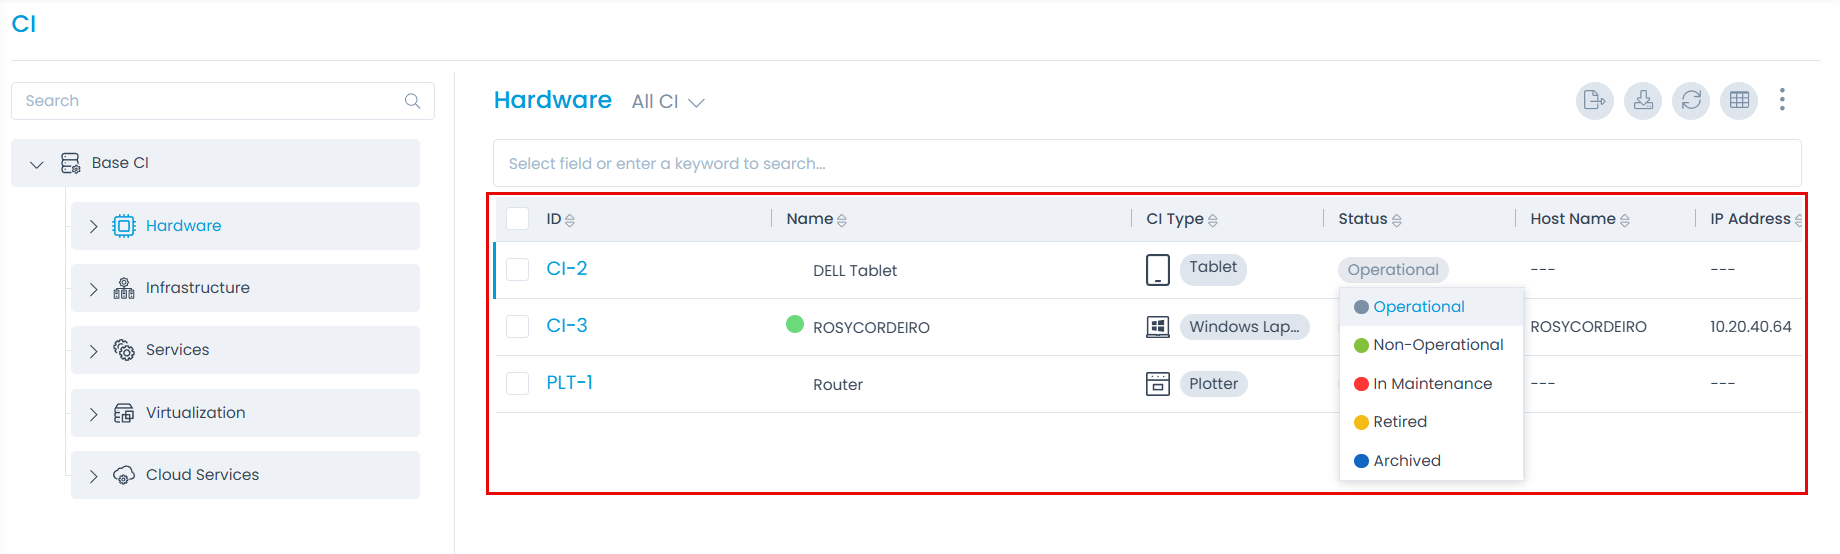
| Status | Status of the CI. You can change the status by clicking on it and selecting the required option. The options are: Operational, Non-Operational, In Maintenance, and Retired. |
| Hostname | The host name of CI. |
| IP Address | IP Address of the CIt. |
| Used By | Name of the person using the CI. You can also assign the CI to someone from here. |
| Managed By Group | Name of the group managing the CI. You can also assign it to other group by clicking on it and selecting the required group. If not assigned, the column displays Unassigned. |
| Managed By | Name of the person managing the CI. You can also assign it to someone else by clicking on it, and selecting the required name. If not assigned, the column displays Unassigned. |
You can also select other columns to be viewed in the grid later and set their values.
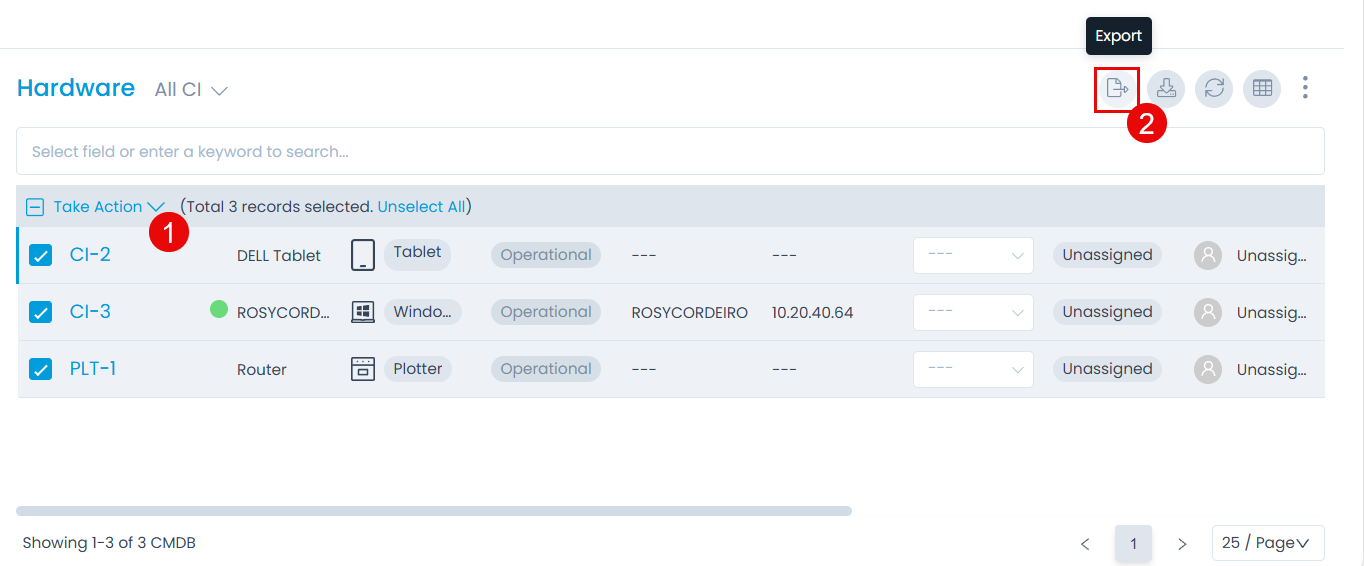
Export CIs
You can export the details of any CI in CSV and Excel format.
To do so,
- Select the desired CIs to be exported.
- Click the Export button and a popup appears. If no CI is selected, all the added CI details would be included.
- Select the format as CSV or Excel.
- If Excel is selected, you can enable the Password Protected option to secure the file. If enabled enter the Attachment Password. If not provided, the common password set from Edit User Profile page will be used.
- Select the desired fields to be included in the file.
- Click Export and the link to download the file is sent via an email.

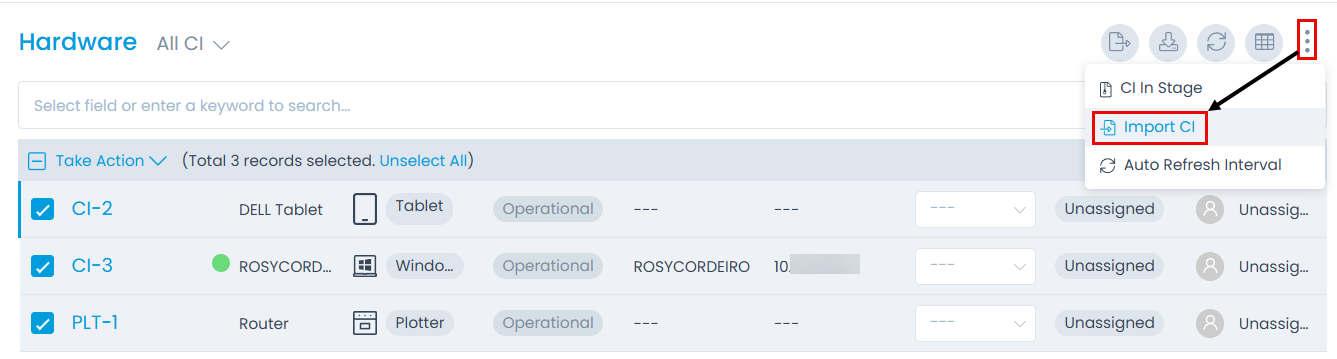
Import CIs
This option allows you to import the CIs in bulk. To do so,
- Click the vertical three dots and select the Import CI option. The CI Batches page appears.
- Click the Import Batch button.
- Select the Import File Type as CSV or Excel that you want to import.
- Select the CI Type (default: Base CI) and Date Format.
- Select the file using the Select CSV/Excel button if you already have it filled with the respective fields. If not, select the new .csv/excel file using Click Here and fill the respective details. Once the file is uploaded, click Next.
- The Name and CI Type are the mandatory fields for importing the CI list.
- It is recommended to take the backup of the existing CI list before proceeding with the import.
- If any fields in the import file are left blank for existing CIs, those fields will be cleared out.
- To prevent updating fields that do not need changes, it is recommended to remove those optional fields from the import file before importing.
- If any fields with configured default values are left blank in the import sheet, the system will automatically apply the default values when the record is created.
- During CI import, the update or creation of a CI depends on the Name field—if the Name matches an existing record, the CI is updated; if it differs, a new CI is created based on the selected CI type.

- Map the fields as per the requirement. By default it is mapped, only in case of removal/change of some parameters mapping is necessary, and click Save Batch.

- The CI Batches page appears. It displays the status of the import along with the details like processing time, total records, success records, failed records, etc. as shown below. Once successful, the imported CIs will appear on the CI list page.

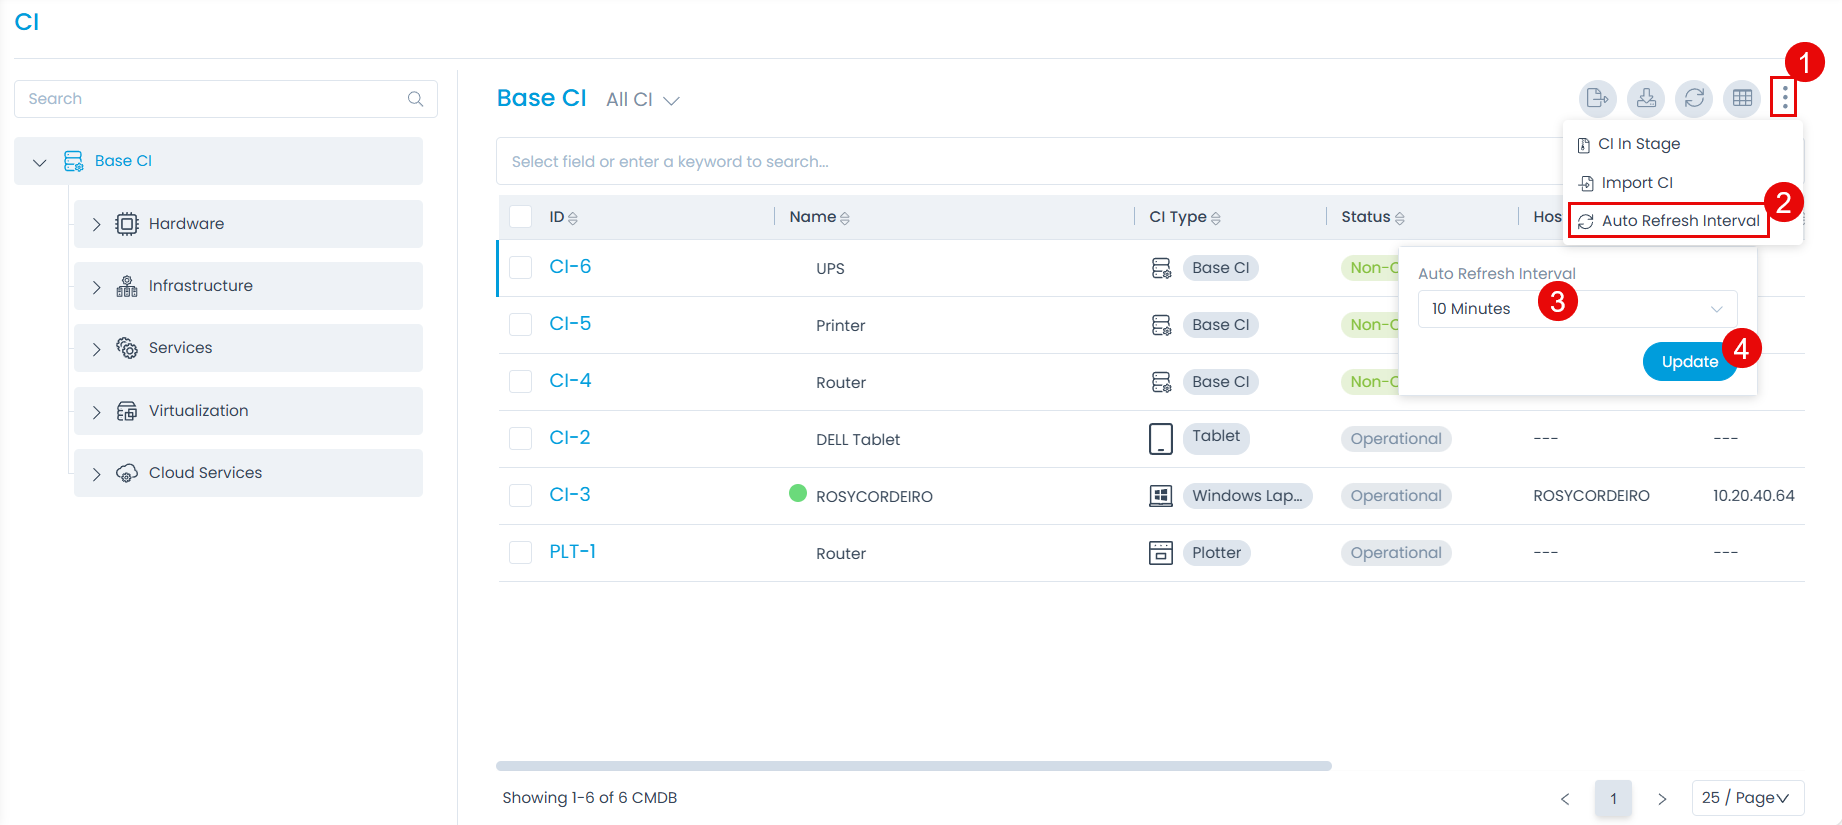
Auto Refresh Interval
Apart from the manual refresh, you can set the time interval, after which the Technician Portal page will get refreshed automatically. Thus, you don't need to click the refresh button repeatedly. It applies to the Request, Problem, Change, Release, Asset (Hardware, Software, Non-IT, Consumable), CI, and My Task modules. Once selected, set the time interval after which the page will get refreshed everytime, and click Update. The timer will be visible on the screen.
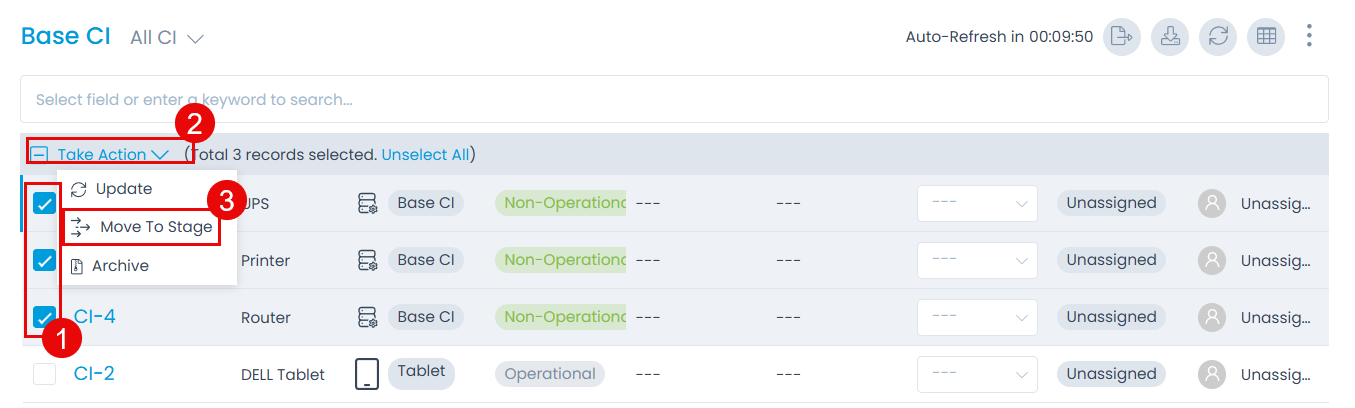
Bulk Operations
With bulk operations, you can manage multiple CIs together. To do so, select the CI/s (1), click Take Action dropdown (2), and a list of actions appears (3).

Update
This option helps you to make changes to any of the field associated with the CI directly. If you want to update the same field for multiple CIs,
- Select the desired CIs.
- Click on the Take Action dropdown.
- Select the Update option. A popup appears. It displays all the common fields that can be updated in one go.
- Edit the required fields.
- Click Update.


Move to Stage
This option helps to move the unwanted or unused CIs to the stage so they will not be visible anymore in the list. To do so,
- Select the desired CIs.
- Click the Take Action dropdown.
- Select the option Move To Stage. A confirmation message appears. Click Yes to continue or No to discard the action.
- If Yes is clicked, the CI moves to the stage as shown in the below figure.

Later, the CIs in stage can be moved back to CMDB (Central Database) by selecting the required CIs and clicking the Add to CMDB button as shown below.

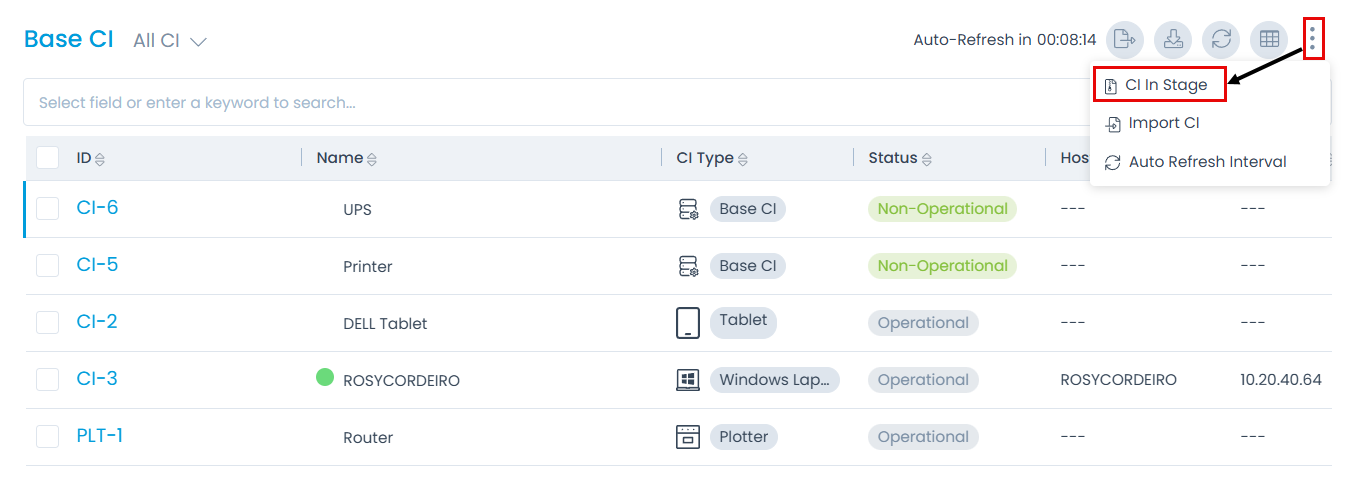
Once added, the CIs will be available in the list. Multiple CI selection is also possible using bulk actions. You can also view the CIs in stage, by clicking the vertical three dots and selecting the CI In Stage option as shown below.
Sync Warranty
This option enables to fetch the updated warranty details of the selected assets. This option is available only for Hardware CIs.
To do so,
- Select the desired Hardware type of CIs.
- Click the Take Action dropdown.
- Select the option Sync Warranty. A dialog box appears. Select the desired Warranty Sync configuration and click Yes to begin the process.


Archive
This option allows you to archive the CIs that are not in use or not required anymore.
To archive the CI,
- Select the required CIs.
- Click the Take Action dropdown.

- Select Archive and a confirmation message will appear. Click Yes to continue and the selected CIs will move from the CI list page to the archive list. You can also click "No" to cancel the process if required.
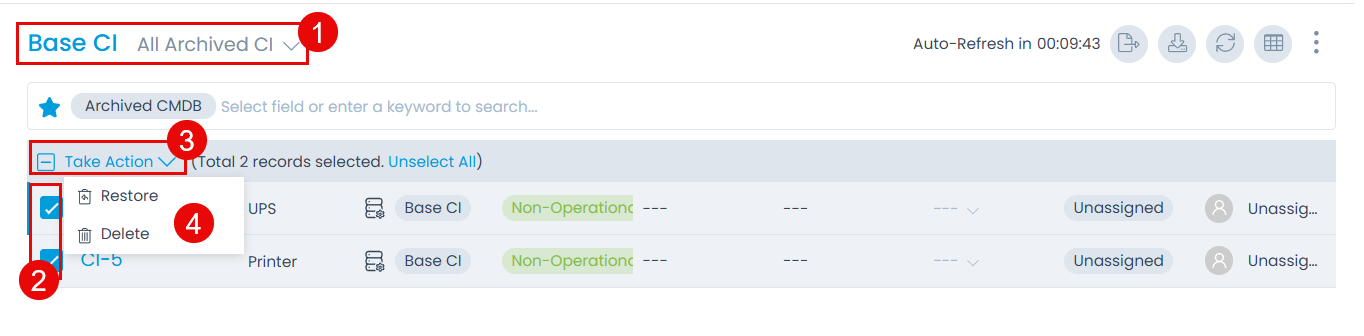
Restore and Delete
This option allows you to restore and delete the archived CIs in one go. All the archived CIs can be seen using the predefined filters available and restored or deleted too if no longer required.
To restore or delete the CIs,
- Search for the archived CIs using the predefined filter All Archived {CI Type} CI.
- Select the required CIs.
- Click the Take Action dropdown.
- Select Restore and the selected CIs will move from the Archive list to the CI list. Also, if required you can delete the archived CIs from here using the Delete option. Once restored the relations, tasks, and linked events associated with the CI will also be restored.