7.7. Working on a Contract
Once a Technician decides to work on a Contract, he heads to the Details View of the Contract. There he/she uses the product features and capabilities to manage the Contract.
7.7.1. Contract Details View
The Contract Details view organizes and manages all information related to a Contract. Each Contract has its own Details View having features that Technicians use to resolve a Contract.
To open Contract Details View:
Go to Contract List View.
Click on the Contract (name) of which you want to see the Details View. It doesn’t matter whether you are in Grid or Table View.
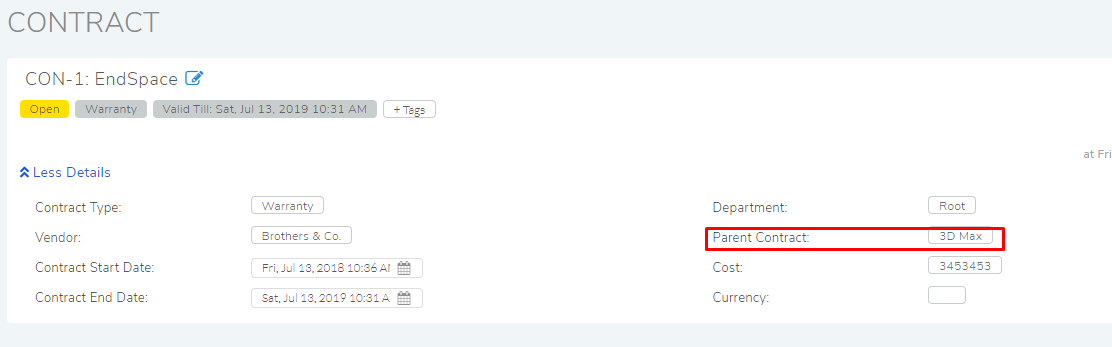
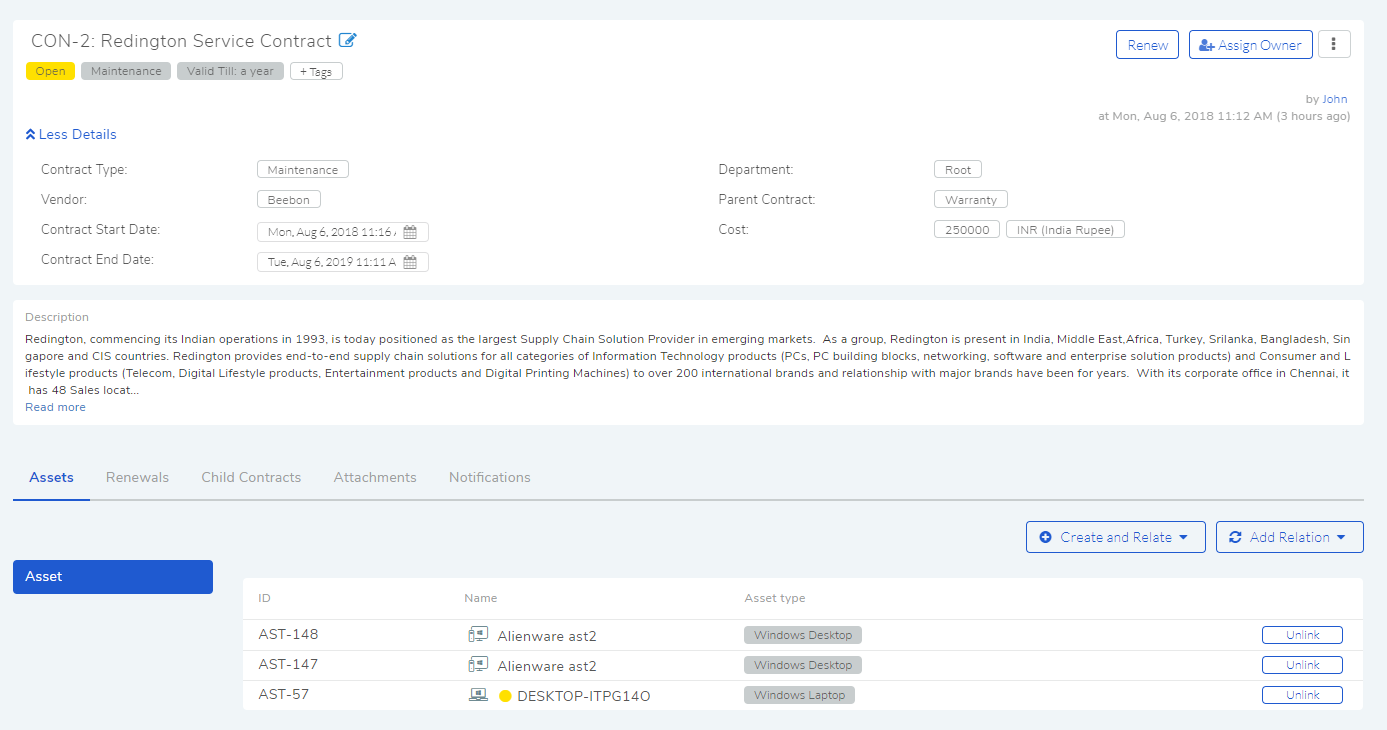
The Details View opens with the following fields:
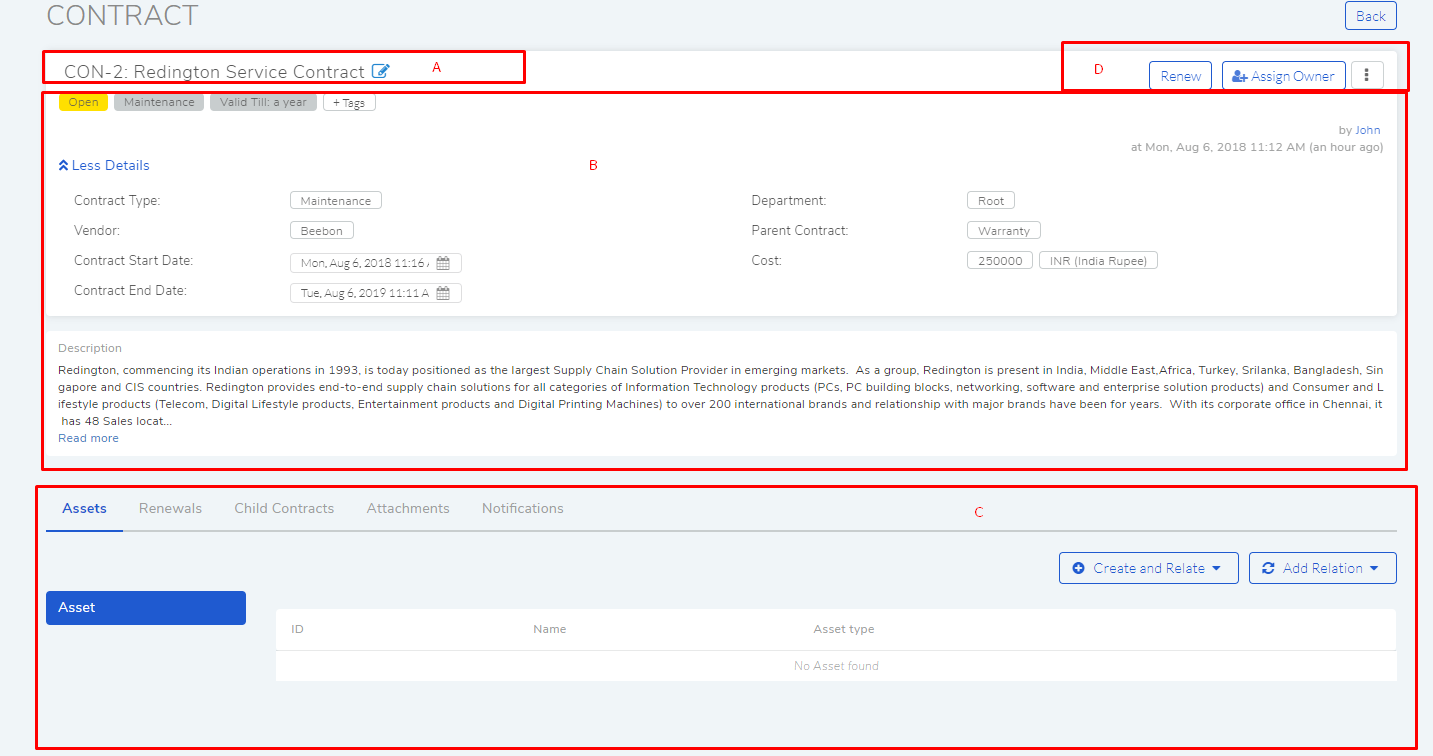
Section A is where you view the ID and Name of the Contract. Here you get the option to edit the Name and Description of the Contract. Related topic: modify contract name and description.
Section B is where you classify a contract.
In section C, you get six tabs and the following options under them:
Contract Renewal
Child Contract
custom contract Field (visible when there are custom fields)
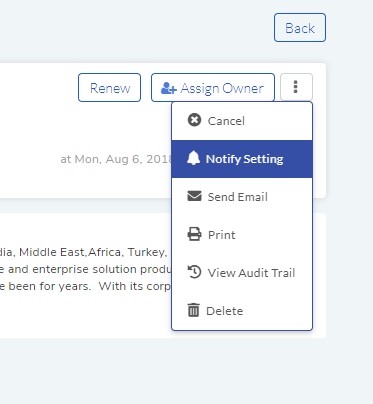
Section D houses the Renew Contract Option, Assign Owner option and Action Menu. In the Action Menu we have the following options:
Notify Settings
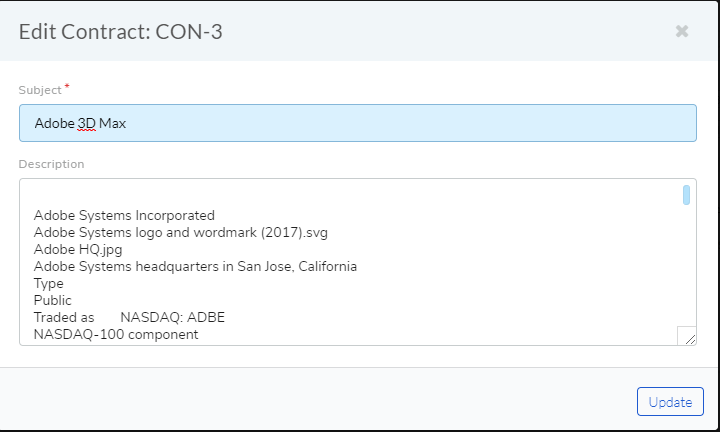
7.7.2. Modify Contract Name and Description
The Contract module allows you to change the Name and Description of a Contract from its contract details view.
To Change the Name and Description:
In the Details View of a Contract, click on the edit icon in section A of
con-18.A dialog opens where you can edit the Name and Description of the Contract.
7.7.3. Classify a Contract
There are many avenues to classify a Contract. You can manage all the classifications from the contract details view. The system allows the following categories for classification:
Status
Contract Type.
Vendor info.
Duration of the Contract (Start and End date).
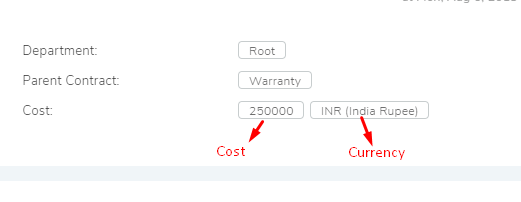
Department
Parent Contract
Cost and Currency
7.7.3.1. Status
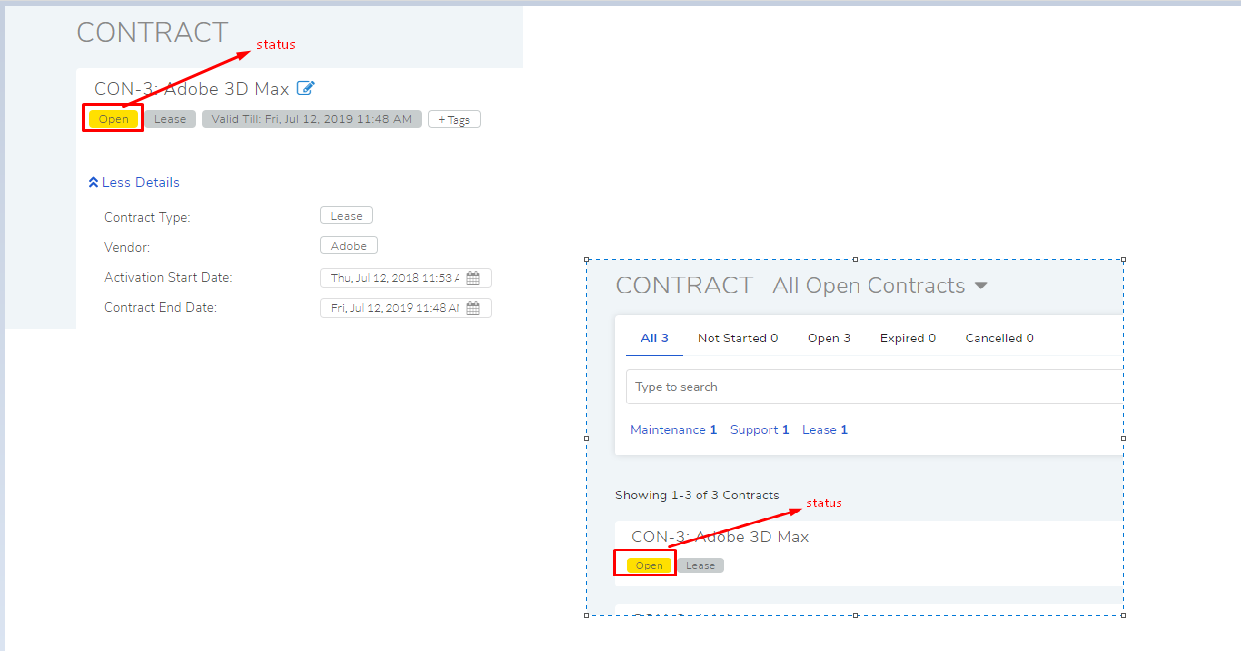
Status shows the life-cycle of the Contract. There are four statuses, and they are set automatically by the system. The statuses are as follows:
Not Started: Contracts that are yet reach their start date show this status.
Open: Active Contracts show this status.
Expired: Contracts that have reached or crossed their End date show this status.
Cancelled: As the name suggests, cancelled Contracts show this status.
Note
You cannot change Status manually.
7.7.3.2. Contract Type
A Contract Type shows the nature of relationship between two or more parties. Every Contract has a type, and we give four types out of the box. You can add more types (Learn how to add more Contract Type). Following are the pre-defined types:
Lease: A lease is a contractual arrangement calling for the lessee to pay the lessor for use of an asset. Property, buildings and vehicles are common assets that are leased. Industrial or business equipment is also leased (wikipedia).
Warranty: In contract law, a warranty has various meanings but generally means a guarantee or promise which provides assurance by one party to the other party that specific facts or conditions are true or will happen (wikipedia).
Support: A contractual obligation to provide support in the form of troubleshooting, maintenance, and Repair.
Maintenance: An agreement between parties covering the maintenance of an Asset/Assets over a specified period of time.
7.7.3.3. Vendor
A Vendor is an entity that offers something for sale. A Contract generally defines the terms and conditions between a buyer and seller (Vendor). While adding a Contract you can directly associate a Vendor from the system Vendor list or add it later. Learn how to add a Vendor.
7.7.3.4. Duration
A Contract is valid for a defined period. You can show the validity of a Contract using the Start and End fields (input: date and time) in the Details View of a Contract.

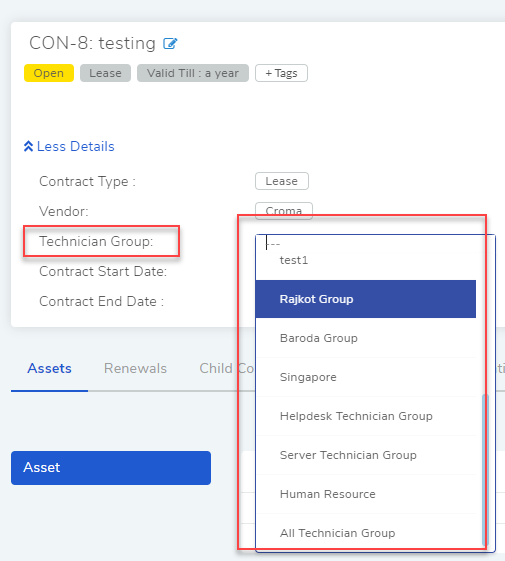
7.7.3.5. Technician Group
Attach the technician group to some of the important contracts to limited users. By associating Technician Group with contract, visibility of that particular contract can be restricted to a particular group of users. Other users that are not in that technician group will not be able to view/search such contracts.
7.7.3.6. Department
You can associate a Department with a Contract from the system Department list. Learn how to add Departments.
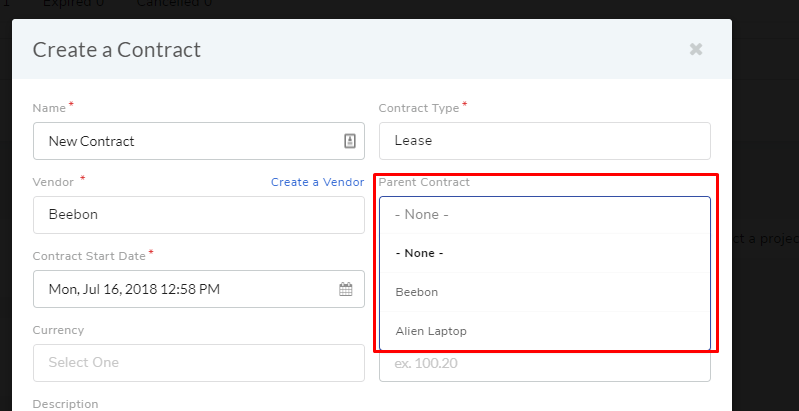
7.7.3.7. Parent Contract
A Contract can be a child of another Contract, also referred to as sub-contract. This field shows the name of the primary Contract as a parent.
Note
An assigned owner can set this field.
7.7.3.8. Cost and Currency
You can record the associated cost with a Contract in the Details View. The cost can be recorded in a particular currency; you can access the system currency list from the field. Learn how to add a Adding a Currency.
7.7.4. Associate Assets
A Contract is generally created around an Asset/Assets, and it defines the obligation of the seller and duties of the buyer. A Contract can have relationship with an Asset/Assets;
You can link an Asset/Assets with a Contract is the following way:
Go to the contract details view of a Contract.
You can find all existing association under the Assets tab. Here you have two options: create a new Asset and Relate (Create and Relate), and relate a existing Asset (Add Relation) in the CMDB.
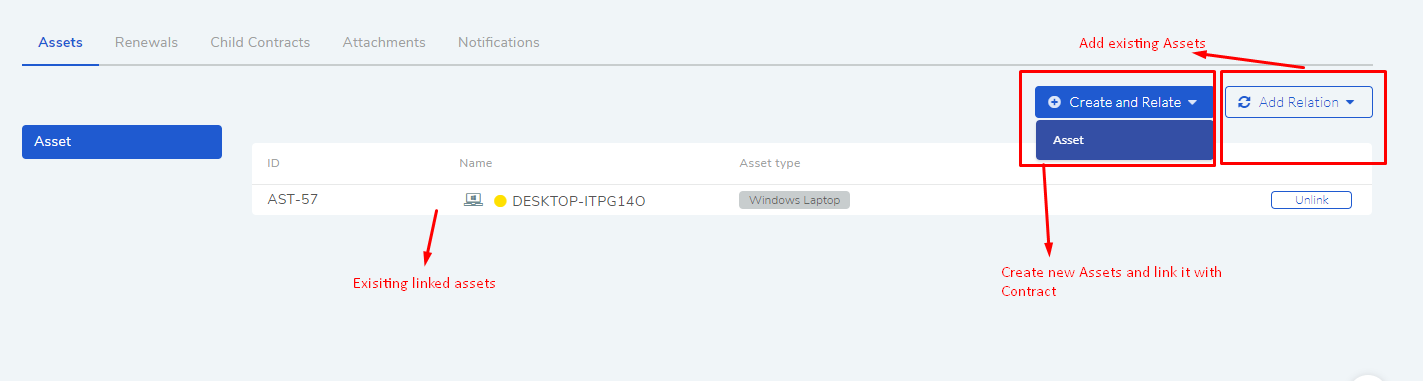
Clicking on Click and Relate >> Asset opens the Add Asset dialog box (Learn More). Use this option when the associated Asset/Assets is/are not in the CMDB.
Clicking on Add Relation >> Asset opens the Create a Relationship with Asset dialog box, where you can search and associate multiple Assets.
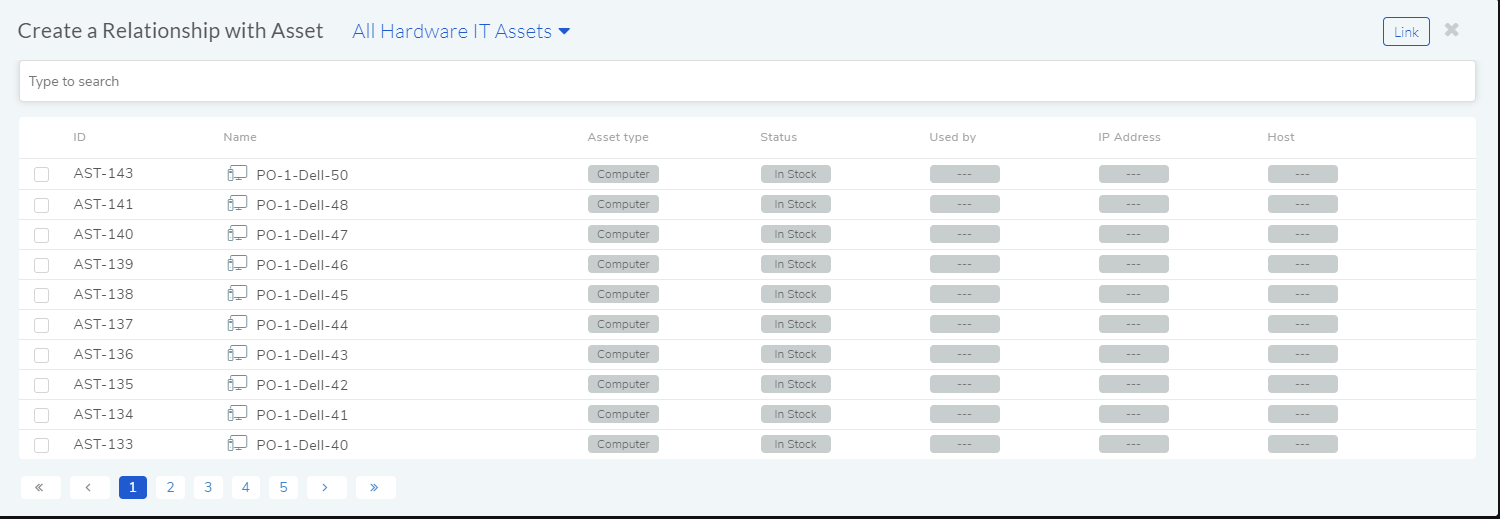
You can add the following class of Assets:
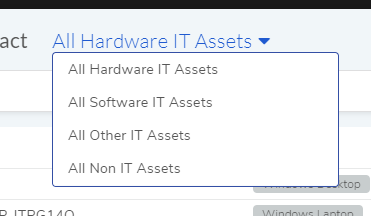
Based on the selected Asset class, the list area is populated.
The search bar supports the Advance Search feature where you can use search options and keywords to create a filter. Learn how to use the search bar.
Once you are done selecting the Asset/Assets, click on Associate.
7.7.5. Contract Renewal
A Contract is time bound; it has a start date and end date. A Technician can extend this period by reissuing the Contract (with different date and time) which is termed as Renewal. When a Contract is Renewed, the following behavior can be noticed:
A duplicate Contract is created with a different start and end time with the keyword Renewed Contract.
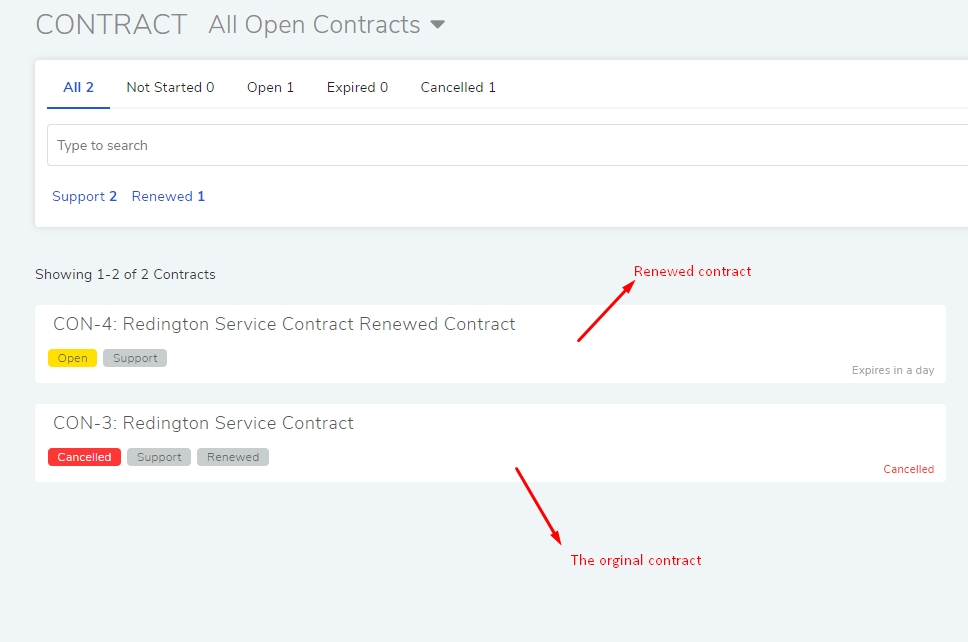
When the renewed contract starts the original contract gets cancelled.
7.7.5.1. Renewal date and time conditions
The below table shows the conditions that you need to keep in mind when setting the date and time of a Contract renewal.
Start Date&Time |
End Date&Time |
|
Original Contract |
13/07/2018/6:00 PM |
13/07/2019/6:00 PM |
Renewed Contract |
The start date&time cannot be less than start date&time of the original contract. If condition is not meet, then the original contract is cancelled. |
The end date&time cannot be less than the end date&time of the original Contract. |
7.7.5.2. Creating a Renewal
Note
A Contract can have only one renewal (A renewed contract can also be renewed). Only the assigned Technician of a Contract can initiate a renewal.
Acme Inc has purchased Alienware laptops from Vendor Beebon Inc. Beebon Inc is contractually obligated to provide service to Acme Inc. Acme Inc has a Service Contract with Beebon that is going to expire after a year. Acme Inc decides to renew the Contract and extend it for another year.
The assigned Technician of the Contract has to update the Contract. Now he has to create a renewal.
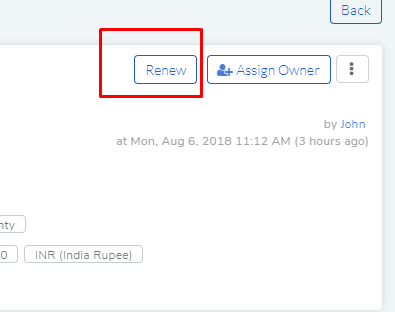
He goes to the contract details view of the Contract.
He clicks on Renew.
A dialog box opens where he gets the following fields:
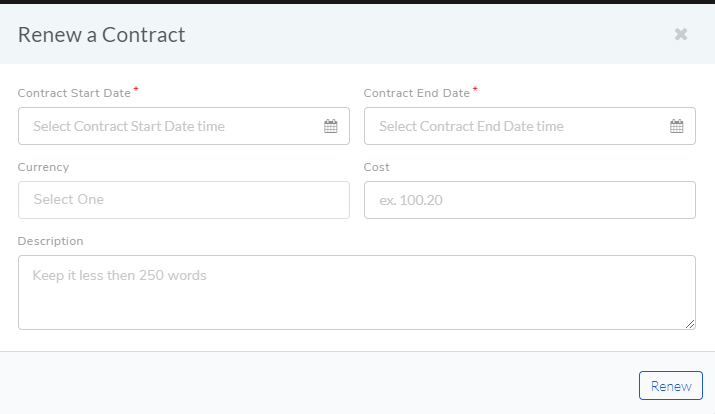
Contract Start and End date&time: The time period of the new Contract.
Currency and Cost: Currency selection from the system currency list (Learn how to add currency) and the total cost of the renewal.
Description: Details of the renewal if any.
He fills the details of the new Contract and clicks on Renew. The start and end time of the Contract is set considering the Renewal date and time conditions.
The new Contract will start after the expiry of the current active Contract. When the new Contract starts, the old Contract will get cancelled and the Renewed status will change to Yes. The Renewed Contract is visible under the Renewals tab.

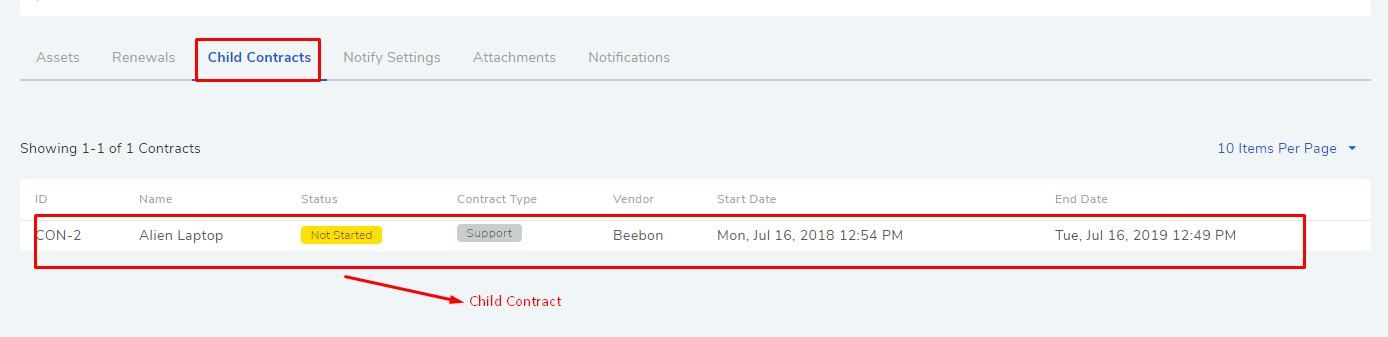
7.7.6. Child Contract
A Contract can have multiple sub-contracts. In the product, a sub-contract is referred to as a Child Contract. A sub-contract is a contract between a party to an original contract and a third party. An original Contract is referred to as a Parent Contract.
The relationship between a Parent Contract and its children can be defined as follows:
There’s a direct relationship between a Parent and its children with regards to expiry and cancellation.
When a Parent Contract expires, all its child Contracts also expire.
When a Parent Contract is cancelled, all its child Contracts are also get cancelled.
To add a Child Contract
While creating a Contract, you get the option to select a Parent Contract. If you select a Parent Contract, then the Contract that you are creating becomes a Child Contract. You can view all Child Contracts of a Parent Contract under the Child Contracts tab on the Details View.
7.7.7. Notifications
The Contract module has pre-defined Notifications and also the option to send custom Notification. Currently, there are four pre-defined Notifications out of the box. They are as follows:
You will find the pre-defined Notifications in Admin (A Navigation tab) >> Email Notifications (under Automation) >> under Contract.
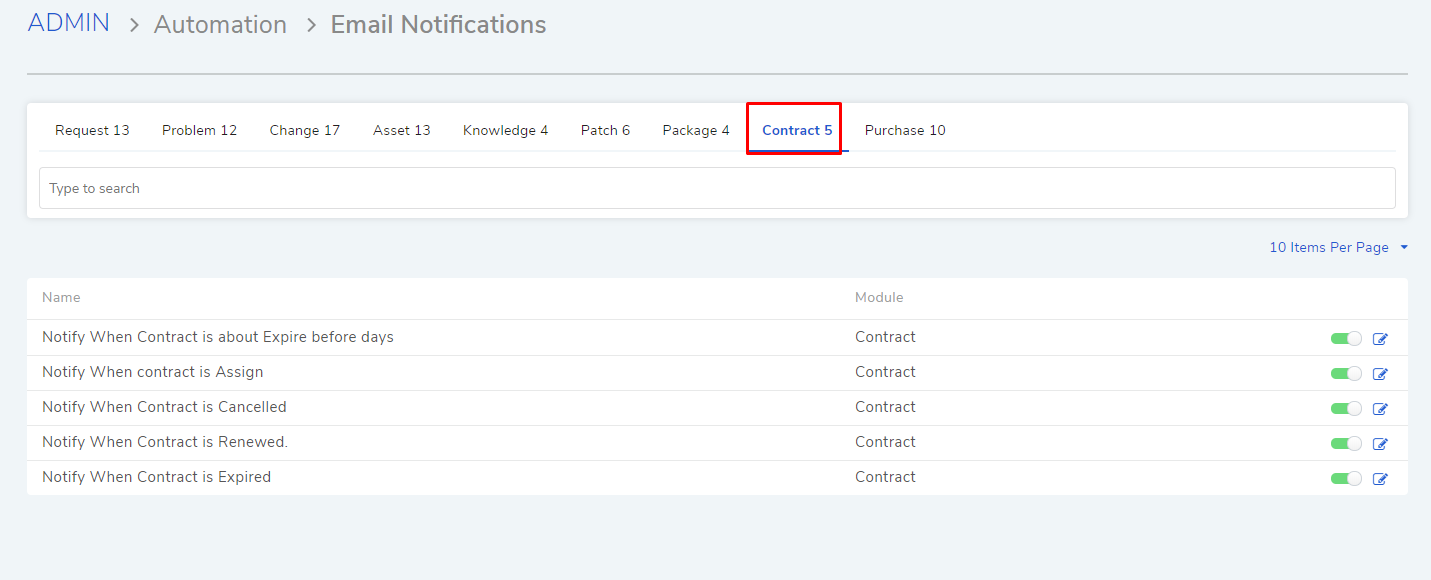
Notify When Contract is Cancelled |
The assigned Technician gets an email notification when a Contract is Cancelled. |
Notify When Contract is Renewed. |
The assigned Technician gets an email notification when a Contract is Renewed. |
Notify When Contract is about Expire before days. |
Notify a select set of people by an email about the expiry of a Contract before a set number of days. The recipients are added from the Notify Settings in the Details View of a Contract. |
Notify When Contract is Expired |
The assigned Technician gets an email notification when a Contract expires. |
Notify when Contract is Assigned |
An email notification is sent to a Technician when a contract is assigned to him. |
7.7.7.1. Notify Settings
A Technician can add recipients to a Contract who will receive an email notification telling them that the Contract is going to expire after a certain number of days. The Technician can control who receives the email and the number of days before (the email is sent) expiry.
To Configure Notify Settings:
Go to the Contract Details View of the Contract of which you want to configure Notify Settings.
Click on Notify Settings from the Action Menu.
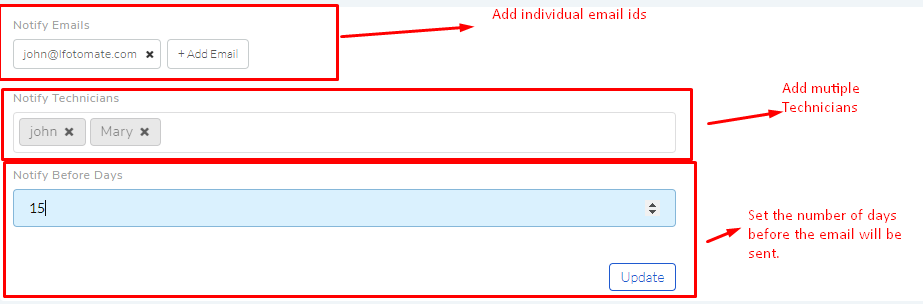
When you are done Configuring, hit Update to save your settings.
7.7.7.2. Custom Notification
A Technician can generate a notification instantaneously from the Contract Details View of a Contract. He can add multiple recipients and add a custom message body.
To send a custom notification:
Go to the Contract Details View of a Contract.
Select Send Email from the Action Menu.

A dialog box opens where you can create a custom notification.
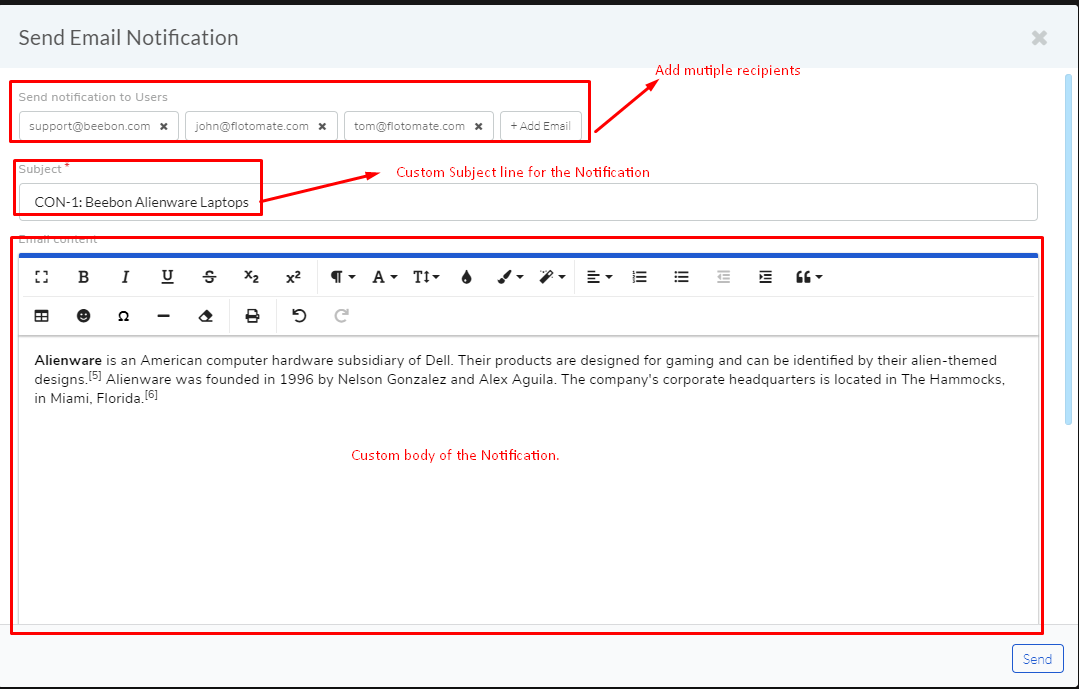
When you are done creating a custom notification, hit send.
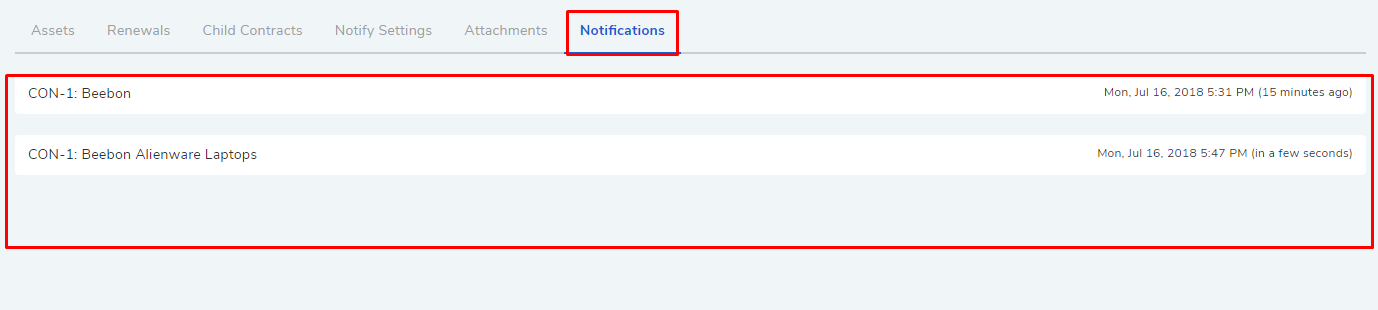
Note
You can view all sent Custom Notifications under the Notifications tab.
7.7.8. Attachments
A Technician can add Attachments to a Contract. A Contract can have multiple Attachments. To add a Attachment:
Go to the Contract Details View of a Contract.
You will find all existing Attachments under the Attachments tab. Click on Add an Attachment.

A dialog box opens where you have to add a name and description, and attach a file.
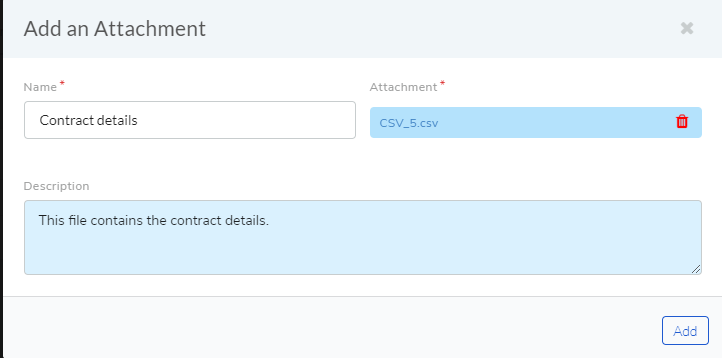
Click on Add when you are done. The attached file will be added to the Contract.