11.8. Setting up Asset Management
Users can go beyond the basic categorization by defining the identity of each Asset. By identity, we mean product information that can be used for identification. You can add this information in the form of Asset Type, Status, Product Type, Manufacturer details, Warranty information and Vendor details.
11.8.1. Custom Asset Types
We have introduced the concept of Asset Type Hierarchy to make cataloging of Assets simple. It is a predefined catalog of Asset Types, which serves the purpose of giving you a generic umbrella term for every Asset in the CMDB.
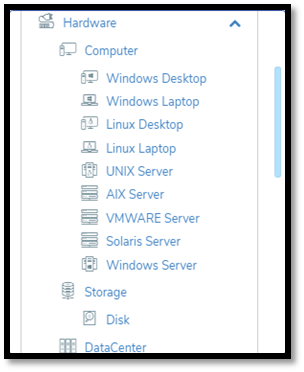
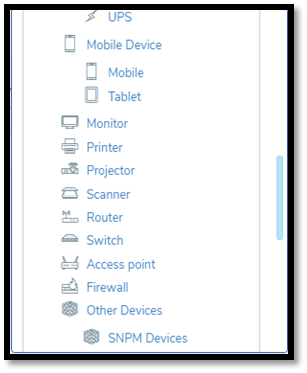
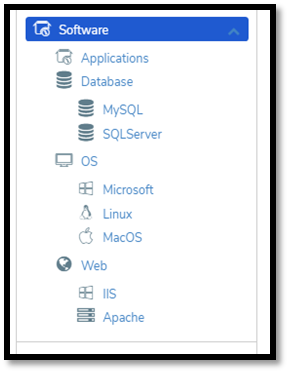
Motadata allows you to add custom Asset Sub-Types in the Asset Type Hierarchy. You can create sub-types up to two levels.
To add an Asset Type:
Go to Admin (A Navigation Tab) >> Asset Types (Asset Management).
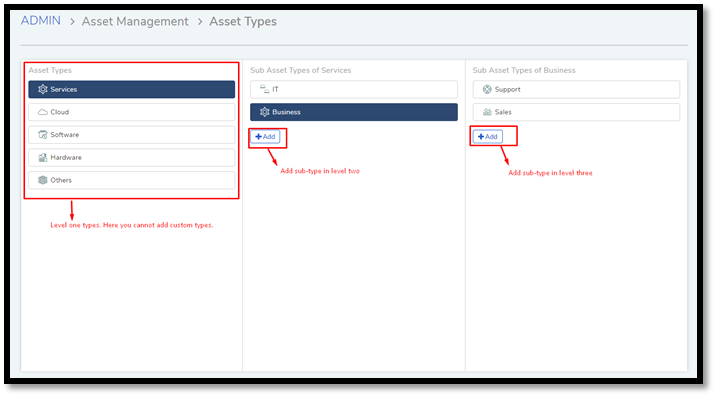
The Asset Types page opens. Here you can add your sub-types in level two and three using the Add button.
Editing/Deleting Custom Types
Go to Admin >. Asset Types.
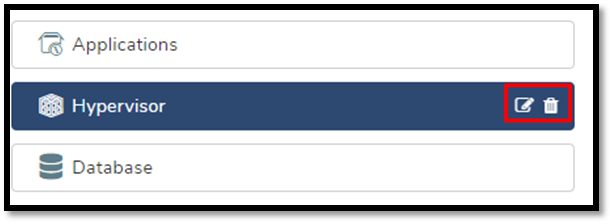
You can change the name of any custom type using the Edit Icon or delete any type using the Delete Icon.
11.8.2. Asset Status
Every Asset in the CMDB has a life-cycle which we can highlight using statuses. A status shows the stage at which an Asset is in its life-cycle. We provide pre-defined statuses, and you can add more statuses.
Currently, the system has five predefined statuses out of which three are immutable, they are:
In Use
Missing
Retired
11.8.2.1. Adding a Custom Status
Go to Admin (A Navigation tab) >> Asset Custom Types (Asset Management).
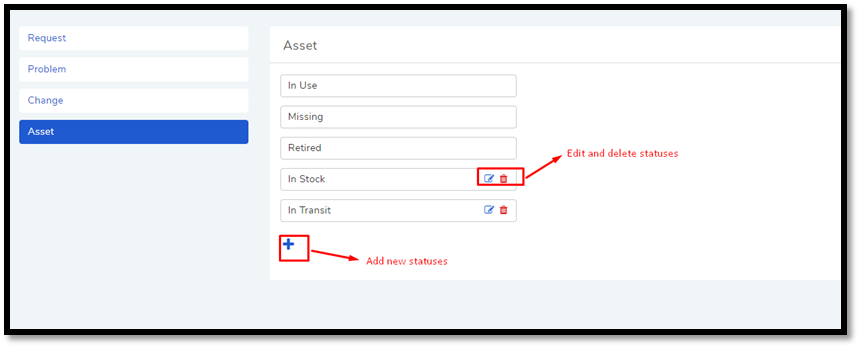
The Custom Status page opens. Add your statuses using the plus icon.
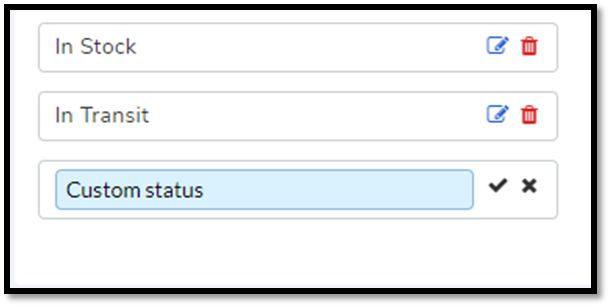
Editing/Deleting Statuses
You can edit/delete any status with the Edit/Delete Icon. You can also rearrange them by drag and drop.
11.8.3. Product
Every CI (Configuration Item) in the CMDB is an instance of a Product. For example; a Windows workstation could be an instance of a Product called HP Desktop JP78. A single Product can have multiple instances in the CMDB.
Asset Management allows you to maintain a catalog of products. You can maintain information about the vendor and manufacturer in each product.
To add a new Product:
Note
The add form supports Product Custom Field
Go to Asset (A Navigation Tab) >> Product Catalog.
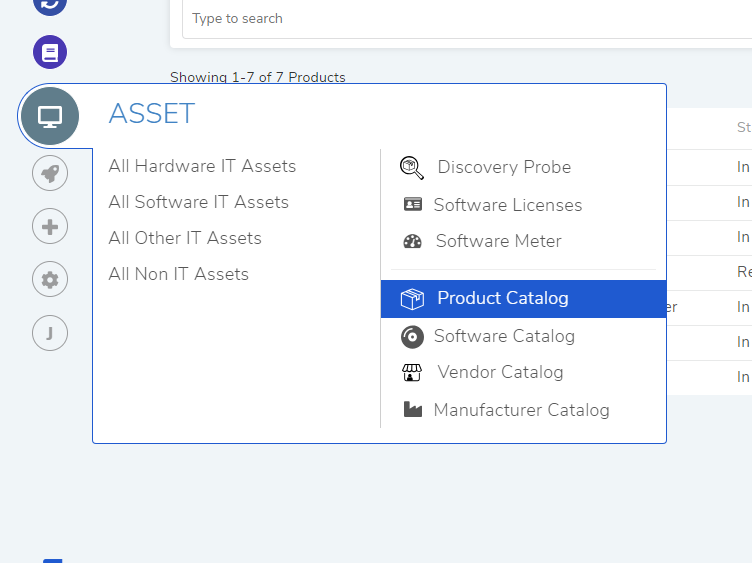
The Product Catalog page opens. Here you can view all the available products in the system.
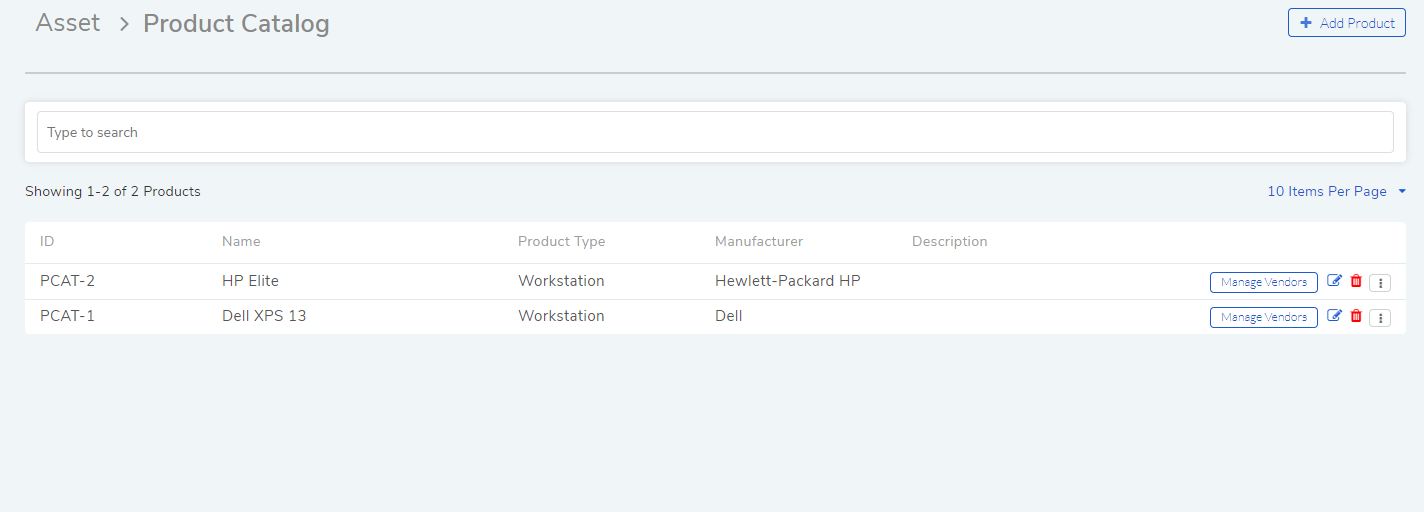
Click on Add Product situated in the top right corner of the page.
The Add Product dialog box opens. You have to type in the following details of a product:
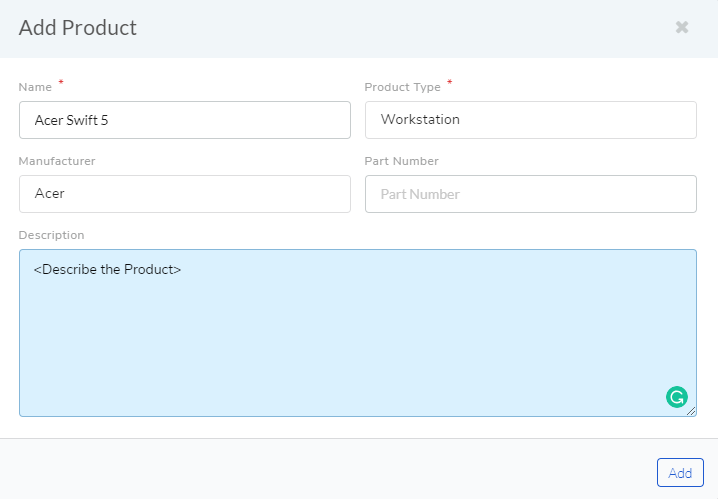
Name: Acer Swift 5 is the name of a printer.
Product Type: Workstation is the Product Type for Acer Swift 5. This field has a drop-down list. If you do not see the correct Product Type, then you have to add it. Learn how to add a Product Type.
Manufacturer: This field has a drop-down list. If you do not see the correct Manufacturer name, then you have to add it. Learn how to add a Manufacturer.
Part Number: A part number is a identifier; if you have one, add it here.
Description: A short description of the Product.
Click on Add and your Product is added to the Products page.
11.8.3.1. Searching Products
You can search for a Product using the search bar on the Product Catalog page. The search bar has the search option type that allows you to search based on Product Type.
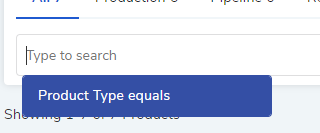
Clicking on the Product Type option opens another drop-down list where you have to make a selection. The Product list is filtered based on the selections that you make.

You can create multiple conditions using the available options. You can also search using keywords. Just type in a keyword and hit enter. You can use both keywords and search options.
11.8.3.2. Configure Depreciation
An Asset, in the CMDB, is an instance of a Product. An Asset can inherit certain properties from its associated Product. One such property is Depreciation.
A user can add Depreciation criteria to a Product, which allows a Hardware/Non-IT Asset (associated with the product) to populate its Depreciation details under Financial. If the Purchase Cost is there, then the Asset details automatically shows the monthly and annual Depreciation.
To add Depreciation:
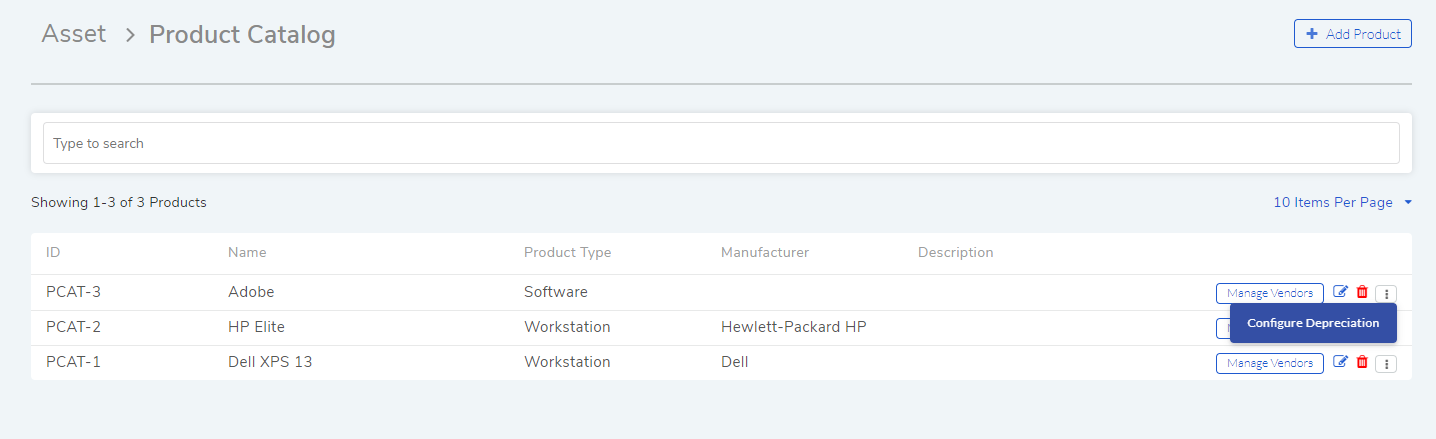
Go to Asset (A Navigation Tab) >> Product Catalog.
Select Configure Depreciation from the Action Menu of a Product.
The Depreciation Configurations dialog box opens where you have to input the following:
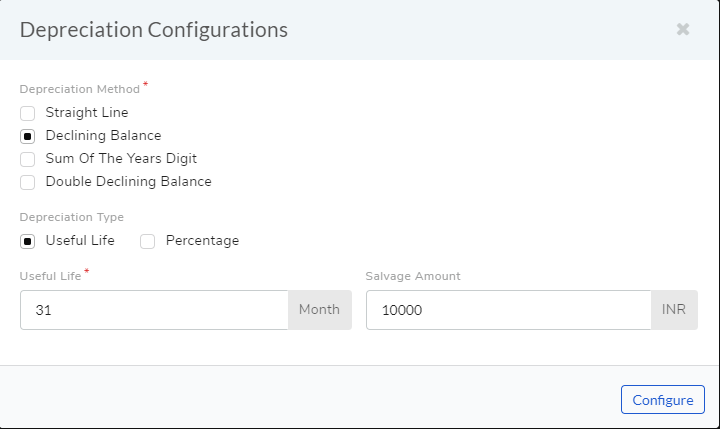
Depreciation Method: Currently we support four Depreciation methods.
Rate of Depreciation.
Useful life of the Asset.
Salvage Value of the Asset.
Depending on the method selected, you have to provide the parameters. Lean more about Depreciation
When done, click on Configure. Now associated Hardware/Non-IT Assets can use the Depreciation config.
Editing/Deleting a Product
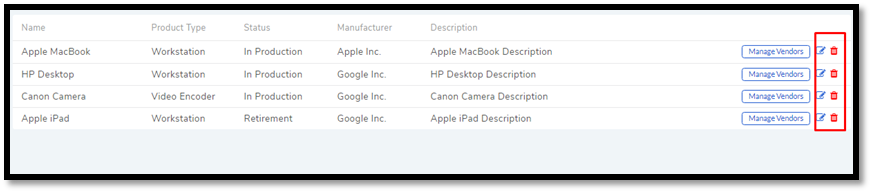
To Edit a Product:
Go to Asset (A Navigation Tab) >> Product Catalog.
The Products page opens. Clicking on the Edit Icon adjacent to a Product opens the Edit Product dialog box.
Performs the edits and hit Update.
To Delete a Product:
In the Product Catalog page, click on the Delete Icon adjacent to the Product that you want to delete. On confirming the Product is deleted.
11.8.4. Vendor
A Vendor is a person or an organization that sales the Products. You can maintain a list of Vendors in Motadata that you can associate with each Asset and Product.
To add a Vendor:
Note
The add form supports Vendor Custom Field
Go to Asset (A Navigation Tab) >> Vendors Catalog.
- The Vendor Catalog page opens. Here you can view all the available
Vendors in the system.
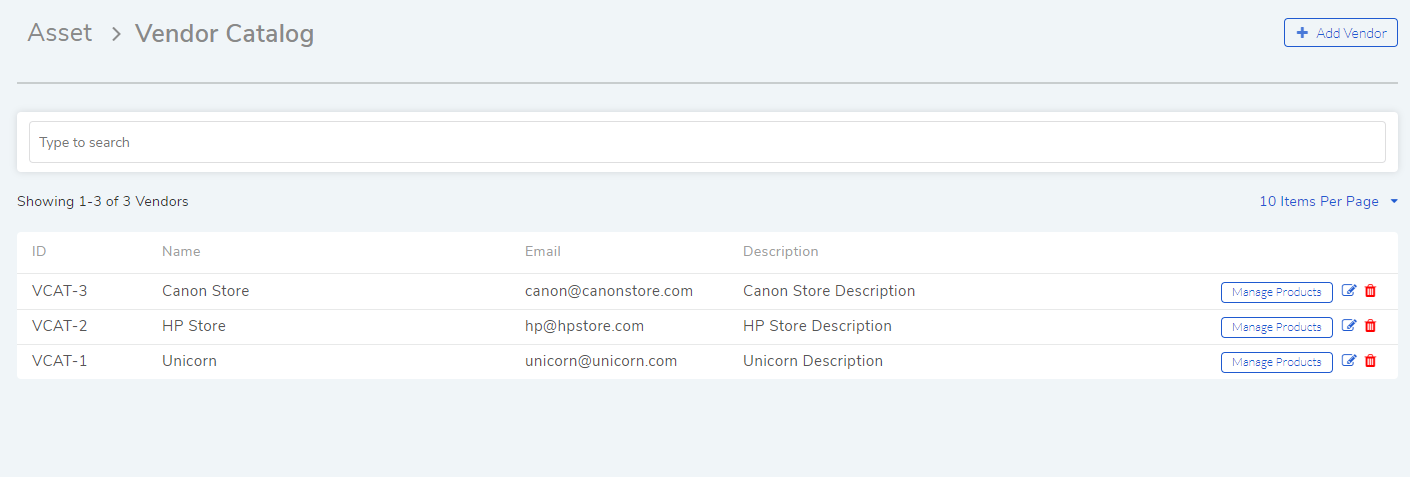
Click on Add Vendor situated in the top right corner of the page.
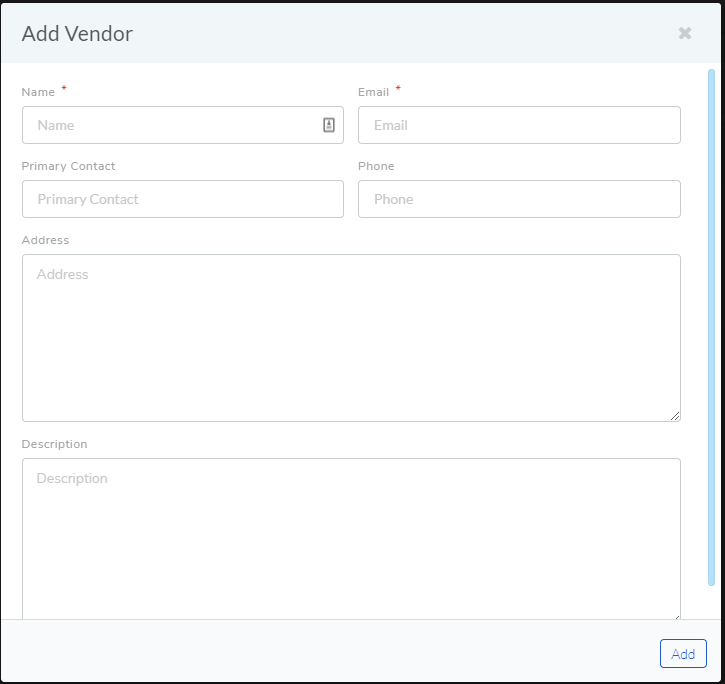
- The Add Vendor dialog box opens. Fill in the contact details of the
Vendor and hit Save. The Vendor is added to the Vendor Catalog page.

To Edit a Vendor:
Go to Asset (A Navigation Tab) >> Vendor Catalog.
The Vendor Catalog page opens. Clicking on the Edit Icon adjacent to a Vendor opens the Edit Vendor dialog box. Performs the edits and hit Update.
To Delete a Vendor:
In the Vendor Catalog page, click on the Delete Icon adjacent to the Vendor that you want to delete. On confirming the Vendor gets deleted.
11.8.5. Managing Vendors in a Product
You can link a Product listed on the Product Catalog page to a Vendor listed on the Vendor Catalog page and Vice-Versa.
11.8.5.1. Linking a Vendor
Note
You need to first add a Product before linking any vendor.
Go to Asset (A Navigation Tab) >> Product Catalog.
In Product Catalog page, click on Manage Vendors adjacent to the Product that you want to link.
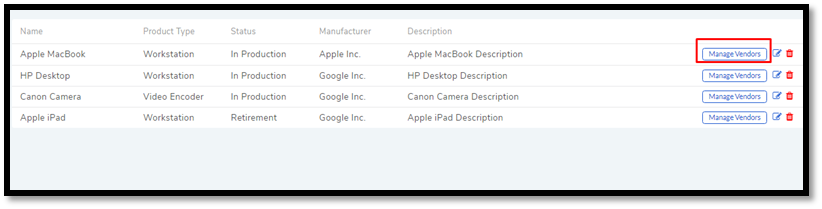
The Manage Vendors page opens. In this page, you can view all the Vendors linked to the Product. A Vendor can be added only once. Click on Link Vendor situated in the top right corner.
The Add Product Vendor dialog box opens. Fill in the Vendor and transaction details.
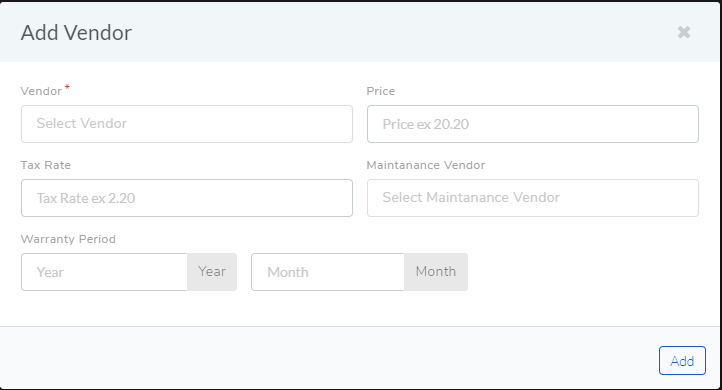
You can add a Vendor from the Vendor Catalog in the Vendor field (amf-73).
After filling in the details, click save to link the Vendor to the
Product. Learn how to add a Vendor.
11.8.5.2. Editing/De-linking a Vendor
You can easily edit & de-link a Vendor from a Product by following the below mentioned steps:
To edit Vendor Info of a Product:
Go to Asset >> Products Catalog and then to the Manage Vendors page of the Product that you want to edit.
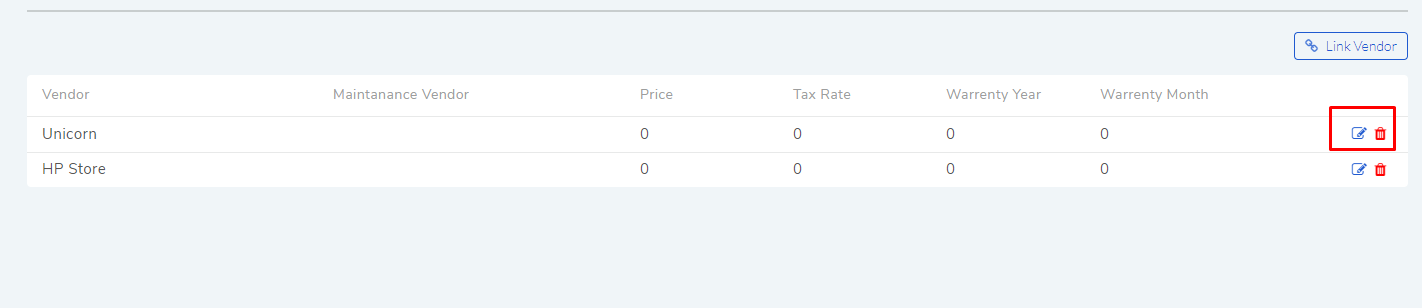
Clicking on the Edit Icon opens the Edit Product Vendor dialog box. Performs the edits and hit Update.
To Delink a Vendor:
In the Manage Vendors page, click on the Delete Icon adjacent to the Vendor that you want to delink. On confirming the Vendor is delinked from the Product.
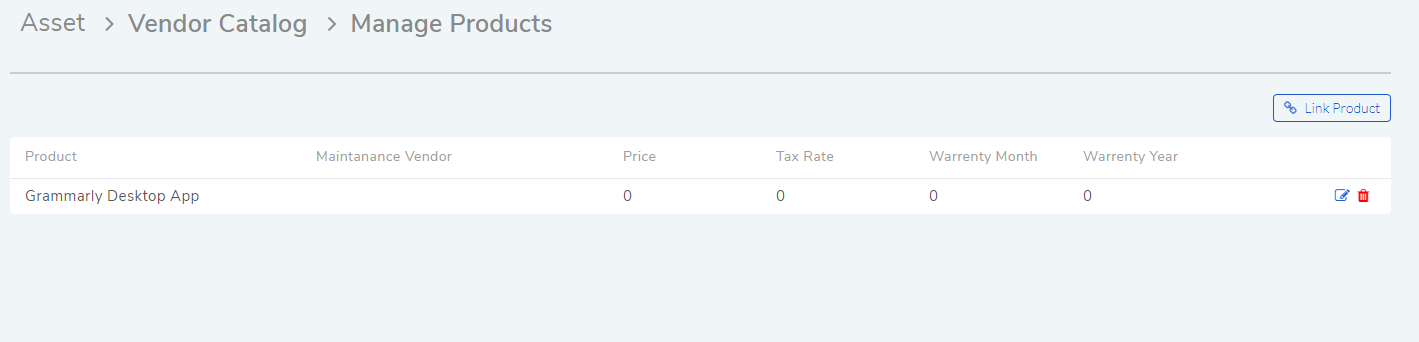
11.8.6. Managing Products in a Vendor
All Products have a Vendor associated with them. You can link a Product with a Vendor from the Vendor Catalog page and Vice-Versa.
11.8.6.1. Linking a Product
Note
You need to first add a Product before linking any vendor.
Go to Asset (A Navigation Tab) >> Vendor Catalog.
In Vendor Catalog page, click on Manage Products adjacent to the Vendor that you want to link.
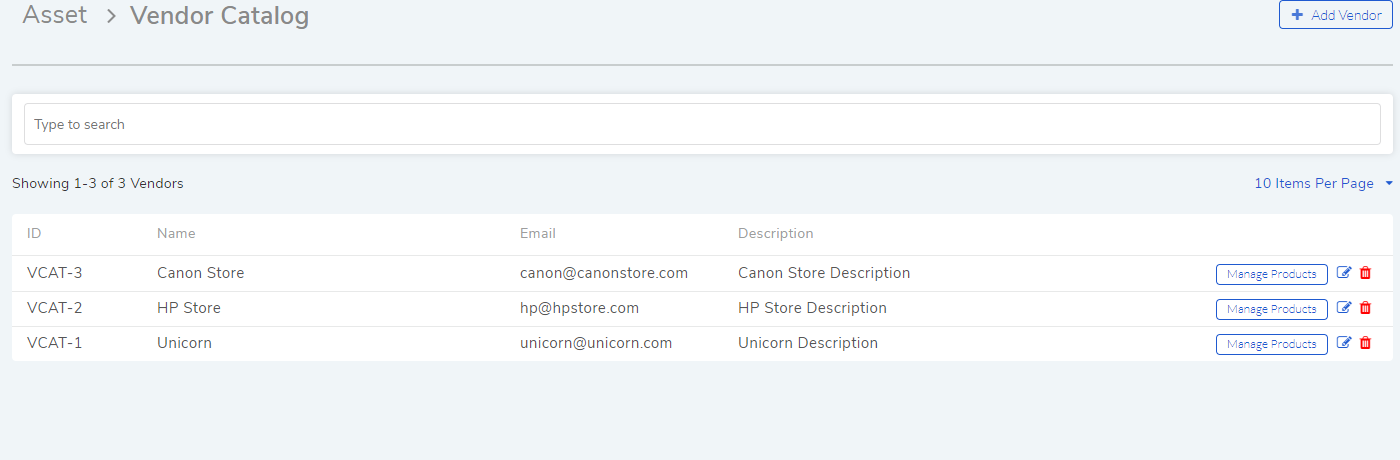
The Manage Products page opens. In this page, you can view all the Products linked to the Vendor. A Product can be added only once. Click on Link Product situated in the top right corner.
The Add Product dialog box opens. Fill in the Product and transaction details.

You can add a Product from the Product Catalog in the Product field (amf-74.2).
After filling in the details, click save to link the Product to the
Vendor.
11.8.6.2. Editing/De-linking a Product
You can easily edit & de-link a Product from a Vendor by following the below mentioned steps:
To edit Vendor Info of a Product:
Go to Asset >> Vendor Catalog and then to the Manage Products page of the Vendor that you want to edit.
Clicking on the Edit Icon opens the Edit Product dialog box. Performs the edits and hit Update.
To Delink a Vendor:
In the Manage Product page, click on the Delete Icon adjacent to the Product that you want to delink. On confirmation, the Product is de-linked from the Vendor.
11.8.7. Software Catalog
The Software Catalog is used by Patch Management to store the names of application for which Patches have been identified. The names in the Software Catalog are used when creating deployment requests for Patches. The catalog is automatically updated by the main server based on the information received from the Computers. You can also add Software manually.
To add a Software in the Catalog:
Go to Asset (A Navigation Tab) >> Software Catalog.
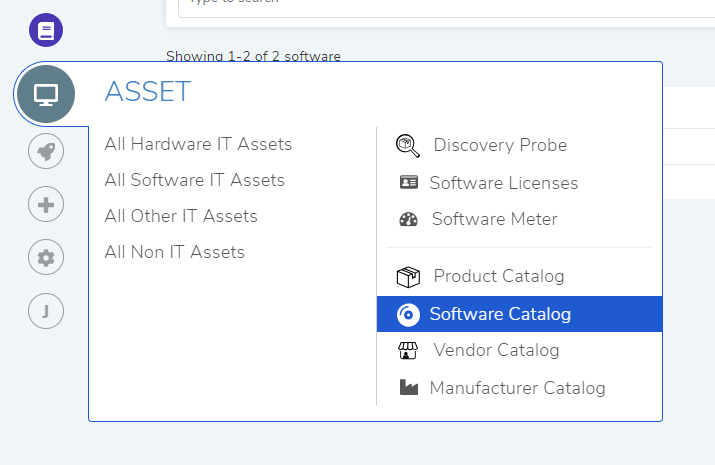
The Software Catalog page opens. Here you can view the list of application names. There are search bar and filters to search for names. Click on the Add Software button to add a new entry.
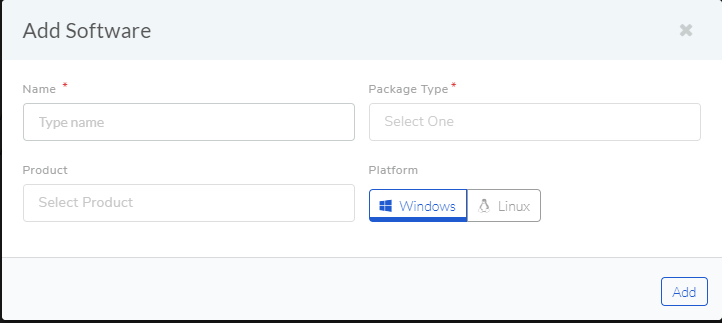
The new dialog box opens. Provide the all the details and click on Add.
11.8.8. Product Type
A Product can be further categorized into Product Types. A Product Type is a generic category to group Products. For example, Router is a Product Type that describes Products like Asus, TP-Link, etc. In Motadata, you get a list of Product Types out of the box, but you can also add more types.
To Add a Product Type:
Go to Admin (A Navigation Tab) >> Product Types (Asset Management).
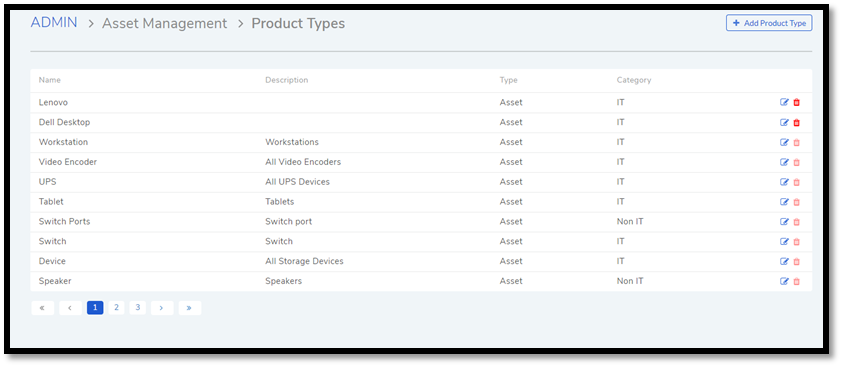
The Product Types page opens. Here you can view all the Product Types added by you along with the predefined types. Now click on Add Product Type situated in the top right corner of the page.
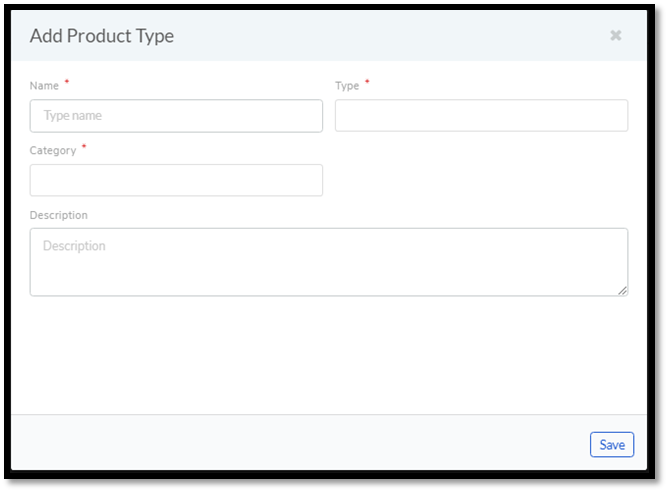
You see the Add Product Type dialog box. You have to fill the following fields:
Name: Type an appropriate Type name. For example, Desktop is a proper Product Type name.
Type: It is a subdivision of a Product Type. There are four main Types to choose from:
Asset: It is a thing that can provide value generally for more than a year. For example, a Laptop computer.
Component: It refers to a functional part of an Asset. For example, a GPU card is a component that goes into a Desktop.
Consumable: It is a thing whose ability to deliver value gets exhausted within a short period, generally less than a year. For example, a Printer’s toner cartridge.
Others: Anything that doesn’t fall in the above three Types.
Category: Here you have to make a selection between an IT and Non-IT Asset. Learn the difference between an IT and Non-IT Asset.
Description: A short description of the Product Type.
After filling the details hit Save to create the Product Type.
Editing/Deleting a Product Type

Note
You can only change the description of the predefined Product Types. None of the predefined Product Types can be deleted.
To Edit a Product Type:
Go to Admin (A Navigation Tab)>> Product Types (Asset Management).
In the Product Types page, click on the Edit Icon adjacent to the Product Type you want to edit.
Perform your edits in the Edit Product Type dialog box and hit Update.
To Delete a Product Type:
In the Product Types page, click on the Delete Icon adjacent to the Product Type that you want to delete. On confirmation the Product Type gets deleted.
11.8.9. Manufacturer
In Motadata you can maintain a list of manufacturers’ names that you add to various Products in the system. Before adding a Manufacturer’s name to a Product, you have to add it to the system.
To Add a Manufacturer:
Go to Asset (A Navigation Tab) >> Manufacturer Catalog.
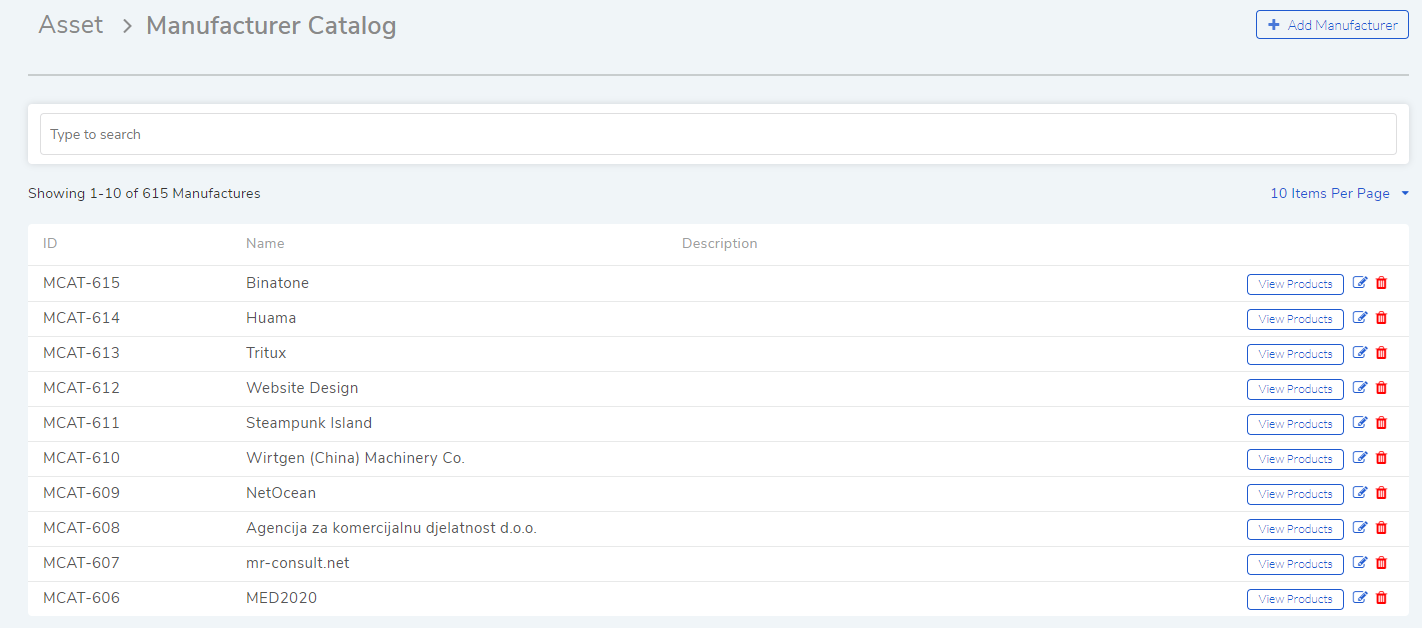
The Manufacturers page opens. Here you can view all existing Manufacturers. Click on Add Manufacturer situated in the top right corner of the page.
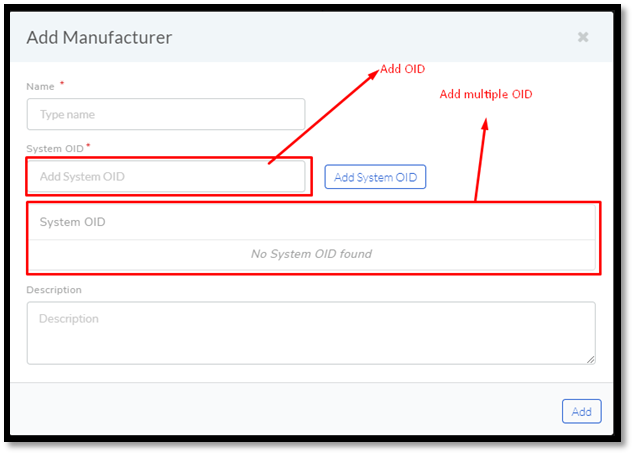
The Add Manufacturer dialog box opens. Type in the Name of the Manufacturer and a Description, and you can also maintain a record of sysOIDs (System OID) using the ADD System OID (
amf-79) button.The sysOID is for SNMP devices. The product matches SNMP devices with Manufacturers using the sysOID. The first 12 characters of a sysOID gives enough information to perform the match. The matchmaking happens even when the manufacturer is not explicitly mentioned in a SNMP device.
When you are done, hit Add to add the Manufacturer.
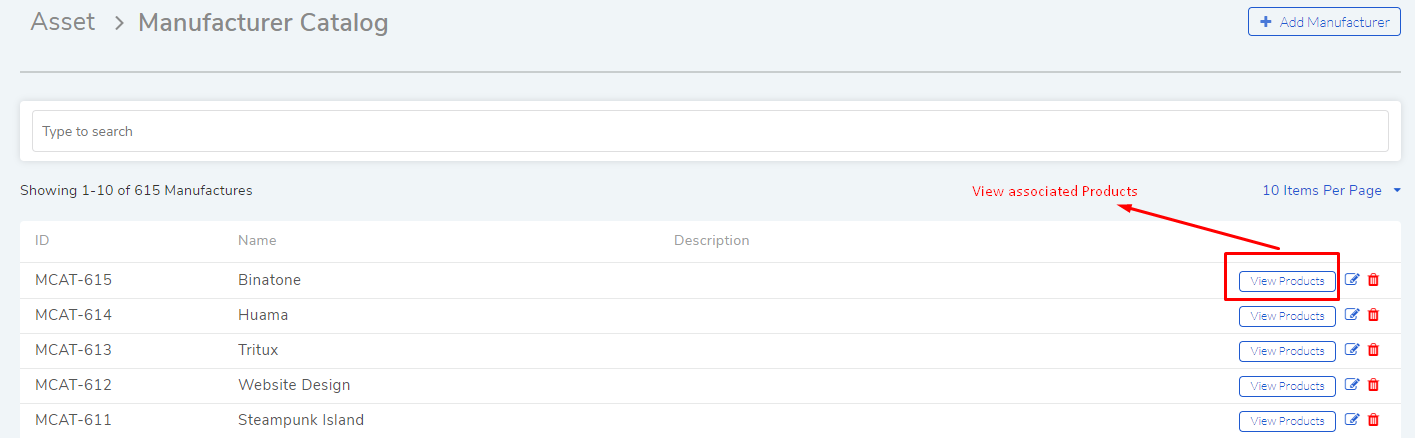
View Linked Products
In the Asset >> Manufacturer Catalog page, you can view the associated Products of a Manufacturer using the View Products option.
To Edit a Manufacturer:
Go to Asset >> Manufacturer Catalog.
In the Manufacturers Catalog page, click on the Edit Icon adjacent to the Manufacturer that you want to edit.
Perform your edits in the Edit Manufacturer dialog box and hit Update.
To Delete a Manufacturer:
In the Manufacturers Catalog page, click on the Delete Icon adjacent to the Manufacturer that you want to delete. On confirmation, the manufacturer gets deleted.
11.8.10. SNMP Custom Properties
Custom properties allow you to fetch specific property values of an SNMP device. The values are located using OIDs (Object IDs). An OID is an address to identify a device and its statuses. For example, we can know the temperature reading coming from a sensor at a remote facility.
An SNMP device can have multiple OIDs, each one for a specific property. You can maintain records of SNMP devices with their OIDs in the SNMP Custom Properties section of Admin.
Whenever an SNMP device is discovered, the product checks whether the sysOID of the discovered Asset is there in the SNMP Custom Properties or not. If it is there, then the Asset Type, Vendor details and custom properties using OIDs are fetched and mapped to the discovered Asset.
To add an SNMP device:
Go to Admin >> SNMP Custom Properties (Asset Management).
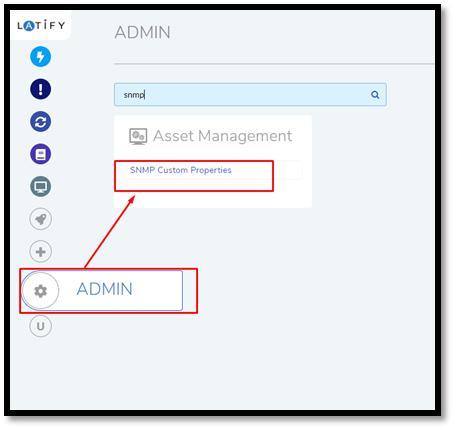
The SNMP Custom Properties page opens where you see existing devices, if any. Click on Add SNMP Device in the top right corner of the page.
Add SNMP Device dialog box opens. There you enter the following things:
Name of the SNMP device.
SysOID of the SNMP device (it uniquely identifies the device).
Asset Type of the device. This information has to be explicitly mentioned since there is no way to ascertain the type of an SNMP device during discovery using OIDs.
Manufacturer details of the device. This is an optional field.
Description of the device. This is an optional field.
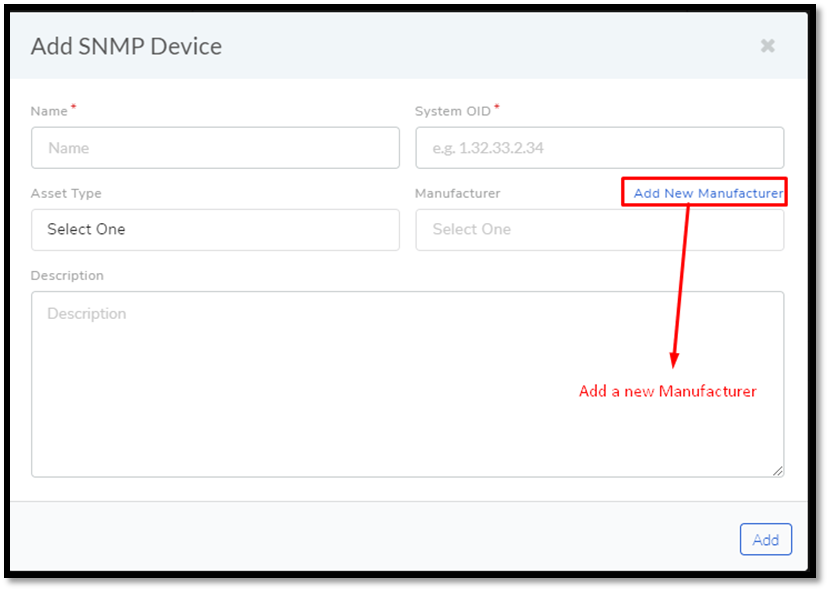
Clicking on Add adds the device in the custom properties page.
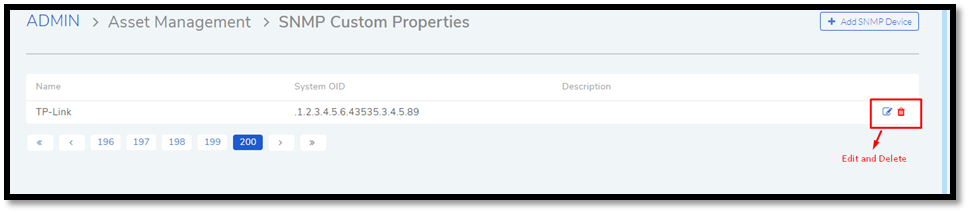
To add OIDs in an SNMP device:
Each OID that you add in an SNMP device represents a custom property. You can view the custom property values in the details view of an SNMP device.
Go to Admin >> SNMP Custom Properties.
In the SNMP Custom Properties page click on an SNMP device.
The Device Properties page opens. Click on Add SNMP Device Properties in the top right corner of the page.
In the new dialog box, you have to enter the following things:
OID of the property as mentioned by the manufacturer.
Label of the property as mentioned by the manufacturer.
Name of the property as it going to be shown in the product.
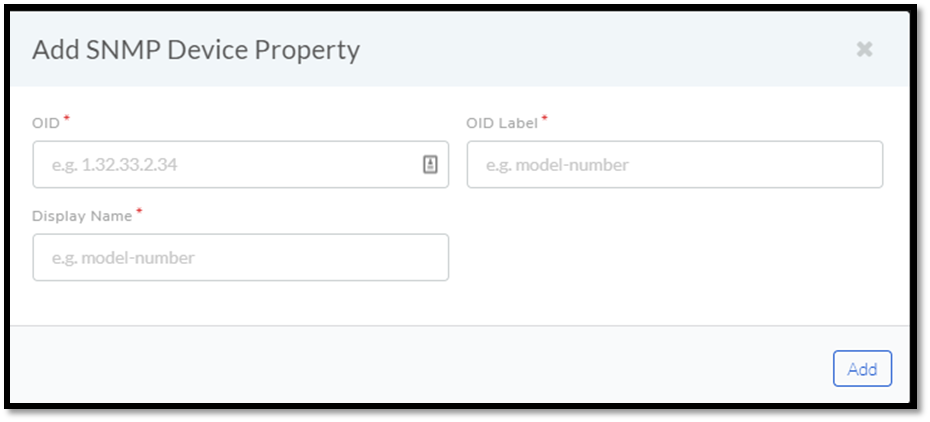
Clicking on Add adds the OID in the device properties page.
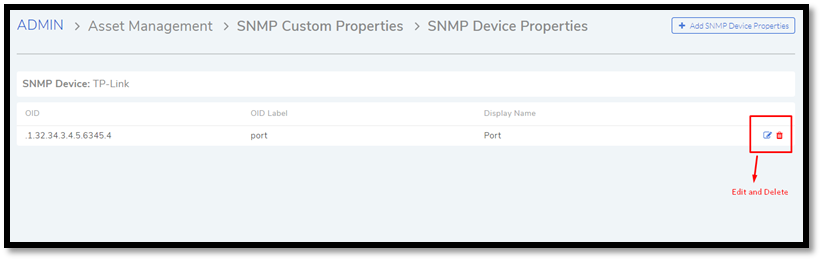
Similarly add other OIDs; each new property is going to have a new OID.
View Custom Properties:
Go to the Details View of an SNMP Asset with custom properties.
The Custom Properties are highlighted in the Properties tab.
