11.9. Manually Creating an Asset in the CMDB
Motadata allows you to add Assets in the CMDB manually. The process involves filling the Add an Asset dialog box. You can add both IT and Non-IT Assets using the Add an Asset dialog box. To add an Asset:
Click on the Create (A Navigation Tab).
- Select Asset from the popup menu. The Add an Asset dialog
box opens.
You can also open the dialog box by pressing A in your keyboard.
Note
Please refer to amf-86 for the below description.
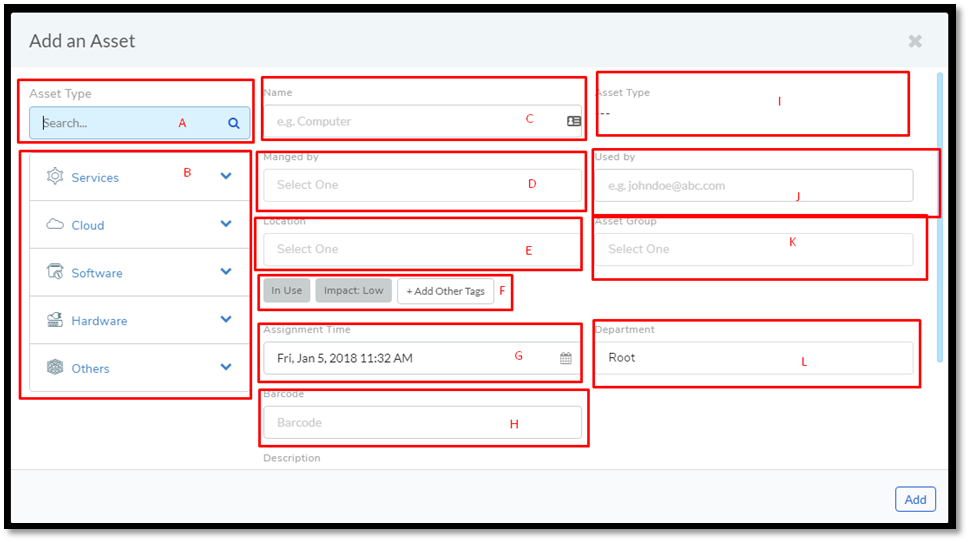
Two things are compulsory when creating an Asset: Name of the Asset and Asset Type. The Asset that you are adding must have a type which is present in the Asset Type Hierarchy. So before you add any Asset, you must have a Name and an Asset Type for each of your Assets.
Section-A has the search bar that lets you search an Asset Type in the Asset Type Hierarchy. The found types are shown below in section-B.
Section-B gives you access to the entire Asset Type Hierarchy when there’s no keyword in the search bar above. You can view all the sub-types by clicking a Parent Category. There are five Parent Categories to select from:
Services: This category houses Non-IT Asset Types.
Cloud: This category houses Assets related to cloud hosting.
Software: All Software Assets come in this category.
Hardware: This category contains all physical, pingable IT Assets.
Others: This category includes both IT and Non-IT Assets.
You put the display name in the Name field in section-C. This is a required field. The product shows an Asset by this name.
In section-D, you select the name of the Technician who is managing the Asset. Clicking on the field gives you a list of all the available Technicians in the system.
In section-E, you select the Location of the Asset from a drop-down list.
In section-F, you can perform three operations:
Status: Here you can set a status for the Asset. Learn more about predefined and custom statuses.
Impact: You can specify the impact as either Low, Self, Department or Business.
Tag: You can add a custom tag to the Asset.
In section-H, you put the Barcode ID which is a sequence of alpha-numeric characters not more than 15 characters.
Whatever Asset Type that you select, it is shown in section-I.
In section-J, you put the email address of the person who is using the Asset.
In section-K, you select an Asset Group. This is a way to categorize the Asset. Learn more about creating Asset Groups.
You select the Department where the Asset belongs from a drop-down list in section-J.
You give a brief description of the Asset in the Description field.
You can upload files as attachments with the Asset by using the Attach File button. For example, you can upload the invoice of the Asset.
Type in the Details and hit Add to create the Asset.