10.6.4. Custom Fields
When creating a ticket or CI (Configurable Item), our system captures certain data. Apart from the default types, we give users the flexibility to capture custom data types using the custom field feature. For example, some of our product users are capturing employee id using a custom field.
Custom fields are additional fields added by a user. They can appear while creating a ticket, and in the details view of a ticket and CI. Custom fields can be added to Requests, Problems, Changes, Release, Contract, Feedback, Purchase, Project and Assets.
Note
Adding Custom Fields requires administrative rights.
10.6.4.1. Types of Fields
We have four field types and one formatting option which you can use. The fields support a host of input types. Using the formatting option you can build interesting forms. The various options are as follows:
Text Field: This is a basic field that allows users to input a small amount of text. Supported value types are: Text, Number and Date.

Dropdown: This field is populated from a predefined list. You get the option to defined the list.

Section: Adding a section allows you to group fields. You can group similar fields together and align them in split form inside the section.

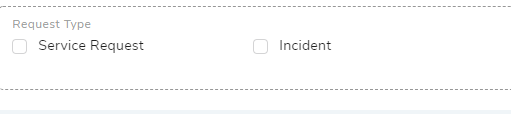
Checkbox: It is a predefined checklist. You select by the checking the options.

Radio Button: Similar to checklist, but supports only one selection.
Text Area-input: It is a multi line text input area.

Labels: This are static, immutable chunks of text.

File Upload: This field allows you to attach a file of size up to 5 MB.

Dependent Field: This field allows you to create dependent drop-downs up to 3 levels.

10.6.4.2. Working with Custom Fields
The product has a simple drag and drop UI to create and arrange fields.
10.6.4.2.1. Create a custom field
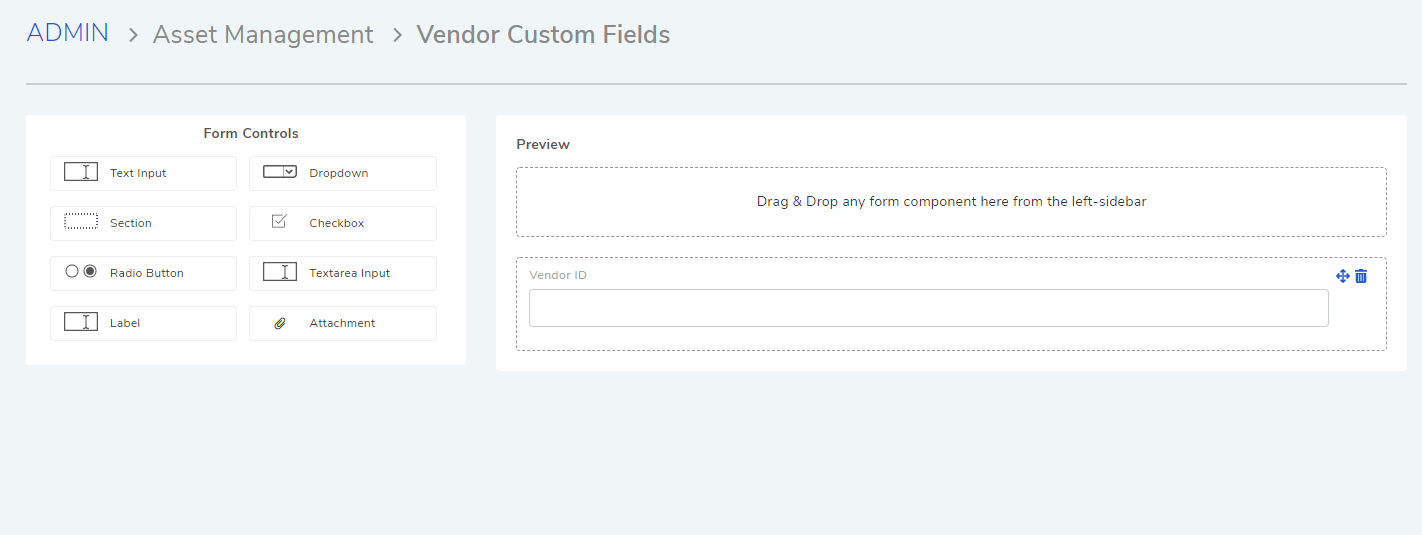
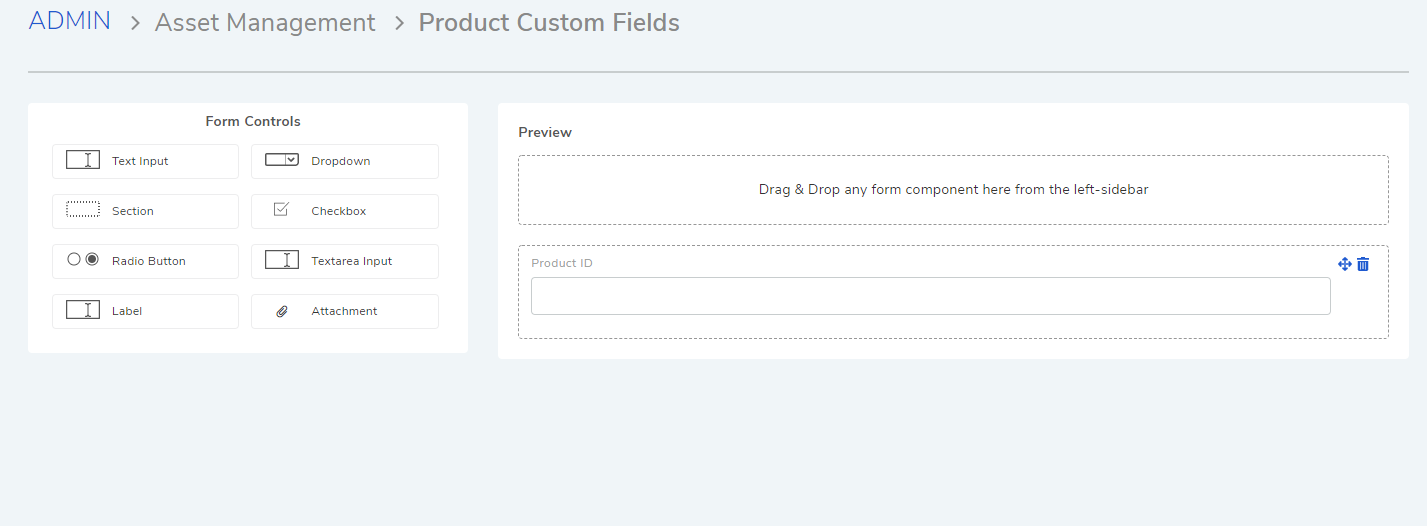
Go to Admin >> (Request, Problem, Change, Release, Contract, Purchase, Feedback, Project, or Asset) Custom Fields.
Note
Each module has a separate custom fields page.
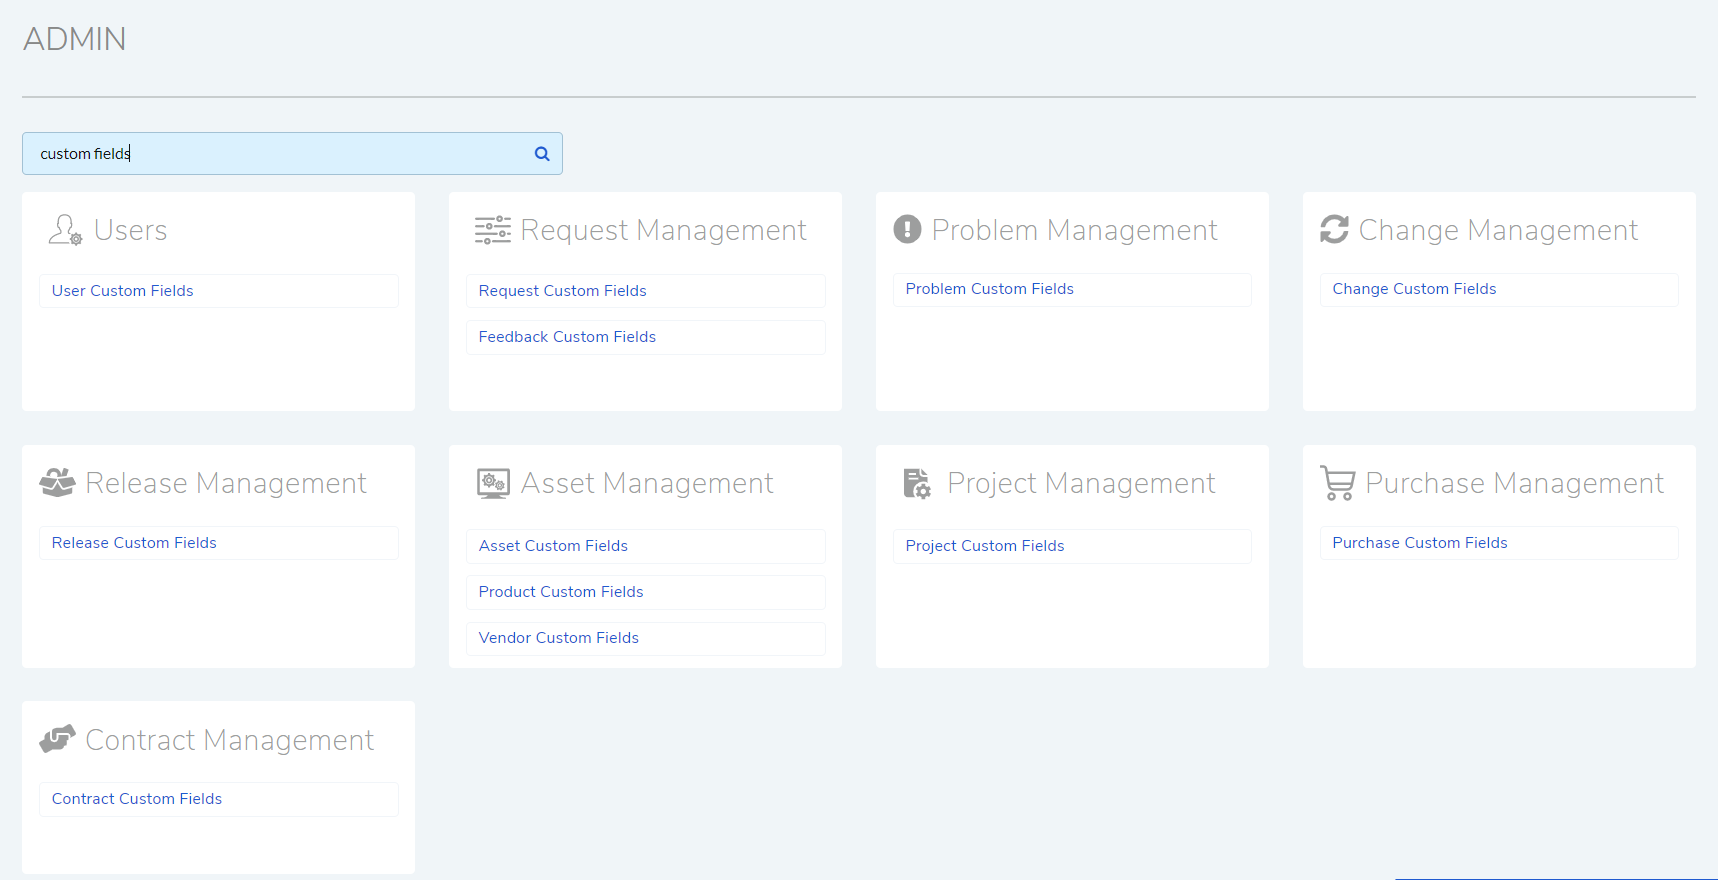
In the Custom Fields page, you can view your existing custom fields, if any.
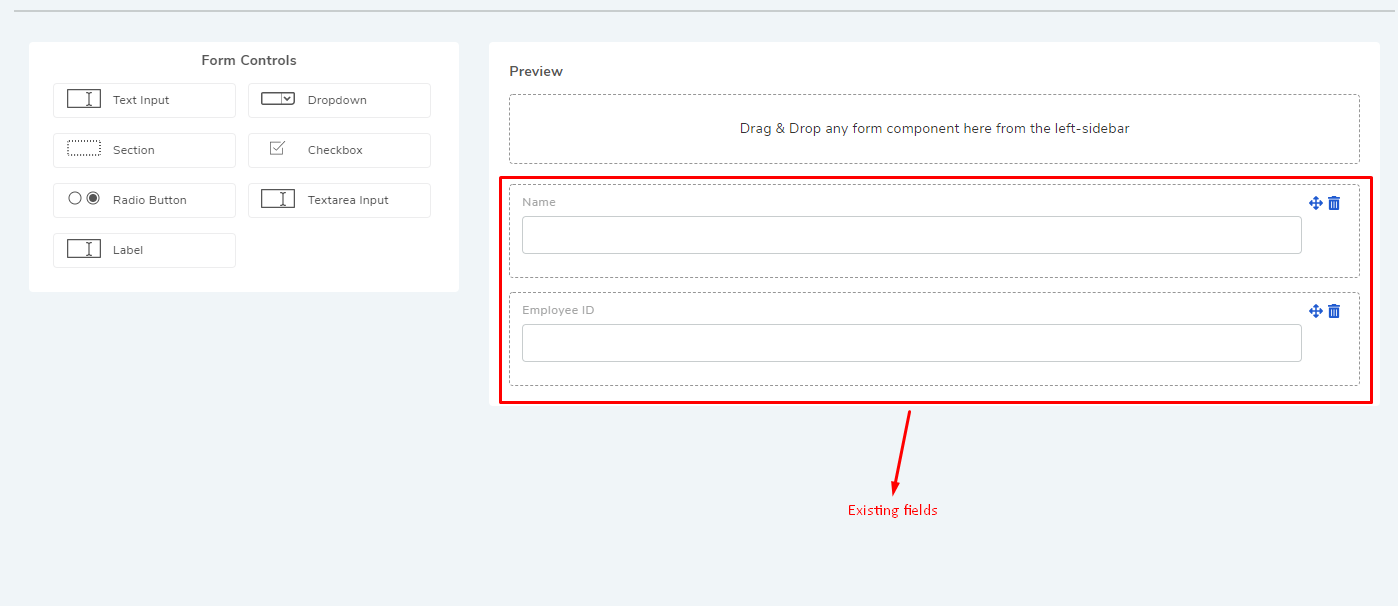
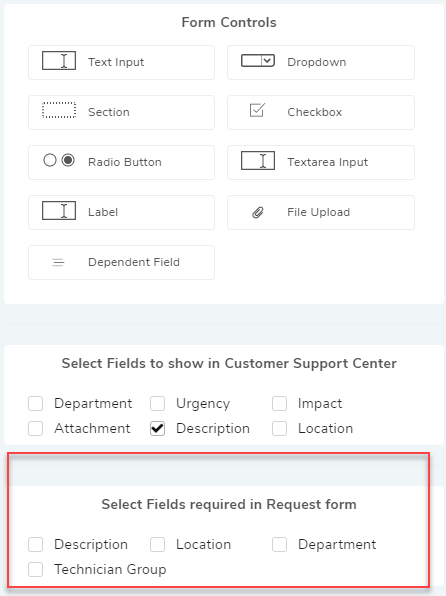
To create a new field, drag and drop a field type from the Form Control section to the Preview section.
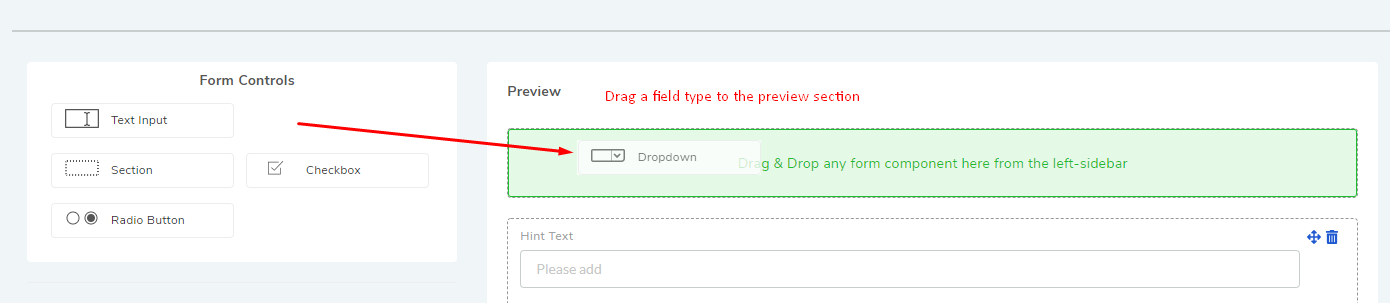
The field is immediately created, and you can edit the field in its Glance View. You can open the Glance view by clicking on the field.
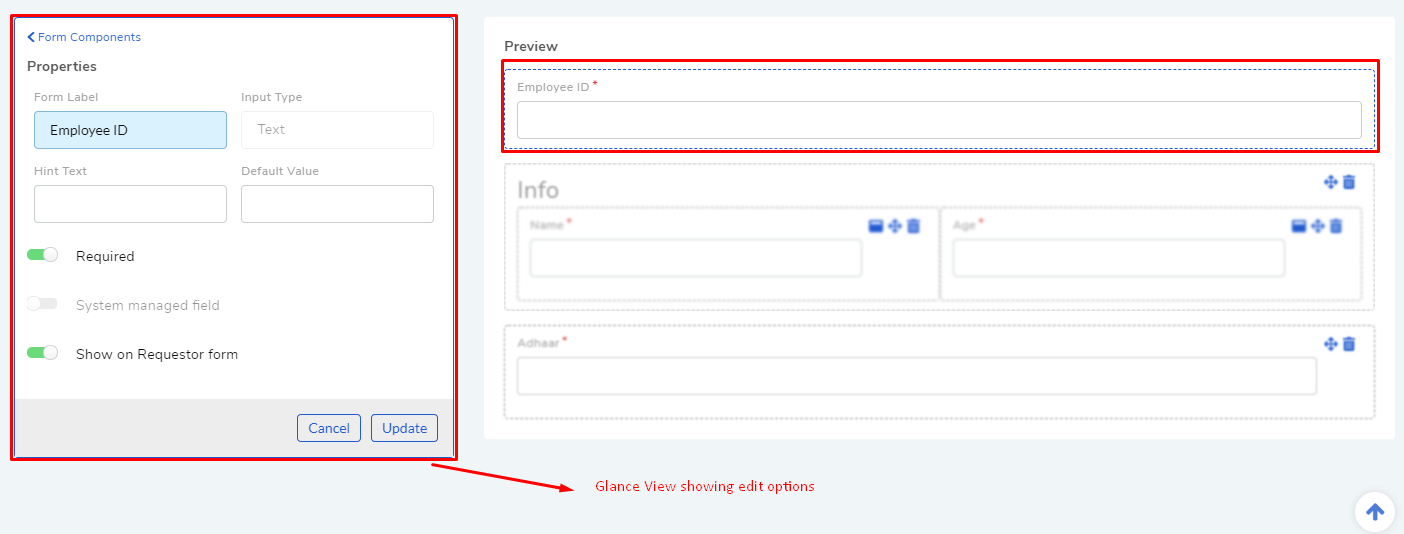
Depending on the field type you can edit the following things:
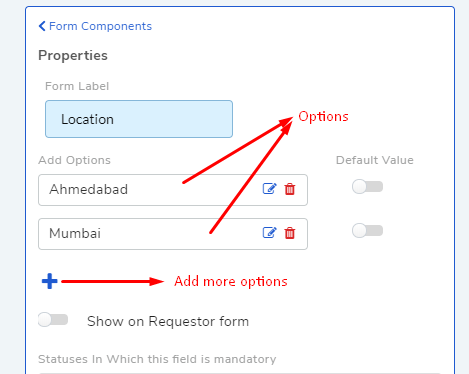
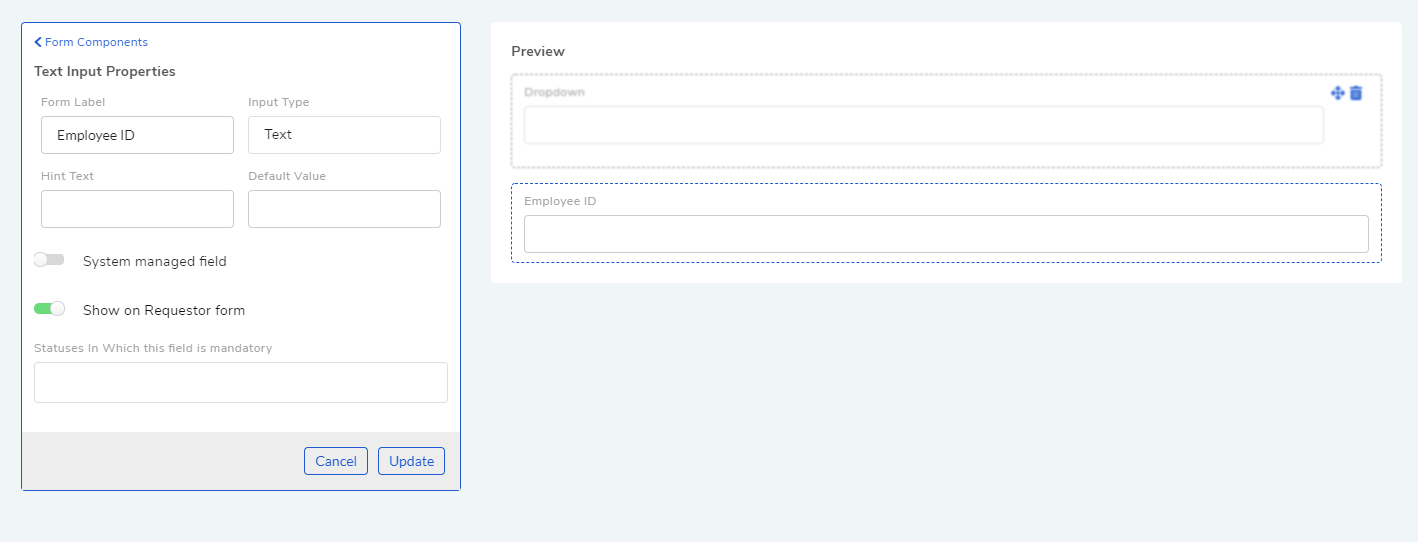
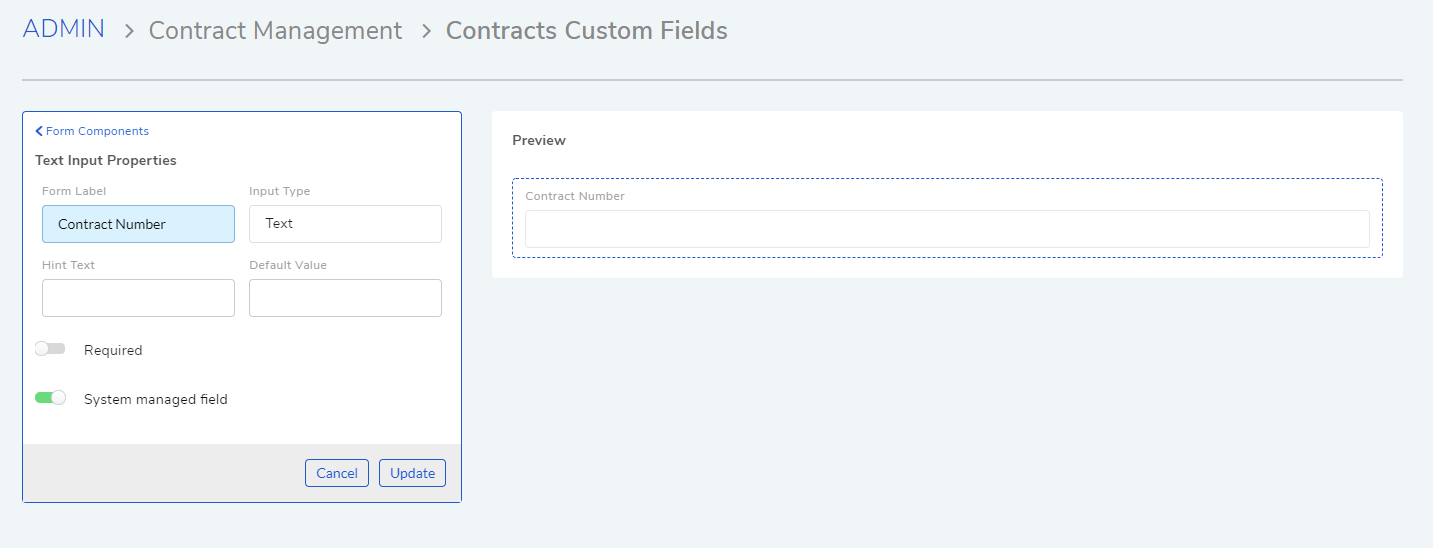
Form Label: This refers to the title of the field.
Input Type: Available for Text Input field. This field supports three types of inputs: Text, Number and Date (Sat, Jul 21, 2018 4:39 PM).
Hint Text: Available for Text Input and Drop-down. Hint text appears pre-filled in the input area; hinting the user what to input.
Default Value: Applicable in all field types. You can choose what value to be pre-selected or pre-filled by default. In case there are multiple options, you can select any one as the default value.
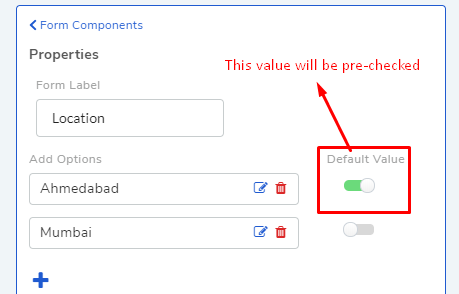
Add Option: For Checkbox and Radio-button type fields, you can add n number of options.
Label value: Refers to a static chunk of text which is immutable and available only in a Label field.
10.6.4.2.2. Additional Custom Field Options
Clicking on a field opens the glance view where you will get additional options depending on the field type and module selected.
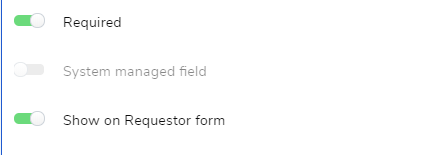
Required: This option makes the field compulsory on a form.
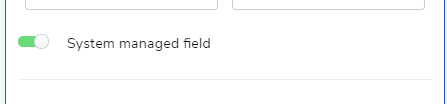
System Managed field: This option makes the field uneditable, and the field will show only system generated values.
Show on Requester form: This option is only available in Request fields and allows to control what field to show on the Requester form.
10.6.4.2.3. Rearrange Custom Field
You can arrange the fields using drag and drop. You can group fields in to sections (this feature is available for Request, Requestor, Feedback, Purchase, Contract, Project and Problem custom fields), and you can arrange custom fields in to a matrix using the section feature.
Note
The rearrange feature doesn’t work when a field is in edit mode (Glance View is open). The fields are movable when the move icon is visible.
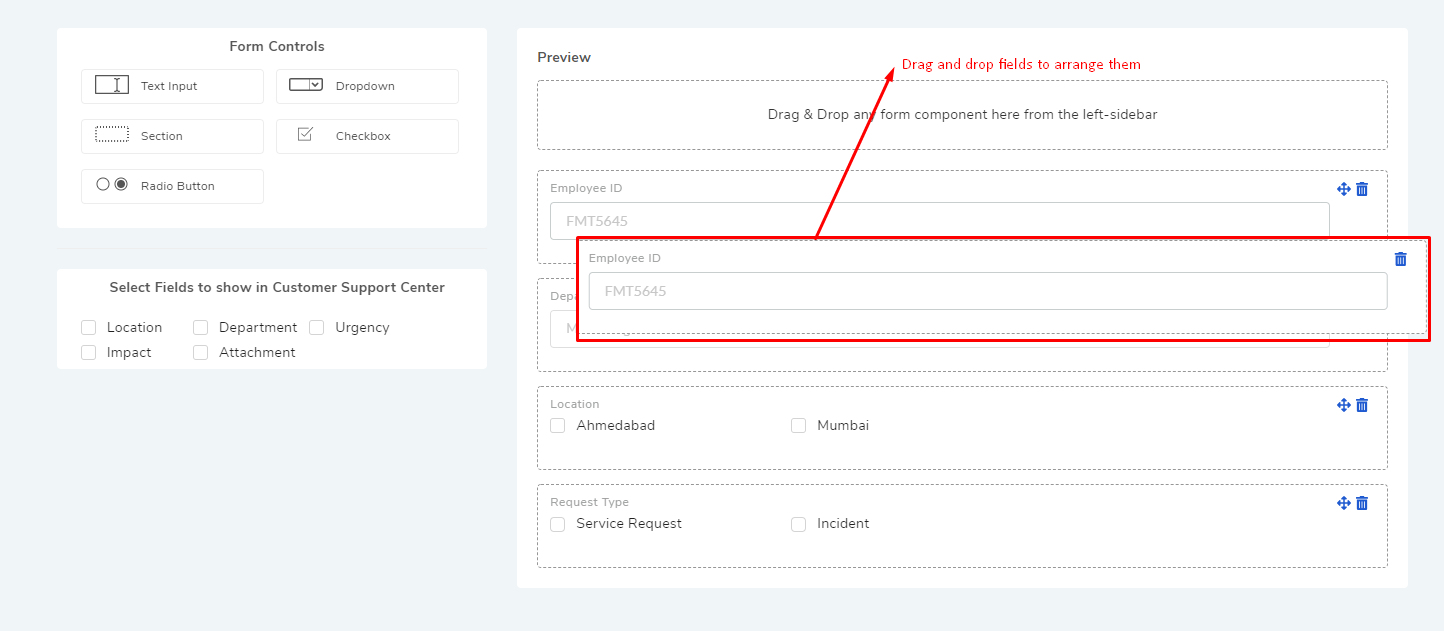
You can delete a field using the adjacent trash icon.
10.6.4.3. Custom Field Behavior
The behavior and outlook of custom fields is different for each module.
10.6.4.3.1. Request
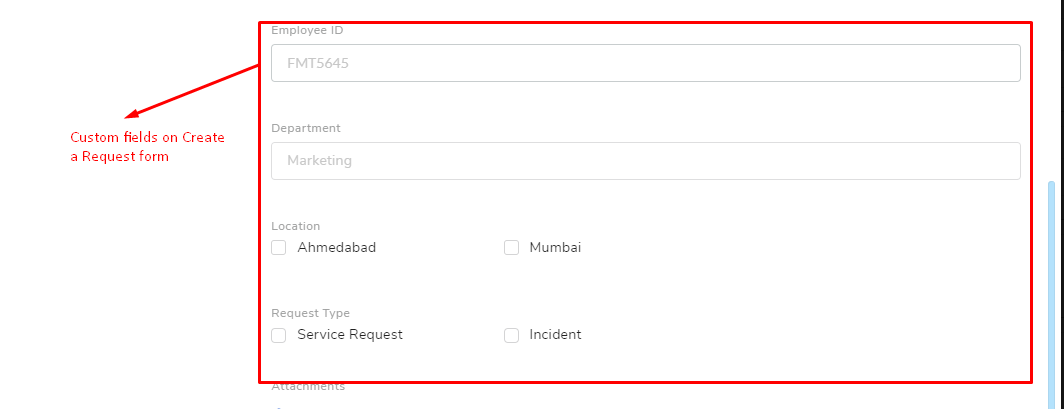
Custom fields appear on the Create a Request form (in all templates) and in ‘custom fields’ tab of existing tickets. The fields appear by default in the Technician portal, but you have to specifically toggle an option to make them appear in the Customer portal.
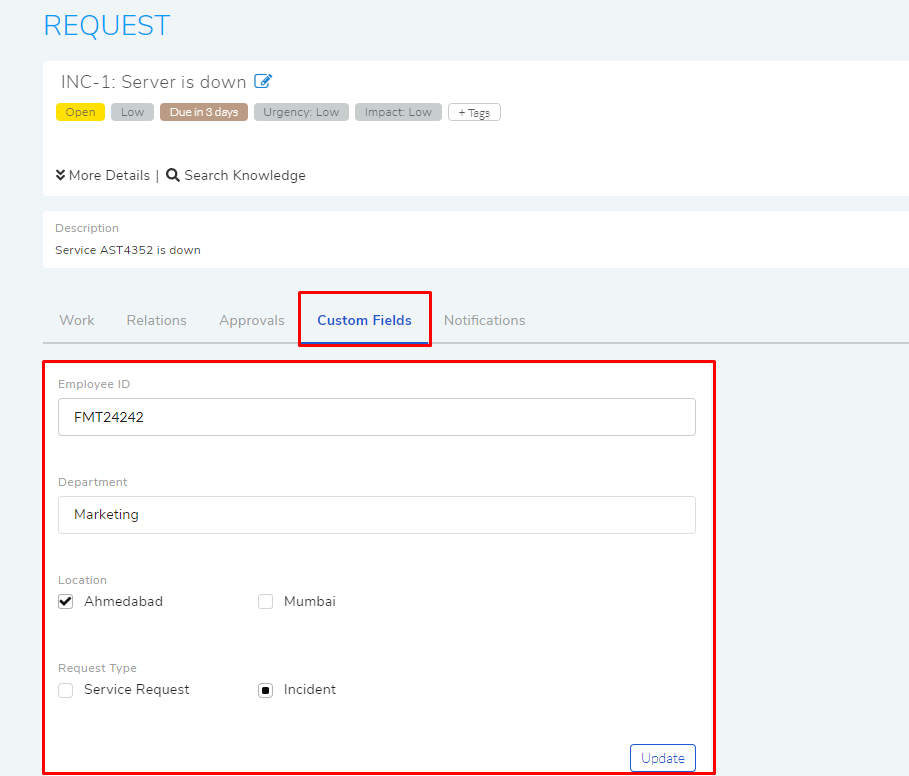
You can view and edit custom fields from the details view of a Request. You can find the fields under the Custom Fields tab.
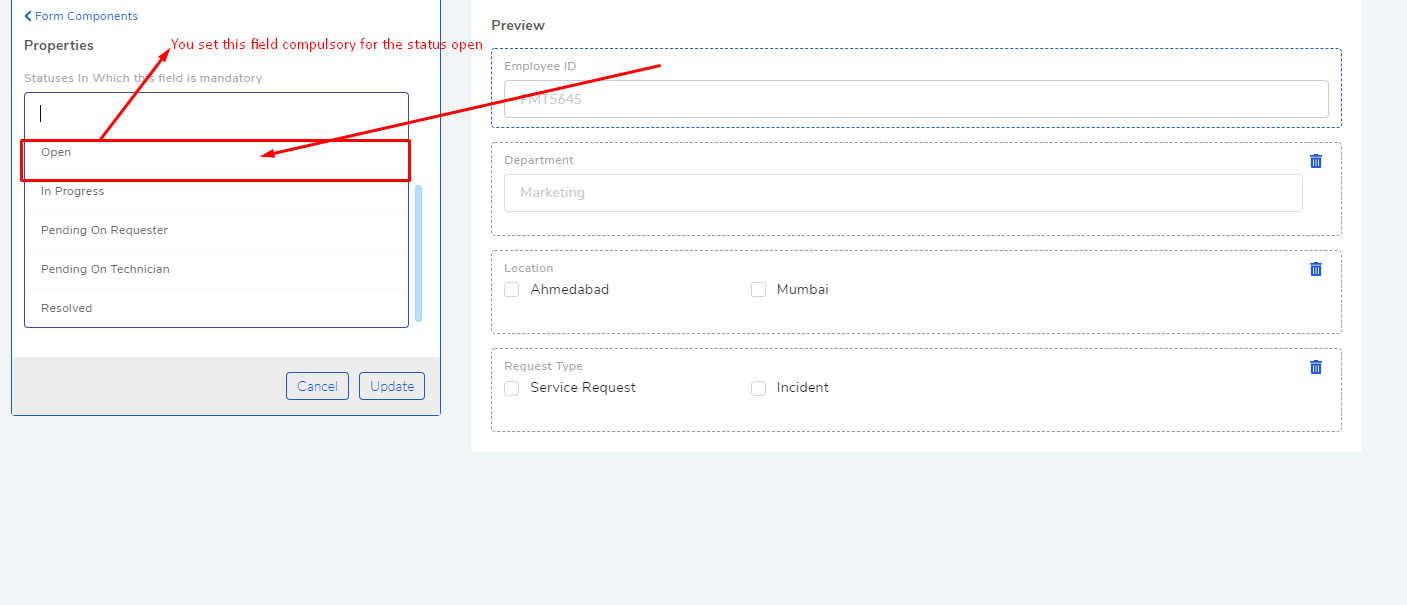
You can make a field compulsory for certain Statuses. For example, if a field is compulsory in Open Status, then you cannot keep the field empty when changing to another Status.
You can make a field as system field, which shows only system generated value. Such fields are not editable from the user interface.
You can control the visibility of some default fields on the (Requestor Form) Customer portal; they are:

You can make the default fields required/optional on the (Requestor Form) Customer portal; they are:
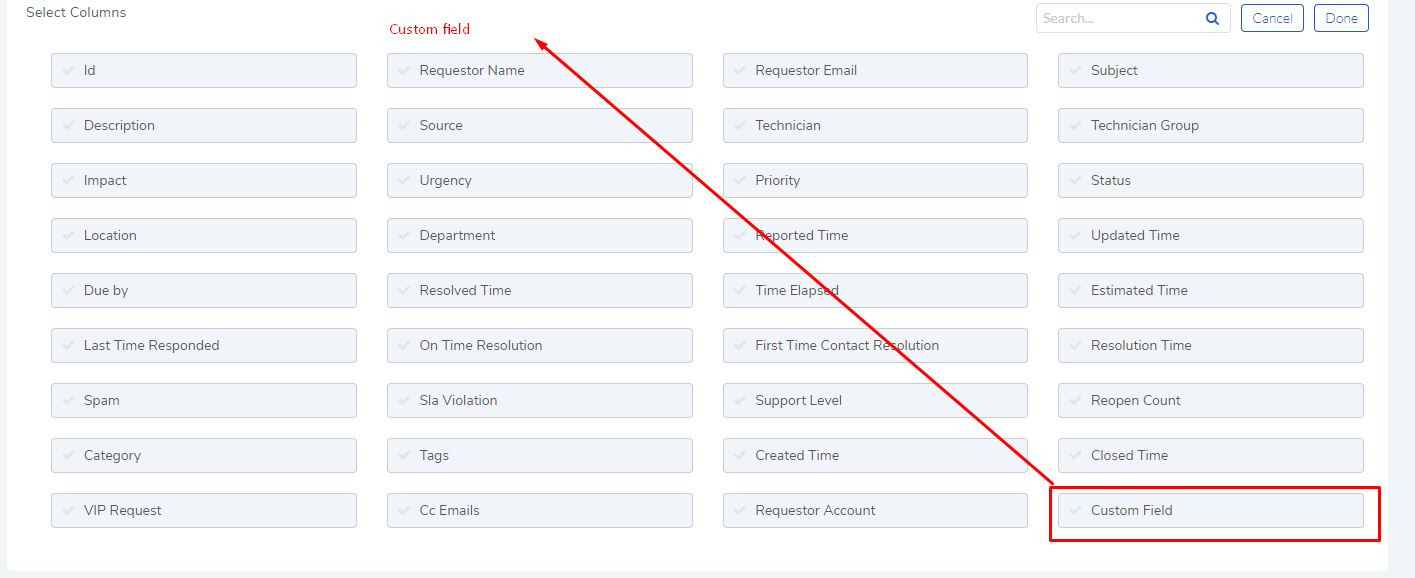
Custom fields in Request also appear in the Report module. Technicians can use custom fields in generating reports.
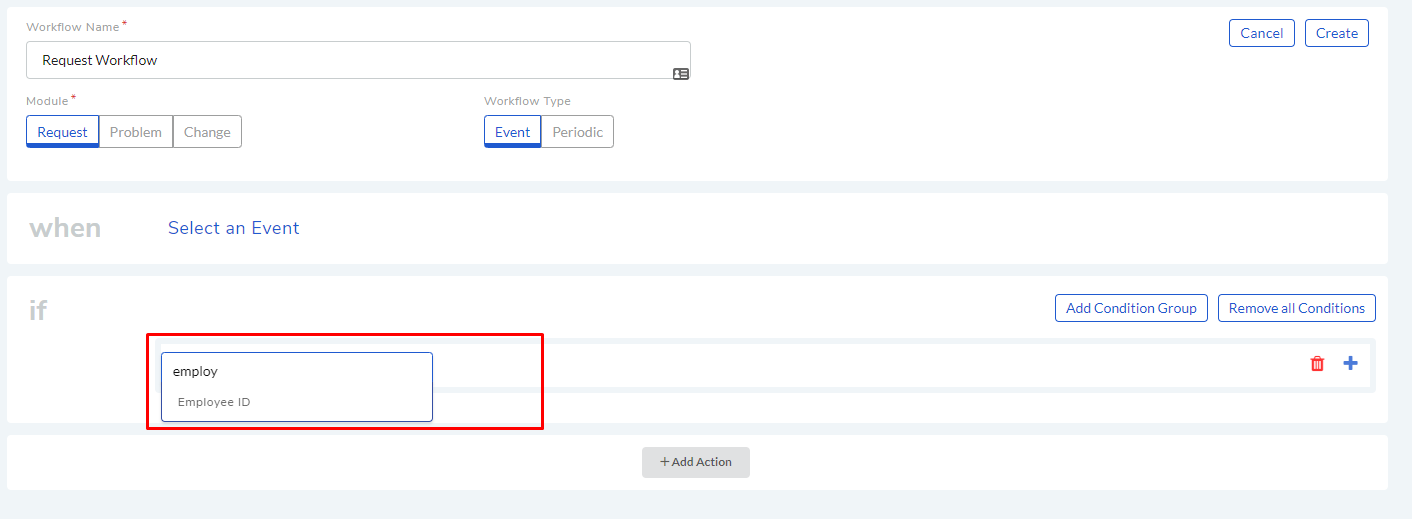
Custom fields in Request appear as part of the Workflow conditions.
10.6.4.3.2. Problem
Problem custom fields are available to Technicians on the Create a Problem page (in all templates) and in ‘custom fields’ tab of existing tickets.

Technicians can view and edit custom fields from the details view of a Problem. You can find the fields under the Custom Fields tab.

You can make a field compulsory for certain Statuses. For example, if a field is compulsory in Open Status, then you cannot keep the field empty when changing to another Status. Please refer to the above section.
You can make a field as system field, which shows only system generated value. Such fields are not editable from the user interface.
Custom fields in Problem also appear in the Report module (as part of the column selection). Technicians can use custom fields in generating reports.
Custom fields in Problem also appear as part of the Workflow conditions.
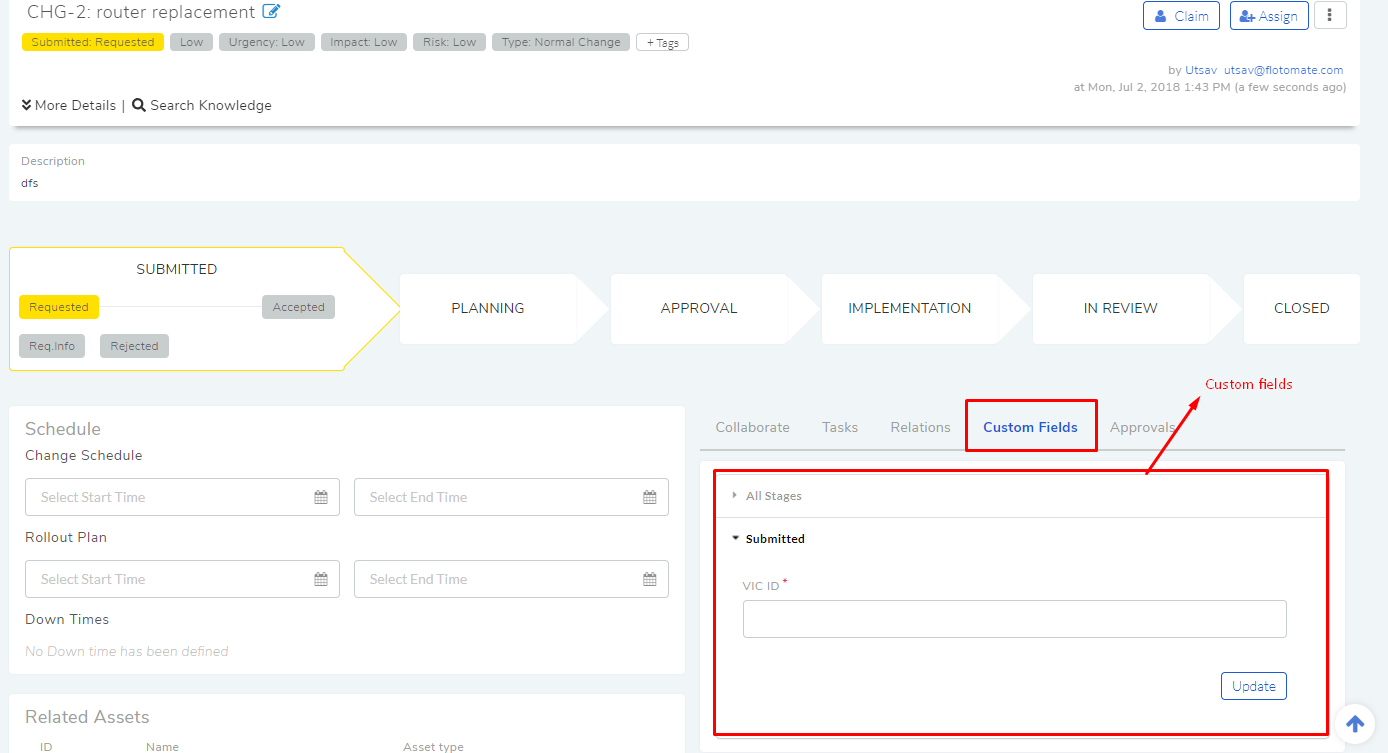
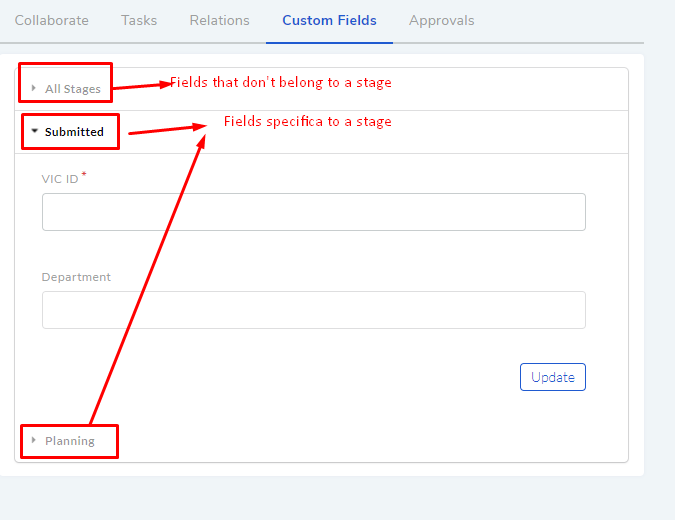
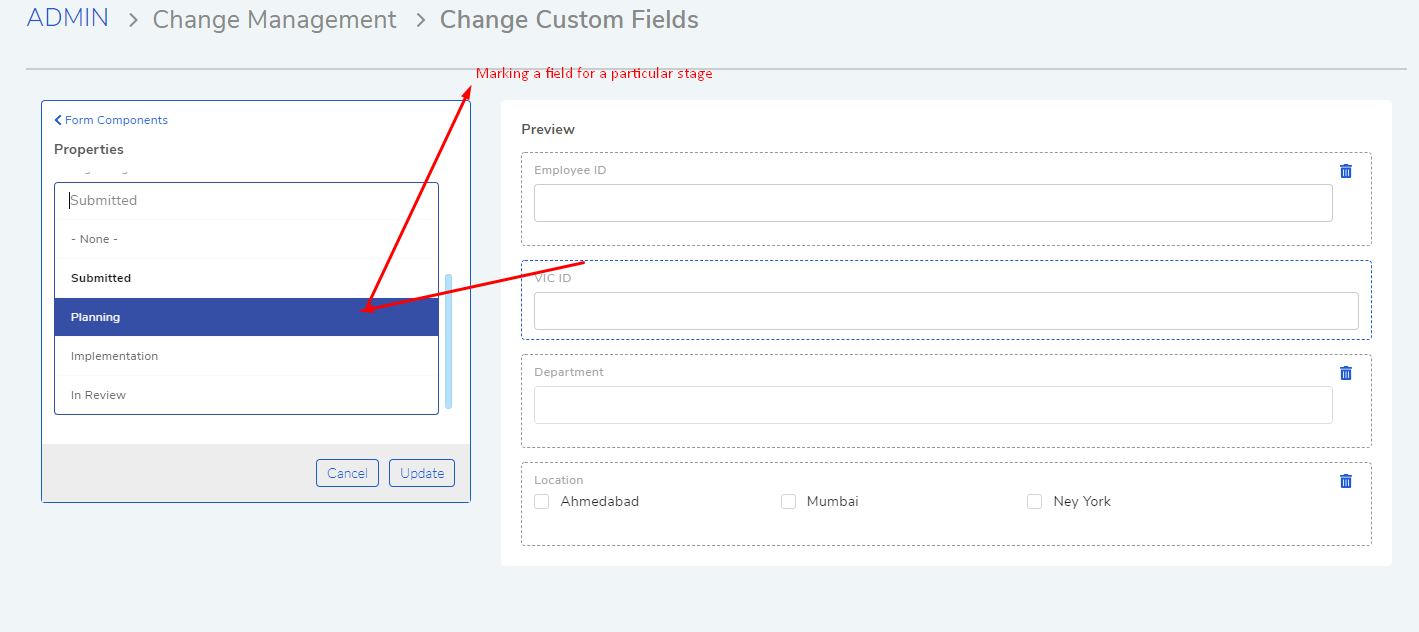
10.6.4.3.3. Change
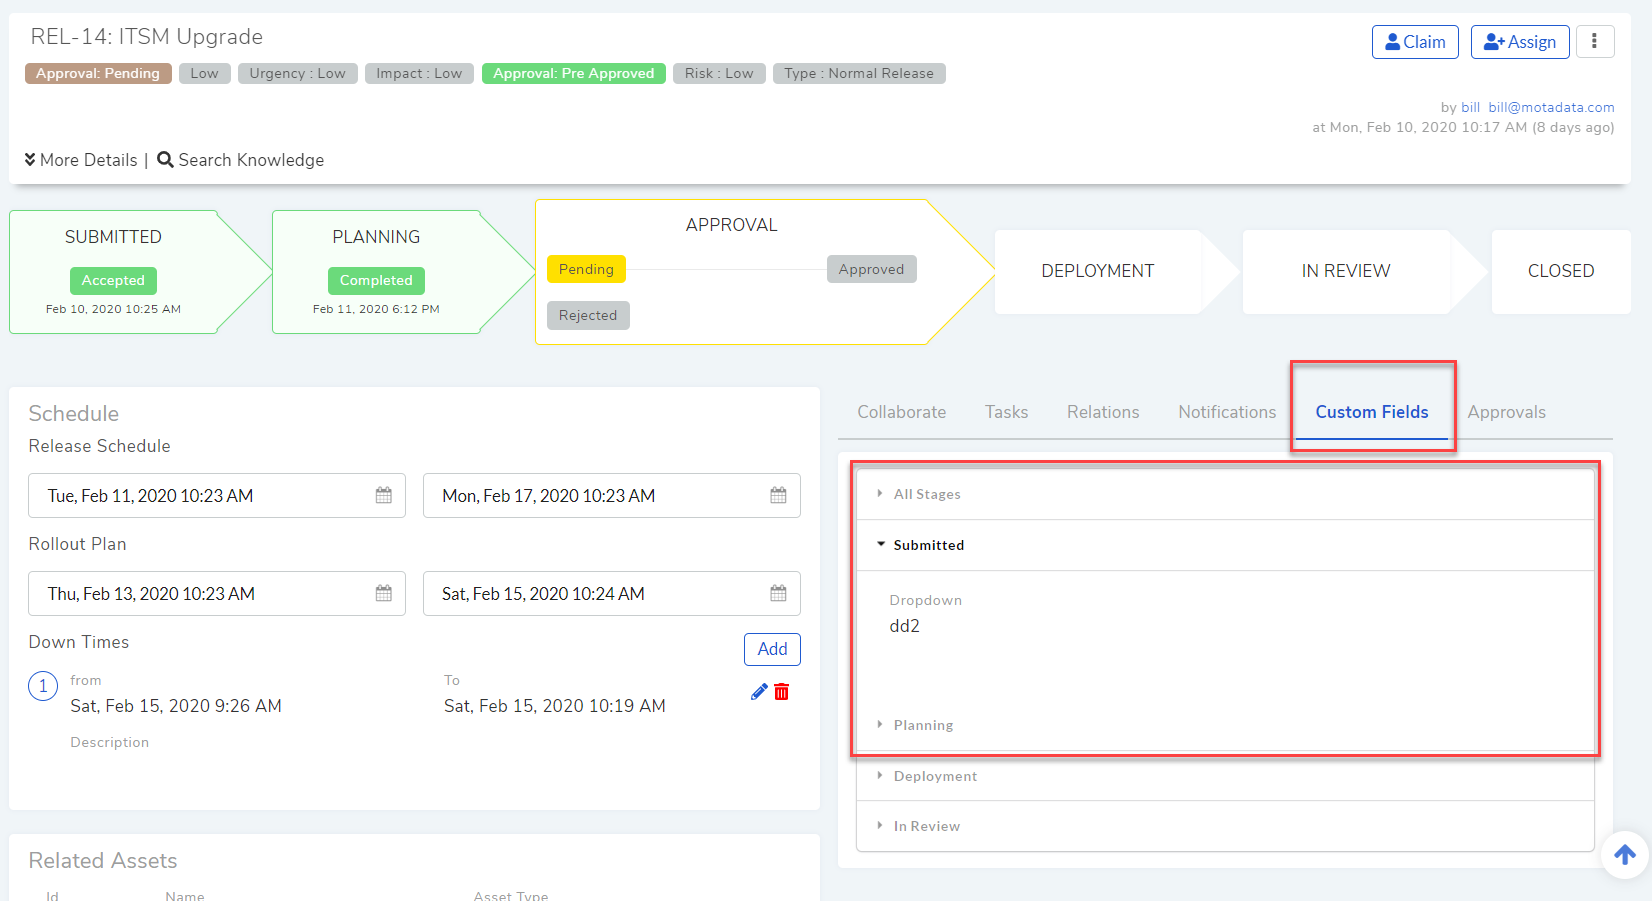
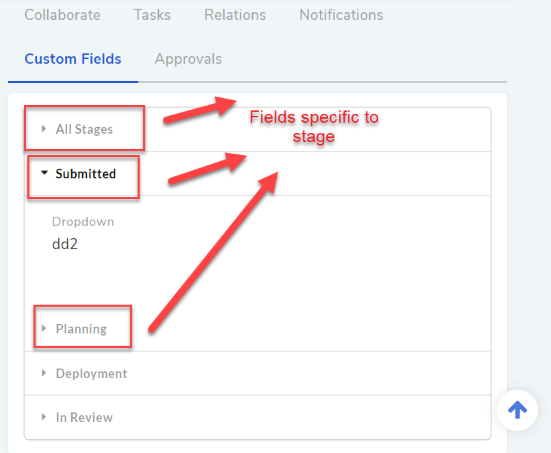
Change custom fields are available to Technicians on the Create a Change page (in all templates) and in ‘custom fields’ tab of existing tickets. While creating custom fields, you can specifically mark a field as belonging to a particular stage.
Note
Stage specific fields can be edited in their respective stages.
You can mark a field as compulsory at a particular stage. You can even mark a field as a system field that only shows system generated data.
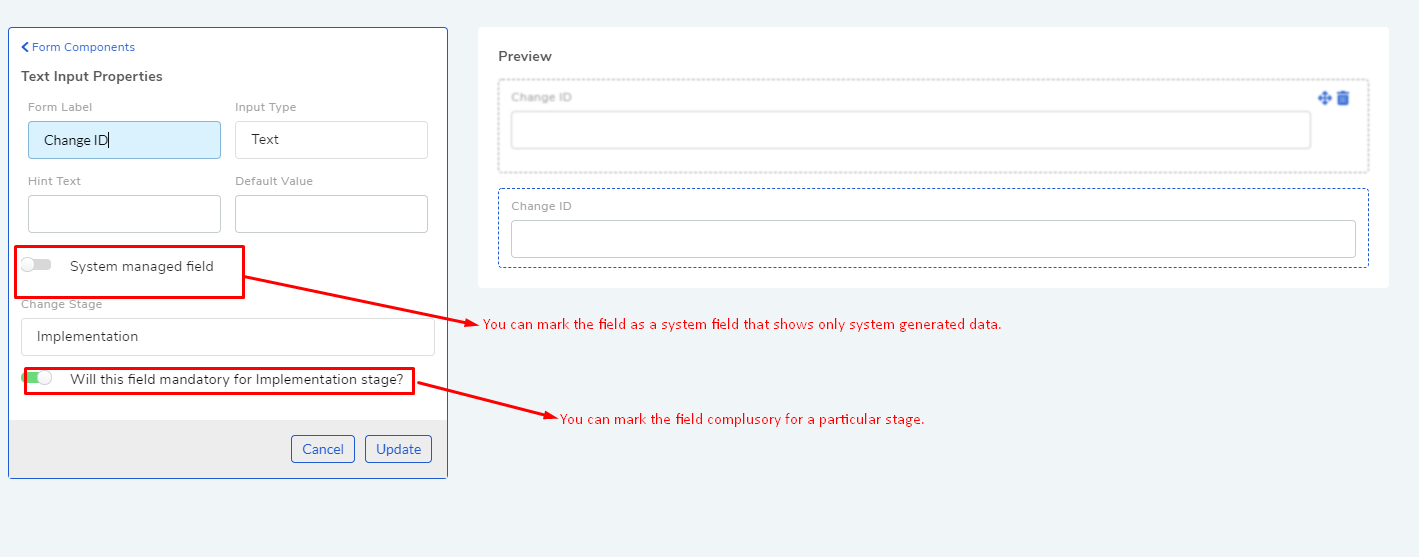
You can make a field as system field, which shows only system generated value. Such fields are not editable from the user interface.
Custom fields in Change also appear in the Report module (as part of the column selection). Technicians can use custom fields in generating reports.
Custom fields in Change also appear as part of the Workflow conditions.
10.6.4.3.4. Release
Release custom fields are available to Technicians on the Create a Release page (in all templates) and in ‘custom fields’ tab of existing tickets. While creating custom fields, you can specifically mark a field as belonging to a particular stage.
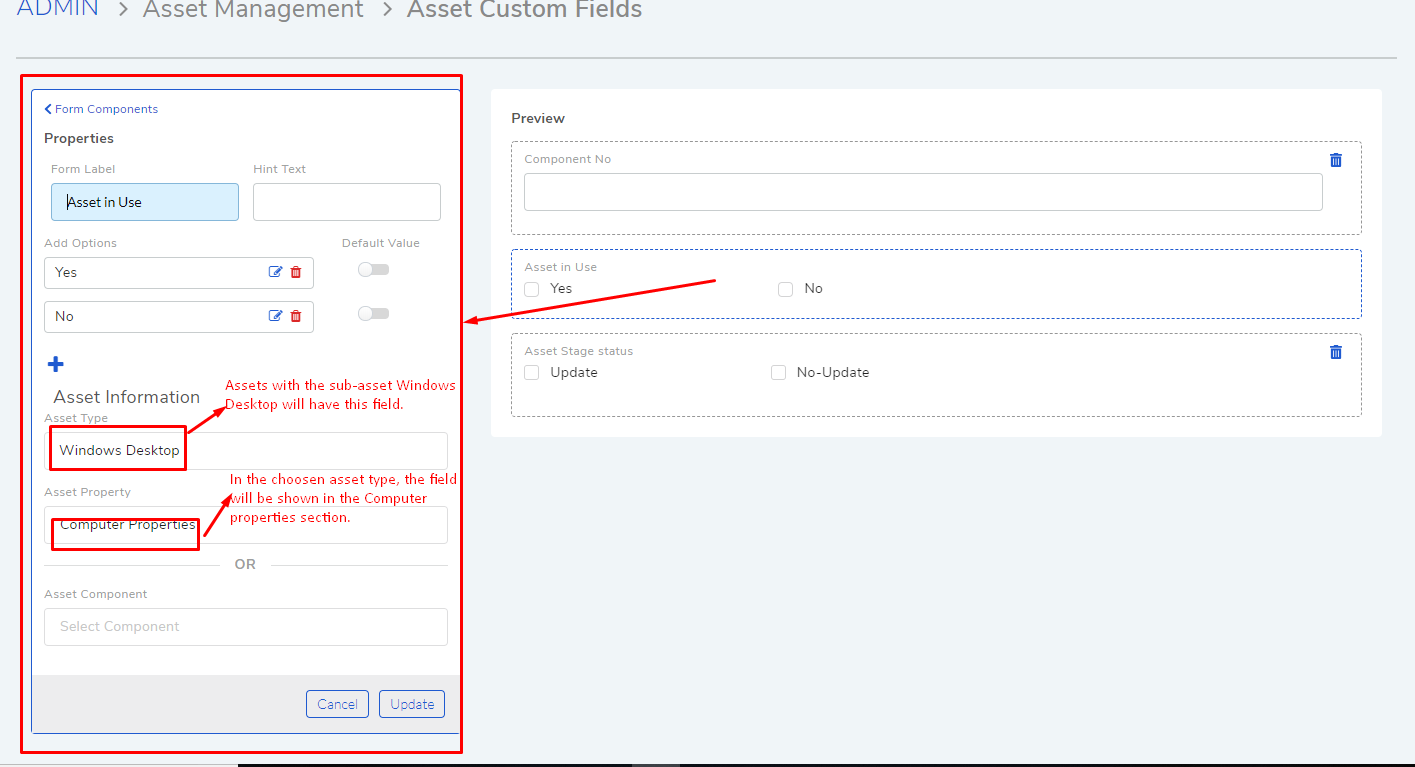
10.6.4.3.5. Asset
You add a custom field either to an Asset Type (all sub-types will have the field) or a particular sub-type (specific).
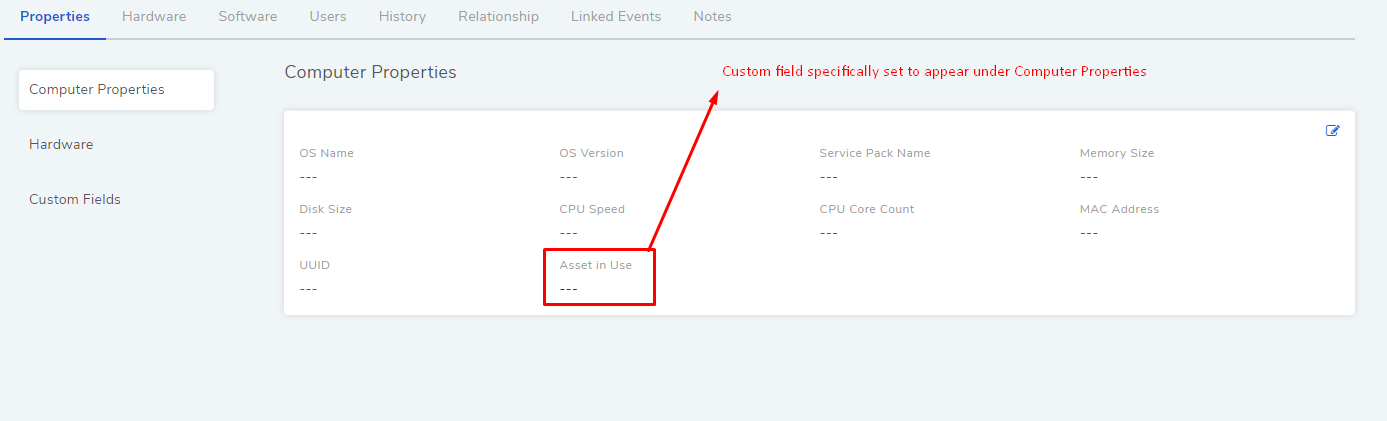
Within a type, you can either make the field appear in Property section or Component section. Please refer to the Asset Management manual to learn more.
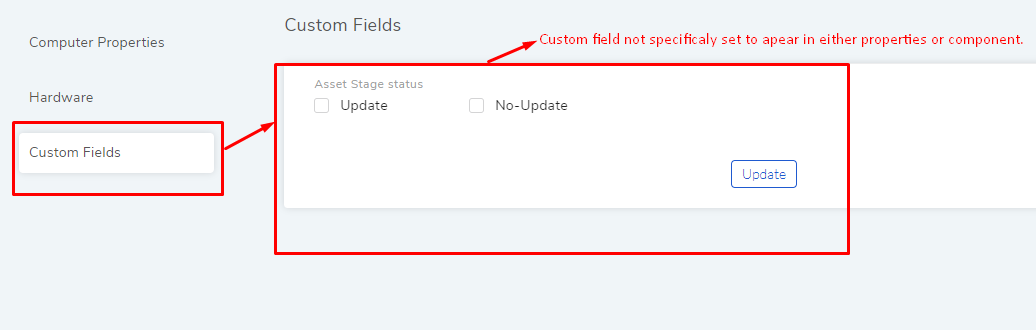
You can make a field as system field, which shows only system generated value. Such fields are not editable from the user interface.
Custom fields in Asset also appear in the Report module (as part of the column selection). Technicians can use custom fields in generating reports. Remember, custom fields are specific to an Asset Type and a sub-type.
10.6.4.3.6. User Custom Field
Here Custom fields allow you to create new variables to store additional information about requestors.
You can create n number of text fields.
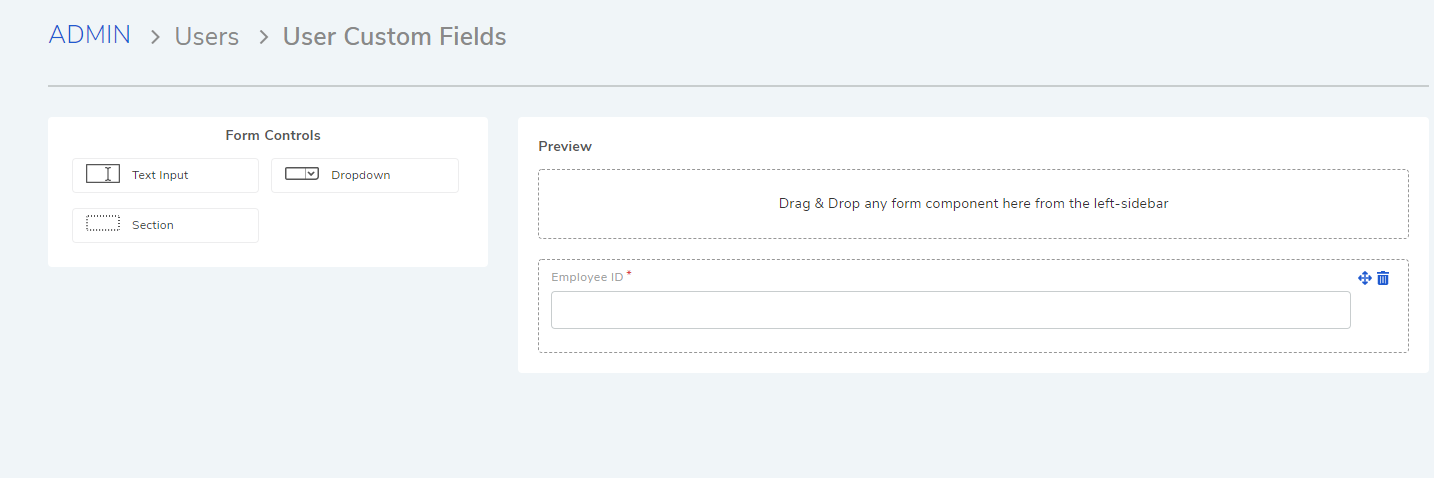
You can make a field as system field, which shows only system generated value. Such fields are not editable from the user interface.

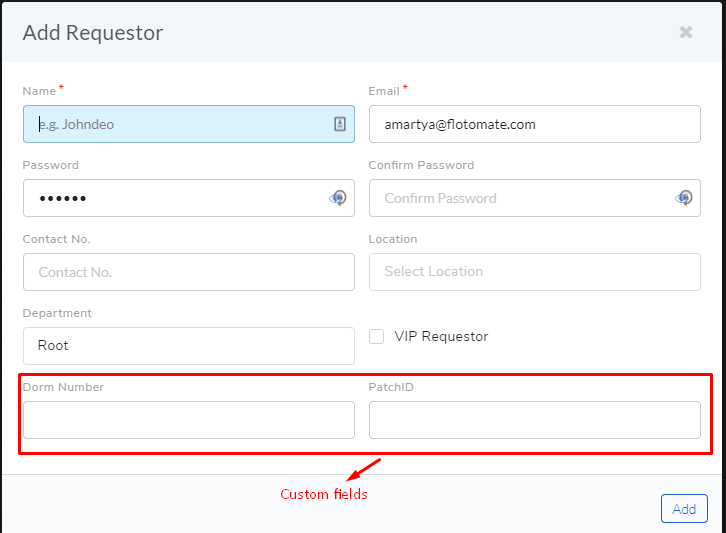
Such fields appear on the form for creating Requestors.
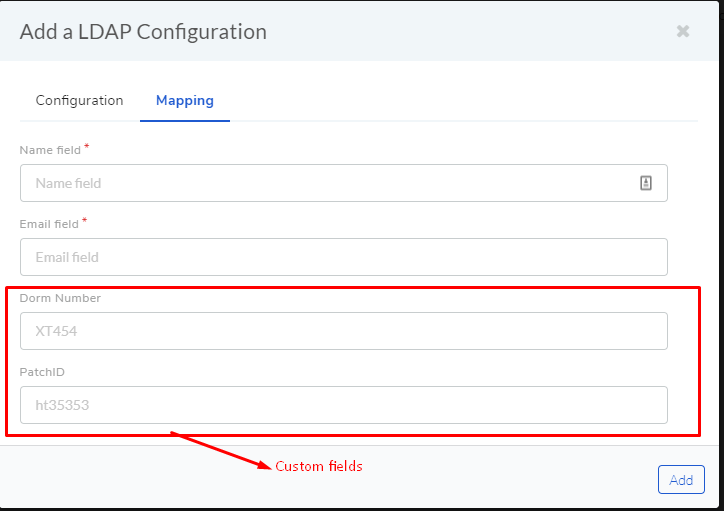
Requestor Custom fields also appear while mapping field names during LDAP Configurations.
Custom fields are considered when mapping columns during CSV import of Requestors.

10.6.4.3.7. Contract Custom Fields
Users can add Custom Contract Fields in the Contract module. Some of the use cases of having custom fields are:
Custom fields can be used for capturing additional information about a Contract.
Custom fields appear in the Reporting module, where you can generate reports using custom fields.
Custom fields are supported in CSV import of Contracts (as one of the header property values). Custom fields can be used to capture additional information during Contract CSV import.
You can make a field as system field, which shows only system generated value. Such fields are not editable from the user interface.
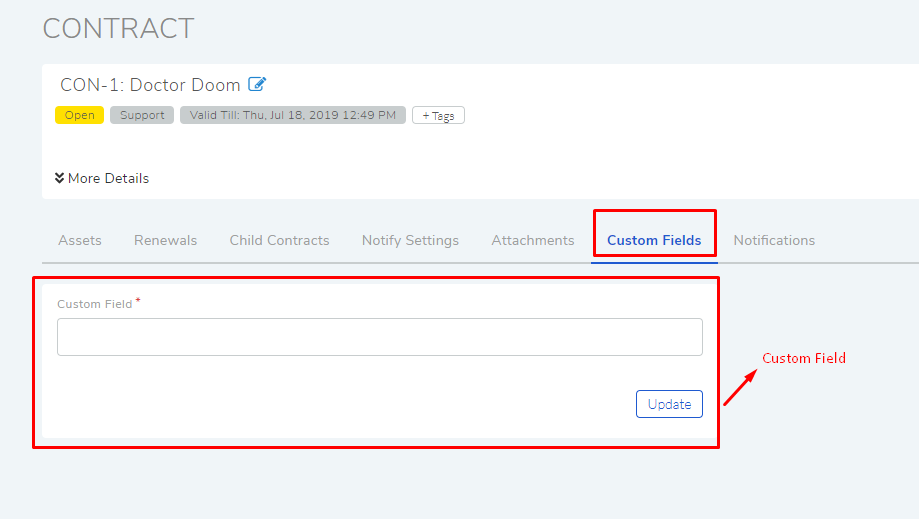
You can view and edit values of such fields from the Custom Fields tab in the contract details view of a Contract.
10.6.4.3.8. Feedback Form
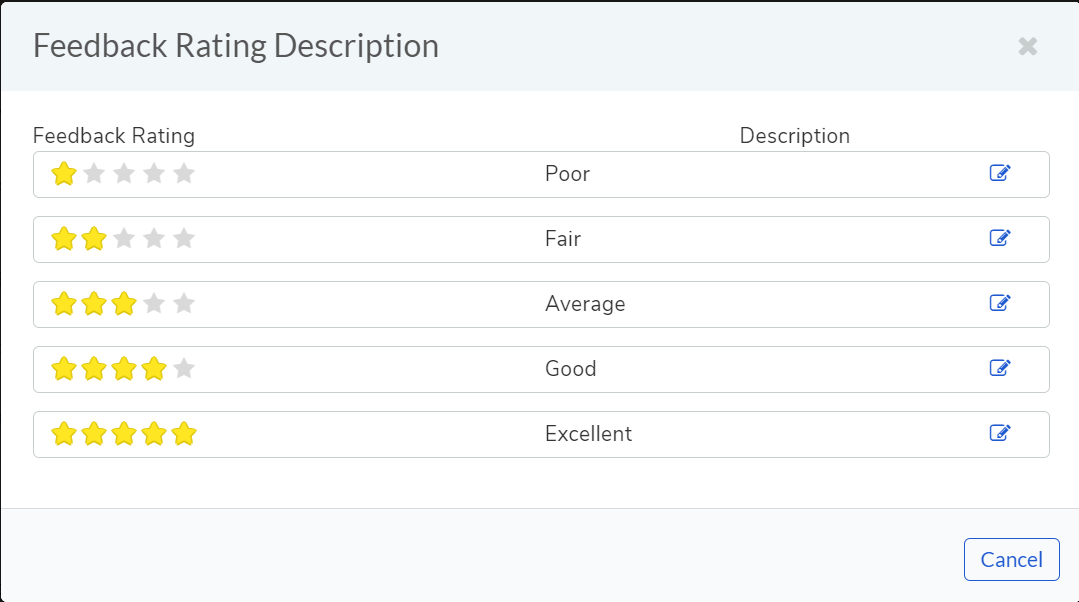
A Feedback form captures the experience of a Requestor with the Helpdesk. A Feedback form is always specific to a particular Request. Using Custom fields, administrators can add more fields to capture additional information. Values captured by custom fields are visible on the Custom Field Page
Things to Remember:
A Feedback form is specific to a particular Request.
A link to the Feedback form is sent with the Resolved and Closure Email, and an Email sent manually. (Learn More).
Note
You can make a field as system field, which shows only system generated value. Such fields are not editable from the user interface. Learn more.
The Actual Feedback Form:
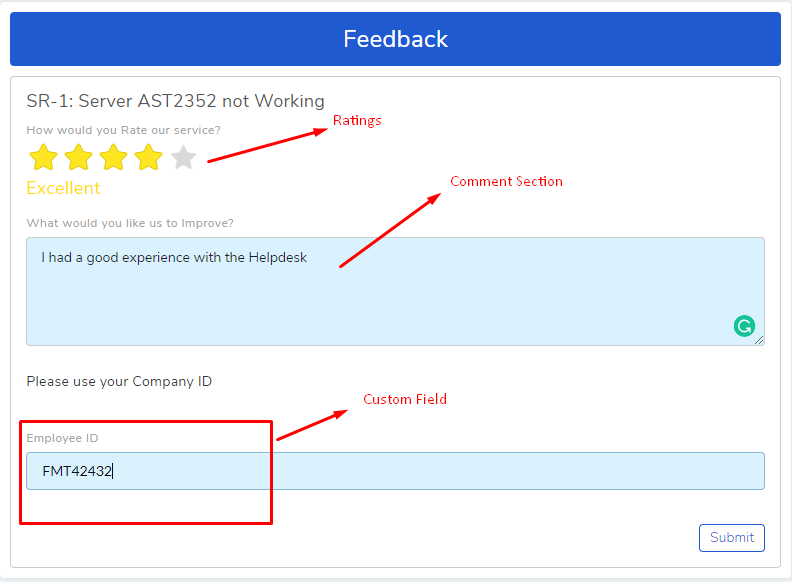
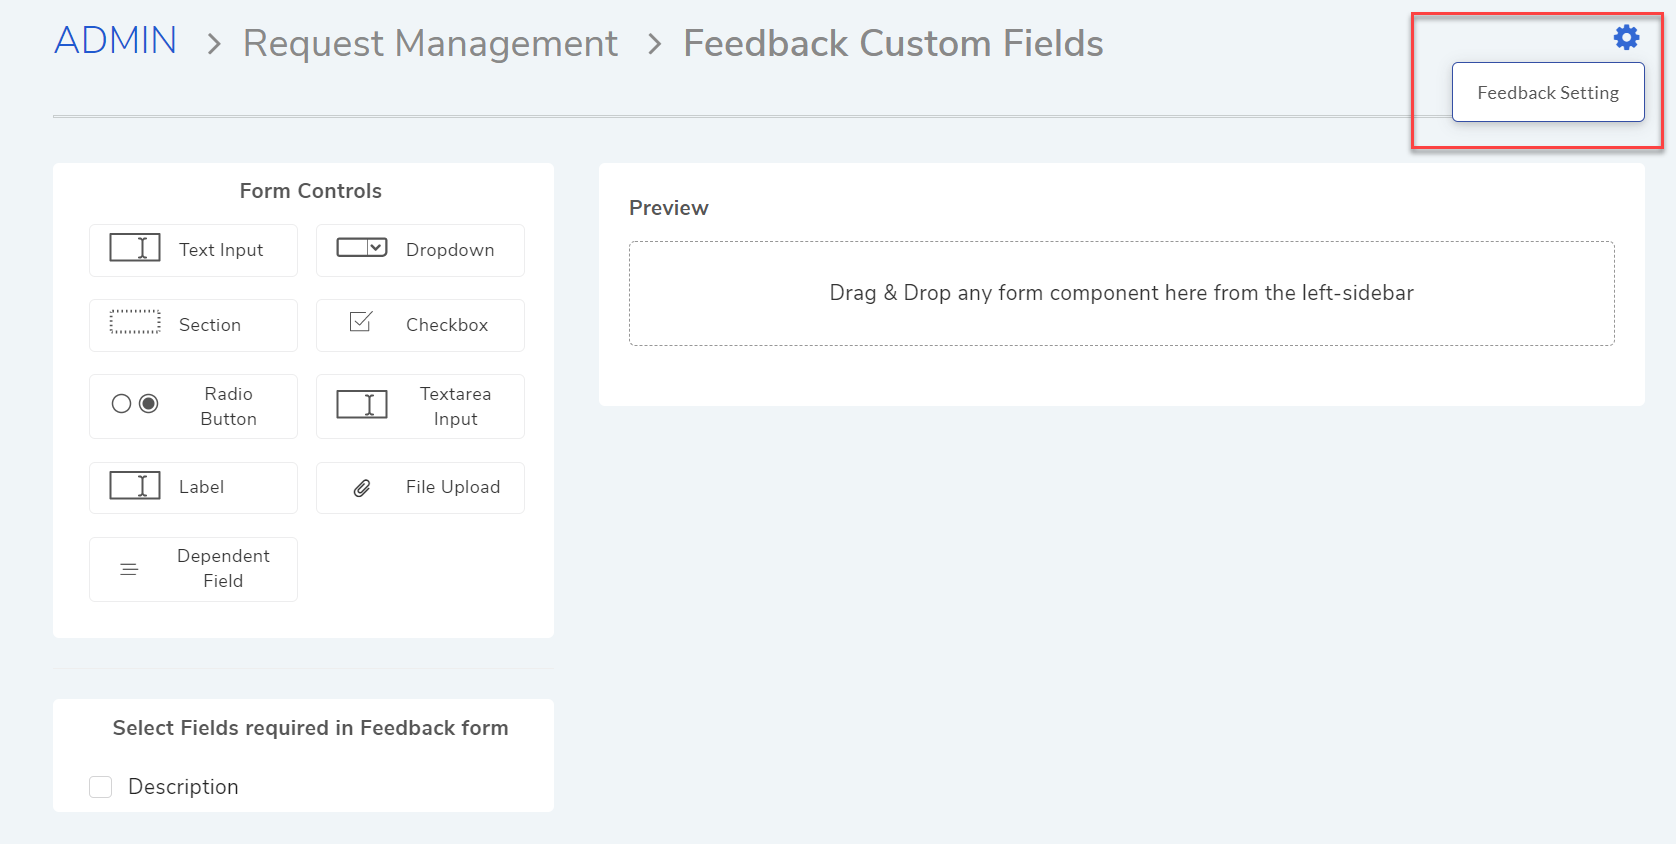
Also the Feedback Rating can be done from the same Page. Go to Admin >> Any Module >> Custom Fields.
10.6.4.3.9. Purchase Custom Field
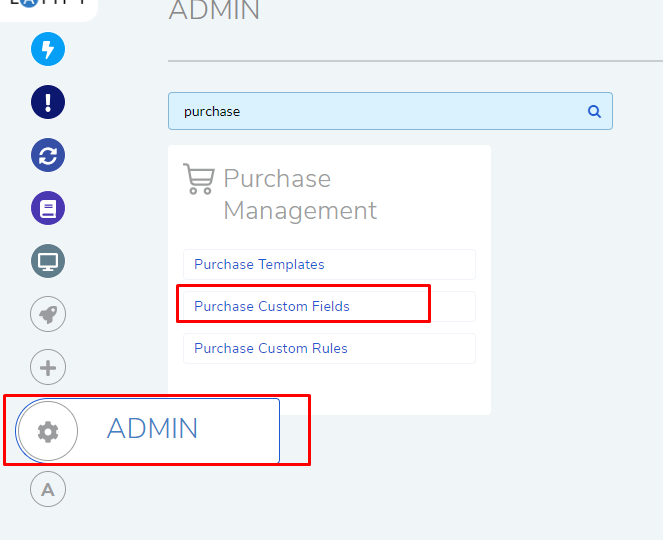
Custom fields appear on the Edit a PO page. Custom fields can be accessed from Admin >> Purchase Custom Fields.
There are two class of Purchase Custom Fields:
General Details: This class of custom fields appear under the Additional Information section of Edit a PO page.
Purchase Items: These are Text fields that support only numbers, and they either add or subtract to the Net Total price of a Purchase Order (excluding or including shipping).
Learn More about Purchase Custom Fields.
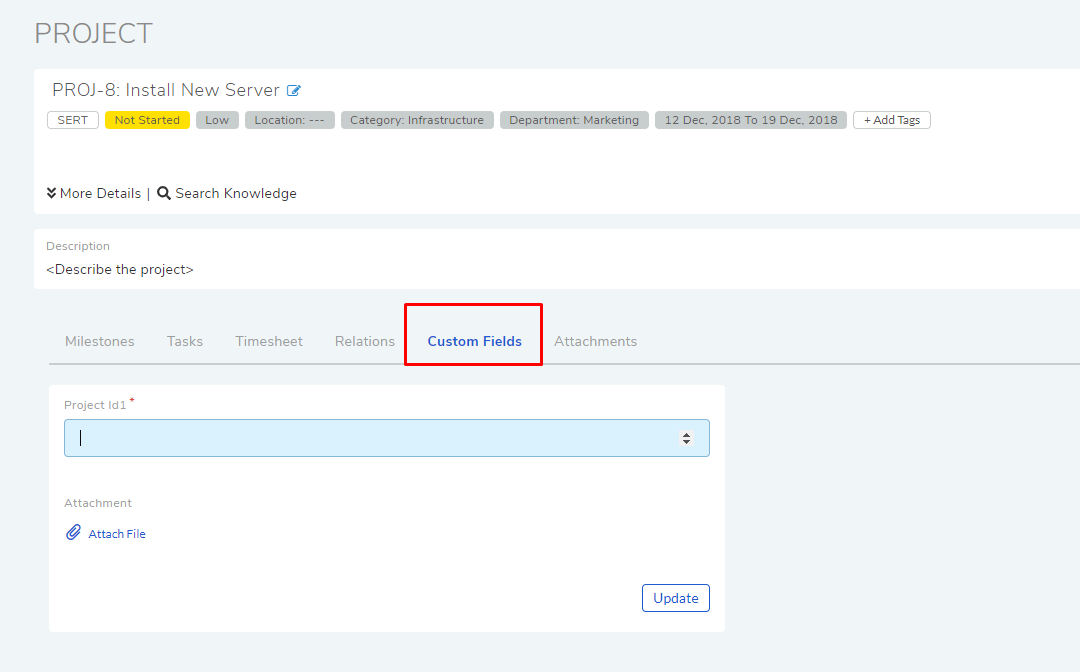
10.6.4.3.10. Project Custom Field
Custom fields appear under the Custom Field tab in the details view of a project.