How to Upgrade OS Using Package Deployment?
Upgrade Windows OS on endpoints centrally using agent-based Package Management, no manual intervention required on target devices.
Motadata ServiceOps supports OS upgrades via Package Management using a ZIP package that contains the OS ISO file and the scripts provided by Motadata. The agent executes the upgrade silently on the endpoint, performs pre-deployment compatibility checks, runs the in-place upgrade, and validates the result post-deployment.
The steps and examples in this guide use a Windows 10 to Windows 11 upgrade as a reference. The overall procedure applies to any supported OS upgrade.
- OS Upgrade via Package Management is currently supported for Windows OS only.
- Ensure the Windows Agent is version 8.7.405 or higher, the File Server is version 8.7.401 or higher, and ServiceOps is on the latest 8.7.4 release.
- Ensure the device remains connected to a power source throughout the upgrade process.
- Ensure the ISO version is higher than the installed OS version on the endpoint machine.
- Ensure the PowerShell and WMIC services are enabled on the endpoint machine.
- Continuous Internet connectivity with stable bandwidth is required throughout the upgrade process without any interruption.
Server Prerequisites
Before deploying OS upgrades via Package Management, the following server and infrastructure changes are required on the ServiceOps application server.
Application Server Configuration
Add the following properties to the application properties file at the path /opt/flotomate/main-server/config/application-custom.properties and restart the main server:
spring.servlet.multipart.max-file-size=10240MB
spring.servlet.multipart.max-request-size=10240MB
Nginx Configuration
Update two blocks in the Nginx configuration file:
In the
location /api/downloadblock, add:proxy_buffering off;In the
location /api/upload/bigdeliverableblock, update:client_max_body_size 10G;Update
/fileserver/apilike thislocation /fileserver/api {
proxy_pass http://localhost:6060/api;
proxy_buffering off;
proxy_max_temp_file_size 8192m;
}
Restart the main server and nginx after updating the application properties file for the changes to take effect.
Compatibility Requirements
Before deploying the upgrade package, verify that each target endpoint meets the hardware and firmware requirements for the target OS.
Hardware & Firmware Requirements
| Requirement | Minimum Value |
|---|---|
| RAM | 4 GB or more |
| Disk Space | 64 GB free space |
| Processor | 1 GHz or faster, minimum 2 cores, 64-bit compatible |
| Firmware | UEFI with Secure Boot capability |
| TPM | Version 2.0 or above |
Validation Commands
Run the following commands on target endpoints to confirm compatibility before deployment.
Check OS Version
winver
The result must indicate Windows 10. Devices already running Windows 11 must not be targeted.
Check RAM
Get-CimInstance Win32_ComputerSystem | Select TotalPhysicalMemory
Returned value must be ≥ 4 GB.
Check Disk Space
Get-PSDrive C
Available free space must be ≥ 64 GB.
Check Processor
Get-CimInstance Win32_Processor | Select Name, NumberOfCores, MaxClockSpeed
Result must show minimum 2 cores, clock speed ≥ 1 GHz, and a 64-bit compatible processor.
Check TPM Version
tpm.msc
TPM status must show TPM is ready for use with Specification Version 2.0 or above.
Check Secure Boot Status
Confirm-SecureBootUEFI
Result must return True. Secure Boot must be enabled.
Procedure
Step 1: Create a Package
- Navigate to Admin > Patch Management > Packages and click Add Package.
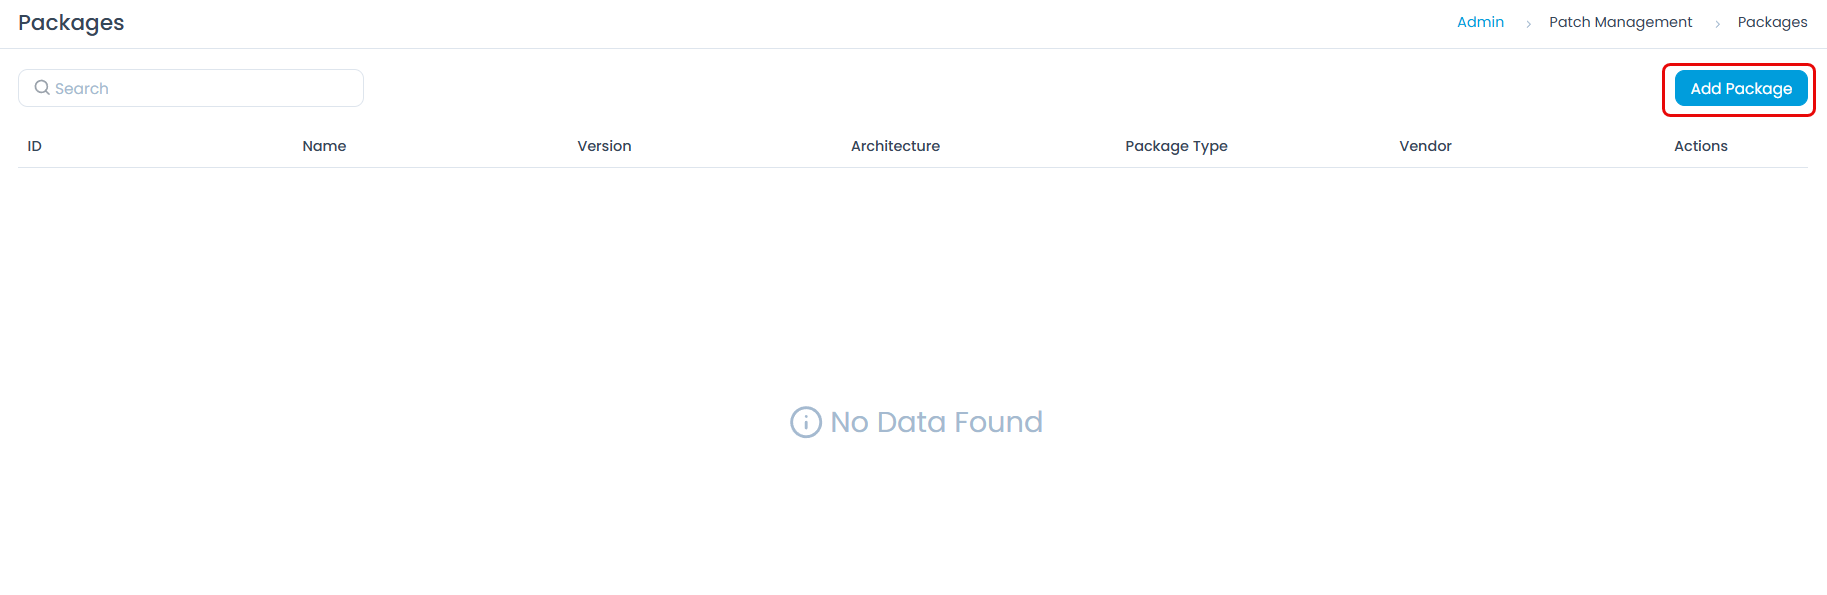
- Enter the package details:
- Name: Enter a descriptive name (e.g.,
OS Upgrade - Windows 11). - Package Type: Select ZIP.
- Upload File: Upload the ZIP file you created containing the OS ISO and the scripts provided by Motadata.
- Name: Enter a descriptive name (e.g.,
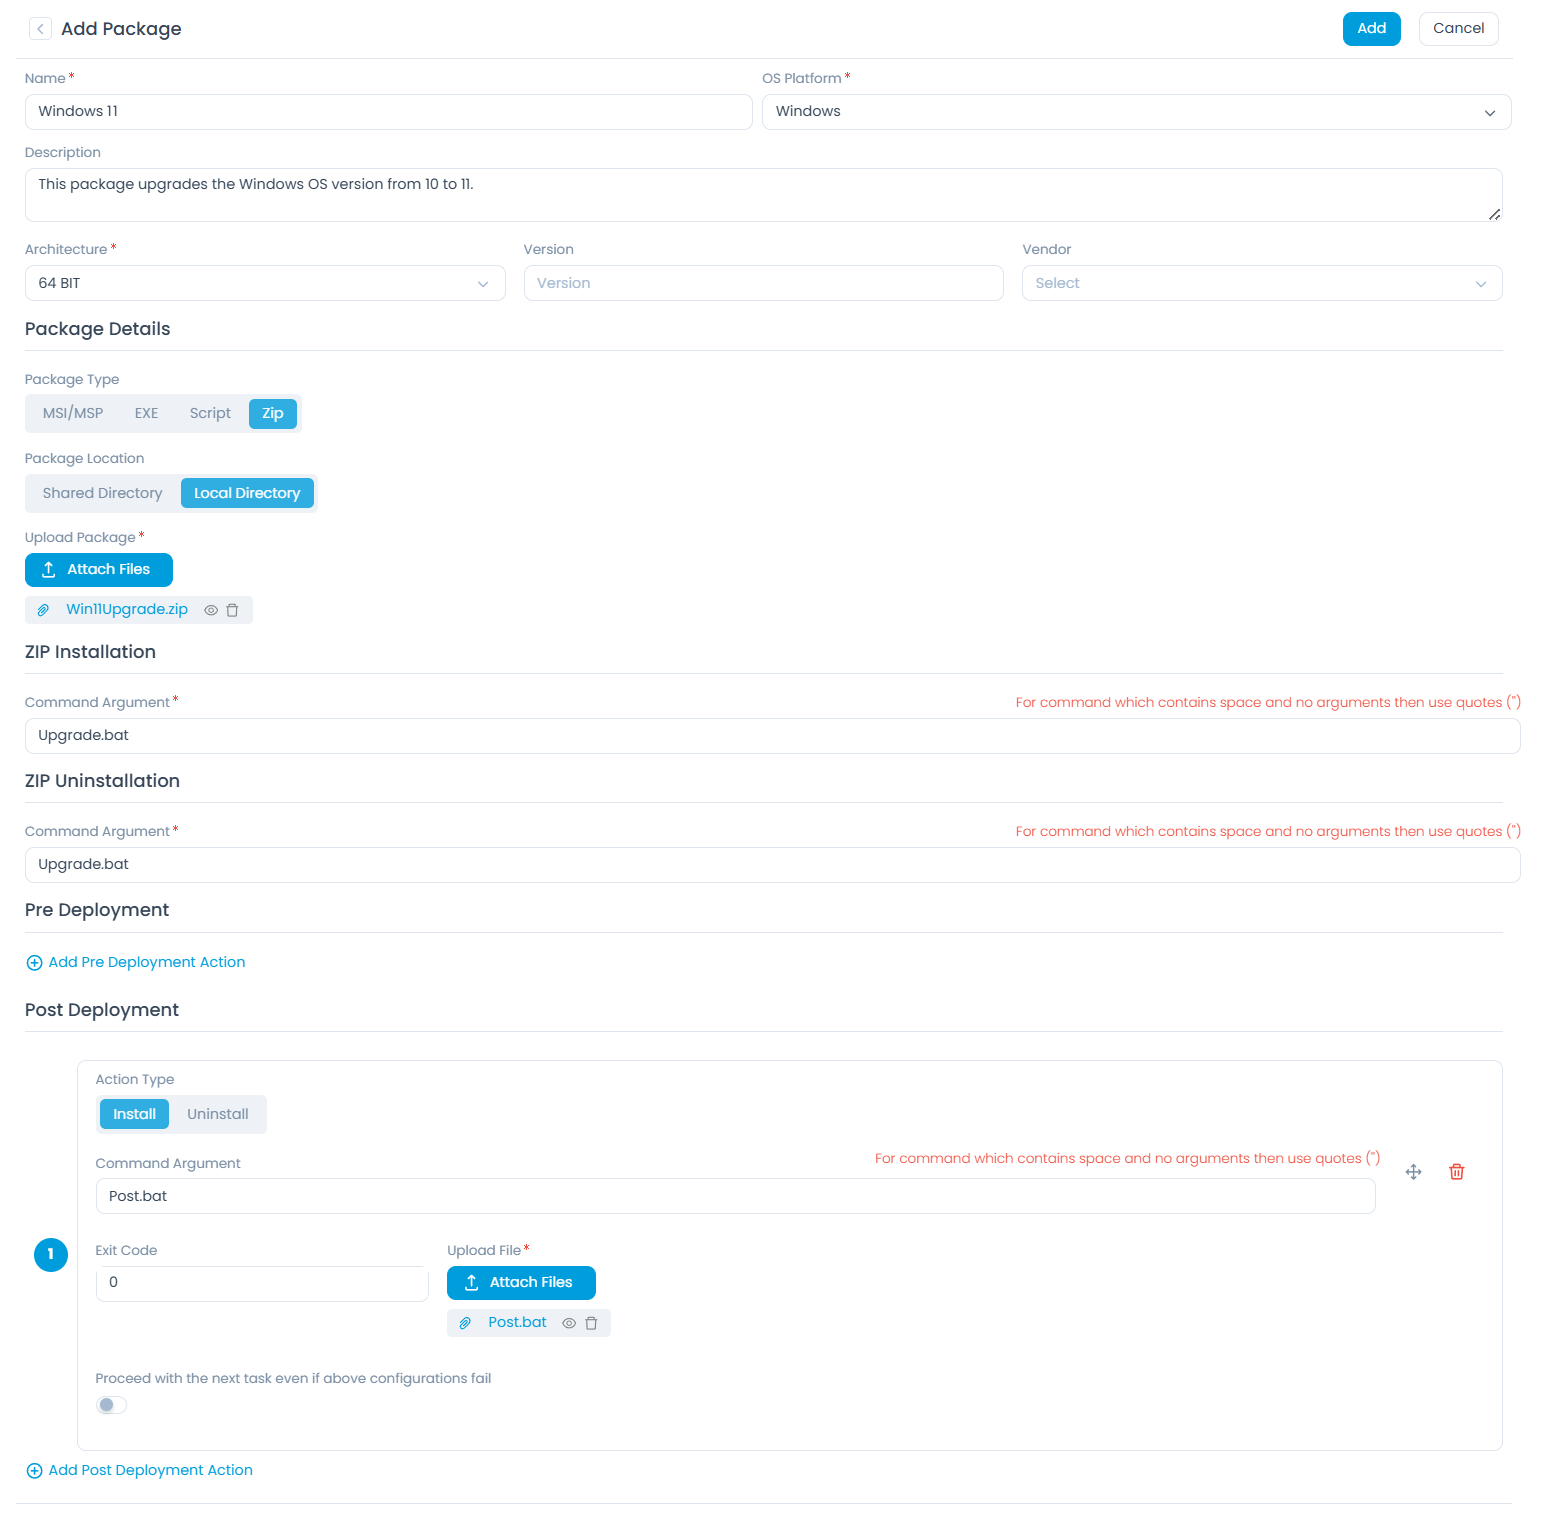
Both the Upgrade.bat and Post.bat scripts are provided by the Motadata Support team. Contact Motadata Support to obtain these scripts before proceeding. The Post.bat file is to be uploaded separately in the Post Deployment section.
Required ZIP contents (Windows 11 upgrade example):
windows.iso: Windows 11 ISO file (obtained separately). The ISO file must be named exactlywindows.iso.Upgrade.bat: provided by the Motadata Support team; mounts the ISO and initiates the silent upgrade.
Configure the commands:
Installation Command: Enter the installation script name provided in the package (e.g.,
Upgrade.batfor Windows 11).This triggers pre-deployment compatibility checks, ISO mounting, the silent in-place OS upgrade, and automatic execution under agent context.
Uninstallation Command:
cmd /c exit 0This is a no-operation command. OS upgrade rollback is not supported through package uninstallation.
Under the Post Deployment section, upload the
Post.batfile (provided by the Motadata support team) and set the command to:Post.batThis file validates whether the OS upgrade process is completed successfully.
Click Add to save the package.
Step 2: Create a Deployment Policy
- Navigate to Admin > Patch Management > Deployment Management > Deployment Policies and create a deployment policy to control how the deployment request executes the upgrade.

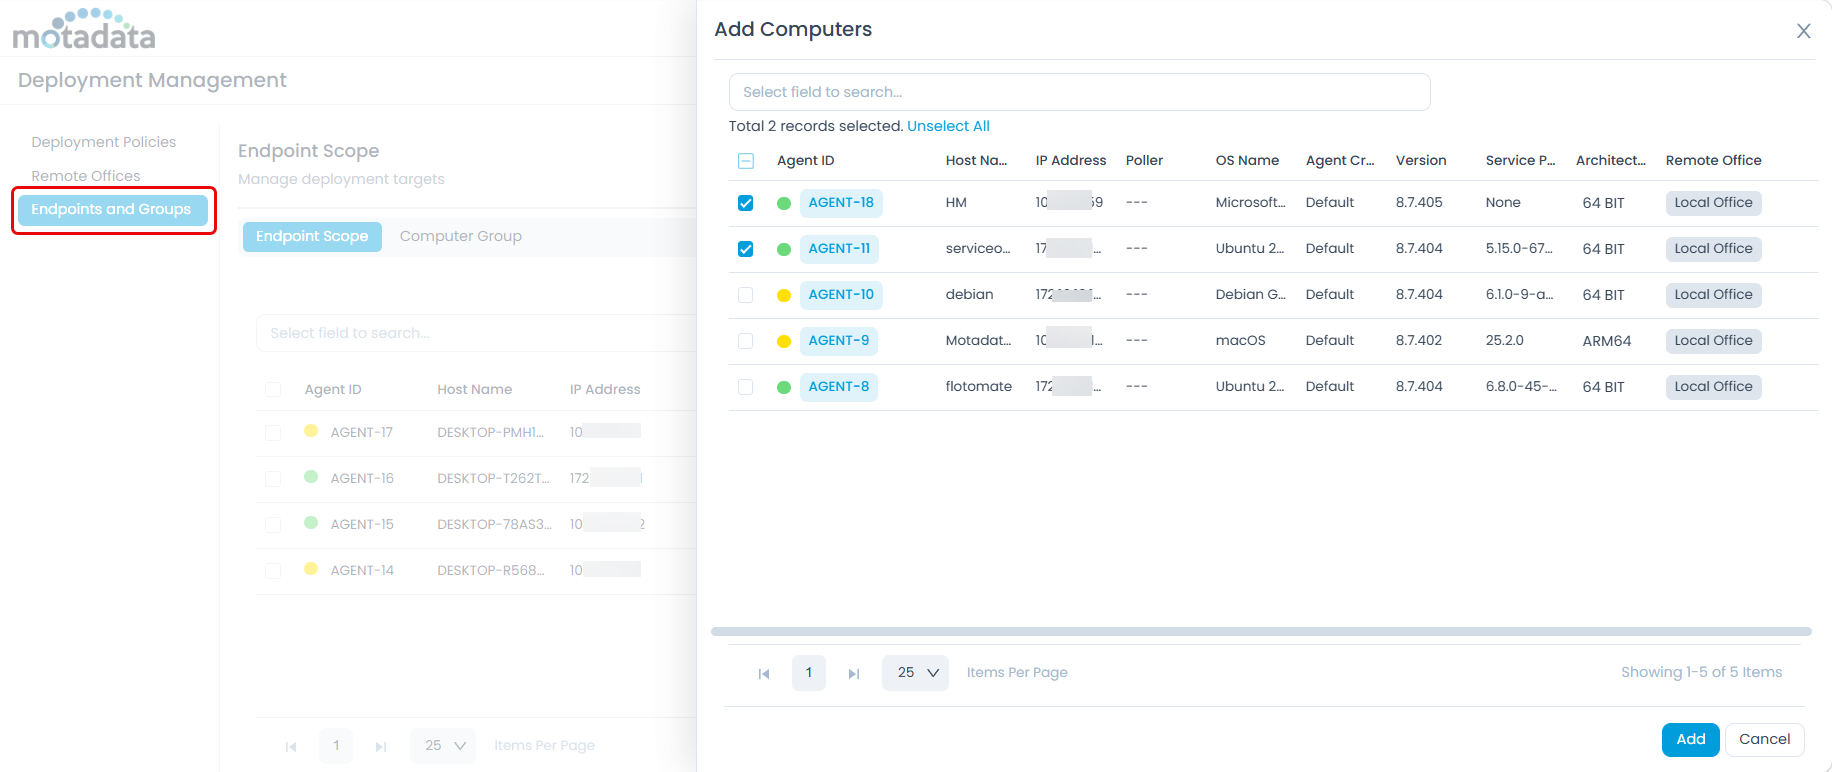
Step 3: Add Computers to Endpoint Scope
- Navigate to Admin > Patch Management > Deployment Management > Endpoints and Groups and add the target computers.
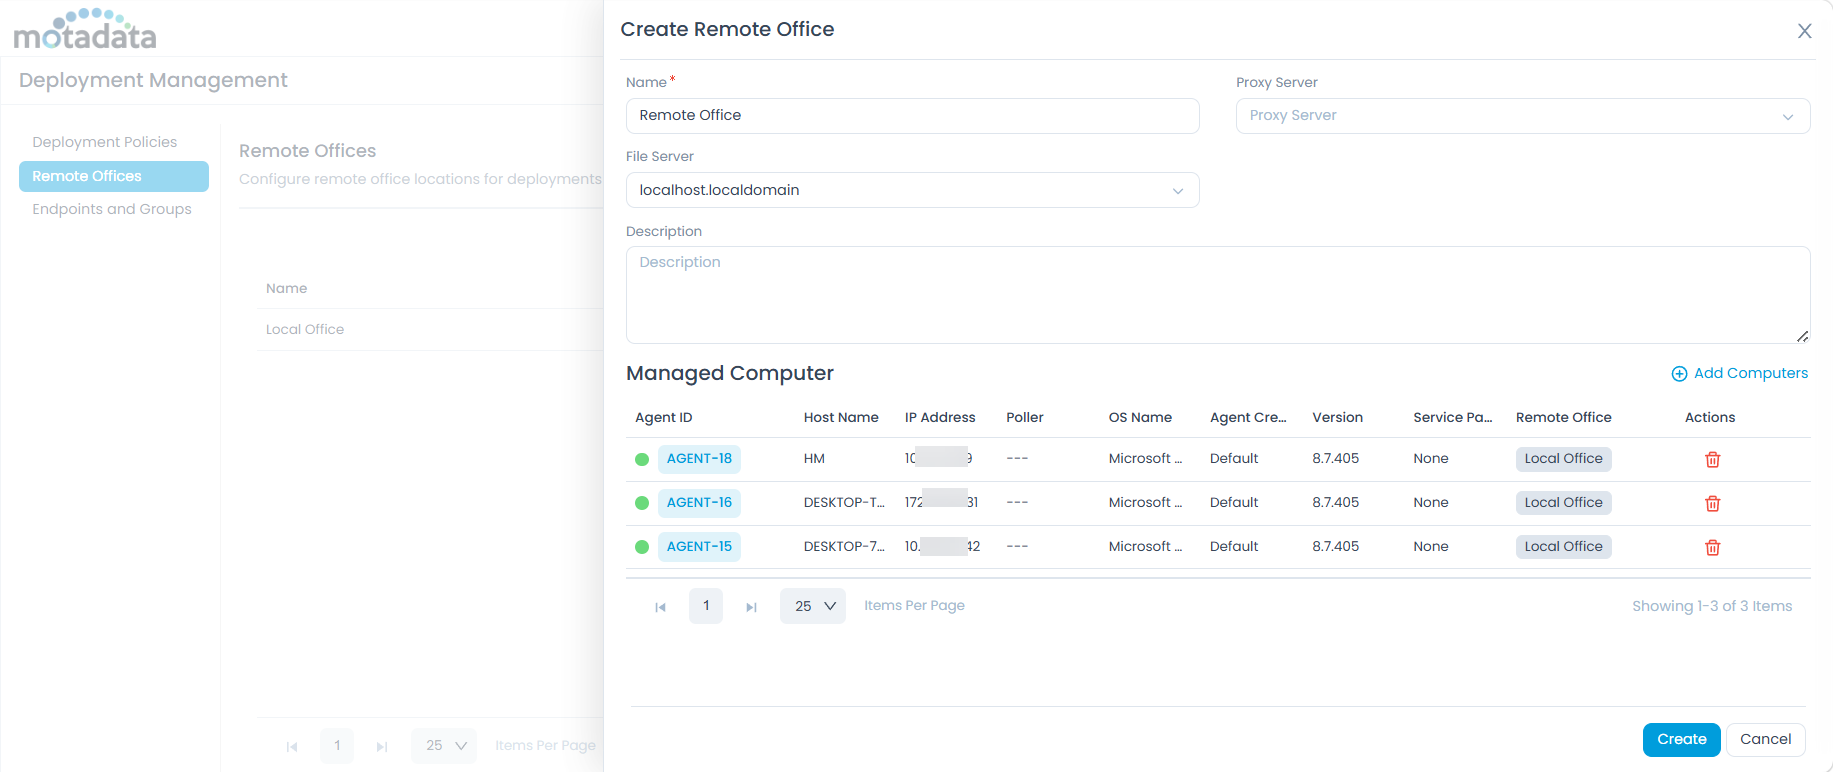
Step 4: Create Remote Offices (Optional)
- If you want to distribute the upgrade package through remote offices, navigate to Admin > Patch Management > Deployment Management > Remote Offices and click Create Remote Office. Add the computers you want to include in the remote office scope.
This step is optional. Remote Offices are useful when deploying to endpoints across different network locations to optimize bandwidth usage. If not required, skip to Step 5.
Step 5: Create Package Deployment
- Navigate to Package Management > Package Deployment and click Create Package Deployment.
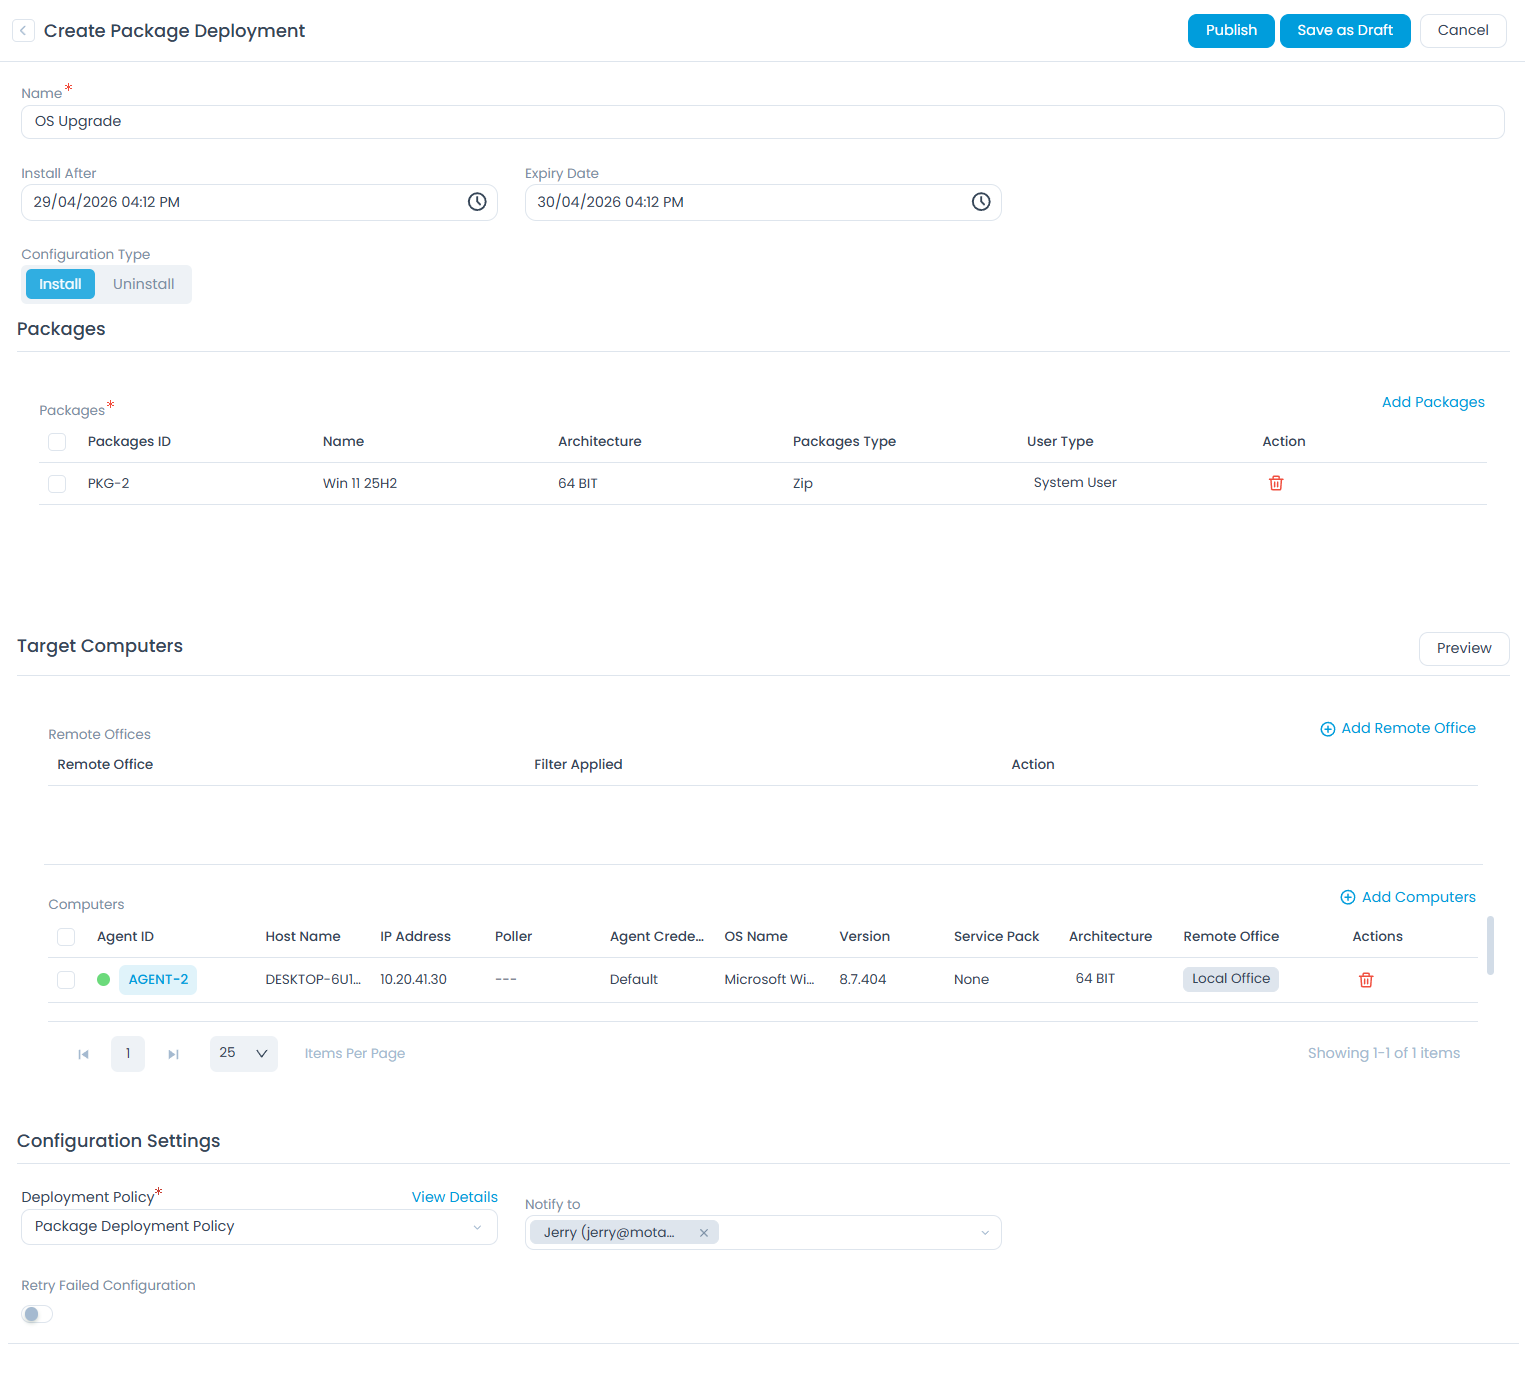
- Fill in the following details:
- Name: Enter a name for this deployment.
- Configuration Type: Select Install.
- Package: Select the OS upgrade package created in Step 1.
- Remote Offices: Select the remote office configured in Step 4 (optional).
- Computers: Select the target endpoints.
- Deployment Policy: Select the policy created in Step 2.
Click Publish to start the deployment.
Monitor the deployment progress on the Installation tab of the Deployment Request Details page. The result message will appear as either Success or Fail.
With Post.bat, validation will run after the upgrade completes. Once all validations are successful, the deployment is marked as Success or the error message is displayed in the result.
Best Practices
- Pilot before rolling out. Deploy to a small group of non-critical endpoints first. Validate the result before targeting the full fleet.
- Schedule during off-hours. OS upgrades require a device reboot. Use the Deployment Policy to schedule the deployment outside business hours to avoid disrupting end users.
- Pre-check server disk space. The system validates available disk space before the upload begins. Ensure the application server has sufficient free space to store the ZIP package (typically 5 GB or more) before initiating the upload.
- Do not retarget already-upgraded devices. Devices already running the target OS must be excluded from the endpoint scope. Running the upgrade package on an already-upgraded device may produce unexpected results.
- Verify agent connectivity before publishing. Confirm that all target endpoints have an active agent connection before publishing the deployment. Offline endpoints will remain in
Yet to Receivestatus until the agent reconnects. - Ensure uninterrupted power during deployment. The end machine must not be restarted or lose power while the deployment is in progress.
Troubleshooting
Upload fails or times out
- Confirm the application properties file has been updated with the correct
max-file-sizeandmax-request-sizevalues and that the main server has been restarted. - Confirm the Nginx
client_max_body_sizeis set to10Gin thelocation /api/upload/bigdeliverableblock. - Check available disk space on the application server. The system will reject the upload if there is insufficient space.
- Check all the configurations of backend properties as mentioned above.
Deployment status remains "Failed" after upgrade
- Open the Deployment Request Details page, go to the Installation tab, and check the result for the error message.
- Check the agent logs on the endpoint for errors during the post-deployment script execution.
- If the upgrade did complete successfully on the device despite the
Failedstatus, check the result.
FAQs
Can I roll back the upgrade after it completes?
A: No. OS upgrade rollback is not supported through Package Management. The uninstallation command is a no-operation placeholder. Plan and validate the upgrade thoroughly using a pilot deployment before targeting production endpoints.
Will existing applications be preserved after the upgrade?
A: This depends on the upgrade method used by the package. For Windows in-place upgrades (such as Windows 10 to Windows 11), installed applications, user files, and settings are preserved.
Can I target multiple endpoints in a single deployment?
A: Yes. In Step 5, the Computers field accepts multiple endpoints. You can also use the Remote Offices field to distribute the package across different network locations, which optimizes bandwidth by avoiding repeated downloads from the central server.
What happens if an endpoint is offline when the deployment is published?
A: The deployment status for that endpoint remains Yet to Receive. Once the agent reconnects, it will pick up the deployment and execute it automatically, provided the deployment policy's schedule window has not expired.