How to Discover WAN Monitoring?
WAN monitoring refers to the process of supervising and managing the availability and health of the WAN link network. It is often crucial for businesses relying heavily on WAN connectivity that their network is available effeciently round the clock.
This is where the Motadaata NMS WAN monitoring feature, helps to monitor the availability of the WAN links, RTT (Round Trip Time), and the network traffic details of your organization. Also, you can view the WAN availability reports on the dasboard and check the performance based on which you can take the necessary measures.
Read on to know the steps involved in monitoring the WAN links.
Prerequisites
The SNMP Walk response of the following devices should be available from the Motdata NMS backend server:
- Router’s IP Address
- Internet Service Provider’s (ISP) IP Address
You can check the SNMP walk response using the following command:
Syntax for v2: snmpwalk -v2c -c [communutiy_name][Router or ISP’s IP Address]
Example: snmpwalk -v2c -c public 10.13.15.90
Syntax for v3: snmpwalk -v3 -l (noAuthNoPriv|authNoPriv|authPriv) -u (username) [-a (MD5|SHA)][-A (authphrase)] [-x DES][-X (privaphrase)] (ipaddress)[:(dest_port)][oid]
Example: snmpwalk -v3 -u site1md5aes -l authPriv -a MD5 -A site1md5aes -x AES -X site1md5aes 192.168.10.11
Supported Devices
- CISCO (IP SLA)
- Juniper (RPM)
Architecture
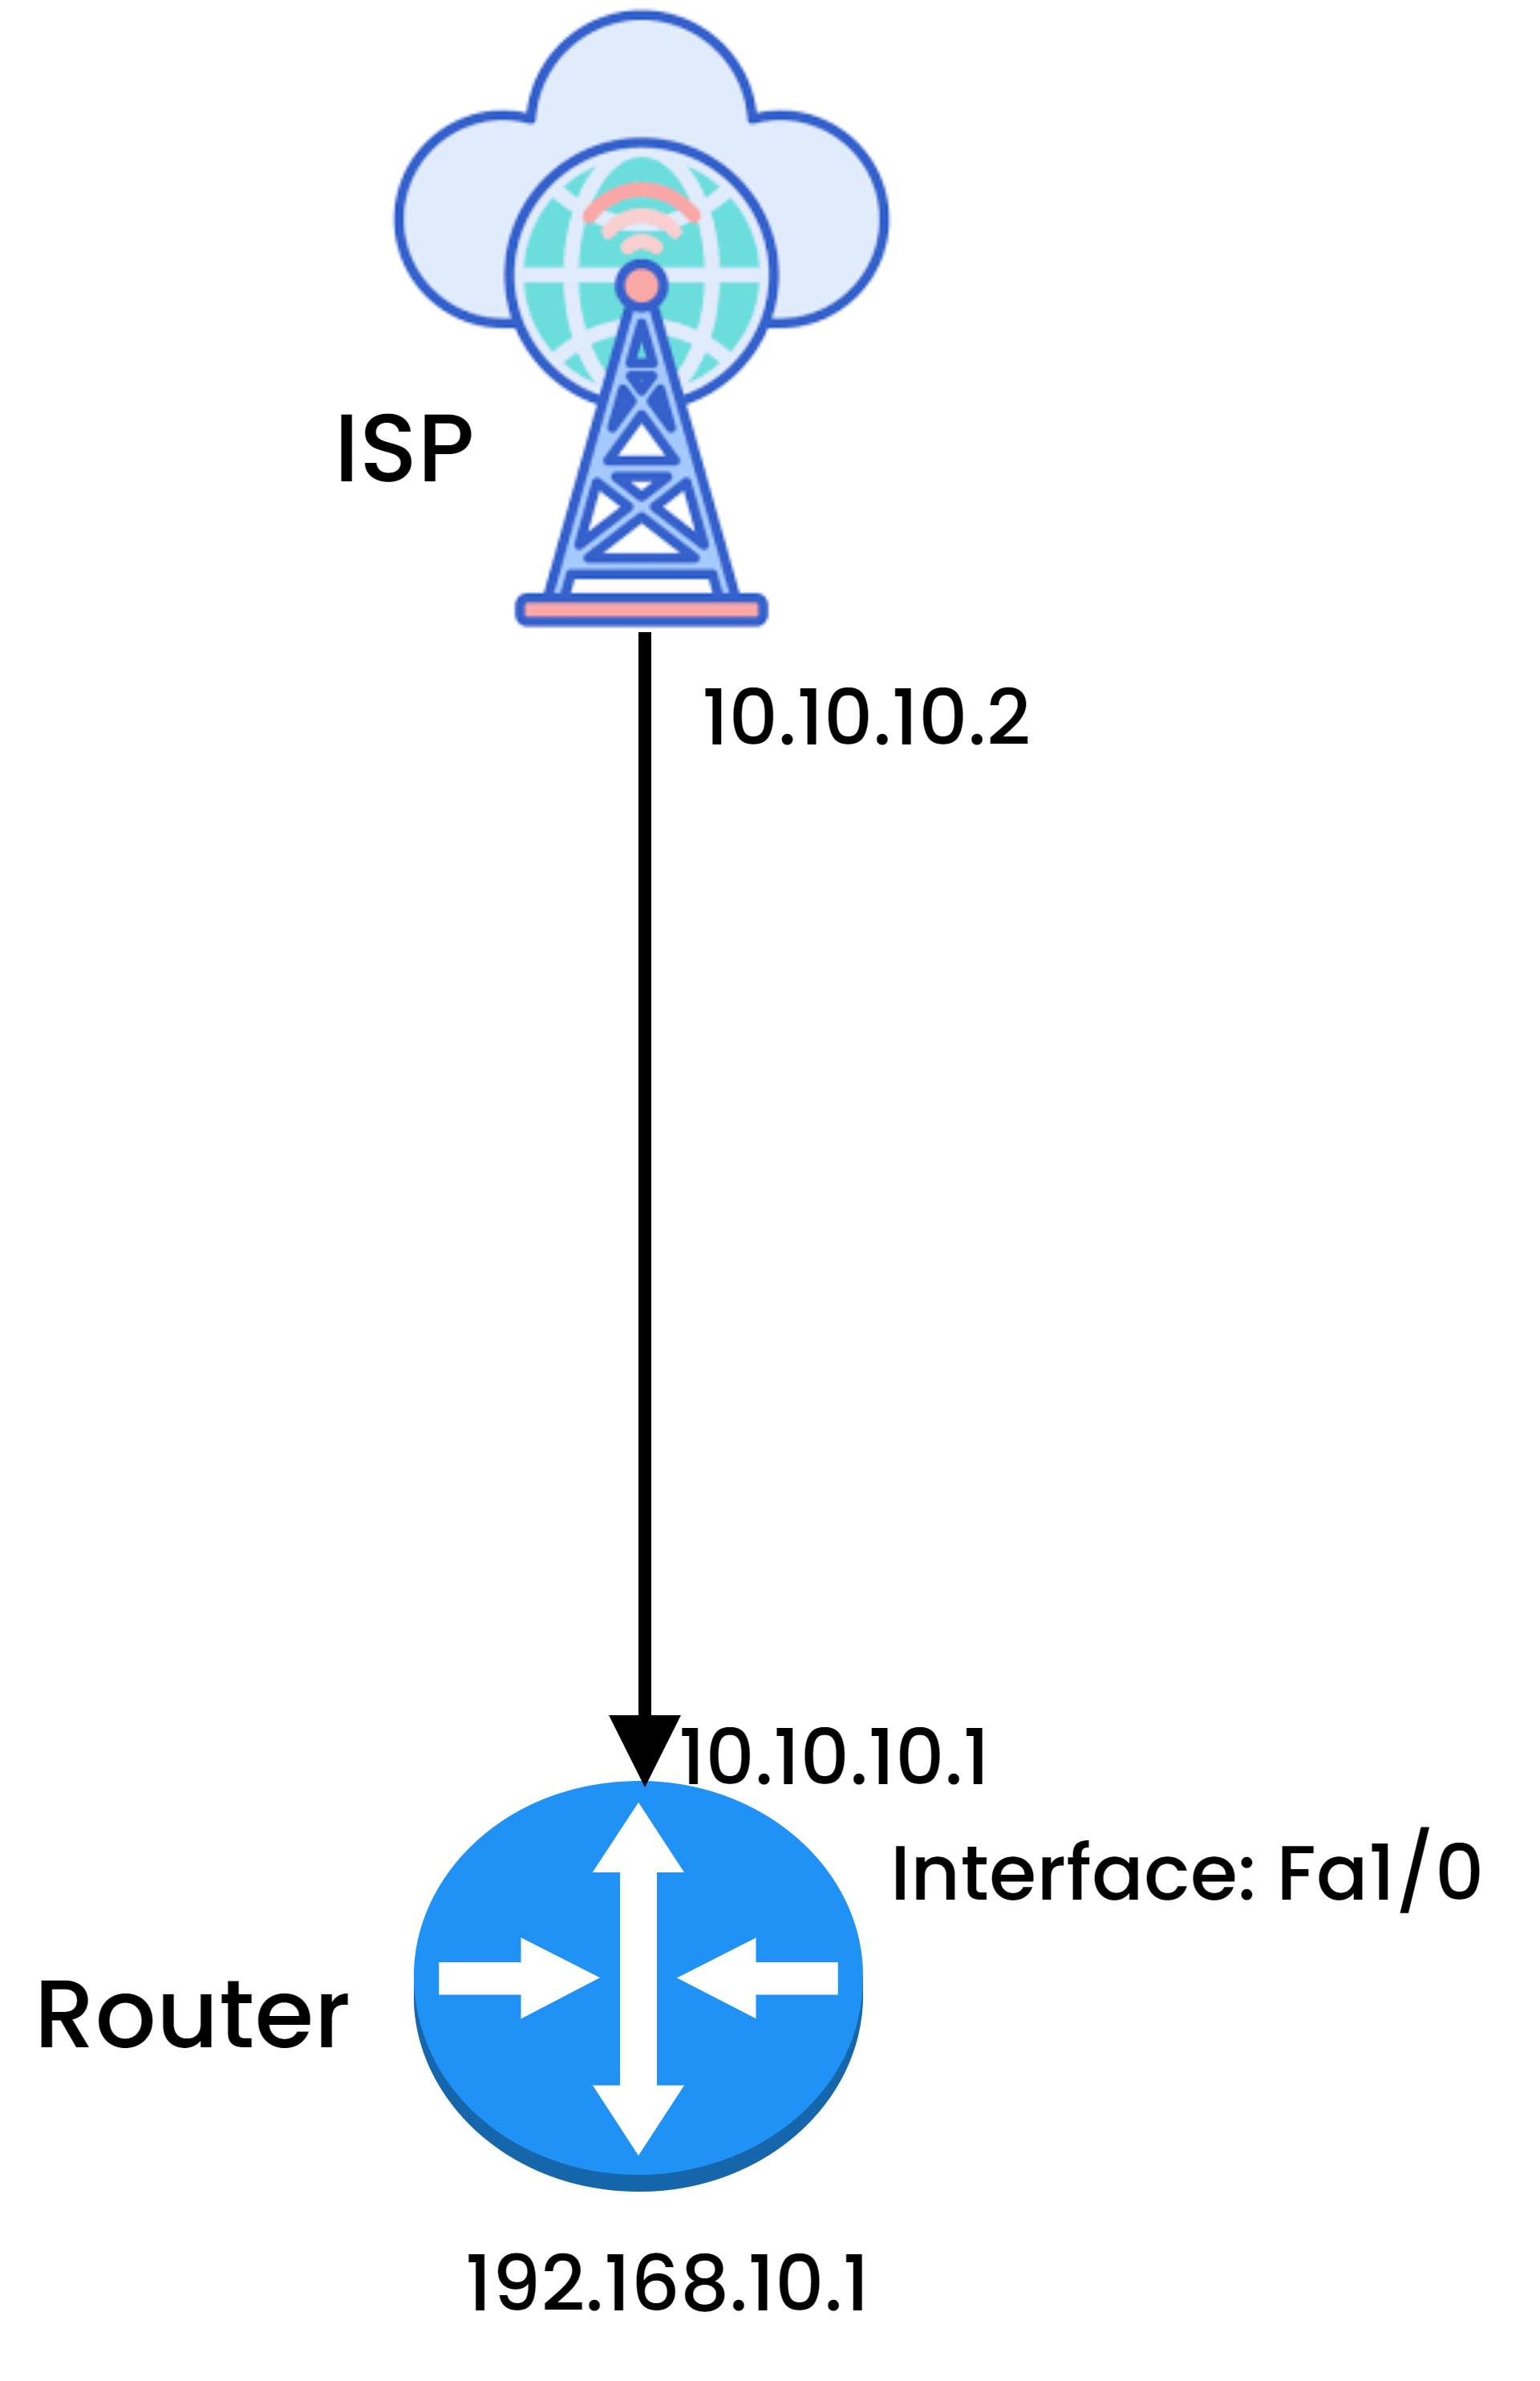
In the above figure, the WAN link between the router and the ISP can be monitored using the below steps.
- Create the credentials for network discovery.
- Create and perform the Network Discovery of the router’s interface 10.10.10.1.
- Provision the interface.
- Create the credentials for WAN monitoring.
- Create a WAN Monitoring profile of the link with source IP as 10.10.10.1 and destination IP as 10.10.10.2.
- Provision the WAN link.
- Once done, the link will be configured and monitored henceforth.
Procedure
To discover the WAN Link monitor, follow the below steps:
- Log in to the NMS portal.
Create Network Credential Profile
- Navigate to Admin > Discovery Settings > Network Credential Profiles page and click +New.
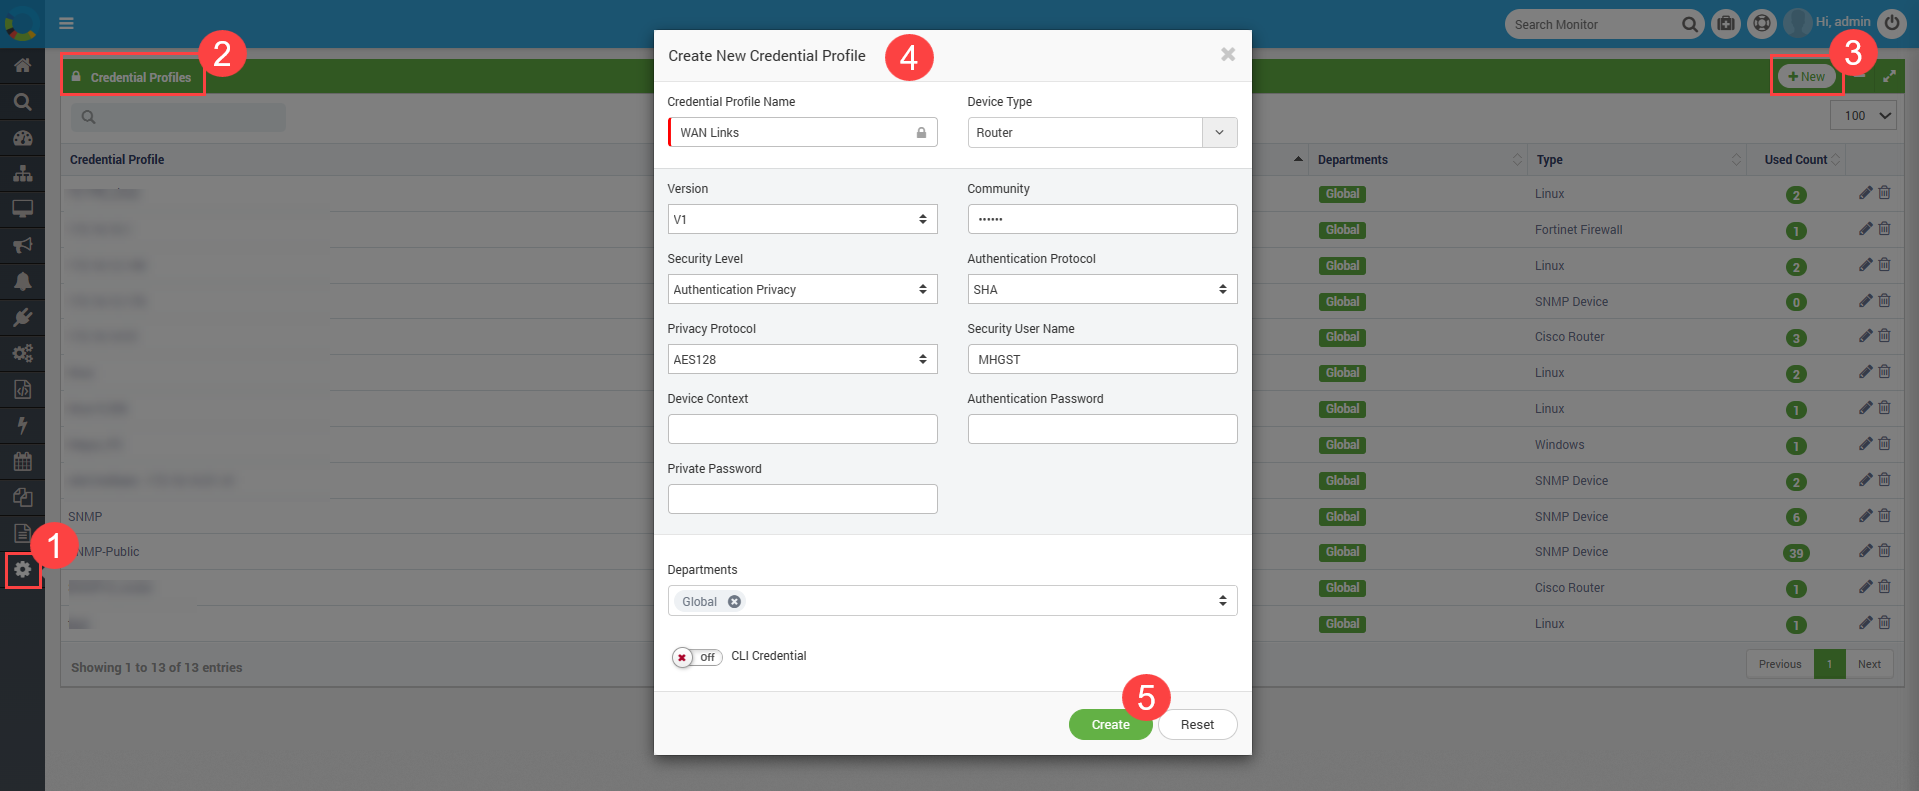
Enter the below details:
| Fields | Description |
|---|---|
| Credential Profile Name | Enter the name of the credential profile. |
| Device Type | Select the type for which you want to create the credential. Here, Router is selected. |
| Version | Select the version number of the SNMP device. The options are: • V1 • V2c • V3 |
| Community | Enter the community name as per the version selected. It is the unique string similar to the username used for handshaking. Motadata will send this string in request and device with same string responds back. |
| Security Level | Select the type of security based on the credentials used. • No Authentication No Privacy: Fill only ‘Security User Name’. • Authentication No Privacy: Fill ‘Security User Name’ and ‘Authentication Password’. • Authentication Privacy: Fill ‘Security User Name’, ‘Authentication Password’, and ‘Private Password’. |
| Authentication Protocol | Select the protocol used in the SNMP device for authentication. |
| Privacy Protocol | Select the protocol used in the SNMP device for privacy. |
| Security User Name | Provide the username to access the SNMP device. |
| Authentication Password | Provide encryption password to access SNMP device (if applicable). |
| Private Password | Provide private password to access SNMP device (if applicable). |
| Departments | Select the department whose users can view and use this credential profile. |
- Once done, click Create. Next, create the network discovery profile.
Create Network Discovery Profile
- Navigate to Admin > Discovery Settings > Network Discovery Profiles page and click +New.
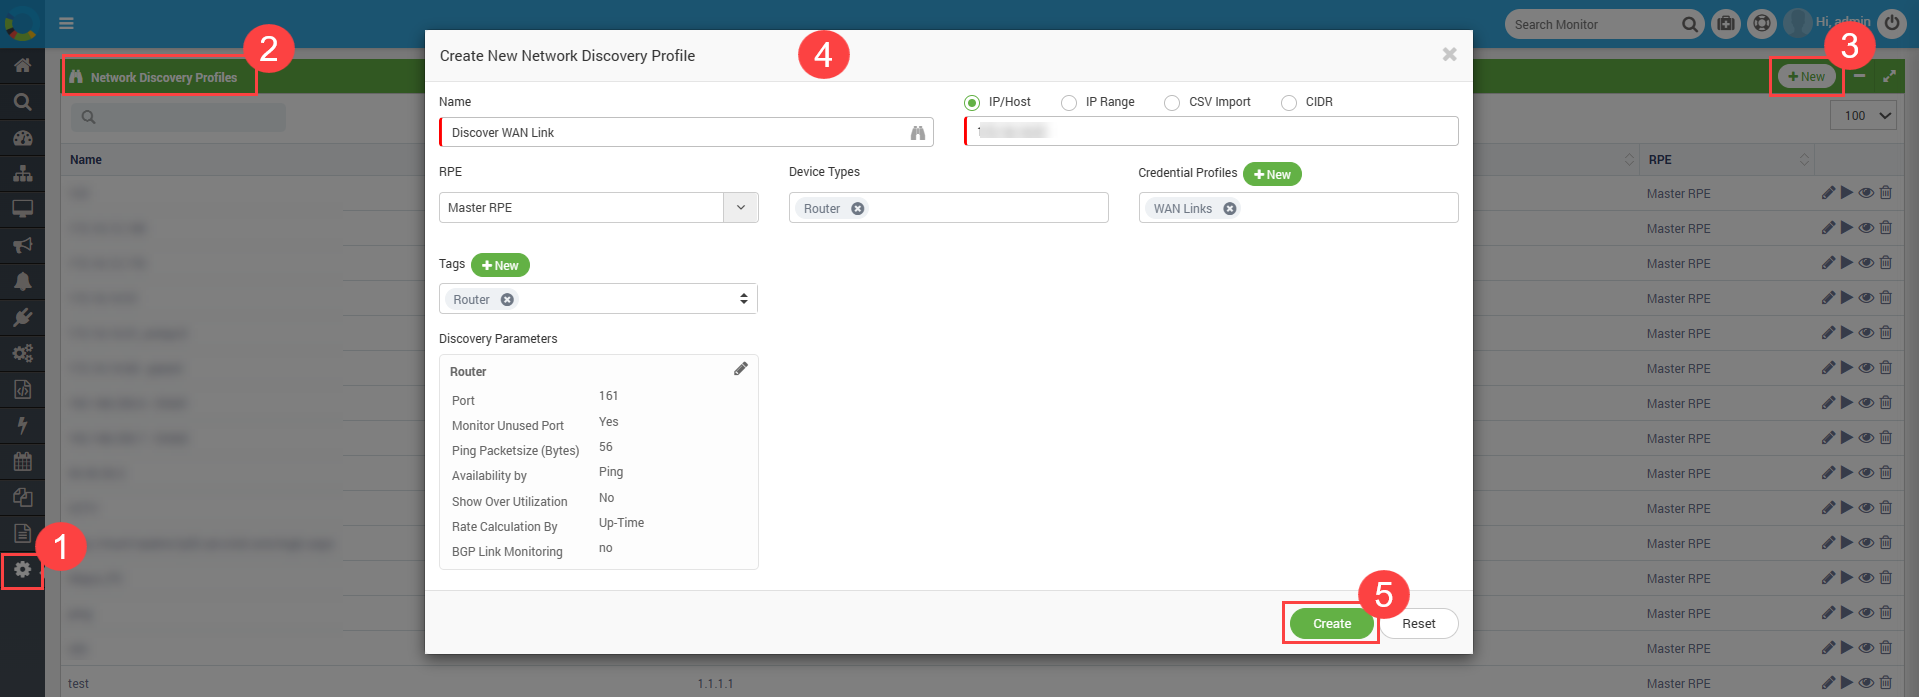
Enter the below details:
| Fields | Description |
|---|---|
| Name | Enter the name of the network discovery profile. |
| IP/Host | Enter the IP or hostname of the device that you want to discover. For example, 10.10.10.1 is used. |
| RPE | Select the RPE from which you want to discover and poll monitors. By default, ‘Master RPE’ is selected. |
| Device Types | Select the device types for which you want to create the discovery profile. |
| Credential Profiles | Select the credentials that will be used for discovery. You can also create a new one using the +New button. |
| Tags | Select the tags used to categorize and group profiles. |
| Discovery Parameters | Default port is visible at bottom. You can change the port by editing the section. ‘Monitor unused port’ will discover the unused ports also. To discover only used ports, edit the section and select yes. |
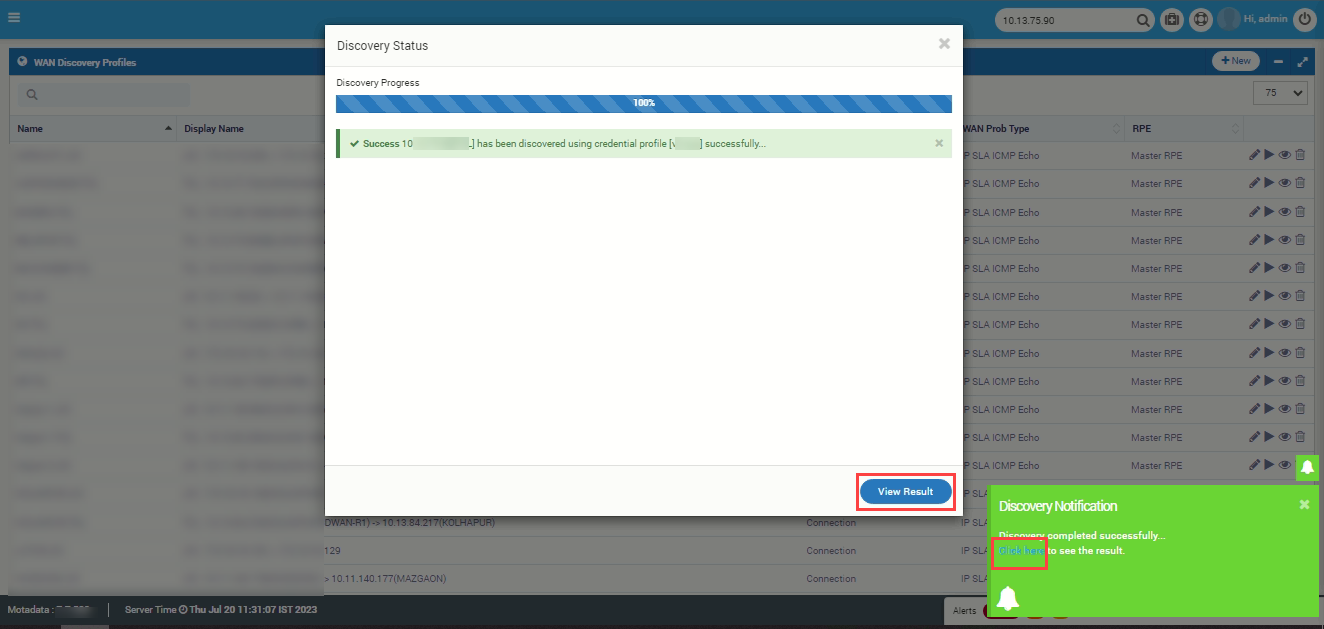
- Once the details are filled in, click Create, and run the discovery. The following screen will appear.

- Click the “View Result” button or the link “Click Here” in the Discovery Notification. The following popup appears.
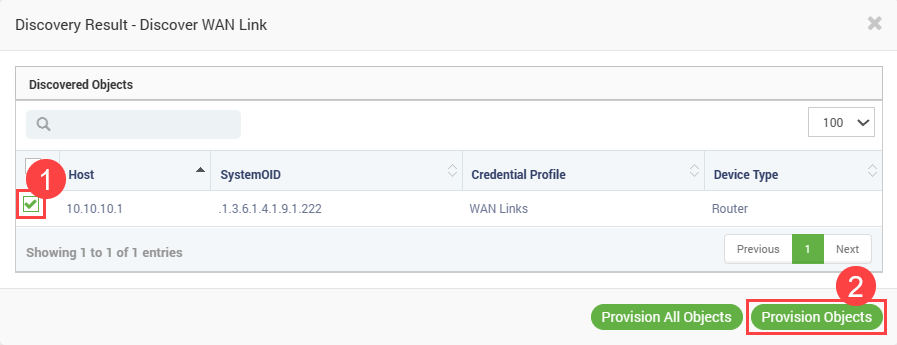
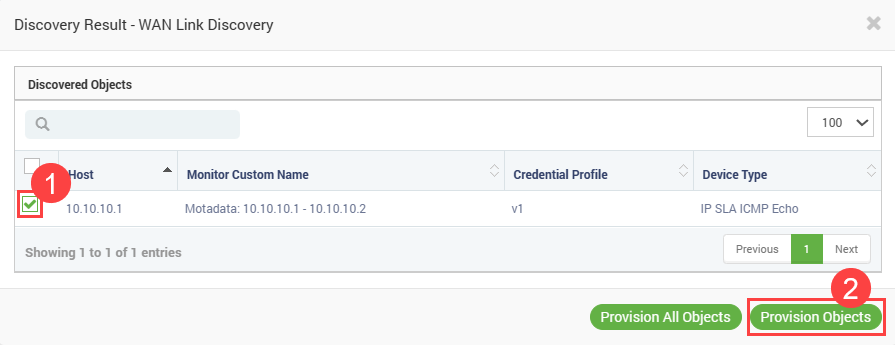
Provision the discovered device. To provision,
a. Click the “View Result” button on the list page (Step 5).
b. Select the “Host” IP Address.
c. Click the “Provision Objects” button.
Once the network device is provisioned, create a WAN credential profile.
Create WAN Credential Profile
- Navigate to Admin > Discovery Settings > WAN Credential Profiles page and click +New. The following popup appears.
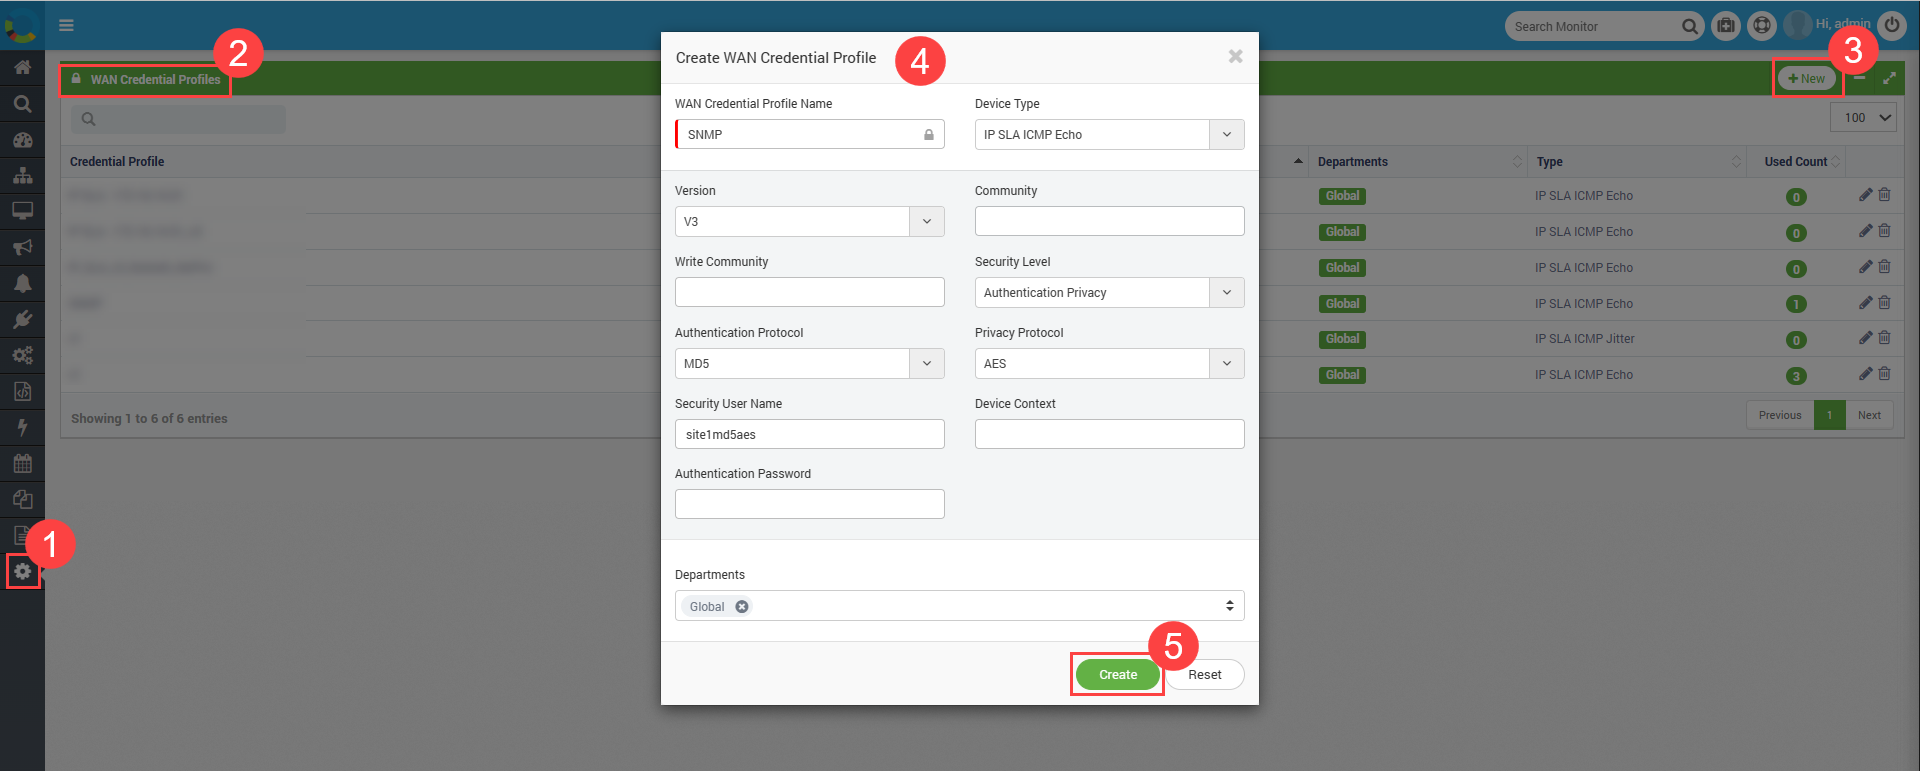
Enter the below details:
| Fields | Description |
|---|---|
| WAN Credential Profile Name | Enter the name of the credential profile. |
| Device Type | Select the type for which you want to create the credential. Here, IP SLA ICMP Echo is selected. |
| Version | Select the version number of the SNMP device. The options are: • V1 • V2c • V3 |
| Community | Enter the community name as per the version selected. It is the unique string similar to the username used for handshaking. Motadata will send this string in request and device with same string responds back. |
| Write Community | A unique string used for authentication and interaction. |
| Security Level | Select the type of security based on the credentials used. • No Authentication No Privacy: Fill only ‘Security User Name’. • Authentication No Privacy: Fill ‘Security User Name’ and ‘Authentication Password’. • Authentication Privacy: Fill ‘Security User Name’, and ‘Authentication Password’. |
| Authentication Protocol | Select the protocol used in the SNMP device for authentication. |
| Privacy Protocol | Select the protocol used in the SNMP device for privacy. |
| Security User Name | Provide the username to access the SNMP device. |
| Device Context | This is optional. |
| Authentication Password | Provide encryption password to access SNMP device (if applicable). |
| Departments | Select the department whose users can view and use this credential profile. |
- Once the details are filled in, click Create. Next, create the WAN discovery profile and use the credentials in it.
Create WAN Monitoring Profile
- Navigate to Admin > Discovery Settings > WAN Monitoring Profiles page and click +New. The following popup will appear.
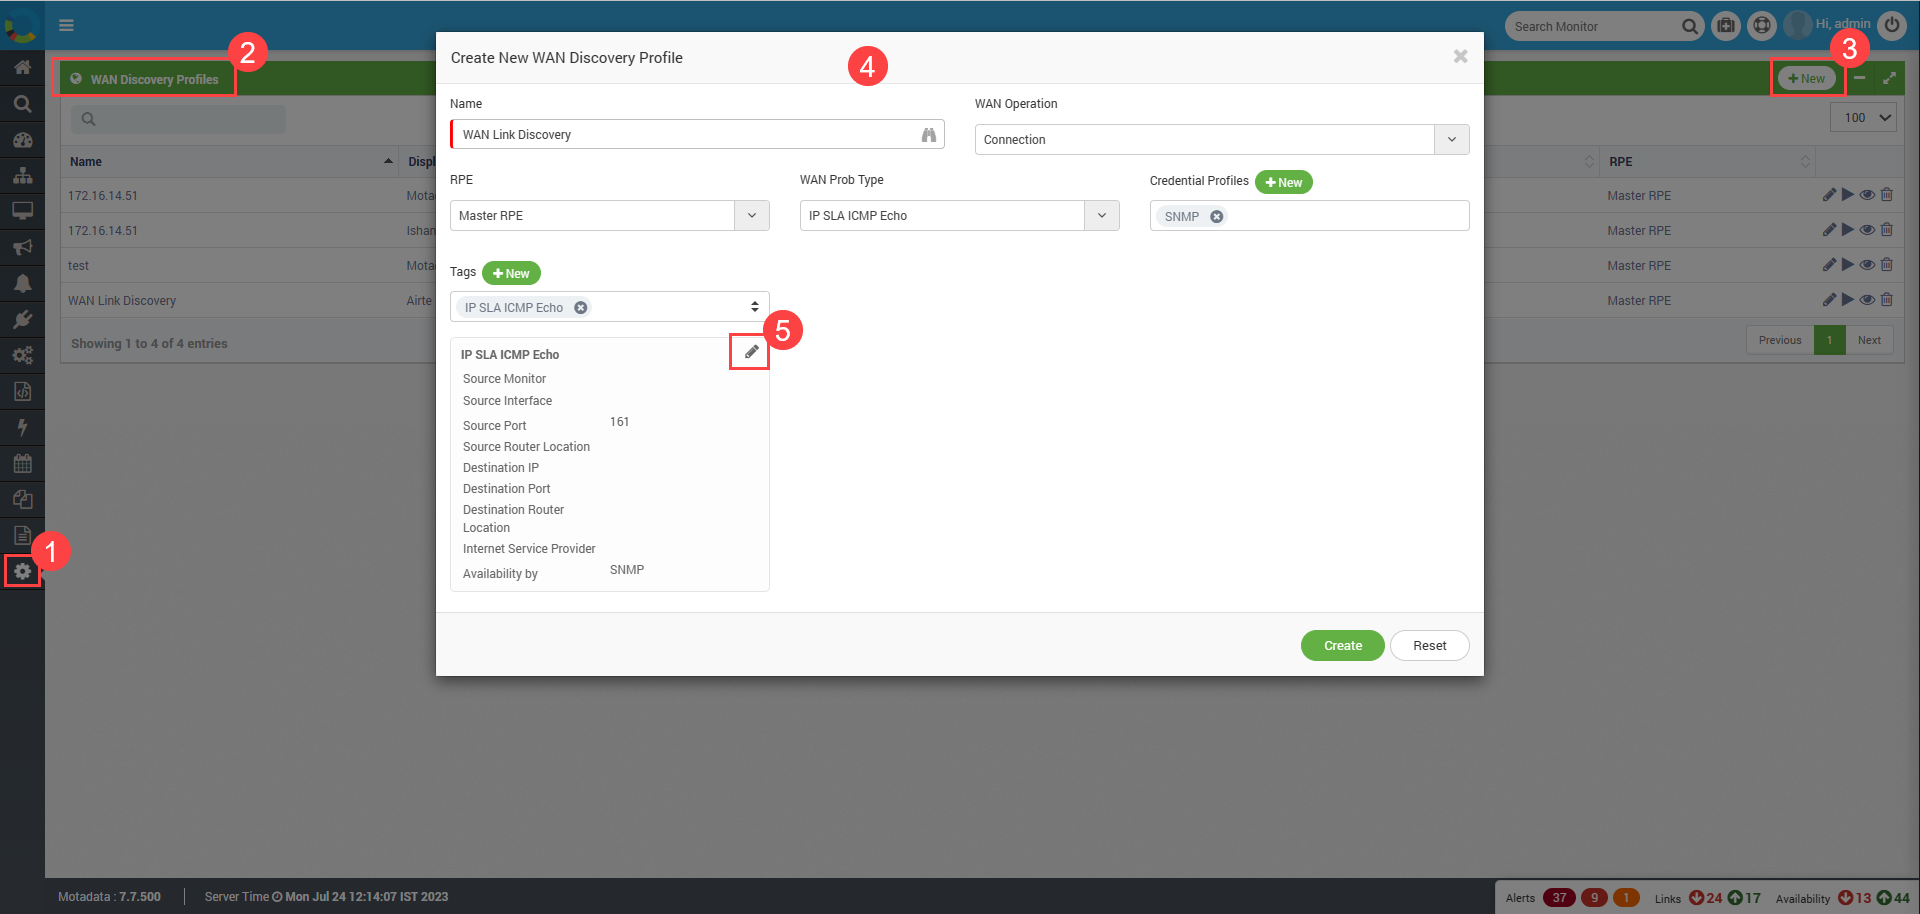
Enter the below details:
| Fields | Description |
|---|---|
| Name | Enter the name of the WAN discovery profile. |
| WAN Operation | Select the WAN operation that you want to perform. |
| RPE | Select the RPE from which you want to discover and poll monitors. By default, ‘Master RPE’ is selected. |
| WAN Probe Type | Select the required probe type. The list displays the supported probe types in the system. Here, IP SLA ICMP Echo is selected. |
| Credential Profiles | Select the desired WAN credential profiles created previously. |
| Tags | Select the tags to categorize and group profiles. |
- Edit the parameter details and the following popup will appear. Here, set the source and destination IP addresses of the WAN link.
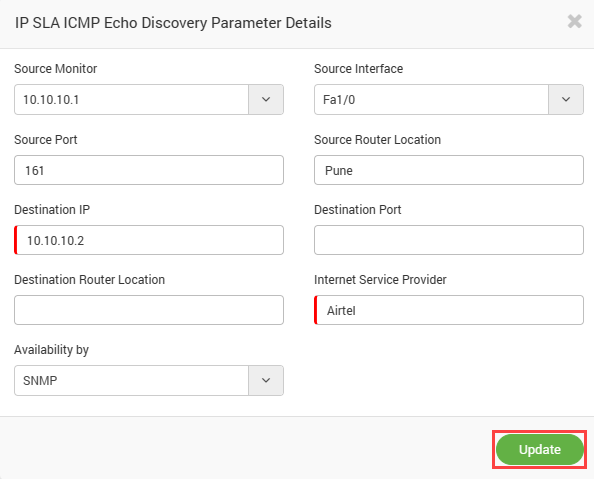
Configure the below fields:
| Fields | Description |
|---|---|
| Source Monitor | Select the monitor from the dropdown list. Here, 10.10.10.1 is selected. |
| Source Interface | Select the interface of the source device. |
| Source Port | Enter the source port of the device. |
| Source Router Location | Enter the location of the source router. |
| Destination IP | Enter the IP address of the destination monitor given by your ISP provider. Here, 10.10.10.2 is entered. |
| Destination Port | Enter the destination port if available. |
| Desitnation Router Location | Enter the location of the destination router. |
| Internet Service Provider | Enter the name of your Internet Service Provider. |
| Availability By | Select the availability by from the dropdown list. Here, SNMP is selected. |
Once all the details are filled in, click Update.
Next, click Create, and run the discovery. The following screen will appear.
- Click the “View Result” button or the link “Click Here” in the Discovery Notification. The following popup appears.
Provision the discovered object. To provision,
a. Click the “View Result” button on the list page (Step 14).
b. Select the “Host” IP Address.
c. Click the “Provision Objects” button.
Once provisioned, the WAN monitoring profile is configured, and now Motadata NMS can monitor this WAN link.