12.17. Automatic Patch Deployment
Deploying Patches is a recurring task that requires time and effort, and the effort to download and deploy new Patches increases with the increase in the number of managed IT Assets.
An Automatic Patch Deployment task helps you to download and deploy Patches, based on a set criterion, periodically. Setting up an auto-deployment task is a one-time activity, and you can turn it off anytime later. You can create multiple auto-deployment tasks.
Few of the benefits of using Automatic Patch Deployment:
Periodic download and deployment of newly found Patches without any misses.
Schedule download of Patches at a time when the network is least likely to have heavy traffic.
12.17.1. Creating an Automatic Patch Deployment
Go to the Motadata Launcher and select Patch.
Select Automatic Patch Deployment from the Patch menu.
The Automatic Patch Deployment page opens. Here you can view all your existing auto-deployments tasks if any. Click on Create Auto Patch Deploy Task situated in the top right corner of the page.
A new page opens with the following fields and options:


Section A (
pf-93.1) is where you provide a name to the task and select a Deployment Policy. You also get a toggle to turn the deployment task off later.Section B is where you decide from which applications to select the Patches. You get three options:
All Application: As the name suggests, this includes all available applications for searching Patches.
Include Application: You include applications from which Patches are selected.
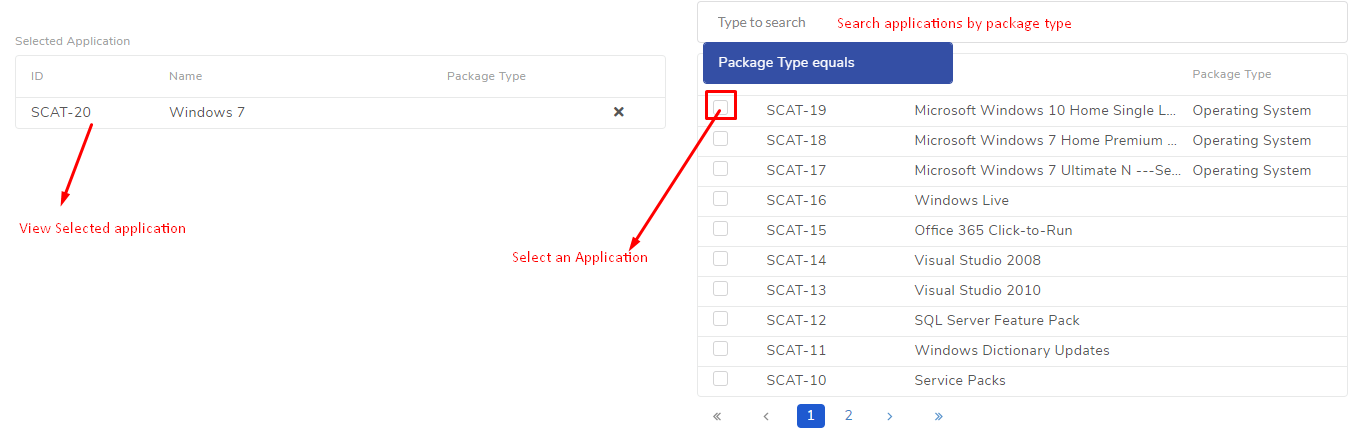
Exclude Application: You exclude applications that are ignored when searching for Patches.
There is a search bar that supports filtering using Package Type.
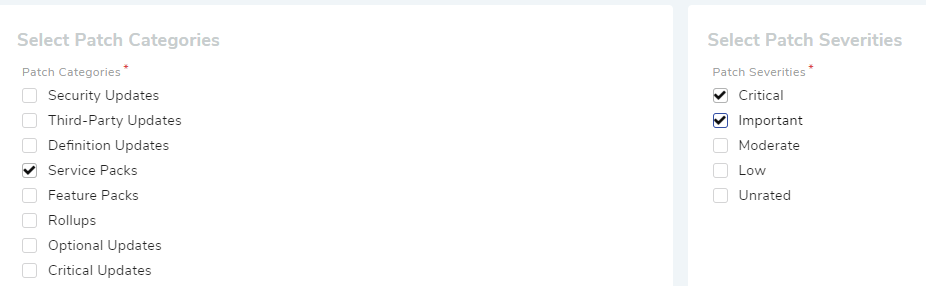
You can filter application Patches using criteria Categories and Severities; for example, you can make the Test Task select Patches with the Category Service Packs and Severity, Critical and Important.
Section C is where you select task and Patch type:
Task Type:
Download only Approved Patch types in the File Server.
Download only Approved Patch types in the File Server, and create a drafted Deployment Request.
Download only Approved Patch types in the File Server, and create and publish a Deployment Request.
Patch Type:
Only consider Approved Patches that are newly added to the tool.
Only consider Approved Patches that are missing.
Only consider Approved Patches that are newly added missing.
Section D is where you set your target computers. Patch will be deployed in the target computers. You can set Computers either from a Remote Office or by manually selecting them from the list, or both.
Setting a Remote Office. This will allow auto selection of multiple computers from a Remote Office’s network may or may not be based on include and exclude conditions.
Setting individual computers.
Adding a different Scope (Target) if there are multiple Remote Offices.
Complete filling the fields and selecting the options. Click on Create to create your auto-deployment task.
In order to run the auto-deployment task, you have to create a schedule.
Edit/Delete a Deployment Task
You can open a task in edit mode by clicking on the Edit Icon adjacent to a task. Similarly, you can delete a task using the Delete Icon.
12.17.2. Create an Auto-Deployment Schedule
Scheduling tells the tool when to start an auto-deployment task. The outcome of an auto-deployment task is a Pre-Approved Deployment Request for Patches satisfying the Patch type of the task.
Go to the Automatic Patch Deployment Page.
Click on the Schedule button adjacent to the task for which you want to set a schedule.

A dialog box opens. Click on the Schedule button.

Set a Schedule frequency:
Note
Except Interval, every other option requires you to set a Time Zone.
Once: Deployment happens only once at a specific date and time.
Daily: The deployment task activates on a start date & time. After that, the deployment happens every day at a specified time mentioned in the Hour and Minute field.
Weekly: Deployment happens on a specific day/days of a week at a specified time.
Monthly: Discovery happens in selected month/months of a year on a particular day at a specified time.
Interval: Discovery happens after every specified minutes, hours, days or month.
An auto-deployment task generates a notification whenever it creates a Deployment Request. Set the recipients; it can either be a Technician Group/Groups or an individual (email)/individuals.
Click on Save Schedules to save your settings.
You can edit the schedule settings of any task.
12.17.3. View Status of an Auto Patch Deployment Task

Using the Status button, you can check the download status of all associated Patches of a request, and associated Deployment Requests.
Clicking on a Status button opens a new page with the following tabs:

Download Status: Here you can view all involved Patches and their download statuses. A Patch transitions through various statuses during a download cycle. Some of the statuses reflect a stage, and some are conclusions. Altogether there are six statuses:
Pending: The Patch has been put in a queue by the Product Server for download.
Downloading: The Product Server is downloading the Patch.
Downloaded: The Product Server has finished downloading the Patch.
Transferring: The Product Server is transferring the Patch to the File Server.
Available: The Patch is available on the File Server for deployment.
Cancelled: There was an error in downloading the Patch.
Deployment Requests: Here you can view all Deployment Requests created by the Auto Patch Deployment Task. Each request has a Status button to view its Deployment Status.