12.8. Enabling Patch Download
Currently, all Patches are downloaded by the Main Server from the Update Server in the File Server by default. A Patch is downloaded in the File Server when there’s a request for the Patch or someone initiates a manual download.
Computers during a deployment fetch the Patches from a File Server; the mechanism has been designed to save bandwidth during a deployment. You cannot expect hundreds of Computers downloading the same Patch separately. Instead, a Patch is first downloaded on the File Server, and then it is fetched by the Computers.
To facilitate the download process (in to the File Server), you need to configure two things: Proxy Server and File Server configuration.
12.8.1. Configuring Proxy Settings
Before you can download anything, you have to make sure the Main Server can access the internet. For this, you have to configure the Proxy Settings in the tool.
12.8.1.1. Accessing Proxy Settings
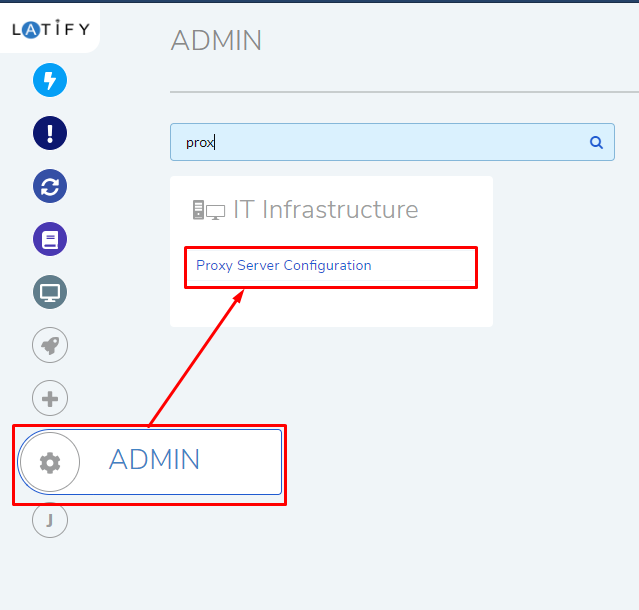
Log in to your Dashboard.
Go to Admin (A Navigation Tab) >> Proxy Server Configurations (IT Infrastructure).
12.8.1.2. Configure Proxy Settings
On clicking the Proxy Server Configurations, the Proxy Server Configuration page opens. Click on Edit to make things editable. You get three options to select from, and they are as follows:
No Internet Access: Select this option when you do not want the Main Server to access the Internet.
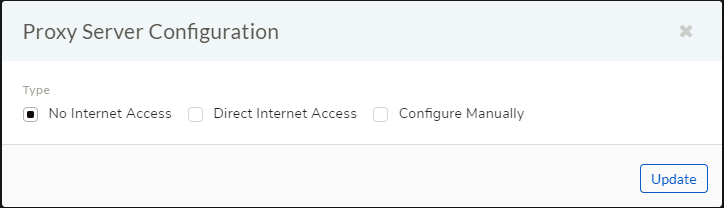
Direct Internet Access: Select this option when there are no Proxy settings between the Internet and the Main Server.
Configure Manually: If you have a Proxy, then you can configure it under this option. Your inputs go in the following fields:
Host: Provide the address of the Computer running the Proxy server.
Port: Refers to the port number of the Proxy server.
Username: Username of the Proxy server
Password: Password of the Proxy server.
Select an option and provide the required inputs. Hit Update to save your changes. Now you have successfully configured your Proxy settings.
12.8.2. Configuring File Server
A File Server is a computer responsible for central storage of data. A file server works in conjunction with our main server, and it’s the backbone for Remote Deployment.
The File Server is the default location where the Main Server stores all the Patches before deployment.
Note
Shared drive configuration in our product has been deprecated, and the current architecture allows delivery of Patch/Packages to Agent/Relay via File Server only.
Learn how to setup a File Server.
12.8.3. Configuring Package Location for Manually Uploaded Packages
In a standard setup, Agents update the Main Server with the required Patches, and the Main Server fetches them from the Update Server. Here access to the internet plays a vital role. In a situation when there’s no internet this process will not work.
The Main Server allows for manual Patch creation to over the limitation of having to have an active internet connection for Patch Deployment. When a user creates a Patch, the details are updated in the Patch List; the only problem is the details don’t have the file location.
To Configure Package Location:
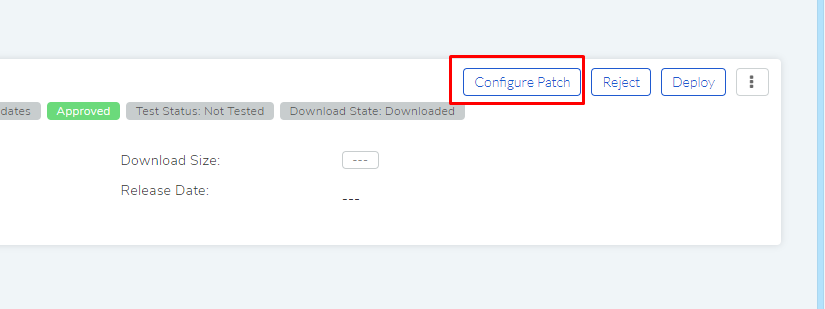
Go to the Details View of a manually created Patch.
Click on Configure Packages situated in the top right corner of the page.
The Configure Patch dialog box opens. There you have two options:
Upload a package file (a user can upload multiple package files).
Add Shared Drive file path of the package file (one can add multiple file paths).
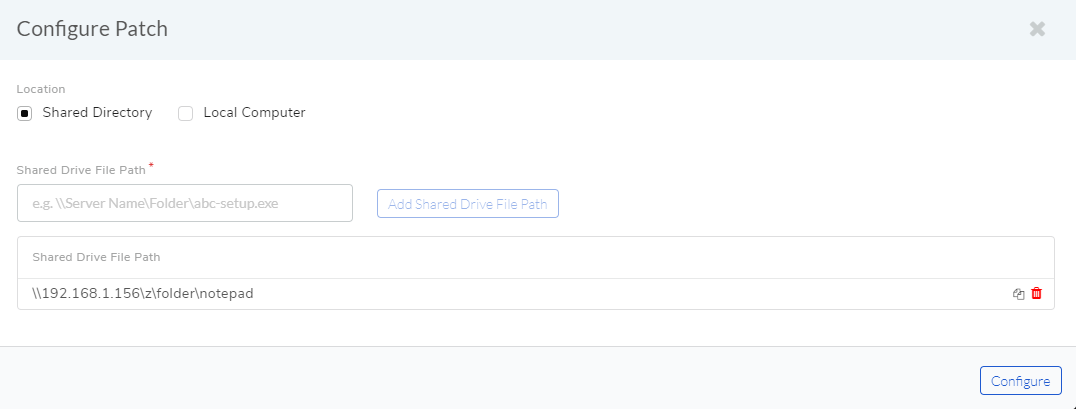
In the Configure Patch dialog box, you can view the paths/files that have been added. You can delete a path/file by clicking the adjacent delete icon.
Note
Relate topic: Manual Patch.