10.3.2. Managing SLA
Service Level Agreements define the commitment between Requestors and the IT service provider in an organization. SLAs determine the level of urgency, response time, and the time required for Tickets to get resolved, and they also govern the escalation rules when Tickets are not resolved or responded within a stipulated time frame. SLAs can be set for a department and a sub-department.
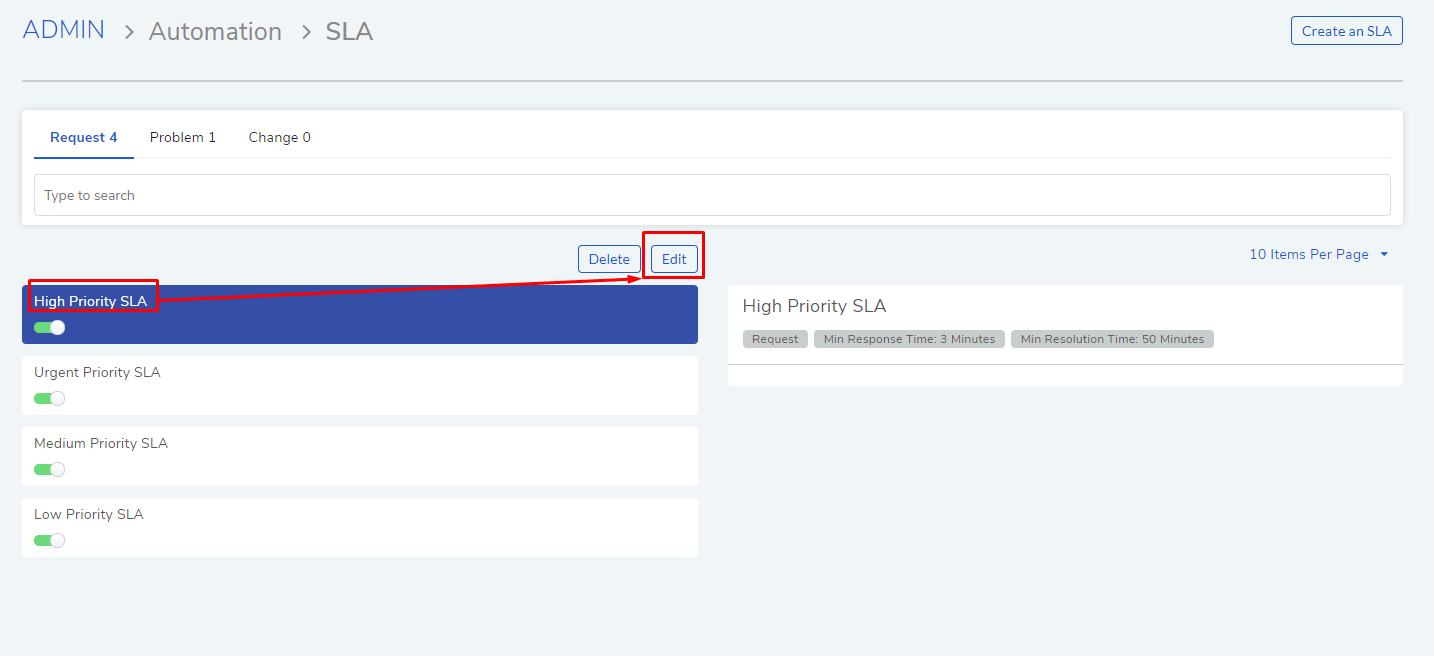
By default we have four SLAs defined out of the box with each having their own rules for resolution and escalation time. The default SLAs are defined for the Request module and, they are triggered based on the Priority.
Low Priority SLA |
Medium Priority SLA |
High Priority SLA |
Urgent Priority SLA |
We have extended support of SLA for Problem and Change modules from build-2.7.0. Only difference being, new modules don’t support setting of Response time and Escalation; you can only set Resolution time and escalation.
Note
Managing SLAs requires Administrative rights.
10.3.2.1. Create a SLA
Log in to your dashboard.
Go to Admin >> SLA (Automation). The new page lists all existing SLAs in the system.
Click Create SLA situated in the top right corner of the page.
You get the following page:
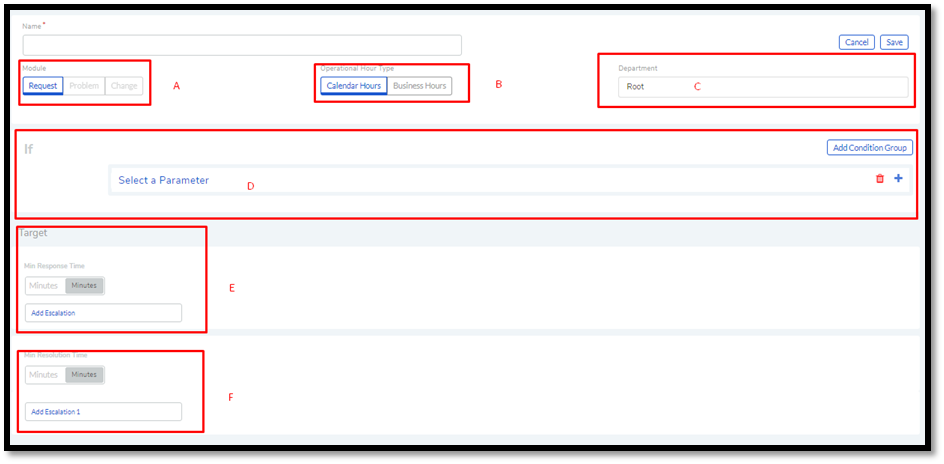
You have to give the SLA a name before doing anything else.
Section A gives you the option to choose for which module the SLA is for.
Section C lets you classify the SLA for a particular department. You can select the department from a drop-down list.
Creating an SLA rule in a four-stage process:
10.3.2.1.1. Setting Operational Hour Type
Section B gives you the option to either select clock time (Calendar Hours) or business time (Business Hours). Under business time, working hours of your organization would be considered when defining a day.
10.3.2.1.2. Setting SLA Conditions
Section D (adf-42) lets you define the conditions for the SLA to
be applicable. To learn how to use control flow using condition
statements, please refer setting Workflow conditions.
10.3.2.1.3. Setting Response Time and Escalation
Section E lets you decide the response time. If no action is taken on a Request within the Response time then SLA is triggered. You can set escalation rules that determine the actions after an SLA violation. Please refer below figure to set escalation.

You can set multiple actions before and after a response violation. In section A, you enter when the action happens, before
or after violation, and the time period.
You decide the action, in case of violation, from a drop-down list in section B
You can add multiple actions by clicking the Select-An-Action option (section-C). You delete an action by clicking the delete icon.
10.3.2.1.4. Setting Resolution Time and Escalation
Section F lets you decide the maximum time that should take to resolve a Request. Just like resolution, you can add actions that are performed before or after a violation of resolution Time.
Here you can have multiple escalations (maximum up to five) each with its own before and after time.
10.3.2.2. Add a Service Level Agreement (SLA)
Go to Admin (A Navigation Tab) >> SLA (Automation).
Click Create SLA.
We are going to create an SLA called VIP SLA.
We add a name and department.
We set the following values for the Stages:
Values |
Stage Name |
|---|---|
Calendar Hours |
Setting Operational Hour Type |
VIP Request equals to True |
Setting SLA Conditions |
Set assignee to a technician after 10 mins of violation. |
Setting Response Time and Escalation |
Set priority to urgent a day before violation. |
Setting Resolution Time and Escalation |
Save your changes by clicking on Create.
10.3.2.3. Edit Service Level Agreement (SLA)
Go to SLA in Automation.
Click on the SLA that you want to edit or click the Edit button.
Make the changes.
You can update your changes or delete the SLA.
In the SLA page, you can turn on/off an SLA using the toggle under the name.
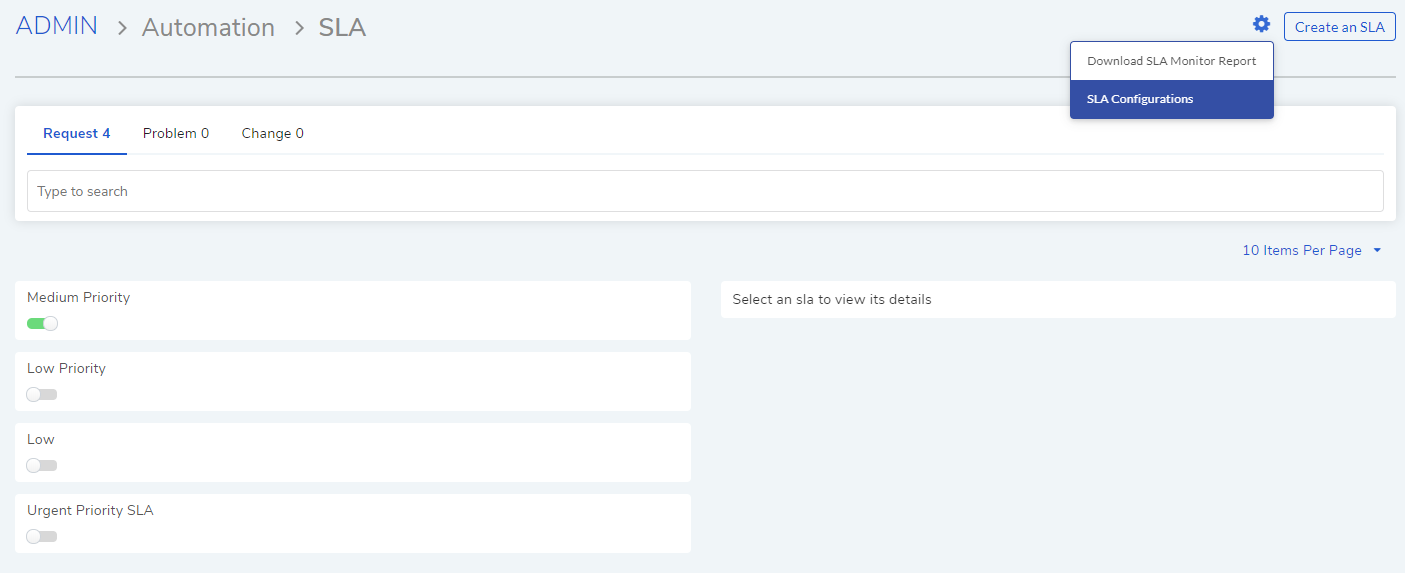
10.3.2.4. Set Default SLA Due date
You can set the default due date of tickets that doesn’t qualify for an SLA.
Go to Admin > Automation > SLA.
Click on SLA settings icon.
Choose SLA Configuration and set a time.
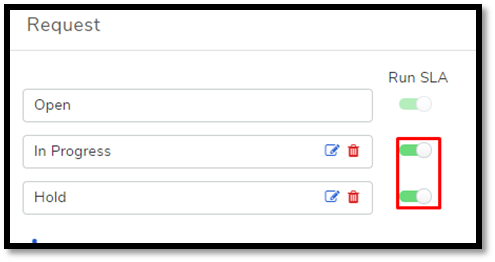
10.3.2.5. Manage SLA with Status
In the Custom Status page, you can turn on/off SLA in a Request Status using the adjacent toggle button. Learn more about SLA.
Except for Open, Resolved and Closed, you can deactivate/activate SLA in all other Statuses, including custom ones.